Product Manual MODEL VPR100 Series
Product Manual MODEL VPR100 Series - Connection Technology ...
Product Manual MODEL VPR100 Series - Connection Technology ...

You also want an ePaper? Increase the reach of your titles
YUMPU automatically turns print PDFs into web optimized ePapers that Google loves.
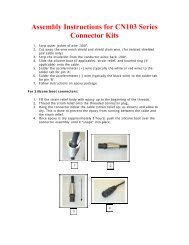
Section IIInstallationThe <strong>VPR100</strong> <strong>Series</strong> system is contained within a standard fiberglass junction boxenclosure. Mounting brackets are provided for wall-mounting the enclosure. (Wallanchoring screws are not included).Cables enter and exit the enclosure through conduit fittings on the bottom of theunit. All input and output wiring is connected at the terminal blocks at the bottomof the unit. All outputs are routed through a 1.5” Conduit Fittings. All inputs arerouted through a 1.5” Conduit fitting as well. 110 VAC is needed to power the unitthrough the terminals on the far right side of the enclosure. A ½” Conduit Fittingis provided for AC power entry. (Figure 2)NOTE: If there is no sensor wired to the sensor input terminal, thecorresponding transmitter for that channel will not power on. This willcause the Output Display to read low or negative values. Be sure to powerthe system on AFTER the sensor has been connected.NOTE: If the display fails to output a value after power has been turned onand the sensor has been wired, turn off the unit, wait several seconds andthen reapply power. The internal electronics require some time to ramp upand settle before they are fully operational.WaveformOutputsVibrationLevelDisplays110 VACPowerSensorInputsRelayOutputsFigure 2. Cable Entry/Exit &PowerMNX10023 / Rev C4-11-08 3