C 446 Digital Media Tuner - NAD
C 446 Digital Media Tuner - NAD
C 446 Digital Media Tuner - NAD

You also want an ePaper? Increase the reach of your titles
YUMPU automatically turns print PDFs into web optimized ePapers that Google loves.
®<br />
C <strong>446</strong> <strong>Digital</strong> <strong>Media</strong> <strong>Tuner</strong><br />
Quick Start Guide<br />
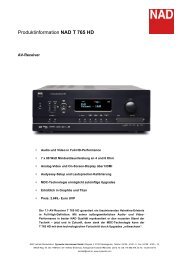
WHAT’S IN THE BOX<br />
CONNECT<br />
1 Connect WiFi aerial.<br />
2 Connect network cable.<br />
3 Connect DAB aerial (230V version model only).<br />
IMPORTANT!<br />
4 Connecting the C<strong>446</strong> to an external device.<br />
5 Connecting the C<strong>446</strong> to an external device via<br />
an optical cable.<br />
6 Connecting the AC mains input to a live AC wall outlet<br />
using the supplied detachable mains power cord.<br />
Download the C <strong>446</strong> Owner’s Manual from the <strong>NAD</strong> website - http://nadelectronics.com/products/tuners/C-<strong>446</strong>-<strong>Digital</strong>-<strong>Media</strong>-<strong>Tuner</strong><br />
Under the Manuals/Downloads tab you will find the C <strong>446</strong> Owner’s Manual in 9 different languages as well as a video presentation of the C <strong>446</strong> setup procedure.<br />
The manual contains connection and setup procedures for other sources like DAB, AM, FM and UPnP Receiver, as well as detailed descriptions of the C <strong>446</strong>’s other<br />
functions and features.
START UP!<br />
With rear panel POWER switch set to ON, press Standby button to wake up C <strong>446</strong> from standby mode.<br />
The following controls are used to navigate through the C <strong>446</strong> functions and features:<br />
1 3 SOURCE 4<br />
During input of alphanumeric<br />
characters, press to move forward or<br />
backward the text entry.<br />
INTERNET RADIO - WIRELESS SETUP<br />
The C<strong>446</strong> is defaulted to “Wired” connection. If there is no “Wired” connection and Wireless broadband connection is setup and available, the following applies:<br />
Internet Radio<br />
Check Network Setup<br />
1 Press [SETUP]<br />
1<br />
Wireless Setup<br />
}View Networks<br />
Connect WPS<br />
Set Region<br />
4 Scroll to View Networks by rotating [CONTROL/<br />
ENTER]. Press [CONTROL/ENTER] to select.<br />
Enter Password<br />
_<br />
{Source} = Next/Prev<br />
{Scroll} = Edit Char<br />
7 Rotate [CONTROL/ENTER] to select first<br />
character of password.<br />
Press [SOURCE 4] to select character and<br />
move to next character. Press [3 SOURCE] to<br />
go back to the previous character.<br />
Press [CONTROL/ENTER] to enter password.<br />
2 SETUP<br />
Bring up Settings Menu.<br />
Settings Menu<br />
}Network Setup<br />
Last.FM Setup<br />
Display Brightness<br />
2 Scroll to Network Setup by rotating [CONTROL/<br />
ENTER]. Press [CONTROL/ENTER] to select.<br />
Available Networks<br />
Scanning...<br />
5 The C <strong>446</strong> will scan for available networks.<br />
Network Status<br />
Connected: <strong>NAD</strong> LAB<br />
IP: 192.168.13.17<br />
RSSI: 80%<br />
3 BACK<br />
Bring back previous menu list. During<br />
input of alphanumeric characters,<br />
press to delete previous character.<br />
8 Upon successful connection, the status of the<br />
selected network is displayed. Press [BACK]<br />
three times to return to the top-level menu.<br />
2 3 4<br />
4 CONTROL/ENTER<br />
Rotate to go up/down menu/item<br />
list. Press to select item or start<br />
playback.<br />
Network Setup<br />
}Wireless Setup<br />
Interface<br />
Status<br />
3 Scroll to Wireless Setup by rotating [CONTROL/<br />
ENTER]. Press [CONTROL/ENTER] to select.<br />
Available Networks<br />
}<strong>NAD</strong> LAB<br />
PICKNET<br />
AIR<br />
6 Scroll to desired network by rotating [CONTROL/<br />
ENTER]. Press [CONTROL/ENTER] to select.
INTERNET RADIO - WIRED SETUP<br />
Default display for Internet Radio starts here if wireless connection is successful or if “Wired” connection is available and selected as the default network interface:<br />
My Favourites<br />
Local Canada<br />
}Stations<br />
Podcasts<br />
1 Scroll to Stations by rotating [CONTROL/<br />
ENTER]. Press [CONTROL/ENTER] to select.<br />
Nepal<br />
Pakistan<br />
}Philippines<br />
Singapore<br />
4 Press [CONTROL/ENTER] to select the desired<br />
location.<br />
LAST.FM<br />
Last.fm is a music recommendation streaming service supported by the C<strong>446</strong>. Last.fm offers a large number of music options. Go to www.last.fm to see the<br />
programming available. Last.fm is a pay per use service. To use the service with C <strong>446</strong>, an account must be setup at Last.fm. Then, the account information needs to be<br />
entered into the C <strong>446</strong> as below example.<br />
Last.FM<br />
}All Stations<br />
Alternative<br />
Dance<br />
Electronica<br />
UPnP CLIENT<br />
The C<strong>446</strong> utilizes a UPnP (Universal Plug and Play) client to allow playback of audio files wherever music is stored in a home network such as a computer, NAS<br />
(network-attached storage), Apple iOS device or Android phone.<br />
The C <strong>446</strong> browses your UPnP server audio content over the local network. It includes MP3, FLAC, WMA, WAV, and AAC codecs. The computer, NAS or mobile devices<br />
on the network are all potential servers. In order to use them as such, they each need to be set up to act as a UPnP server.<br />
Windows 7 has a built-in UPnP server. To enable it and other related information, visit the following websites:<br />
http://windows.microsoft.com/en-us/windows7/Getting-started-with-media-streaming<br />
http://windows.microsoft.com/en-US/windows7/Stream-your-media-to-devices-and-computers-using-Windows-<strong>Media</strong>-Player<br />
For other Windows versions, Linux or Mac computers, server software such as “Twonky Server” can be downloaded and installed. Visit twonky.com for more<br />
information.<br />
UPnP Client<br />
}Location<br />
Genre<br />
Search stations<br />
Popular stations<br />
2 Scroll to Location by rotating [CONTROL/<br />
ENTER]. Press [CONTROL/ENTER] to select.<br />
5 After selecting “All Stations”, a list of all available<br />
stations are shown. Select desired station.<br />
Settings Menu<br />
Network Setup<br />
}Last.FM Setup<br />
Display Brightness<br />
1 Press [SETUP] 2 Scroll to Last.fm by rotating [CONTROL/ENTER].<br />
Press [CONTROL/ENTER] to select.<br />
}Twonky Server [HOME]<br />
1 Press [SETUP] 2 Scroll to a UPnP server by rotating [CONTROL/<br />
ENTER]. Press [CONTROL/ENTER] to select.<br />
Africa<br />
}Asia<br />
Carribean<br />
Central America<br />
3 Rotate [CONTROL/ENTER] to scroll through the<br />
list of locations.<br />
Internet Radio<br />
Magic 89.9<br />
Playing<br />
6 Selected station starts playing.<br />
Last.FM Setup<br />
}User Name<br />
Password<br />
3 Rotate [CONTROL/ENTER] to select first<br />
character of user name or password.<br />
Press [SOURCE 4] to select character and<br />
move to next character. Press [3 SOURCE] to<br />
go back to the previous character.<br />
Press [CONTROL/ENTER] to enter password or<br />
user name.<br />
Album<br />
All Tracks<br />
}Artist<br />
Artist Index<br />
3 Rotate [CONTROL/ENTER] to scroll through the<br />
content list. Press [CONTROL/ENTER] to select.
USB<br />
The C<strong>446</strong> can play back AAC+, MP3, WMA, WAV or FLAC files stored on a USB (Universal Serial Bus)<br />
memory stick. Plug the USB memory stick into the USB port on the front panel.<br />
When connected, the following keys on the TNR 2 remote control are active:<br />
[ 4 ] , [ j ] , [ g ] , [ 7/8 ] , [ 9/0 ] , [ MENU ], [ SHUF ], [ RPT ]<br />
USB<br />
iPod<br />
Attached<br />
1 Connnection of a USB memory stick is<br />
acknowledged on the front panel display.<br />
USB<br />
<strong>NAD</strong> MP3 test file 2<br />
Playing 0:38<br />
4 Selected file begins playing.<br />
The C<strong>446</strong> has a MP DOCK Data Port where a corresponding DATA<br />
PORT from a <strong>NAD</strong> IPD Dock for iPod (<strong>NAD</strong> IPD) can be connected<br />
and interfaced. This allows control of the <strong>NAD</strong> IPD via C <strong>446</strong>.<br />
When connected, the following keys on the TNR 2 remote control<br />
are active:<br />
[ 4 ] , [ j ] , [ g ] , [ 7/8 ] , [ 9/0 ] , [ MENU ], [ SHUF ], [ RPT ]<br />
iPod Display<br />
iPod Connected<br />
1 Connnection of an <strong>NAD</strong> IPD Dock for iPod (<strong>NAD</strong><br />
IPD) is acknowledged on the front panel display.<br />
}<strong>NAD</strong> MP3 Test File<br />
WMA Files<br />
Various Artist<br />
2 Scroll to a desired folder by rotating [CONTROL/<br />
ENTER]. Press [CONTROL/ENTER] to select.<br />
These Words<br />
Natasha<br />
Unwritten<br />
Playing 00:57<br />
2 Use [CONTROL/ENTER] to scroll through menu<br />
selections. Press [CONTROL/ENTER] to select or<br />
start playback.<br />
©2011 <strong>NAD</strong> ELECTRONICS INTERNATIONAL, A DIVISION OF LENBROOK INDUSTRIES LIMITED<br />
All rights reserved. <strong>NAD</strong> and the <strong>NAD</strong> logo are trademarks of <strong>NAD</strong> Electronics International, a division of Lenbrook Industries Limited.<br />
No part of this publication may be reproduced, stored or transmitted in any form without the written permission of <strong>NAD</strong> Electronics International.<br />
C<strong>446</strong>_QS_V07 - 04/11<br />
<strong>NAD</strong> MP3 test file 1<br />
}<strong>NAD</strong> MP3 test file 2<br />
<strong>NAD</strong> MP3 test file 3<br />
<strong>NAD</strong> MP3 test file 4<br />
3 Scroll to a desired file by rotating [CONTROL/<br />
ENTER]. Press [CONTROL/ENTER] to select.