KESSEL-Staufix® SWA Backwater Valve
KESSEL-Staufix® SWA Backwater Valve
KESSEL-Staufix® SWA Backwater Valve

You also want an ePaper? Increase the reach of your titles
YUMPU automatically turns print PDFs into web optimized ePapers that Google loves.
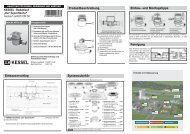
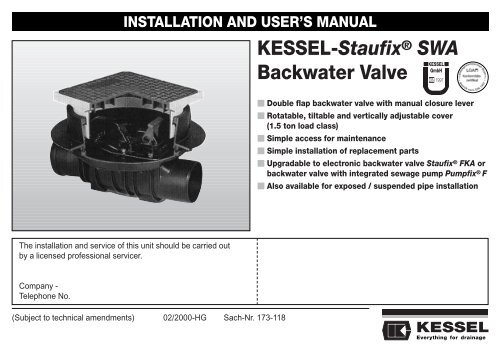
INSTALLATION AND USER’S MANUAL<strong>KESSEL</strong>-Staufix ® <strong>SWA</strong><strong>Backwater</strong> <strong>Valve</strong> Double flap backwater valve with manual closure lever Rotatable, tiltable and vertically adjustable cover(1.5 ton load class) Simple access for maintenance Simple installation of replacement parts Upgradable to electronic backwater valve Staufix ® FKA orbackwater valve with integrated sewage pump Pumpfix ® F Also available for exposed / suspended pipe installationThe installation and service of this unit should be carried outby a licensed professional servicer.Company -Telephone No.(Subject to technical amendments) 02/2000-HG Sach-Nr. 173-118Everything for drainage
Table of Contents1. Safety instructions / General 1.1 Areas of application .......................................................................... page 31.2 Contents of delivery .......................................................................... page 32. Installation 2.1 Installation in a concrete slab / floor.................................................. page 42.2 Deep installation in a concrete slab / floor ........................................ page 42.3 Installations subject to groundwater.................................................. page 52.4 Installation in exposed / suspended pipe .......................................... page 52.5 Upgradability..................................................................................... page 52.6 Installation example .......................................................................... page 63. Inspection .......................................................................................................... page 74. Maintenance 4.1 Dissassembly, Cleaning and Reassembly ........................................ page 74.2 Operational Test................................................................................ page 85. Upgrading .......................................................................................................... page 96. Warranty .......................................................................................................... page 10Everything for drainage
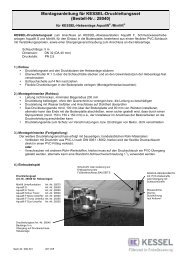
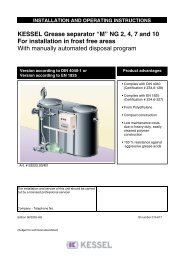
1. Safety instructions / GeneralDear customer,Before placing the <strong>KESSEL</strong> Staufix ® <strong>SWA</strong>in service, please carefully read and followthis Installation and User’s Manual.The information provided in this manualis valuable and will help provide years ofsafe and reliable service of the <strong>KESSEL</strong>Staufix ® <strong>SWA</strong> backwater valve.1. General1.1 Areas of applicationThe Staufix ® <strong>SWA</strong> is designed to be installedbelow the backwater level in a downwardsloped, continous run drainage pipe. In thisapplication the Staufix ® <strong>SWA</strong> will providethrough drainage during normal conditionsand protection against backwater duringtimes of backwater.1.2 Contents of deliveryThe Staufix ® <strong>SWA</strong> package includes thevalve itself, a see-thru test funnel and theInstallation and User’s Manual.Depending on which Staufix ® <strong>SWA</strong> is ordered,the package will also include the following:For underground installation (in the concreteslab / floor).North American Product Numbers - 65043,65044 and 65046 / European Product Numbers73100.10 S or X, 73125.10 S or X,73150.10 S or X. Contained in this packageis the backwater valve with integratedinspection chamber comprising of theStaufix ® <strong>SWA</strong> body, access chamber and aLoad Class A15 (1.5 ton) cover.For installation in exposed / suspendedpipe.North American Product Numbers - 65053,65054 and 65056 / European Product Numbers73100.10, 73125.10, 73150.10.Contained in this package is the backwatervalve with transparent protective cover.Illus. 13Everything for drainage
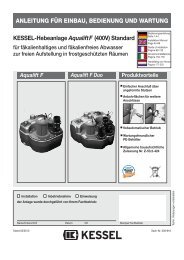
2. Installation2.1 Installation in a concrete slab / floor.North American Product Numbers - 65043,65044 and 65046 / European ProductNumbers 73100.10 S or X, 73125.10 S or X,73150.10 S or X.The body of the Staufix ® <strong>SWA</strong> should beinstalled level as shown in Illustration 2.Grease and install the included rubbergasket between the Staufix ® <strong>SWA</strong> body andthe access chamber as shown in Illustration3. As seen in Illustration 4, the cover of theStaufix ® <strong>SWA</strong> is completely adjustable. Thiscover can be raised or lowered to meet floorheights, tilted laterally to meet grades in thefloor and rotated to match floor patterns.2.2 Deep installation in a concrete slab /floor.For deep installation depths use theextension section (North American Option -4 / European Product Number 83070, adds7 inches / 180mm). If installing an extensionsection make sure to grease its rubbergasket. If more than one extension sectionis needed, be sure that the valve is notinstalled so deep that access to the valve forinspection, maintenance or use is hindered.Illus. 3Illus. 4Illus. 5Illus. 2Everything for drainage 4
2. Installation2.3 Installations subject to groundwaterThere are certain circumstances where theupward force of groundwater can penetratethrough slab installed fixtures and causemoisture problems. The <strong>KESSEL</strong> Staufix ®<strong>SWA</strong> provides protection against the upwardforce of groundwater by including thewater barrier (North American Option -5 /European Product Number 83019 (rubberbarrier) and Product Number 83018(flange)) during installation. This barrier issimply placed between the body of theStaufix ® <strong>SWA</strong> and the flange which is thenbolted tight by the included bolts as shownin Illus. 6.2.4 Installation in an exposed /suspended pipeNorth American Product Numbers 65053,65054 and 65056 / European ProductNumbers 73100.10, 73125.10 and73150.10.The Staufix ® <strong>SWA</strong> valve designed to beinstalled in an exposed / suspended pipecomes ready to be installed in a properlysloped drainage pipe. This valve is equippedwith a see-thru, easily removable protectivecover.2.5 UpgradabilityAll of the <strong>KESSEL</strong> Staufix ® <strong>SWA</strong>s areupgradable to either the <strong>KESSEL</strong> Staufix ®FKA electronic backwater valve with opticalprobe, motorized flap and control unit or thePumpfix ® F electronic backwater valve withoptical probe, intregrated sewage pump andcontrol unit. In preparation for a futureupgrading, when installing a Staufix ® <strong>SWA</strong> aDN 50 or 1.5 inch DWV Sched 40 PVC pipeshould be run under the floor from the backwatervalve to a nearby power source so thatfuture electrical connections can easily bemade. An example of this preparation can beseen in Illus. 1 and Illus. 5.ATTENTION:Make sure that no cables or otherobjects impair the movement of the manualclosure lever or interfere with the operation,inspection or maintenance of the valve.Illus. 6Illus. 7FlangeFlangeRubber barrierRubber barrier5Everything for drainage
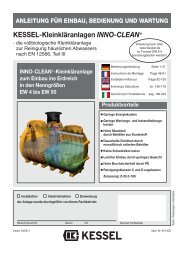
2. Installation2.6 Installation Example <strong>KESSEL</strong> Staufix ® <strong>SWA</strong> backwater valve 2 free hanging backwater flaps Manual closure lever Access chamber with coverTile, carpet orconcrete floorExpansion joint1.5 inch Sched 40 DWVPVC pipe for upgrading to<strong>KESSEL</strong> Staufix ® FKA orPumpfix ® FcmIllus. 10Everything for drainage 6
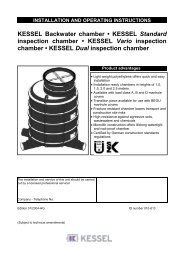
3. Inspection / 4. Maintenance3. InspectionThe Staufix ® <strong>SWA</strong> should be inspectedmonthly by the owner or a professional toinsure that it is in proper operationalcondition. The manual closure lever shouldbe closed and opened several times toinsure that it functions properly. Pleasemake sure that upon completion of themonthly inspection that the manual closurelever is in the ‘FLAP OPEN (FREEHANGING)’ (vertical) position.4. MaintenanceThe Staufix ® <strong>SWA</strong> should be maintainedevery six months by a professional. Pleasemake sure that no fixtures are drainedthrough the Staufix ® <strong>SWA</strong> during thisinspection. The procedure for maintainingthe valve is in Sections 4.1 and 4.2 of thisInstallation and User’s manual (As seen inIllustrations 11 thru 14).4.1 Dissassembly, Cleaning and Reassembly.Illustration 11a) Close the manual closure lever.b) Loosen and remove the six bolts.c) Remove the cover.Illustration 12a) Remove both free hanging flaps alongwith their housings.b) Clean all parts (try not to remove any ofthe gasket and seal grease).c) Check all seals and sealing areas andreplace with <strong>KESSEL</strong> replacement partsif necessary.d) Check the complete Staufix ® <strong>SWA</strong> inaccordance with this manual.7Everything for drainage
4. MaintenanceIllustration 13a) Grease rubber gaskets and sealing areasif necessary.b) Replace flaps and housings in theirappropriate slots.c) Replace the cover. Retighten the six boltsin a crosswise pattern to a torque of 6 lbfft(8Nm).d) Return the manual closure lever to the‘FLAP OPEN (FREE HANGING)’(vertical) position4.2 Staufix ® <strong>SWA</strong> water tightness testfor double flap backwater valvesClose the flap by placing the manualclosure lever in the ’FLAP LOCKEDCLOSED’ position. Remove the red plasticcap (#1 in Illustration 14) with a largescrewdriver and screw in the suppliedsee-thru test funnel by hand. Pour waterinto the funnel until the water has reachedthe 100 mm mark on the funnel. Over thenext 10 minutes keep an eye on the waterlevel and refill to the 100 mm mark when necessarywhile keeping track of how much additionalwater has been added. If after the 10minutes less than 500 cubic centimeters (0.5liters, approx 0.5 quarts) of water wasneeded to keep the level at the 100 mmmark, the Staufix ® <strong>SWA</strong> has passed the watertightness test. This is a performance teststandard used by the German Industry Norm.After the test, remove the calibration funnelby hand and replace and tighten the redplastic cap with a large screwdriver. Returnthe manual closure lever to the ‘FLAPOPEN (FREE HANGING)’ (vertical)position.Illustration 14Red capFunnelEverything for drainage 8
5. UpgradingThe <strong>KESSEL</strong> Staufix ® <strong>SWA</strong> can be easilyupgraded to the Staufix ® FKA electronicbackwater valve with optical probe, motorizedflap closure and control unit (EuropeanOrder #80081 for 3 inch pipe or Order#80080 for 4 and 6 inch pipe) ( NorthAmerican Option -9, please specify pipesize) or to the Pumpfix ® F electronicbackwater valve with optical probe,integrated sewage pump and control unit(European Order #28079 for 3 inch pipe,Order #28080 for 4 inch pipe or Order#28081 for 6 inch pipe) (North AmericanOption -8, please specify pipe size). It isimportant that when installing the Staufix ®<strong>SWA</strong> that a 1.5 inch Schedule 40 DWV (DN50) pipe is connected from the Staufix ®<strong>SWA</strong> to a location where a control unit couldbe located so that the electrical cables of anew electronic valve can be easily connected(as seen in Illustration 1 on page 3).Upgrading the Staufix ® <strong>SWA</strong> is done bysimply removing the cover and backwaterflaps of the Staufix ® <strong>SWA</strong> and replacing itwith either a Staufix ® FKA or Pumpfix ® Fupgrade cover. Cables for the optical probeand motor or pump are then run through thepre-installed 1.5 inch Sched 40 DWV PVC(DN 50) pipe or directly to the control unitwhich is to be mounted on a nearby wallwith the included mounting hardware.9Everything for drainage
6. WarrantyThis product is warranteed to be free ofdefects in material and workmanship. Thiswarranty is for a period of six (6) months andbegins with the date of purchase. Thiswarranty is only valid on material andworkmanship that upon the manufacturer’sinspection is deemed to be the fault of themanufacturer. Warranty claims shall besubmitted to the manufacturer in writing. Incases where the manufacturer is found to beat fault, the manufacturer shall have theoption of repairing or replacing the defectiveitem. The manufacturer shall not beresponsible for any labor or shippingcharges or any loss, injury or damageswhatsoever, including incidental orconsequential damages.Everything for drainage 10
Notes11Everything for drainage
Everything for DrainageSolutions from a single source<strong>Backwater</strong> valves and cleanoutsPolymer and cast iron drainsVolatile liquid trapsLifting stations, pumps, warningand control unitsRainwater management systemsGrease, starch and oil / fuelseparatorsInspection chambersCustom projects for industrialapplicationsPolymer pipe fittingsStainless steel drains andchannelsEverything for drainage