Concept XPS standard shower tray - Butech
Concept XPS standard shower tray - Butech
Concept XPS standard shower tray - Butech

Create successful ePaper yourself
Turn your PDF publications into a flip-book with our unique Google optimized e-Paper software.
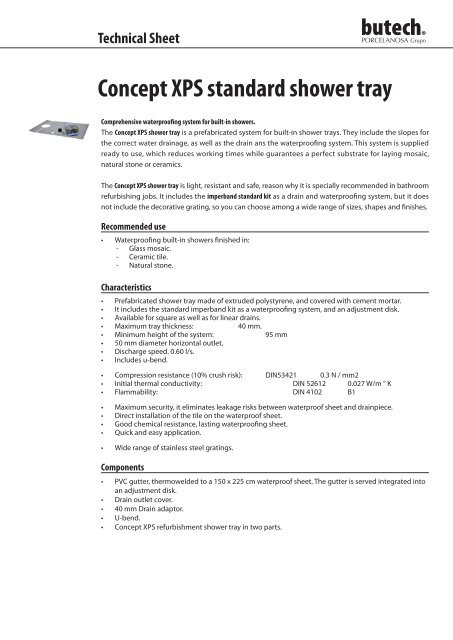
Technical Sheet<strong>Concept</strong> <strong>XPS</strong> <strong>standard</strong> <strong>shower</strong> <strong>tray</strong>Comprehensive waterproofing system for built-in <strong>shower</strong>s.The <strong>Concept</strong> <strong>XPS</strong> <strong>shower</strong> <strong>tray</strong> is a prefabricated system for built-in <strong>shower</strong> <strong>tray</strong>s. They include the slopes forthe correct water drainage, as well as the drain ans the waterproofing system. This system is suppliedready to use, which reduces working times while guarantees a perfect substrate for laying mosaic,natural stone or ceramics.The <strong>Concept</strong> <strong>XPS</strong> <strong>shower</strong> <strong>tray</strong> is light, resistant and safe, reason why it is specially recommended in bathroomrefurbishing jobs. It includes the imperband <strong>standard</strong> kit as a drain and waterproofing system, but it doesnot include the decorative grating, so you can choose among a wide range of sizes, shapes and finishes.Recommended use• Waterproofing built-in <strong>shower</strong>s finished in:--Glass mosaic.--Ceramic tile.--Natural stone.Characteristics• Prefabricated <strong>shower</strong> <strong>tray</strong> made of extruded polystyrene, and covered with cement mortar.• It includes the <strong>standard</strong> imperband kit as a waterproofing system, and an adjustment disk.• Available for square as well as for linear drains.• Maximum <strong>tray</strong> thickness: 40 mm.• Minimum height of the system: 95 mm• 50 mm diameter horizontal outlet.• Discharge speed. 0.60 l/s.• Includes u-bend.• Compression resistance (10% crush risk): DIN53421 0.3 N / mm2• Initial thermal conductivity: DIN 52612 0.027 W/m ° K• Flammability: DIN 4102 B1• Maximum security, it eliminates leakage risks between waterproof sheet and drainpiece.• Direct installation of the tile on the waterproof sheet.• Good chemical resistance, lasting waterproofing sheet.• Quick and easy application.• Wide range of stainless steel gratings.Components• PVC gutter, thermowelded to a 150 x 225 cm waterproof sheet. The gutter is served integrated intoan adjustment disk.• Drain outlet cover.• 40 mm Drain adaptor.• U-bend.• <strong>Concept</strong> <strong>XPS</strong> refurbishment <strong>shower</strong> <strong>tray</strong> in two parts.
<strong>Concept</strong> <strong>XPS</strong> <strong>shower</strong> <strong>tray</strong> + <strong>standard</strong> imperband kitComplementsSquare gratings10. x 10 cm Stainless steel grating. Available finishes:• Standard squared• Standard sunLinear gratings59.6 x 9.3, 80 x 9.3, and 120 x 9.3 cm Stainless steel gratings. Available finishes:• Chrome texture• Texture• Squared• Line• White• CeramicInstallation GuideThis prefabricated <strong>shower</strong> <strong>tray</strong> has been developed for placing in a thin layer with adhesive and a notched trowel.Type C2 adhesives are recommended in accordance with EN 12004. butech recommends using fr-one n or one flex n1. Connection of the imperband kit to the drain pipe.Depending on the drainage pipe position, select oneof the system outlets and seal the other outlet with thecap provided to that effect. Given the case, use the drainoutlet diameter adapter and glue the drainage pipe.2. Testing the drain water tightness.Pour water through the drain and check that the gutterworks correctly. Protect the drain to prevent debris fromfalling in it.3. Installing the <strong>Concept</strong> <strong>XPS</strong> <strong>shower</strong> <strong>tray</strong>.Fill the <strong>shower</strong> <strong>tray</strong> base with cement mortar to the level ofthe <strong>Concept</strong> <strong>XPS</strong> <strong>shower</strong> <strong>tray</strong>, fit the two parts of the <strong>tray</strong> withoutleaving a joint, on the adjustment disk of the drain. Verifythat the drain top plus the grating is at the desired level.There are 50 mm thick polystyrene parts for replacing thecement mortar screed.4. Waterproofing the <strong>shower</strong> <strong>tray</strong> base.Once the <strong>Concept</strong> <strong>XPS</strong> <strong>shower</strong> <strong>tray</strong> is installed, choose atype C2 EN 12004 cement-based adhesive, and extend itwith a 6 mm notched trowel.
<strong>Concept</strong> <strong>XPS</strong> <strong>shower</strong> <strong>tray</strong> + <strong>standard</strong> imperband kitInstallation Guide5. Gluing the waterproof sheet.Cut the waterproofing sheet based on the <strong>shower</strong> <strong>tray</strong>, leavingenough sheet to cover 10 cm on all walls; unfold thewaterproof sheet and press it onto the fresh adhesive, makingsure no air pockets are formed.6. Waterproofing the <strong>shower</strong> <strong>tray</strong> angles.In the corners, fold the sheet so that it covers the entire jointbetween wall and <strong>shower</strong>. In case the waterproofing needsto be extended both on the wall and on the floor, overlapwith at least 5 cm imperbandindoor waterproof sheet.7. Placing the grating frame.Place the grating frame into the drain hole and stick withthe p-404 polyurethane putty. It is not necessary to seal thejoint between the frame and the drain. Place the u-bend.8. Laying the covering material.Once the grating frame is in place, spread a layer of typeC2 as per EN 12004 cement-based adhesive with a suitablesize notched trowel, starting from the grating frame. Lay thechosen covering.9. Installing the decorative grating.Once the <strong>shower</strong> <strong>tray</strong> has been covered, seal the joint betweenthe frame and covering with p-404 elastic putty andplace the decorative grating. Finally, seal the tile joints with awaterproof material.In the case of linear gratings with ceramic finish, cut ceramicswith water-cooled electric cutting machine, polishing theedges with abrasive block, and paste with p-404, polyurethaneputty.
<strong>Concept</strong> <strong>XPS</strong> <strong>shower</strong> <strong>tray</strong> + <strong>standard</strong> imperband kitDimensionsMeasures in mm.250 Ø208 Ø20 2065ReferencesConsult butech’s 2013 concept professional xps catalog.butech building technologies, S.A.Carretera Villarreal - Puebla de Arenoso (cv-20) km 2.5 - 12540 Villarreal - Castellón - Spain.Apartado de correos: 297 - Telephone (+ 34) 964 53 62 00 - Fax (+ 34) 964 53 00 34 - butech@butech.es - http://www.butech.es
Technical Sheet<strong>Concept</strong> <strong>XPS</strong> refurbishment <strong>shower</strong> <strong>tray</strong>Comprehensive waterproofing system for built-in <strong>shower</strong>s.The <strong>Concept</strong> <strong>XPS</strong> <strong>shower</strong> <strong>tray</strong> is a prefabricated system for built-in <strong>shower</strong> <strong>tray</strong>s. They include the slopes forthe correct water drainage, as well as the drain ans the waterproofing system. This system is suppliedready to use, which reduces working times while guarantees a perfect substrate for laying mosaic,natural stone or ceramics.The <strong>Concept</strong> <strong>XPS</strong> <strong>shower</strong> <strong>tray</strong> is light, resistant and safe, reason why it is specially recommended in bathroomrefurbishing jobs. It includes the imperband refurbishing kit as a drain and waterproofing system, but it doesnot include the decorative grating, so you can choose among a wide range of sizes, shapes and finishes.Recommended use• Waterproofing built-in <strong>shower</strong>s finished in:--Glass mosaic.--Ceramic tile.--Natural stone.Specially recommended for bathroom refurbishing jobs.Characteristics• Prefabricated <strong>shower</strong> <strong>tray</strong> made of extruded polystyrene, and covered with cement mortar.• It includes the imperband refurbishing kit as a waterproofing system and adjustment disk• Available for square as well as for linear drains.• Maximum <strong>tray</strong> thickness: 30 mm.• Minimum height of the system: 75 mm• 50 mm diameter horizontal outlet.• Discharge speed. 0.58 l/s.• Includes u-bend.• Compression resistance (10% crush risk): DIN 53421 0.3 N / mm 2• Initial thermal conductivity: DIN 52612 0.027 W/m ° K• Flammability: DIN 4102 B1• Maximum security, it eliminates leakage risks between waterproof sheet and drainpiece.• Direct installation of the tile on the waterproof sheet.• Good chemical resistance, lasting waterproofing sheet.• Quick and easy application.• Wide range of stainless steel gratings.Components• PVC gutter, thermowelded to a 150 x 225 cm waterproof sheet. The gutter is served integrated intoan adjustment disk.• U-bend.• <strong>Concept</strong> <strong>XPS</strong> refurbishment <strong>shower</strong> <strong>tray</strong> in two parts.
<strong>Concept</strong> <strong>XPS</strong> <strong>shower</strong> <strong>tray</strong> + imperband refurbishing kitComplementsSquare gratings10 x 10 cm Stainless steel grating. Available finishes:• Standard squared• Standard sunLinear gratings59.6 x 9.3, 80 x 9.3, and 120 x 9.3 cm Stainless steel gratings. Available finishes:• Chrome texture• Texture• Squared• Line• White• CeramicInstallation GuideThis prefabricated <strong>shower</strong> <strong>tray</strong> has been developed for placing in a thin layer with adhesive and a notched trowel.1. Connection of the imperband kit to the drain pipe.Connect the imperband refurbishing kit outlet to thedrain pipe.2. Testing the drain water tightness.Pour water through the drain and check that the gutterworks correctly. Protect the drain to prevent debris fromfalling in it.3. Installing the <strong>Concept</strong> <strong>XPS</strong> <strong>shower</strong> <strong>tray</strong>.Fill the <strong>shower</strong> <strong>tray</strong> base with cement mortar to the level ofthe <strong>Concept</strong> <strong>XPS</strong> <strong>shower</strong> <strong>tray</strong>, fit the two parts of the <strong>tray</strong> withoutleaving a joint, on the adjustment disk of the drain. Verifythat the drain top plus the grating is at the desired level.4. Waterproofing the <strong>shower</strong> <strong>tray</strong> base.Once the <strong>Concept</strong> <strong>XPS</strong> <strong>shower</strong> <strong>tray</strong> is installed, choose atype C2 EN 12004 cement-based adhesive, and extend itwith a 6 mm notched trowel.There are 50 mm thick polystyrene parts for replacing thecement mortar screed.
<strong>Concept</strong> <strong>XPS</strong> <strong>shower</strong> <strong>tray</strong> + imperband refurbishing kitInstallation Guide5. Gluing the waterproof sheet.Cut the waterproofing sheet based on the <strong>shower</strong> <strong>tray</strong>,leaving enough sheet to cover 10 cm on all walls; unfoldthe waterproof sheet and press it onto the fresh adhesive,making sure no air pockets are formed.6. Waterproofing the <strong>shower</strong> <strong>tray</strong> angles.In the corners, fold the sheet so that it covers the entire jointbetween wall and <strong>shower</strong>. In case the waterproofing needsto be extended both on the wall and on the floor, overlapwith at least 5 cm imperbandindoor waterproof sheet.7. Placing the grating frame.Place the grating frame into the drain hole and stick withthe p-404 polyurethane putty. It is not necessary to seal thejoint between the frame and the drain. Place the u-bend.8. Laying the covering material.Once the grating frame is in place, spread a layer of typeC2 as per EN 12004 cement-based adhesive with a suitablesize notched trowel, starting from the grating frame. Lay thechosen covering.9. Installing the decorative grating.Once the <strong>shower</strong> <strong>tray</strong> has been covered, seal the joint betweenthe frame and covering with p-404 elastic putty andplace the decorative grating. Finally, seal the tile joints with awaterproof material.In the case of linear gratings with ceramic finish, cut ceramicswith water-cooled electric cutting machine, polishing theedges with abrasive block, and paste with p-404, polyurethaneputty.
<strong>Concept</strong> <strong>XPS</strong> <strong>shower</strong> <strong>tray</strong> + imperband refurbishing kitDimensionsMeasures in mm.257 Ø220 Ø20 2055ReferencesConsult references in butech’s 2013 concept xps cataloguebutech building technologies, S.A.Carretera Villarreal - Puebla de Arenoso (cv-20) km 2.5 - 12540 Villarreal - Castellón - Spain.Apartado de correos: 297 - Telephone (+ 34) 964 53 62 00 - Fax (+ 34) 964 53 00 34 - butech@butech.es - http://www.butech.es.