Makeup Kit - Treasure House of Makeup
Makeup Kit - Treasure House of Makeup
Makeup Kit - Treasure House of Makeup

Create successful ePaper yourself
Turn your PDF publications into a flip-book with our unique Google optimized e-Paper software.
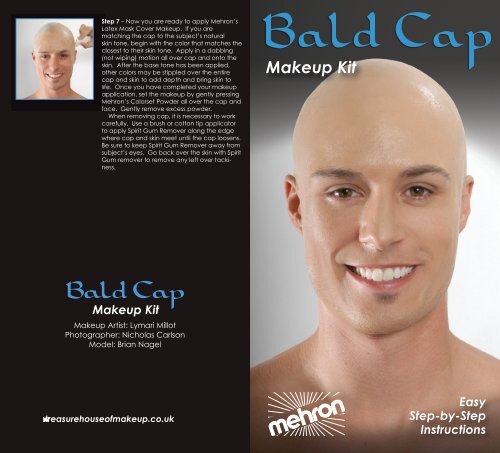
Step 7 – Now you are ready to apply Mehron’s<br />
Latex Mask Cover <strong>Makeup</strong>. If you are<br />
matching the cap to the subject’s natural<br />
skin tone, begin with the color that matches the<br />
closest to their skin tone. Apply in a dabbing<br />
(not wiping) motion all over cap and onto the<br />
skin. After the base tone has been applied,<br />
other colors may be stippled over the entire<br />
cap and skin to add depth and bring skin to<br />
life. Once you have completed your makeup<br />
application, set the makeup by gently pressing<br />
Mehron’s Colorset Powder all over the cap and<br />
face. Gently remove excess powder.<br />
When removing cap, it is necessary to work<br />
carefully. Use a brush or cotton tip applicator<br />
to apply Spirit Gum Remover along the edge<br />
where cap and skin meet until the cap loosens.<br />
Be sure to keep Spirit Gum Remover away from<br />
subject’s eyes. Go back over the skin with Spirit<br />
Gum remover to remove any left over tackiness.<br />
<strong>Makeup</strong> <strong>Kit</strong><br />
<strong>Makeup</strong> Artist: Lymari Millot<br />
Photographer: Nicholas Carlson<br />
Model: Brian Nagel<br />
www.treasurehouse<strong>of</strong>makeup.co.uk<br />
<strong>Makeup</strong> <strong>Kit</strong><br />
Easy<br />
Step-by-Step<br />
Instructions
Bald cap is best applied on subject with short hair or short sideburns. Edges<br />
<strong>of</strong> the cap cannot blend in properly if the hair continues into a thick sideburn<br />
in front <strong>of</strong> the ear. If sideburns are long, trim as close as possible and work<br />
Spirit Gum into hair and flatten with a cloth.<br />
Step 1 – Dampen hair with water, slick back<br />
using hair gel or hair spray and dry with hair<br />
dryer. Hair must be as flat as possible. If subject<br />
has long hair, pull back into a flat ponytail at<br />
the nape <strong>of</strong> the neck and allow hair to run out<br />
the back <strong>of</strong> the cap at the neck and down into<br />
the costume.<br />
To ensure good adhesion it’s important that<br />
skin be completely clean and dry. Use rubbing<br />
alcohol on a cotton ball to clean face and<br />
hairline.<br />
Step 2 – Fit the cap over subject’s head and<br />
pull back. Center cap so it fits snugly all around<br />
the head and covers ears evenly. To remove air<br />
that may be trapped under the cap, lift one<br />
side <strong>of</strong> the cap and release the air, be care not<br />
to stretch the cap.<br />
If the ears are to be exposed, an ear slit must<br />
be cut into each side <strong>of</strong> the cap. With cap in<br />
position on the head. Draw a circle measuring<br />
about 1 inch at the center <strong>of</strong> each ear just<br />
above the ear canal entrance, and then draw<br />
a line continuing down and slightly forward on<br />
each side. Make sure the cap does not shift<br />
when marking.<br />
Step 3 – When cutting latex, it is always better to<br />
cut too little than too much. Remember you<br />
can always go back and enlarge the cut. VERY<br />
CAREFULLY stretch cap down and away from<br />
ears as you SLOWLY cut up the to the circle.<br />
When the circle is reached, cut a round hole<br />
the size <strong>of</strong> the circle so you end up with a “keyhole”<br />
shape. If the circle is not cut in the top,<br />
the latex will continue to tear upwards and<br />
became unusable.<br />
Align the cut over ear to see what other<br />
trimmings should be done. Slowly guide ear<br />
through slit and adjust as needed. If cap<br />
buckles above the ear, the slit will have to be<br />
increased slightly, Likewise, some <strong>of</strong> the front<br />
edges <strong>of</strong> the cut may need to be trimmed for a<br />
good fit. When finished, the cap should fit very<br />
close to the ear in front and back without any<br />
buckling when it is stretched down tight.<br />
Step 4 – Lift front edge <strong>of</strong> cap above eyebrows<br />
and fold up about 1 /4 - 1 /2 inch. Apply Mehron’s<br />
Spirit Gum under the edge <strong>of</strong> the cap and to<br />
the skin from outer eyebrow to outer eyebrow<br />
(be careful not to get Spirit Gum in the eyes).<br />
When Spirit Gum becomes tacky, flip top edge<br />
forward and gently press into the skin with a<br />
damp cloth or towel. Allow front to dry 3-4<br />
minutes.<br />
Step 5 - After the front edge is glued down,<br />
smooth out the top <strong>of</strong> cap and pull down the<br />
back to prevent wrinkles across the top <strong>of</strong> the<br />
head. Now you’re ready to glue down the<br />
back <strong>of</strong> cap using Spirit Gum. Have the subject<br />
lift chin lightly up and tilt head back. In this<br />
position, pull the cap so that it is snug, but not<br />
stretched too tightly. Apply Spirit Gum to the<br />
skin and under the edge <strong>of</strong> the cap. Once the<br />
Spirit Gum becomes tacky, press edge <strong>of</strong> cap<br />
to the neck and gently press into the skin with a<br />
damp cloth or towel.(Be sure to leave a 1 inch<br />
gap in the Spirit Gum in the center <strong>of</strong> the back<br />
to allow sweat to drain.) Once the front and<br />
back are secure, begin working forward from<br />
name <strong>of</strong> the neck to the ear and then ear to<br />
brow, gently pulling the cap taught and gluing<br />
down all <strong>of</strong> the edges.<br />
Step 6 – After cap is glued in place completely<br />
without wrinkles, apply Mehron’s Liquid Latex<br />
with a sponge over the seam line about 1 inch<br />
in each direction on the skin and cap. (If you<br />
need a thinner coat <strong>of</strong> latex, dilute it with<br />
water)Work on one small section at a time<br />
(about 3 inches) and use a clean edge <strong>of</strong> the<br />
sponge for each section. The latex should be<br />
very thin and gently stippled. When latex is dry<br />
(usually about 3-4 minutes) repeat as<br />
necessary. Do not touch latex with fingers as<br />
you may pull it <strong>of</strong>f the skin. Once the latex<br />
application is complete, lightly pat Mehron’s<br />
Colorset Powder with a powder puff on the<br />
latex to reduce tackiness.