
Create successful ePaper yourself
Turn your PDF publications into a flip-book with our unique Google optimized e-Paper software.
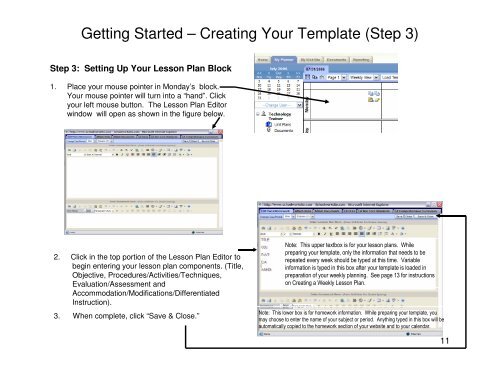
Getting Started – Creating Your Template (Step 3)Step 3: Setting Up Your <strong>Lesson</strong> <strong>Plan</strong> Block1. Place your mouse pointer in Monday’s block.Your mouse pointer will turn into a “hand”. Clickyour left mouse button. The <strong>Lesson</strong> <strong>Plan</strong> Editorwindow will open as shown in the figure below.2. Click in the top portion of the <strong>Lesson</strong> <strong>Plan</strong> Editor tobegin entering your lesson plan components. (Title,Objective, Procedures/Activities/Techniques,Evaluation/Assessment andAccommodation/Modifications/DifferentiatedInstruction).3. When complete, click “Save & Close.”Note: This upper textbox is for your lesson plans. Whilepreparing your template, only the information that needs to berepeated every week should be typed at this time. Variableinformation is typed in this box after your template is loaded inpreparation of your weekly planning. See page 13 for instructionson Creating a Weekly <strong>Lesson</strong> <strong>Plan</strong>.Note: This lower box is for homework information. While preparing your template, youmay choose to enter the name of your subject or period. Anything typed in this box will beautomatically copied to the homework section of your website and to your calendar.11