RoadRunner Owner's Manual - Data I/O Corporation
RoadRunner Owner's Manual - Data I/O Corporation RoadRunner Owner's Manual - Data I/O Corporation
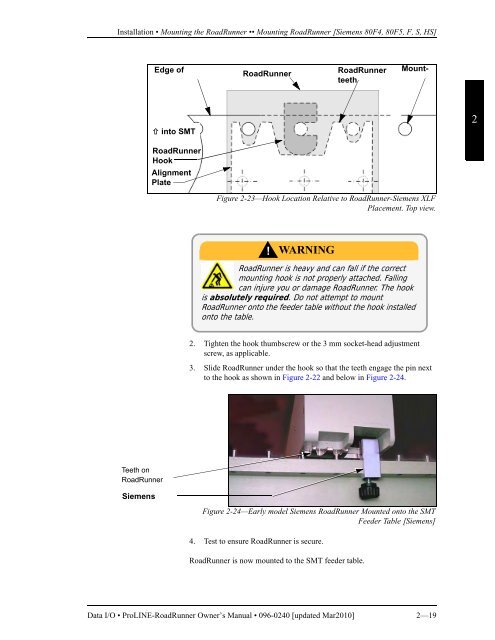
Installation • Mounting the RoadRunner •• Mounting RoadRunner [Siemens 80F4, 80F5, F, S, HS]Edge ofRoadRunnerRoadRunnerteethMount- into SMT2RoadRunnerHookAlignmentPlateFigure 2-23—Hook Location Relative to RoadRunner-Siemens XLFPlacement. Top view.!WARNINGRoadRunner is heavy and can fall if the correctmounting hook is not properly attached. Fallingcan injure you or damage RoadRunner. The hookis absolutely required. Do not attempt to mountRoadRunner onto the feeder table without the hook installedonto the table.2. Tighten the hook thumbscrew or the 3 mm socket-head adjustmentscrew, as applicable.3. Slide RoadRunner under the hook so that the teeth engage the pin nextto the hook as shown in Figure 2-22 and below in Figure 2-24.Teeth onRoadRunnerSiemensFigure 2-24—Early model Siemens RoadRunner Mounted onto the SMTFeeder Table [Siemens]4. Test to ensure RoadRunner is secure.RoadRunner is now mounted to the SMT feeder table.Data I/O • ProLINE-RoadRunner Owner’s Manual • 096-0240 [updated Mar2010] 2—19
Installation • Mounting the RoadRunner •• Mounting RoadRunner [Siemens SIPLACE X2, X3, X4, X4i]Mounting RoadRunner [Siemens SIPLACE X2, X3, X4, X4i]2CAUTION: Heavy weight. Use great care when mountingRoadRunner to the feeder table. It is heavy, anddropping it can cause serious damage to RoadRunnerand anything it falls upon. Use only approved hardwareto mount RoadRunner to the SMT feeder table.!WARNINGFEEDER CARTS CAN TIP causing personal injury ordamage. Remove RoadRunner from the FeederCart before pulling the cart away from the SMTmachine.NOTE: When selecting slot positions forRoadRunner, consider that access to it isfrom the right side.NOTE: The SMT Adapter forSIPLACE X RoadRunner mustbe attached to RoadRunnerbefore being mounting onto aFeeder Bank.If the SMT Adapter is notattached to the RoadRunner,contact Data I/O support— attaching it requires removing theRoadRunner Conveyor Cover.To mount the RoadRunner onto the machine feeder table, perform the following:1. Holding RoadRunner level, align the grooves on the Adapter with ribson the Feeder Bank, and slide RoadRunner as far forward as it will go.2—20 Data I/O • ProLINE-RoadRunner Owner’s Manual • 096-0240 [updated Mar2010]
- Page 1 and 2: Seeseparate Service ManuCovers all
- Page 3 and 4: Data I/O has endeavored to ensure t
- Page 5 and 6: 2 • InstallationUnpacking the Roa
- Page 7 and 8: Glossary • Glossary of TermsAlpha
- Page 9 and 10: 1Overview • RoadRunner is — •
- Page 11 and 12: 1Overview • Overall System Descri
- Page 14 and 15: Overview • Overall System Descrip
- Page 16 and 17: Overview • Overall System Descrip
- Page 18 and 19: Overview • TaskLink’s Handshake
- Page 20 and 21: Overview • Safety •• Safety F
- Page 22 and 23: Specifications [Assembleon]Overview
- Page 24 and 25: Specifications [Fuji NXT, AIM]Overv
- Page 26 and 27: Overview • Specifications [Panaso
- Page 28 and 29: Overview • Specifications [Panaso
- Page 30 and 31: Specifications [Universal GSM]Overv
- Page 32 and 33: Chapter22InstallationFor the Reject
- Page 34 and 35: Installation • Mounting the RoadR
- Page 36 and 37: Installation • Mounting the RoadR
- Page 39 and 40: Installation • Mounting the RoadR
- Page 41 and 42: Installation • Mounting the RoadR
- Page 43 and 44: Installation • Mounting the RoadR
- Page 45 and 46: Installation • Mounting the RoadR
- Page 47 and 48: Installation • Mounting the RoadR
- Page 49: Installation • Mounting the RoadR
- Page 53 and 54: Installation • Mounting the RoadR
- Page 55 and 56: Installation • Installing the Rej
- Page 57 and 58: Installation • Making the Necessa
- Page 59 and 60: Installation • Making the Necessa
- Page 61 and 62: Installation • Applying Power for
- Page 63 and 64: Installation • Configuring for Ne
- Page 65 and 66: Operation • Operator Functions
- Page 67 and 68: Operation • Operator Functions
- Page 69 and 70: Operation • Operator Functions
- Page 71 and 72: Operation • Operator Functions
- Page 73 and 74: Operation • Operator Functions
- Page 75 and 76: Operation • Operator Functions
- Page 77 and 78: Operation • Operator Functions
- Page 79 and 80: Operation • Operator Functions
- Page 81 and 82: Operation • Operator Functions
- Page 83 and 84: Operation • Operator Functions
- Page 85 and 86: Operation • Operator Functions
- Page 87 and 88: Operation • Supervisor Functions
- Page 89 and 90: Operation • Supervisor Functions
- Page 91 and 92: Operation • Supervisor Functions
- Page 93 and 94: Operation • Supervisor Functions
- Page 95 and 96: Operation • Supervisor Functions
- Page 97 and 98: Operation • Supervisor Functions
- Page 99 and 100: Operation • Supervisor Functions
Installation • Mounting the <strong>RoadRunner</strong> •• Mounting <strong>RoadRunner</strong> [Siemens 80F4, 80F5, F, S, HS]Edge of<strong>RoadRunner</strong><strong>RoadRunner</strong>teethMount- into SMT2<strong>RoadRunner</strong>HookAlignmentPlateFigure 2-23—Hook Location Relative to <strong>RoadRunner</strong>-Siemens XLFPlacement. Top view.!WARNING<strong>RoadRunner</strong> is heavy and can fall if the correctmounting hook is not properly attached. Fallingcan injure you or damage <strong>RoadRunner</strong>. The hookis absolutely required. Do not attempt to mount<strong>RoadRunner</strong> onto the feeder table without the hook installedonto the table.2. Tighten the hook thumbscrew or the 3 mm socket-head adjustmentscrew, as applicable.3. Slide <strong>RoadRunner</strong> under the hook so that the teeth engage the pin nextto the hook as shown in Figure 2-22 and below in Figure 2-24.Teeth on<strong>RoadRunner</strong>SiemensFigure 2-24—Early model Siemens <strong>RoadRunner</strong> Mounted onto the SMTFeeder Table [Siemens]4. Test to ensure <strong>RoadRunner</strong> is secure.<strong>RoadRunner</strong> is now mounted to the SMT feeder table.<strong>Data</strong> I/O • ProLINE-<strong>RoadRunner</strong> Owner’s <strong>Manual</strong> • 096-0240 [updated Mar2010] 2—19


