User Guide - PregSafe
User Guide - PregSafe User Guide - PregSafe
Internal and Printable NotesThese free text fields allow the user to enter comments. The Internal Notes field is forcomments that are intended for internal use only, and they will not appear on the patientreport. The Printable Notes are intended to be printed on the patient report, however,they will only appear on formats 1 or 4. Each of these notes fields holds 1150characters. You can expand the field to show the entire content by bringing focus to thefield and pressing F5. If a patient has a note entry in either note field, when therequisition in selected in the Add/View screen, an icon will appear below the Closebutton.AChE FieldIf the panel you have ordered is an amniotic fluid panel, the AChE checkbox will appear.Check it if an AChE test has been done. Two additional checkboxes will appear, one tocheck if the AChE test was positive and the other if the sample was bloodstained.Checking the AChE checkbox and not the Positive checkbox indicates that AChE wasnegative. If you check the AChE checkbox, when your report is printed, risk will not bereported, since AChE is a confirmatory test. The AChE result is printed only on Reportformat 7. If the AFP and AChE do not agree, ie if one is positive and the other negative,the report will state “Screening Ambiguous.”Specimen InformationThe Specimen section allows you to record information about the specimen and aboutthe patient at the time of the specimen draw.WeightA heavier patient has a larger blood volume, which results in a dilution of the analytes inthe patient’s bloodstream. PregSafe performs weight correction to adjust the MoMcalculations to compensate for this dilution effect. To do this, the program needs thepatient’s weight at the time the specimen was drawn. Type in the patient’s weight, andchange the weight units if different from the default . Use the mouse or the ←or→ key tochange the weight unit selection. If you want to calculate the risk without weightcorrection, leave the patient weight field blank.Note: Because the patient’s weight does not affect the volume of amniotic fluid, there isno weight correction to the MoM for amniotic fluid samples, therefore the patient’sweight is not needed when calculating amniotic fluid risk.Collection CentreIf you wish to record the collection centre for the sample, choose it from the list, or typein a new centre if it is not on the list already. If you open the selection list and type thefirst letter(s) of the collection centre you want, the list will scroll to that point.Specimen Numbers AssignedBy Referring Lab – If you wish to track the lab number assigned to the specimen by thelab that referred the specimen to you, enter it here. It will appear on certain patient reportformats.By Assaying Lab – This is a required field. Enter your lab’s specimen number, or let theprogram assign it automatically by setting the default auto-numbering function in the SiteOptions section of the Tools menu.18
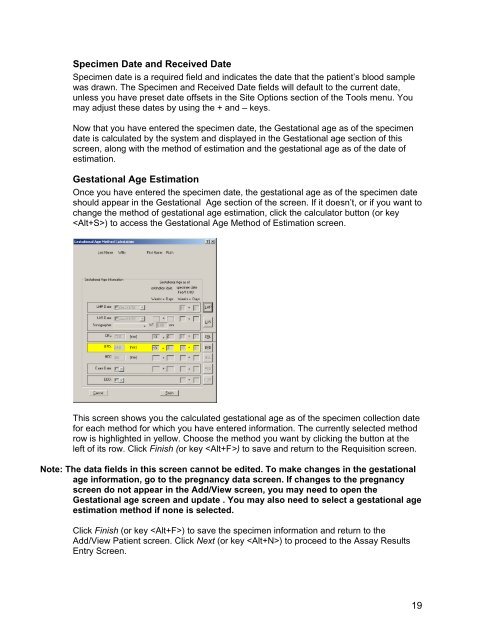
Specimen Date and Received DateSpecimen date is a required field and indicates the date that the patient’s blood samplewas drawn. The Specimen and Received Date fields will default to the current date,unless you have preset date offsets in the Site Options section of the Tools menu. Youmay adjust these dates by using the + and – keys.Now that you have entered the specimen date, the Gestational age as of the specimendate is calculated by the system and displayed in the Gestational age section of thisscreen, along with the method of estimation and the gestational age as of the date ofestimation.Gestational Age EstimationOnce you have entered the specimen date, the gestational age as of the specimen dateshould appear in the Gestational Age section of the screen. If it doesn’t, or if you want tochange the method of gestational age estimation, click the calculator button (or key) to access the Gestational Age Method of Estimation screen.This screen shows you the calculated gestational age as of the specimen collection datefor each method for which you have entered information. The currently selected methodrow is highlighted in yellow. Choose the method you want by clicking the button at theleft of its row. Click Finish (or key ) to save and return to the Requisition screen.Note: The data fields in this screen cannot be edited. To make changes in the gestationalage information, go to the pregnancy data screen. If changes to the pregnancyscreen do not appear in the Add/View screen, you may need to open theGestational age screen and update . You may also need to select a gestational ageestimation method if none is selected.Click Finish (or key ) to save the specimen information and return to theAdd/View Patient screen. Click Next (or key ) to proceed to the Assay ResultsEntry Screen.19
- Page 1 and 2: © Lilac Medicare (P) Ltd.User Guid
- Page 3: The PregSafe WarrantyDisclaimer ofW
- Page 6 and 7: 3 Navigating in PregSafeThis sectio
- Page 8 and 9: The Patient Entry ShortcutsOpens th
- Page 10 and 11: will remove the character to the le
- Page 12 and 13: 3.2.11 Date FieldsThe date fields i
- Page 14 and 15: might be considered responsible if
- Page 16 and 17: 7 Closing PregSafeThere are three w
- Page 18 and 19: Table of ContentsTable of Contents
- Page 20 and 21: Not Saved: the data entered has not
- Page 22 and 23: 2.1.1. Patient InformationThe patie
- Page 24 and 25: If you wish to skip this step, afte
- Page 26 and 27: SmokerChoose Yes if the patient is
- Page 28 and 29: LMP Date to the LMP Date and open t
- Page 30 and 31: EDDTo enter an estimated date of de
- Page 32 and 33: Requisition NumberYou may enter a r
- Page 36 and 37: 2.1.5. Adding a new pregnancy/requi
- Page 38 and 39: 2.2. ASSAY RESULTS ENTRY USING THE
- Page 40 and 41: Choose either the Requisition,Speci
- Page 42 and 43: 2.3.1. Editing a Patient RecordWhen
- Page 44 and 45: 2.3.2. Editing Critical DataCertain
Specimen Date and Received DateSpecimen date is a required field and indicates the date that the patient’s blood samplewas drawn. The Specimen and Received Date fields will default to the current date,unless you have preset date offsets in the Site Options section of the Tools menu. Youmay adjust these dates by using the + and – keys.Now that you have entered the specimen date, the Gestational age as of the specimendate is calculated by the system and displayed in the Gestational age section of thisscreen, along with the method of estimation and the gestational age as of the date ofestimation.Gestational Age EstimationOnce you have entered the specimen date, the gestational age as of the specimen dateshould appear in the Gestational Age section of the screen. If it doesn’t, or if you want tochange the method of gestational age estimation, click the calculator button (or key) to access the Gestational Age Method of Estimation screen.This screen shows you the calculated gestational age as of the specimen collection datefor each method for which you have entered information. The currently selected methodrow is highlighted in yellow. Choose the method you want by clicking the button at theleft of its row. Click Finish (or key ) to save and return to the Requisition screen.Note: The data fields in this screen cannot be edited. To make changes in the gestationalage information, go to the pregnancy data screen. If changes to the pregnancyscreen do not appear in the Add/View screen, you may need to open theGestational age screen and update . You may also need to select a gestational ageestimation method if none is selected.Click Finish (or key ) to save the specimen information and return to theAdd/View Patient screen. Click Next (or key ) to proceed to the Assay ResultsEntry Screen.19


