XenMobile Migration Whitepaper - Citrix Knowledge Center
XenMobile Migration Whitepaper - Citrix Knowledge Center
XenMobile Migration Whitepaper - Citrix Knowledge Center
You also want an ePaper? Increase the reach of your titles
YUMPU automatically turns print PDFs into web optimized ePapers that Google loves.
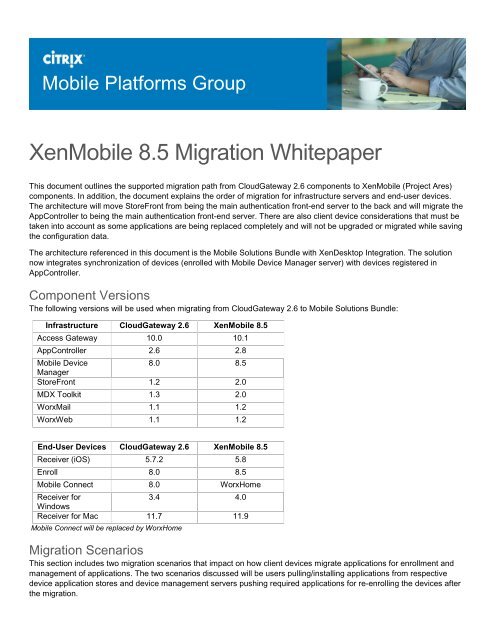
Mobile Platforms Group<strong>XenMobile</strong> 8.5 <strong>Migration</strong> <strong>Whitepaper</strong>This document outlines the supported migration path from CloudGateway 2.6 components to <strong>XenMobile</strong> (Project Ares)components. In addition, the document explains the order of migration for infrastructure servers and end-user devices.The architecture will move StoreFront from being the main authentication front-end server to the back and will migrate theAppController to being the main authentication front-end server. There are also client device considerations that must betaken into account as some applications are being replaced completely and will not be upgraded or migrated while savingthe configuration data.The architecture referenced in this document is the Mobile Solutions Bundle with XenDesktop Integration. The solutionnow integrates synchronization of devices (enrolled with Mobile Device Manager server) with devices registered inAppController.Component VersionsThe following versions will be used when migrating from CloudGateway 2.6 to Mobile Solutions Bundle:Infrastructure CloudGateway 2.6 <strong>XenMobile</strong> 8.5Access Gateway 10.0 10.1AppController 2.6 2.8Mobile Device8.0 8.5ManagerStoreFront 1.2 2.0MDX Toolkit 1.3 2.0WorxMail 1.1 1.2WorxWeb 1.1 1.2End-User Devices CloudGateway 2.6 <strong>XenMobile</strong> 8.5Receiver (iOS) 5.7.2 5.8Enroll 8.0 8.5Mobile Connect 8.0 WorxHomeReceiver for3.4 4.0WindowsReceiver for Mac 11.7 11.9Mobile Connect will be replaced by WorxHome<strong>Migration</strong> ScenariosThis section includes two migration scenarios that impact on how client devices migrate applications for enrollment andmanagement of applications. The two scenarios discussed will be users pulling/installing applications from respectivedevice application stores and device management servers pushing required applications for re-enrolling the devices afterthe migration.
<strong>XenMobile</strong> 8.5 Enterprise with XenDesktop IntegrationThe following diagrams illustrate the components before and after migration (for reference).Before <strong>Migration</strong>
After <strong>Migration</strong><strong>Migration</strong> ProcessComplete the migration order for each component using the following procedure. <strong>Citrix</strong> Systems, Inc. recommends toprovide notification to users when the entire solution is migrated to new versions for <strong>XenMobile</strong> 8.5.<strong>Migration</strong> Order1. Upgrade NetScaler Gateway 10.0 to 10.1.a. Logon to NetScaler administration web console.b. Go to Configuration > System node, click Upgrade Wizard.c. Upload the g-zipped package for NetScaler Gateway 10.1. The upgrade process will prompt to restart theappliance.d. Logon to the NetScaler administration web console again.e. Verify if the following settings have not been overwritten:i. Session Profiles > Client Experience Home Page and Published Applications Web InterfaceFQDNs.ii. Clientless Access Profiles contain the same cookies configured previously.iii. Allowed Clientless Access domains contain the same addresses, including StoreFront.iv. Secure Ticket Authentication URLs.f. Test the configuration by logging on through the web browser or <strong>Citrix</strong> Receiver.g. Verify if the users are able to login and authenticate to StoreFront defined stores configured.2. Upgrade StoreFront 1.2 to 2.0.a. Logon to the StoreFront server console.b. Upgrade StoreFront by running the StoreFront 2.0 installer as an administrator.c. When the upgrade is completed, open StoreFront administration snap-in and remove CloudGatewaycontroller from each store as this will be moved in the migration solution.
d. Open NetScaler Gateway Properties and for each gateway defined and change the version field in thesettings from 9.x to 10.0.x or later.e. Test the configuration by logging on through the web browser or <strong>Citrix</strong> Receiver and verify if the users areable to log on and authenticate to StoreFront defined stores configured.3. Upgrade AppController 2.6 to 2.8.a. Logon to AppController administration web console.b. Go to Settings > Release Management.c. Upload the upgrade package. The upgrade process will prompt to restart the appliance.d. Logon to the administration web console again.e. Upgrade any Mobile applications using the MDX Toolkit 2.0-149 shipped with <strong>XenMobile</strong> 8.5.Warning: Update the upgraded apps in AppController to the latest versions. If the Mobile applications arenot upgraded, you will not be able to link and synchronize AppController and Mobile Device Managerservers.f. Go to Settings > Deployment, and verify if the same settings are being used in NetScaler Gateway andStoreFront for the solution.Note: PN Agent Legacy mode is no longer required for <strong>XenMobile</strong> 8.5 and StoreFront 2.0 deployments.g. Logon to NetScaler administration web console. For each session profile, change the URLs in ClientExperience Home Page and Published Applications Web Interface Address from StoreFront toAppController. It might be required to change Store name in URLs depending on previous configuration.h. Go to NetScaler Gateway > Global Settings.i. Click Bind/Unbind AppController URL and type the web URL for the AppController appliance.j. Save the configuration.At this stage, the solution can be tested through web browser only. When the client devices are updated withWorxHome, then the Mobile applications can be tested.4. Upgrade Mobile Device Manager 8.0.1 to 8.5a. Logon to the Mobile Device Manager server console.b. Upgrade the server by running the 8.5 installer as a user with administrative privileges.c. When the upgrade is completed, link AppController with Mobile Device Manager.i. Warning: Before proceeding, verify that Mobile applications are updated in AppController.ii. Logon to AppController administration web console.iii. Go to Settings > <strong>XenMobile</strong> MDM and edit the settingsiv. Type the FQDN of the Mobile Device Manager Server, port and a password for Shared Key.v. Set Instance Path to “/zdm”.vi. Select the required settings for Require Device Manager enrollment depending on enforcementof enrolling devices and save the changes.vii. Go back to Mobile Device Manager server and open administration web console.viii. Go to Options > Modules Configuration > AppC Webservice API.ix. Type the FQDN of the AppController appliance, set the Shared Key to the same password usedin AppController configuration and check Enable AppController setting.x. Click Check Connection and verify successful link between the two servers.Note: Click Check Connection only if AppController <strong>XenMobile</strong> MDM settings have already beenconfigured.To test the configuration, see the next section for updating the client devices to the latest applications neededfor enrollment.5. Upgrade the client devices.a. On iOS devices, update Enroll 8.0 to 8.5 (either from Apple AppStore or push from Mobile Device Manager,only if previously being managed by Mobile Device Manager). Install or push WorxHome to deployed devices.i. Users must re-subscribe to previously subscribed applications.ii. Install or Push <strong>Citrix</strong> Receiver for iOS 5.8.iii. Test the configuration by launching Mobile, Web, SaaS, and HDX applications from WorxHome.b. On Android devices, install WorxHome (from Google Play store) to deployed devices.
i. Users might have to re-enroll using WorxHome.ii. Users must re-subscribe to previously subscribed applications.iii. Install or Push <strong>Citrix</strong> Receiver for Android 3.3.iv. Test the configuration by launching Mobile, Web, SaaS, and HDX applications from WorxHome.c. On Windows and Mac devices, upgrade the respective <strong>Citrix</strong> Receiver version for the platform.a. Users must re-subscribe to previously subscribed applications.b. Test the configuration by launching Web, SaaS, and HDX applications from <strong>Citrix</strong> Receiver.At this stage, the solution should be successfully migrated to <strong>XenMobile</strong> 8.5, while switching StoreFront andAppController as the authentication and application store managers. AppController will take over all subscriptionand application policy data for the solution.
<strong>XenMobile</strong> 8.5 for Mobile Application Management (previously known asCloudGateway)The following diagrams illustrate the components before and after migration (for reference).Before <strong>Migration</strong>
After <strong>Migration</strong><strong>Migration</strong> ProcessComplete the migration order for each component using the following procedure. <strong>Citrix</strong> Systems, Inc. recommends toprovide notification to users while the entire solution is migrated to the new versions for <strong>XenMobile</strong> 8.5 for MobileApplication Management.<strong>Migration</strong> Order1. Upgrade NetScaler Gateway 10.0 to 10.1.a. Logon to NetScaler administration web console.b. Go to Configuration > System node, click Upgrade Wizard.c. Upload the g-zipped package for NetScaler Gateway 10.1. The upgrade process will prompt to restart theappliance.d. Logon back to the NetScaler administration web console.e. Verify that the following settings have not been overwritten:i. Session Profiles > Client Experience Home Page and Published Applications Web InterfaceFQDNs.ii. Clientless Access Profiles contain the same cookies configured previously.iii. Allowed Clientless Access domains contain the same addresses, including StoreFront.iv. Secure Ticket Authentication URLs.f. Test the configuration by logging on through web browser or <strong>Citrix</strong> Receiver.g. Verify if the users are able to logon and authenticate to StoreFront defined stores configured.2. Upgrade StoreFront 1.2 to 2.0.a. Logon to the StoreFront server console.b. Upgrade StoreFront by running the StoreFront 2.0 installer as an administrator.
c. When the upgrade is completed, open StoreFront administration snap-in, remove CloudGatewaycontroller from each store as this will be moved in the migration solution.d. Open NetScaler Gateway Properties and for each gateway defined and change the version field insettings from 9.x to 10.0.x or later.e. Test the configuration by logging on through web browser or <strong>Citrix</strong> Receiver.f. Verify if the users are able to login and authenticate to StoreFront defined stores configured.3. Upgrade AppController 2.6 to 2.8a. Logon to AppController administration web console.b. Go to Settings > Release Management.c. Upload the upgrade package. The upgrade process will prompt to restart the appliance.d. Logon to the administration web console again.e. Upgrade any Mobile applications using the MDX Toolkit 2.0-149 shipped with <strong>XenMobile</strong> 8.5.Note: Update the upgraded apps in AppController to the latest versions.f. Go to Settings > Deployment, verify the same settings are being used in NetScaler Gateway andStoreFront for the solution.Note: PN Agent Legacy mode is no longer required for <strong>XenMobile</strong> 8.5 and StoreFront 2.0 deployments.g. Logon to NetScaler administration web console.h. For each session profile, change the URLs in Client Experience Home Page and PublishedApplications Web Interface Address from StoreFront to AppController. It might be required to changeStore name in URLs depending on previous configuration.i. Go to NetScaler Gateway > Global Settings.j. Click Bind/Unbind AppController URL, type the web URL for the AppController appliance.k. Save the configuration.At this stage, the solution can be tested through web browser only. When the client devices are updated withWorxHome, then the Mobile applications can be tested.4. Upgrade the client devices.a. On iOS devices, install WorxHome (from Apple App Store) to deployed devices.i. Users must re-subscribe to previously subscribed applications.ii. Update <strong>Citrix</strong> Receiver for iOS 5.8.iii. Test the configuration by launching Mobile, Web, SaaS and HDX applications from WorxHome.b. On Android devices, install WorxHome (from Google Play store) to deployed devices.i. Users might have to re-enroll using WorxHome.ii. Users must re-subscribe to previously subscribed applications.iii. Install <strong>Citrix</strong> Receiver for Android 3.3.iv. Test the configuration by launching Mobile, Web, SaaS and HDX applications from WorxHome.c. On Windows and Mac devices, upgrade the respective <strong>Citrix</strong> Receiver version for the platform.i. Users must re-subscribe to previously subscribed applications.ii. Test the configuration by launching Web, SaaS and HDX applications from <strong>Citrix</strong> Receiver.At this stage, the solution should be successfully migrated to <strong>XenMobile</strong> 8.5 for Mobile Application Management,while switching StoreFront and AppController as the authentication and application store managers.AppController will take over all subscription and application policy data for the solution.
Observations while Testing <strong>Migration</strong> OrderDuring internal testing, <strong>Citrix</strong> found that, when migrating NetScaler Gateway or StoreFront server, it had little impact tolegacy components (that is, AppController or Mobile Device Manager) in the infrastructure. However, if AppController orMobile Device Manager is upgraded, the authentication services, as noted previously, had to be switched from StoreFrontto AppController. The reason for the switch is that WorxHome is unable to communicate directly to StoreFront as theStoreFront server does not have knowledge of the App Store in AppController.The order of migration outlined previously, will ensure a smoother transition of services to the client devices as long asNetScaler Gateway is bound to AppController and the Client Experience profiles switched to AppController appliance.


