Network IP Camera - Edimax
Network IP Camera - Edimax Network IP Camera - Edimax
2.4 Client SettingsIn ‘Client Settings’ menu, you configure basic IP camera settings like datatransfer protocol and data storage folder.To access ‘Client Settings’ menu, click ‘Client Settings’ button on the left.The following screen will appear:23
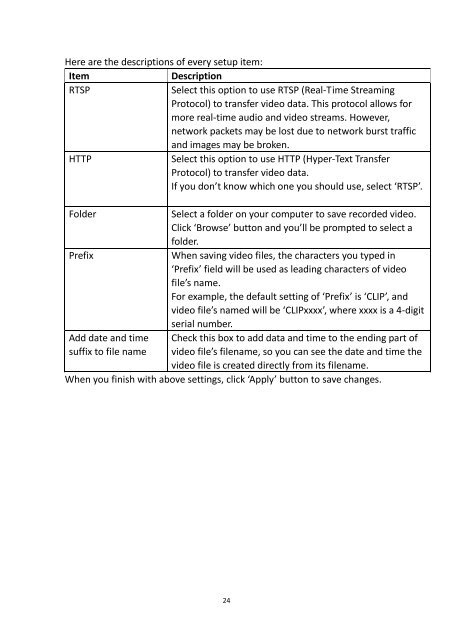
Here are the descriptions of every setup item:ItemDescriptionRTSPSelect this option to use RTSP (Real-Time StreamingProtocol) to transfer video data. This protocol allows formore real-time audio and video streams. However,network packets may be lost due to network burst trafficand images may be broken.HTTPSelect this option to use HTTP (Hyper-Text TransferProtocol) to transfer video data.If you don’t know which one you should use, select ‘RTSP’.FolderPrefixAdd date and timesuffix to file nameSelect a folder on your computer to save recorded video.Click ‘Browse’ button and you’ll be prompted to select afolder.When saving video files, the characters you typed in‘Prefix’ field will be used as leading characters of videofile’s name.For example, the default setting of ‘Prefix’ is ‘CLIP’, andvideo file’s named will be ‘CLIPxxxx’, where xxxx is a 4-digitserial number.Check this box to add data and time to the ending part ofvideo file’s filename, so you can see the date and time thevideo file is created directly from its filename.When you finish with above settings, click ‘Apply’ button to save changes.24
- Page 1 and 2: VD-233EDUser Manual08-2013 / v1.1
- Page 3 and 4: 3-8 PTZ Control ...................
- Page 5 and 6: 1.2 Key feature of this network IP
- Page 7 and 8: 1.4 Packaging ContentsPlease check
- Page 9 and 10: Rear Cover:56 7,813211104912ItemDes
- Page 11: 2-1. Please refer to the definition
- Page 14 and 15: Chapter II Using Network IP Camera
- Page 16 and 17: If you need to change a certain IP
- Page 18 and 19: For IE 9:Click ‘Install’ button
- Page 20 and 21: NOTE:If this is the first time you
- Page 22 and 23: ‘Connect’ buttonIf you want to
- Page 26 and 27: Chapter III Advanced ConfigurationI
- Page 28 and 29: Daylight SavingKeep the currentdate
- Page 30 and 31: Here are the descriptions of every
- Page 32 and 33: DHCP IPv4 / IPv6: Obtain both IPv4
- Page 34 and 35: 3-3-2 ‘Advanced’ setup pageYou
- Page 36 and 37: 3-4 IP FilterWhen this IP camera is
- Page 38 and 39: 3-5 VideoYou can adjust the image o
- Page 40 and 41: Power LineFrequencyCondition(ABW)WD
- Page 42 and 43: 640x480 (VGA)/ 320x240 (QVGA)Frame
- Page 44 and 45: Overlayshow certain text / picture
- Page 46 and 47: 3-7 MotionThis IP camera is capable
- Page 48 and 49: 3-8 PTZ ControlIf you mount the IP
- Page 50 and 51: 3-9 EventWhen there’s an event, y
- Page 52 and 53: To add a new event, click ‘New’
- Page 54 and 55: 3-9-3 Event ServerYou can define th
- Page 56 and 57: SMTP ServerCheck this box to enable
- Page 58 and 59: 3-10 Recording to Micro SD CardWhen
- Page 60 and 61: Set the time range then click “Se
- Page 62 and 63: 3-13 Device InfoYou can check the i
- Page 64 and 65: SD card deviceUpgradeSD card.Upgrad
- Page 66 and 67: Digital I/O User ManualDI/DO connec
- Page 68 and 69: Federal Communication Commission In
- Page 70 and 71: EU Declaration of ConformityEnglish
- Page 72 and 73: Declaration of ConformityWe, Edimax
Here are the descriptions of every setup item:ItemDescriptionRTSPSelect this option to use RTSP (Real-Time StreamingProtocol) to transfer video data. This protocol allows formore real-time audio and video streams. However,network packets may be lost due to network burst trafficand images may be broken.HTTPSelect this option to use HTTP (Hyper-Text TransferProtocol) to transfer video data.If you don’t know which one you should use, select ‘RTSP’.FolderPrefixAdd date and timesuffix to file nameSelect a folder on your computer to save recorded video.Click ‘Browse’ button and you’ll be prompted to select afolder.When saving video files, the characters you typed in‘Prefix’ field will be used as leading characters of videofile’s name.For example, the default setting of ‘Prefix’ is ‘CL<strong>IP</strong>’, andvideo file’s named will be ‘CL<strong>IP</strong>xxxx’, where xxxx is a 4-digitserial number.Check this box to add data and time to the ending part ofvideo file’s filename, so you can see the date and time thevideo file is created directly from its filename.When you finish with above settings, click ‘Apply’ button to save changes.24


