ML10/MP10 46-60" LCD Video Wall Mount Instruction Sheet
ML10/MP10 46-60" LCD Video Wall Mount Instruction Sheet
ML10/MP10 46-60" LCD Video Wall Mount Instruction Sheet

You also want an ePaper? Increase the reach of your titles
YUMPU automatically turns print PDFs into web optimized ePapers that Google loves.
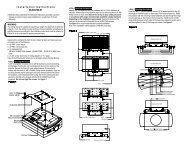
1. Make sure that the pull out mount assembly is level – use it as a template to mark 4 mountingholes.2. Drill four 1/4” (6 mm) diameter holes to a minimum depth of 2.5” (64 mm).3. Insert anchors into the holes flush with the wall.4. Place the pull out mount assembly over the anchors and secure it with four #14 x 2.5” screws, andfender washers.5. Level and then tighten all fasteners.Landscape OrientationSolid concreteAnchorsCinder blockFenderwashers#14 x 2.5”screws*Pull out mount assembly* Make sure there is a minimum 16” (406.4 mm) horizontal distance between the #14 x2.5” screws.Portrait OrientationSolid concreteAnchorsCinder blockFenderwashers#14 x 2.5”screws*Pull out mount assemblyconcretesurfaceEDrill holes and insert anchors (E).FG HPlace plate (F) over anchors (G) and secure with screws (H).Tighten all fasteners.<strong>ML10</strong>/<strong>MP10</strong> <strong>LCD</strong> <strong>Video</strong> <strong>Wall</strong> <strong>Mount</strong> <strong>Instruction</strong> <strong>Sheet</strong> 7 of 22020-100726-05 Rev. 1 (07-2013)