MMKS devices of HPM, series MDJ Operating ... - hpmtechnologie.de
MMKS devices of HPM, series MDJ Operating ... - hpmtechnologie.de
MMKS devices of HPM, series MDJ Operating ... - hpmtechnologie.de

You also want an ePaper? Increase the reach of your titles
YUMPU automatically turns print PDFs into web optimized ePapers that Google loves.
<strong>MMKS</strong> <strong><strong>de</strong>vices</strong> <strong>of</strong> <strong>HPM</strong>, <strong>series</strong> <strong>MDJ</strong> <strong>Operating</strong> Instructions<br />
Stationary valve and container unit<br />
Common or asynchronous activation<br />
with or without level control<br />
Spray head group<br />
Tubing group<br />
Introduction<br />
These instructions inclu<strong>de</strong> some important instructions and safety information. The<br />
manufacturer has no influence on the integration <strong>of</strong> the valve and container unit on<br />
the customer’s machine. This item is not subject <strong>of</strong> the current instructions. We<br />
reserve the right for any technical changes which will become necessary for<br />
improvement <strong>of</strong> the valve and container unit and which are not indicated in the<br />
present operating instructions. The compressed container unit is <strong>de</strong>scribed in a<br />
separate manual. Also, both spray head group and tubing group are <strong>de</strong>scribed<br />
in a common, separate instruction manual. These operating instructions are based<br />
on CE-regulations 98/37/CE.<br />
General Information<br />
Manufacturer / First marketer / Authorized Agent<br />
<strong>HPM</strong> Technologie GmbH<br />
Rudolf-Diesel-Strasse 3<br />
D-72525 Münsingen<br />
Phone: (49) 7381/9344-33<br />
Fax: (49) 7381/9344-88<br />
Email: verkauf@<strong>hpmtechnologie</strong>.<strong>de</strong><br />
Internet/website: www.<strong>hpmtechnologie</strong>.<strong>de</strong><br />
Item<br />
Designation<br />
Production Year<br />
Serial number<br />
Product <strong>de</strong>signation<br />
This information is indicated on the<br />
specification label<br />
This information is indicated on the<br />
Declaration <strong>of</strong> Conformity <strong>of</strong> the CE<br />
www.<strong>hpmtechnologie</strong>.<strong>de</strong> Stand: 04/2008 Seite – 1 –
<strong>MMKS</strong> <strong><strong>de</strong>vices</strong> <strong>of</strong> <strong>HPM</strong>, <strong>series</strong> <strong>MDJ</strong> <strong>Operating</strong> Instructions<br />
Stationary valve and container unit<br />
Common or asynchronous activation<br />
with or without level control<br />
Spray head group<br />
Tubing group<br />
Safety Advices<br />
• These operating instructions must be ready to hand at all times.<br />
• Please observe their application in accordance with the<br />
requirements.<br />
• Adhere to the pressure and temperature limits.<br />
• Observe the comments in chapter Assembly and starting<br />
operation.<br />
• Keep away from ignition sources.<br />
• Observe all relevant regulations concerning acci<strong>de</strong>nt prevention.<br />
• All work on the valve and container unit may only be executed by<br />
specially instructed staff who observes the relevant regulations.<br />
• Ensure material compatibility between filling material, container<br />
and sealing material.<br />
• Apply only original spare parts.<br />
• Ensure that specification label is legible.<br />
Application in accordance with the requirements:<br />
<strong>MMKS</strong> appliances <strong>of</strong> <strong>HPM</strong> may only be used for spraying fluids.<br />
Stationary valve and container unit for operation <strong>of</strong> 1 spray head with maximum 6<br />
spray nozzles (e.g. PSM 6-fold) up to max. 3 x 6 spray heads with max. 6 spray<br />
nozzles per time.<br />
Appropriate for all liquids, with exception <strong>of</strong> varnishes, resins and adhesives which<br />
reach a maximum viscosity <strong>of</strong> 2,300 m2/s at 20° C or<br />
500 mm2/s at 40° C.<br />
It is the customer, not the manufacturer <strong>HPM</strong> Technologie GmbH, that bears sole<br />
responsibility <strong>of</strong> ensuring that the valve and container unit is appropriate for the<br />
actual application, taking relevant safety and other requirements into consi<strong>de</strong>ration.<br />
Do not use the container for storage or handling <strong>of</strong> toxic, easily inflammable or<br />
explosive materials before taking further protective measures. When evaluating<br />
whether certain fluids are appropriate, the user must consi<strong>de</strong>r the relevant<br />
regulations concerning his application, especially trading, traffic or water<br />
regulations.<br />
www.<strong>hpmtechnologie</strong>.<strong>de</strong> Stand: 04/2008 Seite – 2 –
<strong>MMKS</strong> <strong><strong>de</strong>vices</strong> <strong>of</strong> <strong>HPM</strong>, <strong>series</strong> <strong>MDJ</strong> <strong>Operating</strong> Instructions<br />
Stationary valve and container unit<br />
Common or asynchronous activation<br />
with or without level control<br />
Spray head group<br />
Tubing group<br />
Description and function <strong>of</strong> the valve and container unit<br />
The unit consists <strong>of</strong> one special steel compressed container with liquid filter<br />
(100…120my), valve group and service module for storing liquids used in <strong>MMKS</strong><br />
<strong><strong>de</strong>vices</strong> <strong>of</strong> <strong>HPM</strong>.<br />
Do not pour dirty fluid in the container.<br />
Close container tightly after filling.<br />
The unfiltered and unoiled compressed air (6 – 9 bar) is connected with the service<br />
module. Spray air pressure is adjusted by the pressure regulator.<br />
We recommend a low spray air pressure <strong>of</strong> 0.5 up to<br />
max. 2.5 bar.<br />
Magnetic valves in the air and liquid feed tubes allow assembly <strong>of</strong> valve and<br />
container units up to max. 1,000 mm above or below the spray heads. Larger<br />
differences are possible by adjusting the liquid pressure. I.e. if several spray heads<br />
are used, it is possible to position them at different levels from each other as well as<br />
from the valve and container unit.<br />
Control valves may only be operated at the levels indicated for tension, control<br />
current or control air pressure. See specification label.<br />
The valves must not be used in hazardous or wet areas.<br />
If the current is interrupted, the valves are closed. If the current is switched on, the<br />
valves are opened simultaneously and both spray air and fluid can flow to the spray<br />
head.<br />
Spray start, duration and spray stop are controlled by valves activated from the<br />
customer's control unit.<br />
Without or with level control (with existing level control, please refer to enclosed<br />
measurement sheet).<br />
The level control must not be used in hazardous or wet areas.<br />
www.<strong>hpmtechnologie</strong>.<strong>de</strong> Stand: 04/2008 Seite – 3 –
<strong>MMKS</strong> <strong><strong>de</strong>vices</strong> <strong>of</strong> <strong>HPM</strong>, <strong>series</strong> <strong>MDJ</strong> <strong>Operating</strong> Instructions<br />
Stationary valve and container unit<br />
Common or asynchronous activation<br />
with or without level control<br />
Spray head group<br />
Tubing group<br />
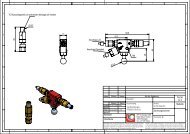
Assembly and initial operation<br />
Picture: Presentation <strong>of</strong> a <strong>MDJ</strong> <strong>de</strong>vice with assembled spray head group and tubing group.<br />
Starting Operation:<br />
• General proceeding:<br />
• Unpack shipment and check contents.<br />
• Assemble control unit with container unit.<br />
www.<strong>hpmtechnologie</strong>.<strong>de</strong> Stand: 04/2008 Seite – 4 –
<strong>MMKS</strong> <strong><strong>de</strong>vices</strong> <strong>of</strong> <strong>HPM</strong>, <strong>series</strong> <strong>MDJ</strong> <strong>Operating</strong> Instructions<br />
Stationary valve and container unit<br />
Common or asynchronous activation<br />
with or without level control<br />
Spray head group<br />
Tubing group<br />
• Remove container from the frame and put asi<strong>de</strong>.<br />
• Place control unit and frame <strong>of</strong> the container unit on an even surface<br />
(e.g. table, ground).<br />
• Loosen M6 cylindrical screws <strong>of</strong><br />
the clamping connectors from<br />
the control unit.<br />
• Push frame with the both long<br />
pr<strong>of</strong>ile sections into the clamping<br />
connector until stop.<br />
• Tighten M6 cylindrical screws <strong>of</strong><br />
the clamping connector at torque<br />
8-12 Nm.<br />
• Check stability <strong>of</strong> mounting.<br />
• Hang in container on hook again and connect tubes <strong>of</strong> control unit with the<br />
container.<br />
• Fix the complete <strong>de</strong>vice at the fixation borings M6 (4 pieces) horizontally to<br />
an appropriate wall.<br />
• Assemble valve and container unit vertically<br />
by means <strong>of</strong> fixation borings<br />
Picture: Tube<br />
• Upright mounting <strong>of</strong> check valve on<br />
distributor.<br />
assembling on<br />
distributor<br />
• Connect all components with the air and<br />
fluid tubes by using the supplied screw<br />
connections and sleeve clamping rings (see<br />
picture), do not bend tubes; smallest<br />
bending radius: R 50.<br />
www.<strong>hpmtechnologie</strong>.<strong>de</strong> Stand: 04/2008 Seite – 5 –
<strong>MMKS</strong> <strong><strong>de</strong>vices</strong> <strong>of</strong> <strong>HPM</strong>, <strong>series</strong> <strong>MDJ</strong> <strong>Operating</strong> Instructions<br />
Stationary valve and container unit<br />
Common or asynchronous activation<br />
with or without level control<br />
Spray head group<br />
Tubing group<br />
• Assembly at the place <strong>of</strong> installation and connection to the pressure tube<br />
must be executed by skilled staff. Control technique and evaluation must be<br />
performed by client’s skilled staff.<br />
• Connection tubes and couplings must be appropriate for the permitted<br />
pressure and temperature range.<br />
• Start spraying <strong>de</strong>vice, adjust spray nozzles (see the corresponding <strong>Operating</strong><br />
Instructions <strong>of</strong> your spray head).<br />
Operation<br />
Avoid strong shaking or vibrations.<br />
Certain applications require operation and hazard<br />
instructions. If necessary, such information must be<br />
completed by the operator. The service staff must be<br />
instructed.<br />
Maintenance / Inspection<br />
(<strong>de</strong>pends on the applied liquid)<br />
Every four weeks at the latest:<br />
• Check and if necessary, clean the container (this must be done<br />
weekly or on a daily basis when using fluids that create waxy<br />
residues).<br />
• Check and clean the fluid circuits, if necessary (this must be<br />
done weekly or on a daily basis when using fluids that create<br />
waxy residues).<br />
www.<strong>hpmtechnologie</strong>.<strong>de</strong> Stand: 04/2008 Seite – 6 –
<strong>MMKS</strong> <strong><strong>de</strong>vices</strong> <strong>of</strong> <strong>HPM</strong>, <strong>series</strong> <strong>MDJ</strong> <strong>Operating</strong> Instructions<br />
Stationary valve and container unit<br />
Common or asynchronous activation<br />
with or without level control<br />
Spray head group<br />
Tubing group<br />
Cleaning fluid circuits:<br />
1. Empty container (with TC <strong>series</strong> loosen<br />
feed tube, empty container and rinse, if necessary),<br />
spray tubes clean with fully opened nozzles.<br />
2. Fill in cleaning liquid in container and rinse.<br />
2. Empty cleaning fluid from container and pour in<br />
spraying liquid.<br />
3. To bleed the <strong>de</strong>vice, spray with fully opened<br />
nozzles until tubes are completely bled.<br />
4. Then adjust nozzles according to the <strong>de</strong>sired quantity.<br />
Check and if necessary, clean the control unit.<br />
Cleaning <strong>of</strong> the air filter:<br />
1. Unscrew inspection glass.<br />
2. Remove filter, rinse and blow out.<br />
3. Reassemble filter and inspection glass<br />
If very dirty or damaged: replace parts ! Refer to the<br />
enclosed spare parts list.<br />
• Check all connections if they are sealed.<br />
• Check all tubes for kinks.<br />
• Check all electric cables for cable breaks.<br />
General:<br />
Only use original <strong>HPM</strong> screw connections.<br />
If the unit has not been operated for a longer<br />
period <strong>of</strong> time, the container and all components<br />
transporting liquids have to be cleaned thoroughly.<br />
Please refer to your liquid supplier for the appropriate cleaning<br />
agent.<br />
www.<strong>hpmtechnologie</strong>.<strong>de</strong> Stand: 04/2008 Seite – 7 –
<strong>MMKS</strong> <strong><strong>de</strong>vices</strong> <strong>of</strong> <strong>HPM</strong>, <strong>series</strong> <strong>MDJ</strong> <strong>Operating</strong> Instructions<br />
Stationary valve and container unit<br />
Common or asynchronous activation<br />
with or without level control<br />
Spray head group<br />
Tubing group<br />
If it doesn’t work properly<br />
Tips and tricks you can use.<br />
Liquid is not siphoned, nozzles do not spray full, round cones, nozzle “spits”:<br />
There is a sealing element missing from the nozzle (please check according to spare<br />
part list).<br />
Check tubes and tube joints for leakage (there should be no air bubbles in the liquid<br />
tubes).<br />
Check valve is blocked or damaged:<br />
Clean or replace it, do not remove it.<br />
Solid impurities have been collected between the inner (air) and outer (liquid)<br />
nozzle (cuttings, small grains, film impurities, dirt from air pressure feed line):<br />
Carefully brush insi<strong>de</strong> and outsi<strong>de</strong> surface <strong>of</strong> nozzle with cleaning agent or replace<br />
nozzle. Rinse with solvent before stoppages.<br />
In the event <strong>of</strong> frequent occurrence, fit with a flushing <strong>de</strong>vice (available as an<br />
option).<br />
Outer / inner nozzle were damaged mechanically:<br />
Nozzle must be replaced.<br />
Nozzle was bored subsequently:<br />
In this case install original nozzle.<br />
Check small filter in container:<br />
If dirty, clean or replace.<br />
www.<strong>hpmtechnologie</strong>.<strong>de</strong> Stand: 04/2008 Seite – 8 –
<strong>MMKS</strong> <strong><strong>de</strong>vices</strong> <strong>of</strong> <strong>HPM</strong>, <strong>series</strong> <strong>MDJ</strong> <strong>Operating</strong> Instructions<br />
Stationary valve and container unit<br />
Common or asynchronous activation<br />
with or without level control<br />
Spray head group<br />
Tubing group<br />
When spray air pressure is reduced, the spray jet <strong>of</strong> one nozzle subsi<strong>de</strong>s<br />
consi<strong>de</strong>rably earlier than that <strong>of</strong> the others (if using several spray heads):<br />
Solid impurities were collected between the inner (air) and outer (liquid) nozzle –<br />
carefully brush inner and outer nozzle surfaces with suitable solvent (use s<strong>of</strong>t brush).<br />
Ask your liquid supplier for a suitable solvent or cleaning agent!<br />
Air bubbles in liquid tubes, liquid runs back into container:<br />
Individual parts (such as O-ring, screw plugs, trust washer etc.) are damaged or<br />
completely missing (please check items according to spare part list).<br />
Inner nozzle was mechanically damaged - Nozzle must be replaced.<br />
Liquid <strong>de</strong>posits appear on the conical surfaces <strong>of</strong> the inner nozzle and outer<br />
nozzle (insi<strong>de</strong>):<br />
Clean with solvent and s<strong>of</strong>t brush, immerse outer nozzle in solvent if necessary, then<br />
blow through thoroughly.<br />
In such cases, always clean regularly or flush through with solvent before stoppages.<br />
Bore <strong>of</strong> outer nozzle is damaged or dirty (cuttings, <strong>de</strong>posits, etc.):<br />
Clean or replace nozzle.<br />
The spray cone is too narrow (jet formation), nozzle drops:<br />
Liquid pressure is too high – adjust at the pressure regulator.<br />
Outer nozzle is opened too far: Reduce opening.<br />
www.<strong>hpmtechnologie</strong>.<strong>de</strong> Stand: 04/2008 Seite – 9 –
<strong>MMKS</strong> <strong><strong>de</strong>vices</strong> <strong>of</strong> <strong>HPM</strong>, <strong>series</strong> <strong>MDJ</strong> <strong>Operating</strong> Instructions<br />
Stationary valve and container unit<br />
Common or asynchronous activation<br />
with or without level control<br />
Spray head group<br />
Tubing group<br />
Dripping during spraying (particularly with thicker spraying media):<br />
Change nozzle setting – reduce liquid flow and raise spray air pressure slightly.<br />
Check whether nozzle is damaged or whether the nozzle output is reduced by<br />
<strong>de</strong>posits / film formation – replace or clean nozzle.<br />
Dripping at the end <strong>of</strong> a spraying phase (particularly with thinner spraying<br />
media):<br />
Reduce liquid pressure at the pressure regulator.<br />
Fit a spring-loa<strong>de</strong>d check valve at the liquid inlet <strong>of</strong> the spray head. Or if already<br />
fitted, the valve is possibly <strong>de</strong>fective.<br />
Nozzle opened too much (max. two rotations).<br />
Device does not stop or the liquid in the container runs out completely:<br />
Put hand lever <strong>of</strong> the valves in horizontal position, activation is effected by the<br />
client’s control unit.<br />
Use vertical position <strong>of</strong> the hand lever only for maintenance work or for quantity<br />
adjustment <strong>of</strong> the nozzle.<br />
www.<strong>hpmtechnologie</strong>.<strong>de</strong> Stand: 04/2008 Seite – 10 –