User Manual
User Manual User Manual
MANIPULATING DATAADDING NEW RECORDSUse the New Record feature when you want to add a record to your database. You canadd a New Record in List View or Card View.• From the Select menu choose New Record (or press CTRL+N on your keyboard).• Enter the desired data into the fields in the New Record.BACKING UP DATAThe Backup feature in SmartAddresser 5 compresses your SmartAddresser 5 Database toa .zip format. By default, the resulting .zip file will be stored in the same directory asyour actual database. However, you can change the path and save the zipped file toanother location. The compressed file can be decompressed using WinZip or byRestoring it in SmartAddresser 5. It is not required to have any compression softwareon your computer to use the Backup and Restore features in SmartAddresser 5.Follow the steps below to create a Backup of a file:• From the File menu, choose Backup.The Backup window will appear.• If you would like to save the compressed file to a different location click theSave button.• Click Backup.62
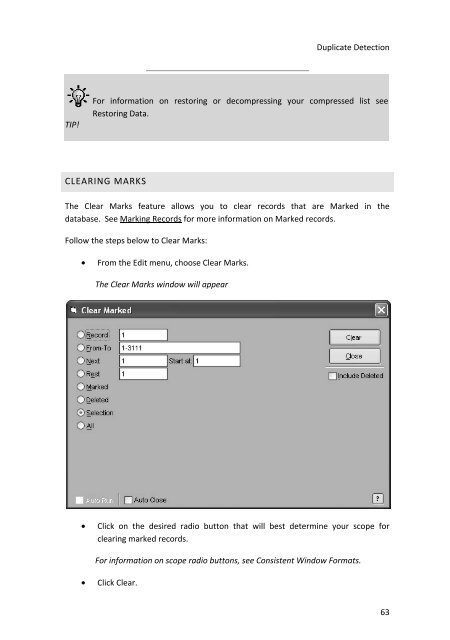
Duplicate DetectionTIP!For information on restoring or decompressing your compressed list seeRestoring Data.CLEARING MARKSThe Clear Marks feature allows you to clear records that are Marked in thedatabase. See Marking Records for more information on Marked records.Follow the steps below to Clear Marks:• From the Edit menu, choose Clear Marks.The Clear Marks window will appear• Click on the desired radio button that will best determine your scope forclearing marked records.For information on scope radio buttons, see Consistent Window Formats.• Click Clear.63
- Page 18 and 19: SmartAddresser 5TIP!SmartAddresser
- Page 20 and 21: SmartAddresser 5Once the input file
- Page 22 and 23: SmartAddresser 5you'd select the ad
- Page 24 and 25: SmartAddresser 5Check the boxes as
- Page 26 and 27: SmartAddresser 5The SmartAddresser
- Page 28 and 29: SmartAddresser 5temporarily deleted
- Page 30 and 31: SmartAddresser 5• From the Status
- Page 32 and 33: SmartAddresser 5• Click OK, and y
- Page 34 and 35: SmartAddresser 5• Click Presort,
- Page 36 and 37: SmartAddresser 5When printing tags,
- Page 38 and 39: SmartAddresser 5SMARTADDRESSER 5 SY
- Page 40 and 41: SmartAddresser 5Filter.Displays the
- Page 42 and 43: SmartAddresser 5Creates a new datab
- Page 44 and 45: SmartAddresser 5KEYBOARD SHORTCUTS
- Page 46 and 47: SmartAddresser 5OPENING A NEW LISTS
- Page 49 and 50: Duplicate DetectionTIP!You can also
- Page 51 and 52: Duplicate Detection• Select the d
- Page 53 and 54: Duplicate Detectionlocation of the
- Page 55 and 56: Duplicate Detectionusing the file n
- Page 57 and 58: Duplicate DetectionTIP!If you do no
- Page 59 and 60: Duplicate DetectionFor information
- Page 61 and 62: Follow the steps below to Export da
- Page 63 and 64: VIEWING THE DATATHE LIST VIEWThe Li
- Page 65 and 66: Duplicate DetectionUSER DEFINED SOR
- Page 67: Duplicate DetectionSORTING BY DEFAU
- Page 71 and 72: Duplicate Detection• Type a name
- Page 73 and 74: Duplicate Detectionthe appropriate
- Page 75 and 76: Duplicate Detection• Click on the
- Page 77 and 78: Duplicate DetectionThe Table Design
- Page 79 and 80: Duplicate DetectionFloat fields spe
- Page 81 and 82: Duplicate Detection• Position you
- Page 83 and 84: Duplicate Detection• Click Fill.U
- Page 85 and 86: Duplicate Detection• Select the f
- Page 87 and 88: Duplicate Detection• Click Go.Rec
- Page 89 and 90: Duplicate DetectionThe Nth Select w
- Page 91 and 92: Duplicate Detection• Click on the
- Page 93 and 94: Duplicate DetectionThe Recall windo
- Page 95 and 96: Duplicate Detection• Click on the
- Page 97 and 98: Duplicate Detection• Deliverable
- Page 99 and 100: Duplicate DetectionResize field wid
- Page 101 and 102: Duplicate DetectionCheck the desire
- Page 103 and 104: Duplicate DetectionFor more informa
- Page 105 and 106: Duplicate Detection* Creates a fiel
- Page 107 and 108: Duplicate Detection• Select the d
- Page 109 and 110: Duplicate DetectionTIP!The informat
- Page 111 and 112: Duplicate Detection• If you plan
- Page 113 and 114: DUPLICATE DETECTIONDUPLICATE DETECT
- Page 115 and 116: Duplicate DetectionOriginal* Keeps
- Page 117 and 118: Duplicate DetectionExact Match* Wil
Duplicate DetectionTIP!For information on restoring or decompressing your compressed list seeRestoring Data.CLEARING MARKSThe Clear Marks feature allows you to clear records that are Marked in thedatabase. See Marking Records for more information on Marked records.Follow the steps below to Clear Marks:• From the Edit menu, choose Clear Marks.The Clear Marks window will appear• Click on the desired radio button that will best determine your scope forclearing marked records.For information on scope radio buttons, see Consistent Window Formats.• Click Clear.63


