User Manual
User Manual User Manual
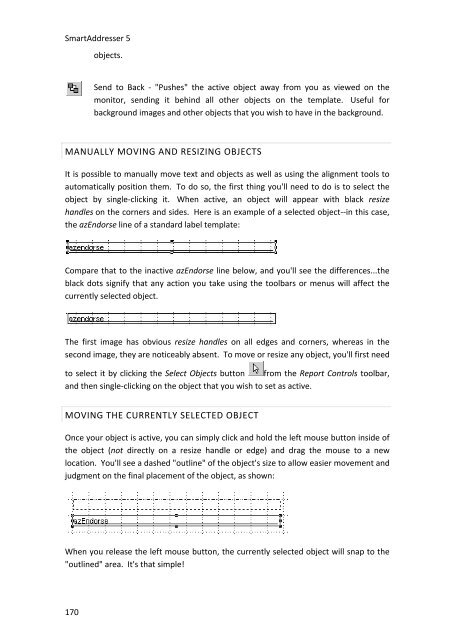
SmartAddresser 5objects.Send to Back - "Pushes" the active object away from you as viewed on themonitor, sending it behind all other objects on the template. Useful forbackground images and other objects that you wish to have in the background.MANUALLY MOVING AND RESIZING OBJECTSIt is possible to manually move text and objects as well as using the alignment tools toautomatically position them. To do so, the first thing you'll need to do is to select theobject by single-clicking it. When active, an object will appear with black resizehandles on the corners and sides. Here is an example of a selected object--in this case,the azEndorse line of a standard label template:Compare that to the inactive azEndorse line below, and you'll see the differences...theblack dots signify that any action you take using the toolbars or menus will affect thecurrently selected object.The first image has obvious resize handles on all edges and corners, whereas in thesecond image, they are noticeably absent. To move or resize any object, you'll first needto select it by clicking the Select Objects button from the Report Controls toolbar,and then single-clicking on the object that you wish to set as active.MOVING THE CURRENTLY SELECTED OBJECTOnce your object is active, you can simply click and hold the left mouse button inside ofthe object (not directly on a resize handle or edge) and drag the mouse to a newlocation. You'll see a dashed "outline" of the object's size to allow easier movement andjudgment on the final placement of the object, as shown:When you release the left mouse button, the currently selected object will snap to the"outlined" area. It's that simple!170
PrintingTIP!If you have Snap to Grid enabled from the Format menu, objects that youmove may "snap" several pixels on screen at a time. To override the Snap toGrid functionality, hold down the CTRL key on your keyboard when initiating adrag. This will move the object smoothly, ignoring any Snap to Gridsettings. For more information on Snap to Grid, refer to the Snap to Gridarea of this topic.Resizing the Currently Selected ObjectResizing an object is very similar to moving an object. The main difference is that,instead of clicking directly in the center of an object, you will click on one of the resizehandles positioned on the edges of the object. When you click the left mouse button ona resize handle and drag the mouse, the dashed "outline" will resize based on theopposite edge of the object that you have clicked on.CHANGING OBJECT ATTRIBUTES - THE FORMAT MENUAll of the buttons in the Layout toolbar are also available under the Format menu. TheFormat menu also includes functions for the grouping and ungrouping of objects, theSnap to Grid feature, setting the Grid Scale, adjusting the font, and adjusting textalignment. Menu items that are not also found in the Layout toolbar are described indetail below:Horizontal Spacing - The Horizontal Spacing selection allows you to adjust thehorizontal spacing between multiple objects with a single click. Spacing may beincreased, decreased, or made equal between all objects from the sub-menu.Vertical Spacing - The Vertical Spacing selection allows you to adjust the vertical spacingbetween multiple objects with a single click. Spacing may be increased, decreased, ormade equal between all objects from the sub-menu.Group - Group joins multiple selected objects so that they can be manipulated as asingle object. If, for example, you have more than one object selected, you can chooseGroup from the Format menu. This will allow the objects to be positioned, cut, andpasted as if all objects in the group were a single object. You cannot change the fontsize or change the color of grouped objects.Ungroup - Ungroup separates previously grouped objects so that they may bemanipulated individually.Snap to Grid - Snap to Grid is the default setting for every template in the Label andReport Designer. When this option is checked within the Format menu, an invisiblealignment grid is toggled on so that objects are automatically aligned to the nearest grid171
- Page 125 and 126: Searching and Querying DataCREATING
- Page 127: Searching and Querying Data• Type
- Page 130 and 131: SmartAddresser 5Piece SetupThe Clas
- Page 132 and 133: SmartAddresser 5Calculator indicati
- Page 134 and 135: SmartAddresser 5Container Setup128p
- Page 136 and 137: SmartAddresser 5Check the Include C
- Page 138 and 139: SmartAddresser 5The Prepare in Reve
- Page 140 and 141: PrintingPRINTINGPRINTING ADDRESS LA
- Page 142 and 143: SmartAddresser 5Opens the Label Des
- Page 144 and 145: SmartAddresser 5PRINTING CONTAINER
- Page 146 and 147: SmartAddresser 5EDITING LABEL AND R
- Page 148 and 149: SmartAddresser 5Using the column se
- Page 150 and 151: SmartAddresser 5After selecting you
- Page 152 and 153: SmartAddresser 5Since you already k
- Page 154 and 155: SmartAddresser 5Next we'll add the
- Page 156 and 157: SmartAddresser 5Close the Preview a
- Page 158 and 159: SmartAddresser 5endorsement, name,
- Page 160 and 161: SmartAddresser 5Adjust the Page Set
- Page 162 and 163: SmartAddresser 5This area of the Pa
- Page 164 and 165: SmartAddresser 5Click OK to close t
- Page 166 and 167: SmartAddresser 5type. Furthermore,
- Page 168 and 169: SmartAddresser 5first,lastaddressci
- Page 170 and 171: SmartAddresser 5the field name. Whe
- Page 172 and 173: SmartAddresser 5Choose the appropri
- Page 174 and 175: SmartAddresser 5You can see the too
- Page 178 and 179: SmartAddresser 5line when they are
- Page 180 and 181: SmartAddresser 5Have a repetitive j
- Page 182 and 183: SmartAddresser 5Deletes the current
- Page 184 and 185: SmartAddresser 5With the Scripts Wi
- Page 186 and 187: SmartAddresser 5Click on the open b
- Page 188 and 189: SmartAddresser 5Click the "Auto" ch
- Page 190 and 191: SmartAddresser 5We're halfway there
- Page 192 and 193: SmartAddresser 5Click the Save butt
- Page 194 and 195: SmartAddresser 5Congratulations, yo
- Page 196 and 197: PROPERTIESDICTIONARIESA.K.A. Dictio
- Page 198 and 199: SmartAddresser 5If you recognize a
- Page 200 and 201: SmartAddresser 5The next time you p
- Page 202 and 203: SmartAddresser 5FOLDERS PROPERTIES
- Page 204 and 205: SmartAddresser 5• Click on the Ed
- Page 206 and 207: SmartAddresser 5None* Displays a gr
- Page 208 and 209: SmartAddresser 5Suffix* Punctuates
- Page 210 and 211: SmartAddresser 5• Click OK.204
- Page 213 and 214: CONTACT AND SUPPORT INFORMATIONTECH
- Page 215 and 216: LICENSE AGREEMENT AND COPYRIGHTSSMA
- Page 217 and 218: License Agreement and Copyrightsthe
- Page 219 and 220: APPENDIXSMARTADDRESSER 5 DEFAULT FI
- Page 221 and 222: department Character 50 Contact Dep
- Page 223 and 224: ozipcode Character 10 Original Zip
- Page 225 and 226: PPO Box RecordRRural Route RecordSS
SmartAddresser 5objects.Send to Back - "Pushes" the active object away from you as viewed on themonitor, sending it behind all other objects on the template. Useful forbackground images and other objects that you wish to have in the background.MANUALLY MOVING AND RESIZING OBJECTSIt is possible to manually move text and objects as well as using the alignment tools toautomatically position them. To do so, the first thing you'll need to do is to select theobject by single-clicking it. When active, an object will appear with black resizehandles on the corners and sides. Here is an example of a selected object--in this case,the azEndorse line of a standard label template:Compare that to the inactive azEndorse line below, and you'll see the differences...theblack dots signify that any action you take using the toolbars or menus will affect thecurrently selected object.The first image has obvious resize handles on all edges and corners, whereas in thesecond image, they are noticeably absent. To move or resize any object, you'll first needto select it by clicking the Select Objects button from the Report Controls toolbar,and then single-clicking on the object that you wish to set as active.MOVING THE CURRENTLY SELECTED OBJECTOnce your object is active, you can simply click and hold the left mouse button inside ofthe object (not directly on a resize handle or edge) and drag the mouse to a newlocation. You'll see a dashed "outline" of the object's size to allow easier movement andjudgment on the final placement of the object, as shown:When you release the left mouse button, the currently selected object will snap to the"outlined" area. It's that simple!170


