User Manual
User Manual User Manual
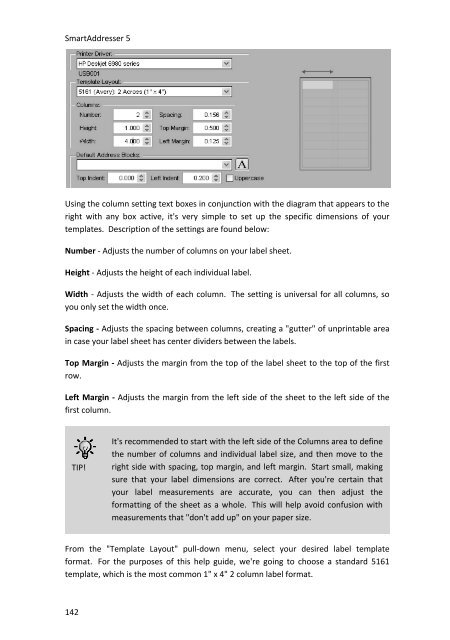
SmartAddresser 5Using the column setting text boxes in conjunction with the diagram that appears to theright with any box active, it's very simple to set up the specific dimensions of yourtemplates. Description of the settings are found below:Number - Adjusts the number of columns on your label sheet.Height - Adjusts the height of each individual label.Width - Adjusts the width of each column. The setting is universal for all columns, soyou only set the width once.Spacing - Adjusts the spacing between columns, creating a "gutter" of unprintable areain case your label sheet has center dividers between the labels.Top Margin - Adjusts the margin from the top of the label sheet to the top of the firstrow.Left Margin - Adjusts the margin from the left side of the sheet to the left side of thefirst column.TIP!It's recommended to start with the left side of the Columns area to definethe number of columns and individual label size, and then move to theright side with spacing, top margin, and left margin. Start small, makingsure that your label dimensions are correct. After you're certain thatyour label measurements are accurate, you can then adjust theformatting of the sheet as a whole. This will help avoid confusion withmeasurements that "don't add up" on your paper size.From the "Template Layout" pull-down menu, select your desired label templateformat. For the purposes of this help guide, we're going to choose a standard 5161template, which is the most common 1" x 4" 2 column label format.142
PrintingAfter choosing your template, you'll notice the Columns section updates with theappropriate information. You can modify the settings as you see fit. The pre-createdAvery Label equivalents that are generated by default, however, will already have thecorrect column settings.DEFAULT ADDRESS BLOCK CREATIONCreating one of the standard address blocks within the Label Layout Assistant couldn'tbe easier. Choose your font, the pre-created address block of your choice, and that's allthere is to it! You can even modify the information after it's placed into the Mail MergeFields area to create a customized version of the default address blocks. Follow theinstructions below to create a basic address block:In the Default Address Blocks area, click on the Font buttonwill appear.. The fonts windowIf you desire a specific font, select it from the Font list. Choose the desired font styleand size, and then click OK.From the Default Address Blocks pull-down menu, choose your desired Addressblock. Descriptions of the address blocks are found below:Basic Address Block - Creates a simple, 3-line address block with First and Last, Address,and City-St-Zip. Useful for non-barcoded First Class Single Piece Labels for a residentiallist.Address Block with Company - Creates a 4-line address block with First and Last,Company, Address, and City-St-Zip. Useful for non-barcoded First Class Single PieceLabels for a commercial list.Address Block with Endorsement - Creates a 5-line address block with Endorse, Firstand Last, Company, Address, and City-St-Zip. A standard non-automation label for manyclasses of mail.Address Block with Barcode - Creates a 5-line address block with Barcode, First andLast, Company, Address, and City-St-Zip.Address Block with Endorsement & Barcode - Creates a 6-line address block withBarcode, Endorse, First and Last, Company, Address, and City-St-Zip.My Address Block - After modifying any address block settings, you can select thisoption to save it as the default "custom" address block, which can be recalled any timein the future by selecting My Address Block in the Label Layout Assistant.143
- Page 97 and 98: Duplicate Detection• Deliverable
- Page 99 and 100: Duplicate DetectionResize field wid
- Page 101 and 102: Duplicate DetectionCheck the desire
- Page 103 and 104: Duplicate DetectionFor more informa
- Page 105 and 106: Duplicate Detection* Creates a fiel
- Page 107 and 108: Duplicate Detection• Select the d
- Page 109 and 110: Duplicate DetectionTIP!The informat
- Page 111 and 112: Duplicate Detection• If you plan
- Page 113 and 114: DUPLICATE DETECTIONDUPLICATE DETECT
- Page 115 and 116: Duplicate DetectionOriginal* Keeps
- Page 117 and 118: Duplicate DetectionExact Match* Wil
- Page 119 and 120: SEARCHING AND QUERYING DATABASIC SE
- Page 121 and 122: Searching and Querying Data• Sele
- Page 123 and 124: Searching and Querying DataTIP!When
- Page 125 and 126: Searching and Querying DataCREATING
- Page 127: Searching and Querying Data• Type
- Page 130 and 131: SmartAddresser 5Piece SetupThe Clas
- Page 132 and 133: SmartAddresser 5Calculator indicati
- Page 134 and 135: SmartAddresser 5Container Setup128p
- Page 136 and 137: SmartAddresser 5Check the Include C
- Page 138 and 139: SmartAddresser 5The Prepare in Reve
- Page 140 and 141: PrintingPRINTINGPRINTING ADDRESS LA
- Page 142 and 143: SmartAddresser 5Opens the Label Des
- Page 144 and 145: SmartAddresser 5PRINTING CONTAINER
- Page 146 and 147: SmartAddresser 5EDITING LABEL AND R
- Page 150 and 151: SmartAddresser 5After selecting you
- Page 152 and 153: SmartAddresser 5Since you already k
- Page 154 and 155: SmartAddresser 5Next we'll add the
- Page 156 and 157: SmartAddresser 5Close the Preview a
- Page 158 and 159: SmartAddresser 5endorsement, name,
- Page 160 and 161: SmartAddresser 5Adjust the Page Set
- Page 162 and 163: SmartAddresser 5This area of the Pa
- Page 164 and 165: SmartAddresser 5Click OK to close t
- Page 166 and 167: SmartAddresser 5type. Furthermore,
- Page 168 and 169: SmartAddresser 5first,lastaddressci
- Page 170 and 171: SmartAddresser 5the field name. Whe
- Page 172 and 173: SmartAddresser 5Choose the appropri
- Page 174 and 175: SmartAddresser 5You can see the too
- Page 176 and 177: SmartAddresser 5objects.Send to Bac
- Page 178 and 179: SmartAddresser 5line when they are
- Page 180 and 181: SmartAddresser 5Have a repetitive j
- Page 182 and 183: SmartAddresser 5Deletes the current
- Page 184 and 185: SmartAddresser 5With the Scripts Wi
- Page 186 and 187: SmartAddresser 5Click on the open b
- Page 188 and 189: SmartAddresser 5Click the "Auto" ch
- Page 190 and 191: SmartAddresser 5We're halfway there
- Page 192 and 193: SmartAddresser 5Click the Save butt
- Page 194 and 195: SmartAddresser 5Congratulations, yo
- Page 196 and 197: PROPERTIESDICTIONARIESA.K.A. Dictio
SmartAddresser 5Using the column setting text boxes in conjunction with the diagram that appears to theright with any box active, it's very simple to set up the specific dimensions of yourtemplates. Description of the settings are found below:Number - Adjusts the number of columns on your label sheet.Height - Adjusts the height of each individual label.Width - Adjusts the width of each column. The setting is universal for all columns, soyou only set the width once.Spacing - Adjusts the spacing between columns, creating a "gutter" of unprintable areain case your label sheet has center dividers between the labels.Top Margin - Adjusts the margin from the top of the label sheet to the top of the firstrow.Left Margin - Adjusts the margin from the left side of the sheet to the left side of thefirst column.TIP!It's recommended to start with the left side of the Columns area to definethe number of columns and individual label size, and then move to theright side with spacing, top margin, and left margin. Start small, makingsure that your label dimensions are correct. After you're certain thatyour label measurements are accurate, you can then adjust theformatting of the sheet as a whole. This will help avoid confusion withmeasurements that "don't add up" on your paper size.From the "Template Layout" pull-down menu, select your desired label templateformat. For the purposes of this help guide, we're going to choose a standard 5161template, which is the most common 1" x 4" 2 column label format.142


