User Manual
User Manual User Manual
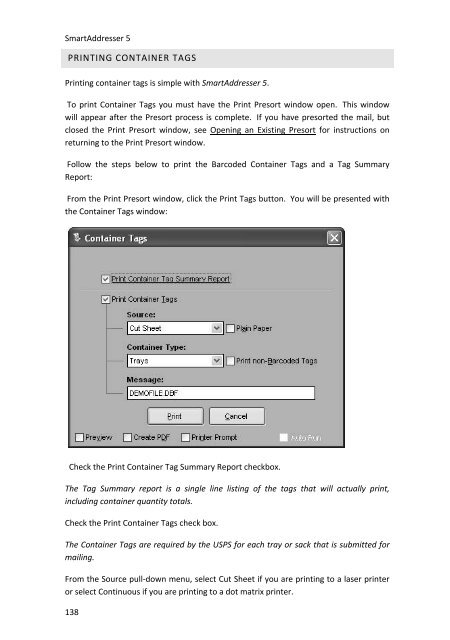
SmartAddresser 5PRINTING CONTAINER TAGSPrinting container tags is simple with SmartAddresser 5.To print Container Tags you must have the Print Presort window open. This windowwill appear after the Presort process is complete. If you have presorted the mail, butclosed the Print Presort window, see Opening an Existing Presort for instructions onreturning to the Print Presort window.Follow the steps below to print the Barcoded Container Tags and a Tag SummaryReport:From the Print Presort window, click the Print Tags button. You will be presented withthe Container Tags window:Check the Print Container Tag Summary Report checkbox.The Tag Summary report is a single line listing of the tags that will actually print,including container quantity totals.Check the Print Container Tags check box.The Container Tags are required by the USPS for each tray or sack that is submitted formailing.From the Source pull-down menu, select Cut Sheet if you are printing to a laser printeror select Continuous if you are printing to a dot matrix printer.138
PrintingIf you're printing the container tags on plain paper and require guide lines to be printedfor cutting, check the "Plain Paper" box. If you do not require guides to be printed, donot check the box.From the Container Type pop-up, select Trays for letter size mailings, and Sacks for flatsize mailings. For First Class flat size mailings, select Trays.For printing Barcoded container tags, leave the "Print non-Barcoded Tags" boxunchecked. For non-automation mailings that require non-barcoded container tags,check the box.Click Print.The Container Tag Summary Report will print first followed by the Container Tags. Youwill be prompted to switch paper stock before the Container Tags print.You also have several other options available on the Container Tags window. They arenoted below:Preview - Checking the preview box and clicking the Print button will show you thepreview pane, without actually sending any data to the default printer. This will allowyou to view the tag content without physically printing it. You can use the previewcontrol bar to then print the tags or switch between pages as desired.Create PDF - Checking the Create PDF box will generate a file called "eTags.pdf" in yourPresort Folder location. To easily access the presort directory, close the Tags windowand go back to the Print Presort window. You'll see the line for the Presort Path is alink. Click the link to easily open the presort folder location, where you'll find theeTags.pdf file:Printer Prompt - Checking Printer Prompt will allow you to send the Container Tags to adifferent printer than your default driver. SmartAddresser 5 5.0 prints all reports andtags to the default printer automatically, but the Printer Prompt checkbox allows you toredirect the documents as they are printed.139
- Page 93 and 94: Duplicate DetectionThe Recall windo
- Page 95 and 96: Duplicate Detection• Click on the
- Page 97 and 98: Duplicate Detection• Deliverable
- Page 99 and 100: Duplicate DetectionResize field wid
- Page 101 and 102: Duplicate DetectionCheck the desire
- Page 103 and 104: Duplicate DetectionFor more informa
- Page 105 and 106: Duplicate Detection* Creates a fiel
- Page 107 and 108: Duplicate Detection• Select the d
- Page 109 and 110: Duplicate DetectionTIP!The informat
- Page 111 and 112: Duplicate Detection• If you plan
- Page 113 and 114: DUPLICATE DETECTIONDUPLICATE DETECT
- Page 115 and 116: Duplicate DetectionOriginal* Keeps
- Page 117 and 118: Duplicate DetectionExact Match* Wil
- Page 119 and 120: SEARCHING AND QUERYING DATABASIC SE
- Page 121 and 122: Searching and Querying Data• Sele
- Page 123 and 124: Searching and Querying DataTIP!When
- Page 125 and 126: Searching and Querying DataCREATING
- Page 127: Searching and Querying Data• Type
- Page 130 and 131: SmartAddresser 5Piece SetupThe Clas
- Page 132 and 133: SmartAddresser 5Calculator indicati
- Page 134 and 135: SmartAddresser 5Container Setup128p
- Page 136 and 137: SmartAddresser 5Check the Include C
- Page 138 and 139: SmartAddresser 5The Prepare in Reve
- Page 140 and 141: PrintingPRINTINGPRINTING ADDRESS LA
- Page 142 and 143: SmartAddresser 5Opens the Label Des
- Page 146 and 147: SmartAddresser 5EDITING LABEL AND R
- Page 148 and 149: SmartAddresser 5Using the column se
- Page 150 and 151: SmartAddresser 5After selecting you
- Page 152 and 153: SmartAddresser 5Since you already k
- Page 154 and 155: SmartAddresser 5Next we'll add the
- Page 156 and 157: SmartAddresser 5Close the Preview a
- Page 158 and 159: SmartAddresser 5endorsement, name,
- Page 160 and 161: SmartAddresser 5Adjust the Page Set
- Page 162 and 163: SmartAddresser 5This area of the Pa
- Page 164 and 165: SmartAddresser 5Click OK to close t
- Page 166 and 167: SmartAddresser 5type. Furthermore,
- Page 168 and 169: SmartAddresser 5first,lastaddressci
- Page 170 and 171: SmartAddresser 5the field name. Whe
- Page 172 and 173: SmartAddresser 5Choose the appropri
- Page 174 and 175: SmartAddresser 5You can see the too
- Page 176 and 177: SmartAddresser 5objects.Send to Bac
- Page 178 and 179: SmartAddresser 5line when they are
- Page 180 and 181: SmartAddresser 5Have a repetitive j
- Page 182 and 183: SmartAddresser 5Deletes the current
- Page 184 and 185: SmartAddresser 5With the Scripts Wi
- Page 186 and 187: SmartAddresser 5Click on the open b
- Page 188 and 189: SmartAddresser 5Click the "Auto" ch
- Page 190 and 191: SmartAddresser 5We're halfway there
- Page 192 and 193: SmartAddresser 5Click the Save butt
SmartAddresser 5PRINTING CONTAINER TAGSPrinting container tags is simple with SmartAddresser 5.To print Container Tags you must have the Print Presort window open. This windowwill appear after the Presort process is complete. If you have presorted the mail, butclosed the Print Presort window, see Opening an Existing Presort for instructions onreturning to the Print Presort window.Follow the steps below to print the Barcoded Container Tags and a Tag SummaryReport:From the Print Presort window, click the Print Tags button. You will be presented withthe Container Tags window:Check the Print Container Tag Summary Report checkbox.The Tag Summary report is a single line listing of the tags that will actually print,including container quantity totals.Check the Print Container Tags check box.The Container Tags are required by the USPS for each tray or sack that is submitted formailing.From the Source pull-down menu, select Cut Sheet if you are printing to a laser printeror select Continuous if you are printing to a dot matrix printer.138


