

Global Service Way - Technical Information
Global Service Way - Technical Information
Global Service Way - Technical Information

You also want an ePaper? Increase the reach of your titles
YUMPU automatically turns print PDFs into web optimized ePapers that Google loves.
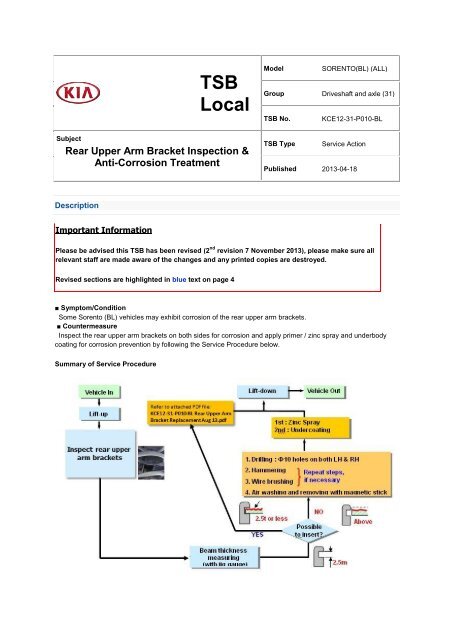
TSBLocalSubjectRear Upper Arm Bracket Inspection &Anti-Corrosion TreatmentModelSORENTO(BL) (ALL)Group Driveshaft and axle (31)TSB No. KCE12-31-P010-BLTSB Type <strong>Service</strong> ActionPublished 2013-04-18DescriptionImportant <strong>Information</strong>Please be advised this TSB has been revised (2 nd revision 7 November 2013), please make sure allrelevant staff are made aware of the changes and any printed copies are destroyed.Revised sections are highlighted in blue text on page 4■ Symptom/ConditionSome Sorento (BL) vehicles may exhibit corrosion of the rear upper arm brackets.■ CountermeasureInspect the rear upper arm brackets on both sides for corrosion and apply primer / zinc spray and underbodycoating for corrosion prevention by following the <strong>Service</strong> Procedure below.Summary of <strong>Service</strong> Procedure
<strong>Service</strong> ProcedureNOTEBefore conducting the procedure, verify that the vehicle is included in the attached VIN list.REAR UPPER ARM BRACKET INSPECTION1.Lift up the vehicle to check if the rear upper armbrackets (A) corroded.2.Lightly hit the left rear upper arm bracket (B) with ahammer to remove some rust and dust.CAUTIONBe careful NOT to strike the rear upper armbracket too hard to prevent it from being damaged.
3.Check the thickness of the upper armbrackets at as many points as possible using thethickness gauge. Check the upper arm bracketbeam with the 2.5mm groove (C) of the thicknessgauge where the arrows indicate in the picture(picture shows axle removed from vehicle,however thickness can be checked in situ)4. Repeat steps 2 and 3 for the right rear upperarm bracket.IMPORTANT NOTE:If the rear upper arm beam does not fit into the thickness gauge proceed withthe Rear Axle Casing Undercoating procedure detailed below.If the rear upper arm beam does fit into the 2.5mm groove on the thicknessgauge, refer to the PDF file attached to the GSW TSB titled “KCE12-31-P010-BL Rear Upper Arm Bracket Replacement November 13”.REAR AXLE CASING UNDERCOATING1. Remove the lateral rod (A). This provides morespace to carry out this procedure.Tightening torque:187~215 N.m (18.7~21.5 kgf.m, 135~155 Ib.ft)
2. Remove rust and dust from the rear axlecasing by following the detailed proceduresbelow.WARNINGMake sure to wear protective glasses to avoidany foreign material getting in eyes.1) Lightly hit the rear axle casing (B) throughoutwith a hammer. Be sure to beat the front of therear axle casing (C).CAUTIONBe careful NOT to strike the rear axlecasing too hard to prevent it from being damaged.2) Remove rust and dust by rubbing rear upperarm welding (D), rear lower arm mounting (F) andthe differential housing area (E) with a wire brush.
3) Use an air blow gun to blow off debris and dirtfrom around these areas.4) Drill holes (G) 10mm in diameter on the lower of the rear side of the left rear upper arm bracket as indicatedin the below picture.CAUTIONBe careful not to damage the rear axle casing.# The position of holes on the rear upper arm bracketFrontRearRearFrontFrontRearRearFront
5) Using a magnetic stick (H) remove rust insidethe left rear upper arm bracket.6) Using an air blow gun (J) remove rustand debris from inside the left rear upper armbracket.3. Repeat steps 4) through 6) for the rightrear upper arm bracket.
4. Apply primer ( Zinc spray).1) Sufficiently apply primer on the welded areas(K) of the right and left rear of left upper armsbrackets.NOTEIt takes 5 minutes for primer to dry.2) Sufficiently apply primer/zinc spray on thedifferential housing (L) of the axle casing on therubbed down areas.3) Sufficiently apply primer into the space (M)between the lower arm mounting and rear axlecasing on both sides.
4. Apply undercoating.CAUTIONMake sure to use one can of undercoating pervehicle.1) Sufficiently spray undercoating on the outsideof the left rear upper arm bracket (N).2) Spray undercoating on the inside of the leftrear upper arm bracket through the upper armbracket holes (O).3) Repeat step 1) and 2) for the right rearupper arm bracket.4) Spray undercoating on the rear axle casing (P)throughout as shown in photo.
5. Reinstall the lateral rod.Tightening torque:187~215 N.m (18.7~21.5 kgf.m, 135~155 Ib.ft)Operation Code And timeOP CODE OP NAME OP TIME SUBLET VALUE120026R0Rear Upper Arm Bracket Inspection andrear axle casing undercoating(Dealers thickness gauge used)0.7 M/H £14.65NoteFor first ever claim per dealer please use OP Code 120026R2. This OP Code will reimburse the dealer forthe cost of purchasing the thickness gauge.For subsequent claims use OP Code 120026R0A sublet value of £14.64 must be entered on every claim to cover the cost of the Zinc spray (Two repairsper can) and under coating (One can per car)