How to refill “Cartridge Refillable 207 bar Alu / empty ... - Mammut
How to refill “Cartridge Refillable 207 bar Alu / empty ... - Mammut
How to refill “Cartridge Refillable 207 bar Alu / empty ... - Mammut

Create successful ePaper yourself
Turn your PDF publications into a flip-book with our unique Google optimized e-Paper software.
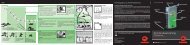
05 Carefully place the valve body of the cartridge in a benchvise. Use rubber or aluminum vise jaws <strong>to</strong> protect the cartridgefrom damage. Ensure that you clamp the cartridge at theValve Body and not by the cartridge body or the gauge.06 Remove the protective cap and connec<strong>to</strong>r. The connec<strong>to</strong>rcan be removed using a wrench (20 mm or 13/16 inch). Thereare two different size connec<strong>to</strong>rs that may be encountered.Both versions will fit a 13/16" spark plug socket, but the fit isoften very snug.07 Once the connec<strong>to</strong>r is removed you will find two itemson the valve (1× gasket ring and 1× burst disc).Discard bothitems, making sure that none are stuck inside the connec<strong>to</strong>r.08 Replace these two items (see illustration). On <strong>to</strong>p of thethreaded Valve End, place a gasket ring and then a burstdisc. Always install these items in the correct order (burstdisc on <strong>to</strong>p of gasket ring as shown). Mistaken use of twoburst discs could result in the airbag not inflation, sotake extra care!09 Screw the connec<strong>to</strong>r on<strong>to</strong> the Cartridge. If using a <strong>to</strong>rquewrench the connec<strong>to</strong>r must be tightened <strong>to</strong> the proper <strong>to</strong>rquesetting (see illustration). The correct <strong>to</strong>rque <strong>to</strong> tighten theconnec<strong>to</strong>r is 24 Nm (17 ft-pd or 212.4 in-lb). Less <strong>to</strong>rque canlead <strong>to</strong> leakage, excessive <strong>to</strong>rque can damage the cartridge.If a <strong>to</strong>rque wrench is not used a submersion leak-test mustbe performed after filling.05 Den Ventilkörper der Kartusche vorsichtig in einenSchraubs<strong>to</strong>ck platzieren. Schraubs<strong>to</strong>ckbacken aus Gummioder <strong>Alu</strong>minium verwenden, um die Kartusche nicht zubeschädigen. Darauf achten, dass die Kartusche amVentilkörper und nicht am Kartuschenkörper oder an derDruckanzeige eingeklemmt wird.06 Schutzkappe und Verbindungsstück abnehmen. DasVerbindungsstück kann mit einem Schraubenschlüssel(20 mm bzw. 13/16") entfernt werden. Es gibt zwei verschiedeneVerbindungsstückgrössen. Beide passen in einen20-mm-Kerzenstutzen (13/16"), sitzen aber oft sehr eng.07 Wenn das Verbindungsstück entfernt wurde, sind zweiTeile auf dem Ventil zu sehen (1 Dichtungsring und 1 Abdeckplättchen).Beide Teile abnehmen und darauf achten,dass kein Teil im Verbindungsstück klemmt.08 Die beiden Teile ersetzen (siehe Abbildung). Auf das Ventilendemit dem Gewinde oben einen Dichtungsring und dannein Abdeckplättchen aufsetzen. Die beiden Teile immer in derrichtigen Reihenfolge aufsetzen (Abdeckplättchen auf denDichtungsring, siehe Abbildung). Achtung: Ein versehentlichesEinsetzen zweier Abdeckplättchen könnte dazuführen, dass der Airbag nicht ausgelöst wird.09 Verbindungsstück auf die Kartusche schrauben. Wennein Drehmomentschlüssel verwendet wird, muss dasVerbindungsstück auf den richtigen Drehmomentwert festgezogenwerden (siehe Abbildung). Das korrekte Drehmomentfür das Anziehen des Verbindungsstücks ist 24 Nm (17 ft-lbbzw. 212,4 in-lb). Ein geringeres Drehmoment kann dazuführen, dass die Kartusche leckt, ein zu hohes Drehmomentkann sie beschädigen. Wenn kein Drehmomentschlüsselverwendet wird, muss nach dem Befüllen ein Dichtigkeitstestdurchgeführt werden.05 Placez avec précaution le corps de soupape de la car<strong>to</strong>uchedans un étau d’établi. Utilisez des mâchoires d’étauen caoutchouc ou en aluminium pour ne pas endommagerla car<strong>to</strong>uche. Veillez à serrer la car<strong>to</strong>uche au niveau du corpsde soupape et non pas du corps de la car<strong>to</strong>uche ou de lajauge.06 Ôtez le bouchon de protection et le connecteur. Leconnecteur peut être enlevé à l’aide d’une clé à molette(20 mm ou 13/16"). Il existe deux tailles de connecteurs quevous êtes susceptible de trouver. Les deux versions s’adaptentà une douille de bougie de 20 mm (13/16"), mais cetteadaptation est souvent très juste.07 Une fois le connecteur ôté, vous trouverez deux élémentssur la soupape (1joint et 1disque de rupture). Enlevez cesdeux éléments en vous assurant qu’aucun d’eux n’est coincéà l’intérieur du connecteur.08 Replacez ces deux éléments (cf. illustration). À l’extrémitéde la soupape filetée, placez un joint, puis un disque derupture. Placez <strong>to</strong>ujours ces éléments dans le bon ordre (ledisque de rupture sur le joint comme indiqué sur le schéma).En cas d’utilisation incorrecte de deux disques derupture, l’airbag risque de ne pas se gonfler, faitesdonc très attention !09 Vissez le connecteur sur la car<strong>to</strong>uche. Si vous utilisez uneclé dynamométrique, le connecteur doit être serré à l’aidedu couple de serrage adapté (cf. illustration). Le serrageadapté pour le connecteur est de 24 Nm (17 ft-lb ou 212,4in-lb). Un serrage insuffisant peut conduire à une fuite, unserrage excessif peut endommager la car<strong>to</strong>uche. Si vousn’utilisez pas de clé dynamométrique, un test d’étanchéitépar submersion doit être réalisé après le remplissage.05 060709080BLUEGREENRED0Torque = 24 Nm(212 in/lb)BLUEGREENRED