INSTALLATION INSTRUCTIONS OF BAY/BOW FRAME ... - Pella.com
INSTALLATION INSTRUCTIONS OF BAY/BOW FRAME ... - Pella.com
INSTALLATION INSTRUCTIONS OF BAY/BOW FRAME ... - Pella.com

Create successful ePaper yourself
Turn your PDF publications into a flip-book with our unique Google optimized e-Paper software.
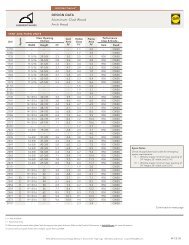
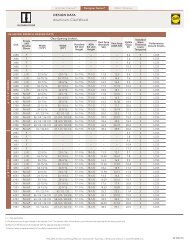
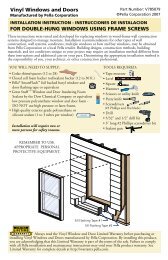
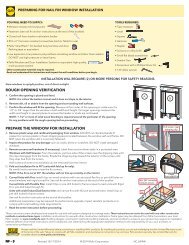
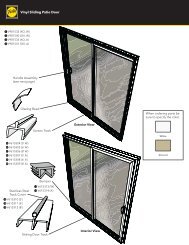
10 INTERIOR CASING/TRIM <strong>INSTALLATION</strong>Note: Interior casing/trim is sent cut to length. Dry fit all the trim pieces to confirm the correctlength before attaching with 1" brads/finishing nails. If trim pieces are too long they may betrimmed, if they are too short, trim will need to be re-ordered.A. Attach sill trim piece first. (Sill trim piece is notched tofit over the sill pan edge). Attach with finishing nails.B. Attach jamb pieces on both sides of the window.Attach with finishing nails.C. Attach head trim with finishing nails.D. Repeat A-C on all windows in the bay/bow frame.INSTALLING ROTO COVER AND CRANKA. Place the cover over the operator stud andsnap into place.B. Apply pressure to the pocket end of thecover and snap into place.C. Use a medium size flat-blade screwdriver toloosen the set screw in the crank handle.D. Slide the crank handle onto the stud. Unlock,open window, then close and lock window.E. Fold the crank handle down and checkalignment of knob with the pocket.Note: You may need to adjust the crankposition on the stud until the correctalignment is achieved.F. Open the crank and tighten the set screw.G. After the final installation, fold the crank overand snap the knob into the pocket.Note: Even with the window open the crankcan be folded to avoid interfering with thewindow treatments.