TABLE OF CONTENTS
TABLE OF CONTENTS
TABLE OF CONTENTS

Create successful ePaper yourself
Turn your PDF publications into a flip-book with our unique Google optimized e-Paper software.
<strong>TABLE</strong> <strong>OF</strong> <strong>CONTENTS</strong>1.0 INTRODUCTION .........................................................11.1 SYSTEM COVERAGE ...............................................11.2 SIX-STEP TROUBLESHOOTING PROCEDURE ..........................12.0 IDENTIFICATION <strong>OF</strong> SYSTEM .............................................13.0 SYSTEM DESCRIPTION AND FUNCTIONAL OPERATION ......................13.1 AIRBAG SYSTEM/OCCUPANT RESTRAINT CONTROLLER SYSTEM ........23.1.1 DRIVER AIRBAG. ...........................................23.1.2 CLOCKSPRING. ............................................43.1.3 PASSENGER AIRBAGS ......................................43.1.4 SEAT BELT SWITCHES (SBS). ................................53.1.5 CURTAIN AIRBAGS .........................................53.1.6 FRONT IMPACT SENSOR ....................................53.1.7 SIDE IMPACT SENSOR ......................................63.1.8 SPECIAL TOOLS. ...........................................63.1.9 DIAGNOSTIC TROUBLE CODES ..............................63.1.9.1 ACTIVE CODES ............................................63.1.9.2 STORED CODES ...........................................63.2 AUDIO SYSTEM ....................................................73.2.1 REMOTE RADIO CONTROLS .................................73.2.2 CD CHANGER. .............................................73.3 HEATING & A/C SYSTEM ............................................73.3.1 SYSTEM AVAILABILITY ......................................73.3.2 SYSTEM CONTROLS. .......................................73.3.3 SYSTEM REVISIONS ........................................83.3.4 SYSTEM DIAGNOSTICS (MTC) ...............................83.3.5 SYSTEM DIAGNOSTICS (AZC). ...............................83.3.6 FOLLOWING A REPAIR (AZC). ................................93.4 BODY CONTROL MODULE ...........................................93.5 CHIME SYSTEM ...................................................103.5.1 MIC REQUESTED CHIME MESSAGES ........................103.5.2 BCM INITIATED CHIME MESSAGES ..........................103.5.3 EVIC CHIME REQUESTED MESSAGES .......................103.5.4 SENTRY KEY IMMOBILIZER SYSTEM. ........................103.6 DOOR AJAR SYSTEM ..............................................113.7 DOOR MODULES ..................................................113.7.1 POWER WINDOWS ........................................113.7.2 POWER DOOR LOCKS .....................................113.7.3 DOOR LOCK INHIBIT .......................................113.7.4 REMOTE KEYLESS ENTRY .................................113.7.4.1 PANIC FUNCTION. .........................................113.7.5 ROLLING CODE ...........................................123.7.6 PROGRAMMABLE DOOR LOCK FEATURES ...................123.8 ELECTRONIC VEHICLE INFORMATION CENTER .......................123.8.1 VEHICLE INFORMATION DISPLAY. ...........................123.8.2 STEP BUTTON ............................................133.8.3 MENU BUTTON ...........................................133.8.4 RESET BUTTON ...........................................133.8.5 COMPASS/TEMPERATURE (C/T) BUTTON .....................133.8.6 TRAVELER DISPLAY FUNCTIONS ............................13i
<strong>TABLE</strong> <strong>OF</strong> <strong>CONTENTS</strong> - Continued3.8.7 COMPASS/TEMPERATURE. .................................133.8.8 COMPASS OPERATION. ....................................143.8.9 SETTING MAGNETIC ZONE VARIANCE .......................143.8.10 COMPASS CALIBRATION ...................................143.8.11 DIAGNOSIS AND TESTING ..................................143.8.12 AMBIENT TEMPERATURE SENSOR ..........................153.8.13 AMBIENT TEMPERATURE SENSOR FAULT CODES .............153.8.14 AMBIENT TEMPERATURE SENSOR TEST .....................153.8.14 HOMELINK UNIVERSAL TRANSMITTER ......................163.9 TIRE PRESSURE MONITORING SYSTEM (TPM) ........................163.9.1 TRAINING THE EVIC .......................................163.9.2 PRESSURE THRESHOLDS ..................................173.9.3 CRITICAL AND NON-CRITICAL PRESSURE ALERTS ............173.9.4 SYSTEM FAULTS ..........................................173.9.5 SPARE WHEEL AUTO-LOCATE ..............................173.9.6 REMOVE MAGNET FROM SPARE ............................183.9.6 TIRE PRESSURE UNAVAILABLE .............................183.9.7 TIRE PRESSURE NOW AVAILABLE ...........................183.9.8 DIAGNOSING AND CLEARING SYSTEM FAULTS ...............183.9.9 SYSTEM TEST ............................................183.9 EXTERIOR LIGHTING SYSTEM ......................................183.9.1 EXTERIOR LIGHTING BATTERY SAVER .......................183.9.2 HEADLAMP DELAY ........................................183.9.3 HEADLAMP SWITCH .......................................183.9.4 FOG LAMP CONTROL ......................................183.10 INTERIOR LIGHTING ...............................................193.10.1 COURTESY LAMP CONTROL. ...............................193.10.2 ILLUMINATED ENTRY ......................................193.10.3 INTERIOR LIGHTING BATTERY SAVER .......................193.11 ELECTRO/MECHANICAL INSTRUMENT CLUSTER (EMIC). .......193.11.1 INSTRUMENT PANEL DIMMING ..............................193.12 MEMORY SEATS ..................................................193.12.1 POWER SEAT .............................................203.12.2 EASY EXIT SEAT (AVAILABLE WITH MEMORY SEAT) ...........203.12.3 GUARD BANDS ...........................................203.12.4 ELECTRICALLY HEATED SEATS .............................203.13 SENTRY KEY IMMOBILIZER SYSTEM (SKIS). ..........................213.14 POWER SUNRO<strong>OF</strong> ................................................213.15 COMMUNICATION .................................................213.16 VEHICLE THEFT SECURITY SYSTEM. ................................223.17 WINDSHIELD WIPER & WASHER ....................................233.17.1 FRONT WIPER ............................................233.17.2 REAR WIPER SYSTEM .....................................243.18 USING THE DRBIII ................................................253.18.1 DRBIII ERROR MESSAGES AND BLANK SCREEN .............253.18.2 DRBIII DOES NOT POWER UP. .............................253.18.3 DISPLAY IS NOT VISIBLE ...................................254.0 DISCLAIMERS, SAFETY, WARNINGS ......................................254.1 DISCLAIMERS. ....................................................254.2 SAFETY ..........................................................254.2.1 TECHNICIAN SAFETY INFORMATION .........................25ii
<strong>TABLE</strong> <strong>OF</strong> <strong>CONTENTS</strong> - Continued4.2.2 VEHICLE PREPARATION FOR TESTING. ......................264.2.3 SERVICING SUB-ASSEMBLIES ..............................264.2.4 DRBIII SAFETY INFORMATION. .............................264.3 WARNINGS .......................................................264.3.1 VEHICLE DAMAGE WARNINGS ..............................264.3.2 ROAD TESTING A COMPLAINT VEHICLE ......................265.0 REQUIRED TOOLS AND EQUIPMENT .....................................276.0 GLOSSARY <strong>OF</strong> ACRONYMS .............................................277.0 DIAGNOSTIC INFORMATION AND PROCEDURES ...........................29AIRBAGACCELEROMETER 1 ....................................................30ACCELEROMETER 2 ....................................................30INTERNAL 1 ...........................................................30OUTPUT DRIVER 1 .....................................................30STORED ENERGY FIRING 1. .............................................30AIRBAG WARNING INDICATOR OPEN .....................................32AIRBAG WARNING INDICATOR SHORT ....................................32CLUSTER MESSAGE MISMATCH .........................................34DRIVER CURTAIN SQUIB CIRCUIT OPEN ..................................36DRIVER CURTAIN SQUIB CIRCUIT SHORT .................................39DRIVER CURTAIN SQUIB SHORT TO BATTERY .............................42DRIVER CURTAIN SQUIB SHORT TO GROUND .............................44DRIVER SEAT BELT SWITCH CIRCUIT OPEN ...............................46DRIVER SEAT BELT SWITCH SHORT TO BATTERY ..........................48DRIVER SEAT BELTS SWITCH SHORT TO GROUND .........................50DRIVER SIDE IMPACT SENSOR INTERNAL 1 ...............................52NO DRIVER SIDE IMPACT SENSOR COMMUNICATION. ......................52DRIVER SQUIB 1 CIRCUIT OPEN .........................................56DRIVER SQUIB 1 CIRCUIT SHORT ........................................59DRIVER SQUIB 1 SHORT TO BATTERY ....................................61DRIVER SQUIB 1 SHORT TO GROUND ....................................64DRIVER SQUIB 2 CIRCUIT OPEN .........................................67DRIVER SQUIB 2 CIRCUIT SHORT ........................................70DRIVER SQUIB 2 SHORT TO BATTERY ....................................73DRIVER SQUIB 2 SHORT TO GROUND ....................................76LEFT FRONT IMPACT SENSOR INTERNAL 1. ...............................79NO LEFT FRONT IMPACT SENSOR COMMUNICATION .......................79LOSS <strong>OF</strong> IGNITION RUN - START .........................................83LOSS <strong>OF</strong> IGNITION RUN ONLY ...........................................86NO CLUSTER MESSAGE ................................................89NO PASSENGER SIDE IMPACT SENSOR COMMUNICATION ..................91PASSENGER SIDE IMPACT SENSOR INTERNAL 1 ...........................91NO PCI TRANSMISSION .................................................95NO RIGHT FRONT IMPACT SENSOR COMMUNICATION ......................97RIGHT FRONT IMPACT SENSOR INTERNAL 1 ..............................97PASSENGER CURTAIN SQUIB CIRCUIT OPEN .............................101PASSENGER CURTAIN SQUIB CIRCUIT SHORT ............................104PASSENGER CURTAIN SQUIB SHORT TO BATTERY ........................107PASSENGER CURTAIN SQUIB SHORT TO GROUND ........................109iii
<strong>TABLE</strong> <strong>OF</strong> <strong>CONTENTS</strong> - ContinuedPASSENGER SEAT BELT SWITCH CIRCUIT OPEN ..........................111PASSENGER SEAT BELT SWITCH SHORT TO BATTERY .....................113PASSENGER SEAT BELT SWITCH SHORT TO GROUND .....................115PASSENGER SQUIB 1 CIRCUIT OPEN ....................................117PASSENGER SQUIB 1 CIRCUIT SHORT. ..................................120PASSENGER SQUIB 1 SHORT TO BATTERY ...............................122PASSENGER SQUIB 1 SHORT TO GROUND ...............................124PASSENGER SQUIB 2 CIRCUIT OPEN ....................................126PASSENGER SQUIB 2 CIRCUIT SHORT. ..................................129PASSENGER SQUIB 2 SHORT TO BATTERY ...............................131PASSENGER SQUIB 2 SHORT TO GROUND ...............................133*AIRBAG INDICATOR ON WITHOUT ACTIVE TROUBLE CODES ...............135AUDIOALL OUTPUTS SHORT - BASE AUDIO SYSTEM ............................136ALL OUTPUTS SHORT - PREMIUM AUDIO SYSTEM ........................138CASSETTE PLAYER INOP ..............................................140CD MECHANICAL FAILURE .............................................140*AM/FM SWITCH INOPERATIVE. .........................................140*ANY STATION PRESET SWITCH INOPERATIVE. ...........................140*BALANCE INOPERATIVE ...............................................140*CD EJECT SWITCH INOPERATIVE. ......................................140*EQUALIZER INOPERATIVE .............................................140*FADER INOPERATIVE .................................................140*FF/RW SWITCH INOPERATIVE ..........................................140*HOUR/MINUTE SWITCHES INOPERATIVE ................................140*PAUSE/PLAY SWITCH INOPERATIVE ....................................140*PWR SWITCH INOPERATIVE ...........................................140*SCAN SWITCH INOPERATIVE ..........................................140*SEEK SWITCH INOPERATIVE. ..........................................140*SET SWITCH INOPERATIVE ............................................140*TAPE EJECT SWITCH INOPERATIVE. ....................................140*TIME SWITCH INOPERATIVE ...........................................140*TUNE SWITCH INOPERATIVE. ..........................................140CD CHANGER MECHANICAL FAILURE. ...................................142CD CHANGER READ FAILURE. ..........................................143CD CHANGER TEMPERATURE HIGH .....................................144CD READ FAILURE ....................................................145CD TEMPERATURE HIGH ...............................................146NO ANTENNA CONNECTION ............................................147POWER AMP SHUTDOWN - BASE AUDIO SYSTEM .........................148POWER AMP SHUTDOWN - PREMIUM AUDIO SYSTEM .....................150RADIO DIMMING SHORTED HIGH. .......................................152REMOTE RADIO SWITCH SHORTED TO GROUND .........................153*NO SOUND FROM ALL SPEAKERS ......................................156*REMOTE RADIO CONTROLS INOPERATIVE ..............................160CHIMECHIME INOPERATIVE WITH KEY IN IGNITION, DRIVER DOOR OPEN. .........163*CHIME INOPERATIVE AT ALL TIMES .....................................165*CHIME INOPERATIVE WITH DRIVERS SEAT BELT UNFASTENED ............166*CHIME INOPERATIVE WITH EXTERIOR LAMPS, DRIVER DOOR OPEN .......168*CHIME SOUNDS WITH DRIVER DOOR OPEN .............................169iv
<strong>TABLE</strong> <strong>OF</strong> <strong>CONTENTS</strong> - Continued*LIFTGATE FLIP-UP AJAR CIRCUIT OPEN .................................244*LIFTGATE FLIP-UP AJAR CIRCUIT SHORT TO GROUND ....................246*PASSENGER DOOR AJAR CIRCUIT OPEN ................................247*PASSENGER DOOR AJAR CIRCUIT SHORT TO GROUND ...................248*RIGHT REAR DOOR AJAR CIRCUIT OPEN. ...............................249*RIGHT REAR DOOR AJAR CIRCUIT SHORT TO GROUND. ..................250ELECTRICALLY HEATED SYSTEMSDRIVER SEAT HEAT OUTPUT OPEN/SHT TO BATTERY (LAREDO) ............251DRIVER SEAT HEAT OUTPUT OPEN/SHT TO BATTERY (LIMITED) ............255DRIVER SEAT HEAT OUTPUT SHORT TO GND (LIMITED). ...................259DRIVER SEAT HEAT OUTPUT SHORT TO GROUND (LAREDO) ...............261DRIVER THERMISTOR OUT <strong>OF</strong> RANGE HIGH .............................263DRIVER THERMISTOR OUT <strong>OF</strong> RANGE LOW ..............................265PASSENGER SEAT HEAT OUTPUT OPEN/SHT TO BATTERY (LAREDO). .......267PASSENGER SEAT HEAT OUTPUT OPEN/SHT TO BATTERY (LIMITED) ........271PASSENGER SEAT HEAT OUTPUT SHORT TO GND (LAREDO) ...............275PASSENGER SEAT HEAT OUTPUT SHORT TO GND (LIMITED) ...............277PASSENGER THERMISTOR OUT <strong>OF</strong> RANGE HIGH .........................279PASSENGER THERMISTOR OUT <strong>OF</strong> RANGE LOW .........................281REAR DEF RELAY SHORTED HI .........................................283REAR DEFOGGER RELAY OPEN ........................................284*DRIVER SEAT BACK HEATER INOPERATIVE (LIMITED). ....................286*DRIVER SEAT BOLSTER HEATER INOPERATIVE (LIMITED) .................287*DRIVER SEAT CUSHION HEATER INOPERATIVE (LIMITED) .................288*HEATED SEATS INOPERATIVE DUE TO KEY-IN IGNITION SWITCH INPUT .....289*PASSENGER SEAT BACK HEATER INOPERATIVE (LIMITED) ................291*PASSENGER SEAT BOLSTER HEATER INOPERATIVE (LIMITED) .............292*PASSENGER SEAT CUSHION HEATER INOPERATIVE (LIMITED) .............293*REAR WINDOW DEFOGGER GRID INOPERATIVE .........................294*REAR WINDOW DEFOGGER SWITCH INDICATOR INOPERATIVE ............298EXTERIOR LIGHTINGFOG LAMP RELAY CKT SHORTED HI. ....................................299FOG LAMP RELAY CKT SHORTED LO/OPEN ..............................300HAZARD RELAY CKT SHORTED HI. ......................................302HEADLAMP SW OPEN CKT .............................................303HEADLAMP SW SHORT TO GROUND. ....................................305HIGH BEAM RELAY CKT SHORTED HI ....................................306LOW BEAM RELAY CKT SHORTED HI ....................................307LOW BEAM RELAY CKT SHORTED LO/OPEN ..............................308PARK LAMP RELAY CKT SHORTED HI ....................................310PARK LAMP RELAY CKT SHORTED LO/OPEN. .............................311REAR FOG LAMP RELAY CKT OPEN .....................................313REAR FOG RELAY OUTPUT SHORTED HI. ................................316*AUTO HEADLAMPS WILL NOT TURN <strong>OF</strong>F ................................317*AUTO HEADLAMPS WILL NOT TURN ON .................................317*FLASH TO PASS INOPERATIVE .........................................320*FOG LAMPS WILL NOT TURN <strong>OF</strong>F ......................................321*FOG LAMPS WILL NOT TURN ON .......................................323*HIGH BEAM HEADLAMPS WILL NOT TURN <strong>OF</strong>F. ..........................326*HIGH BEAM HEADLAMPS WILL NOT TURN ON. ...........................328*LOW BEAM HEADLAMPS WILL NOT TURN <strong>OF</strong>F ...........................330vi
<strong>TABLE</strong> <strong>OF</strong> <strong>CONTENTS</strong> - Continued*LOW BEAM HEADLAMPS WILL NOT TURN ON ............................331*PARK LAMPS WILL NOT TURN <strong>OF</strong>F .....................................333*PARK LAMPS WILL NOT TURN ON ......................................334*REAR FOG LAMPS WILL NOT TURN <strong>OF</strong>F. ................................335*REAR FOG LAMPS WILL NOT TURN ON .................................337HEATING & A/CAMBIENT AIR TEMP FAILURE (AZC) (ACTIVE) .............................339AMBIENT AIR TEMP FAILURE (AZC) (STORED) ............................340BLOWER SELECT SW OPEN (AZC) (ACTIVE) ..............................341BLOWER SELECT SW OPEN (AZC) (STORED) .............................342BLOWER SELECT SW SHORTED (AZC) (ACTIVE) ..........................343BLOWER SELECT SW SHORTED (AZC) (STORED) .........................344CAL CHECKSUM FAILURE (AZC) (ACTIVE) ................................345CAL CHECKSUM FAILURE (AZC) (STORED) ...............................346COUNTRY CODE FAILURE (AZC) (ACTIVE) ................................347COUNTRY CODE FAILURE (AZC) (STORED) ...............................348DEFECTIVE I/R SENSOR (AZC) (ACTIVE) .................................349DEFECTIVE I/R SENSOR (AZC) (STORED) ................................350DRIVER BLEND DOOR NOT RESPONDING (AZC) (ACTIVE) ..................351DRIVER BLEND DOOR NOT RESPONDING (AZC) (STORED) .................354DRIVER BLEND DOOR RANGE TOO LARGE (AZC) (ACTIVE) .................355DRIVER BLEND DOOR RANGE TOO LARGE (AZC) (STORED) ................357DRIVER BLEND DOOR RANGE TOO SMALL (AZC) (ACTIVE) .................358DRIVER BLEND DOOR RANGE TOO SMALL (AZC) (STORED) ................360ENGINE COOLANT RESPONSE FAILURE (AZC) (ACTIVE) ...................361ENGINE COOLANT RESPONSE FAILURE (AZC) (STORED) ..................362ENGINE RPM FAILURE (AZC) (ACTIVE) ...................................363ENGINE RPM FAILURE (AZC) (STORED) ..................................364EVAP TEMP SENSOR OPEN (MTC & AZC). ................................365EVAP TEMP SENSOR SHORTED (MTC & AZC) .............................368IAT RESPONSE FAILURE (AZC) (ACTIVE) .................................370IAT RESPONSE FAILURE (AZC) (STORED) ................................371MODE DOOR RANGE TOO LARGE (AZC) (ACTIVE) .........................372MODE DOOR RANGE TOO LARGE (AZC) (STORED) ........................374MODE DOOR RANGE TOO SMALL (AZC) (ACTIVE) .........................375MODE DOOR RANGE TOO SMALL (AZC) (STORED) ........................377MODE MOTOR NOT RESPONDING (AZC) (ACTIVE). ........................378MODE MOTOR NOT RESPONDING (AZC) (STORED). .......................381MODE SELECT SW OPEN (AZC) (ACTIVE) ................................382MODE SELECT SW OPEN (AZC) (STORED) ...............................383MODE SELECT SW SHORTED (AZC) (ACTIVE). ............................384MODE SELECT SW SHORTED (AZC) (STORED). ...........................385PASS BLEND DOOR NOT RESPONDING (AZC) (ACTIVE) ....................386PASS BLEND DOOR NOT RESPONDING (AZC) (STORED) ...................389PASS BLEND DOOR RANGE TOO LARGE (AZC) (ACTIVE) ...................390PASS BLEND DOOR RANGE TOO LARGE (AZC) (STORED) ..................392PASS BLEND DOOR RANGE TOO SMALL (AZC) (ACTIVE) ...................393PASS BLEND DOOR RANGE TOO SMALL (AZC) (STORED) ..................395RECIRC DOOR RANGE TOO LARGE (AZC) (ACTIVE) .......................396RECIRC DOOR RANGE TOO LARGE (AZC) (STORED) ......................398RECIRC DOOR RANGE TOO SMALL (AZC) (ACTIVE). .......................399RECIRC DOOR RANGE TOO SMALL (AZC) (STORED). ......................401vii
<strong>TABLE</strong> <strong>OF</strong> <strong>CONTENTS</strong> - ContinuedRECIRC MOTOR NOT RESPONDING (AZC) (ACTIVE) .......................402RECIRC MOTOR NOT RESPONDING (AZC) (STORED) ......................405VEHICLE SPEED FAILURE (AZC) (ACTIVE) ................................406VEHICLE SPEED FAILURE (AZC) (STORED) ...............................407VEHICLE VIN FAILURE (AZC) (ACTIVE) ...................................408VEHICLE VIN FAILURE (AZC) (STORED) ..................................409VF DIMMING FAILURE (AZC) (ACTIVE). ...................................410VF DIMMING FAILURE (AZC) (STORED) ...................................411*A/C SWITCH SIGNAL NOT OPERATING PROPERLY (MTC & AZC) ............412*BLOWER MOTOR ALWAYS RUNS AT ONE SPEED ONLY (AZC) ..............413*BLOWER MOTOR INOPERATIVE (AZC). ..................................415INSTRUMENT CLUSTERABS LAMP CIRCUIT SHORT. ............................................419AIRBAG LAMP DRIVER FAILURE. ........................................419BRAKE LAMP CIRCUIT SHORT ..........................................419ABS LAMP OPEN ......................................................420AIRBAG LAMP OPEN. ..................................................420BRAKE LAMP OPEN ...................................................420ABS MESSAGE NOT RECEIVED BY MIC ..................................421ACM MESSAGE NOT RECEIVED BY MIC ..................................422BCM MESSAGES NOT RECEIVED BY MIC. ................................423CHECKSUM FAILURE ..................................................424EATX MESSAGE STATUS ...............................................425NO PCI BUS COMMUNICATION ..........................................426PCM MESSAGE NOT RECEIVED BY MIC ..................................427SKIM MESSAGE NOT RECEIVED BY MIC .................................428*AIRBAG INDICATOR NOT OPERATING PROPERLY. ........................429*ALL GAUGES INOPERATIVE ............................................430*BRAKE INDICATOR INOPERATIVE. ......................................432*BRAKE WARNING INDICATOR ALWAYS ON ...............................433*CHECK ENGINE INDICATOR NOT OPERATING PROPERLY .................435*CHECK GAUGES INDICATOR INOPERATIVE ..............................436*COOLANT LEVEL INDICATOR INOPERATIVE - DIESEL ONLY ................437*CRUISE ON INDICATOR NOT OPERATING PROPERLY .....................438*FUEL GAUGE NOT OPERATING PROPERLY ..............................439*HIGH BEAM INDICATOR INOPERATIVE. ..................................440*INSTRUMENT CLUSTER DIMMING INOPERATIVE. .........................441*LOW COOLANT INDICATOR ALWAYS ON - DIESEL ONLY ...................442*LOW FUEL INDICATOR INOPERATIVE ...................................443*O/D <strong>OF</strong>F INDICATOR INOPERATIVE .....................................444*OIL PRESSURE GAUGE NOT OPERATING PROPERLY .....................445*SEAT BELT INDICATOR INOPERATIVE ...................................446*SEATBELT INDICATOR ALWAYS ON .....................................448*SKIM INDICATOR INOPERATIVE ........................................449*SPEEDOMETER NOT OPERATING PROPERLY ............................450*TACHOMETER NOT OPERATING PROPERLY .............................451*TEMPERATURE GAUGE INOPERATIVE ..................................452*TRANS OVER TEMP INDICATOR INOPERATIVE ...........................453*VOLTMETER INOPERATIVE ............................................454*WATER IN FUEL INDICATOR PROBLEMS - DIESEL ONLY ...................455viii
<strong>TABLE</strong> <strong>OF</strong> <strong>CONTENTS</strong> - ContinuedINTERIOR LIGHTINGDIM SW SHORT TO GROUND ...........................................456DIMMER SWITCH OPEN CIRCUIT ........................................458LAMP FADE FAILURE SHORT TO BATTERY ...............................460LOAD SHED FAILURE SHORT TO BATTERY ...............................462PANEL LAMP DRIVER FAILURE ..........................................464*ALL COURTESY LAMPS INOPERATIVE. ..................................468*ASH TRAY LAMP INOPERATIVE .........................................469*COURTESY LAMPS INOPERATIVE (EXCEPT FRONT DOORS) ...............470*COURTESY LAMPS INOPERATIVE FROM DOME LAMP SWITCH ONLY .......471*COURTESY LAMPS INOPERATIVE FROM DRIVERS FRONT DOOR ONLY .....472*COURTESY LAMPS INOPERATIVE FROM LEFT REAR DOOR ONLY ..........474*COURTESY LAMPS INOPERATIVE FROM LIFTGATE .......................476*COURTESY LAMPS INOPERATIVE FROM LIFTGATE FLIP-UP GLASS ONLY . . .478*COURTESY LAMPS INOPERATIVE FROM PASSENGER FRONT DOOR ONLY . .479*COURTESY LAMPS INOPERATIVE FROM RIGHT REAR DOOR ONLY .........481*COURTESY LAMPS ON AT ALL TIMES (EXCEPT BOTH FRONT DOORCOURTESY LAMPS IF EQUIP) ...........................................483*DRIVER DOOR COURTESY LAMP INOPERATIVE ..........................484*GLOVE BOX LAMP INOPERATIVE .......................................485*HEATED SEAT SWITCH ILLUMINATION LAMP INOPERATIVE ................486*HVAC CONTROL ILLUMINATION LAMPS INOPERATIVE .....................488*I/P COURTESY LAMPS INOP ...........................................489*LIFTGATE COURTESY LAMP DISABLE FEATURE INOPERATIVE .............490*OVERHEAD, REAR AND LIFTGATE LAMPS INOPERATIVE ..................491*PASSENGER DOOR COURTESY LAMP INOPERATIVE ......................492*PRNDL/T-CASE ILLUMINATION LAMPS INOPERATIVE ......................493*RADIO ILLUMINATION LAMPS INOPERATIVE .............................494*READING & VANITY LAMPS INOPERATIVE ...............................495MEMORY SEATFRONT RISER SENSOR OUT <strong>OF</strong> RANGE HIGH ............................496FRONT RISER SENSOR OUT <strong>OF</strong> RANGE LOW. ............................498HORIZONTAL SENSOR OUT <strong>OF</strong> RANGE HIGH .............................500HORIZONTAL SENSOR OUT <strong>OF</strong> RANGE LOW .............................502REAR RISER SENSOR OUT <strong>OF</strong> RANGE HIGH .............................504REAR RISER SENSOR OUT <strong>OF</strong> RANGE LOW ..............................506RECLINER SENSOR OUT <strong>OF</strong> RANGE HIGH ...............................508RECLINER SENSOR OUT <strong>OF</strong> RANGE LOW ................................510*DRIVER SEAT FRONT RISER MOVEMENT INOPERATIVE ...................512*DRIVER SEAT HORIZONTAL MOVEMENT INOPERATIVE ....................515*DRIVER SEAT REAR RISER MOVEMENT INOPERATIVE ....................518*DRIVER SEAT RECLINER MOVEMENT INOPERATIVE ......................521OVERHEAD CONSOLEAMBIENT TEMPERATURE SENSOR CIRCUIT OPEN ........................524AMBIENT TEMPERATURE SENSOR CIRCUIT SHORT .......................526BUS MESSAGES MISSING ..............................................528COMPASS TEST FAILURE ..............................................529COOLANT LEVEL SWITCH CIRCUIT OPEN - GAS ONLY .....................530DEMAGNETIZE COMPASS ..............................................532EVIC INTERNAL FAILURE ...............................................533NO BCM MESSAGES RECEIVED. ........................................534NO PCM MESSAGES RECEIVED. ........................................535ix
<strong>TABLE</strong> <strong>OF</strong> <strong>CONTENTS</strong> - ContinuedSET COMPASS VARIANCE AS PER SERVICE INFORMATION. ................536WASHER FLUID SWITCH FAILURE .......................................537*AVERAGE FUEL ECONOMY INACCURATE OR WRONG. ....................538*DISTANCE TO EMPTY INACCURATE OR WRONG. .........................538*DISTANCE TO SERVICE INACCURATE OR WRONG ........................538*ELAPSED IGNITION ON TIME INACCURATE OR WRONG ...................538*INSTANT FUEL ECONOMY INACCURATE OR WRONG. .....................538*TRIP ODOMETER INACCURATE OR WRONG .............................538*EVIC DIMMING INOPERATIVE ..........................................539*EVIC INOPERATIVE ...................................................540*LOW COOLANT WARNING ALWAYS ON - GAS ONLY .......................541*LOW WASHER FLUID MESSAGE ALWAYS ON. ............................542*TEMPERATURE DISPLAY INACCURATE OR INOPERATIVE ..................543POWER DOOR LOCKS/RKE*ALL DOORS (EXCEPT DRIVER FAIL TO LOCK/UNLOCK ....................544*ALL DOORS (EXCEPT DRIVER) FAIL TO LOCK ............................545*ALL DOORS (EXCEPT DRIVER) FAILS TO UNLOCK ........................546*ALL LOCKS INOPERATIVE FROM DRIVER DOOR MODULE .................547*ALL LOCKS INOPERATIVE FROM PASSENGER DOOR MODULE .............548*AUTOMATIC DOOR LOCKS INOPERATIVE ................................549*DOORS LOCK WITH KEY IN IGNITION & FRONT DOOR OPEN. ..............550*DRIVER DOOR FAILS TO LOCK .........................................552*DRIVER DOOR FAILS TO LOCK & UNLOCK ...............................553*DRIVER DOOR FAILS TO UNLOCK ......................................554*LEFT REAR DOOR FAILS TO LOCK & UNLOCK. ...........................555*LIFTGATE LOCK FAILS TO LOCK/UNLOCK. ...............................556*PASSENGER DOOR FAILS TO LOCK & UNLOCK ..........................557*RIGHT REAR DOOR FAILS TO LOCK & UNLOCK ..........................558*RKE INOPERATIVE - JAPAN ONLY. ......................................559*RKE TRANSMITTER INOPERATIVE ......................................561*RKE TRANSMITTER POOR RANGE - JAPAN ONLY. ........................562POWER MIRROR*BOTH MEMORY MIRRORS INOPERATIVE ................................563*DRIVER MEMORY MIRROR INOPERATIVE. ...............................564*FOLDING POWER MIRROR INOPERATIVE. ...............................567*PASSENGER MEMORY MIRROR INOPERATIVE ...........................571POWER TOPACCESSORY (SUNRO<strong>OF</strong>) DELAY RELAY SHORTED HI. .....................574*SUNRO<strong>OF</strong> DELAY INOPERATIVE ........................................575*SUNRO<strong>OF</strong> MOTOR INOPERATIVE .......................................576POWER WINDOWS*ALL POWER WINDOWS INOPERATIVE ...................................582*DRIVER REAR WINDOW INOPERATIVE FROM BOTH SWITCHES ............583*DRIVER REAR WINDOW INOPERATIVE FROM DDM .......................586*DRIVER REAR WINDOW INOPERATIVE FROM REAR SWITCH. ..............587*DRIVER WINDOW INOPERATIVE ........................................588*PASSENGER REAR WINDOW INOPERATIVE FROM BOTH SWITCHES ........591*PASSENGER REAR WINDOW INOPERATIVE FROM DDM ...................594*PASSENGER REAR WINDOW INOPERATIVE FROM REAR SWITCH ..........595x
<strong>TABLE</strong> <strong>OF</strong> <strong>CONTENTS</strong> - Continued*PASSENGER WINDOW INOPERATIVE FROM BOTH SWITCHES. .............596*PASSENGER WINDOW INOPERATIVE FROM DDM. ........................599*PASSENGER WINDOW INOPERATIVE FROM PDM .........................600TIRE PRESSURE MONITORINGLF SENSOR BATTERY LOW .............................................601LF TIRE PRESSURE SENSOR FAILURE ...................................601LR SENSOR BATTERY LOW. ............................................601LR TIRE PRESSURE SENSOR FAILURE. ..................................601RF SENSOR BATTERY LOW ............................................601RF TIRE PRESSURE SENSOR FAILURE ..................................601RR SENSOR BATTERY LOW ............................................601RR TIRE PRESSURE SENSOR FAILURE ..................................601SPARE TIRE PRESSURE SENSOR FAILURE ...............................601SPARE TIRE SENSOR BATTERY LOW ....................................601VEHICLE THEFT/SECURITYBCM MESSAGE NOT RECEIVED (EXPORT ONLY) ..........................604PRE-ARM TIMEOUT FAILURE (EXPORT ONLY). ............................604HORN RELAY CIRCUIT SHORTED HI .....................................606ITM - EEPROM FAILURE (EXPORT ONLY) .................................607LOOPBACK FAILURE (EXPORT ONLY) ....................................607ITM - TRANSDUCER FAILURE (EXPORT ONLY) ............................608ITM - VIN MISMATCH (EXPORT ONLY) ....................................609NO SERIAL COMMUNICATION (EXPORT ONLY) ............................610SIREN COMMUNICATION FAILURE (EXPORT ONLY) ........................610PCM MESSAGE NOT RECEIVED (EXPORT ONLY) ..........................613SIREN BATTERY HAS BEEN TAMPERED (EXPORT ONLY) ...................614SIREN EEPROM FAILURE (EXPORT ONLY) ................................615SIREN INTERNAL BATTERY (EXPORT ONLY) ..............................615SIREN ROM FAILURE (EXPORT ONLY) ...................................615*ALARM TRIPS ON ITS OWN ............................................616*DRIVERS DOOR KEY FAILS TO DISARM VTSS ............................617*HAZARD LAMPS FAIL TO FLASH WITH ALARM TRIPPED ...................619*HEADLAMPS FAIL TO FLASH WITH ALARM TRIPPED ......................620*HORN FAILS TO SOUND WITH ALARM TRIPPED ..........................621*INTRUSION TRANSCEIVER MODULE SENSITIVITY (EXPORT ONLY). .........622*THEFT ALARM WILL NOT ARM. .........................................623*VTSS DOES NOT TRIP FROM DRIVERS DOOR. ...........................624*VTSS DOES NOT TRIP FROM HOOD (IF EQUIPPED) .......................625*VTSS DOES NOT TRIP FROM LEFT REAR DOOR. .........................626*VTSS DOES NOT TRIP FROM LIFTGATE .................................627*VTSS DOES NOT TRIP FROM LIFTGATE FLIP-UP GLASS ONLY .............628*VTSS DOES NOT TRIP FROM PASSENGER FRONT DOOR. .................629*VTSS DOES NOT TRIP FROM RIGHT REAR DOOR ........................630*VTSS INDICATOR INOPERATIVE ........................................631WINDSHIELD WIPER & WASHERRAIN SENSOR FAULT ..................................................632WASHER FLUID SENSOR FAILURE ......................................633WIPER ON/<strong>OF</strong>F RELAY SHORTED HIGH ..................................634WIPER ON/<strong>OF</strong>F RELAY SHORTED LOW/OPEN CIRCUIT .....................636WIPER PARK SWITCH FAILURE .........................................640xi
<strong>TABLE</strong> <strong>OF</strong> <strong>CONTENTS</strong> - ContinuedWIPER SWITCH MUX CKT OPEN ........................................643WIPER SWITCH MUX CKT SHORT TO GROUND ...........................645VERIFICATION TESTSVERIFICATION TESTS ..................................................6478.0 COMPONENT LOCATIONS ..............................................6558.1 AIRBAG SYSTEM .................................................6558.2 AUDIO SYSTEM ..................................................6568.3 AUTOMATIC ZONE CONTROL (AZC). ................................6568.3.1 AZC MODULE ............................................6568.3.2 HVAC UNIT ..............................................6578.3.3 EVAPORATOR TEMPERATURE SENSOR .....................6578.3.4 REAR WINDOW DEFOGGER ...............................6578.3.5 DRB III SCREEN, AZC MODULE BLOWER MOTOR CONTROLLERSIGNAL .................................................6588.4 CHIME SYSTEM ..................................................6588.5 ELECTRONIC VEHICLE INFORMATION CENTER (EVIC) ................6598.6 BODY CONTROL MODULE & JUNCTION BLOCK ......................6598.7 INSTRUMENT PANEL .............................................6608.8 POWER DOOR LOCKS ............................................6608.8.1 FRONT DOOR. ...........................................6608.8.2 REAR DOOR .............................................6608.8.3 LIFTGATE ...............................................6618.9 SYSTEM COMPONENT LOCATIONS .................................6618.10 VEHICLE THEFT SECURITY SYSTEM (VTSS) & SKIS ..................6618.11 WIPER SYSTEM ..................................................6629.0 CONNECTOR PINOUTS ................................................665ADJUS<strong>TABLE</strong> PEDALS MODULE (EXCEPT BUILT-UP-EXPORT) - GREEN 14WAY.................................................................665AIRBAG CONTROL MODULE C1 (ORC C1) - YELLOW 32 WAY. ...............665AIRBAG CONTROL MODULE C2 (ORC C2) - YELLOW 32 WAY. ...............666AMBIENT TEMPERATURE SENSOR - BLACK 2 WAY ........................666AMBIENT TEMPERATURE SENSOR (SENSOR SIDE). .......................666ANTENNA MODULE (BUILT-UP-EXPORT) - WHITE 2 WAY ....................667AUTOMATIC ZONE CONTROL MODULE C1 (AZC) - WHITE 16 WAY ...........667AUTOMATIC ZONE CONTROL MODULE C2 (AZC) - WHITE 12 WAY ...........667BLOWER MOTOR - BLACK 2 WAY. .......................................667BLOWER MOTOR CONTROLLER (AZC) - BLACK 3 WAY .....................668BODY CONTROL MODULE C1 - GRAY 26 WAY .............................668BODY CONTROL MODULE C2 - GRAY 22 WAY .............................669C106 (DIESEL) - GRAY (BODY SIDE) .....................................670C106 (DIESEL) - GRAY (RIGHT HEADLAMP AND DASH SIDE) ................671C106 (GAS) - GRAY/RHD BLACK/LHD (BODY SIDE) .........................672C106 (GAS) - GRAY/RHD BLACK/LHD (RIGHT HEADLAMP AND DASH SIDE). . . .673C107 (DIESEL) - GRAY (BODY SIDE) .....................................674C107 (DIESEL) - GRAY (LEFT HEADLAMP AND DASH SIDE) .................675C107 (GAS) - GRAY/RHD BLACK/LHD (BODY SIDE) .........................676C107 (GAS) - GRAY/RHD BLACK/LHD (LEFT HEADLAMP AND DASH SIDE) .....677C200 - GRAY/LHD BLACK/RHD (INSTRUMENT PANEL SIDE) .................678xii
<strong>TABLE</strong> <strong>OF</strong> <strong>CONTENTS</strong> - ContinuedC200 - GRAY/LHD BLACK/RHD (LEFT BODY SIDE) .........................679C202 (AZC) - WHITE (A/C SIDE). .........................................680C202 (AZC) - WHITE (INSTRUMENT PANEL SIDE) ..........................680C202 (MTC) - WHITE (A/C SIDE) .........................................681C202 (MTC) - WHITE (INSTRUMENT PANEL SIDE) ..........................681C203 (AZC) - WHITE (A/C SIDE). .........................................681C203 (AZC) - WHITE (INSTRUMENT PANEL SIDE) ..........................682C317 - (INTRUSION TRANSCEIVER MODULE SIDE) ........................682C317 - (OVERHEAD SIDE) ..............................................682C318 - (LEFT BODY SIDE (LHD)/ RIGHT BODY SIDE (RHD)). .................682C318 - (OVERLAY SIDE) ................................................682C319 - (OVERLAY SIDE) ................................................682C319 - (RIGHT BODY SIDE (LHD)/ LEFT BODY SIDE (RHD)). .................683CARGO LAMP - WHITE 3 WAY. ..........................................683CLOCKSPRING C2 -4WAY.............................................683CLOCKSPRING C3 - GRAY 6 WAY. .......................................683CLOCKSPRING C4 - BLACK 2 WAY. ......................................683COMPACT DISC CHANGER (PREMIUM RADIO) - BLACK 8 WAY ..............684CONTROLLER ANTILOCK BRAKE - BLACK 24 WAY .........................684COOLANT LEVEL SENSOR - LT. GRAY 2 WAY. .............................684DATA LINK CONNECTOR - BLACK 16 WAY ................................685DIAGNOSTIC JUNCTION PORT - BLACK 16 WAY ...........................685DRIVER AIRBAG SQUIB 1 - BLACK 2 WAY. ................................685DRIVER AIRBAG SQUIB 2 - GREEN 2 WAY ................................686DRIVER BLEND DOOR MOTOR/ACTUATOR (LHD) (AZC) - BLACK 2 WAY ......686DRIVER BLEND DOOR MOTOR/ACTUATOR (RHD) (AZC)- BLACK 2 WAY. ......686DRIVER CURTAIN AIRBAG - BLACK 2 WAY ................................686DRIVER CYLINDER LOCK SWITCH - GRAY 2 WAY. .........................687DRIVER DOOR LOCK MOTOR/AJAR SWITCH - BLACK 4 WAY ................687DRIVER DOOR MODULE C1 - WHITE 15 WAY. .............................687DRIVER DOOR MODULE C2 - BLACK 12 WAY .............................688DRIVER DOOR MODULE C3 - BLACK 4 WAY ..............................688DRIVER FRONT DOOR COURTESY LAMP - BLACK 2 WAY. ..................688DRIVER FRONT POWER WINDOW MOTOR - BLACK 2 WAY .................688DRIVER HEATED SEAT BACK (PREMIUM I/III) -3WAY......................689DRIVER HEATED SEAT CUSHION (PREMIUM I/III) -4WAY...................689DRIVER HEATED SEAT SWITCH - WHITE 6 WAY ...........................689DRIVER LUMBAR MOTOR (MIDLINE/PREMIUM) - BLACK 2 WAY ..............689DRIVER LUMBAR SWITCH (MIDLINE/PREMIUM) - WHITE 6 WAY. .............690DRIVER POWER MIRROR - BLACK 12 WAY ...............................690DRIVER POWER SEAT FRONT RISER MOTOR - RED 2 WAY .................690DRIVER POWER SEAT FRONT RISER MOTOR SENSOR (PREMIUM II/III)-3WAY..............................................................690DRIVER POWER SEAT HORIZONTAL MOTOR - BLACK 2 WAY. ...............691DRIVER POWER SEAT HORIZONTAL MOTOR SENSOR (PREMIUM II/III)- BLACK 3 WAY .......................................................691DRIVER POWER SEAT REAR RISER MOTOR - RED 2 WAY ..................691DRIVER POWER SEAT REAR RISER MOTOR SENSOR (PREMIUM II/III)-3WAY..............................................................691DRIVER POWER SEAT RECLINER MOTOR - BLACK 2 WAY ..................692DRIVER POWER SEAT RECLINER MOTOR SENSOR (PREMIUM II/III)- BLACK 3 WAY .......................................................692DRIVER POWER SEAT SWITCH (MIDLINE/PREMIUM) - GREEN 10 WAY .......693xiii
<strong>TABLE</strong> <strong>OF</strong> <strong>CONTENTS</strong> - ContinuedDRIVER REAR POWER WINDOW MOTOR - BLACK 2 WAY. ..................693DRIVER REAR POWER WINDOW SWITCH - BLUE 6 WAY ...................694DRIVER SEAT BELT SWITCH -2WAY ....................................694DRIVER SIDE IMPACT SENSOR - BLACK 4 WAY ...........................694ENGINE CONTROL MODULE C1 (DIESEL) - BLACK 81 WAY. .................695ENGINE CONTROL MODULE C2 (DIESEL) - BLACK 40 WAY. .................696FRONT WASHER PUMP - WHITE 2 WAY ..................................696FRONT WIPER MOTOR - BLACK 6 WAY. ..................................697HOOD AJAR SWITCH (BUILT-UP-EXPORT) - BLACK 2 WAY ..................697HORN NO. 1 - BLACK 2 WAY ............................................697HORN NO. 2 - BLACK 2 WAY ............................................697IGNITION SWITCH C1 - WHITE 6 WAY ....................................698IGNITION SWITCH C2 - BLACK 2 WAY ....................................698INSTRUMENT CLUSTER - WHITE 12 WAY .................................698INTRUSION TRANSCEIVER MODULE (BUILT-UP-EXPORT) - BLACK 6 WAY. ....698FUSES (JB) ...........................................................700CIRCUIT BREAKERS ...................................................700ACCESSORY DELAY RELAY. ............................................700FOG LAMP RELAY .....................................................701HIGH BEAM RELAY ....................................................701LOW BEAM RELAY ....................................................701PARK LAMP RELAY ....................................................701REAR FOG LAMP RELAY (BUILT-UP-EXPORT) .............................701REAR WINDOW DEFOGGER RELAY. .....................................701JUNCTION BLOCK BODY CONTROL MODULE - BLACK 26 WAY ..............702JUNCTION BLOCK C1 - BLACK 52 WAY ...................................703JUNCTION BLOCK C2 (LHD) - BLACK 52 WAY .............................704JUNCTION BLOCK C2 (RHD) - BLACK 52 WAY .............................705JUNCTION BLOCK C3 - BLACK 52 WAY ...................................706JUNCTION BLOCK C4 - WHITE 2 WAY ....................................707JUNCTION BLOCK C5 - WHITE 3 WAY ....................................707LEFT COURTESY LAMP - BLACK 2 WAY ..................................707LEFT DOOR HANDLE COURTESY LAMP - WHITE 3 WAY ....................707LEFT FOG LAMP - BLACK 2 WAY ........................................708LEFT FRONT DOOR SPEAKER - WHITE 3 WAY ............................708LEFT FRONT IMPACT SENSOR - BLACK 4 WAY ............................708LEFT FRONT PARK LAMP - WHITE 2 WAY. ................................708LEFT FRONT PARK/TURN SIGNAL LAMP (EXCEPT BUILT-UP-EXPORT)- BLACK 3 WAY .......................................................709LEFT FRONT SIDE MARKER LAMP (EXCEPT BUILT-UP-EXPORT)- WHITE 2 WAY. .......................................................709LEFT FRONT TURN SIGNAL LAMP (BUILT-UP-EXPORT) - WHITE 2 WAY .......709LEFT HIGH BEAM HEADLAMP - BLACK 2 WAY .............................710LEFT INSTRUMENT PANEL SPEAKER - WHITE 2 WAY ......................710LEFT LIFTGATE AJAR SWITCH - BLACK 2 WAY ............................710LEFT LOW BEAM HEADLAMP - GRAY 2 WAY ..............................710LEFT MULTI-FUNCTION SWITCH - WHITE 11 WAY ..........................711LEFT REAR DOOR LOCK MOTOR/AJAR SWITCH - BLACK 4 WAY. ............711LEFT REAR DOOR SPEAKER - WHITE 3 WAY. .............................711LEFT REMOTE RADIO SWITCH - BLACK 2 WAY ............................711LEFT VISOR/VANITY LAMP - BLACK 2 WAY. ...............................712LICENSE LAMP NO. 1 - BLACK 2 WAY ....................................712LICENSE LAMP NO. 2 - BLACK 2 WAY ....................................712xiv
<strong>TABLE</strong> <strong>OF</strong> <strong>CONTENTS</strong> - ContinuedLIFTGATE FLIP-UP AJAR SWITCH - GRAY 2 WAY. ..........................712LIFTGATE FLIP-UP PUSH BUTTON SWITCH - BLACK 2 WAY .................713LIFTGATE FLIP-UP RELEASE SOLENOID - BLACK 2 WAY. ...................713LIFTGATE POWER LOCK MOTOR - BLACK 4 WAY. .........................713MANUAL TEMPERATURE CONTROL C1 (MTC) - WHITE 11 WAY ..............713MANUAL TEMPERATURE CONTROL C2 (MTC) - WHITE 2 WAY ...............714MODE DOOR MOTOR/ACTUATOR (AZC) - BLACK 2 WAY ....................714OVERHEAD MAP/COURTESY LAMP - WHITE 3 WAY ........................714PASSENGER AIRBAG - YELLOW 4 WAY. ..................................714PASSENGER BLEND DOOR MOTOR/ACTUATOR (LHD) (AZC) - BLACK 2 WAY . .715PASSENGER BLEND DOOR MOTOR/ACTUATOR (RHD) (AZC) - BLACK 2 WAY. .715PASSENGER CURTAIN AIRBAG - BLACK 2 WAY. ...........................715PASSENGER DOOR LOCK MOTOR/AJAR SWITCH - BLACK 4 WAY ...........715PASSENGER DOOR MODULE C1 - WHITE 15 WAY .........................716PASSENGER DOOR MODULE C2 - BLACK 12 WAY .........................716PASSENGER FRONT DOOR COURTESY LAMP - BLACK 2 WAY ..............716PASSENGER FRONT POWER WINDOW MOTOR - BLACK 2 WAY .............717PASSENGER HEATED SEAT BACK (PREMIUM I/III) -3WAY..................717PASSENGER HEATED SEAT CUSHION (PREMIUM I/III) -4WAY ..............717PASSENGER HEATED SEAT SWITCH - BLACK 6 WAY. ......................717PASSENGER POWER MIRROR - BLACK 12 WAY ...........................718PASSENGER REAR POWER WINDOW MOTOR - BLACK 2 WAY ..............718PASSENGER REAR POWER WINDOW SWITCH - BLUE 6 WAY ...............718PASSENGER SEAT BELT SWITCH -2WAY................................718PASSENGER SIDE IMPACT SENSOR - BLACK 4 WAY .......................719POWER AMPLIFIER C1 (PREMIUM RADIO) - WHITE 18 WAY .................719POWER AMPLIFIER C2 (PREMIUM RADIO) - WHITE 12 WAY .................719FUSES (DIESEL) ......................................................721FUSES (GAS) .........................................................723HORN RELAY .........................................................723WIPER HIGH/LOW RELAY. ..............................................723WIPER ON/<strong>OF</strong>F RELAY .................................................724POWERTRAIN CONTROL MODULE C1 (GAS) - BLACK 32 WAY ...............724POWERTRAIN CONTROL MODULE C2 (GAS) - WHITE 32 WAY ...............725POWERTRAIN CONTROL MODULE C3 (GAS) - GRAY 32 WAY ................726RADIO C1 - GRAY 22 WAY ..............................................727RADIO C2 - GRAY 10 WAY ..............................................727RAIN SENSOR (AUTOWIPE) - BLACK 6 WAY. ..............................727REAR WASHER PUMP - BLACK 2 WAY ...................................728REAR WIPER MOTOR - BLACK 6 WAY ....................................728RECIRCULATION DOOR MOTOR/ACTUATOR (AZC) - BLACK 2 WAY. ..........728RED BRAKE WARNING INDICATOR SWITCH - GRAY 2 WAY .................728REMOTE KEYLESS MODULE (JAPAN) - BLUE 6 WAY .......................729RIGHT COURTESY LAMP - BLACK 2 WAY .................................729RIGHT FOG LAMP - BLACK 2 WAY .......................................729RIGHT FRONT DOOR SPEAKER - WHITE 3 WAY ...........................729RIGHT FRONT IMPACT SENSOR - BLACK 4 WAY. ..........................730RIGHT FRONT PARK LAMP - WHITE 2 WAY ...............................730RIGHT FRONT PARK/TURN SIGNAL LAMP (EXCEPT BUILT-UP-EXPORT)- BLACK 3 WAY .......................................................730RIGHT FRONT SIDE MARKER LAMP (EXCEPT BUILT-UP-EXPORT)- WHITE 2 WAY. .......................................................731RIGHT HIGH BEAM HEADLAMP - BLACK 2 WAY. ...........................731xv
<strong>TABLE</strong> <strong>OF</strong> <strong>CONTENTS</strong> - ContinuedRIGHT INSTRUMENT PANEL SPEAKER - WHITE 2 WAY .....................731RIGHT LIFTGATE AJAR SWITCH - BLACK 2 WAY ...........................731RIGHT LOW BEAM HEADLAMP - GRAY 2 WAY .............................732RIGHT MULTI-FUNCTION SWITCH - WHITE 10 WAY ........................732RIGHT REAR DOOR LOCK MOTOR/AJAR SWITCH - BLACK 4 WAY ...........732RIGHT REAR DOOR SPEAKER - WHITE 3 WAY ............................732RIGHT REMOTE RADIO SWITCH - BLACK 2 WAY. ..........................733RIGHT VISOR/VANITY LAMP - BLACK 2 WAY ..............................733SEAT BELT SWITCH - WHITE 2 WAY .....................................733SEAT MODULE C1 (PREMIUM) - BLACK 20 WAY ...........................734SEAT MODULE C2 (PREMIUM) - ORANGE 20 WAY .........................735SENTRY KEY IMMOBILIZER MODULE - BLACK 6 WAY ......................735SHIFTER ASSEMBLY C1 (DIESEL) - BLACK 12 WAY ........................736SHIFTER ASSEMBLY C2 (DIESEL) -6WAY................................736SIREN (BUILT-UP-EXPORT) -3WAY......................................736SUNRO<strong>OF</strong> CONTROL MODULE -8WAY ..................................736SUNRO<strong>OF</strong> MOTOR C1 - WHITE 2 WAY ...................................737SUNRO<strong>OF</strong> MOTOR C2 - BLACK 3 WAY ...................................737SUNRO<strong>OF</strong> SWITCH - GRAY 5 WAY .......................................737TRANSMISSION CONTROL MODULE (4.7L) - BLACK 60 WAY. ................738TRANSMISSION CONTROL MODULE C1 (DIESEL) - BLACK 18 WAY. ..........739TRANSMISSION CONTROL MODULE C2 (DIESEL) - BLACK 14 WAY. ..........739VEHICLE INFORMATION CENTER - BLACK 6 WAY. .........................739WASHER FLUID LEVEL SWITCH - GRAY 2 WAY ............................74010.0 SCHEMATIC DIAGRAMS. ...............................................74110.1 AIRBAG SYSTEM .................................................74110.2 AUDIO SYSTEM ..................................................74210.2.1 PREMIUM AUDIO SYSTEM .................................74210.2.2 BASE AUDIO SYSTEM. ....................................74310.2.3 REMOTE RADIO CONTROLS ...............................74410.2.4 CD CHANGER. ...........................................74410.3 HEATING & A/C. ..................................................74510.3.1 AUTOMATIC ZONE CONTROL – LHD ........................74510.3.2 AUTOMATIC ZONE CONTROL – RHD ........................74610.3.3 MANUAL TEMPERATURE CONTROL ........................74710.4 CHIME ..........................................................74710.5 DOOR AJAR SYSTEM .............................................74810.6 EVIC. ...........................................................74910.7 EXTERIOR LIGHTING .............................................74910.8 INTERIOR LIGHTING ..............................................75010.9 MECHANICAL INSTRUMENT CLUSTER ..............................75110.10 MEMORY HEATED SEATS .........................................75210.10.1 LAREDO ONLY ...........................................75210.10.2 LIMITED ONLY ...........................................75310.11 POWER DOOR LOCKS ............................................75410.12 POWER MIRROR SYSTEM .........................................75410.12.1 DRIVER MIRROR .........................................75410.12.2 PASSENGER MIRROR. ....................................75510.13 POWER SUNRO<strong>OF</strong> ...............................................75510.14 POWER WINDOWS ...............................................75610.14.1 DRIVER SIDE ............................................756xvi
<strong>TABLE</strong> <strong>OF</strong> <strong>CONTENTS</strong> - Continued10.14.2 PASSENGER SIDE ........................................75610.15 VEHICLE COMMUNICATION ........................................75710.15.1 VEHICLE COMMUNICATION – LHD ..........................75710.15.2 VEHICLE COMMUNICATION – RHD. .........................75810.15.3 PCM COMMUNICATION. ...................................75910.15.4 ECM COMMUNICATION – DIESEL ...........................75910.16 VEHICLE THEFT SECURITY SYSTEM (VTSS) .........................76010.16.1 INTRUSION TRANSCEIVER MODULE (EXPORT ONLY) .........76110.17 WINDSHIELD WIPER SYSTEM. .....................................76210.17.1 FRONT WIPERS ..........................................76210.17.2 REAR WIPER SYSTEM ....................................763xvii
NOTESxviii
GENERAL INFORMATION1.0 INTRODUCTIONThe procedures contained in this manual includeall the specifications, instructions and graphicsneeded to diagnose 2002 body system problems. Thediagnostics in this manual are based on the failurecondition or symptom being present at the time ofdiagnosis.Please follow the recommendations below whenchoosing your diagnostic path.1. First make sure the DRBIII is communicatingwith the appropriate modules; i.e., if theDRBIII displays a ‘‘No Response’’ or a “Bus Signals Open” condition, you must diagnose thatfirst.2. Read DTC’s (diagnostic trouble codes) with theDRBIII.3. If no DTC’s are present, identify the customercomplaint.4. Once the DTC or customer complaint is identified,locate the matching test in the Table ofContents and begin to diagnose the symptom.All component location views are in Section 8.0. Allconnector pinouts are in Section 9.0. All schematicsare in Section 10.0.An * placed before the symptom description indicatesa customer complaint.When repairs are required, refer to the appropriateservice information for the proper removal andrepair procedure.Diagnostic procedures change every year. Newdiagnostic systems may be added: carryover systemsmay be enhanced. READ THIS MANUALBEFORE TRYING TO DIAGNOSE A VEHICLEDIAGNOSTIC TROUBLE CODE. It is recommendedthat you review the entire manual to becomefamiliar with all the new and changed diagnosticprocedures.This book reflects many suggested changes fromreaders of past issues. After using this book, if youhave any comments or suggestions, please fill outthe sheet in the back of this book and mail it back tous.1.1 SYSTEM COVERAGEThis diagnostic procedures manual covers all2002 JEEP GRAND CHEROKEE ‘‘body’’ relatedfaults. This diagnostic procedures manual also coversboth left hand drive (LHD) and right hand drive(RHD) vehicles. There may be some slight differencesin the location views of components. If thelocation views shown are on a LHD vehicle, a RHDvehicle will be symmetrically opposite.1.2 SIX-STEP TROUBLESHOOTINGPROCEDUREDiagnosis of the body system is done in six basicsteps:• verification of complaint• verification of any related symptoms• symptom analysis• problem isolation• repair of isolated problem• verification of proper operation2.0 IDENTIFICATION <strong>OF</strong>SYSTEMThe vehicle systems that are part of the ‘‘body’’system are:• Airbag• Audio• Chime• Communication• Electrically heated system• Exterior lighting• Heating and A/C• Instrument Cluster• Interior Lighting• Memory Seat• Overhead Console• Power Door Lock/RKE• Power mirrors• Power sunroof• Power windows• Tire Pressure Monitoring (TPM)• Vehicle theft security system (VTSS)• Windshield Wiper and Washer3.0 SYSTEM DESCRIPTION ANDFUNCTIONAL OPERATIONThe body system on the 2002 WJ/WG consists ofa combination of modules that communicate overthe PCI bus (Programmable Communication Interfacemultiplex system). Through the PCI bus, informationabout the operation of vehicle componentsand circuits is relayed quickly to the appropriatemodule(s). All modules receive all the informationtransmitted on the bus even though a module maynot require all information to perform it’s function.It will only respond to messages ‘‘addressed’’ to itthrough a binary coding process. This method of1
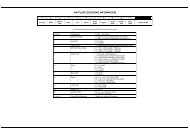
GENERAL INFORMATIONdata transmission significantly reduces the complexityof the wiring in the vehicle and the size ofwiring harnesses. All of the information about thefunctioning of all the systems is organized, controlled,and communicated by the PCI bus, which isdescribed in the Communication Section of thisgeneral information.3.1 AIRBAG SYSTEM/OCCUPANTRESTRAINT CONTROLLER SYSTEMThe 2002 WJ/WG Airbag System contain thefollowing components: Occupant Restraint Controller(ORC), Airbag Warning Indicator, Clockspring,Driver and Passenger Airbags, Driver and PassengerHall-effect Seat Belt buckle Switches (SBS),Driver and Passenger Front and Side Impact Sensors,curtain Airbags, and front impact sensors.The Occupant Restraint Controller (ORC) is anew type of Airbag Control Module (ACM). The newACM supports staged airbag deployment and remoteimpact sensing. Staged deployment is theability to trigger airbag system squib inflators individuallyas needed to provide the appropriaterestraint for the severity of the impact. The ACMhas four major functions: PCI Bus communications,onboard diagnostics, impact sensing, and componentdeployment. The ACM also contains anenergy-storage capacitor. This capacitor storesenough electrical energy to deploy the front airbagcomponents for two seconds following a batterydisconnect or failure during an impact. The ACM issecured to the floor panel transmission tunnel underthe console. The ACM cannot be repaired oradjusted.The ACM sends and/or receives PCI Bus messageswith the Instrument Cluster (MIC), BodyControl Module (BCM), and Impact Sensors Diagnostictrouble codes will be set if the communicationwith these modules is lost or contains invalid information.The microprocessor in the ACM monitors theimpact sensors signals and the airbag system electricalcircuits to determine the system readiness. Ifthe ACM detects a monitored system fault it sendsa message to the instrument cluster via PCI bus toturn on the airbag warning indicator. The ACM canset both active and stored diagnostic trouble codesto aid in the diagnosing system problems. SeeDIAGNOSTIC TROUBLE CODES in this section.The ACM uses two front impact sensors and ACMAccelerometer to sense the rate of vehicle deceleration,provide verification of the direction and severityof an impact. A pre-programmed decision algorithmin the ACM microprocessor determines whenthe deceleration rate is severe enough to requireairbag system protection. The ACM also uses thedriver and front passenger seat belt switch status(buckled or unbuckled) and crash severity to determinethe level of driver and front passenger airbagdeployment, low medium or high. When the programmedconditions are met, the ACM sends anelectrical signal to deploy the appropriate airbagsystem components.WARNING: THE AIRBAG SYSTEM IS ASENSITIVE, COMPLEX ELECTRO-MECHANICAL UNIT. BEFORE ATTEMPTINGTO DIAGNOSE OR SERVICE ANY AIRBAGSYSTEM OR RELATED STEERING WHEEL,STEERING COLUMN, OR INSTRUMENTPANEL COMPONENTS YOU MUST FIRSTDISCONNECT AND ISOLATE THE BATTERYNEGATIVE (GROUND) CABLE. WAIT TWOMINUTES FOR THE SYSTEM CAPACITOR TODISCHARGE BEFORE FURTHER SYSTEMSERVICE. THIS IS THE ONLY SURE WAY TODISABLE THE AIRBAG SYSTEM. FAILURETO DO THIS COULD RESULT IS ACCIDENTALAIRBAG DEPLOYMENT AND POSSIBLEPERSONAL INJURY. NEVER STRIKE ORKICK THE AIRBAG CONTROL MODULE, ASIT CAN DAMAGE THE IMPACT SENSOR ORAFFECT ITS CALIBRATION. IF AN AIRBAGCONTROL MODULE IS ACCIDENTALLYDROPPED DURING SERVICE, THE MODULEMUST BE SCRAPPED AND REPLACED WITHA NEW UNIT.The airbag warning indicator is the only point atwhich the customer can observe symptoms of asystem malfunction. Whenever the ignition key isturned to the run or start position, the ACM performsa lamp check by turning the airbag warningindicator on for 6-8 seconds. After the lamp check, ifthe indicator turns off, it means that the ACM haschecked the system and found it to be free ofdiscernible malfunctions. If the lamp remains on,there could be an active fault in the system or theMIC lamp circuit may be internally shorted. If thelamp comes on and stays on for a period longer than6-8 seconds then goes off, there is usually an intermittentproblem in the system.3.1.1 DRIVER AIRBAGThe airbag protective trim cover is the mostvisible part of the driver side airbag system. Theprotective trim cover is fitted to the front of theairbag module and forms a decorative cover in thecenter of the steering wheel. The module ismounted directly to the steering wheel. Locatedunder the trim cover are the horn switch, the airbagcushion, and the airbag cushion supporting components.The airbag module includes a housing towhich the cushion and hybrid inflator are attached2
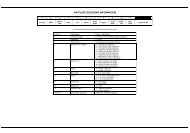
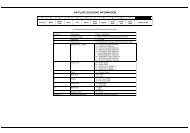
GENERAL INFORMATIONand sealed. The 2002 WJ/WG is equipped withdriver airbag with dual stage inflators. When suppliedwith the proper electrical signal, the inflatoror inflators discharge the gas directly into thecushion. The airbag module cannot be repaired, andmust be replaced if deployed or in any way damaged.WARNING: THE DRIVER AIRBAG MODULECONTAINS ARGON GAS PRESSURIZED TOOVER 17236.89 Kpa (2500 PSI). DO NOTATTEMPT TO DISMANTLE AN AIRBAGMODULE OR TAMPER WITH ITS INFLATOR.DO NOT PUNCTURE, INCINERATE, ORBRING INTO CONTACT WITH ELECTRICITY.DO NOT STORE AT TEMPERATUREEXCEEDING 93°C (200°F). REPLACE AIRBAGSYSTEM COMPONENTS ONLY BUTINTERNAL DIFFERENCES MAY RESULT ININFERIOR OCCUPANT PROTECTION. THEFASTENERS, SCREWS, AND BOLTSORIGINALLY USED FOR THE AIRBAGSYSTEM COMPONENTS HAVE SPECIALCOATINGS AND ARE SPECIFICALLYDESIGNED FOR THE AIRBAG SYSTEM. THEYMUST NEVER BE REPLACED WITH ANYSUBSTITUTES. ANY TIME A NEW FASTENERIS NEEDED, REPLACE IT WITH THECORRECT FASTENERS PROVIDED IN THESERVICE PACKAGE OR SPECIFIED IN THEMOPAR PARTS CATALOG.CAUTION: Deployed Front Air Bags may ormay not have live pyrotechnic material withinthe air bag inflator. Do not dispose of 2002Model Year Driver and Passenger Airbagsunless you are sure of complete deployment.Please refer to the Hazardous SubstanceControl System for Proper Disposal. Disposeof deployed air bags in a manner consistentwith state, provincial, local, and federalregulations. Use the following table toidentify the status of the Airbag Squib.AIRBAG SQUIB STATUS(1) Using a DRBIII read Airbag DTC’s If the following active codes are present:ACTIVE DTC CONDITIONS SQUIB STATUSDriver Squib 1 openDriver Squib 2 openDriver Squib 1 openDriver Squib 2 openDriver Squib 1 openDriver Squib 2 openIf Driver Squib 1 openCheck the stored DTC’s AND IF the stored minutesfor both are within 15 minutes of each other.Check the stored DTC’s AND IF the stored minutesfor Driver Squib 2 open is GREATER thanthe stored minutes for Driver Squib 1 by 15 minutesor more.Check the stored DTC’s AND IF the stored minutesfor Driver Squib 1 open is GREATER thanthe stored minutes for Driver Squib 2 by 15 minutesor more.AND IF Driver Squib 2 opens is NOT an activecode.Both Driver Squib 1and 2 were used.Driver Squib 1 wasused;Driver Squib 2 is live.Driver Squib 1 is live;Driver Squib 2 wasused.Driver Squib 1 wasused;Driver Squib 2 is live.3
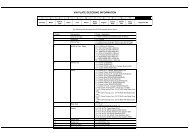
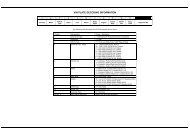
GENERAL INFORMATIONACTIVE DTC CONDITIONS SQUIB STATUSIf Driver Squib 2 openAND IF Driver Squib 1 open is NOT an activecode.Driver Squib 1 is live;Driver Squib 2 wasused.If neither of the following codes is an active code:ACTIVE DTCDriver squib 1 openDriver Squib 2 open3.1.2 CLOCKSPRINGSQUIB STATUSStatus of Airbag isUnknown.The clockspring is mounted on the steering columnbehind the steering wheel. This assemblyconsist of a plastic housing which contains a flat,ribbon-like, electrically conductive tape that windsand unwinds with the steering wheel rotation. Theclockspring is used to maintain a continuous electricalcircuit between the instrument panel wiringand the driver airbag, the horn, and the vehiclespeed control switches if equipped. The clockspringmust be properly centered when it is reinstalled onthe steering column following any service procedure,or it could be damaged. The clockspring cannotbe repaired and it must be replaced.3.1.3 PASSENGER AIRBAGSThe 2002 WJ/WG is equipped with front passengerairbag with dual stage squib inflators. Whensupplied with the proper electrical signal the passengerairbag inflator or inflators discharge the gasdirectly into the cushion. The airbag module cannotbe repaired, and must be replaced if deployed or inany way damaged.WARNING: THE PASSENGER AIRBAG MODULECONTAINS INERT GAS PRESSURIZED TO17236.89 Kpa (2500 PSI). DO NOT ATTEMPT TODISMANTLE AN AIRBAG MODULE OR TAMPERWITH ITS INFLATOR. DO NOT PUNCTURE,INCINERATE, OR BRING INTO CONTACT WITHELECTRICITY. DO NOT STORE ATTEMPERATURE EXCEEDING 93°C (200°F).REPLACE AIRBAG SYSTEM COMPONENTS ONLYWITH PARTS SPECIFIED IN THE MOPAR PARTSCATALOG. SUBSTITUTE PARTS MAY APPEARINTERCHANGEABLE, BUT INTERNALDIFFERENCES MAY RESULT IN INFERIOROCCUPANT PROTECTION. THE FASTENERS,SCREWS, AND BOLTS ORIGINALLY USED FORTHE AIRBAG SYSTEM COMPONENTS HAVESPECIAL COATINGS AND ARE SPECIFICALLYDESIGNED FOR THE AIRBAG SYSTEM. THEYMUST NEVER BE REPLACED WITH ANYSUBSTITUTES. ANY TIME A NEW FASTENER ISNEEDED, REPLACE IT WITH THE CORRECTFASTENERS PROVIDED IN THE SERVICEPACKAGE OR SPECIFIED IN THE MOPAR PARTSCATALOG.CAUTION: Deployed Front Air Bags may ormay not have live pyrotechnic material withinthe air bag inflator. Do not dispose of 2002Model Year Driver and Passenger Airbagsunless you are sure of complete deployment.Please refer to the Hazardous SubstanceControl System for Proper Disposal. Disposeof deployed air bags in a manner consistentwith state, provincial, local, and federalregulations. Use the following table toidentify the status of the Airbag Squib.AIRBAG SQUIB STATUS(1) Using a DRBIII read Airbag DTC’s If the following active codes are present:ACTIVE DTC CONDITIONS SQUIB STATUSPassenger Squib 1openPassenger Squib 2openPassenger Squib 1openPassenger Squib 2openCheck the stored DTC’s AND IF the storedminutes for both are within 15 minutes of eachother.Check the stored DTC’s AND IF the storedminutes for Passenger Squib 2 open isGREATER than the stored minutes for PassengerSquib 1 by 15 minutes or more.4Both Passenger Squib1 and 2 were used.Passenger Squib 1 wasused; Passenger Squib2 is live.
GENERAL INFORMATIONACTIVE DTC CONDITIONS SQUIB STATUSPassenger Squib 1openPassenger Squib 2openIf Passenger Squib 1openIf Passenger Squib 2openCheck the stored DTC’s AND IF the storedminutes for Passenger Squib 1 open isGREATER than the stored minutes for DriverSquib 2 by 15 minutes or more.AND IF Passenger Squib 2 open is NOT an activecode.AND IF Passenger Squib 1 open is NOT an activecode.Passenger Squib 1 islive; Driver Squib 2was used.Passenger Squib 1 wasused; Passenger Squib2 is live.Passenger Squib 1 islive; Passenger Squib 2was used.If neither of the following codes is an active code:ACTIVE DTCPassenger squib 1 openPassenger squib 2 openSQUIB STATUSStatus of Airbag isUnknown.3.1.4 SEAT BELT SWITCHES (SBS)The hall-effect driver and front passenger seatbelt switches provide the seat belt status, buckledor unbuckled, via hardwired inputs to the ACM.The ACM uses seat belt switch inputs to determinethe appropriate level of airbag deployment. TheACM also controls the seat belt warning indicatorvia a PCI Bus message to the instrument cluster.The indicator will be turned on if the driver seatbelt status is unbuckled. If the seat belt switchesare damaged or defective the seat belt buckleassembly must be replaced. The ACM continuouslymonitors the seat belt switch circuits for an open orshorted conditions.3.1.5 CURTAIN AIRBAGSThe Left and Right curtain airbags are located inthe outboard edge of the roof under the headliner,just above the door openings. When supplied withthe proper electrical signal the inflator can dischargethe compress gas directly into the curtainairbag. Upon deployment, the curtain will tearopen the headliner allowing the curtain airbag tofully deploy between the headliner and seat. Thecurtain airbag cannot re repaired and must bereplaced if deployed or in any way damaged.WARNING: THE CURTAIN AIRBAGCONTAINS AN INERT GAS PRESSURIZEDTO 17236.89 Kpa (2500 PSI). DO NOTATTEMPT TO DISMANTLE AN AIRBAGMODULE OR TAMPER WITH ITS INFLATOR.DO NOT PUNCTURE, INCINERATE, ORBRING INTO CONTACT WITH ELECTRICITY.DO NOT STORE AT TEMPERATUREEXCEEDING 93°C (200°F). REPLACEAIRBAG SYSTEM COMPONENTS ONLYWITH PARTS SPECIFIED IN THE CHRYSLERMOPAR PARTS CATALOG. SUBSTITUTEPARTS MAY APPEAR INTERCHANGEABLE,BUT INTERNAL DIFFERENCES MAY RESULTIN INFERIOR OCCUPANT PROTECTION. THEFASTENERS, SCREWS, AND BOLTSORIGINALLY USED FOR THE AIRBAGSYSTEM COMPONENTS HAVE SPECIALCOATINGS AND ARE SPECIFICALLYDESIGNED FOR THE AIRBAG SYSTEM.THEY MUST NEVER BE REPLACED WITHANY SUBSTITUTES. ANY TIME A NEWFASTENER IS NEEDED, REPLACE IT WITHTHE CORRECT FASTENERS PROVIDED INTHE SERVICE PACKAGE OR SPECIFIED INTHE MOPAR PARTS CATALOG.3.1.6 FRONT IMPACT SENSORThe front impact sensors are electronic accelerometersthat sense the rate of vehicle deceleration,and then combined with the ACM Accelerometerprovides verification of the direction and severity ofan impact. Each sensor also contains an electroniccommunication chip that allows the unit to communicatethe sensor status as well as sensor faultinformation to the microprocessor in the AirbagControl Module. The ACM microprocessor continuouslymonitors all of the front passive restraintsystem electrical circuits to determine the systemreadiness. If the ACM detects a system fault, it setsa Diagnostic Trouble Code and controls the airbagindicator operation accordingly. The impact sen-5
GENERAL INFORMATIONsors each receive battery current and groundthrough dedicated left and right sensor signal andground circuits from the ACM. The impact sensorsand the ACM communicate by modulating thevoltage in the sensor signal circuit. If the sensor isdropped it must be replaced. Disconnect the batteryor remove both airbag fuses before servicingimpact sensors.CAUTION: Do not remove or install impactsensors while the sensor is connected to thevehicle wiring.3.1.7 SIDE IMPACT SENSORThe side impact sensors are electronic accelerometersthat sense the rate of vehicle decelerationand when combined with the ACM Accelerometerprovides verification of the direction and severity ofa side impact. Each sensor also contains an electroniccommunication chip that allows the unit tocommunicate the sensor status as well as sensorfault information to the microprocessor in the AirbagControl Module. The ACM microprocessor continuouslymonitors all of the passive restraintsystem electrical circuits to determine the systemreadiness. If the ACM detects a system fault, it setsa Diagnostic Trouble Code and controls the airbagwarning indicator operation accordingly. The sideimpact sensors receive battery current and groundthrough dedicated driver and passenger sensorsignal and ground circuits from the ACM. Theimpact sensors and the ACM communicate bymodulating the voltage in the sensor signal circuit.If the sensor is dropped it must be replaced. Disconnectthe battery or remove both airbag fusesbefore servicing impact sensors.CAUTION: Do not remove or install theimpact sensors while the sensor isconnected to the vehicle wiring.3.1.8 SPECIAL TOOLSSome airbag diagnostic test use special tools,airbag load tools, 8310 and 8443 for testing squibcircuits. The load tools contain fixed resistive loads,jumpers and adapters. The fixed loads are connectedto cables and mounted in a storage case. Thecables can be directly connected to some airbagsystem connectors. Jumpers are used to convert theload tool cable connectors to the other airbag systemconnectors. The adapters are connected to the moduleharness connector to open shorting clips andprotect the connector terminal during testing. Whenusing the load tool follow all of the safety proceduresin the service information for disconnecting airbagsystem components. Inspect the wiring, connectorand terminals for damage or misalignment. Substitutethe airbag load tool in place of a Driver orPassenger Airbag, curtain airbag, clockspring (use ajumper if needed). Then follow all of the safetyprocedures in the service information for connectingairbag system components. Read the module activeDTC’s. If the module reports NO ACTIVE DTC’s thedefective components has been removed from thesystem and should be replaced. If the DTC is stillactive, continue this process until all component inthe circuit have been tested. Then disconnect themodule connector and connect the matching adapterto the module connector. With all airbags disconnectedand the adapter installed the squib wiringcan be tested for open and shorted conditions.3.1.9 DIAGNOSTIC TROUBLE CODESAirbag diagnostic trouble codes consist of activeand stored codes. If more than one code exists,diagnostic priority should be given to the activecodes. Each diagnostic trouble code is diagnosed byfollowing a specific testing procedure. The diagnostictest procedures contain step-by-step instructionsfor determining the cause of the troublecodes. It is not necessary to perform all of the testsin this book to diagnose an individual code. Alwaysbegin by reading the diagnostic trouble codes withthe DRBIII. This will direct you to the specifictest(s) that must be performed. In certain testprocedures within this manual, diagnostic troublecodes are used as a diagnostic tool.3.1.9.1 ACTIVE CODESThe code becomes active as soon as the malfunctionis detected or key-on, whichever occurs first. Anactive trouble code indicates an on-going malfunction.This means that the defect is currently thereevery time the airbag control module checks thatcircuit or component. It is impossible to erase anactive code. Active diagnostic trouble codes for theairbag system are not permanent and will changewithin 12 seconds the reason for the code is corrected.With the exception of the warning lamp trouble codesor malfunctions, when a malfunction is detected, theairbag lamp remains lit for a minimum of 12 secondsor as long as the malfunction is present.3.1.9.2 STORED CODESAirbag codes are automatically stored in theACM’s memory as soon as the malfunction is detected.A stored code indicates there was an activecode present at some time. When a trouble codeoccurs, the airbag warning indicator illuminatesfor 12 seconds minimum (even if the problemexisted for less than 12 seconds). The code isstored, along with the time in minutes it wasactive, and the number of times the ignition hasbeen cycled since the problem was last detected.6
GENERAL INFORMATIONThe minimum time shown for any code will be oneminute, even if the code was actually present forless than one minute. Thus, the time shown for acode that was present for two minutes 13 seconds,for example, would be three minutes. If a malfunctionis detected a diagnostic trouble code is storedand will remain stored. When and if the malfunctionceases to exist, an ignition cycle count will beinitiated for that code. If the ignition cycle countreaches 254 without a reoccurrence of the samemalfunction, the diagnostic trouble code is erasedand that ignition cycle counter is reset to zero. Ifthe malfunction reoccurs before the count reaches254, then the ignition cycle counter will be resetand diagnostic trouble code will continue to be astored code. If a malfunction is not active whileperforming a diagnostic test procedure, the activecode diagnostic test will not locate the source of theproblem. In this case, the stored code can indicatean area to inspect. Maintain a safe distance fromall airbags while performing the following inspection.If no obvious problems are found, erase storedcodes, and with the ignition on wiggle the wireharness and connectors, rotate the steering wheelfrom stop to stop. Recheck for codes periodically asyou work through the system. This procedure mayuncover a malfunction that is difficult to locate.3.2 AUDIO SYSTEMThe PCI Bus inputs into the radio are used forVF dimming and remote steering wheel controls.All the radios are capable of displaying faults andallowing certain actuation tests through the use ofthe DRBIII. When attempting to perform PCI Busdiagnostics, the first step is to identify the radio inuse in the vehicle.When trouble shooting output shorts or “output”error messages, the following applies:On radios without an external amplifier, theterm output refers to the path between the radioand the speaker. This type of circuit can be monitoredall the way through the speaker connectionsby the radio assembly. When the radio displays ashorted output DTC with this type of system, thespeaker, radio, or wiring could be at fault.On radios with an external amplifier, the term“output” refers to the circuit between the radioconnector and the amplifier. The radio is capable ofmonitoring only this portion and can tell nothingabout the circuit between the amplifier and thespeakers. Consequently, a shorted output DTC onthis type of system would only refer to this circuit.A faulty speaker could not cause this DTC.3.2.1 REMOTE RADIO CONTROLSThese radios can be controlled via remote radioswitches (optional). These switches are located onthe back side of the steering wheel. They controlmode, preset, seek up, seek down, volume up andvolume down functions.These functions are inputs to the Body ControlModule and can be read with the DRBIII. Theswitches are a multiplexed signal to the BCM. Theradio control MUX circuit is a 5 volt line that ispulled to ground through different value resistorsbuilt into the switches. This causes a voltage dropto be seen by the BCM and it sends a specificmessage to the radio on the PCI Bus circuit. Theradio then responses to the message.This circuit is fairly simple to troubleshoot. Thecircuit must be complete from the switches in thesteering wheel to the BCM. The ground must becomplete so that the switches can cause the voltagedrop for the BCM to see. The circuit passes throughthe clockspring so continuity through this devisemust be verified.3.2.2 CD CHANGERThe CD Changer is mounted in the cargo area ofthe passenger compartment on the right rear quarterpanel. The CD Changer features a removable10-CD magazine. The CD Changer receives bothground and radio switch power through the radio.The controls on the radio operate the CD Changerthrough messages sent over the PCI Bus. Thetwo-channel audio outputs of the CD Changer arehard-wired back to the radio, which then outputsthe signal through the channels to the speakers oramplifiers.3.3 HEATING & A/C SYSTEM3.3.1 SYSTEM AVAILABILITY• Depending on the model, either a Manual TemperatureControl (MTC) or Automatic Zone Control(AZC) HVAC system is available in thesevehicles.3.3.2 SYSTEM CONTROLSManual Temperature Control (MTC)• Refer to the Service Manual for MTC systemdescription and operation information.The Automatic Zone Control (AZC) Module:• is fully addressable with the DRBIII.• communicates over the Programmable CommunicationInterface Multiplex System (PCI) Bus.• has dual infrared sensors, mounted in the AZCmodule face, which independently measure surfacetemperature to maintain occupant comfortlevels.7
GENERAL INFORMATION• has dual-zone temperature-controls to provide awide side-to-side variation in temperature tomeet the needs of either front seat occupant.• can be operated in a manual mode.• uses engine temperature data, received over thePCI Bus, for cold engine blower lock-out.• uses engine RPM data, received over the PCIBus, for wide-open throttle A/C cut-out.• uses vehicle speed data, received over the PCIBus, to determine air-flow over the condenser foroptimum cooling performance.• uses Evaporator Temperature Sensor data, receivedover the PCI Bus, to prevent evaporatorfreeze up while maintaining optimum coolingperformance.• uses Ambient Temperature Sensor data, receivedover the PCI Bus, to optimize comfortcontrol.• provides an A/C request to the BCM when compressoroperation is desired.• controls rear defogger operation.• controls fan speed, providing 10 blower speeds inmanual mode and infinite speeds in automaticmode.▪ The Blower Motor Controller provides a 5.0volt signal to the AZC Module over the BlowerMotor Control circuit. The AZC Module providesa variable duty cycle ground to the 5.0volt signal based on input from the blowerswitch. When the blower switch is set to LOspeed, the AZC Module provides a short dutycycle (less time grounding the signal voltage).As higher blower speeds are requested, theAZC Module increases the duty cycle (moretime grounding the signal voltage). When theblower switch reaches HI speed, the duty cycleincreases to where the signal pattern is almosta flat line (with brief voltage spikes).• controls electronic door actuator operation.▪ A simplified control system for operation of themode, recirculation, and temperature controlactuators provides positive positioning withoutthe complexity of feedback from position sensors.The AZC Module knows the number ofoperating actuator revolutions required for fulldoor travel as well as the number of actuatorcommutator pulses per revolution. Using theseparameters, the AZC Module runs the actuatorfor the number of commutator pulses thatcorrespond to the desired door position. Tomaintain accuracy, the system recalibrates itselfperiodically at known zero and full travelconditions.• Refer to the Service Manual for additional AZCsystem description and operation information.The Dual-Zone AZC HVAC system uses:• two, two-wire electronic blend door actuators.• one, two-wire electronic mode door actuator.• one, two-wire electronic recirculation door actuator.3.3.3 SYSTEM REVISIONSThe 2002 WJ/WG HVAC systems remain mostlycarryover from 2001. Revisions to the 2002 MTCand AZC HVAC systems include:• the addition of an Evaporator Temperature Sensorwhich is hard wired to the BCM. Data fromthe sensor is used to prevent evaporator freezeup while maintaining optimum cooling performance.• new Diagnostic Trouble Codes (DTCs) for a shortlow and for an open on the Evaporator TemperatureSensor circuit.3.3.4 SYSTEM DIAGNOSTICS (MTC)Fault detection is through Diagnostic TroubleCodes (DTCs)• DTCs are displayed by the DRBIII.• DTCs pertaining to the Evaporator TemperatureSensor are stored in the BCM. Diagnostics forthese DTCs can be found in the Heating & A/Ccategory of this manual.• Diagnostics for symptoms pertaining to A/C compressoroperation can be found in the Heating &A/C category of this manual and in the PowertrainDiagnostic Procedures manual.• DTCs pertaining to A/C compressor control circuitsare stored in the PCM/ECM. Diagnosticsfor these DTCs can be found in the PowertrainDiagnostic Procedures manual• Refer to the Service Manual for additional MTCsystem diagnosis and testing information.3.3.5 SYSTEM DIAGNOSTICS (AZC)Fault detection is through active and stored DiagnosticTrouble Codes (DTCs)• DTCs are displayed by the DRBIII.AZC Module DTCs• Active DTCs are those which currently exist inthe system. The condition causing the fault mustbe repaired in order to clear this type of DTC.• Active DTCs become stored DTCs when thecondition that caused the active DTC no longerexists.• Stored DTCs will be erased after 72 key cycles orby clearing them with the DRBIII.• Diagnostics for symptoms pertaining to A/C compressoroperation can be found in the Heating &8
GENERAL INFORMATIONA/C category of this manual and in the PowertrainDiagnostic Procedures manual.• Refer to the Service Manual for additional AZCsystem diagnosis and testing information.BCM DTCs• DTCs pertaining to the Evaporator TemperatureSensor are stored in the BCM. Diagnostics forthese DTCs can be found in the Heating & A/Ccategory of this manual.PCM/ECM DTCs• DTCs pertaining to A/C compressor control circuitsare stored in the PCM/ECM. Diagnosticsfor these DTCs can be found in the PowertrainDiagnostic Procedures manual.3.3.6 FOLLOWING A REPAIR (AZC)The AZC Reset Module function:• is actuated with the DRBIII.• must be actuated if the AZC Module or any dooractuator is replaced.• homes and repositions door actuators.3.4 BODY CONTROL MODULEThe body control module (BCM) supplies vehicleoccupants with visual and audible information andcontrols various vehicle functions. To provide andreceive information, the module is interfaced to thevehicle’s serial bus communication network (ProgrammableCommunication Interface or PCI bus).This network consists of the powertrain controlmodule (PCM) or engine control module (ECM)(diesel), the memory/heated seat module (MHSM,MSM or HSM), the sentry key immobilizer module(SKIM), the transmission control module (TCM),the electro/mechanical instrument cluster (MIC),the driver door module (DDM), the passenger doormodule (PDM), the airbag control module (ACM),the controller antilock brake (CAB), the optionalelectronic vehicle information center (EVIC), theoptional PCI radio, the optional CD changer, theoptional automatic zone control module (AZC), theshifter assembly (diesel), the optional power amplifier,the optional adjustable pedal module, theoptional rain sensor, and the optional intrusiontransceiver module (export). The BCM is operationalwhen battery power is supplied to the moduleand in addition, ignition switch power is neededfor ignition switched functions.The BCM provides the following new features:• Full control of all exterior and interior lamps,including these features:> A Battery Saver automatically turns off allexterior and interior lamps within 8 minutesafter the ignition is turned off, if they are notturned off by the driver. This includes thefront and rear reading/courtesy lamps andthe cargo area dome lamp, even if they areturned on manually.> Theater-style interior lighting dims graduallywhen the doors are closed.> Interior courtesy lamp operation may be ‘‘defeated’’using the dimmer control ring on theleft multifunction switch.> Instrument panel light intensity may be maximizedfor daytime visibility with the headlamps or parking lights by using the dimmercontrol ring on the left multifunction switch.• An Accessory/Sunroof Delay allows continuedoperation of the sunroof and the power windowsafter ignition-<strong>OF</strong>F. These accessories can be operatedup to 45 seconds after ignition-<strong>OF</strong>F oruntil door is opened.• Beep tones for warnings and programming actionsassociated with the Sentry Key Immobilizersystem and the EVIC.The BCM also provides the following features:• Intermittent wipe and low speed wiper control• Wiper system status• Ignition on/off timer• VF displays synchronization• Rear door and liftgate ajar status• Acquisition & transmission of external temperature• A/C select switch status• Chime• Courtesy lamps with fade to off feature• Reading lights/glove box lamp load sheddingcontrol• Exterior lighting control including automaticheadlamps, fog lamp control, rear fog lamp controland parking lamps• Exterior lamp status• Headlamp time delay upon ignition off and headlampsswitch off• Parade mode• Illuminated entry• Instrument panel dimming• Vehicle theft security system with panic & hornand hazard lamp activation• Key-in ignition switch interface• Brake fluid level switch/park brake switch interface• Seatbelt reminder• Speed sensitive intermittent wipe control• Remote radio switch interface to radio9
GENERAL INFORMATION• Vehicle ignition status• BCM self diagnostics• Liftgate courtesy lamp disable• Rear window defogger control• Accessory delay control (windows and sunroof)• Fuel economy and distance to empty (DTE) calculations• Heated seat switch status• Exterior lamp load shed• Support of EVIC programmable featuresThe BCM receives information over the PCI busfrom the PCM in order to support certain features.The required information is as follows:• Engine RPM• Engine and battery temperature• Injector on time and distance pulses• Vehicle speed• Engine model• Fuel tank level• Vehicle identification numberThe BCM provides the PCM with information onthe A/C switch status.The 2002 WJ/WG has several programmablefeatures which can be enabled/disabled by usingthe EVIC or the DRBIII.3.5 CHIME SYSTEMThe chime system responds to requests from fivemodules: the Body Control Module (BCM), ElectronicVehicle Information Center (EVIC), MechanicalInstrument Cluster (MIC), Sentry Key ImmobilizerModule (SKIM) and the Powertrain ControlModule (PCM). Each module monitors its relatedsystems and, via the PCI bus, requests the BCM tosound its internal chime as needed.The chime will sound for the following conditions:3.5.1 MIC REQUESTED CHIMEMESSAGES• Airbag• Check Gauges:• Low Fuel• ABS• Low Battery Voltage• Water in Fuel (Diesel)• Low Coolant level (Diesel)Charging Voltage LowCoolant Temp HighLow Oil PressureCharging Voltage High3.5.2 BCM INITIATED CHIME MESSAGES• Headlamp ON with ignition <strong>OF</strong>F and driver dooropen• Key in ignition with ignition <strong>OF</strong>F and driverdoor open• Seat Belt Warning• Overspeed Warning (Gulf Coast Countries Only)3.5.3 EVIC CHIME REQUESTEDMESSAGESWhen the following messages are displayed theEVIC will send a chime request to the BCM. TheBCM will respond with a series of chimes.• Turn signal on for more than 1.0 mile• Service reminder• Coolant level low• Washer fluid low• Tire Pressure Monitoring System alert messages(if equipped)• Door or liftgate ajar (when critical speed isreached)****CRITICAL SPEED CHARTDOOR AJARTURN CHIMEONTURN CHIME<strong>OF</strong>FLEFT REAR 3.0 MPH (5 kmh) 1.0 MPH (2 kmh)RIGHT REAR 3.0 MPH (5 kmh) 1.0 MPH (2 kmh)LIFTGATE 3.0 MPH (5 kmh) 1.0 MPH (2 kmh)PASSENGER 3.0 MPH (5 kmh) 1.0 MPH (2 kmh)DRIVER 10.0 MPH (16kmh)3.5.4 SENTRY KEY IMMOBILIZERSYSTEM7.0 MPH (11 kmh)The Sentry Key Immobilizer System (SKIS) alsouses tactile beep support from the chime warningsystem. The Sentry Key Immobilizer Module(SKIM) is programmed to send chime request messagesover the Programmable Communications Interface(PCI) data bus to the Body Control Module(BCM) to provide audible confirmation that:• the SKIM has been successfully placed in theCustomer Learn mode.• A new Sentry key transponder has been successfullyprogrammed by the SKIM.See the owner’s manual in the vehicle glove box formore information on the features, use and operationof the SKIS. Refer to Sentry Key ImmobilizerSystem in the Description and Operationsection of the service information - Vehicle Theft/10
GENERAL INFORMATIONAlarm systems for more information on the SKIS.For diagnostic information, refer to the PowertrainDiagnostic Information.3.6 DOOR AJAR SYSTEMThe door ajar, liftgate ajar, and the liftgateflip-up ajar states are used as inputs for variouscontrol modules on the vehicle. The DRBIII willdisplay the state of the door ajar, liftgate ajar, andliftgate flip-up ajar switches in Inputs/Outputs. It’simportant to note, that when a door, liftgate, orliftgate flip-up is closed, the switch state on theDRBIII will show OPEN, and when the door,liftgate, or liftgate flip-up is open, the switch statewill show CLOSED. During diagnosis, if a door,liftgate, or liftgate flip-up is closed and the DRBI-II displays the switch state as CLOSED, it indicatesa shorted ajar circuit. If the door, liftgate, orliftgate flip-up is open and the DRBIII displaysthe switch state as OPEN, it indicates an open ajarcircuit.3.7 DOOR MODULESA multiplexed door module is located on eachfront door, driver door (DDM) and passenger door(PDM). They control the following features: powerdoor locks, automatic (rolling) door locks, driverwindow express down, memory recall functions(adjustable pedals, memory seats and mirrors),remote keyless entry, power mirrors, heated mirrors,door key cylinder disarm (driver door only),door lock inhibit and auto unlock on exit. Reducedwiring complexity is a key advantage of usingmultiplexed door modules. These modules are addressablewith the DRBIII from the ‘‘Body’’ menuto facilitate faster and easier diagnosis.3.7.1 POWER WINDOWSThe power windows can be raised or loweredfrom the driver’s door module (DDM) or the individualdoor switch. The DDM has a lock out switchthat prevents the windows from being operatedfrom any switch except the driver’s door. When theswitch is pressed, it also shuts off the individualdoor switch LED’s.A feature of this system allows the windows to beoperated from any window switch for 45 secondsafter the ignition is turned off, provided a frontdoor is not opened. Another feature is the ‘‘ExpressDown’’ driver door only. When the driver pressesthe down switch to the second detent, the windowwill travel all the way down even if the switch isreleased. To stop the window travel, simply pressthe switch momentarily in either direction.Twelve volts are provided on the rear windowmotor circuit on both the up and down circuits. Theappropriate door module supplies this voltage.When the rear switch is pressed, the supply circuitto one side of the switch is opened and ground isprovided making a complete circuit and thereforeoperating the window motor.3.7.2 POWER DOOR LOCKSThe power door locks are operated four differentways:1. Front door lock switches2. Auto (rolling) door lock feature (vehicle speedabove 15 MPH (24 kmh) and all doors closed).3. Auto unlock on exit (vehicle stopped after autodoor locks had locked the doors, transmission inneutral or park and the drivers door is opened -all doors will unlock).4. Remote Keyless Entry (RKE)3.7.3 DOOR LOCK INHIBITWhen the key is in the ignition and in the offposition, and either front door is opened, the lockswitch on that door is disabled. The unlock switchis still functional. This protects against locking thevehicle with the keys still in the ignition. Forexample, if the driver’s door is opened and thepassenger front door closed, the locks are operationalfrom the passenger door switch.3.7.4 REMOTE KEYLESS ENTRYWhen the lock button on the transmitter ispressed, all locks will lock, illuminated entry willbe turned off, (providing all doors are closed) andthe vehicle theft security system (if equipped) willbe armed. When the unlock button on the transmitteris pressed one time, the driver front doorwill unlock, the illuminated entry will turn on thecourtesy lamps, the vehicle theft security system (ifequipped) will be disarmed. When the button ispressed a second time, the other doors will unlock.This feature is programmable to open all doors onone press using the EVIC or the DRBIII.The passenger door module (PDM) contains theRKE receiver. When the PDM receives a validsignal from the RKE transmitter, it will send asignal on the PCI bus to lock or unlock the doors.The RKE transmitter uses radio frequency signalsto communicate with the RKE receiver. If vehicle isequipped with the memory system, the memorymessage will be received as to which transmittersent the signal (1 or 2).3.7.4.1 PANIC FUNCTIONWhen the panic button on the RKE transmitteris pressed it pulsates the headlamp, hazard lampsand horn relays and actuates the courtesy lamprelay. By pressing the button again the horn and11
GENERAL INFORMATIONexterior lamps will stop but the courtesy lamps willremain on until the BCM times them out or theignition is turned on. The panic feature is able to beset if the ignition is on but only if the panic buttonis pressed prior to the vehicle being started, it willcontinue for three minutes or until the vehicle hasreached a speed of 15 MPH, if not canceled by theoperator.Actuating the headlamp, horn, hazard lampsand courtesy lamp relays with the DRBIII willverify that the circuits and the body control moduleare OK. If the panic feature is still inoperable withboth transmitters, replacement of the passengerdoor module will be necessary. If the function isinoperable with just one transmitter, then it isobvious that the transmitter must be replaced.3.7.5 ROLLING CODEThe rolling code feature changes part of thetransmitter message each time that it is used. Thetransmitter message and the receiver messageincrement together. Under certain conditions witha rolling code system (pressing a button on theRKE transmitter over 255 times outside the receiverrange, battery replacement, etc.), the receiverand transmitter can fall out of synchronization.Note: The lock function works from the RKEkeyfob even in out of synchronization condition andtherefore it could be verified by pressing the LOCKbutton on the RKE keyfob. To re-synchronize, pressand release the UNLOCK button on the RKEkeyfob repeatedly (it may take up to eight cycles)while listening carefully for the power door locks inthe vehicle to cycle, indicating that re-synchronizationhas occurred.3.7.6 PROGRAMMABLE DOOR LOCKFEATURES• The RKE can be changed to unlock all doors withone press• The Automatic Door Locks can be enabled/disabled• Auto Unlock on Exit can be enabled/disabled• RKE horn chirp on lock can be enabled/disabled• RKE optical chirp (turn signal lamps) can beenabled/disabled• Program a new RKE transmitter (DRBIII only)• RKE linked to memory (if equipped with memorysystem) enabled/disabled (DRBIII only).Allows memory to be operable only from thedriver door switch.3.8 ELECTRONIC VEHICLE INFORMATIONCENTERThe Electronic Vehicle Information Center(EVIC) is located in the overhead console. TheEVIC supplements the standard vehicle instrumentation.The EVIC uses a vacuum fluorescent(VF) display to supply the vehicle operator with acompass reading, outdoor temperature, averagefuel economy, distance to empty, instantaneous fueleconomy, trip odometer, elapsed ignition on time,distance to service, warning messages, servicemessages and memory system messages. It alsoprovides an interface to enable and disable vehicleprogrammable features. If equipped, the EVIC isalso available with an integrated Universal GarageDoor Opener (UGDO) known as HomeLink. Alsoif equipped, the EVIC is available with a TirePressure Monitoring (TPM) System.The EVIC function buttons are labeled C/T, RE-SET, STEP, and MENU. The three UGDO buttonsare labeled with dots to indicate the channel number.The BCM supplies most of the information displayedby the EVIC. Display information is receivedover the PCI bus. The EVIC sends andreceives data over the PCI bus, communicatingwith the BCM, PCM, and the Instrument Cluster.Tire Pressure Monitoring System information isreceived by the EVIC in the form of radio transmissions.The tire pressure sensors are mounted tothe vehicle wheels. For complete information, referto the Tire Pressure Monitoring System section inthis publication.3.8.1 VEHICLE INFORMATION DISPLAYThe EVIC provides the following functions:• Compass direction• Outside temperature• Elapsed ignition on time• Distance to empty• Average fuel economy• Instantaneous fuel economy• Trip odometer• Distance to service• Driver alert messages:– TURN SIGNAL ON (with vehicle graphic)– PERFORM SERVICE– DOOR OPEN (individual or multiple doors,with graphic)– LIFTGATE OPEN (with graphic)– LIFTGLASS OPEN (with graphic)– COOLANT LEVEL LOW (with graphic)12
GENERAL INFORMATION– WASHER FLUID LOW (with graphic)An audible chime or chimes will accompany anydisplayed warning messages. Chime requests withan OPEN message are dependent upon vehiclespeed.The EVIC will not display information for any ofthe screens for which it did not receive the properPCI bus data. Refer to the symptom list in theOverhead Console section for problems related tothe EVIC.The EVIC receives the following messages fromthe Body Control Module (BCM):• Verification of US/Metric status• VF display dimming brightness and exteriorlamp status• Trip Odometer data• Elapsed Ignition On Time data• Fuel Economy (Average and Instantaneous)• Distance to Empty• Outside Temperature• Distance to service• Driver warning messagesThe EVIC transmits the following messages tothe BCM:• Status Request: Beep, Reset, US/M Toggle• Current DisplayThe EVIC receives the following message fromthe PCM:• Vehicle Speed3.8.2 STEP BUTTONThe STEP Button can be used in one of thefollowing three ways:1) To sequentially select one of seven displays orblank display in the following order:• Average Fuel Economy• Distance to Empty• Instantaneous Fuel Economy• Trip Odometer• Time Elapsed• Distance to Service Message• Individual Tire Pressure• Off (Blank)2) To set the magnetic variance zone when VARI-ANCE = X (X = 1 - 15) is indicated in the VFDisplay.3) To select the displayed programmable featuresetting.3.8.3 MENU BUTTONUse the MENU button to sequentially step theEVIC through the programmable features.Use the MENU button to enter the Tire PressureMonitoring (TPM) Training Procedure.3.8.4 RESET BUTTONThe RESET Button has two different functions:1) To clear the trip functions that may be reset2) To enter and exit the diagnostic modePressing the RESET button once will clear thetrip function that is currently being displayed(except Distance to Service) and the EVIC will senda PCI bus beep request to the BCM. If the RESETbutton is pressed again within 3 seconds, the EVICwill reset ALL of the trip functions and an additionalbeep request is sent to the BCM. The tripfunctions that may be reset are:• Average Fuel Economy• Trip Odometer• Elapsed TimeA reset will only occur if one of the trip functionsthat may be reset is currently being displayed.Pressing the RESET button for more than three(3) seconds resets the Distance to Service functionwhile the Distance to Service message is beingdisplayed. The EVIC module will send a beeprequest to the BCM.Simultaneously pressing the RESET button andthe C/T button while turning the ignition from Offto On will enter the EVIC into the self-diagnosticmode.3.8.5 COMPASS/TEMPERATURE (C/T)BUTTONActuating the Compass/Temperature Button(C/T) will cause the EVIC to display the compassand temperature information. This function willoperate from another traveler display or from theprogrammable feature mode.3.8.6 TRAVELER DISPLAY FUNCTIONSUsing the STEP button will change the EVICbetween modes of operation and display the appropriateinformation according to data received fromthe PCI Bus.3.8.7 COMPASS/TEMPERATUREThe EVIC simultaneously displays the compassreading and the outside temperature. Outside temperatureinformation is received via the PCI busfrom the BCM.The EVIC module internally senses and calculatesthe compass direction.13
GENERAL INFORMATION3.8.8 COMPASS OPERATIONUpon ignition on, if the calibration informationstored in the EVIC memory is within the normalrange, the EVIC will perform in slow Auto-Calmode. In slow Auto-Cal mode, the EVIC continuouslycompensates for the slowly changing magneticfield of the vehicle. The compass moduledetects changes in the vehicle magnetism andmakes appropriate internal corrections to ensureproper displayed direction.However, if the calibration information stored inthe EVIC memory is not within the normal rangeat ignition on, the EVIC will enter fast Auto-Cal.CAL is displayed along with the temperature.Auto activation of the fast Auto-Cal mode willalso occur when the EVIC is subjected to highmagnetic field strength levels, which cause allcompass readings to be erroneous for a continuousperiod of five (5) minutes. During fast Auto-Cal,CAL will be displayed along with the temperature.Fast Auto-Cal can also be performed manually,by pressing and holding the RESET button for 10seconds during the Compass/Temperature displaymode.3.8.9 SETTING MAGNETIC ZONEVARIANCEVariance is the difference between magneticNorth and geographic North. For proper compassfunction, the correct variance zone must be set.Refer to the Zone Variance map for the correctzone. Follow these steps to check or change thevariance zone:• The ignition switch must be in the On positionand the EVIC display must not be blank.• If the compass/temperature data is not currentlybeing displayed, momentarily press and releasethe C/T button to display compass/temp information.• Press and hold the RESET button until VARI-ANCE = XX is displayed. The EVIC will displaythe variance zone stored in memory and theword VARIANCE.• Use the STEP button to select the proper variancezone number, 1 through 15.• After selecting the proper zone number, momentarilypress and release the RESET button. Thevariance zone is then stored in the memory andthe EVIC returns to normal operation.3.8.10 COMPASS CALIBRATIONThe compass module has 2 types of autocalibration;slow-cal and fast-cal. Slow-cal ensuresthat during normal vehicle operation the compassperforms auto-calibration functions to keep thecompass sensors in their proper operating range.Whenever the ignition is On and the EVIC receivesPCI bus data indicating that engine RPM isgreater than zero, auto-calibration is performedcontinuously.If the calibration information stored in the compassmodule memory is not within the normalrange after a power-up cycle, the compass willdisplay CAL. The EVIC will enter into the fast-calmode until calibration is complete.To enter the compass into Manual Calibrationmode, perform the following steps:• Drive the vehicle to an area away from any largemetal objects or overhead power lines.• Ensure that the proper variance zone is selected.See Setting Magnetic Zone Variance.• The ignition switch must be in the On positionand the EVIC display must not be blank.• Press the C/T button to view the Compass/Temperature display.• Press and hold the RESET button until CAL isdisplayed, then release the button.• Drive slowly, less than 5 MPH (8KPH) in at least1 complete 360 degree circle.• CAL will remain illuminated to alert the driverthat the compass is in the calibration mode.• After calibration is complete, CAL will turn off.If the compass appears blank, unable to becalibrated, or the compass displays false indications,the vehicle must be demagnetized. Refer toCompass Demagnetizing Procedure in the ServiceManual.3.8.11 DIAGNOSIS AND TESTINGSELF-CHECK DIAGNOSTICSThe EVIC is capable of performing a diagnosticself check on its internal functions. EVIC diagnosticsmay be performed using a DRBIII( or by usingthe following procedure:(1) With the ignition switch in the <strong>OF</strong>F position,depress and hold the RESET and the C/Tbuttons.(2) Turn the ignition switch to the ON position.(3) Continue to hold both buttons until the softwareversions are displayed, then release thebuttons.(4) All of the VFD segments will illuminate for 2-4seconds. Check for segments that do not illuminateor illuminate all the time.14
GENERAL INFORMATION(5) When the self-check is complete the EVIC willdisplay one of the following messages:• PASS SELF TEST• FAILED SELF TEST• NOT RECEIVING J1850 MESSAGE(6) To exit the self-check mode, depress the RESETbutton or cycle the ignition switch and theEVIC will return to normal operation.If a Communication fault is displayed, refer tothe symptom list. If a FAILED is displayed, theEVIC must be replaced.3.8.12 AMBIENT TEMPERATURE SENSORThe ambient air temperature is monitored by theBCM and displayed by the EVIC. The BCM receivesa hardwire input from the ambient temperaturesensor (ATS).The ATS is a variable resistor that operates on a5-volt reference signal circuit hardwired from theBCM. The resistance in the ATS changes as theoutside temperature rises or falls. The BCM sensesthe change in reference voltage through the ATSresistor. Based on the resistance of the ATS, theBCM is programmed to correspond to a specifictemperature. The BCM stores and filters the ambienttemperature data and transmits this data tothe EVIC via the PCI Bus. The ATS cannot beadjusted or repaired and, if faulty or damaged, itmust be replaced.3.8.13 AMBIENT TEMPERATURE SENSORFAULT CODESThe outside temperature function is supportedby the ambient temperature sensor (ATS), a signaland ground circuit hardwired to the BCM, and theEVIC display.If the EVIC display indicates 54°C (130°F) or theATS sense circuit is shorted to ground, the tempdisplay will be 54°C (130°F) to indicate a SHORTcircuit condition.If the EVIC display indicates -40°C (-40°F) or theATS sense circuit is open, the temp display will be-40°C (-40°F) to indicate an OPEN circuit condition.If there is an OPEN or SHORT circuit condition,it must be repaired before the EVIC VFD can betested.The ATS is supported by the BCM. AmbientTemperature Sensor DTCs will be recorded in theBCM. The ATS can be diagnosed using the followingSensor Test. Test the ATS circuits using thediagnostics in the Body Diagnostic ProceduresManual. If the EVIC passes the self test, and theATS, the circuits, and PCI bus communications areconfirmed to be OK, but the EVIC temperaturedisplay is inoperative or incorrect, replace theBCM.3.8.14 AMBIENT TEMPERATURE SENSORTEST(1) Turn the ignition <strong>OF</strong>F.(2) Disconnect the ATS harness connector.15
GENERAL INFORMATION(3) Measure the resistance of the ATS using thefollowing min/max values:• 0° C (32° F) Sensor Resistance = 29.33 - 35.99Kilohms• 10° C (50° F) Sensor Resistance = 17.99 - 21.81Kilohms• 20° C (68° F) Sensor Resistance = 11.37 - 13.61Kilohms• 25° C (77° F) Sensor Resistance = 9.12 - 10.86Kilohms• 30° C (86° F) Sensor Resistance = 7.37 - 8.75Kilohms• 40° C (104° F) Sensor Resistance = 4.90 - 5.75KilohmsThe sensor resistance should read between thesemin/max values. If the resistance values are notOK, replace the Sensor.3.8.14 HOMELINK UNIVERSALTRANSMITTERIf equipped, the HomeLink Universal Transmitteris integrated into the overhead console. Foradded security it will operate home security systemsthat use coded signals known generically asRolling Codes. The overhead console display providesvisual feedback to the driver, indicatingwhich HomeLink transmitter channel button isbeing pressed. The HomeLink can learn and storeup to three separate transmitter radio frequencycodes to operate garage door openers, securitygates, and security lighting. The HomeLink buttonsare marked with one, two, or three dots. Forcomplete information, refer to Universal Transmitterin the Service Manual or the Owner’s Manual.3.9 TIRE PRESSURE MONITORINGSYSTEM (TPM)If equipped with the Tire Pressure MonitoringSystem (TPM), each of the vehicles five wheels willhave a valve stem with an integral pressure sensorand radio transmitter. Radio signals from the tirepressure sensor/transmitters are received and interpretedby the Electronic Vehicle InformationCenter (EVIC).A sensor/transmitter in a mounted wheel willbroadcast its detected pressure once per minutewhen the vehicle speed is greater than 40 km/h (25mph). The spare tire sensor will broadcast onceevery hour. Each sensor’s broadcast is uniquelycoded so that the EVIC can determine location. Theindividual tire pressures can be displayed graphicallyon the EVIC.3.9.1 TRAINING THE EVICThe EVIC can be trained to recognize the sourcelocations of pressure sensor/transmitter signals.Use the following training procedure:(1) Locate ‘‘RETRAIN TIRE SENSORS’’ on theEVIC menu.(2) Press STEP button to select YES and MENUbutton to confirm.When this mode is enabled by selecting ‘‘YES’’the EVIC will initiate the training procedure.(3) The EVIC display will prompt the user to:‘‘TRAIN LEFT FRONT TIRE’’. At this point theuser must set the left front tire sensor to learnmode by positioning a magnet (Relearn Magnetspecial tool 8821) over the valve stem for atleast 5 seconds. The Remote Tire PressureMonitor (RTPM) in the front left tire willtransmit a message indicating to the EVICthat it is in learn mode. When the EVIC hasreceived this message and is assured that ithas learned an ID, the EVIC will request ahorn chirp via a bus message and then displaythe next train request. Note: There is a 60-second timer for learning the first tire locationand a 30-second timer between the remainingtires. If any of these timers expire the EVICwill abort the training procedure.(4) The EVIC will request the initiation of a trainingsequence for each tire, one-by-one in aclockwise direction around the vehicle (LeftFront, Right Front, Right Rear, Left Rear, andSpare). The EVIC will allow 30 seconds (60seconds for the first tire) from the beginning ofthe train request display to the receipt of aunique learn ID message from the RTPM. If,during a training session, a 60 or 30 secondtimer expires before a unique learn sensor ID isreceived or the vehicle is not in park, the EVICwill keep the previous set of trained IDs andwill display ‘‘TRAINING ABORTED’’ until abutton is pressed. Any IDs learned during thecurrent session will be discarded. The EVICwill not store one ID for multiple locations.(5) Once all five tires are successfully trained, theprevious set of stored IDs will be replaced bythe new IDs, and the EVIC will display‘‘TRAINING COMPLETE’’ until a button ispressed.If the vehicle is equipped with the HomeLinkfeature and a HomeLink button is pressed at anytime during the training procedure, the EVIC modulewill immediately exit the training procedure,discard any IDs learned in the current session andperform the HomeLink function. After the buttonis released, the module will display ‘‘RETRAINTIRE SENSORS? NO’’.16
GENERAL INFORMATIONThe training procedure can be stopped at anytime by pressing the C/T, STEP, RESET or MENUbutton. When any of these buttons are pressed theEVIC will display ‘‘TRAINING ABORTED’’ untilanother button is pressed.Once training is complete, the EVIC can determinewhen the spare wheel has been mounted onthe vehicle. The spare wheel sensor/transmitter isexpected to transmit once per hour. If the sensor/transmitter ID for the spare wheel is received at ashorter interval, the EVIC will request a chime anddisplay ‘‘SPARE SWAP DETECTED’’ for five seconds.3.9.2 PRESSURE THRESHOLDSThe EVIC will monitor the tire pressure signalsfrom the five tire sensor/transmitters and determineif any tire has gone below the Low PressureThreshold or raised above the High PressureThreshold. Refer to the table below.LOW TIRE PRESSURE THRESHOLDSSYSTEM STATUS TIRE PRESSUREINDICATOROn172 kPa (25 PSI)Off193 kPa (28 PSI)HIGH TIRE PRESSURE THRESHOLDSSYSTEM STATUS TIRE PRESSUREINDICATOROn310 kPa (45 PSI)Off276 kPa (40 PSI)3.9.3 CRITICAL AND NON-CRITICALPRESSURE ALERTSA critical alert will be triggered when a tirepressure has gone below or above a set thresholdpressure. Depending on what the condition is, theEVIC will request a chime and then display a LOWPRESSURE or HIGH PRESSURE message indicatingthe appropriate location.The alert message will display for three secondsand then switch to the tire pressure trip screen.The tire pressure for the tire that has exceeded itsthreshold will blink at one second intervals on thegraphic display. The blinking tire pressure willcontinue for the rest of the ignition cycle or until anEVIC button is pressed. If the display is removedwithout correcting the condition, it will reappearwithout a chime after 60 seconds to warn the driverof the low/high pressure condition.A non-critical alert will be triggered when low orhigh pressure threshold has been exceeded in thespare tire. The ‘‘SPARE LOW PRESSURE’’ or‘‘SPARE HIGH PRESSURE’’ alert will be displayedfor 60 seconds during each ignition ON cycle. If thepressure threshold is exceeded while the ignition is<strong>OF</strong>F, the alert will be delayed 8-10 seconds afterignition ON.3.9.4 SYSTEM FAULTSNOTE: The Remote Tire Pressure Monitor Sensors(RTPM) are not internally serviceable. For aSensor Failure or Low Battery fault, the RTPMmust be replaced.There are four conditions that will cause a TirePressure Monitoring System fault to be set. Allfault codes are associated with a specific wheellocation.1. If the EVIC detects a non-transmitting Sensor/Transmitter in a road wheel for 10 minutes at avehicle speed above 40 Km/H (25 MPH), it will:a. Store an active fault code.b. Request a chime.c. Display ‘‘SERVICE TIRE PRESS SYSTEM’’.d. Display a dashed line at the wheel location onthe graphic display if the display is activated.2. When the EVIC detects:• A low pressure sensor/transmitter battery statusfor 7 consecutive ignition cycles,• Any sensor transmitting at a shorter than expectedinterval or,• No valid pressure sensor ID from the spare tirefor 20 consecutive ignition cycles spaced at leastone hour apart, it will:a. Store an active fault code.b. Request a chime.c. Display ‘‘SERVICE TIRE PRESS SYSTEM’’.Use the DRBIII Input/Output function to furtherisolate the specific concern.The DRBIII can be queried to determine theSensor/Transmitter status:• ‘‘Invalid Pressure’’ - The Sensor/Transmitter isreporting a negative pressure or a pressureabove 434 kPa (63 psi).• ‘‘Low Batt’’ - The Sensor/Transmitter has reporteda low battery status for seven consecutiveignition cycles.• ‘‘Trained’’ - The Sensor/Transmitter ID code isrecognized by the EVIC.• ‘‘Active’’ - The vehicle is moving at 40 km/h (25mph) and the Sensor/Transmitter is ‘‘awake’’ andtransmitting as expected by the EVIC.3.9.5 SPARE WHEEL AUTO-LOCATEIf the spare tire is mounted on the vehicle, theEVIC will detect the relocation and determine fromthe sensor transmit intervals, which wheels are17
GENERAL INFORMATIONmounted and which one is now the spare. Thespare tire sensor/transmitter transmits once perhour. The sensor/transmitters in the mountedwheels transmit once per minute when the vehicleis moving at 40 km/h (25 mph).3.9.6 REMOVE MAGNET FROM SPAREA magnet is used to initiate a sensor ID transmission.In the EVIC training procedure, the sparewheel is the last in the sequence. If the magnet isleft on the wheel, the sensor/transmitter will continueits ID transmission. If the EVIC detects 20transmissions from the spare wheel in 60 secondsand the vehicle speed is above 40 km/h (25 mph), itwill:• Request a chime.• Display ‘‘REMOVE MAGNET FROM SPARE’’for 60 seconds per ignition-ON cycle.3.9.6 TIRE PRESSURE UNAVAILABLEThe EVIC can detect high radio noise interference.When the noise level is too high to distinguisha transmission from a sensor/transmitter, it will:• Display ‘‘TIRE PRESSURE UNAVAILABLE’’ for5 seconds.• Request a chime.• Switch to the graphic display and show dashedlines instead of the tire pressure for the wheel(s)affected by the radio interference.3.9.7 TIRE PRESSURE NOW AVAILABLEIf the ‘‘TIRE PRESSURE UNAVAILABLE’’ messagewas displayed because of radio noise interference,the EVIC will:• Display ‘‘TIRE PRESSURE NOW AVAILABLE’’for 5 seconds.• Request a chime.When the noise level no longer interferes withsensor/transmitter transmissions.3.9.8 DIAGNOSING AND CLEARINGSYSTEM FAULTSNOTE: The TPM System relearn procedure mustbe performed before servicing the system.All Tire Pressure Monitoring System Faults arespecific to one location. If a ‘‘BATTERY LOW’’,‘‘SENSOR FAILURE’’ fault is detected, the locationwill be displayed. The appropriate sensor/transmitter can then be replaced.If a single sensor/transmitter cannot be detectedby the EVIC, replace that sensor transmitter. Ifnone of the sensors/transmitters can be detected,refer to Tire Pressure Monitoring System symptomsin the EVIC section.3.9.9 SYSTEM TESTA test of the Tire Pressure Monitoring Systemcan be initiated in the EVIC. The test sequence isas follows:1) Scroll to the blank display by pressing the STEPbutton.2) Press and hold the RESET button for fiveseconds.3) The EVIC will request a beep to indicate thestart of the test.4) The EVIC will clear the sensor signal counters5) The vehicle graphic will be displayed withtransmission counters at each corner and forthe spare. (Same display as for pressures butwith counters in place of the tire pressures.)6) Drive the vehicle at speeds above 40 km/h(25 mph) for 10 minutes.7) The counters will increase by one each time asensor signal is received by the EVIC (approximately1 signal per minute from each wheelexcept the spare).The test will continue until any EVIC button ispressed or until the ignition is cycled to <strong>OF</strong>F.3.9 EXTERIOR LIGHTING SYSTEM3.9.1 EXTERIOR LIGHTING BATTERYSAVERThe BCM monitors the status of and controls thepark lamp, head lamp and fog lamp relay’s. If anyexterior lamps are left on after the ignition isturned off, the BCM will turn them off after 8minutes.3.9.2 HEADLAMP DELAYThe headlamp time delay operates when theignition switch is turned off while the headlampsare still on. This feature is customer programmableto provide a 30, 60 or 90 second time delay beforeturning off the headlamps. This feature can also bedisabled.3.9.3 HEADLAMP SWITCHThe headlight switch on WJ vehicles uses amultiplexed (MUX) circuit to the BCM. The BCMwill then control the park lamp, low/high headlamp and fog lamp relay’s based on this input.3.9.4 FOG LAMP CONTROLThe body control module controls the operationof the fog lamp relay which controls the fog lamps.The fog lamps can only be on if the park or lowbeam headlamps are on. If the high beams areturned on, the fog lamps will automatically beturned off.18
GENERAL INFORMATION3.10 INTERIOR LIGHTING3.10.1 COURTESY LAMP CONTROLThe body controller has direct control over all ofthe vehicle’s courtesy lamps. The body computerwill illuminate the courtesy lamps under any of thefollowing conditions:1. Any door is ajar and courtesy lamp switch onthe left multi-function switch is not in the domeoff position.2. The courtesy lamp switch on the left multifunctionswitch is in the dome on position.3. A Remote Keyless entry unlock message is received.4. Driver door unlocked with key (with VTSSonly).3.10.2 ILLUMINATED ENTRYIlluminated entry will be initiated when thecustomer enters the vehicle by unlocking the doorswith the key fob, or with the key if the vehicle isequipped with vehicle theft alarm. Upon exitingthe vehicle, if the lock button is pressed with a dooropen, illuminated entry will cancel when the doorcloses. If the doors are closed and the ignitionswitch is turned on, the illuminated entry alsocancels. The illuminated entry feature will notoperate if the courtesy lamp switch is in the domeoff position.3.10.3 INTERIOR LIGHTING BATTERYSAVERIf any of the interior lamps are left on after theignition is turned off, the BCM will turn them offafter 8 minutes. To return to normal operation, thecourtesy lamps will operate after the dome lampswitch or door ajar switch changes state. The glovebox, switched reading lamps and vanity lampsrequire that the ignition be turned to the on/accposition.3.11 ELECTRO/MECHANICALINSTRUMENT CLUSTER (EMIC)The Instrument Cluster contains a Fuel, Voltmeter,Coolant Temp, and Oil Pressure gauge, aTachometer and a Speedometer. With the exceptionof the Voltmeter, the cluster positions the gaugeswith PCI Bus messages received from the PCM.The Voltmeter operates directly off of the Fused B+Switched Ignition Output circuit that supplies ignitionvoltage for the cluster.The Instrument Cluster also contains warningindicators that are illuminated by hard wired inputsor by messages received from other moduleson the PCI Bus.The Trip/Total Odometer is a Vacuum FluorescentDisplay (VF) that is controlled by PCI Busmessages received from the PCM.The cluster illumination lamps are hard wired inthe Instrument Cluster. When the Park or Headlampsare turned on, the cluster receives a dimmedbattery feed from the Headlamp Switch. The clusterI/O Processor controls the VF display dimmingand also sends dimming level messages on the PCIBus.The EMIC will communicate with the DRBIIIto display PCI Engine Info, PCI Bus Info, andcertain input/outputs. Cluster diagnostic capabilitiesthat the DRBIII will actuate is limited to theCluster Calibration Points for the gauges. TheDRBIII can also extract active and stored DiagnosticTrouble Codes (DTC) from the InstrumentCluster.The EMIC is also capable of performing a diagnosticSelf-Test that is actuated by depressing andholding the Odometer trip reset stalk while cyclingthe ignition from the off to the on position. After thecluster Odometer displays CHEC, releasing thereset stalk begins the test. The cluster will thenposition all of the gauges at specified calibrationpoints and will illuminate all the PCI Bus controlledindicators. The cluster will also illuminateeach segment of the VF display.The EMIC can verify communications with thePCM, ID the module, or change the country codeusing the DRBIII. For further information regardingthe diagnostic routine and an explanation of thefaults, refer to the appropriate Service Manual.3.11.1 INSTRUMENT PANEL DIMMINGI/P dimming is accomplished using the bodycomputer. The panel dimming level switch is readby the body computer which converts the level to avalue that is sent over the PCI bus. Other modulessuch as the Radio, MIC, and the EVIC use this dataso their display intensity matches the other incandescentbulbs in the vehicle that are driven directlyby the BCM.3.12 MEMORY SEATSThe memory system consists of the driver powerseat, both outside rear view mirrors and the radiopresets. The memory module for the seat ismounted under the driver’s seat. The module isavailable with or without the heated seat feature.The seat module receives input from the 8-waypower seat switch, the driver’s seat position sensors,both front seat negative temperature coeffi-19
GENERAL INFORMATIONcients (NTC’s) (if heated seat equipped) and thePCI bus circuit. The memory switch, located on thedriver door, is wired directly to the driver doormodule and sends its messages over the PCI bus.The memory seat module performs the followingfunctions: positions the drivers seat, actuates thedriver’s and passenger’s seat heaters (if equipped)and sends the memory location over the PCI bus.When a memory button is pressed (#1 or #2) onthe memory switch, the driver door module sends arecall message to the memory seat module (MSM),the PCI radio and the passenger door module. Theywill in turn position the driver seat, both mirrorsand set the radio presets. When the RKE button ispressed, depending on which transmitter (#1 or#2), the passenger door module sends the recallmessage.3.12.1 POWER SEATThe memory power seat provides the driver with2 position settings for the driver’s seat. Each powerseat motor is connected to the MSM with twocircuits. Each circuit is switched between batteryand ground. By alternating the circuits the MSMcontrols the movement of the motors based oninput from the seat mounted switch.Each motor contains a potentiometer to monitorthe seat position. To monitor the position of themotor, the MSM sends out a 5-volt reference on thesensor supply circuit. The sensor is grounded backto the module on a common ground circuit. Basedon the position of the sensor, the MSM monitors thevoltage change through the sensor on a separatesignal circuit.The MSM stores the input value of each of thefour seat potentiometers in memory when thesystem is requested. The driver can initiate memoryrecall, using either the memory switch or theRKE transmitter. When initiated, the MSM adjuststhe four seat motors to match the memorizedseat position data.For safety reasons, the memory seat recall isdisabled by the MSM when the vehicle is out ofpark position or if the seatbelt is buckled. Anyobstruction to seat movement over a 2 second delaywill cause the seat to stop moving in which case astalled motor would be detected by the MSM whichwould then flag a trouble code and the correspondingseat output would be deactivated. However, ifthe object obstructing the seat is removed, the seatwill function normally again.3.12.2 EASY EXIT SEAT (AVAILABLEWITH MEMORY SEAT)The intent of this feature is to allow for easierentry and exit to the vehicle by moving the seatrearward a short distance when the operator turnsthe vehicle off. The seat can be recalled to one of it’stwo set memory positions by pressing either of thememory recall buttons on the switch or the RKEtransmitters. If any seat movement is initiated,whether manual or by memory recall, after theignition has been turned off, this will cancel anyensuing glide to enter movement until the nextignition cycle.This feature can be enabled/disabled by theowner through the electronic vehicle informationcenter (EVIC) or using the DRBIII. When usingthe DRBIII it will also inform as to what state itis in. To reinstate the feature, simply repeat theprocess.3.12.3 GUARD BANDSThe module provides guard bands which preventthe seat track from hitting the hard limits of thegiven seat axis during manual power seat operation.The guard band values for each hard limit arestored in EEPROM. The guard band can be bypassedby running the seat to the end of its traveland then releasing the switch and pressing itagain. The seat will move a short distance further.Once the seat is past the guard band, it can bestored in memory, but if recall is initiated the seatwill move to the guard bands and no further.When a seat module or seat track assembly isreplaced, the DRBIII must be used to perform the“Reset Guard Bands” procedure. WARNING: Theoperator must be out of the seat when this procedureis being used as the seat will move to the endof it’s travel in all 8 positions.3.12.4 ELECTRICALLY HEATED SEATSThe heated seat feature is available with orwithout the memory system. The module is locatedunder the driver’s seat and is known as the heatedseat module (HSM) or the memory heated seatmodule (MHSM). The control switches for theheated seats are located on the instrument paneland are wired to the body control module. TheBCM then sends the message to the HSM via thePCI bus. The system offers two seat temperaturesettings of approximately 96.8 F (36°C) (LO) andapproximately 107.6 F (41°C) (HI).As the temperature in the seat rises, the negativetemperature coefficient (NTC) resistance decreasesand the voltage reading detected by theHSM decreases. The seat heater output is deactivatedonce the voltage reading reaches it’s thresholdfor either setting, high or low.As the temperature decreases, the voltage readingincreases until the upper threshold is reachedfor either setting high or low. At this point the seatheat output is activated once again and this cyclerepeats itself as long as the seat heat request is on.20
GENERAL INFORMATIONThe thresholds for low and high settings are preprogrammedinto the module memory.The heated seat switch contain resistors pulledup to 5 volts which are processed by the bodycontrol module as the voltage readings indicatingdesired heat setting high or low.The heater elements inside the seat back andcushion are different for the Limited and Laredomodels. The Laredo seat heater elements are wiredin series whereas the Limited seat elements arewired in parallel. This means that if an element isopen in a Laredo model there will be no heateroutput to either the cushion or the seat back. If anelement is open in a Limited model, the otherelements will operate as usual. However, if one ofthe elements is open, the seat cushion will have tobe replaced.There are three heater elements in the seatcushions for both models. The Laredo uses a resistorwire for its center and both side bolsters (raisedouter side panels) and the Limited uses a carbonfiber element for its center and resistor wire for thebolsters.3.13 SENTRY KEY IMMOBILIZER SYSTEM(SKIS)The Sentry Key Immobilizer System (SKIS) is animmobilizer system designed to prevent unauthorizedvehicle operation. The system consists of aSentry Key Immobilizer Module (SKIM), ignitionkey(s) equipped with a transponder chip and enginecontroller. When the ignition switch is turnedon, the SKIM interrogates the ignition key. If theignition key is “Valid” the SKIM sends a PCI Busmessage to the engine controller indicating thepresence of a valid ignition key. Upon receiving a“Valid” key signal the PCM/ECM will allow theengine to continue to operate.For additional information on the SKIS, refer tothe appropriate Powertrain Diagnostic information.3.14 POWER SUNRO<strong>OF</strong>The power sunroof in the Grand Cherokee iscontrolled by the Body Control Module (BCM).After the ignition has been turned off, the powersunroof will remain operational for an additional45 seconds. If the front doors are opened duringthis time, the BCM will remove power from thesunroof.3.15 COMMUNICATIONThe Programmable Communication Interface orPCI Bus is a single wire multiplexed networkcapable of supporting binary encoded messagesshared between multiple modules. The PCI buscircuit is identified as D25. The modules are wiredin parallel. Connections are made in the harnessusing splices. One splice called the DiagnosticJunction Port, serves as the “Hub” of the bus. TheDiagnostic Junction Port provides an access pointto isolate most of the modules on the bus in order toassist in diagnosing the circuit. The following modulesare used on the WJ/WG:• Body Control Module• Adjustable Pedals Module• Door Modules (Driver & Passenger)• Airbag Control Module• Controller Antilock Brake• Powertrain Control Module• Engine Control Module (Diesel)• Radio• CD Changer• Transmission Control Module• Automatic Zone Control Module• Sentry Key Immobilizer Module• Seat Module• Electronic Vehicle Information Center• Mechanical Instrument Cluster• Shifter Assembly (Diesel)• Rain Sensor• Power Amplifier• Intrusion Transceiver Module (Export)Each module provides its own bias and terminationin order to transmit and receive messages. Thebus voltage is at zero volts when no modules aretransmitting and is pulled up to about seven and ahalf volts when modules are transmitting.The bus messages are transmitted at a rateaveraging 10800 bits per second. Since there isonly voltage present when the modules transmitand the message length is only about 500 milliseconds,it is ineffective to try and measure the busactivity with a conventional voltmeter. The preferredmethod is to use DRBIII lab scope. The 12vsquare wave selection on the 20-volt scale providesa good view of the bus activity. Voltage on the busshould pulse between zero and about seven and ahalf volts. Refer to the following figure for sometypical displays.The PCI Bus failure modes are broken down intotwo categories. Complete PCI Bus CommunicationFailure and individual module no response. Causesof complete PCI Bus Communication Failure includea short to ground or battery on the PCIcircuit. Individual module no response can becaused by an open circuit at either the Diagnostic21
GENERAL INFORMATION• Dashed lines in the EVIC ambient temperaturedisplay• No response received from any module on thePCI bus (expect the PCM/ECM)• No start (if equipped with Sentry Key Immobilizer)Symptoms of Individual module failure couldinclude any one or more of the above. The differencewould be that at least one or more moduleswould respond to the DRBIII.Diagnosis starts with symptom identification. Ifa complete PCI Bus Communication Failure issuspected, begin by identifying which modules thevehicle is equipped with and then attempt to get aresponse from the modules with the DRBIII. Ifany modules are responding, the failure is notrelated to the total bus, but can be caused by one ormore module’s PCI circuit or power supply andground circuits. The DRBIII may display “BUS +/-SIGNAL OPEN” or “NO RESPONSE” to indicate acommunication problem. These same messageswill be displayed if the vehicle is not equipped withthat particular module. The CCD error message isa default message used by the DRBIII and in noway indicates whether or not the PCI bus is operational.The message is only an indication that amodule is either not responding or the vehicle isnot equipped.3.16 VEHICLE THEFT SECURITY SYSTEMJunction Port or the module, or an open battery orground circuit to the affected module.Symptoms of a complete PCI Bus CommunicationFailure would include but are not limited to:• All gauges on the EMIC stay at zero• All telltales on EMIC illuminate• EMIC backlighting at full intensityThe vehicle theft security system (VTSS) is controlledby the body control module, which monitorsvehicle doors, liftgate, liftglass and the ignition forunauthorized operation. The alarm activates bysounding the horn, flashing the headlamps, hazardlamps, and the VTSS indicator lamp. The VTSSdoes not prevent engine operation, this is donewith the sentry key immobilizer module. Passivearming occurs upon normal vehicle exit by removingthe ignition key, opening the driver door, lockingthe doors with the power lock, and closing thedriver door or locking the doors with RKE. Theindicator lamp on the dash will flash for 15 seconds,showing that arming is in progress. If nomonitored systems are activated during this period,the system will arm and the indicator willflash at a slower rate. When something triggers thealarm, the system will signal the headlamps, parklamps, and horn for about 18 minutes.For complaints about the Theft Alarm going offon it’s own, use the DRBIII and select ‘‘TheftAlarm’’, “VTSS” then ‘‘Monitor Display’’ and readthe ‘‘Alarm Tripped By’’ status.Tamper Alert - The VTSS tamper alert will soundthe horn three times upon disarming to indicate atamper condition has occurred.22
GENERAL INFORMATIONManual Override - The system will not arm if thedoors are locked using the manual lock control or ifthe locks are actuated by an inside occupant afterthe doors are closed.To verify the system, proceed as follows:1. Open the driver’s door.2. Remove the ignition key (but keep it in hand).3. Lock the doors with the power lock switch or theRKE.4. Close the driver’s door.NOTE: After the doors are closed, lockingthe doors with RKE will also arm the system.NOTE: If the VTSS indicator lamp flashed,the system is operational and verified. If not,there may be a problem with the system.Arming/Disarming - Active arming occurs whenthe remote keyless entry transmitter is used to lockthe vehicle doors, whether the doors are open orclosed. If one or more doors are open, the armingsequence is completed only after all doors areclosed.Passive disarming occurs upon normal vehicleentry (unlocking driver’s door with the key). Thisdisarming also will halt the alarm once it has beenactivated.Active disarming occurs when the remote keylessentry transmitter is used to unlock the vehicledoors. This disarming also will halt the alarm onceit has been activated.Intrusion Transceiver Module (Export only)The Body Control Module (BCM) along with anIntrusion Transceiver Module (ITM) will controlthe premium Vehicle Theft Security System(VTSS) on export vehicles. Premium VTSS alsoincludes a battery-backed siren for the audiblealert. In addition to the other features of the baseVTSS the ITM is used to monitor the interior of thevehicle for movement while the alarm is set. Thisfeature can also be disabled with three additionallock commands from the Remote Keyless Entrysystem (which will be confirmed with an audiblechirp) during the VTSS pre-arming sequence.When the alarm is tripped it will actuate thehazard lamps for twenty-five seconds and the sirentwenty-eight seconds. After that period if the disturbanceis still present only the siren will beactivated again for twenty-eight seconds with fiveseconds intervals between warning cycles. Thiswill continue up to ten times unless the disturbancegoes away. Also while the alarm is set thesiren will monitor it’s Fused B(+) and Siren SignalControl circuits. If either of these circuits becomeopen the siren will trip itself to the alarming state.NOTE: The intrusion transceiver moduleand/or siren must never be swapped fromone vehicle to another. Once connected to aparticular vehicle they will only properlyfunction for that vehicle.NOTE: If the VTSS indicator lamp comes onafter ignition on and stays on, the PCI buscommunication with the powertrain controlmodule possibly has been lost.3.17 WINDSHIELD WIPER & WASHER3.17.1 FRONT WIPERSystem DescriptionThe front wiper system consists of the followingfeatures: lo-hi-speed, mist wipers, intermittent wipers,and wipe after wash. The front wiper system isonly active when the ignition is in the run/accposition.The BCM controls the front wiper system withone low-going output to a relay. With this outputthe BCM determines the motor wipe rate. This rateis a function of the intermittent wiper switchposition and vehicle speed. The BCM times thedelay after the wipers have parked. If the drivergoes from a longer to a shorter delay interval, awipe is done immediately. The speed sensitivedelay is set based on the current speed of thevehicle. If the vehicle crosses above the speedthreshold of 10 MPH (16 kmh) while the intermittentwiper delay is occurring, a smaller delay canbe used. If the vehicle crosses below the speedthreshold a longer delay should not be used untilthe current delay is completed.In the lo-hi and mist state, the BCM constantlyoutputs an active control signal for a delay of zero.The multifunction switch controls the wiper high/low relay wiper motor in the hi state. This is donewith an additional output from the multifunctionswitch to a relay which selects the motor windingto be energized. The BCM does not distinguishbetween lo-hi-or mist positions. The mist positionis a momentary input to the BCM which causes thewipers to operate at low speed as long as the mistinput is present.The BCM also monitors the front washer motorto perform wipe after wash. The BCM will perform3 wipes after the wash input is released.Since the front wiper system is an importantsafety feature, the BCM will support wiper operationin the event of a failed park input.If BCM does not detect a change of state on thepark input for 8 seconds with the wiper relayenergized a Diagnostic Trouble Code will set in theBCM.23
GENERAL INFORMATIONOnce a failed park switch is detected, intermittentoperation is disabled and the BCM will defaultto the low speed wiper state when the wiper switchis in the intermittent position. The wiper relay willbe de-energized when the wiper mode switch is inthe <strong>OF</strong>F position. For open and short states on thewiper mode switch, the wipers should default to<strong>OF</strong>F.SYSTEM FEATURESRain Sensor ModuleThe Microprocessor-based Rain Sensor Module(RSM) senses moisture on the outside of the windshieldglass, and sends a wipe command to theBody Control Module (BCM). The RSM sends awipe command to the BCM over the PCI data bus.The BCM then activates or deactivates the frontwiper system. Sensitivity inputs are based on thedriver-selected settings on the right side multifunctionswitch.Speed Sensitive Intermittent Wipe ModeThere are 5 individual delay times with a minimumdelay of 1/2 second to a maximum of 18seconds. When the vehicle speed is under 10 MPH(16 kmh), the delay time is doubled providing arange of 1 second to 36 seconds.Mist WipeThe wiper operates as long as the wiper switch is inthe mist position.Park after Ignition OffBecause the wiper relays are powered from thebattery the BCM can run the wipers to park afterthe ignition is turned off.Wipe after WashWhen the driver presses the wash button and thenreleases it, the wiper will continue to run for 3additional wipe cycles.The wiper system utilizes the BCM to control theon/off relay for low wiper functions, intermittentwiper delay as the switch position changes, pulsewipe, wipe after wash mode, and wiper motor parkfunctions. The BCM uses the vehicle speed input todouble the usual delay time below 10 MPH (16kmh).FRONT/REAR WIPER AND WASHER SWITCHES(RIGHT MULTI-FUNCTION SWITCH STALK)The front windshield and rear liftglass wiper/washer switches are located on the wiper multifunctionswitch stalk which is secured to the rightside of the multi-function switch mounting housingon the steering column.A knob on the end of the wiper multifunctionswitch stalk is rotated to select the desired frontwiper speed (HIGH or LOW) or one of the fiveintermittent front wiper positions. The wiper stalkis pulled toward the driver to activate the windshieldwasher system. Both the front wiper andfront washer motors will operate continuously foras long as the stalk is held in the momentaryFRONT WASH position.Another rotary switch on the wiper multifunctionswitch stalk is rotated to select the desiredrear wiper speed (ON or DELAY). The wiper stalkis pushed toward the instrument panel to activatethe rear liftglass washer system. Both the rearwiper and rear washer motors will operate continuouslyfor as long as the stalk is held in themomentary REAR WASH position.If any part of the right multi-function switchstalk is faulty or damaged, the entire wiper multifunctionswitch assembly must be replaced.3.17.2 REAR WIPER SYSTEMFive circuits feed the rear wiper module. It hastwo high current circuits, battery (B+) and ground,that run the motor. The remaining three circuitsare low current control circuits.Two of these circuits come from the rear wiperswitch on the right multi-function switch stalk.These circuits are referred to as the rear wipermotor control circuit and the rear wiper motorintermittent control circuit. When the rear wiperswitch is in the Off position, both of these circuitsare open and the wiper module parks or remainsparked. When the rear wiper switch is in theIntermittent position, the intermittent control circuitis switched to ignition voltage, the motorcontrol circuit is open and the wiper is in theintermittent modes. When the rear wiper switch isin the On position, the intermittent control circuitis open and the motor control circuit is switched toignition voltage and the wiper is in continuouswipe mode.REAR WIPER SYSTEM CONTROL CIRCUITSREARWIPERSWITCHPOSITION<strong>OF</strong>FDELONWASHDELAYCIRCUITCONTINU-OUS CIR-CUITAJARCIRCUITWIPERMODEOPEN OPEN OPEN PARKEDOPEN OPEN GROUND PARKEDIGNITION OPEN OPEN DELAYIGNITION OPEN GROUND PARKEDOPEN IGNITION OPEN ONOPEN IGNITION GROUND PARKEDIGNITON IGNITION OPEN WASHIGNITION IGNITION GROUND PARKEDThe third control circuit is the AJAR circuit. Thiscircuit is fed by the flip-up glass ajar switch. Whenthe flip-up glass is closed the ajar switch is openand the rear wiper module functions normally.When the flip-up glass is open, the ajar switch isclosed and the circuit provides ground to the mod-24
GENERAL INFORMATIONule. This ground signal indicates to the rear wipermodule that it should park if operating or not allowoperation if parked.3.18 USING THE DRBIIIRefer to the DRBIII user’s guide for instructionsand assistance with reading trouble codes,erasing trouble codes and other DRBIII functions.3.18.1 DRBIII ERROR MESSAGES ANDBLANK SCREENUnder normal operation, the DRBIII will displayone of only two error messages:– User-Requested WARM Boot or User-Requested COLD BootIf the DRBIII should display any other errormessage, record the entire display and call theSTAR Center for information and assistance. Thisis a sample of such an error message display:ver: 2.14date: 26 Jul93file: key_itf.ccdate: Jul 26 1993line: 548err: 0x1User-Requested COLD BootPress MORE to switch between this displayand the application screen.Press F4 when done noting information.3.18.2 DRBIII DOES NOT POWER UPIf the LED’s do not light or no sound is emitted atstart up, check for loose cable connections or a badcable. Check the vehicle battery voltage (data linkconnector cavity 16). A minimum of 11 volts isrequired to adequately power the DRBIII.If all connections are proper between theDRBIII and the vehicle or other devices, and thevehicle battery is fully charged, and inoperativeDRBIII may be the result of faulty cable or vehiclewiring.3.18.3 DISPLAY IS NOT VISIBLELow temperatures will affect the visibility of thedisplay. Adjust the contrast to compensate for thiscondition.4.0 DISCLAIMERS, SAFETY,WARNINGS4.1 DISCLAIMERSAll information, illustrations, and specificationscontained in this manual are based on the latestinformation available at the time of publication.The right is reserved to make changes at any timewithout notice.4.2 SAFETY4.2.1 TECHNICIAN SAFETY INFORMATIONWARNING: ENGINES PRODUCE CARBONMONOXIDE THAT IS ODORLESS, CAUSESSLOWER REACTION TIME, AND CAN LEADTO SERIOUS INJURY. WHEN THE ENGINE ISOPERATING, KEEP SERVICE AREAS WELLVENTILATED OR ATTACH THE VEHICLEEXHAUST SYSTEM TO THE SHOP EXHAUSTREMOVAL SYSTEM.Set the parking brake and block the wheelsbefore testing or repairing the vehicle. It is especiallyimportant to block the wheels on front-wheeldrive vehicles; the parking brake does not hold thedrive wheels.When servicing a vehicle, always wear eye protection,and remove any metal jewelry such asrings, watchbands or bracelets that might make aninadvertent electrical contact.When diagnosing a body system problem, it isimportant to follow approved procedures whereapplicable. These procedures can be found in thisGeneral Information Section or in service manualprocedures. Following these procedures is veryimportant to the safety of individuals performingdiagnostic tests.25
GENERAL INFORMATION4.2.2 VEHICLE PREPARATION FORTESTINGMake sure the vehicle being tested has a fullycharged battery. If it does not, false diagnosticcodes or error messages may occur.4.2.3 SERVICING SUB-ASSEMBLIESSome components of the body system are intendedto be serviced as an assembly only. Attemptingto remove or repair certain system subcomponentsmay result in personal injury and/orimproper system operation. Only those componentswith approved repair and installation proceduresin the service manual should be serviced.4.2.4 DRBIII SAFETY INFORMATIONWARNING: EXCEEDING THE LIMITS <strong>OF</strong> THEDRBIII MULTIMETER IS DANGEROUS. ITCAN EXPOSE YOU TO SERIOUS ORPOSSIBLY FATAL INJURY. CAREFULLYREAD AND UNDERSTAND THE CAUTIONSAND THE SPECIFICATION LIMITS.• Follow the vehicle manufacturer’s service specificationsat all times.• Do not use the DRBIII if it has been damaged.• Do not use the test leads if the insulation isdamaged or if metal is exposed.• To avoid electrical shock, do not touch the testleads, tips, or the circuit being tested.• Choose the proper range and function for themeasurement. Do not try voltage or currentmeasurements that may exceed the rated capacity.• Do not exceed the limits shown in the tablebelow:FUNCTIONVoltsOhms (resistance)*Frequency MeasuredFrequency GeneratedINPUT LIMIT0 - 500 peak volts AC0 - 500 volts DC0 - 1.12 megohms0-10kHzTemperature -58 - 1100°F-50 - 600°C• Use caution when measuring voltage above 25vDC or 25v AC.• Use the low current shunt to measure circuits upto 10A. Use the high current clamp to measurecircuits exceeding 10A.• When testing for the presence of voltage orcurrent, make sure the meter is functioningcorrectly. Take a reading of a known voltage orcurrent before accepting a zero reading.• When measuring current, connect the meter inseries with test lead.• Disconnect the live test lead before disconnectingthe common test lead.• When using the meter function, keep theDRBIII away from spark plug or coil wires toavoid measuring error from outside interference.4.3 WARNINGS4.3.1 VEHICLE DAMAGE WARNINGSBefore disconnecting any control module, makesure the ignition is ‘‘off’’. Failure to do so coulddamage the module.When testing voltage or continuity at any controlmodule, use the terminal side (not the wire end) ofthe connector. Do not probe a wire through theinsulation, this will damage it and eventuallycause it to fail because of corrosion. Be carefulwhen performing electrical tests so as to preventaccidental shorting of terminals. Such mistakescan damage fuses or components. Also, a secondcode could be set, making diagnosis of the originalproblem more difficult.4.3.2 ROAD TESTING A COMPLAINTVEHICLESome complaints will require a test drive as partof the repair verification procedure. The purpose ofthe test drive is to try to duplicate the diagnosticcode or symptom condition.* Ohms cannot be measured if voltage is present.Ohms can be measured only in a non-poweredcircuit.• Voltage between any terminal and ground mustnot exceed 500v DC or 500v peak AC.26
CAUTION: Before road testing a vehicle, besure that all components are reassembled.During the test drive, do not try to read theDRBIII screen while in motion. Do not hangthe DRB from the rear view mirror or operateit yourself. Have an assistant available tooperate the DRBIII.5.0 REQUIRED TOOLS ANDEQUIPMENTDRBIII (diagnostic read-out box)Jumper WiresOhmmeterVoltmeterDiagnostic Junction Port Tester #8339Test LightMiller Special Tool #83108310 Airbag Load Tool8443 SRS Airbag Load Tool6.0 GLOSSARY <strong>OF</strong> ACRONYMSABSACMAECMAPMASDMAZCBCMCABDABDDMDLCantilock brake systemairbag control moduleairbag electronic control module(ACM)adjustable pedals moduleairbag system diagnostic module(ACM)automatic zone controlbody control modulecontroller antilock brakedriver airbagdriver door moduledata link connectorDTCEBLECMEVICHSMHVACI/RITMMHSMMICMSMMUXODOORCPABPCIPCMPDCPDMPWMRKESBSSKIMSKISSQUIBTCMTPMVFDVTSSGENERAL INFORMATIONdiagnostic trouble codeelectric back lite (rear window defogger)engine control moduleelectronic vehicle information centerheated seat module (also calledseat module)heater ventilation, air conditioninginfrared sensorintrusion transceiver modulememory heated seat module (alsocalled seat module)mechanical instrument clustermemory seat moduleMultiplexedodometeroccupant restraint controller (ACM)passenger airbagProgrammable CommunicationInterface (vehicle communicationbus)powertrain control modulepower distribution centerpassenger door modulepulse width modulatedremote keyless entrySeatbelt switchsentry key immobilizer modulesentry key immobilizer systemalso called initiator (located in rearof airbag module)transmission control moduletire pressure monitoringvacuum fluorescent displayvehicle theft security system27
NOTES28
7.0DIAGNOSTIC INFORMATION ANDPROCEDURES29
AIRBAGSymptom List:ACCELEROMETER 1ACCELEROMETER 2INTERNAL 1OUTPUT DRIVER 1STORED ENERGY FIRING 1Test Note:All symptoms listed above are diagnosed using the same tests.The title for the tests will be INTERNAL MODULE DTC.When Monitored and Set Condition:ACCELEROMETER 1When Monitored: With the ignition on, the module on board diagnostics continuouslyperforms internal circuit tests.Set Condition: This DTC will set if the module identifies an out of range internal circuit.ACCELEROMETER 2When Monitored: With the ignition on, the module on board diagnostics continuouslyperforms internal circuit tests.Set Condition: This DTC will set if the module identifies an out of range internal circuit.INTERNAL 1When Monitored: With the ignition on, the module on board diagnostics continuouslyperforms internal circuit tests.Set Condition: This DTC will set if the module identifies an out of range internal circuit.OUTPUT DRIVER 1When Monitored: With the ignition on the module on board diagnostics continuouslyperforms internal circuit tests.Set Condition: This DTC will set if the module identifies an out of range internal circuit.STORED ENERGY FIRING 1When Monitored: With the ignition on the ACM on board diagnostics continuouslyperforms internal circuit tests.Set Condition: This DTC will set if the ACM identifies an out of range internal circuit.30
AIRBAGINTERNAL MODULE DTC — ContinuedAIRBAG CONTROL MODULE - ACMPOSSIBLE CAUSESTEST ACTION APPLICABILITY1 Turn the ignition on.Ensure the battery is fully charged.WARNING: IF THE MODULE IS DROPPED AT ANY TIME, IT MUST BEREPLACED.NOTE: For the purpose of this test, the AECM and ORC modules will bereferred to as an ACM.From the list below, select the appropriate module reporting this diagnostic troublecode.SELECT ONE:AllACM - ACTIVE or STORED DTCWARNING: MAKE SURE THE BATTERY IS DISCONNECTED,THEN WAIT TWO MINUTES BEFORE PROCEEDING. Replacethe Airbag Control Module in accordance with Service Instructions.Perform AIRBAG VERIFICATION TEST - VER 1.NOTE: When reconnecting Airbag system components, the ignition must beturned off and the battery must be disconnected.31
AIRBAGSymptom List:AIRBAG WARNING INDICATOR OPENAIRBAG WARNING INDICATOR SHORTTest Note:All symptoms listed above are diagnosed using the same tests.The title for the tests will be AIRBAG WARNING INDICATORTEST.When Monitored and Set Condition:AIRBAG WARNING INDICATOR OPENWhen Monitored: With ignition on the ACM monitors the PCI Bus for a message from theMIC containing the airbag warning indicator status. The MIC transmits the message onetime at ignition on, upon lamp state change, or in response to the ACM lamp message.Set Condition: This DTC will set if the indicator status is OPEN for 2 or 3 consecutivemessages or 2 or 3 seconds.AIRBAG WARNING INDICATOR SHORTWhen Monitored: With ignition on the ACM monitors the PCI Bus for a message from theMIC containing the airbag warning indicator status. The MIC transmits the message onetime at ignition on, upon lamp state change, or in response to the ACM lamp message.Set Condition: This DTC will set if the indicator status is SHORT for 2 or 3 consecutivemessages or 2 or 3 seconds.POSSIBLE CAUSESMIC, COMMUNICATION FAILUREWARNING INDICATORACM, WARNING INDICATORSTORED CODE OR INTERMITTENT CONDITIONACTIVE CODE PRESENTTEST ACTION APPLICABILITY1 Turn the ignition on.Ensure the battery is fully charged.NOTE: For the purpose of this test, the AECM and ORC modules will bereferred to as an ACM.SELECT ACTIVE or STORED DTC:AllACM - ACTIVE DTCGo To 2ACM - STORED DTCGo To 5NOTE: When reconnecting Airbag system components, the ignition must beturned off and the battery must be disconnected.32
AIRBAGAIRBAG WARNING INDICATOR TEST — ContinuedTEST ACTION APPLICABILITY2 With the DRBIII, ensure PCI Bus communications with the Instrument Cluster.AllIs the Instrument Cluster communicating on the PCI Bus?Yes → Go To 3No → Refer to category COMMUNICATION CATEGORY and select therelated symptom INSTRUMENT CLUSTER BUS +/- SIGNALOPEN.3 With the DRBIII select PASSIVE RESTRAINTS, AIRBAG and MONITOR DIS-PLAY.Using the DRBIII, read the WARNING LAMP MONITOR screen.Select the LAMP STATUS displayed on the DRB monitors screen.Does the DRBIII show the LAMP STATUS: OK?AllYESNOGo To 4Replace Instrument Cluster.Perform BODY VERIFICATION TEST - VER 1.4 WARNING: TURN THE IGNITION <strong>OF</strong>F, DISCONNECT THE BATTERY ANDWAIT TWO MINUTES BEFORE PROCEEDING.If there are no possible causes remaining, view repair.AllRepairReplace the Airbag Control Module in accordance with ServiceInstructions. WARNING: IF THE AIRBAG CONTROL MODULEIS DROPPED AT ANY TIME, IT MUST BE REPLACED.Perform AIRBAG VERIFICATION TEST - VER 1.5 NOTE: Ensure the battery is fully charged.With the DRBIII, record and erase all DTCs from all modules.All active codes must be resolved before diagnosing any stored codes.Maintain a safe distance from all airbags while performing the following steps.With the DRBIII monitor active codes as you work through the system.NOTE: If equipped with Passenger Airbag On-Off switch, read the DTC’s inall switch positions.Wiggle the wiring harness and connectors of the appropriate airbag system androtate the steering wheel from stop to stop.NOTE: Check connectors - Clean and repair as necessary.You have just attempted to simulate the condition that initially set the trouble codemessage.The following additional checks may assist you in identifying a possible intermittentproblem:- Visually inspect related wire harness connectors. Look for broken, bent, pushed out,spread, corroded, or contaminated terminals.- Visually inspect the related harnesses. Look for chafed, pierced, pinched or partiallybroken wire.- Refer to Wiring Diagrams and Technical Service Bulletins that may apply.Did the DTC become active ?AllYes → Select appropriate symptom from Symptom List.No → No problem found at this time. Erase all codes before returningvehicle to customer.33
AIRBAGSymptom:CLUSTER MESSAGE MISMATCHWhen Monitored and Set Condition:CLUSTER MESSAGE MISMATCHWhen Monitored: After the MIC bulb test is completed, the ACM compares the LampRequest by ACM, On or Off, and the Lamp on by MIC, On or Off, PCI Bus messages. Eachmessage is transmitted one time per second or when a change in the lamp state occur.Set Condition: If the Lamp Request by ACM, On or Off, and the Lamp on by MIC, On orOff, messages do not match, the code will set.POSSIBLE CAUSESMIC DIAGNOSTIC CODESCLUSTER MESSAGE MISMATCHSTORED CODE OR INTERMITTENT CONDITIONACM, CLUSTER MESSAGE MISMATCHACTIVE CODE PRESENTTEST ACTION APPLICABILITY1 Turn the ignition on.Ensure the battery is fully charged.NOTE: For the purpose of this test, the AECM and ORC modules will bereferred to as an ACM.SELECT ACTIVE or STORED DTC:AllACM - ACTIVE DTCGo To 2ACM - STORED DTCGo To 5NOTE: When reconnecting Airbag system components, the ignition must beturned off and the battery must be disconnected.2 Turn the ignition on.With the DRBIII, read the MIC DTCs.Does the DRBIII display any active Diagnostic Codes?AllYes → Refer to symptom list for problems related to Instrument Cluster.No → Go To 334
AIRBAGCLUSTER MESSAGE MISMATCH — ContinuedTEST ACTION APPLICABILITY3 With the DRBIII select PASSIVE RESTRAINTS, AIRBAG, MONITOR DISPLAYand WARNING LAMP STATUS.Cycle the ignition key and observe the LAMP ON BY MIC and LAMP REQ BY ACMmonitors after the 6 to 8 second indicator test.Does the LAMP ON BY MIC and LAMP REQ BY ACM monitors match?AllYESNOGo To 4Replace Mechanical Instrument Cluster.Perform BODY VERIFICATION TEST - VER 1.4 WARNING: MAKE SURE THE BATTERY IS DISCONNECTED, THEN WAITTWO MINUTES BEFORE PROCEEDING.If there are no possible causes remaining, view repair.AllRepairReplace the Airbag Control Module in accordance with ServiceInstructions. WARNING: IF THE AIRBAG CONTROL MODULEIS DROPPED AT ANY TIME, IT MUST BE REPLACED.Perform AIRBAG VERIFICATION TEST - VER 1.5 NOTE: Ensure the battery is fully charged.With the DRBIII, record and erase all DTCs from all modules.All active codes must be resolved before diagnosing any stored codes.Maintain a safe distance from all airbags while performing the following steps.With the DRBIII monitor active codes as you work through the system.NOTE: If equipped with Passenger Airbag On-Off switch, read the DTC’s inall switch positions.Wiggle the wiring harness and connectors of the appropriate airbag system androtate the steering wheel from stop to stop.NOTE: Check connectors - Clean and repair as necessary.You have just attempted to simulate the condition that initially set the trouble codemessage.The following additional checks may assist you in identifying a possible intermittentproblem:- Visually inspect related wire harness connectors. Look for broken, bent, pushed out,spread, corroded, or contaminated terminals.- Visually inspect the related harnesses. Look for chafed, pierced, pinched or partiallybroken wire.- Refer to Wiring Diagrams and Technical Service Bulletins that may apply.Did the DTC become active ?AllYes → Select appropriate symptom from Symptom List.No → No problem found at this time. Erase all codes before returningvehicle to customer.35
AIRBAGSymptom:DRIVER CURTAIN SQUIB CIRCUIT OPENWhen Monitored and Set Condition:DRIVER CURTAIN SQUIB CIRCUIT OPENWhen Monitored: With the ignition is On, the ACM monitors the resistance of theCurtain Squib circuits.Set Condition: When the ACM detects an open circuit or high resistance on the CurtainSquib circuits.POSSIBLE CAUSESCURTAIN AIRBAG OPENCURTAIN SQUIB LINE 1 OR LINE 2 CIRCUIT OPENACM, CURTAIN SQUIB CIRCUIT OPENSTORED CODE OR INTERMITTENT CONDITIONACTIVE CODE PRESENTTEST ACTION APPLICABILITY1 Ensure the battery is fully charged.Turn the ignition on.NOTE: For the purpose of this test, the AECM and ORC modules will bereferred to as an ACM.SELECT ONE:AllACM - ACTIVE DTCGo To 2ACM - STORED DTCGo To 4NOTE: When reconnecting Airbag system components, the ignition must beturned off and the battery must be disconnected.36
AIRBAGDRIVER CURTAIN SQUIB CIRCUIT OPEN — ContinuedTEST ACTION APPLICABILITY2 WARNING: TURN IGNITION <strong>OF</strong>F, DISCONNECT THE BATTERY AND WAITTWO MINUTES BEFORE PROCEEDING.WARNING: DO NOT PLACE AN INTACT UNDEPLOYED CURTAIN AIRBAGFACE DOWN ON A HARD SURFACE, THE AIRBAG WILL PROPEL INTOTHE AIR IF ACCIDENTALLY DEPLOYED, AND COULD RESULT IN SERI-OUS OR FATAL INJURY.Disconnect the Curtain Airbag connector.NOTE: Check connectors - Clean and repair as necessary.Connect the appropriate Load Tool to the Curtain Airbag connector.WARNING: TURN IGNITION ON, THEN RECONNECT THE BATTERY.With the DRBIII, read the ACM active DTC’s.Does the DRBIII show CURTAIN SQUIB CIRCUIT OPEN?AllYes → Go To 3No → Replace Curtain Airbag in accordance with the Service Information.Perform AIRBAG VERIFICATION TEST - VER 1.3 WARNING: TURN IGNITION <strong>OF</strong>F, DISCONNECT THE BATTERY AND WAITTWO MINUTES BEFORE PROCEEDING.WARNING: DO NOT PLACE AN INTACT UNDEPLOYED CURTAIN AIRBAGFACE DOWN ON A HARD SURFACE, THE AIRBAG WILL PROPEL INTOTHE AIR IF ACCIDENTALLY DEPLOYED, AND COULD RESULT IN SERI-OUS OR FATAL INJURY.Disconnect the Airbag Load Tool Jumper.Disconnect the Airbag Control Module Connector.NOTE: Check connectors - Clean and repair as necessary.Connect the appropriate Load Tool adaptor to the Airbag Control Module connector.Measure the resistance of the Curtain Squib Line 1 and Line 2 circuits between theLoad Tool ACM adaptor and the Curtain Airbag connector.Is the resistance below 1.0 ohms on both circuits?AllYes → Replace the Airbag Control Module in accordance with the Serviceinformation. WARNING: IF THE AIRBAG CONTROL MODULEIS DROPPED AT ANY TIME, IT MUST BE REPLACED.Perform AIRBAG VERIFICATION TEST - VER 1.No → Repair open or high resistance in the Curtain Squib Line 1 or Line2 circuits.Perform AIRBAG VERIFICATION TEST - VER 1.37
AIRBAGDRIVER CURTAIN SQUIB CIRCUIT OPEN — ContinuedTEST ACTION APPLICABILITY4 NOTE: Ensure the battery is fully charged.With the DRBIII, record and erase all DTCs from all modules.All active codes must be resolved before diagnosing any stored codes.Maintain a safe distance from all airbags while performing the following steps.With the DRBIII monitor active codes as you work through the system.NOTE: If equipped with Passenger Airbag On-Off switch, read the DTC’s inall switch positions.Wiggle the wiring harness and connectors of the appropriate airbag system androtate the steering wheel from stop to stop.NOTE: Check connectors - Clean and repair as necessary.You have just attempted to simulate the condition that initially set the trouble codemessage.The following additional checks may assist you in identifying a possible intermittentproblem:- Visually inspect related wire harness connectors. Look for broken, bent, pushed out,spread, corroded, or contaminated terminals.- Visually inspect the related harnesses. Look for chafed, pierced, pinched or partiallybroken wire.- Refer to Wiring Diagrams and Technical Service Bulletins that may apply.Did the DTC become active ?AllYes → Select appropriate symptom from Symptom List.No → No problem found at this time. Erase all codes before returningvehicle to customer.38
AIRBAGSymptom:DRIVER CURTAIN SQUIB CIRCUIT SHORTWhen Monitored and Set Condition:DRIVER CURTAIN SQUIB CIRCUIT SHORTWhen Monitored: When the ignition is on, the ACM monitors the resistance between theCurtain Squib circuits.Set Condition: When the ACM detects a low resistance between the Curtain Squibcircuits.POSSIBLE CAUSESCURTAIN AIRBAG SHORTCURTAIN SQUIB LINE 1 SHORT TO LINE 2ACM, CURTAIN SQUIB CIRCUIT SHORTSTORED CODE OR INTERMITTENT CONDITIONACTIVE CODE PRESENTTEST ACTION APPLICABILITY1 Ensure the battery is fully charged.Turn the ignition on.NOTE: For the purpose of this test, the AECM and ORC modules will bereferred to as an ACM.SELECT ONE:AllACM - ACTIVE DTCGo To 2ACM - STORED DTCGo To 4NOTE: When reconnecting Airbag system components, the ignition must beturned off and the battery must be disconnected.39
AIRBAGDRIVER CURTAIN SQUIB CIRCUIT SHORT — ContinuedTEST ACTION APPLICABILITY2 WARNING: TURN THE IGNITION <strong>OF</strong>F, DISCONNECT THE BATTERY ANDWAIT TWO MINUTES BEFORE PROCEEDING.WARNING: DO NOT PLACE AN INTACT UNDEPLOYED CURTAIN AIRBAGFACE DOWN ON A HARD SURFACE, THE AIRBAG WILL PROPEL INTOTHE AIR IF ACCIDENTALLY DEPLOYED, AND COULD RESULT IN SERI-OUS OR FATAL INJURY.Disconnect the Curtain Airbag connector.NOTE: Check connectors - Clean repair as necessary.Connect the appropriate Load Tool to the Curtain Airbag connector.WARNING: TURN IGNITION ON, THEN RECONNECT THE BATTERY.With the DRB, read the ACM active DTC’s.Does the DRBIII show CURTAIN SQUIB CIRCUIT SHORT?AllYes → Go To 3No → Replace Curtain Airbag in accordance with the Service Information.Perform AIRBAG VERIFICATION TEST - VER 1.3 WARNING: TURN THE IGNITION <strong>OF</strong>F, DISCONNECT THE BATTERY ANDWAIT TWO MINUTES BEFORE PROCEEDING.WARNING: DO NOT PLACE AN INTACT UNDEPLOYED CURTAIN AIRBAGFACE DOWN ON A HARD SURFACE, THE AIRBAG WILL PROPEL INTOTHE AIR IF ACCIDENTALLY DEPLOYED, AND COULD RESULT IN SERI-OUS OR FATAL INJURY.Disconnect the Airbag Load Tool Jumper.Disconnect the Airbag Control Module connectorNOTE: Check connectors - Clean and repair as necessary.Connect the appropriate Load Tool adaptor to the ACM connector.Measure the resistance between the Curtain Squib Line 1 and Line 2 circuits at theCurtain Airbag connector.Is the resistance below 10K ohms?AllYes → Repair Curtain Squib Line 1 shorted to Line 2 circuit.Perform AIRBAG VERIFICATION TEST - VER 1.No → Replace the Airbag Control Module in accordance with ServiceInstructions. WARNING: IF THE AIRBAG CONTROL MODULEIS DROPPED AT ANY TIME, IT MUST BE REPLACED.Perform AIRBAG VERIFICATION TEST - VER 1.40
AIRBAGDRIVER CURTAIN SQUIB CIRCUIT SHORT — ContinuedTEST ACTION APPLICABILITY4 NOTE: Ensure the battery is fully charged.With the DRBIII, record and erase all DTCs from all modules.All active codes must be resolved before diagnosing any stored codes.Maintain a safe distance from all airbags while performing the following steps.With the DRBIII monitor active codes as you work through the system.NOTE: If equipped with Passenger Airbag On-Off switch, read the DTC’s inall switch positions.Wiggle the wiring harness and connectors of the appropriate airbag system androtate the steering wheel from stop to stop.NOTE: Check connectors - Clean and repair as necessary.You have just attempted to simulate the condition that initially set the trouble codemessage.The following additional checks may assist you in identifying a possible intermittentproblem:- Visually inspect related wire harness connectors. Look for broken, bent, pushed out,spread, corroded, or contaminated terminals.- Visually inspect the related harnesses. Look for chafed, pierced, pinched or partiallybroken wire.- Refer to Wiring Diagrams and Technical Service Bulletins that may apply.Did the DTC become active ?AllYes → Select appropriate symptom from Symptom List.No → No problem found at this time. Erase all codes before returningvehicle to customer.41
AIRBAGSymptom:DRIVER CURTAIN SQUIB SHORT TO BATTERYWhen Monitored and Set Condition:DRIVER CURTAIN SQUIB SHORT TO BATTERYWhen Monitored: When the ignition is on, the ACM monitors the voltage of the CurtainSquib circuits.Set Condition: When the ACM detects high voltage on the Curtain Squib circuits.POSSIBLE CAUSESCURTAIN AIRBAG SHORT TO BATTERYCURTAIN SQUIB LINE 1 OR LINE 2 SHORTED TO BATTERYACM, CURTAIN SQUIB SHORT TO BATTERYSTORED CODE OR INTERMITTENT CONDITIONACTIVE CODE PRESENTTEST ACTION APPLICABILITY1 Turn the ignition on.Ensure the battery is fully charged.NOTE: For the purpose of this test, the AECM and ORC modules will bereferred to as an ACM.SELECT ONE:AllACM - ACTIVE DTCGo To 2ACM - STORED DTCGo To 4NOTE: When reconnecting Airbag system components, the ignition must beturned off and the battery must be disconnected.2 WARNING: TURN IGNITION <strong>OF</strong>F, DISCONNECT THE BATTERY AND WAITTWO MINUTES BEFORE PROCEEDING.WARNING: DO NOT PLACE AN INTACT UNDEPLOYED CURTAIN AIRBAGFACE DOWN ON A HARD SURFACE, THE AIRBAG WILL PROPEL INTOTHE AIR IF ACCIDENTALLY DEPLOYED, AND COULD RESULT IN SERI-OUS OR FATAL INJURY.Disconnect the Curtain Airbag connector.NOTE: Check connectors - Clean and repair as necessary.Connect the appropriate Load Tool to the Curtain Airbag connector.WARNING: TURN IGNITION ON, THEN RECONNECT THE BATTERY.With the DRBIII, read ACM active DTC’s.Does the DRBIII display CURTAIN SQUIB SHORT TO BATTERY?AllYes → Go To 3No → Replace Curtain Airbag in accordance with the Service Information.Perform AIRBAG VERIFICATION TEST - VER 1.42
AIRBAGDRIVER CURTAIN SQUIB SHORT TO BATTERY — ContinuedTEST ACTION APPLICABILITY3 WARNING: TURN IGNITION <strong>OF</strong>F, DISCONNECT THE BATTERY AND WAITTWO MINUTES BEFORE PROCEEDING.WARNING: DO NOT PLACE AN INTACT UNDEPLOYED CURTAIN AIRBAGFACE DOWN ON A HARD SURFACE, THE AIRBAG WILL PROPEL INTOTHE AIR IF ACCIDENTALLY DEPLOYED, AND COULD RESULT IN SERI-OUS OR FATAL INJURY.Disconnect the Airbag Load Tool Jumper.Disconnect the Airbag Control Module connector.NOTE: Check connectors - Clean and repair as necessary.Connect the appropriate Load Tool ACM adaptor to the ACM connector.WARNING: TURN IGNITION ON, THEN RECONNECT THE BATTERY.Measure the voltage of the Curtain Squib Line 1 and Line 2 circuits between theCurtain Airbag connector and ground.Is any voltage present on either circuit?AllYes → Repair Curtain Squib Line 1 or Line 2 shorted to battery.Perform AIRBAG VERIFICATION TEST - VER 1.No → Replace the Airbag Control Module in accordance with ServiceInstructions. WARNING: IF THE AIRBAG CONTROL MODULEIS DROPPED AT ANY TIME, IT MUST BE REPLACED.Perform AIRBAG VERIFICATION TEST - VER 1.4 NOTE: Ensure the battery is fully charged.With the DRBIII, record and erase all DTCs from all modules.All active codes must be resolved before diagnosing any stored codes.Maintain a safe distance from all airbags while performing the following steps.With the DRBIII monitor active codes as you work through the system.NOTE: If equipped with Passenger Airbag On-Off switch, read the DTC’s inall switch positions.Wiggle the wiring harness and connectors of the appropriate airbag system androtate the steering wheel from stop to stop.NOTE: Check connectors - Clean and repair as necessary.You have just attempted to simulate the condition that initially set the trouble codemessage.The following additional checks may assist you in identifying a possible intermittentproblem:- Visually inspect related wire harness connectors. Look for broken, bent, pushed out,spread, corroded, or contaminated terminals.- Visually inspect the related harnesses. Look for chafed, pierced, pinched or partiallybroken wire.- Refer to Wiring Diagrams and Technical Service Bulletins that may apply.Did the DTC become active ?AllYes → Select appropriate symptom from Symptom List.No → No problem found at this time. Erase all codes before returningvehicle to customer.43
AIRBAGSymptom:DRIVER CURTAIN SQUIB SHORT TO GROUNDWhen Monitored and Set Condition:DRIVER CURTAIN SQUIB SHORT TO GROUNDWhen Monitored: When the ignition is on, the ACM monitors the resistance of theCurtain Squib circuits.Set Condition: When the ACM detects a short to ground on the Curtain Squib circuits.POSSIBLE CAUSESCURTAIN AIRBAG SHORT TO GROUNDCURTAIN SQUIB LINE 1 OR LINE 2 SHORTED TO GROUNDACM, CURTAIN SQUIB SHORT TO GROUNDSTORED CODE OR INTERMITTENT CONDITIONACTIVE CODE PRESENTTEST ACTION APPLICABILITY1 Ensure the battery is fully charged.Turn the ignition on.NOTE: For the purpose of this test, the AECM and ORC modules will bereferred to as an ACM.SELECT ONE:AllACM - ACTIVE DTCGo To 2ACM - STORED DTCGo To 4NOTE: When reconnecting Airbag system components, the ignition must beturned off and the battery must be disconnected.2 WARNING: TURN IGNITION <strong>OF</strong>F, DISCONNECT THE BATTERY AND WAITTWO MINUTES BEFORE PROCEEDING.WARNING: DO NOT PLACE AN INTACT UNDEPLOYED CURTAIN AIRBAGFACE DOWN ON A HARD SURFACE, THE AIRBAG WILL PROPEL INTOTHE AIR IF ACCIDENTALLY DEPLOYED, AND COULD RESULT IN SERI-OUS OR FATAL INJURY.Disconnect the Curtain Airbag connector.NOTE: Check connectors - Clean and repair as necessary.Connect the appropriate Load Tool to the Curtain Airbag connector.WARNING: TURN IGNITION ON, THEN RECONNECT THE BATTERY.With the DRBIII, read ACM active DTC’s.Does the DRBIII display CURTAIN SQUIB SHORT TO GROUND?AllYes → Go To 3No → Replace the Curtain Airbag in accordance with Service Instructions.Perform AIRBAG VERIFICATION TEST - VER 1.44
AIRBAGDRIVER CURTAIN SQUIB SHORT TO GROUND — ContinuedTEST ACTION APPLICABILITY3 WARNING: TURN IGNITION <strong>OF</strong>F, DISCONNECT THE BATTERY AND WAITTWO MINUTES BEFORE PROCEEDING.WARNING: DO NOT PLACE AN INTACT UNDEPLOYED CURTAIN AIRBAGFACE DOWN ON A HARD SURFACE, THE AIRBAG WILL PROPEL INTOTHE AIR IF ACCIDENTALLY DEPLOYED, AND COULD RESULT IN SERI-OUS OR FATAL INJURY.Disconnect the Airbag Load Tool Jumper.Disconnect the Airbag Control Module connector.NOTE: Check connectors - Clean and repair as necessary.Connect the appropriate Load Tool ACM adaptor to the ACM connector.Measure the resistance of the Curtain Squib Line 1 and Line 2 circuits between theCurtain Squib connector and ground.Is the resistance below 10K ohms on either circuit?AllYes → Repair Curtain Squib Line 1 or Line 2 shorted to ground.Perform AIRBAG VERIFICATION TEST - VER 1.No → Replace the Airbag Control Module in accordance with ServiceInstructions. WARNING: IF THE AIRBAG CONTROL MODULEIS DROPPED AT ANY TIME, IT MUST BE REPLACED.Perform AIRBAG VERIFICATION TEST - VER 1.4 NOTE: Ensure the battery is fully charged.With the DRBIII, record and erase all DTCs from all modules.All active codes must be resolved before diagnosing any stored codes.Maintain a safe distance from all airbags while performing the following steps.With the DRBIII monitor active codes as you work through the system.NOTE: If equipped with Passenger Airbag On-Off switch, read the DTC’s inall switch positions.Wiggle the wiring harness and connectors of the appropriate airbag system androtate the steering wheel from stop to stop.NOTE: Check connectors - Clean and repair as necessary.You have just attempted to simulate the condition that initially set the trouble codemessage.The following additional checks may assist you in identifying a possible intermittentproblem:- Visually inspect related wire harness connectors. Look for broken, bent, pushed out,spread, corroded, or contaminated terminals.- Visually inspect the related harnesses. Look for chafed, pierced, pinched or partiallybroken wire.- Refer to Wiring Diagrams and Technical Service Bulletins that may apply.Did the DTC become active ?AllYes → Select appropriate symptom from Symptom List.No → No problem found at this time. Erase all codes before returningvehicle to customer.45
AIRBAGSymptom:DRIVER SEAT BELT SWITCH CIRCUIT OPENWhen Monitored and Set Condition:DRIVER SEAT BELT SWITCH CIRCUIT OPENWhen Monitored: With the ignition on the ACM monitors the Seat Belt Switch circuit foran open condition.Set Condition: The code will set if the ACM does not detect the correct circuit voltage.POSSIBLE CAUSESDRIVER SEAT BELT SWITCH OPENDRIVER SEAT BELT SWITCH CIRCUITS OPENACM, DRIVER SEAT BELT SWITCH CIRCUIT OPENSTORED CODE OR INTERMITTENT CONDITIONACTIVE CODE PRESENTTEST ACTION APPLICABILITY1 NOTE: Ensure that the battery is fully charged.Turn the ignition on.NOTE: For the purpose of this test, the AECM and ORC modules will bereferred to as an ACM.SELECT ACTIVE or STORED DTC:AllACM - ACTIVE DTCGo To 2ACM - STORED DTCGo To 4NOTE: When reconnecting Airbag system components, the ignition must beturned off and the battery must be disconnected.2 Turn the ignition off.Disconnect the Driver Seat Belt Switch.NOTE: Check connectors - Clean and repair as necessary.Turn the ignition on.Measure the voltage between Driver Seat Belt Switch Line 1 and Line 2 circuits atthe SBS connector.Is there any voltage present?AllYes → Replace the Driver Seat Belt Switch Buckle Assembly.Perform AIRBAG VERIFICATION TEST - VER 1.No → Go To 346
AIRBAGDRIVER SEAT BELT SWITCH CIRCUIT OPEN — ContinuedTEST ACTION APPLICABILITY3 WARNING: TURN IGNITION <strong>OF</strong>F, DISCONNECT THE BATTERY AND WAITTWO MINUTES BEFORE PROCEEDING.Disconnect the Airbag Control Module connectorNOTE: Check connectors - Clean and repair as necessary.Connect the appropriate Load Tool adaptor to the Airbag Control Module connector.Measure the resistance of the Driver SBS Line 1 and line 2 circuits between theDriver SBS harness connector and Airbag Load Tool adaptor.Is the resistance of both circuits below 10K ohms?AllYes → Replace the Airbag Control Module in accordance with the Serviceinformation. WARNING: IF THE AIRBAG CONTROL MODULEIS DROPPED AT ANY TIME, IT MUST BE REPLACED. MUSTBE REPLACED.Perform AIRBAG VERIFICATION TEST - VER 1.No → Repair the open Driver Seat Belt Switch Line 1 or Line 2.Perform AIRBAG VERIFICATION TEST - VER 1.NOTE: When reconnecting Airbag system components, the ignition must beturned off and the battery must be disconnected.4 NOTE: Ensure the battery is fully charged.With the DRBIII, record and erase all DTCs from all modules.All active codes must be resolved before diagnosing any stored codes.Maintain a safe distance from all airbags while performing the following steps.With the DRBIII monitor active codes as you work through the system.NOTE: If equipped with Passenger Airbag On-Off switch, read the DTC’s inall switch positions.Wiggle the wiring harness and connectors of the appropriate airbag system androtate the steering wheel from stop to stop.NOTE: Check connectors - Clean and repair as necessary.You have just attempted to simulate the condition that initially set the trouble codemessage.The following additional checks may assist you in identifying a possible intermittentproblem:- Visually inspect related wire harness connectors. Look for broken, bent, pushed out,spread, corroded, or contaminated terminals.- Visually inspect the related harnesses. Look for chafed, pierced, pinched or partiallybroken wire.- Refer to Wiring Diagrams and Technical Service Bulletins that may apply.Did the DTC become active ?AllYes → Select appropriate symptom from Symptom List.No → No problem found at this time. Erase all codes before returningvehicle to customer.47
AIRBAGSymptom:DRIVER SEAT BELT SWITCH SHORT TO BATTERYWhen Monitored and Set Condition:DRIVER SEAT BELT SWITCH SHORT TO BATTERYWhen Monitored: With the ignition on the ACM monitors the Seat Belt Buckle Switchcircuit for an short to battery.Set Condition: The code will set if the ACM detects high circuit voltage.POSSIBLE CAUSESDRIVER SEAT BELT SWITCH SHORT TO BATTERYDRIVER SEAT BELT SWITCH CIRCUITS SHORT TO BATTERYACM, DRIVER SEAT BELT SWITCH SHORT TO BATTERYSTORED CODE OR INTERMITTENT CONDITIONACTIVE CODE PRESENTTEST ACTION APPLICABILITY1 NOTE: Ensure that the battery is fully charged.Turn the ignition on.NOTE: For the purpose of this test, the AECM and ORC modules will bereferred to as an ACM.SELECT ACTIVE or STORED DTC:AllACM - ACTIVE DTCGo To 2ACM - STORED DTCGo To 42 Turn the ignition off.Disconnect the Driver Seat Belt Switch.NOTE: Check connectors - Clean and repair as necessary.Turn the ignition on.With the DRBIII, read the active Airbag DTCs.Does the DRB show DRIVER SEAT BELT SWITCH CIRCUIT OPEN?AllYes → Replace the Driver Seat Belt Switch Buckle Assembly.Perform AIRBAG VERIFICATION TEST - VER 1.No → Go To 348
AIRBAGDRIVER SEAT BELT SWITCH SHORT TO BATTERY — ContinuedTEST ACTION APPLICABILITY3 WARNING: TURN IGNITION <strong>OF</strong>F, DISCONNECT THE BATTERY AND WAITTWO MINUTES BEFORE PROCEEDING.Disconnect the Airbag Control Module connectorNOTE: Check connectors - Clean and repair as necessary.WARNING: TURN THE IGNITION ON, THEN RECONNECT THE BATTERY.Measure the voltage on the Driver SBS Line 1 and line 2 circuits at the Driver SBSconnector.Is there any voltage present?AllYes → Repair the Driver Seat Belt Switch line 1 or line 2 shorted tobattery.Perform AIRBAG VERIFICATION TEST - VER 1.No → Replace the Airbag Control Module in accordance with the Serviceinformation. WARNING: IF THE AIRBAG CONTROL MODULEIS DROPPED AT ANY TIME, IT MUST BE REPLACED.Perform AIRBAG VERIFICATION TEST - VER 1.NOTE: When reconnecting Airbag system components, the ignition must beturned off and the battery must be disconnected.4 NOTE: Ensure the battery is fully charged.With the DRBIII, record and erase all DTCs from all modules.All active codes must be resolved before diagnosing any stored codes.Maintain a safe distance from all airbags while performing the following steps.With the DRBIII monitor active codes as you work through the system.NOTE: If equipped with Passenger Airbag On-Off switch, read the DTC’s inall switch positions.Wiggle the wiring harness and connectors of the appropriate airbag system androtate the steering wheel from stop to stop.NOTE: Check connectors - Clean and repair as necessary.You have just attempted to simulate the condition that initially set the trouble codemessage.The following additional checks may assist you in identifying a possible intermittentproblem:- Visually inspect related wire harness connectors. Look for broken, bent, pushed out,spread, corroded, or contaminated terminals.- Visually inspect the related harnesses. Look for chafed, pierced, pinched or partiallybroken wire.- Refer to Wiring Diagrams and Technical Service Bulletins that may apply.Did the DTC become active ?AllYes → Select appropriate symptom from Symptom List.No → No problem found at this time. Erase all codes before returningvehicle to customer.49
AIRBAGSymptom:DRIVER SEAT BELTS SWITCH SHORT TO GROUNDWhen Monitored and Set Condition:DRIVER SEAT BELTS SWITCH SHORT TO GROUNDWhen Monitored: With the ignition on the ACM monitors the Seat Belt Buckle Switchcircuit for a shorted together or shorted to ground condition.Set Condition: The code will set if the ACM detects low circuit voltage.POSSIBLE CAUSESDRIVER SEAT BELT SWITCH SHORT TOGETHER OR TO GROUNDDRIVER SEAT BELT SWITCH CIRCUITS SHORT TOGETHERDRIVER SEAT BELT SWITCH CIRCUITS SHORT TO GROUNDACM, DRIVER SEAT BELT SWITCH SHORT TO GROUNDSTORED CODE OR INTERMITTENT CONDITIONACTIVE CODE PRESENTTEST ACTION APPLICABILITY1 NOTE: Ensure that the battery is fully charged.Turn the ignition on.NOTE: For the purpose of this test, the AECM and ORC modules will bereferred to as an ACM.SELECT ACTIVE or STORED DTC:AllACM - ACTIVE DTCGo To 2ACM - STORED DTCGo To 52 Turn Ignition off.Disconnect the Driver Seat Belt Switch connector.NOTE: Check connectors - Clean and repair as necessary.Turn Ignition on.With the DRBIII, read the active Airbag DTCs.Does the DRB show DRIVER SEAT BELT CIRCUIT OPEN?AllYes → Replace the Driver Seat Belt Switch Buckle Assembly.Perform AIRBAG VERIFICATION TEST - VER 1.No → Go To 350
AIRBAGDRIVER SEAT BELTS SWITCH SHORT TO GROUND — ContinuedTEST ACTION APPLICABILITY3 WARNING: TURN IGNITION <strong>OF</strong>F, DISCONNECT THE BATTERY AND WAITTWO MINUTES BEFORE PROCEEDING.Disconnect the Airbag Control Module connectorNOTE: Check connectors - Clean and repair as necessary.Measure the resistance between the Driver SBS Line 1 and line 2 circuits at theDriver SBS connector.Is the resistance below 10K ohms?AllYes → Repair the Driver Seat Belt Switch Line 1 and Line 2 shortedtogether.Perform AIRBAG VERIFICATION TEST - VER 1.No → Go To 44 Measure the resistance of the Driver SBS Line 1 and Line 2 circuits between theDriver SBS connector and ground.Is the resistance below 10K ohms on either circuit?AllYes → Repair the Driver Seat Belt Switch line 1 or line 2 shorted toground.Perform AIRBAG VERIFICATION TEST - VER 1.No → Replace the Airbag Control Module in accordance with the Serviceinformation. WARNING: IF THE AIRBAG CONTROL MODULEIS DROPPED AT ANY TIME, IT MUST BE REPLACED.Perform AIRBAG VERIFICATION TEST - VER 1.5 NOTE: Ensure the battery is fully charged.With the DRBIII, record and erase all DTCs from all modules.All active codes must be resolved before diagnosing any stored codes.Maintain a safe distance from all airbags while performing the following steps.With the DRBIII monitor active codes as you work through the system.NOTE: If equipped with Passenger Airbag On-Off switch, read the DTC’s inall switch positions.Wiggle the wiring harness and connectors of the appropriate airbag system androtate the steering wheel from stop to stop.NOTE: Check connectors - Clean and repair as necessary.You have just attempted to simulate the condition that initially set the trouble codemessage.The following additional checks may assist you in identifying a possible intermittentproblem:- Visually inspect related wire harness connectors. Look for broken, bent, pushed out,spread, corroded, or contaminated terminals.- Visually inspect the related harnesses. Look for chafed, pierced, pinched or partiallybroken wire.- Refer to Wiring Diagrams and Technical Service Bulletins that may apply.Did the DTC become active ?AllYes → Select appropriate symptom from Symptom List.No → No problem found at this time. Erase all codes before returningvehicle to customer.51
AIRBAGSymptom List:DRIVER SIDE IMPACT SENSOR INTERNAL 1NO DRIVER SIDE IMPACT SENSOR COMMUNICATIONTest Note:All symptoms listed above are diagnosed using the same tests.The title for the tests will be DRIVER SIDE IMPACT SENSORINTERNAL 1.When Monitored and Set Condition:DRIVER SIDE IMPACT SENSOR INTERNAL 1When Monitored: The Left Front Impact sensors is equipped with onboard diagnostics tomonitor the sensors internal circuits. If a problem is identified the sensor sends the DriverSide Impact sensor internal 1 message to the ACM.Set Condition: The code will set if the ACM receives an internal 1 message from theDriver Side Impact Sensor.NO DRIVER SIDE IMPACT SENSOR COMMUNICATIONWhen Monitored: The ACM continuously communicates with the Driver Side ImpactSensor over the sensor signal circuit. The sensor communication and onboard diagnosticsare powered by the ACM signal.Set Condition: The code will set, if the ACM and Driver Side Impact Sensor do notestablish and maintain valid data communications.POSSIBLE CAUSESSIGNAL CIRCUIT SHORTED TO BATTERYSIGNAL CIRCUIT SHORT TO GROUNDDRIVER SIDE SENSOR CIRCUITS SHORTED TOGETHERGROUND CIRCUIT OPENSIGNAL CIRCUIT OPENACM, DRIVER SIDE IMPACT SENSORREPAIR IS COMPLETESTORED CODE OR INTERMITTENT CONDITIONACTIVE CODE PRESENT52
AIRBAGDRIVER SIDE IMPACT SENSOR INTERNAL 1 — ContinuedTEST ACTION APPLICABILITY1 Turn the ignition on.NOTE: Ensure the battery is fully charged.NOTE: For the purpose of this test, the AECM and ORC modules will bereferred to as an ACM.SELECT ACTIVE or STORED DTC:AllACM - ACTIVE DTCGo To 2ACM - STORED DTCGo To 9NOTE: When reconnecting Airbag system components, the ignition must beturned off and the battery must be disconnected.2 WARNING: TURN THE IGNITION <strong>OF</strong>F, DISCONNECT THE BATTERY ANDWAIT TWO MINUTES BEFORE PROCEEDING.Disconnect the Driver Side Impact Sensor connector.Disconnect the Airbag Control Module connector.WARNING: TURN THE IGNITION ON, THEN RECONNECT THE BATTERY.Measure the voltage of the Driver Side Impact Sensor Signal circuit between theDriver Side Sensor connector and ground.Is there any voltage present?AllYes → Repair the Driver Side Impact Sensor Signal circuit shorted tobattery.Perform AIRBAG VERIFICATION TEST - VER 1.No → Go To 33 Turn the ignition off.Measure the resistance of the Driver Side Impact Sensor Signal circuit between theDriver Side Impact Sensor connector and ground.Is the resistance below 100K ohms?AllYes → Repair the Driver Side Impact Sense signal circuit shorted for ashort to ground.Perform AIRBAG VERIFICATION TEST - VER 1.No → Go To 44 Measure the resistance between the Driver Side Impact Sensor Signal and SensorGround circuits at the Driver Side Impact Sensor connector.Is the resistance below 100K ohms?AllYes → Repair the Driver Side Impact Sensor circuits shorted together.Perform AIRBAG VERIFICATION TEST - VER 1.No → Go To 55 Connect the appropriate Load Tool adaptor to the Airbag Control Module connector.Measure the resistance of the Driver Side Impact Sensor Ground circuit between theDriver Side Impact Sensor connector and the Load Tool adaptor.Is the resistance below 1 ohm?AllYes → Go To 6No → Repair the Driver Side Impact Sensor Ground circuit open or highresistance.Perform AIRBAG VERIFICATION TEST - VER 1.53
AIRBAGDRIVER SIDE IMPACT SENSOR INTERNAL 1 — ContinuedTEST ACTION APPLICABILITY6 Connect the appropriate Load Tool adaptor to the Airbag Control Module connector.Measure the resistance of the Driver Side Impact Sensor Signal circuit between theDriver Side Impact Sensor connector and the Load Tool adaptor.Is the resistance below 1 ohm?AllYes → Go To 7No → Repair the Driver Side Impact Sensor Signal circuit open or highresistance.Perform AIRBAG VERIFICATION TEST - VER 1.7 Replace the Driver Side Impact Sensor.Reconnect the vehicle body harness to the impact sensor.Remove any special tools or jumper wires and reconnect all previously disconnectedcomponents - except the Battery.WARNING: TURN THE IGNITION ON, THEN RECONNECT THE BATTERY.Connect the DRB to the Data Link Connector - use the most current softwareavailable.Use the DRB III and erase the stored codes in all airbag system modules.Turn the Ignition Off, and wait 15 seconds before turning the Ignition On.Wait one minute, and read active codes and if there are none present read the storedcodes.DID the active Driver Side Impact Sensor DTC return?AllYes → Go To 8No → Repair is complete.Perform AIRBAG VERIFICATION TEST - VER 1.8 WARNING: TURN THE IGNITION <strong>OF</strong>F, DISCONNECT THE BATTERY ANDWAIT TWO MINUTES BEFORE PROCEEDING.WARNING: IF THE AIRBAG CONTROL MODULE IS DROPPED AT ANYTIME, IT MUST BE REPLACED.If there are no possible causes remaining, view repair.AllRepairReplace the Airbag Control Module in accordance with ServiceInstructions.Perform AIRBAG VERIFICATION TEST - VER 1.54
AIRBAGDRIVER SIDE IMPACT SENSOR INTERNAL 1 — ContinuedTEST ACTION APPLICABILITY9 NOTE: Ensure the battery is fully charged.With the DRBIII, record and erase all DTCs from all modules.All active codes must be resolved before diagnosing any stored codes.Maintain a safe distance from all airbags while performing the following steps.With the DRBIII monitor active codes as you work through the system.NOTE: If equipped with Passenger Airbag On-Off switch, read the DTC’s inall switch positions.Wiggle the wiring harness and connectors of the appropriate airbag system androtate the steering wheel from stop to stop.NOTE: Check connectors - Clean and repair as necessary.You have just attempted to simulate the condition that initially set the trouble codemessage.The following additional checks may assist you in identifying a possible intermittentproblem:- Visually inspect related wire harness connectors. Look for broken, bent, pushed out,spread, corroded, or contaminated terminals.- Visually inspect the related harnesses. Look for chafed, pierced, pinched or partiallybroken wire.- Refer to Wiring Diagrams and Technical Service Bulletins that may apply.Did the DTC become active ?AllYes → Select appropriate symptom from Symptom List.No → No problem found at this time. Erase all codes before returningvehicle to customer.55
AIRBAGSymptom:DRIVER SQUIB 1 CIRCUIT OPENWhen Monitored and Set Condition:DRIVER SQUIB 1 CIRCUIT OPENWhen Monitored: With the ignition on the ACM monitors the resistance of the DriverSquib 1 circuits.Set Condition: The ACM detects an open circuit or high resistance in the Driver Squib 1circuits.POSSIBLE CAUSESDRIVER AIRBAG OPENCLOCKSPRING SQUIB CIRCUITS OPENDRIVER SQUIB 1 LINE 1 OR LINE 2 CIRCUIT OPENACM, DRIVER SQUIB 1 CIRCUIT OPENSTORED CODE OR INTERMITTENT CONDITIONACTIVE CODE PRESENTTEST ACTION APPLICABILITY1 Turn the ignition on.NOTE: Ensure that the battery is fully charged.NOTE: For the purpose of this test, the AECM and ORC modules will bereferred to as an ACM.SELECT ACTIVE or STORED DTC:AllACM - ACTIVE DTCGo To 2ACM - STORED DTCGo To 5NOTE: When reconnecting Airbag system components, the ignition must beturned off and the battery must be disconnected.56
AIRBAGDRIVER SQUIB 1 CIRCUIT OPEN — ContinuedTEST ACTION APPLICABILITY2 WARNING: TURN THE IGNITION <strong>OF</strong>F, DISCONNECT THE BATTERY ANDWAIT TWO MINUTES BEFORE PROCEEDING.WARNING: DO NOT PLACE AN INTACT UNDEPLOYED AIRBAG FACEDOWN ON A HARD SURFACE, THE AIRBAG WILL PROPEL INTO THE AIRIF ACCIDENTALLY DEPLOYED, AND COULD RESULT IN SERIOUS ORFATAL INJURY.Disconnect the Driver Airbag.NOTE: Check connectors - Clean and repair as necessary.Connect the appropriate Load Tool to the Driver Airbag connectors.WARNING: TURN THE IGNITION ON, THEN RECONNECT THE BATTERY.With the DRBIII, read the active Airbag DTCs.Does the DRBIII show DRIVER SQUIB 1 CIRCUIT OPEN?AllYes → Go To 3No → Replace the Driver Airbag in accordance with the Service Information.Perform AIRBAG VERIFICATION TEST - VER 1.3 WARNING: TURN THE IGNITION <strong>OF</strong>F, DISCONNECT THE BATTERY ANDWAIT TWO MINUTES BEFORE PROCEEDING.Disconnect the Clockspring connector.NOTE: Check connectors - Clean and repair as necessary.Connect the appropriate Load Tool to the Clockspring connector.WARNING: TURN THE IGNITION ON, THEN RECONNECT THE BATTERY.With the DRBIII, read the active Airbag DTCs.Does the DRBIII show DRIVER SQUIB 1 CIRCUIT OPEN?AllYes → Go To 4No → Replace the Clockspring in accordance with the Service Information.Perform AIRBAG VERIFICATION TEST - VER 1.4 WARNING: TURN THE IGNITION <strong>OF</strong>F, DISCONNECT THE BATTERY ANDWAIT TWO MINUTES BEFORE PROCEEDING.Disconnect the Airbag Control Module connector.NOTE: Check connectors - Clean and repair as necessary.Connect the appropriate Load Tool adaptor to the Airbag Control Module connector.Disconnect the Load Tool from the Clockspring connector.Measure the resistance of the Driver Squib 1 Line 1 and Line 2 circuit between theACM adaptor and the Clockspring connector.Is the resistance below 1.0 ohms on both circuits?AllYes → Replace the Airbag Control Module in accordance with ServiceInstructions. WARNING: IF THE AIRBAG CONTROL MODULEIS DROPPED AT ANY TIME, IT MUST BE REPLACED.Perform AIRBAG VERIFICATION TEST - VER 1.No → Repair open or high resistance in the Driver Squib 1 Line 1 orLine 2 circuit.Perform AIRBAG VERIFICATION TEST - VER 1.57
AIRBAGDRIVER SQUIB 1 CIRCUIT OPEN — ContinuedTEST ACTION APPLICABILITY5 NOTE: Ensure the battery is fully charged.With the DRBIII, record and erase all DTCs from all modules.All active codes must be resolved before diagnosing any stored codes.Maintain a safe distance from all airbags while performing the following steps.With the DRBIII monitor active codes as you work through the system.NOTE: If equipped with Passenger Airbag On-Off switch, read the DTC’s inall switch positions.Wiggle the wiring harness and connectors of the appropriate airbag system androtate the steering wheel from stop to stop.NOTE: Check connectors - Clean and repair as necessary.You have just attempted to simulate the condition that initially set the trouble codemessage.The following additional checks may assist you in identifying a possible intermittentproblem:- Visually inspect related wire harness connectors. Look for broken, bent, pushed out,spread, corroded, or contaminated terminals.- Visually inspect the related harnesses. Look for chafed, pierced, pinched or partiallybroken wire.- Refer to Wiring Diagrams and Technical Service Bulletins that may apply.Did the DTC become active ?AllYes → Select appropriate symptom from Symptom List.No → No problem found at this time. Erase all codes before returningvehicle to customer.58
AIRBAGSymptom:DRIVER SQUIB 1 CIRCUIT SHORTWhen Monitored and Set Condition:DRIVER SQUIB 1 CIRCUIT SHORTWhen Monitored: With the ignition on the ACM monitors the resistance of the DriverSquib 1 circuits.Set Condition: The ACM has detected low resistance on the Driver Squib 1 circuits.POSSIBLE CAUSESDRIVER AIRBAG CIRCUIT SHORTCLOCKSPRING, DRIVER SQUIB 1 CIRCUIT SHORTDRIVER SQUIB 1 LINE 1 SHORT TO LINE 2ACM, DRIVER SQUIB 1 CIRCUIT SHORTSTORED CODE OR INTERMITTENT CONDITIONACTIVE CODE PRESENTTEST ACTION APPLICABILITY1 Turn the ignition on.NOTE: Ensure that the battery is fully charged.NOTE: For the purpose of this test, the AECM and ORC modules will bereferred to as an ACM.SELECT ACTIVE or STORED DTC:AllACM - ACTIVE DTCGo To 2ACM - STORED DTCGo To 5NOTE: When reconnecting airbag system components the Ignition must beturned off and the Battery must be disconnected.2 WARNING: TURN THE IGNITION <strong>OF</strong>F, DISCONNECT THE BATTERY ANDWAIT TWO MINUTES BEFORE PROCEEDING.Disconnect the Driver Airbag.WARNING: DO NOT PLACE AN INTACT UNDEPLOYED AIRBAG FACEDOWN ON A HARD SURFACE, THE AIRBAG WILL PROPEL INTO THE AIRIF ACCIDENTALLY DEPLOYED, AND COULD RESULT IN SERIOUS ORFATAL INJURY.NOTE: Check connectors - Clean and repair as necessary.Connect the appropriate Load Tool to the Driver Airbag connectors.WARNING: TURN THE IGNITION ON, THEN RECONNECT THE BATTERY.With the DRBIII, read the active Airbag DTCs.Does the DRBIII show DRIVER SQUIB 1 CIRCUIT SHORT?AllYes → Go To 3No → Replace Driver Airbag.Perform AIRBAG VERIFICATION TEST - VER 1.59
AIRBAGDRIVER SQUIB 1 CIRCUIT SHORT — ContinuedTEST ACTION APPLICABILITY3 WARNING: TURN THE IGNITION <strong>OF</strong>F, DISCONNECT THE BATTERY ANDWAIT TWO MINUTES BEFORE PROCEEDING.Disconnect the Clockspring connector.NOTE: Check connectors - Clean and repair as necessary.Connect the appropriate Load Tool to the Clockspring connector.WARNING: TURN THE IGNITION ON, THEN RECONNECT THE BATTERY.With the DRBIII, read the active Airbag DTCs.Does the DRBIII show DRIVER SQUIB 1 CIRCUIT SHORT?AllYes → Go To 4No → Replace Clockspring.Perform AIRBAG VERIFICATION TEST - VER 1.4 WARNING: TURN THE IGNITION <strong>OF</strong>F, DISCONNECT THE BATTERY ANDWAIT TWO MINUTES BEFORE PROCEEDING.Disconnect the Airbag Control Module connector.NOTE: Check connectors - Clean and repair as necessary.Connect the appropriate Load Tool adaptor to the Airbag Control Module connector.Disconnect the Load Tool from the Clockspring connector.Measure the resistance between the Driver Squib 1 Line 1 and Line 2 at theClockspring connector.Is the resistance below 10K ohms?AllYes → Repair the Driver Squib 1 Line 1 circuit shorted to Driver Squib1 Line 2 circuit.Perform AIRBAG VERIFICATION TEST - VER 1.No → Replace the Airbag Control Module in accordance with ServiceInstructions. WARNING: IF THE AIRBAG CONTROL MODULEIS DROPPED AT ANY TIME, IT MUST BE REPLACED.Perform AIRBAG VERIFICATION TEST - VER 1.5 NOTE: Ensure the battery is fully charged.With the DRBIII, record and erase all DTCs from all modules.All active codes must be resolved before diagnosing any stored codes.Maintain a safe distance from all airbags while performing the following steps.With the DRBIII monitor active codes as you work through the system.NOTE: If equipped with Passenger Airbag On-Off switch, read the DTC’s inall switch positions.Wiggle the wiring harness and connectors of the appropriate airbag system androtate the steering wheel from stop to stop.NOTE: Check connectors - Clean and repair as necessary.You have just attempted to simulate the condition that initially set the trouble codemessage.The following additional checks may assist you in identifying a possible intermittentproblem:- Visually inspect related wire harness connectors. Look for broken, bent, pushed out,spread, corroded, or contaminated terminals.- Visually inspect the related harnesses. Look for chafed, pierced, pinched or partiallybroken wire.- Refer to Wiring Diagrams and Technical Service Bulletins that may apply.Did the DTC become active ?AllYes → Select appropriate symptom from Symptom List.No → No problem found at this time. Erase all codes before returningvehicle to customer.60
AIRBAGSymptom:DRIVER SQUIB 1 SHORT TO BATTERYWhen Monitored and Set Condition:DRIVER SQUIB 1 SHORT TO BATTERYWhen Monitored: With the ignition on the ACM monitors the voltage of the Driver Squib1 circuits.Set Condition: The ACM has detected high voltage on the Driver Squib 1 circuits.POSSIBLE CAUSESDRIVER AIRBAG CIRCUIT SHORT TO BATTERYCLOCKSPRING, DRIVER SQUIB 1 CIRCUIT SHORT TO BATTERYDRIVER SQUIB 1 LINE 1 OR LINE 2 SHORT TO BATTERYACM, DRIVER SQUIB 1 CIRCUITS SHORT TO BATTERYSTORED CODE OR INTERMITTENT CONDITIONACTIVE CODE PRESENTTEST ACTION APPLICABILITY1 Turn the ignition on.NOTE: Ensure that the battery is fully charged.NOTE: For the purpose of this test, the AECM and ORC modules will bereferred to as an ACM.SELECT ACTIVE or STORED ACM DTC:AllACM - ACTIVE DTCGo To 2ACM - STORED DTCGo To 5NOTE: When reconnecting Airbag system components, the ignition must beturned off and the battery must be disconnected.61
AIRBAGDRIVER SQUIB 1 SHORT TO BATTERY — ContinuedTEST ACTION APPLICABILITY2 WARNING: TURN THE IGNITION <strong>OF</strong>F, DISCONNECT THE BATTERY ANDWAIT TWO MINUTES BEFORE PROCEEDING.WARNING: DO NOT PLACE AN INTACT UNDEPLOYED AIRBAG FACEDOWN ON A HARD SURFACE, THE AIRBAG WILL PROPEL INTO THE AIRIF ACCIDENTALLY DEPLOYED, AND COULD RESULT IN SERIOUS ORFATAL INJURY.Disconnect the Driver Airbag.NOTE: Check connectors - Clean and repair as necessary.Connect the appropriate Load Tool to the Driver Airbag connectors.WARNING: TURN THE IGNITION ON, THEN RECONNECT THE BATTERY.With the DRBIII, read the active Airbag DTCS.Does the DRBIII show DRIVER SQUIB 1 SHORT TO BATTERY?AllYes → Go To 3No → Replace the Driver Airbag in accordance with the Service Information.Perform AIRBAG VERIFICATION TEST - VER 1.3 WARNING: TURN THE IGNITION <strong>OF</strong>F, DISCONNECT THE BATTERY ANDWAIT TWO MINUTES BEFORE PROCEEDING.Disconnect the Clockspring connector.NOTE: Check connectors - Clean and repair as necessary.Connect the appropriate Load Tool to the Clockspring connector.WARNING: TURN THE IGNITION ON, THEN RECONNECT THE BATTERY.With the DRBIII, read the active Airbag DTCs.Does the DRBIII show DRIVER SQUIB 1 SHORT TO BATTERY ?AllYes → Go To 4No → Replace the Clockspring in accordance with the Service Information.Perform AIRBAG VERIFICATION TEST - VER 1.4 WARNING: TURN THE IGNITION <strong>OF</strong>F, DISCONNECT THE BATTERY ANDWAIT TWO MINUTES BEFORE PROCEEDING.WARNING: IF THE AIRBAG CONTROL MODULE IS DROPPED AT ANYTIME, IT MUST BE REPLACED.Disconnect the Airbag Control Module connector.NOTE: Check connectors - Clean and repair as necessary.Connect the appropriate Load Tool adaptor to the Airbag Control Module connector.WARNING: TURN THE IGNITION ON, THEN RECONNECT THE BATTERY.Disconnect the Load Tool from the Clockspring connector.Measure the voltage on the Driver Squib 1 Line 1 and Line 2 circuits between theClockspring connector and ground.Is there any voltage present?AllYes → Repair the Driver Squib 1 Line 1 or Line 2 circuits shorted tobattery.Perform AIRBAG VERIFICATION TEST - VER 1.No → Replace the Airbag Control Module in accordance with ServiceInstructions. WARNING: IF THE AIRBAG CONTROL MODULEIS DROPPED AT ANY TIME, IT MUST BE REPLACED.Perform AIRBAG VERIFICATION TEST - VER 1.62
AIRBAGDRIVER SQUIB 1 SHORT TO BATTERY — ContinuedTEST ACTION APPLICABILITY5 NOTE: Ensure the battery is fully charged.With the DRBIII, record and erase all DTCs from all modules.All active codes must be resolved before diagnosing any stored codes.Maintain a safe distance from all airbags while performing the following steps.With the DRBIII monitor active codes as you work through the system.NOTE: If equipped with Passenger Airbag On-Off switch, read the DTC’s inall switch positions.Wiggle the wiring harness and connectors of the appropriate airbag system androtate the steering wheel from stop to stop.NOTE: Check connectors - Clean and repair as necessary.You have just attempted to simulate the condition that initially set the trouble codemessage.The following additional checks may assist you in identifying a possible intermittentproblem:- Visually inspect related wire harness connectors. Look for broken, bent, pushed out,spread, corroded, or contaminated terminals.- Visually inspect the related harnesses. Look for chafed, pierced, pinched or partiallybroken wire.- Refer to Wiring Diagrams and Technical Service Bulletins that may apply.Did the DTC become active ?AllYes → Select appropriate symptom from Symptom List.No → No problem found at this time. Erase all codes before returningvehicle to customer.63
AIRBAGSymptom:DRIVER SQUIB 1 SHORT TO GROUNDWhen Monitored and Set Condition:DRIVER SQUIB 1 SHORT TO GROUNDWhen Monitored: With the ignition on the ACM monitors the resistance of the DriverSquib 1 circuits.Set Condition: The ACM has detected a short to ground in the Driver Squib 1 circuits.POSSIBLE CAUSESDRIVER AIRBAG CIRCUIT SHORT TO GROUNDCLOCKSPRING, DRIVER SQUIB 1 CIRCUIT SHORT TO GROUNDDRIVER SQUIB 1 LINE 1 OR LINE 2 SHORTED TO GROUNDACM, DRIVER SQUIB 1 CIRCUITS SHORT TO GROUNDSTORED CODE OR INTERMITTENT CONDITIONACTIVE CODE PRESENTTEST ACTION APPLICABILITY1 Turn the ignition on.NOTE: Ensure that the battery is fully charged.NOTE: For the purpose of this test, the AECM and ORC modules will bereferred to as an ACM.SELECT ACTIVE or STORED DTC:AllACM - ACTIVE DTCGo To 2ACM - STORED DTCGo To 5NOTE: When reconnecting Airbag system components, the ignition must beturned off and the battery must be disconnected.64
AIRBAGDRIVER SQUIB 1 SHORT TO GROUND — ContinuedTEST ACTION APPLICABILITY2 WARNING: TURN THE IGNITION <strong>OF</strong>F, DISCONNECT THE BATTERY ANDWAIT TWO MINUTES BEFORE PROCEEDING.WARNING: DO NOT PLACE AN INTACT UNDEPLOYED AIRBAG FACEDOWN ON A HARD SURFACE, THE AIRBAG WILL PROPEL INTO THE AIRIF ACCIDENTALLY DEPLOYED, AND COULD RESULT IN SERIOUS ORFATAL INJURY.Disconnect the Driver Airbag Module.NOTE: Check connectors - Clean and repair as necessary.Connect the appropriate Load Tool to the Driver Airbag connectors.WARNING: TURN THE IGNITION ON, THEN RECONNECT THE BATTERY.With the DRBIII, read the active Airbag DTCs.Does the DRBIII show DRIVER SQUIB 1 SHORT TO GROUND?AllYes → Go To 3No → Replace the Driver Airbag in accordance with the Service Information.Perform AIRBAG VERIFICATION TEST - VER 1.3 WARNING: TURN THE IGNITION <strong>OF</strong>F, DISCONNECT THE BATTERY ANDWAIT TWO MINUTES BEFORE PROCEEDING.Disconnect the Clockspring connector.NOTE: Check connectors - Clean and repair as necessary.Connect the appropriate Load Tool to the Clockspring connector.WARNING: TURN THE IGNITION ON, THEN RECONNECT THE BATTERY.With the DRBIII, read the active Airbag DTCs.Does the DRBIII show DRIVER SQUIB 1 SHORT TO GROUND?AllYes → Go To 4No → Replace the Clockspring.Perform AIRBAG VERIFICATION TEST - VER 1.4 WARNING: TURN THE IGNITION <strong>OF</strong>F, DISCONNECT THE BATTERY ANDWAIT TWO MINUTES BEFORE PROCEEDING.Disconnect the Airbag Control Module connector.NOTE: Check connectors - Clean and repair as necessary.Connect the appropriate Load Tool adaptor to the Airbag Control Module connector.Disconnect the Load Tool from the Clockspring connector.Measure the resistance of the Driver Squib 1 Line 1 and Line 2 circuits betweenClockspring connector and ground.Is the resistance below 10K ohms on either circuit?AllYes → Repair Driver Squib 1 Line 1 or Line 2 circuits shorted to ground.Perform AIRBAG VERIFICATION TEST - VER 1.No → Replace the Airbag Control Module in accordance with ServiceInstructions. WARNING: IF THE AIRBAG CONTROL MODULEIS DROPPED AT ANY TIME, IT MUST BE REPLACED.Perform AIRBAG VERIFICATION TEST - VER 1.65
AIRBAGDRIVER SQUIB 1 SHORT TO GROUND — ContinuedTEST ACTION APPLICABILITY5 NOTE: Ensure the battery is fully charged.With the DRBIII, record and erase all DTCs from all modules.All active codes must be resolved before diagnosing any stored codes.Maintain a safe distance from all airbags while performing the following steps.With the DRBIII monitor active codes as you work through the system.NOTE: If equipped with Passenger Airbag On-Off switch, read the DTC’s inall switch positions.Wiggle the wiring harness and connectors of the appropriate airbag system androtate the steering wheel from stop to stop.NOTE: Check connectors - Clean and repair as necessary.You have just attempted to simulate the condition that initially set the trouble codemessage.The following additional checks may assist you in identifying a possible intermittentproblem:- Visually inspect related wire harness connectors. Look for broken, bent, pushed out,spread, corroded, or contaminated terminals.- Visually inspect the related harnesses. Look for chafed, pierced, pinched or partiallybroken wire.- Refer to Wiring Diagrams and Technical Service Bulletins that may apply.Did the DTC become active ?AllYes → Select appropriate symptom from Symptom List.No → No problem found at this time. Erase all codes before returningvehicle to customer.66
AIRBAGSymptom:DRIVER SQUIB 2 CIRCUIT OPENWhen Monitored and Set Condition:DRIVER SQUIB 2 CIRCUIT OPENWhen Monitored: With the ignition on the ACM monitors the resistance of the DriverSquib 2 circuits.Set Condition: The ACM has detected an open circuit or high resistance in the DriverSquib 2 circuits.POSSIBLE CAUSESDRIVER AIRBAG CIRCUIT OPENCLOCKSPRING, DRIVER SQUIB 2 CIRCUIT OPENDRIVER SQUIB 2 LINE 1 OR LINE 2 CIRCUIT OPENACM, DRIVER SQUIB 2 CIRCUIT OPENSTORED CODE OR INTERMITTENT CONDITIONACTIVE CODE PRESENTTEST ACTION APPLICABILITY1 Turn the ignition on.NOTE: Ensure that the battery is fully charged.NOTE: For the purpose of this test, the AECM and ORC modules will bereferred to as an ACM.SELECT ACTIVE or STORED DTC:AllACM - ACTIVE DTCGo To 2ACM - STORED DTCGo To 5NOTE: When reconnecting airbag system components the Ignition must beturned off and the Battery must be disconnected.67
AIRBAGDRIVER SQUIB 2 CIRCUIT OPEN — ContinuedTEST ACTION APPLICABILITY2 WARNING: TURN THE IGNITION <strong>OF</strong>F, DISCONNECT THE BATTERY ANDWAIT TWO MINUTES BEFORE PROCEEDING.WARNING: DO NOT PLACE AN INTACT UNDEPLOYED AIRBAG FACEDOWN ON A HARD SURFACE, THE AIRBAG WILL PROPEL INTO THE AIRIF ACCIDENTALLY DEPLOYED, AND COULD RESULT IN SERIOUS ORFATAL INJURY.Disconnect the Driver Airbag connector.NOTE: Check connectors - Clean and repair as necessary.Connect the appropriate Load Tool to the Driver Airbag connectors.WARNING: TURN THE IGNITION ON, THEN RECONNECT THE BATTERY.With the DRBIII, read the active Airbag DTCs.Does the DRBIII show DRIVER SQUIB 2 CIRCUIT OPEN?AllYes → Go To 3No → Replace the Driver Airbag in accordance with the Service Information.Perform AIRBAG VERIFICATION TEST - VER 1.3 WARNING: TURN THE IGNITION <strong>OF</strong>F, DISCONNECT THE BATTERY ANDWAIT TWO MINUTES BEFORE PROCEEDING.Disconnect the Clockspring connector.NOTE: Check connectors - Clean and repair as necessary.Connect the appropriate Load Tool to the Clockspring connector.WARNING: TURN THE IGNITION ON, THEN RECONNECT THE BATTERY.With the DRB, read the active Airbag DTCs.Does the DRB show DRIVER SQUIB 2 CIRCUIT OPEN?AllYes → Go To 4No → Replace the Clockspring in accordance with the Service Information.Perform AIRBAG VERIFICATION TEST - VER 1.4 WARNING: TURN THE IGNITION <strong>OF</strong>F, DISCONNECT THE BATTERY ANDWAIT TWO MINUTES BEFORE PROCEEDING.Disconnect the Airbag Control module connector.NOTE: Check connectors - Clean and repair as necessary.Connect the appropriate Load Tool adaptor to the Airbag Control module connector.Disconnect the Load Tool from the Clockspring connector.Measure the resistance of the Driver Squib 2 Line 1 and Line 2 circuits between theACM adaptor and the Clockspring connector.Is the resistance below 1.0 ohms on both circuits?AllYes → Replace the Airbag Control Module in accordance with the Serviceinformation. WARNING: IF THE AIRBAG CONTROL MODULEIS DROPPED AT ANY TIME, IT MUST BE REPLACED.Perform AIRBAG VERIFICATION TEST - VER 1.No → Repair the open or high resistance in the Driver Squib 2 Line 1 orLine 2 circuits.Perform AIRBAG VERIFICATION TEST - VER 1.68
AIRBAGDRIVER SQUIB 2 CIRCUIT OPEN — ContinuedTEST ACTION APPLICABILITY5 NOTE: Ensure the battery is fully charged.With the DRBIII, record and erase all DTCs from all modules.All active codes must be resolved before diagnosing any stored codes.Maintain a safe distance from all airbags while performing the following steps.With the DRBIII monitor active codes as you work through the system.NOTE: If equipped with Passenger Airbag On-Off switch, read the DTC’s inall switch positions.Wiggle the wiring harness and connectors of the appropriate airbag system androtate the steering wheel from stop to stop.NOTE: Check connectors - Clean and repair as necessary.You have just attempted to simulate the condition that initially set the trouble codemessage.The following additional checks may assist you in identifying a possible intermittentproblem:- Visually inspect related wire harness connectors. Look for broken, bent, pushed out,spread, corroded, or contaminated terminals.- Visually inspect the related harnesses. Look for chafed, pierced, pinched or partiallybroken wire.- Refer to Wiring Diagrams and Technical Service Bulletins that may apply.Did the DTC become active ?AllYes → Select appropriate symptom from Symptom List.No → No problem found at this time. Erase all codes before returningvehicle to customer.69
AIRBAGSymptom:DRIVER SQUIB 2 CIRCUIT SHORTWhen Monitored and Set Condition:DRIVER SQUIB 2 CIRCUIT SHORTWhen Monitored: With the ignition on the ACM monitors the resistance of the DriverSquib 2 circuits.Set Condition: The ACM has detected low resistance on the Driver Squib 2 circuits.POSSIBLE CAUSESDRIVER AIRBAG CIRCUIT SHORTCLOCKSPRING, DRIVER SQUIB 2 CIRCUIT SHORTDRIVER SQUIB 2 LINE 1 SHORT TO LINE 2ACM, DRIVER SQUIB 2 CIRCUIT SHORTSTORED CODE OR INTERMITTENT CONDITIONACTIVE CODE PRESENTTEST ACTION APPLICABILITY1 Turn the ignition on.NOTE: Ensure that the battery is fully charged.NOTE: For the purpose of this test, the AECM and ORC modules will bereferred to as an ACM.SELECT ACTIVE or STORED DTC:AllACM - ACTIVE DTCGo To 2ACM - STORED DTCGo To 5NOTE: When reconnecting Airbag system components, the ignition must beturned off and the battery must be disconnected.70
AIRBAGDRIVER SQUIB 2 CIRCUIT SHORT — ContinuedTEST ACTION APPLICABILITY2 WARNING: TURN THE IGNITION <strong>OF</strong>F, DISCONNECT THE BATTERY ANDWAIT TWO MINUTES BEFORE PROCEEDING.WARNING: DO NOT PLACE AN INTACT UNDEPLOYED AIRBAG FACEDOWN ON A HARD SURFACE, THE AIRBAG WILL PROPEL INTO THE AIRIF ACCIDENTALLY DEPLOYED, AND COULD RESULT IN SERIOUS ORFATAL INJURY.Disconnect the Driver Airbag.NOTE: Check connectors - Clean and repair as necessary.Connect the appropriate Load Tool to the Driver Airbag connectors.WARNING: TURN THE IGNITION ON, THEN RECONNECT THE BATTERY.With the DRBIII, read the active Airbag DTCs.Does the DRB show DRIVER SQUIB 2 CIRCUIT SHORT?AllYes → Go To 3No → Replace Driver Airbag in accordance with the Service Information.Perform AIRBAG VERIFICATION TEST - VER 1.3 WARNING: TURN THE IGNITION <strong>OF</strong>F, DISCONNECT THE BATTERY ANDWAIT TWO MINUTES BEFORE PROCEEDING.Disconnect the Clockspring connector.NOTE: Check connectors - Clean and repair as necessary.Connect the appropriate Load Tool to the Clockspring connector.WARNING: TURN THE IGNITION ON, THEN RECONNECT THE BATTERY.With the DRBIII, read the active Airbag DTCs.Does the DRB show DRIVER SQUIB 2 CIRCUIT SHORT?AllYes → Go To 4No → Replace Clockspring in accordance with the Service Information.Perform AIRBAG VERIFICATION TEST - VER 1.4 WARNING: TURN THE IGNITION <strong>OF</strong>F, DISCONNECT THE BATTERY ANDWAIT TWO MINUTES BEFORE PROCEEDING.Disconnect the Airbag Control Module connector.NOTE: Check connectors - Clean and repair as necessary.Connect the appropriate Load Tool adaptor to the Airbag Control Module connector.Disconnect the Load Tool from the Clockspring connector.Measure the resistance between the Driver Squib 2 Line 1 and Line 2 at theClockspring connector.Is the resistance below 10K ohms?AllYes → Repair the Driver Squib 2 Line 1 circuit shorted to Driver Squib2 Line 2 circuit.Perform AIRBAG VERIFICATION TEST - VER 1.No → Replace the Airbag Control Module in accordance with ServiceInstructions. WARNING: IF THE AIRBAG CONTROL MODULEIS DROPPED AT ANY TIME, IT MUST BE REPLACED.Perform AIRBAG VERIFICATION TEST - VER 1.71
AIRBAGDRIVER SQUIB 2 CIRCUIT SHORT — ContinuedTEST ACTION APPLICABILITY5 NOTE: Ensure the battery is fully charged.With the DRBIII, record and erase all DTCs from all modules.All active codes must be resolved before diagnosing any stored codes.Maintain a safe distance from all airbags while performing the following steps.With the DRBIII monitor active codes as you work through the system.NOTE: If equipped with Passenger Airbag On-Off switch, read the DTC’s inall switch positions.Wiggle the wiring harness and connectors of the appropriate airbag system androtate the steering wheel from stop to stop.NOTE: Check connectors - Clean and repair as necessary.You have just attempted to simulate the condition that initially set the trouble codemessage.The following additional checks may assist you in identifying a possible intermittentproblem:- Visually inspect related wire harness connectors. Look for broken, bent, pushed out,spread, corroded, or contaminated terminals.- Visually inspect the related harnesses. Look for chafed, pierced, pinched or partiallybroken wire.- Refer to Wiring Diagrams and Technical Service Bulletins that may apply.Did the DTC become active ?AllYes → Select appropriate symptom from Symptom List.No → No problem found at this time. Erase all codes before returningvehicle to customer.72
AIRBAGSymptom:DRIVER SQUIB 2 SHORT TO BATTERYWhen Monitored and Set Condition:DRIVER SQUIB 2 SHORT TO BATTERYWhen Monitored: With the ignition on the ACM monitors the voltage of the Driver Squib2 circuits.Set Condition: The ACM has detected high voltage on the Driver Squib 2 circuits.POSSIBLE CAUSESDRIVER AIRBAG CIRCUIT SHORT TO BATTERYCLOCKSPRING, DRIVER SQUIB 2 CIRCUIT SHORT TO BATTERYDRIVER SQUIB 2 LINE 1 OR LINE 2 SHORT TO BATTERYACM, DRIVER SQUIB 2 CIRCUIT SHORT TO BATTERYSTORED CODE OR INTERMITTENT CONDITIONACTIVE CODE PRESENTTEST ACTION APPLICABILITY1 NOTE: Ensure that the battery is fully charged.Turn the ignition on.NOTE: For the purpose of this test, the AECM and ORC modules will bereferred to as an ACM.SELECT ACTIVE or STORED DTC:AllACM - ACTIVE DTCGo To 2ACM - STORED DTCGo To 5NOTE: When reconnecting Airbag system components, the ignition must beturned off and the battery must be disconnected.73
AIRBAGDRIVER SQUIB 2 SHORT TO BATTERY — ContinuedTEST ACTION APPLICABILITY2 WARNING: TURN THE IGNITION <strong>OF</strong>F, DISCONNECT THE BATTERY ANDWAIT TWO MINUTES BEFORE PROCEEDING.WARNING: DO NOT PLACE AN INTACT UNDEPLOYED AIRBAG FACEDOWN ON A HARD SURFACE, THE AIRBAG WILL PROPEL INTO THE AIRIF ACCIDENTALLY DEPLOYED, AND COULD RESULT IN SERIOUS ORFATAL INJURY.Disconnect the Driver Airbag.NOTE: Check connectors - Clean and repair as necessary.Connect the appropriate Load Tool to the Driver Airbag connectors.WARNING: TURN THE IGNITION ON, THEN RECONNECT THE BATTERY.With the DRBIII, read the active Airbag DTC’s.Does the DRB show DRIVER SQUIB 2 SHORT TO BATTERY?AllYes → Go To 3No → Replace the Driver Airbag in accordance with the Service Information.Perform AIRBAG VERIFICATION TEST - VER 1.3 WARNING: TURN THE IGNITION <strong>OF</strong>F, DISCONNECT THE BATTERY ANDWAIT TWO MINUTES BEFORE PROCEEDING.Disconnect the Clockspring connector.NOTE: Check connectors - Clean and repair as necessary.Connect the appropriate Load Tool to the Clockspring connector.WARNING: TURN THE IGNITION ON, THEN RECONNECT THE BATTERY.With the DRBIII, read the active Airbag DTCs.Does the DRB show DRIVER SQUIB 2 SHORT TO BATTERY ?AllYes → Go To 4No → Replace the Clockspring in accordance with the Service Information.Perform AIRBAG VERIFICATION TEST - VER 1.4 WARNING: TURN THE IGNITION <strong>OF</strong>F, DISCONNECT THE BATTERY ANDWAIT TWO MINUTES BEFORE PROCEEDING.Disconnect the Airbag Control Module connector.NOTE: Check connectors - Clean and repair as necessary.Connect the appropriate Load Tool adaptor to the Airbag Control Module connector.WARNING: TURN THE IGNITION ON, THEN RECONNECT THE BATTERY.Disconnect the Load Tool from the Clockspring connector.Measure the voltage on the Driver Squib 2 Line 1 and Line 2 from the Clockspringconnector to ground.Is there any voltage present?AllYes → Repair the Driver Squib 2 Line 1 or Line 2 circuits shorted tobattery.Perform AIRBAG VERIFICATION TEST - VER 1.No → Replace the Airbag Control Module in accordance with ServiceInstructions. WARNING: IF THE AIRBAG CONTROL MODULEIS DROPPED AT ANY TIME, IT MUST BE REPLACED.Perform AIRBAG VERIFICATION TEST - VER 1.74
AIRBAGDRIVER SQUIB 2 SHORT TO BATTERY — ContinuedTEST ACTION APPLICABILITY5 NOTE: Ensure the battery is fully charged.With the DRBIII, record and erase all DTCs from all modules.All active codes must be resolved before diagnosing any stored codes.Maintain a safe distance from all airbags while performing the following steps.With the DRBIII monitor active codes as you work through the system.NOTE: If equipped with Passenger Airbag On-Off switch, read the DTC’s inall switch positions.Wiggle the wiring harness and connectors of the appropriate airbag system androtate the steering wheel from stop to stop.NOTE: Check connectors - Clean and repair as necessary.You have just attempted to simulate the condition that initially set the trouble codemessage.The following additional checks may assist you in identifying a possible intermittentproblem:- Visually inspect related wire harness connectors. Look for broken, bent, pushed out,spread, corroded, or contaminated terminals.- Visually inspect the related harnesses. Look for chafed, pierced, pinched or partiallybroken wire.- Refer to Wiring Diagrams and Technical Service Bulletins that may apply.Did the DTC become active ?AllYes → Select appropriate symptom from Symptom List.No → No problem found at this time. Erase all codes before returningvehicle to customer.75
AIRBAGSymptom:DRIVER SQUIB 2 SHORT TO GROUNDWhen Monitored and Set Condition:DRIVER SQUIB 2 SHORT TO GROUNDWhen Monitored: With the ignition on the ACM monitors the resistance of the DriverSquib 2 circuits.Set Condition: The ACM has detected a short to ground in the Driver Squib 2 circuits.POSSIBLE CAUSESDRIVER AIRBAG, CIRCUIT SHORT TO GROUNDCLOCKSPRING, DRIVER SQUIB 2 CIRCUIT SHORT TO GROUNDDRIVER SQUIB 2 LINE 1 OR LINE 2 SHORT TO GROUNDACM, DRIVER SQUIB 2 CIRCUIT SHORT TO GROUNDSTORED CODE OR INTERMITTENT CONDITIONACTIVE CODE PRESENTTEST ACTION APPLICABILITY1 NOTE: Ensure that the battery is fully charged.Turn the ignition on.NOTE: For the purpose of this test, the AECM and ORC modules will bereferred to as an ACM.SELECT ACTIVE or STORED DTC:AllACM - ACTIVE DTCGo To 2ACM - STORED DTCGo To 5NOTE: When reconnecting Airbag system components, the ignition must beturned off and the battery must be disconnected.76
AIRBAGDRIVER SQUIB 2 SHORT TO GROUND — ContinuedTEST ACTION APPLICABILITY2 WARNING: TURN THE IGNITION <strong>OF</strong>F, DISCONNECT THE BATTERY ANDWAIT TWO MINUTES BEFORE PROCEEDING.WARNING: DO NOT PLACE AN INTACT UNDEPLOYED AIRBAG FACEDOWN ON A HARD SURFACE, THE AIRBAG WILL PROPEL INTO THE AIRIF ACCIDENTALLY DEPLOYED, AND COULD RESULT IN SERIOUS ORFATAL INJURY.Disconnect the Driver Airbag.NOTE: Check connectors - Clean and repair as necessary.Connect the appropriate Load Tool to the Driver Airbag connectors.WARNING: TURN THE IGNITION ON, THEN RECONNECT THE BATTERY.With the DRBIII, read the active Airbag DTCs.Does the DRB show DRIVER SQUIB 2 SHORT TO GROUND?AllYes → Go To 3No → Replace the Driver Airbag in accordance with the Service Information.Perform AIRBAG VERIFICATION TEST - VER 1.3 WARNING: TURN THE IGNITION <strong>OF</strong>F, DISCONNECT THE BATTERY ANDWAIT TWO MINUTES BEFORE PROCEEDING.Disconnect the Clockspring connector.NOTE: Check connectors - Clean and repair as necessary.Connect the appropriate Load Tool to the Clockspring connector.WARNING: TURN THE IGNITION ON, THEN RECONNECT THE BATTERY.With the DRBIII, read the active Airbag DTCs.Does the DRB show DRIVER SQUIB 2 SHORT TO GROUND?AllYes → Go To 4No → Replace the Clockspring in accordance with the Service Information.Perform AIRBAG VERIFICATION TEST - VER 1.4 WARNING: TURN THE IGNITION <strong>OF</strong>F, DISCONNECT THE BATTERY ANDWAIT TWO MINUTES BEFORE PROCEEDING.Disconnect the Airbag Control Module connector.NOTE: Check connectors - Clean and repair as necessary.Connect the appropriate Load Tool adaptor to the Airbag Control Module connector.Disconnect the Load Tool from the Clockspring connector.Measure the resistance of the Driver Squib 2 Line 1 and Line 2 circuits betweenClockspring connector and ground.Is the resistance below 10K ohms on either circuit?AllYes → Repair Driver Squib 2 Line 1 or Line 2 circuits shorted to ground.Perform AIRBAG VERIFICATION TEST - VER 1.No → Replace the Airbag Control Module in accordance with ServiceInstructions. WARNING: IF THE AIRBAG CONTROL MODULEIS DROPPED AT ANY TIME, IT MUST BE REPLACED.Perform AIRBAG VERIFICATION TEST - VER 1.77
AIRBAGDRIVER SQUIB 2 SHORT TO GROUND — ContinuedTEST ACTION APPLICABILITY5 NOTE: Ensure the battery is fully charged.With the DRBIII, record and erase all DTCs from all modules.All active codes must be resolved before diagnosing any stored codes.Maintain a safe distance from all airbags while performing the following steps.With the DRBIII monitor active codes as you work through the system.NOTE: If equipped with Passenger Airbag On-Off switch, read the DTC’s inall switch positions.Wiggle the wiring harness and connectors of the appropriate airbag system androtate the steering wheel from stop to stop.NOTE: Check connectors - Clean and repair as necessary.You have just attempted to simulate the condition that initially set the trouble codemessage.The following additional checks may assist you in identifying a possible intermittentproblem:- Visually inspect related wire harness connectors. Look for broken, bent, pushed out,spread, corroded, or contaminated terminals.- Visually inspect the related harnesses. Look for chafed, pierced, pinched or partiallybroken wire.- Refer to Wiring Diagrams and Technical Service Bulletins that may apply.Did the DTC become active ?AllYes → Select appropriate symptom from Symptom List.No → No problem found at this time. Erase all codes before returningvehicle to customer.78
AIRBAGSymptom List:LEFT FRONT IMPACT SENSOR INTERNAL 1NO LEFT FRONT IMPACT SENSOR COMMUNICATIONTest Note:All symptoms listed above are diagnosed using the same tests.The title for the tests will be LEFT FRONT IMPACT SENSORTEST.When Monitored and Set Condition:LEFT FRONT IMPACT SENSOR INTERNAL 1When Monitored: The Left Front Impact sensors is equipped with onboard diagnostics tomonitor the sensors internal circuits. If a problem is identified the sensor sends the LeftFront Impact sensor internal 1 message to the ACM.Set Condition: The code will set if the ACM receives an internal 1 message from the LeftFront Impact Sensor.NO LEFT FRONT IMPACT SENSOR COMMUNICATIONWhen Monitored: The ACM continuously communicates with the Left Front ImpactSensor over the sensor signal circuit. The sensor communication and onboard diagnosticsare powered by the ACM signal.Set Condition: The code will set, if the ACM and Left Front Sensor do not establish andmaintain valid data communications.POSSIBLE CAUSESSIGNAL CIRCUIT SHORTED TO BATTERYSIGNAL CIRCUIT SHORT TO GROUNDLEFT SENSOR CIRCUITS SHORTED TOGETHERGROUND CIRCUIT OPENSIGNAL CIRCUIT OPENACM, LEFT FRONT IMPACT SENSORREPAIR IS COMPLETESTORED CODE OR INTERMITTENT CONDITIONACTIVE CODE PRESENT79
AIRBAGLEFT FRONT IMPACT SENSOR TEST — ContinuedTEST ACTION APPLICABILITY1 Turn the ignition on.NOTE: Ensure the battery is fully charged.NOTE: For the purpose of this test, the AECM and ORC modules will bereferred to as an ACM.SELECT ACTIVE or STORED DTC:AllACM - ACTIVE DTCGo To 2ACM - STORED DTCGo To 9NOTE: When reconnecting Airbag system components, the ignition must beturned off and the battery must be disconnected.2 WARNING: TURN THE IGNITION <strong>OF</strong>F, DISCONNECT THE BATTERY ANDWAIT TWO MINUTES BEFORE PROCEEDING.Disconnect the Left Front Impact Sensor connector.Disconnect the Airbag Control Module connector.WARNING: TURN THE IGNITION ON, THEN RECONNECT THE BATTERY.Measure the voltage of the Left Front Impact Sensor Signal circuit between the LeftSensor connector and ground.Is there any voltage present?AllYes → Repair the Left Front Impact Sensor Signal circuit shorted tobattery.Perform AIRBAG VERIFICATION TEST - VER 1.No → Go To 33 Turn the ignition off.Measure the resistance of the Left Impact Sensor Signal circuit between the LeftImpact Sensor connector and ground.Is the resistance below 100K ohms?AllYes → Repair the Left Impact Sense signal circuit shorted for a short toground.Perform AIRBAG VERIFICATION TEST - VER 1.No → Go To 44 Measure the resistance between the Left Front Impact Sensor Signal and SensorGround circuits at the Left Impact Sensor connector.Is the resistance below 100K ohms?AllYes → Repair the Left Front Impact Sensor circuits shorted together.Perform AIRBAG VERIFICATION TEST - VER 1.No → Go To 55 Connect the appropriate Load Tool adaptor to the Airbag Control Module connector.Measure the resistance of the Left Front Impact Sensor Ground circuit between theLeft Impact Sensor connector and the Load Tool adaptor.Is the resistance below 1 ohm?AllYes → Go To 6No → Repair the Left Front Impact Sensor Ground circuit open or highresistance.Perform AIRBAG VERIFICATION TEST - VER 1.80
AIRBAGLEFT FRONT IMPACT SENSOR TEST — ContinuedTEST ACTION APPLICABILITY6 Connect the appropriate Load Tool adaptor to the Airbag Control Module connector.Measure the resistance of the Left Front Impact Sensor Signal circuit between theLeft Impact Sensor connector and the Load Tool adaptor.Is the resistance below 1 ohm?AllYes → Go To 7No → Repair the Left Front Impact Sensor Signal circuit open or highresistance.Perform AIRBAG VERIFICATION TEST - VER 1.7 Replace the Left Front Impact Sensor.Reconnect the vehicle body harness to the impact sensor.Remove any special tools or jumper wires and reconnect all previously disconnectedcomponents - except the Battery.WARNING: TURN THE IGNITION ON, THEN RECONNECT THE BATTERY.Connect the DRB to the Data Link Connector - use the most current softwareavailable.Use the DRB III and erase the stored codes in all airbag system modules.Turn the Ignition Off, and wait 15 seconds before turning the Ignition On.Wait one minute, and read active codes and if there are none present read the storedcodes.DID the active Left Impact Sensor DTC return?AllYes → Go To 8No → Repair is complete.8 WARNING: TURN THE IGNITION <strong>OF</strong>F, DISCONNECT THE BATTERY ANDWAIT TWO MINUTES BEFORE PROCEEDING.WARNING: IF THE AIRBAG CONTROL MODULE IS DROPPED AT ANYTIME, IT MUST BE REPLACED.If there are no possible causes remaining, view repair.AllRepairReplace the Airbag Control Module in accordance with ServiceInstructions.Perform AIRBAG VERIFICATION TEST - VER 1.81
AIRBAGLEFT FRONT IMPACT SENSOR TEST — ContinuedTEST ACTION APPLICABILITY9 NOTE: Ensure the battery is fully charged.With the DRBIII, record and erase all DTCs from all modules.All active codes must be resolved before diagnosing any stored codes.Maintain a safe distance from all airbags while performing the following steps.With the DRBIII monitor active codes as you work through the system.NOTE: If equipped with Passenger Airbag On-Off switch, read the DTC’s inall switch positions.Wiggle the wiring harness and connectors of the appropriate airbag system androtate the steering wheel from stop to stop.NOTE: Check connectors - Clean and repair as necessary.You have just attempted to simulate the condition that initially set the trouble codemessage.The following additional checks may assist you in identifying a possible intermittentproblem:- Visually inspect related wire harness connectors. Look for broken, bent, pushed out,spread, corroded, or contaminated terminals.- Visually inspect the related harnesses. Look for chafed, pierced, pinched or partiallybroken wire.- Refer to Wiring Diagrams and Technical Service Bulletins that may apply.Did the DTC become active ?AllYes → Select appropriate symptom from Symptom List.No → No problem found at this time. Erase all codes before returningvehicle to customer.82
AIRBAGSymptom:LOSS <strong>OF</strong> IGNITION RUN - STARTWhen Monitored and Set Condition:LOSS <strong>OF</strong> IGNITION RUN - STARTWhen Monitored: With the ignition in the Run or Start position the module monitors theRun - Start circuit for proper system voltage.Set Condition: The code will set, if the voltage on the Run - Start circuit drops belowapproximately 4.5 volts for the ACM or 6.7 volts for the SIACM.POSSIBLE CAUSESIGNITION SWITCH RUN-START CIRCUIT OPENACM, FUSED IGNITION SW OUTPUT RUN/START SHORTED TO GROUNDFUSED IGNITION SWITCH OUTPUT RUN-START CIRCUIT OPENACM, FUSED IGNITION OUTPUT RUN-START CIRCUIT OPENFUSED IGNITION SWITCH OUTPUT RUN-START CIRCUIT SHORT TO GROUNDSTORED CODE OR INTERMITTENT CONDITIONACTIVE CODE PRESENTTEST ACTION APPLICABILITY1 Turn the ignition on.NOTE: Ensure that the battery is fully charged.NOTE: For the purpose of this test, the AECM and ORC modules will bereferred to as an ACM.From the list below, select the appropriate module and DTC type for the thisdiagnostic trouble code.SELECT ONE:AllACM - ACTIVE DTCGo To 2ACM - STORED DTCGo To 6NOTE: When reconnecting Airbag system components, the ignition must beturned off and the battery must be disconnected.2 Turn ignition off.Remove and inspect the Airbag Run-Start Fuse.NOTE: Check connectors - Clean and repair as necessary.Is the Fuse open?AllYes → Go To 3No → Go To 483
AIRBAGLOSS <strong>OF</strong> IGNITION RUN - START — ContinuedTEST ACTION APPLICABILITY3 WARNING: TURN THE IGNITION <strong>OF</strong>F, DISCONNECT THE BATTERY ANDWAIT TWO MINUTES BEFORE PROCEEDING.WARNING: IF THE AIRBAG CONTROL MODULE IS DROPPED AT ANYTIME, IT MUST BE REPLACED.Disconnect the Airbag Control Module connectorNOTE: Check connectors - Clean and repair as necessary.Disconnect Run - Start fuse.Connect the appropriate Load Tool adaptor to the Airbag connector.Measure the resistance of the Fused Ignition Switch Output Run-Start circuitbetween the Airbag Control Module adaptor and ground.Is the resistance below 10K ohms?AllYes → Repair the Fused Ignition Switch Output Run-Start circuit shortto ground.Perform AIRBAG VERIFICATION TEST - VER 1.No → Replace the Airbag Control Module in accordance with ServiceInstructions. WARNING: make sure the battery is disconnectedand wait 2 minutes before proceeding. Replace the Airbag Run-Start Fuse.Perform AIRBAG VERIFICATION TEST - VER 1.4 Turn the ignition on.Measure the voltage of the Ignition Switch Output circuit between the AirbagRun-Start Fuse and ground.Is the voltage above approximately 4.5 volts?AllYes → Go To 5No → Repair the open Ignition Switch Output Run-Start circuit.Perform AIRBAG VERIFICATION TEST - VER 1.5 WARNING: TURN THE IGNITION <strong>OF</strong>F, DISCONNECT THE BATTERY ANDWAIT TWO MINUTES BEFORE PROCEEDING.Disconnect the Airbag Control Module connector.NOTE: Check connectors - Clean and repair as necessary.Reinstall the previously removed Airbag Run-Start Fuse.WARNING: TURN THE IGNITION ON, THEN RECONNECT THE BATTERY.Measure the voltage of the Fused Ignition Switch Output Run-Start Circuit betweenthe Airbag Control Module connector ground.Is the voltage above approximately 4.5 volts?AllYes → Replace the Airbag Control Module in accordance with ServiceInstructions. WARNING: IF THE AIRBAG CONTROL MODULEIS DROPPED AT ANY TIME, IT MUST BE REPLACED.Perform AIRBAG VERIFICATION TEST - VER 1.No → Repair open Fused Ignition Switch Output Run-Start circuit.Perform AIRBAG VERIFICATION TEST - VER 1.84
AIRBAGLOSS <strong>OF</strong> IGNITION RUN - START — ContinuedTEST ACTION APPLICABILITY6 NOTE: Ensure the battery is fully charged.With the DRBIII, record and erase all DTCs from all modules.All active codes must be resolved before diagnosing any stored codes.Maintain a safe distance from all airbags while performing the following steps.With the DRBIII monitor active codes as you work through the system.NOTE: If equipped with Passenger Airbag On-Off switch, read the DTC’s inall switch positions.Wiggle the wiring harness and connectors of the appropriate airbag system androtate the steering wheel from stop to stop.NOTE: Check connectors - Clean and repair as necessary.You have just attempted to simulate the condition that initially set the trouble codemessage.The following additional checks may assist you in identifying a possible intermittentproblem:- Visually inspect related wire harness connectors. Look for broken, bent, pushed out,spread, corroded, or contaminated terminals.- Visually inspect the related harnesses. Look for chafed, pierced, pinched or partiallybroken wire.- Refer to Wiring Diagrams and Technical Service Bulletins that may apply.Did the DTC become active ?AllYes → Select appropriate symptom from Symptom List.No → No problem found at this time. Erase all codes before returningvehicle to customer.85
AIRBAGSymptom:LOSS <strong>OF</strong> IGNITION RUN ONLYWhen Monitored and Set Condition:LOSS <strong>OF</strong> IGNITION RUN ONLYWhen Monitored: With the ignition in the run position the module monitors the Run Onlycircuit for proper system voltage.Set Condition: If the voltage on the Run Only circuit drops below 4.5 volts, the code willset.POSSIBLE CAUSESIGNITION SWITCH OUTPUT RUN CIRCUIT OPENFUSED IGNITION SWITCH OUTPUT RUN CIRCUIT OPENACM, FUSED IGNITION OUTPUT RUN CIRCUIT OPENCHECKING FOR A SHORTED RUN CIRCUITFUSED IGNITION SWITCH OUTPUT RUN CIRCUIT SHORT TO GROUNDACM, FUSED IGNITION RUN CIRCUIT SHORT TO GROUNDSTORED CODE OR INTERMITTENT CONDITIONACTIVE CODE PRESENTTEST ACTION APPLICABILITY1 Turn the ignition on.Ensure the battery is fully charged.NOTE: For the purpose of this test, the AECM and ORC modules will bereferred to as an ACM.SELECT ACTIVE or STORED DTC:AllACM - ACTIVE DTCGo To 2ACM - STORED DTCGo To 8NOTE: When reconnecting Airbag system components, the ignition must beturned off and the battery must be disconnected.2 Turn Ignition off.Remove and inspect the Airbag Run circuit fuse.Is the Fuse open?AllYes → Go To 3No → Go To 586
AIRBAGLOSS <strong>OF</strong> IGNITION RUN ONLY — ContinuedTEST ACTION APPLICABILITY3 Remove the Airbag Run fuse.NOTE: Check connectors - Clean and repair as necessary.Measure the resistance of the Fused Ignition Switch Output Run circuit between theRun Fuse and ground.Is the resistance below 10.0 ohms ?AllYes → Go To 4No → Replace the defective fuse.Perform AIRBAG VERIFICATION TEST - VER 1.4 WARNING: TURN THE IGNITION <strong>OF</strong>F, DISCONNECT THE BATTERY ANDWAIT TWO MINUTES BEFORE PROCEEDING.Disconnect the Airbag Control Module connector.NOTE: Check connectors - Clean and repair as necessary.Measure the resistance of the Fused Ignition Switch Output Run circuit between theACM connector and ground.Is the resistance below 10K ohms ?AllYes → Repair the Fused Ignition Switch Output Run circuit for a shortto ground and replace Airbag Run Fuse.Perform AIRBAG VERIFICATION TEST - VER 1.No → Replace the Airbag Control Module in accordance with ServiceInstructions and replace the Run Only Fuse. WARNING: IF THEAIRBAG CONTROL MODULE IS DROPPED AT ANY TIME, ITMUST BE REPLACED.Perform AIRBAG VERIFICATION TEST - VER 1.5 Turn ignition on.Measure the voltage of the Ignition Switch Output Run circuit between the AirbagRun circuit fuse and ground.Is the voltage above approximately 4.5 volts?AllYes → Go To 6No → Repair the open Ignition Switch Output Run circuit.Perform AIRBAG VERIFICATION TEST - VER 1.6 WARNING: TURN THE IGNITION <strong>OF</strong>F, DISCONNECT THE BATTERY ANDWAIT TWO MINUTES BEFORE PROCEEDING.Disconnect the Airbag Control Module connector.NOTE: Check connectors - Clean and repair as necessary.Reinstall the airbag Run fuse.WARNING: TURN THE IGNITION ON, THEN RECONNECT THE BATTERY.Measure the voltage of the Fused Ignition Switch Output Run circuit at the AirbagControl Module connector.Is the voltage above approximately 4.5 volts?AllYes → Go To 7No → Repair the an open or high resistance in the Fused IgnitionSwitch Output Run circuit.Perform AIRBAG VERIFICATION TEST - VER 1.87
AIRBAGLOSS <strong>OF</strong> IGNITION RUN ONLY — ContinuedTEST ACTION APPLICABILITY7 WARNING: TURN THE IGNITION <strong>OF</strong>F, DISCONNECT THE BATTERY ANDWAIT TWO MINUTES BEFORE PROCEEDING.If there are no possible causes remaining, view repair.AllRepairReplace the Airbag Control Module in accordance with ServiceInstructions. WARNING: IF THE AIRBAG CONTROL MODULEIS DROPPED AT ANY TIME, IT MUST BE REPLACED.Perform AIRBAG VERIFICATION TEST - VER 1.8 NOTE: Ensure the battery is fully charged.With the DRBIII, record and erase all DTCs from all modules.All active codes must be resolved before diagnosing any stored codes.Maintain a safe distance from all airbags while performing the following steps.With the DRBIII monitor active codes as you work through the system.NOTE: If equipped with Passenger Airbag On-Off switch, read the DTC’s inall switch positions.Wiggle the wiring harness and connectors of the appropriate airbag system androtate the steering wheel from stop to stop.NOTE: Check connectors - Clean and repair as necessary.You have just attempted to simulate the condition that initially set the trouble codemessage.The following additional checks may assist you in identifying a possible intermittentproblem:- Visually inspect related wire harness connectors. Look for broken, bent, pushed out,spread, corroded, or contaminated terminals.- Visually inspect the related harnesses. Look for chafed, pierced, pinched or partiallybroken wire.- Refer to Wiring Diagrams and Technical Service Bulletins that may apply.Did the DTC become active ?AllYes → Select appropriate symptom from Symptom List.No → No problem found at this time. Erase all codes before returningvehicle to customer.88
AIRBAGSymptom:NO CLUSTER MESSAGEWhen Monitored and Set Condition:NO CLUSTER MESSAGEWhen Monitored: With ignition on, the ACM monitors the PCI Bus for a message fromthe MIC containing the airbag warning indicator status. The MIC transmits the messageone time at ignition on, lamp state change, or in response to the ACM message.Set Condition: If the MIC message is not received for 10 consecutive seconds, the codewill set.POSSIBLE CAUSESMIC, COMMUNICATION FAILUREACM, NO CLUSTER MESSAGESSTORED CODE OR INTERMITTENT CONDITIONACTIVE CODE PRESENTTEST ACTION APPLICABILITY1 NOTE: Ensure that the battery is fully charged.NOTE: For the purpose of this test, the AECM and ORC modules will bereferred to as an ACM.Turn the ignition on.SELECT ACTIVE or STORED DTC:AllACM - ACTIVE DTCGo To 2ACM - STORED DTCGo To 4NOTE: When reconnecting Airbag system components, the ignition must beturned off and the battery must be disconnected.2 Turn the ignition on.With the DRBIII, ensure PCI Bus communications with the Instrument Cluster.Is the Instrument Cluster communicating on the PCI Bus?AllYes → Go To 3No → Refer to category COMMUNICATION CATEGORY and select therelated symptom INSTRUMENT CLUSTER BUS +/- SIGNALOPEN.89
AIRBAGNO CLUSTER MESSAGE — ContinuedTEST ACTION APPLICABILITY3 WARNING: TURN THE IGNITION <strong>OF</strong>F, DISCONNECT THE BATTERY ANDWAIT TWO MINUTES BEFORE PROCEEDING.If there are no possible causes remaining, view repair.AllRepairReplace the Airbag Control Module in accordance with ServiceInstructions. WARNING: IF THE AIRBAG CONTROL MODULEIS DROPPED AT ANY TIME, IT MUST BE REPLACED.Perform AIRBAG VERIFICATION TEST - VER 1.NOTE: When reconnecting airbag system components the Ignition must beturned off and the Battery must be disconnected.4 NOTE: Ensure the battery is fully charged.With the DRBIII, record and erase all DTCs from all modules.All active codes must be resolved before diagnosing any stored codes.Maintain a safe distance from all airbags while performing the following steps.With the DRBIII monitor active codes as you work through the system.NOTE: If equipped with Passenger Airbag On-Off switch, read the DTC’s inall switch positions.Wiggle the wiring harness and connectors of the appropriate airbag system androtate the steering wheel from stop to stop.NOTE: Check connectors - Clean and repair as necessary.You have just attempted to simulate the condition that initially set the trouble codemessage.The following additional checks may assist you in identifying a possible intermittentproblem:- Visually inspect related wire harness connectors. Look for broken, bent, pushed out,spread, corroded, or contaminated terminals.- Visually inspect the related harnesses. Look for chafed, pierced, pinched or partiallybroken wire.- Refer to Wiring Diagrams and Technical Service Bulletins that may apply.Did the DTC become active ?AllYes → Select appropriate symptom from Symptom List.No → No problem found at this time. Erase all codes before returningvehicle to customer.90
AIRBAGSymptom List:NO PASSENGER SIDE IMPACT SENSOR COMMUNICATIONPASSENGER SIDE IMPACT SENSOR INTERNAL 1Test Note:All symptoms listed above are diagnosed using the same tests.The title for the tests will be NO PASSENGER SIDE IMPACTSENSOR TEST.When Monitored and Set Condition:NO PASSENGER SIDE IMPACT SENSOR COMMUNICATIONWhen Monitored: The ACM continuously communicates with the Passenger Side ImpactSensor over the sensor signal circuit. The sensor communication and onboard diagnosticsare powered by the ACM signal.Set Condition: The code will set, if the ACM and Passenger Side Impact Sensor do notestablish and maintain valid data communications.PASSENGER SIDE IMPACT SENSOR INTERNAL 1When Monitored: The Right Front Impact sensors is equipped with onboard diagnosticsto monitor the sensors internal circuits. If a problem is identified the sensor sends thePassenger Side Impact sensor internal 1 message to the ACM.Set Condition: The code will set if the ACM receives an internal 1 message from thePassenger Side Impact Sensor.POSSIBLE CAUSESSIGNAL CIRCUIT SHORTED TO BATTERYSIGNAL CIRCUIT SHORT TO GROUNDPASSENGER SIDE SENSOR CIRCUITS SHORTED TOGETHERGROUND CIRCUIT OPENSIGNAL CIRCUIT OPENACM, PASSENGER SIDE IMPACT SENSORREPAIR IS COMPLETESTORED CODE OR INTERMITTENT CONDITIONACTIVE CODE PRESENT91
AIRBAGNO PASSENGER SIDE IMPACT SENSOR TEST — ContinuedTEST ACTION APPLICABILITY1 Turn the ignition on.NOTE: Ensure the battery is fully charged.NOTE: For the purpose of this test, the AECM and ORC modules will bereferred to as an ACM.SELECT ACTIVE or STORED DTC:AllACM - ACTIVE DTCGo To 2ACM - STORED DTCGo To 9NOTE: When reconnecting Airbag system components, the ignition must beturned off and the battery must be disconnected.2 WARNING: TURN THE IGNITION <strong>OF</strong>F, DISCONNECT THE BATTERY ANDWAIT TWO MINUTES BEFORE PROCEEDING.Disconnect the Passenger Side Impact Sensor connector.Disconnect the Airbag Control Module connector.WARNING: TURN THE IGNITION ON, THEN RECONNECT THE BATTERY.Measure the voltage of the Passenger Side Impact Sensor Signal circuit between thePassenger Side Impact Sensor connector and ground.Is there any voltage present?AllYes → Repair the Passenger Side Impact Sensor Signal circuit shorted tobattery.Perform AIRBAG VERIFICATION TEST - VER 1.No → Go To 33 Turn the ignition off.Measure the resistance of the Passenger Side Impact Sensor Signal circuit betweenthe Passenger Side Impact Sensor connector and ground.Is the resistance below 100K ohms?AllYes → Repair the Passenger Side Sense signal circuit shorted for a shortto ground.Perform AIRBAG VERIFICATION TEST - VER 1.No → Go To 44 Measure the resistance between the Passenger Side Impact Sensor Signal andSensor Ground circuits at the Passenger Side Impact Sensor connector.Is the resistance below 100K ohms?AllYes → Repair the Passenger Side Impact Sensor circuits shorted together.Perform AIRBAG VERIFICATION TEST - VER 1.No → Go To 55 Connect the appropriate Load Tool adaptor to the Airbag Control Module connector.Measure the resistance of the Passenger Side Impact Sensor Ground circuit betweenthe Passenger Side Impact Sensor connector and the Load Tool adaptor.Is the resistance below 1 ohm?AllYes → Go To 6No → Repair the Passenger Side Front Impact Sensor Ground circuitopen or high resistance.Perform AIRBAG VERIFICATION TEST - VER 1.92
AIRBAGNO PASSENGER SIDE IMPACT SENSOR TEST — ContinuedTEST ACTION APPLICABILITY6 Connect the appropriate Load Tool adaptor to the Airbag Control Module connector.Measure the resistance of the Passenger Side Impact Sensor Signal circuit betweenthe Passenger Side Impact Sensor connector and the Load Tool adaptor.Is the resistance below 1 ohm?AllYes → Go To 7No → Repair the Passenger Side Impact Sensor Signal circuit open orhigh resistance.Perform AIRBAG VERIFICATION TEST - VER 1.7 Replace the Passenger Side Impact Sensor.Reconnect the vehicle body harness to the impact sensor.Remove any special tools or jumper wires and reconnect all previously disconnectedcomponents - except the Battery.WARNING: TURN THE IGNITION ON, THEN RECONNECT THE BATTERY.Connect the DRB to the Data Link Connector - use the most current softwareavailable.Use the DRB III and erase the stored codes in all airbag system modules.Turn the Ignition Off, and wait 15 seconds before turning the Ignition On.Wait one minute, and read active codes and if there are none present read the storedcodes.DID the active Passenger Side Impact Sensor DTC return?AllYes → Go To 8No → Test Complete.8 WARNING: TURN THE IGNITION <strong>OF</strong>F, DISCONNECT THE BATTERY ANDWAIT TWO MINUTES BEFORE PROCEEDING.WARNING: IF THE AIRBAG CONTROL MODULE IS DROPPED AT ANYTIME, IT MUST BE REPLACED.If there are no possible causes remaining, view repair.AllRepairReplace the Airbag Control Module in accordance with ServiceInstructions.Perform AIRBAG VERIFICATION TEST - VER 1.93
AIRBAGNO PASSENGER SIDE IMPACT SENSOR TEST — ContinuedTEST ACTION APPLICABILITY9 NOTE: Ensure the battery is fully charged.With the DRBIII, record and erase all DTCs from all modules.All active codes must be resolved before diagnosing any stored codes.Maintain a safe distance from all airbags while performing the following steps.With the DRBIII monitor active codes as you work through the system.NOTE: If equipped with Passenger Airbag On-Off switch, read the DTC’s inall switch positions.Wiggle the wiring harness and connectors of the appropriate airbag system androtate the steering wheel from stop to stop.NOTE: Check connectors - Clean and repair as necessary.You have just attempted to simulate the condition that initially set the trouble codemessage.The following additional checks may assist you in identifying a possible intermittentproblem:- Visually inspect related wire harness connectors. Look for broken, bent, pushed out,spread, corroded, or contaminated terminals.- Visually inspect the related harnesses. Look for chafed, pierced, pinched or partiallybroken wire.- Refer to Wiring Diagrams and Technical Service Bulletins that may apply.Did the DTC become active ?AllYes → Select appropriate symptom from Symptom List.No → No problem found at this time. Erase all codes before returningvehicle to customer.94
AIRBAGSymptom:NO PCI TRANSMISSIONWhen Monitored and Set Condition:NO PCI TRANSMISSIONWhen Monitored: With the ignition on and the module transmitting information on thePCI BUS.Set Condition: The code will set if the onboard diagnostic cannot detect the moduletransmitting information on the PCI BUS for 4 consecutive seconds. NOTE: Any PCI BusFailure will may cause a stored code to set.POSSIBLE CAUSESAIRBAG CONTROL MODULE - ACMSTORED CODE OR INTERMITTENT CONDITIONACTIVE CODE PRESENTTEST ACTION APPLICABILITY1 NOTE: Ensure that the battery is fully charged.IF THE MODULE IS DROPPED AT ANY TIME, IT MUST BE REPLACED.Turn the ignition on.From the list below, select the appropriate module and DTC type for the thisdiagnostic trouble code.NOTE: For the purpose of this test, the AECM and ORC modules will bereferred to as an ACM.Select the appropriate module and type of DTCAllACM - ACTIVEWARNING: TURN THE IGNITION <strong>OF</strong>F, DISCONNECT THEBATTERY AND WAIT TWO MINUTES BEFORE PROCEEDING.Replace the Airbag Control Module in accordance with ServiceInstructions.Perform AIRBAG VERIFICATION TEST - VER 1.ACM - STOREDGo To 295
AIRBAGNO PCI TRANSMISSION — ContinuedTEST ACTION APPLICABILITY2 NOTE: Ensure the battery is fully charged.With the DRBIII, record and erase all DTCs from all modules.All active codes must be resolved before diagnosing any stored codes.Maintain a safe distance from all airbags while performing the following steps.With the DRBIII monitor active codes as you work through the system.NOTE: If equipped with Passenger Airbag On-Off switch, read the DTC’s inall switch positions.Wiggle the wiring harness and connectors of the appropriate airbag system androtate the steering wheel from stop to stop.NOTE: Check connectors - Clean and repair as necessary.You have just attempted to simulate the condition that initially set the trouble codemessage.The following additional checks may assist you in identifying a possible intermittentproblem:- Visually inspect related wire harness connectors. Look for broken, bent, pushed out,spread, corroded, or contaminated terminals.- Visually inspect the related harnesses. Look for chafed, pierced, pinched or partiallybroken wire.- Refer to Wiring Diagrams and Technical Service Bulletins that may apply.Did the DTC become active ?AllYes → Select appropriate symptom from Symptom List.No → No problem found at this time. Erase all codes before returningvehicle to customer.96
AIRBAGSymptom List:NO RIGHT FRONT IMPACT SENSOR COMMUNICATIONRIGHT FRONT IMPACT SENSOR INTERNAL 1Test Note:All symptoms listed above are diagnosed using the same tests.The title for the tests will be NO RIGHT FRONT IMPACTSENSOR TEST.When Monitored and Set Condition:NO RIGHT FRONT IMPACT SENSOR COMMUNICATIONWhen Monitored: The ACM continuously communicates with the Right Front ImpactSensor over the sensor signal circuit. The sensor communication and onboard diagnosticsare powered by the ACM signal.Set Condition: The code will set, if the ACM and Right Front Sensor do not establish andmaintain valid data communications.RIGHT FRONT IMPACT SENSOR INTERNAL 1When Monitored: The Right Front Impact sensors is equipped with onboard diagnosticsto monitor the sensors internal circuits. If a problem is identified the sensor sends theRight Front Impact sensor internal 1 message to the ACM.Set Condition: The code will set if the ACM receives an internal 1 message from the RightFront Impact Sensor.POSSIBLE CAUSESSIGNAL CIRCUIT SHORTED TO BATTERYSIGNAL CIRCUIT SHORT TO GROUNDRIGHT SENSOR CIRCUITS SHORTED TOGETHERGROUND CIRCUIT OPENSIGNAL CIRCUIT OPENACM, RIGHT FRONT IMPACT SENSORREPAIR IS COMPLETESTORED CODE OR INTERMITTENT CONDITIONACTIVE CODE PRESENT97
AIRBAGNO RIGHT FRONT IMPACT SENSOR TEST — ContinuedTEST ACTION APPLICABILITY1 Turn the ignition on.NOTE: Ensure the battery is fully charged.NOTE: For the purpose of this test, the AECM and ORC modules will bereferred to as an ACM.SELECT ACTIVE or STORED DTC:AllACM - ACTIVE DTCGo To 2ACM - STORED DTCGo To 9NOTE: When reconnecting Airbag system components, the ignition must beturned off and the battery must be disconnected.2 WARNING: TURN THE IGNITION <strong>OF</strong>F, DISCONNECT THE BATTERY ANDWAIT TWO MINUTES BEFORE PROCEEDING.Disconnect the Right Front Impact Sensor connector.Disconnect the Airbag Control Module connector.WARNING: TURN THE IGNITION ON, THEN RECONNECT THE BATTERY.Measure the voltage of the Right Front Impact Sensor Signal circuit between theRight Sensor connector and ground.Is there any voltage present?AllYes → Repair the Right Front Impact Sensor Signal circuit shorted tobattery.Perform AIRBAG VERIFICATION TEST - VER 1.No → Go To 33 Turn the ignition off.Measure the resistance of the Right Impact Sensor Signal circuit between the RightImpact Sensor connector and ground.Is the resistance below 100K ohms?AllYes → Repair the Right Impact Sense signal circuit shorted for a short toground.Perform AIRBAG VERIFICATION TEST - VER 1.No → Go To 44 Measure the resistance between the Right Front Impact Sensor Signal and SensorGround circuits at the Right Impact Sensor connector.Is the resistance below 100K ohms?AllYes → Repair the Right Front Impact Sensor circuits shorted together.Perform AIRBAG VERIFICATION TEST - VER 1.No → Go To 55 Connect the appropriate Load Tool adaptor to the Airbag Control Module connector.Measure the resistance of the Right Front Impact Sensor Ground circuit between theRight Impact Sensor connector and the Load Tool adaptor.Is the resistance below 1 ohm?AllYes → Go To 6No → Repair the Right Front Impact Sensor Ground circuit open or highresistance.Perform AIRBAG VERIFICATION TEST - VER 1.98
AIRBAGNO RIGHT FRONT IMPACT SENSOR TEST — ContinuedTEST ACTION APPLICABILITY6 Connect the appropriate Load Tool adaptor to the Airbag Control Module connector.Measure the resistance of the Right Front Impact Sensor Signal circuit between theRight Impact Sensor connector and the Load Tool adaptor.Is the resistance below 1 ohm?AllYes → Go To 7No → Repair the Right Front Impact Sensor Signal circuit open or highresistance.Perform AIRBAG VERIFICATION TEST - VER 1.7 Replace the Right Front Impact Sensor.Reconnect the vehicle body harness to the impact sensor.Remove any special tools or jumper wires and reconnect all previously disconnectedcomponents - except the Battery.WARNING: TURN THE IGNITION ON, THEN RECONNECT THE BATTERY.Connect the DRB to the Data Link Connector - use the most current softwareavailable.Use the DRB III and erase the stored codes in all airbag system modules.Turn the Ignition Off, and wait 15 seconds before turning the Ignition On.Wait one minute, and read active codes and if there are none present read the storedcodes.DID the active Right Impact Sensor DTC return?AllYes → Go To 8No → Repair is complete.8 WARNING: TURN THE IGNITION <strong>OF</strong>F, DISCONNECT THE BATTERY ANDWAIT TWO MINUTES BEFORE PROCEEDING.WARNING: IF THE AIRBAG CONTROL MODULE IS DROPPED AT ANYTIME, IT MUST BE REPLACED.If there are no possible causes remaining, view repair.AllRepairReplace the Airbag Control Module in accordance with ServiceInstructions.Perform AIRBAG VERIFICATION TEST - VER 1.99
AIRBAGNO RIGHT FRONT IMPACT SENSOR TEST — ContinuedTEST ACTION APPLICABILITY9 NOTE: Ensure the battery is fully charged.With the DRBIII, record and erase all DTCs from all modules.All active codes must be resolved before diagnosing any stored codes.Maintain a safe distance from all airbags while performing the following steps.With the DRBIII monitor active codes as you work through the system.NOTE: If equipped with Passenger Airbag On-Off switch, read the DTC’s inall switch positions.Wiggle the wiring harness and connectors of the appropriate airbag system androtate the steering wheel from stop to stop.NOTE: Check connectors - Clean and repair as necessary.You have just attempted to simulate the condition that initially set the trouble codemessage.The following additional checks may assist you in identifying a possible intermittentproblem:- Visually inspect related wire harness connectors. Look for broken, bent, pushed out,spread, corroded, or contaminated terminals.- Visually inspect the related harnesses. Look for chafed, pierced, pinched or partiallybroken wire.- Refer to Wiring Diagrams and Technical Service Bulletins that may apply.Did the DTC become active ?AllYes → Select appropriate symptom from Symptom List.No → No problem found at this time. Erase all codes before returningvehicle to customer.100
AIRBAGSymptom:PASSENGER CURTAIN SQUIB CIRCUIT OPENWhen Monitored and Set Condition:PASSENGER CURTAIN SQUIB CIRCUIT OPENWhen Monitored: With the ignition is On, the ACM monitors the resistance of theCurtain Squib circuits.Set Condition: When the ACM detects an open circuit or high resistance on the CurtainSquib circuits.POSSIBLE CAUSESCURTAIN AIRBAG OPENCURTAIN SQUIB LINE 1 OR LINE 2 CIRCUIT OPENACM, CURTAIN SQUIB CIRCUIT OPENSTORED CODE OR INTERMITTENT CONDITIONACTIVE CODE PRESENTTEST ACTION APPLICABILITY1 Ensure the battery is fully charged.Turn the ignition on.NOTE: For the purpose of this test, the AECM and ORC modules will bereferred to as an ACM.SELECT ONE:AllRIGHT SIACM - ACTIVE DTCGo To 2RIGHT SIACM - STORED DTCGo To 4NOTE: When reconnecting Airbag system components, the ignition must beturned off and the battery must be disconnected.101
AIRBAGPASSENGER CURTAIN SQUIB CIRCUIT OPEN — ContinuedTEST ACTION APPLICABILITY2 WARNING: TURN IGNITION <strong>OF</strong>F, DISCONNECT THE BATTERY AND WAITTWO MINUTES BEFORE PROCEEDING.WARNING: DO NOT PLACE AN INTACT UNDEPLOYED CURTAIN AIRBAGFACE DOWN ON A HARD SURFACE, THE AIRBAG WILL PROPEL INTOTHE AIR IF ACCIDENTALLY DEPLOYED, AND COULD RESULT IN SERI-OUS OR FATAL INJURY.Disconnect the Curtain Airbag connector.NOTE: Check connectors - Clean and repair as necessary.Connect the appropriate Load Tool to the Curtain Airbag connector.WARNING: TURN IGNITION ON, THEN RECONNECT THE BATTERY.With the DRBIII, read the ACM active DTC’s.Does the DRB show CURTAIN SQUIB CIRCUIT OPEN?AllYes → Go To 3No → Replace Curtain Airbag in accordance with the Service Information.Perform AIRBAG VERIFICATION TEST - VER 1.3 WARNING: TURN IGNITION <strong>OF</strong>F, DISCONNECT THE BATTERY AND WAITTWO MINUTES BEFORE PROCEEDING.WARNING: DO NOT PLACE AN INTACT UNDEPLOYED CURTAIN AIRBAGFACE DOWN ON A HARD SURFACE, THE AIRBAG WILL PROPEL INTOTHE AIR IF ACCIDENTALLY DEPLOYED, AND COULD RESULT IN SERI-OUS OR FATAL INJURY.Disconnect the Airbag Load Tool Jumper.Disconnect the Airbag Control Module Connector.NOTE: Check connectors - Clean and repair as necessary.Connect the appropriate Load Tool adaptor to the Side Impact Airbag Control Moduleconnector.Measure the resistance of the Curtain Squib Line 1 and Line 2 circuits between theLoad Tool SIACM adaptor and the Curtain Airbag connector.Is the resistance below 1.0 ohms on both circuits?AllYes → Test Complete.No → Repair open or high resistance in the Curtain Squib Line 1 or Line2 circuits.Perform AIRBAG VERIFICATION TEST - VER 1.102
AIRBAGPASSENGER CURTAIN SQUIB CIRCUIT OPEN — ContinuedTEST ACTION APPLICABILITY4 NOTE: Ensure the battery is fully charged.With the DRBIII, record and erase all DTCs from all modules.All active codes must be resolved before diagnosing any stored codes.Maintain a safe distance from all airbags while performing the following steps.With the DRBIII monitor active codes as you work through the system.NOTE: If equipped with Passenger Airbag On-Off switch, read the DTC’s inall switch positions.Wiggle the wiring harness and connectors of the appropriate airbag system androtate the steering wheel from stop to stop.NOTE: Check connectors - Clean and repair as necessary.You have just attempted to simulate the condition that initially set the trouble codemessage.The following additional checks may assist you in identifying a possible intermittentproblem:- Visually inspect related wire harness connectors. Look for broken, bent, pushed out,spread, corroded, or contaminated terminals.- Visually inspect the related harnesses. Look for chafed, pierced, pinched or partiallybroken wire.- Refer to Wiring Diagrams and Technical Service Bulletins that may apply.Did the DTC become active ?AllYes → Select appropriate symptom from Symptom List.No → No problem found at this time. Erase all codes before returningvehicle to customer.103
AIRBAGSymptom:PASSENGER CURTAIN SQUIB CIRCUIT SHORTWhen Monitored and Set Condition:PASSENGER CURTAIN SQUIB CIRCUIT SHORTWhen Monitored: When the ignition is on, the ACM monitors the resistance between theCurtain Squib circuits.Set Condition: When the ACM detects a low resistance between the Curtain Squibcircuits.POSSIBLE CAUSESCURTAIN AIRBAG SHORTCURTAIN SQUIB LINE 1 SHORT TO LINE 2ACM, CURTAIN SQUIB CIRCUIT SHORTSTORED CODE OR INTERMITTENT CONDITIONACTIVE CODE PRESENTTEST ACTION APPLICABILITY1 Ensure the battery is fully charged.Turn the ignition on.NOTE: For the purpose of this test, the AECM and ORC modules will bereferred to as an ACM.SELECT ONE:AllACM - ACTIVE DTCGo To 2ACM - STORED DTCGo To 4NOTE: When reconnecting Airbag system components, the ignition must beturned off and the battery must be disconnected.104
AIRBAGPASSENGER CURTAIN SQUIB CIRCUIT SHORT — ContinuedTEST ACTION APPLICABILITY2 WARNING: TURN THE IGNITION <strong>OF</strong>F, DISCONNECT THE BATTERY ANDWAIT TWO MINUTES BEFORE PROCEEDING.WARNING: DO NOT PLACE AN INTACT UNDEPLOYED CURTAIN AIRBAGFACE DOWN ON A HARD SURFACE, THE AIRBAG WILL PROPEL INTOTHE AIR IF ACCIDENTALLY DEPLOYED, AND COULD RESULT IN SERI-OUS OR FATAL INJURY.Disconnect the Curtain Airbag connector.NOTE: Check connectors - Clean repair as necessary.Connect the appropriate Load Tool to the Curtain Airbag connector.WARNING: TURN IGNITION ON, THEN RECONNECT THE BATTERY.With the DRB, read the ACM active DTC’s.Does the DRB show CURTAIN SQUIB CIRCUIT SHORT?AllYes → Go To 3No → Replace Curtain Airbag in accordance with the Service Information.Perform AIRBAG VERIFICATION TEST - VER 1.3 WARNING: TURN THE IGNITION <strong>OF</strong>F, DISCONNECT THE BATTERY ANDWAIT TWO MINUTES BEFORE PROCEEDING.WARNING: DO NOT PLACE AN INTACT UNDEPLOYED CURTAIN AIRBAGFACE DOWN ON A HARD SURFACE, THE AIRBAG WILL PROPEL INTOTHE AIR IF ACCIDENTALLY DEPLOYED, AND COULD RESULT IN SERI-OUS OR FATAL INJURY.Disconnect the Airbag Load Tool Jumper.Disconnect the Airbag Control Module connectorNOTE: Check connectors - Clean and repair as necessary.Connect the appropriate Load Tool adaptor to the ACM connector.Measure the resistance between the Curtain Squib Line 1 and Line 2 circuits at theCurtain Airbag connector.Is the resistance below 10K ohms?AllYes → Repair Curtain Squib Line 1 shorted to Line 2 circuit.Perform AIRBAG VERIFICATION TEST - VER 1.No → Test Complete.105
AIRBAGPASSENGER CURTAIN SQUIB CIRCUIT SHORT — ContinuedTEST ACTION APPLICABILITY4 NOTE: Ensure the battery is fully charged.With the DRBIII, record and erase all DTCs from all modules.All active codes must be resolved before diagnosing any stored codes.Maintain a safe distance from all airbags while performing the following steps.With the DRBIII monitor active codes as you work through the system.NOTE: If equipped with Passenger Airbag On-Off switch, read the DTC’s inall switch positions.Wiggle the wiring harness and connectors of the appropriate airbag system androtate the steering wheel from stop to stop.NOTE: Check connectors - Clean and repair as necessary.You have just attempted to simulate the condition that initially set the trouble codemessage.The following additional checks may assist you in identifying a possible intermittentproblem:- Visually inspect related wire harness connectors. Look for broken, bent, pushed out,spread, corroded, or contaminated terminals.- Visually inspect the related harnesses. Look for chafed, pierced, pinched or partiallybroken wire.- Refer to Wiring Diagrams and Technical Service Bulletins that may apply.Did the DTC become active ?AllYes → Select appropriate symptom from Symptom List.No → No problem found at this time. Erase all codes before returningvehicle to customer.106
AIRBAGSymptom:PASSENGER CURTAIN SQUIB SHORT TO BATTERYWhen Monitored and Set Condition:PASSENGER CURTAIN SQUIB SHORT TO BATTERYWhen Monitored: When the ignition is on, the ACM monitors the voltage of the CurtainSquib circuits.Set Condition: When the ACM detects high voltage on the Curtain Squib circuits.POSSIBLE CAUSESCURTAIN AIRBAG SHORT TO BATTERYCURTAIN SQUIB LINE 1 OR LINE 2 SHORTED TO BATTERYACM, CURTAIN SQUIB SHORT TO BATTERYSTORED CODE OR INTERMITTENT CONDITIONACTIVE CODE PRESENTTEST ACTION APPLICABILITY1 Turn the ignition on.Ensure the battery is fully charged.NOTE: For the purpose of this test, the AECM and ORC modules will bereferred to as an ACM.SELECT ONE:AllRIGHT SIACM - ACTIVE DTCGo To 2RIGHT SIACM - STORED DTCGo To 4NOTE: When reconnecting Airbag system components, the ignition must beturned off and the battery must be disconnected.2 WARNING: TURN IGNITION <strong>OF</strong>F, DISCONNECT THE BATTERY AND WAITTWO MINUTES BEFORE PROCEEDING.WARNING: DO NOT PLACE AN INTACT UNDEPLOYED CURTAIN AIRBAGFACE DOWN ON A HARD SURFACE, THE AIRBAG WILL PROPEL INTOTHE AIR IF ACCIDENTALLY DEPLOYED, AND COULD RESULT IN SERI-OUS OR FATAL INJURY.Disconnect the Curtain Airbag connector.NOTE: Check connectors - Clean and repair as necessary.Connect the appropriate Load Tool to the Curtain Airbag connector.WARNING: TURN IGNITION ON, THEN RECONNECT THE BATTERY.With the DRBIII, read ACM active DTC’s.Does the DRBIII display CURTAIN SQUIB SHORT TO BATTERY?AllYes → Go To 3No → Replace Curtain Airbag in accordance with the Service Information.Perform AIRBAG VERIFICATION TEST - VER 1.107
AIRBAGPASSENGER CURTAIN SQUIB SHORT TO BATTERY — ContinuedTEST ACTION APPLICABILITY3 WARNING: TURN IGNITION <strong>OF</strong>F, DISCONNECT THE BATTERY AND WAITTWO MINUTES BEFORE PROCEEDING.WARNING: DO NOT PLACE AN INTACT UNDEPLOYED CURTAIN AIRBAGFACE DOWN ON A HARD SURFACE, THE AIRBAG WILL PROPEL INTOTHE AIR IF ACCIDENTALLY DEPLOYED, AND COULD RESULT IN SERI-OUS OR FATAL INJURY.Disconnect the Airbag Load Tool Jumper.Disconnect the Airbag Control Module connector.NOTE: Check connectors - Clean and repair as necessary.Connect the appropriate Load Tool ACM adaptor to the ACM connector.WARNING: TURN IGNITION ON, THEN RECONNECT THE BATTERY.Measure the voltage of the Curtain Squib Line 1 and Line 2 circuits between theCurtain Airbag connector and ground.Is any voltage present on either circuit?AllYes → Repair Curtain Squib Line 1 or Line 2 shorted to battery.Perform AIRBAG VERIFICATION TEST - VER 1.No → Test Complete.4 NOTE: Ensure the battery is fully charged.With the DRBIII, record and erase all DTCs from all modules.All active codes must be resolved before diagnosing any stored codes.Maintain a safe distance from all airbags while performing the following steps.With the DRBIII monitor active codes as you work through the system.NOTE: If equipped with Passenger Airbag On-Off switch, read the DTC’s inall switch positions.Wiggle the wiring harness and connectors of the appropriate airbag system androtate the steering wheel from stop to stop.NOTE: Check connectors - Clean and repair as necessary.You have just attempted to simulate the condition that initially set the trouble codemessage.The following additional checks may assist you in identifying a possible intermittentproblem:- Visually inspect related wire harness connectors. Look for broken, bent, pushed out,spread, corroded, or contaminated terminals.- Visually inspect the related harnesses. Look for chafed, pierced, pinched or partiallybroken wire.- Refer to Wiring Diagrams and Technical Service Bulletins that may apply.Did the DTC become active ?AllYes → Select appropriate symptom from Symptom List.No → No problem found at this time. Erase all codes before returningvehicle to customer.108
AIRBAGSymptom:PASSENGER CURTAIN SQUIB SHORT TO GROUNDWhen Monitored and Set Condition:PASSENGER CURTAIN SQUIB SHORT TO GROUNDWhen Monitored: When the ignition is on, the ACM monitors the resistance of theCurtain Squib circuits.Set Condition: When the ACM detects a short to ground on the Curtain Squib circuits.POSSIBLE CAUSESCURTAIN AIRBAG SHORT TO GROUNDCURTAIN SQUIB LINE 1 OR LINE 2 SHORTED TO GROUNDACM, CURTAIN SQUIB SHORT TO GROUNDSTORED CODE OR INTERMITTENT CONDITIONACTIVE CODE PRESENTTEST ACTION APPLICABILITY1 Ensure the battery is fully charged.Turn the ignition on.NOTE: For the purpose of this test, the AECM and ORC modules will bereferred to as an ACM.SELECT ONE:AllACM - ACTIVE DTCGo To 2ACM - STORED DTCGo To 4NOTE: When reconnecting Airbag system components, the ignition must beturned off and the battery must be disconnected.2 WARNING: TURN IGNITION <strong>OF</strong>F, DISCONNECT THE BATTERY AND WAITTWO MINUTES BEFORE PROCEEDING.WARNING: DO NOT PLACE AN INTACT UNDEPLOYED CURTAIN AIRBAGFACE DOWN ON A HARD SURFACE, THE AIRBAG WILL PROPEL INTOTHE AIR IF ACCIDENTALLY DEPLOYED, AND COULD RESULT IN SERI-OUS OR FATAL INJURY.Disconnect the Curtain Airbag connector.NOTE: Check connectors - Clean and repair as necessary.Connect the appropriate Load Tool to the Curtain Airbag connector.WARNING: TURN IGNITION ON, THEN RECONNECT THE BATTERY.With the DRBIII, read ACM active DTC’s.Does the DRBIII display CURTAIN SQUIB SHORT TO GROUND?AllYes → Go To 3No → Replace the Curtain Airbag in accordance with Service Instructions.Perform AIRBAG VERIFICATION TEST - VER 1.109
AIRBAGPASSENGER CURTAIN SQUIB SHORT TO GROUND — ContinuedTEST ACTION APPLICABILITY3 WARNING: TURN IGNITION <strong>OF</strong>F, DISCONNECT THE BATTERY AND WAITTWO MINUTES BEFORE PROCEEDING.WARNING: DO NOT PLACE AN INTACT UNDEPLOYED CURTAIN AIRBAGFACE DOWN ON A HARD SURFACE, THE AIRBAG WILL PROPEL INTOTHE AIR IF ACCIDENTALLY DEPLOYED, AND COULD RESULT IN SERI-OUS OR FATAL INJURY.Disconnect the Airbag Load Tool Jumper.Disconnect the Airbag Control Module connector.NOTE: Check connectors - Clean and repair as necessary.Connect the appropriate Load Tool ACM adaptor to the ACM connector.Measure the resistance of the Curtain Squib Line 1 and Line 2 circuits between theCurtain Squib connector and ground.Is the resistance below 10K ohms on either circuit?AllYes → Repair Curtain Squib Line 1 or Line 2 shorted to ground.Perform AIRBAG VERIFICATION TEST - VER 1.No → Test Complete.4 NOTE: Ensure the battery is fully charged.With the DRBIII, record and erase all DTCs from all modules.All active codes must be resolved before diagnosing any stored codes.Maintain a safe distance from all airbags while performing the following steps.With the DRBIII monitor active codes as you work through the system.NOTE: If equipped with Passenger Airbag On-Off switch, read the DTC’s inall switch positions.Wiggle the wiring harness and connectors of the appropriate airbag system androtate the steering wheel from stop to stop.NOTE: Check connectors - Clean and repair as necessary.You have just attempted to simulate the condition that initially set the trouble codemessage.The following additional checks may assist you in identifying a possible intermittentproblem:- Visually inspect related wire harness connectors. Look for broken, bent, pushed out,spread, corroded, or contaminated terminals.- Visually inspect the related harnesses. Look for chafed, pierced, pinched or partiallybroken wire.- Refer to Wiring Diagrams and Technical Service Bulletins that may apply.Did the DTC become active ?AllYes → Select appropriate symptom from Symptom List.No → No problem found at this time. Erase all codes before returningvehicle to customer.110
AIRBAGSymptom:PASSENGER SEAT BELT SWITCH CIRCUIT OPENWhen Monitored and Set Condition:PASSENGER SBS CIRCUIT OPENWhen Monitored: The ACM monitors the Seat Belt Buckle Switch circuit for an opencondition.Set Condition: The code will set if the ACM does not detect the correct circuit voltage.POSSIBLE CAUSESPASSENGER SBS OPENPASSENGER SEAT BELT SWITCH CIRCUITS OPENACM, PASSENGER SEAT BELT SWITCH CIRCUIT OPENSTORED CODE OR INTERMITTENT CONDITIONACTIVE CODE PRESENTTEST ACTION APPLICABILITY1 Ensure the battery is fully charged.Turn the ignition on.NOTE: For the purpose of this test, the AECM and ORC modules will bereferred to as an ACM.SELECT ACTIVE or STORED DTC:AllACM - ACTIVE DTCGo To 2ACM - STORED DTCGo To 4NOTE: When reconnecting Airbag system components, the ignition must beturned off and the battery must be disconnected.2 Turn the ignition off.Disconnect the Passenger Seat Belt Switch.NOTE: Check connectors - Clean and repair as necessary.Turn the ignition on.Measure the voltage between Passenger Seat Belt Switch Line 1 and Line 2 circuitsand ground.Is there voltage present on both circuits?AllYes → Replace the Passenger Seat Belt Switch Buckle Assembly.Perform AIRBAG VERIFICATION TEST - VER 1.No → Go To 3111
AIRBAGPASSENGER SEAT BELT SWITCH CIRCUIT OPEN — ContinuedTEST ACTION APPLICABILITY3 WARNING: TURN IGNITION <strong>OF</strong>F, DISCONNECT THE BATTERY AND WAITTWO MINUTES BEFORE PROCEEDING.Disconnect the Airbag Control Module connector.NOTE: Check connectors - Clean and repair as necessary.Connect the appropriate Load Tool adaptor to the Airbag Control Module connectors.Measure the resistance of the Driver SBS Line 1 and line 2 circuits between thePassenger SBS harness connector and Airbag Load Tool adaptor.Is the resistance below 1.0 ohms on both circuits?AllYes → Replace the Airbag Control Module in accordance with the Serviceinformation. WARNING: IF THE AIRBAG CONTROL MODULEIS DROPPED AT ANY TIME, IT MUST BE REPLACED.Perform AIRBAG VERIFICATION TEST - VER 1.No → Repair the open Passenger Seat Belt Switch Line 1 or Line 2.Perform AIRBAG VERIFICATION TEST - VER 1.4 NOTE: Ensure the battery is fully charged.With the DRBIII, record and erase all DTCs from all modules.All active codes must be resolved before diagnosing any stored codes.Maintain a safe distance from all airbags while performing the following steps.With the DRBIII monitor active codes as you work through the system.NOTE: If equipped with Passenger Airbag On-Off switch, read the DTC’s inall switch positions.Wiggle the wiring harness and connectors of the appropriate airbag system androtate the steering wheel from stop to stop.NOTE: Check connectors - Clean and repair as necessary.You have just attempted to simulate the condition that initially set the trouble codemessage.The following additional checks may assist you in identifying a possible intermittentproblem:- Visually inspect related wire harness connectors. Look for broken, bent, pushed out,spread, corroded, or contaminated terminals.- Visually inspect the related harnesses. Look for chafed, pierced, pinched or partiallybroken wire.- Refer to Wiring Diagrams and Technical Service Bulletins that may apply.Did the DTC become active ?AllYes → Select appropriate symptom from Symptom List.No → No problem found at this time. Erase all codes before returningvehicle to customer.112
AIRBAGSymptom:PASSENGER SEAT BELT SWITCH SHORT TO BATTERYWhen Monitored and Set Condition:PASSENGER SEAT BELT SWITCH SHORT TO BATTERYWhen Monitored: The ACM monitors the Seat Belt Buckle Switch circuit for an short tobattery.Set Condition: The code will set if the ACM detects high circuit voltage.POSSIBLE CAUSESPASSENGER SEAT BELT SWITCH CIRCUITS SHORTED TO BATTERYPASSENGER SEAT BELT SWITCH SHORT TO BATTERYACM, PASSENGER SEAT BELT SWITCH SHORT TO BATTERYSTORED CODE OR INTERMITTENT CONDITIONACTIVE CODE PRESENTTEST ACTION APPLICABILITY1 Ensure the battery is fully charged.Turn the ignition on.NOTE: For the purpose of this test, the AECM and ORC modules will bereferred to as an ACM.SELECT ACTIVE or STORED DTC:AllACM - ACTIVE DTCGo To 2ACM - STORED DTCGo To 4NOTE: When reconnecting Airbag system components, the ignition must beturned off and the battery must be disconnected.2 Turn the ignition off.NOTE: Ensure that the battery is fully charged.Disconnect the Passenger Seat Belt Switch connector.NOTE: Check connectors - Clean and repair as necessary.Turn the ignition on.With the DRBIII, read the active Airbag DTCs.Does the DRB show PASSENGER SBS CIRCUIT OPEN?AllYes → Replace the Passenger Seat Belt Switch Buckle Assembly.Perform AIRBAG VERIFICATION TEST - VER 1.No → Go To 3NOTE: When reconnecting Airbag system components, the ignition must beturned off and the battery must be disconnected.113
AIRBAGPASSENGER SEAT BELT SWITCH SHORT TO BATTERY — ContinuedTEST ACTION APPLICABILITY3 WARNING: TURN IGNITION <strong>OF</strong>F, DISCONNECT THE BATTERY AND WAITTWO MINUTES BEFORE PROCEEDING.Disconnect the Airbag Control Module connector.NOTE: Check connectors - Clean and repair as necessary.WARNING: TURN THE IGNITION ON, THEN RECONNECT THE BATTERY.Measure the voltage on the Passenger SBS Line 1 and Line 2 circuits at thePassenger SBS connector.Is there any voltage present?AllYes → Repair the Passenger Seat Belt Switch line 1 or line 2 shorted tobattery.Perform AIRBAG VERIFICATION TEST - VER 1.No → Replace the Airbag Control Module in accordance with the Serviceinformation. WARNING: IF THE AIRBAG CONTROL MODULEIS DROPPED AT ANY TIME, IT MUST BE REPLACED.Perform AIRBAG VERIFICATION TEST - VER 1.4 NOTE: Ensure the battery is fully charged.With the DRBIII, record and erase all DTCs from all modules.All active codes must be resolved before diagnosing any stored codes.Maintain a safe distance from all airbags while performing the following steps.With the DRBIII monitor active codes as you work through the system.NOTE: If equipped with Passenger Airbag On-Off switch, read the DTC’s inall switch positions.Wiggle the wiring harness and connectors of the appropriate airbag system androtate the steering wheel from stop to stop.NOTE: Check connectors - Clean and repair as necessary.You have just attempted to simulate the condition that initially set the trouble codemessage.The following additional checks may assist you in identifying a possible intermittentproblem:- Visually inspect related wire harness connectors. Look for broken, bent, pushed out,spread, corroded, or contaminated terminals.- Visually inspect the related harnesses. Look for chafed, pierced, pinched or partiallybroken wire.- Refer to Wiring Diagrams and Technical Service Bulletins that may apply.Did the DTC become active ?AllYes → Select appropriate symptom from Symptom List.No → No problem found at this time. Erase all codes before returningvehicle to customer.114
AIRBAGSymptom:PASSENGER SEAT BELT SWITCH SHORT TO GROUNDWhen Monitored and Set Condition:PASSENGER SEAT BELT SWITCH SHORT TO GROUNDWhen Monitored: The ACM monitors the Seat Belt Buckle Switch circuit for a shortedtogether or shorted to ground condition.Set Condition: The code will set if the ACM detects low circuit voltage.POSSIBLE CAUSESPASSENGER SEAT BELT SWITCH SHORT TOGETHER OR TO GROUNDPASSENGER SEAT BELT SWITCH CIRCUITS SHORTED TOGETHERPASSENGER SEAT BELT SWITCH CIRCUITS SHORTED TO GROUNDACM, PASSENGER SEAT BELT SWITCH SHORT TO GROUNDSTORED CODE OR INTERMITTENT CONDITIONACTIVE CODE PRESENTTEST ACTION APPLICABILITY1 Ensure the battery is fully charged.Turn the ignition on.NOTE: For the purpose of this test, the AECM and ORC modules will bereferred to as an ACM.SELECT ACTIVE or STORED DTC:AllACM - ACTIVE DTCGo To 2ACM - STORED DTCGo To 5NOTE: When reconnecting Airbag system components, the ignition must beturned off and the battery must be disconnected.2 Turn Ignition off.Disconnect the Passenger Seat Belt Switch connector.NOTE: Check connectors - Clean and repair as necessary.Turn Ignition on.With the DRBIII, read the active Airbag DTCs.Does the DRB show PASSENGER SBS CIRCUIT OPEN?AllYes → Replace the Passenger Seat Belt Switch Buckle Assembly.Perform AIRBAG VERIFICATION TEST - VER 1.No → Go To 3115
AIRBAGPASSENGER SEAT BELT SWITCH SHORT TO GROUND — ContinuedTEST ACTION APPLICABILITY3 WARNING: TURN IGNITION <strong>OF</strong>F, DISCONNECT THE BATTERY AND WAITTWO MINUTES BEFORE PROCEEDING.Disconnect the Airbag Control Module connectorNOTE: Check connectors - Clean and repair as necessary.Measure the resistance between the Driver SBS Line 1 and line 2 circuit at thePassenger SBS connector.Is the resistance below 10K ohms?AllYes → Repair the Passenger Seat Belt Switch Line 1 and Line 2 shortedtogether.Perform AIRBAG VERIFICATION TEST - VER 1.No → Go To 44 WARNING: TURN IGNITION <strong>OF</strong>F, DISCONNECT THE BATTERY AND WAITTWO MINUTES BEFORE PROCEEDING.Disconnect the Airbag Control Module connectorNOTE: Check connectors - Clean and repair as necessary.Measure the resistance of the Passenger SBS Line 1 and line 2 circuit between thePassenger SBS connector and ground.Is the resistance below 10K ohms on either circuit?AllYes → Repair the Passenger Seat Belt Switch line 1 or line 2 shorted toground.Perform AIRBAG VERIFICATION TEST - VER 1.No → Replace the Airbag Control Module in accordance with the Serviceinformation. WARNING: IF THE AIRBAG CONTROL MODULEIS DROPPED AT ANY TIME, IT MUST BE REPLACED.Perform AIRBAG VERIFICATION TEST - VER 1.5 NOTE: Ensure the battery is fully charged.With the DRBIII, record and erase all DTCs from all modules.All active codes must be resolved before diagnosing any stored codes.Maintain a safe distance from all airbags while performing the following steps.With the DRBIII monitor active codes as you work through the system.NOTE: If equipped with Passenger Airbag On-Off switch, read the DTC’s inall switch positions.Wiggle the wiring harness and connectors of the appropriate airbag system androtate the steering wheel from stop to stop.NOTE: Check connectors - Clean and repair as necessary.You have just attempted to simulate the condition that initially set the trouble codemessage.The following additional checks may assist you in identifying a possible intermittentproblem:- Visually inspect related wire harness connectors. Look for broken, bent, pushed out,spread, corroded, or contaminated terminals.- Visually inspect the related harnesses. Look for chafed, pierced, pinched or partiallybroken wire.- Refer to Wiring Diagrams and Technical Service Bulletins that may apply.Did the DTC become active ?AllYes → Select appropriate symptom from Symptom List.No → No problem found at this time. Erase all codes before returningvehicle to customer.116
AIRBAGSymptom:PASSENGER SQUIB 1 CIRCUIT OPENWhen Monitored and Set Condition:PASSENGER SQUIB 1 CIRCUIT OPENWhen Monitored: When the ignition is On, the ACM monitors the resistance of thePassenger Squib 1 circuits.Set Condition: The ACM has detected an open circuit or high resistance on the PassengerSquib 1 circuits.POSSIBLE CAUSESPASSENGER AIRBAG OPENPASSENGER SQUIB 1 LINE 1 OR LINE 2 CIRCUIT OPENSTORED CODE OR INTERMITTENT CONDITIONACM, PASSENGER SQUIB 1 CIRCUIT OPENACTIVE CODE PRESENTTEST ACTION APPLICABILITY1 NOTE: Ensure the battery is fully charged.Turn the ignition on.NOTE: For the purpose of this test, the AECM and ORC modules will bereferred to as an ACM.SELECT ACTIVE or STORED DTC:AllACM - ACTIVE DTCGo To 2ACM - STORED DTCGo To 4NOTE: When reconnecting Airbag system components, the ignition must beturned off and the battery must be disconnected.117
AIRBAGPASSENGER SQUIB 1 CIRCUIT OPEN — ContinuedTEST ACTION APPLICABILITY2 WARNING: TURN THE IGNITION <strong>OF</strong>F, DISCONNECT THE BATTERY ANDWAIT TWO MINUTES BEFORE PROCEEDING.WARNING: DO NOT PLACE AN INTACT UNDEPLOYED AIRBAG FACEDOWN ON A HARD SURFACE, THE AIRBAG WILL PROPEL INTO THE AIRIF ACCIDENTALLY DEPLOYED, AND COULD RESULT IN SERIOUS ORFATAL INJURY.Disconnect the Passenger Airbag.NOTE: Check connectors - Clean and repair as necessary.Connect the appropriate Load Tool to the Passenger Airbag connector.WARNING: TURN IGNITION ON, THEN RECONNECT THE BATTERY.With the DRBIII, read the active Airbag DTCs.Does the DRBIII show PASSENGER SQUIB 1 CIRCUIT OPEN?AllYes → Go To 3No → Replace the Passenger Airbag in accordance with the ServiceInformation.Perform AIRBAG VERIFICATION TEST - VER 1.3 WARNING: TURN THE IGNITION <strong>OF</strong>F, DISCONNECT THE BATTERY ANDWAIT TWO MINUTES BEFORE PROCEEDING.Disconnect the Airbag Control module connector.NOTE: Check connectors - Clean and repair as necessary.Connect the appropriate Load Tool adaptor to the Airbag Control Module connector.Disconnect the Load Tool from the Passenger Airbag connector.Measure the resistance of the Passenger Squib 1 Line 1 and Line 2 circuit betweenthe ACM Adaptor and the Passenger Airbag connector.Is the resistance below 1.0 ohms on both circuits?AllYes → Replace the Airbag Control Module in accordance with ServiceInstructions. WARNING: IF THE AIRBAG CONTROL MODULEIS DROPPED AT ANY TIME, IT MUST BE REPLACED.Perform AIRBAG VERIFICATION TEST - VER 1.No → Repair open or high resistance in Passenger Squib 1 Line 1 orLine 2 circuits.Perform AIRBAG VERIFICATION TEST - VER 1.NOTE: When reconnecting airbag system components the Ignition must beturned off and the Battery must be disconnected.118
AIRBAGPASSENGER SQUIB 1 CIRCUIT OPEN — ContinuedTEST ACTION APPLICABILITY4 NOTE: Ensure the battery is fully charged.With the DRBIII, record and erase all DTCs from all modules.All active codes must be resolved before diagnosing any stored codes.Maintain a safe distance from all airbags while performing the following steps.With the DRBIII monitor active codes as you work through the system.NOTE: If equipped with Passenger Airbag On-Off switch, read the DTC’s inall switch positions.Wiggle the wiring harness and connectors of the appropriate airbag system androtate the steering wheel from stop to stop.NOTE: Check connectors - Clean and repair as necessary.You have just attempted to simulate the condition that initially set the trouble codemessage.The following additional checks may assist you in identifying a possible intermittentproblem:- Visually inspect related wire harness connectors. Look for broken, bent, pushed out,spread, corroded, or contaminated terminals.- Visually inspect the related harnesses. Look for chafed, pierced, pinched or partiallybroken wire.- Refer to Wiring Diagrams and Technical Service Bulletins that may apply.Did the DTC become active ?AllYes → Select appropriate symptom from Symptom List.No → No problem found at this time. Erase all codes before returningvehicle to customer.119
AIRBAGSymptom:PASSENGER SQUIB 1 CIRCUIT SHORTWhen Monitored and Set Condition:PASSENGER SQUIB 1 CIRCUIT SHORTWhen Monitored: When the ignition is on, the ACM monitors the resistance of thePassenger Squib 1 circuits.Set Condition: The ACM has detected low resistance in the Passenger Squib 1 circuits.POSSIBLE CAUSESPASSENGER AIRBAG CIRCUIT SHORTPASSENGER SQUIB 1 LINE 1 SHORT TO LINE 2ACM, PASSENGER SQUIB 1 CIRCUIT SHORTSTORED CODE OR INTERMITTENT CONDITIONACTIVE CODE PRESENTTEST ACTION APPLICABILITY1 NOTE: Ensure that the battery is fully charged.Turn the ignition on.NOTE: For the purpose of this test, the AECM and ORC modules will bereferred to as an ACM.SELECT ACTIVE or STORED DTC:AllACM - ACTIVE DTCGo To 2ACM - STORED DTCGo To 4NOTE: When reconnecting Airbag system components, the ignition must beturned off and the battery must be disconnected.2 WARNING: TURN THE IGNITION <strong>OF</strong>F, DISCONNECT THE BATTERY ANDWAIT TWO MINUTES BEFORE PROCEEDING.WARNING: DO NOT PLACE AN INTACT UNDEPLOYED AIRBAG FACEDOWN ON A HARD SURFACE, THE AIRBAG WILL PROPEL INTO THE AIRIF ACCIDENTALLY DEPLOYED, AND COULD RESULT IN SERIOUS ORFATAL INJURY.Disconnect the Passenger Airbag.NOTE: Check connectors - Clean and repair as necessary.Connect the appropriate Load Tool to the Passenger Airbag connector.WARNING: TURN THE IGNITION ON, THEN RECONNECT THE BATTERY.With the DRBIII, read the active airbag DTCs.Does the DRBIII show PASSENGER SQUIB 1 CIRCUIT SHORT?AllYes → Go To 3No → Replace Passenger Airbag in accordance with the Service Information.Perform AIRBAG VERIFICATION TEST - VER 1.120
AIRBAGPASSENGER SQUIB 1 CIRCUIT SHORT — ContinuedTEST ACTION APPLICABILITY3 WARNING: TURN THE IGNITION <strong>OF</strong>F, DISCONNECT THE BATTERY ANDWAIT TWO MINUTES BEFORE PROCEEDING.Disconnect the Airbag Control Module connectorNOTE: Check connectors - Clean and repair as necessary.Connect the appropriate Load Tool adapter to the Airbag Control Module connector.Disconnect the Load Tool from the Passenger airbag connector.Measure the resistance between Passenger Squib 1 Line 1 and Squib 1 Line 2 circuitat the Passenger Airbag connector.Is the resistance below 10K ohms?AllYes → Repair Passenger Squib 1 Line 1 circuit short to Passenger Squib1 Line 2 circuit.Perform AIRBAG VERIFICATION TEST - VER 1.No → Replace the Airbag Control Module in accordance with ServiceInstructions. WARNING: IF THE AIRBAG CONTROL MODULEIS DROPPED AT ANY TIME, IT MUST BE REPLACED.Perform AIRBAG VERIFICATION TEST - VER 1.NOTE: When reconnecting airbag system components the Ignition must beturned off and the Battery must be disconnected.4 NOTE: Ensure the battery is fully charged.With the DRBIII, record and erase all DTCs from all modules.All active codes must be resolved before diagnosing any stored codes.Maintain a safe distance from all airbags while performing the following steps.With the DRBIII monitor active codes as you work through the system.NOTE: If equipped with Passenger Airbag On-Off switch, read the DTC’s inall switch positions.Wiggle the wiring harness and connectors of the appropriate airbag system androtate the steering wheel from stop to stop.NOTE: Check connectors - Clean and repair as necessary.You have just attempted to simulate the condition that initially set the trouble codemessage.The following additional checks may assist you in identifying a possible intermittentproblem:- Visually inspect related wire harness connectors. Look for broken, bent, pushed out,spread, corroded, or contaminated terminals.- Visually inspect the related harnesses. Look for chafed, pierced, pinched or partiallybroken wire.- Refer to Wiring Diagrams and Technical Service Bulletins that may apply.Did the DTC become active ?AllYes → Select appropriate symptom from Symptom List.No → No problem found at this time. Erase all codes before returningvehicle to customer.121
AIRBAGSymptom:PASSENGER SQUIB 1 SHORT TO BATTERYWhen Monitored and Set Condition:PASSENGER SQUIB 1 SHORT TO BATTERYWhen Monitored: When the ignition is on, the ACM monitors the voltage of the PassengerSquib 1 circuits.Set Condition: The ACM has detected high voltage on the Passenger Squib 1 circuits.POSSIBLE CAUSESPASSENGER AIRBAG CIRCUIT SHORT TO BATTERYPASSENGER SQUIB 1 LINE 1 OR LINE 2 SHORT TO BATTERYACM, PASSENGER SQUIB 1 CIRCUIT SHORT TO BATTERYSTORED CODE OR INTERMITTENT CONDITIONACTIVE CODE PRESENTTEST ACTION APPLICABILITY1 NOTE: Ensure that the battery is fully charged.Turn the ignition on.NOTE: For the purpose of this test, the AECM and ORC modules will bereferred to as an ACM.SELECT ACTIVE or STORED DTC:AllACM - ACTIVE DTCGo To 2ACM - STORED DTCGo To 4NOTE: When reconnecting Airbag system components, the ignition must beturned off and the battery must be disconnected.2 WARNING: TURN THE IGNITION <strong>OF</strong>F, DISCONNECT THE BATTERY ANDWAIT TWO MINUTES BEFORE PROCEEDING.WARNING: DO NOT PLACE AN INTACT UNDEPLOYED AIRBAG FACEDOWN ON A HARD SURFACE, THE AIRBAG WILL PROPEL INTO THE AIRIF ACCIDENTALLY DEPLOYED, AND COULD RESULT IN SERIOUS ORFATAL INJURY.Disconnect the Passenger Airbag connector.NOTE: Check connectors - Clean and repair as necessary.Connect the appropriate Load Tool to the Passenger Airbag connector.WARNING: TURN THE IGNITION ON, THEN RECONNECT THE BATTERY.With the DRBIII, read the active Airbag DTCs.Does the DRBIII show PASSENGER SQUIB 1 CIRCUIT SHORT TO BATTERY?AllYes → Go To 3No → Replace Passenger Airbag in accordance with the Service Information.Perform AIRBAG VERIFICATION TEST - VER 1.122
AIRBAGPASSENGER SQUIB 1 SHORT TO BATTERY — ContinuedTEST ACTION APPLICABILITY3 WARNING: TURN THE IGNITION <strong>OF</strong>F, DISCONNECT THE BATTERY ANDWAIT TWO MINUTES BEFORE PROCEEDING.Disconnect the Airbag Control Module connector.NOTE: Check connectors - Clean and repair as necessary.Connect the appropriate Load Tool adaptor to the Airbag Control Module connector.WARNING: TURN IGNITION ON, THEN RECONNECT THE BATTERY.Disconnect the Load Tool from the Passenger Airbag connector.Measure the voltage on the Passenger Squib 1 Line 1 and Line 2 circuits between thePassenger Airbag connector and ground.Is there any voltage present?AllYes → Repair Passenger Squib 1 Line 1 or Line 2 circuit short to battery.Perform AIRBAG VERIFICATION TEST - VER 1.No → Replace the Airbag Control Module in accordance with ServiceInstructions. WARNING: IF THE AIRBAG CONTROL MODULEIS DROPPED AT ANY TIME, IT MUST BE REPLACED.Perform AIRBAG VERIFICATION TEST - VER 1.4 NOTE: Ensure the battery is fully charged.With the DRBIII, record and erase all DTCs from all modules.All active codes must be resolved before diagnosing any stored codes.Maintain a safe distance from all airbags while performing the following steps.With the DRBIII monitor active codes as you work through the system.NOTE: If equipped with Passenger Airbag On-Off switch, read the DTC’s inall switch positions.Wiggle the wiring harness and connectors of the appropriate airbag system androtate the steering wheel from stop to stop.NOTE: Check connectors - Clean and repair as necessary.You have just attempted to simulate the condition that initially set the trouble codemessage.The following additional checks may assist you in identifying a possible intermittentproblem:- Visually inspect related wire harness connectors. Look for broken, bent, pushed out,spread, corroded, or contaminated terminals.- Visually inspect the related harnesses. Look for chafed, pierced, pinched or partiallybroken wire.- Refer to Wiring Diagrams and Technical Service Bulletins that may apply.Did the DTC become active ?AllYes → Select appropriate symptom from Symptom List.No → No problem found at this time. Erase all codes before returningvehicle to customer.123
AIRBAGSymptom:PASSENGER SQUIB 1 SHORT TO GROUNDWhen Monitored and Set Condition:PASSENGER SQUIB 1 SHORT TO GROUNDWhen Monitored: When the ignition is on, the ACM monitors the resistance of thePassenger Squib 1 circuits for low resistance.Set Condition: The ACM has detected a short to ground in the Passenger Squib 1 circuits.POSSIBLE CAUSESPASSENGER AIRBAG CIRCUIT SHORT TO GROUNDPASSENGER SQUIB 1 LINE 1 AND LINE 2 SHORT TO GROUNDSTORED CODE OR INTERMITTENT CONDITIONACM, PASSENGER SQUIB 1 CIRCUIT SHORT TO GROUNDACTIVE CODE PRESENTTEST ACTION APPLICABILITY1 NOTE: Ensure that the battery is fully charged.Turn the ignition on.NOTE: Connect the appropriate Load Tool to the Passenger Airbag connector.SELECT ACTIVE or STORED DTC:AllACM - ACTIVE DTCGo To 2ACM - STORED DTCGo To 4NOTE: When reconnecting Airbag system components, the ignition must beturned off and the battery must be disconnected.2 WARNING: TURN THE IGNITION <strong>OF</strong>F, DISCONNECT THE BATTERY ANDWAIT TWO MINUTES BEFORE PROCEEDING.WARNING: DO NOT PLACE AN INTACT UNDEPLOYED AIRBAG FACEDOWN ON A HARD SURFACE, THE AIRBAG WILL PROPEL INTO THE AIRIF ACCIDENTALLY DEPLOYED, AND COULD RESULT IN SERIOUS ORFATAL INJURY.Disconnect the Passenger Airbag connector.NOTE: Check connectors - Clean and repair as necessary.Connect the appropriate Load Tool to the Passenger Airbag connector.WARNING: TURN THE IGNITION ON, THEN RECONNECT THE BATTERY.With the DRBIII, read the active Airbag DTCs.Does the DRBIII show PASSENGER SQUIB 1 CIRCUIT SHORT TO GROUND?AllYes → Go To 3No → Replace the Passenger Airbag in accordance with the ServiceInformation.Perform AIRBAG VERIFICATION TEST - VER 1.124
AIRBAGPASSENGER SQUIB 1 SHORT TO GROUND — ContinuedTEST ACTION APPLICABILITY3 WARNING: TURN THE IGNITION <strong>OF</strong>F, DISCONNECT THE BATTERY ANDWAIT TWO MINUTES BEFORE PROCEEDING.Disconnect the Airbag Control Module connectorNOTE: Check connectors - Clean repair as necessary.Connect the appropriate Load Tool adaptor to the Airbag Control Module connector.Disconnect the Load Tool from the Passenger Airbag connector.Measure the resistance of the Passenger Squib 1 Line 1 or Line 2 circuit between thePassenger Airbag Module Connector and ground.Is the resistance below 10K ohms on either circuit?AllYes → Repair Passenger Squib 1 Line 1 and Line 2 circuits for a short toground.Perform AIRBAG VERIFICATION TEST - VER 1.No → Replace the Airbag Control Module in accordance with ServiceInstructions. WARNING: IF THE AIRBAG CONTROL MODULEIS DROPPED AT ANY TIME, IT MUST BE REPLACED.Perform AIRBAG VERIFICATION TEST - VER 1.4 NOTE: Ensure the battery is fully charged.With the DRBIII, record and erase all DTCs from all modules.All active codes must be resolved before diagnosing any stored codes.Maintain a safe distance from all airbags while performing the following steps.With the DRBIII monitor active codes as you work through the system.NOTE: If equipped with Passenger Airbag On-Off switch, read the DTC’s inall switch positions.Wiggle the wiring harness and connectors of the appropriate airbag system androtate the steering wheel from stop to stop.NOTE: Check connectors - Clean and repair as necessary.You have just attempted to simulate the condition that initially set the trouble codemessage.The following additional checks may assist you in identifying a possible intermittentproblem:- Visually inspect related wire harness connectors. Look for broken, bent, pushed out,spread, corroded, or contaminated terminals.- Visually inspect the related harnesses. Look for chafed, pierced, pinched or partiallybroken wire.- Refer to Wiring Diagrams and Technical Service Bulletins that may apply.Did the DTC become active ?AllYes → Select appropriate symptom from Symptom List.No → No problem found at this time. Erase all codes before returningvehicle to customer.125
AIRBAGSymptom:PASSENGER SQUIB 2 CIRCUIT OPENWhen Monitored and Set Condition:PASSENGER SQUIB 2 CIRCUIT OPENWhen Monitored: When the ignition is On, the ACM monitors the resistance of thePassenger Squib 2 circuits.Set Condition: The ACM has detected an open circuit or high resistance on the PassengerSquib 2 circuits.POSSIBLE CAUSESPASSENGER AIRBAG OPENPASSENGER SQUIB 2 LINE 1 OR LINE 2 CIRCUIT OPENACM, PASSENGER SQUIB 2 CIRCUIT OPENSTORED CODE OR INTERMITTENT CONDITIONACTIVE CODE PRESENTTEST ACTION APPLICABILITY1 NOTE: Ensure that the battery is fully charged.Turn the ignition on.NOTE: For the purpose of this test, the AECM and ORC modules will bereferred to as an ACM.SELECT ACTIVE or STORED DTC:AllACM - ACTIVE DTCGo To 2ACM - STORED DTCGo To 4NOTE: When reconnecting Airbag system components, the ignition must beturned off and the battery must be disconnected.126
AIRBAGPASSENGER SQUIB 2 CIRCUIT OPEN — ContinuedTEST ACTION APPLICABILITY2 WARNING: TURN THE IGNITION <strong>OF</strong>F, DISCONNECT THE BATTERY ANDWAIT TWO MINUTES BEFORE PROCEEDING.WARNING: DO NOT PLACE AN INTACT UNDEPLOYED AIRBAG FACEDOWN ON A HARD SURFACE, THE AIRBAG WILL PROPEL INTO THE AIRIF ACCIDENTALLY DEPLOYED, AND COULD RESULT IN SERIOUS ORFATAL INJURY.Disconnect the Passenger Airbag connector.NOTE: Check connectors - Clean and repair as necessary.Connect the appropriate Load Tool to the Passenger Airbag connector.WARNING: TURN THE IGNITION ON, THEN RECONNECT THE BATTERY.With the DRBIII, read the active Airbag DTCs.Does the DRB show PASSENGER SQUIB 2 CIRCUIT OPEN?AllYes → Go To 3No → Replace Passenger Airbag in accordance with the Service Information.Perform AIRBAG VERIFICATION TEST - VER 1.3 WARNING: TURN THE IGNITION <strong>OF</strong>F, DISCONNECT THE BATTERY ANDWAIT TWO MINUTES BEFORE PROCEEDING.Disconnect the Airbag Control Module connector.NOTE: Check connectors - Clean and repair as necessary.Connect the appropriate Load Tool adaptor to the Airbag Control Module connector.Disconnect the Load Tool from the Passenger Airbag connector.Measure the resistance of the Passenger Squib 2 Line 1 and Line 2 circuits betweenthe ACM adaptor and the Passenger Airbag connector.Is the resistance below 1.0 ohms on both circuits?AllYes → Replace the Airbag Control Module in accordance with ServiceInstructions. WARNING: IF THE AIRBAG CONTROL MODULEIS DROPPED AT ANY TIME, IT MUST BE REPLACED.Perform AIRBAG VERIFICATION TEST - VER 1.No → Repair open or high resistance in Passenger Squib 2 Line 1 orLine 2 circuits.Perform AIRBAG VERIFICATION TEST - VER 1.127
AIRBAGPASSENGER SQUIB 2 CIRCUIT OPEN — ContinuedTEST ACTION APPLICABILITY4 NOTE: Ensure the battery is fully charged.With the DRBIII, record and erase all DTCs from all modules.All active codes must be resolved before diagnosing any stored codes.Maintain a safe distance from all airbags while performing the following steps.With the DRBIII monitor active codes as you work through the system.NOTE: If equipped with Passenger Airbag On-Off switch, read the DTC’s inall switch positions.Wiggle the wiring harness and connectors of the appropriate airbag system androtate the steering wheel from stop to stop.NOTE: Check connectors - Clean and repair as necessary.You have just attempted to simulate the condition that initially set the trouble codemessage.The following additional checks may assist you in identifying a possible intermittentproblem:- Visually inspect related wire harness connectors. Look for broken, bent, pushed out,spread, corroded, or contaminated terminals.- Visually inspect the related harnesses. Look for chafed, pierced, pinched or partiallybroken wire.- Refer to Wiring Diagrams and Technical Service Bulletins that may apply.Did the DTC become active ?AllYes → Select appropriate symptom from Symptom List.No → No problem found at this time. Erase all codes before returningvehicle to customer.128
AIRBAGSymptom:PASSENGER SQUIB 2 CIRCUIT SHORTWhen Monitored and Set Condition:PASSENGER SQUIB 2 CIRCUIT SHORTWhen Monitored: When the ignition is on, the ACM monitors the resistance of thePassenger Squib 2 circuits.Set Condition: The ACM has detected low resistance in the Passenger Squib 2 circuits.POSSIBLE CAUSESPASSENGER AIRBAG CIRCUIT SHORTPASSENGER SQUIB 1 LINE 1 SHORT TO LINE 2STORED CODE OR INTERMITTENT CONDITIONACM, PASSENGER SQUIB 2 CIRCUIT SHORTACTIVE CODE PRESENTTEST ACTION APPLICABILITY1 NOTE: Ensure that the battery is fully charged.Turn the ignition on.NOTE: For the purpose of this test, the AECM and ORC modules will bereferred to as an ACM.SELECT ACTIVE or STORED DTC:AllACM - ACTIVE DTCGo To 2ACM - STORED DTCGo To 4NOTE: When reconnecting Airbag system components, the ignition must beturned off and the battery must be disconnected.2 WARNING: TURN THE IGNITION <strong>OF</strong>F, DISCONNECT THE BATTERY ANDWAIT TWO MINUTES BEFORE PROCEEDING.WARNING: DO NOT PLACE AN INTACT UNDEPLOYED AIRBAG FACEDOWN ON A HARD SURFACE, THE AIRBAG WILL PROPEL INTO THE AIRIF ACCIDENTALLY DEPLOYED, AND COULD RESULT IN SERIOUS ORFATAL INJURY.Disconnect the Passenger Airbag.NOTE: Check connectors - Clean and repair as necessary.Connect the appropriate Load Tool to the Passenger Airbag connector.WARNING: TURN THE IGNITION ON, THEN RECONNECT THE BATTERY.With the DRBIII, read the active DTCs.Does the DRB show PASSENGER SQUIB 2 CIRCUIT SHORT?AllYes → Go To 3No → Replace Passenger Airbag in accordance with the Service Information.Perform AIRBAG VERIFICATION TEST - VER 1.129
AIRBAGPASSENGER SQUIB 2 CIRCUIT SHORT — ContinuedTEST ACTION APPLICABILITY3 WARNING: TURN THE IGNITION <strong>OF</strong>F, DISCONNECT THE BATTERY ANDWAIT TWO MINUTES BEFORE PROCEEDING.Disconnect the Airbag Control Module connectorNOTE: Check connectors - Clean and repair as necessary.Connect the appropriate Load Tool adaptor to the Airbag Control Module connectors.Disconnect the Load Tool from the Passenger Airbag connector.Measure the resistance between the Passenger Squib 2 Line 1 and line 2 circuits atthe Passenger Airbag connector.Is the resistance below 10K ohms?AllYes → Repair Passenger Squib 2 Line 1 circuit short to Passenger Squib2 Line 2 circuit.Perform AIRBAG VERIFICATION TEST - VER 1.No → Replace the Airbag Control Module in accordance with ServiceInstructions. WARNING: IF THE AIRBAG CONTROL MODULEIS DROPPED AT ANY TIME, IT MUST BE REPLACED.Perform AIRBAG VERIFICATION TEST - VER 1.4 NOTE: Ensure the battery is fully charged.With the DRBIII, record and erase all DTCs from all modules.All active codes must be resolved before diagnosing any stored codes.Maintain a safe distance from all airbags while performing the following steps.With the DRBIII monitor active codes as you work through the system.NOTE: If equipped with Passenger Airbag On-Off switch, read the DTC’s inall switch positions.Wiggle the wiring harness and connectors of the appropriate airbag system androtate the steering wheel from stop to stop.NOTE: Check connectors - Clean and repair as necessary.You have just attempted to simulate the condition that initially set the trouble codemessage.The following additional checks may assist you in identifying a possible intermittentproblem:- Visually inspect related wire harness connectors. Look for broken, bent, pushed out,spread, corroded, or contaminated terminals.- Visually inspect the related harnesses. Look for chafed, pierced, pinched or partiallybroken wire.- Refer to Wiring Diagrams and Technical Service Bulletins that may apply.Did the DTC become active ?AllYes → Select appropriate symptom from Symptom List.No → No problem found at this time. Erase all codes before returningvehicle to customer.130
AIRBAGSymptom:PASSENGER SQUIB 2 SHORT TO BATTERYWhen Monitored and Set Condition:PASSENGER SQUIB 2 SHORT TO BATTERYWhen Monitored: When the ignition is on, the ACM monitors the voltage of the PassengerSquib 2 circuits.Set Condition: The ACM has detected high voltage on the Passenger Squib 2 circuits.POSSIBLE CAUSESPASSENGER AIRBAG CIRCUIT SHORT TO BATTERYPASSENGER SQUIB 2 LINE 1 OR LINE 2 SHORTED TO BATTERYACM, PASSENGER SQUIB 2 CIRCUIT SHORT TO BATTERYSTORED CODE OR INTERMITTENT CONDITIONACTIVE CODE PRESENTTEST ACTION APPLICABILITY1 NOTE: Ensure that the battery is fully charged.Turn the ignition on.NOTE: For the purpose of this test, the AECM and ORC modules will bereferred to as an ACM.SELECT ACTIVE or STORED DTC:AllACM - ACTIVE DTCGo To 2ACM - STORED DTCGo To 4NOTE: When reconnecting Airbag system components, the ignition must beturned off and the battery must be disconnected.2 WARNING: TURN THE IGNITION <strong>OF</strong>F, DISCONNECT THE BATTERY ANDWAIT TWO MINUTES BEFORE PROCEEDING.WARNING: DO NOT PLACE AN INTACT UNDEPLOYED AIRBAG FACEDOWN ON A HARD SURFACE, THE AIRBAG WILL PROPEL INTO THE AIRIF ACCIDENTALLY DEPLOYED, AND COULD RESULT IN SERIOUS ORFATAL INJURY.Disconnect the Passenger Airbag connector.NOTE: Check connectors - Clean and repair as necessary.Connect the appropriate Load Tool to the Passenger Airbag connector.WARNING: TURN THE IGNITION ON, THEN RECONNECT THE BATTERY.With the DRBIII, read the active Airbag DTCs.Does the DRB show PASSENGER SQUIB 2 CIRCUIT SHORT TO BATTERY?AllYes → Go To 3No → Replace Passenger Airbag in accordance with the Service Information.Perform AIRBAG VERIFICATION TEST - VER 1.131
AIRBAGPASSENGER SQUIB 2 SHORT TO BATTERY — ContinuedTEST ACTION APPLICABILITY3 WARNING: TURN THE IGNITION <strong>OF</strong>F, DISCONNECT THE BATTERY ANDWAIT TWO MINUTES BEFORE PROCEEDING.Disconnect the Airbag Control Module connector.NOTE: Check connectors - Clean and repair as necessary.Connect the appropriate Load Tool adaptor to the Airbag Control Module connector.WARNING: TURN THE IGNITION ON, THEN RECONNECT THE BATTERY.Disconnect the Load Tool from the Passenger Airbag connector.Measure the voltage on the Passenger Squib 2 Line 1 and Line 2 circuits between thePassenger Airbag connector and ground.Is there any voltage present?AllYes → Repair Passenger Squib 2 Line 1 or Line 2 circuit shorted tobattery.Perform AIRBAG VERIFICATION TEST - VER 1.No → Replace the Airbag Control Module in accordance with ServiceInstructions. WARNING: IF THE AIRBAG CONTROL MODULEIS DROPPED AT ANY TIME, IT MUST BE REPLACED.Perform AIRBAG VERIFICATION TEST - VER 1.4 NOTE: Ensure the battery is fully charged.With the DRBIII, record and erase all DTCs from all modules.All active codes must be resolved before diagnosing any stored codes.Maintain a safe distance from all airbags while performing the following steps.With the DRBIII monitor active codes as you work through the system.NOTE: If equipped with Passenger Airbag On-Off switch, read the DTC’s inall switch positions.Wiggle the wiring harness and connectors of the appropriate airbag system androtate the steering wheel from stop to stop.NOTE: Check connectors - Clean and repair as necessary.You have just attempted to simulate the condition that initially set the trouble codemessage.The following additional checks may assist you in identifying a possible intermittentproblem:- Visually inspect related wire harness connectors. Look for broken, bent, pushed out,spread, corroded, or contaminated terminals.- Visually inspect the related harnesses. Look for chafed, pierced, pinched or partiallybroken wire.- Refer to Wiring Diagrams and Technical Service Bulletins that may apply.Did the DTC become active ?AllYes → Select appropriate symptom from Symptom List.No → No problem found at this time. Erase all codes before returningvehicle to customer.132
AIRBAGSymptom:PASSENGER SQUIB 2 SHORT TO GROUNDWhen Monitored and Set Condition:PASSENGER SQUIB 2 SHORT TO GROUNDWhen Monitored: When the ignition is on, the ACM monitors the resistance of thePassenger Squib 2 circuits for low resistance.Set Condition: The ACM has detected a short to ground in the Passenger Squib 2 circuits.POSSIBLE CAUSESPASSENGER AIRBAG CIRCUIT SHORTED TO GROUNDPASSENGER SQUIB 2 LINE 1 OR LINE 2 SHORT TO GROUNDACM, PASSENGER SQUIB 2 CIRCUIT SHORT TO GROUNDSTORED CODE OR INTERMITTENT CONDITIONACTIVE CODE PRESENTTEST ACTION APPLICABILITY1 NOTE: Ensure that the battery is fully charged.Turn the ignition on.NOTE: For the purpose of this test, the AECM and ORC modules will bereferred to as an ACM.SELECT ACTIVE or STORED DTC:AllACM - ACTIVE DTCGo To 2ACM - STORED DTCGo To 4NOTE: When reconnecting Airbag system components, the ignition must beturned off and the battery must be disconnected.2 WARNING: TURN THE IGNITION <strong>OF</strong>F, DISCONNECT THE BATTERY ANDWAIT TWO MINUTES BEFORE PROCEEDING.WARNING: DO NOT PLACE AN INTACT UNDEPLOYED AIRBAG FACEDOWN ON A HARD SURFACE, THE AIRBAG WILL PROPEL INTO THE AIRIF ACCIDENTALLY DEPLOYED, AND COULD RESULT IN SERIOUS ORFATAL INJURY.Disconnect the Passenger Airbag connector.NOTE: Check connectors - Clean and repair as necessary.Connect the appropriate Load Tool to the Passenger Airbag connector.WARNING: TURN THE IGNITION ON, THEN RECONNECT THE BATTERY.With the DRBIII, read the active Airbag DTCs.Does the DRB show PASSENGER SQUIB 2 CIRCUIT SHORT TO GROUND?AllYes → Go To 3No → Replace the Passenger Airbag in accordance with the ServiceInformation.Perform AIRBAG VERIFICATION TEST - VER 1.133
AIRBAGPASSENGER SQUIB 2 SHORT TO GROUND — ContinuedTEST ACTION APPLICABILITY3 WARNING: TURN THE IGNITION <strong>OF</strong>F, DISCONNECT THE BATTERY ANDWAIT TWO MINUTES BEFORE PROCEEDING.WARNING: DO NOT PLACE AN INTACT UNDEPLOYED AIRBAG FACEDOWN ON A HARD SURFACE, THE AIRBAG WILL PROPEL INTO THE AIRIF ACCIDENTALLY DEPLOYED, AND COULD RESULT IN SERIOUS ORFATAL INJURY.Disconnect the Airbag Control Module connectorNOTE: Check connectors - Clean repair as necessary.Connect the appropriate Load Tool adaptor to the Airbag Control Module connector.Disconnect the Load Tool from the Passenger Airbag connector.Measure the resistance of the Passenger Squib 2 Line 1 and Line 2 circuits betweenthe Passenger Airbag Module connector and ground.Is the resistance below 10K ohms on either circuit?AllYes → Repair Passenger Squib 2 Line 1 or Line 2 circuit for a shorted toground.Perform AIRBAG VERIFICATION TEST - VER 1.No → Replace the Airbag Control Module in accordance with ServiceInstructions. WARNING: IF THE AIRBAG CONTROL MODULEIS DROPPED AT ANY TIME, IT MUST BE REPLACED.Perform AIRBAG VERIFICATION TEST - VER 1.4 NOTE: Ensure the battery is fully charged.With the DRBIII, record and erase all DTCs from all modules.All active codes must be resolved before diagnosing any stored codes.Maintain a safe distance from all airbags while performing the following steps.With the DRBIII monitor active codes as you work through the system.NOTE: If equipped with Passenger Airbag On-Off switch, read the DTC’s inall switch positions.Wiggle the wiring harness and connectors of the appropriate airbag system androtate the steering wheel from stop to stop.NOTE: Check connectors - Clean and repair as necessary.You have just attempted to simulate the condition that initially set the trouble codemessage.The following additional checks may assist you in identifying a possible intermittentproblem:- Visually inspect related wire harness connectors. Look for broken, bent, pushed out,spread, corroded, or contaminated terminals.- Visually inspect the related harnesses. Look for chafed, pierced, pinched or partiallybroken wire.- Refer to Wiring Diagrams and Technical Service Bulletins that may apply.Did the DTC become active ?AllYes → Select appropriate symptom from Symptom List.No → No problem found at this time. Erase all codes before returningvehicle to customer.134
AIRBAGSymptom:*AIRBAG INDICATOR ON WITHOUT ACTIVE TROUBLE CODESPOSSIBLE CAUSESFRONT OR SIDE IMPACT SENSOR STORED TROUBLE CODEACM, IMPACT SENSOR INTERNAL 1 STORED TROUBLE CODEINSTRUMENT CLUSTER PROBLEMSTEST ACTION APPLICABILITY1 Turn the ignition on.Make sure that all Airbag and Instrument Cluster active DTCs have been repairedbefore performing this procedure.With the DRBIII select MONITOR DISPLAY, WARNING LAMP STATUS and readthe PASSIVE RESTRAINTS, AIRBAG, MONITOR DISPLAY, WARNING LAMPSTATES.With no active DTCs, Does the LAMP REQ by ACM monitor show ON?AllYes → Go To 2No → Repair or replace the Instrument Cluster as necessary.Perform BODY VERIFICATION TEST - VER 1.NOTE: When reconnecting Airbag system components, the ignition must beturned off and the battery must be disconnected.2 With the DRBIII, read the stored DTCs.Does the DRB show a stored FRONT or SIDE IMPACT SENSOR INTERNAL 1trouble code?AllYes → WARNING: TURN THE IGNITION <strong>OF</strong>F, DISCONNECT THEBATTERY AND WAIT TWO MINUTES BEFORE PROCEED-ING. Replace the front or side impact sensor indicated by thestored diagnostic trouble code.Perform AIRBAG VERIFICATION TEST - VER 1.No → Replace the Airbag Control Module in accordance with ServiceInstructions. WARNING: IF THE AIRBAG CONTROL MODULEIS DROPPED AT ANY TIME, IT MUST BE REPLACED.Perform AIRBAG VERIFICATION TEST - VER 1.135
AUDIOSymptom:ALL OUTPUTS SHORT - BASE AUDIO SYSTEMWhen Monitored and Set Condition:ALL OUTPUTS SHORT - BASE AUDIO SYSTEMWhen Monitored: Ignition in RUN and IOD fuse installed.Set Condition: The radio has sensed a short on the output for more than 10 seconds.POSSIBLE CAUSESDETERMINE FAULTFRONT SHORTED SPEAKERREAR SHORTED SPEAKER(+) CIRCUIT SHORTED TO GROUND(-) CIRCUIT SHORTED TO GROUNDSPEAKER (+) & (-) CIRCUITS SHORTED TOGETHERSPEAKER SECTION <strong>OF</strong> RADIOTEST ACTION APPLICABILITY1 Turn the ignition on.Turn the Radio on.With the DRBIII, erase the audio DTC’s.Cycle the ignition switch from off to on and wait 10 seconds.With the DRBIII, read the audio DTC’s.Does the DRBIII display ALL OUTPUTS SHORT?AllYes → Go To 2No → Refer to the wiring diagrams located in the service information tohelp isolate a possible intermittent short.Perform BODY VERIFICATION TEST - VER 1.2 Turn the ignition off.NOTE: Perform this procedure after disconnecting each front speaker andeach I/P speaker (if equipped) connector.Disconnect each front speaker and each I/P speaker (if equipped) harness connectorone at a time.Turn the ignition on.Turn the radio on.With the DRBIII, erase the audio DTCs.Cycle the ignition switch from off to on and wait 10 seconds.With the DRBIII, read DTC’s.Does the DRBIII display ALL OUTPUTS SHORT with all the speakers disconnected?AllYes → Go To 3No → Replace the Speaker that when disconnected the DTC did notreset.Perform BODY VERIFICATION TEST - VER 1.136
AUDIOALL OUTPUTS SHORT - BASE AUDIO SYSTEM — ContinuedTEST ACTION APPLICABILITY3 Turn the ignition off.NOTE: Perform this procedure after disconnecting each rear speakerconnector.Disconnect each rear speaker harness connector one at a time.Turn the ignition on.Turn the radio on.With the DRBIII, erase the audio DTCs.Cycle the ignition switch from off to on and wait 10 seconds.With the DRBIII, read DTC’s.Does the DRBIII display ALL OUTPUTS SHORT with all the rear speakersdisconnected?AllYes → Go To 4No → Replace the Speaker that when disconnected the DTC did notreset.Perform BODY VERIFICATION TEST - VER 1.4 Turn the ignition off.Disconnect each front and rear speaker harness connectors.Disconnect the Radio harness connector.Measure the resistance between ground and each speaker (+) circuit.Is the resistance below 1000.0 (1K) ohms?AllYes → Repair the speaker (+) circuit for a short to ground.Perform BODY VERIFICATION TEST - VER 1.No → Go To 55 Turn the ignition off.Disconnect each front and rear speaker harness connectors.Disconnect the Radio harness connector.Measure the resistance between ground and each speaker (-) circuit.Is the resistance below 1000.0 (1K) ohms?AllYes → Repair the speaker (-) circuit for a short to ground.Perform BODY VERIFICATION TEST - VER 1.No → Go To 66 Turn the ignition off.Disconnect each front and rear speaker harness connectors.Disconnect the Radio harness connector.Measure the resistance between each speaker (+) circuit and each speaker (-) circuit.Is the resistance below 1000.0 (1K) ohms for any of the measurements?AllYes → Repair the speaker circuits shorted together.Perform BODY VERIFICATION TEST - VER 1.No → Go To 77 If there are no possible causes remaining, view repair. AllRepairReplace the Radio.Perform BODY VERIFICATION TEST - VER 1.137
AUDIOSymptom:ALL OUTPUTS SHORT - PREMIUM AUDIO SYSTEMWhen Monitored and Set Condition:ALL OUTPUTS SHORT - PREMIUM AUDIO SYSTEMWhen Monitored: Ignition in RUN and IOD fuse installed.Set Condition: The radio has sensed a short on the output for more than 10 seconds.POSSIBLE CAUSESDETERMINE FAULTSPEAKER SECTION <strong>OF</strong> POWER AMPLIFIER(+) CIRCUIT SHORTED TO GROUND(-) CIRCUIT SHORTED TO GROUNDSPEAKER (+) & (-) CIRCUITS SHORTED TOGETHERSPEAKER SECTION <strong>OF</strong> RADIOTEST ACTION APPLICABILITY1 Turn the ignition on.Turn the Radio on.With the DRBIII, erase the audio DTC’s.Cycle the ignition switch from off to on and wait 10 seconds.With the DRBIII, read the audio DTC’s.Does the DRBIII display ALL OUTPUTS SHORT?AllYes → Go To 2No → Refer to the wiring diagrams located in the service information tohelp isolate a possible short.Perform BODY VERIFICATION TEST - VER 1.2 Turn the ignition off.Disconnect the Power Amplifier harness connectors.Turn the ignition on.Turn the radio on.With the DRBIII, erase the audio DTCs.Cycle the ignition switch from off to on and wait 10 seconds.With the DRBIII, read DTC’s.Does the DRBIII display ALL OUTPUTS SHORT?AllYes → Go To 3No → Replace the Power Amplifier in accordance with the serviceinformation.Perform BODY VERIFICATION TEST - VER 1.138
AUDIOALL OUTPUTS SHORT - PREMIUM AUDIO SYSTEM — ContinuedTEST ACTION APPLICABILITY3 Turn the ignition off.Disconnect the Power Amplifier harness connectors.Disconnect the Radio harness connector.Measure the resistance between ground and any speaker (+) circuit.Is the resistance below 1000.0 (1K) ohms?AllYes → Repair the speaker (+) circuit for a short to ground.Perform BODY VERIFICATION TEST - VER 1.No → Go To 44 Turn the ignition off.Disconnect the Power Amplifier harness connectors.Disconnect the Radio harness connector.Measure the resistance between ground and any speaker (-) circuit.Is the resistance below 1000.0 (1K) ohms?AllYes → Repair the speaker (-) circuit for a short to ground.Perform BODY VERIFICATION TEST - VER 1.No → Go To 55 Turn the ignition off.Disconnect the Power Amplifier harness connectors.Disconnect the Radio harness connector.Measure the resistance between each speaker (+) circuit and each speaker (-) circuit.Is the resistance below 1000.0 (1K) ohms for any of the measurements?AllYes → Repair the speaker circuits shorted together.Perform BODY VERIFICATION TEST - VER 1.No → Go To 66 If there are no possible causes remaining, view repair. AllRepairReplace the Radio.Perform BODY VERIFICATION TEST - VER 1.139
AUDIOSymptom List:CASSETTE PLAYER INOPCD MECHANICAL FAILURE*AM/FM SWITCH INOPERATIVE*ANY STATION PRESET SWITCH INOPERATIVE*BALANCE INOPERATIVE*CD EJECT SWITCH INOPERATIVE*EQUALIZER INOPERATIVE*FADER INOPERATIVE*FF/RW SWITCH INOPERATIVE*HOUR/MINUTE SWITCHES INOPERATIVE*PAUSE/PLAY SWITCH INOPERATIVE*PWR SWITCH INOPERATIVE*SCAN SWITCH INOPERATIVE*SEEK SWITCH INOPERATIVE*SET SWITCH INOPERATIVE*TAPE EJECT SWITCH INOPERATIVE*TIME SWITCH INOPERATIVE*TUNE SWITCH INOPERATIVETest Note:All symptoms listed above are diagnosed using the same tests.The title for the tests will be CASSETTE PLAYER INOP.When Monitored and Set Condition:CASSETTE PLAYER INOPWhen Monitored: Continuously with the ignition and radio turned on.Set Condition: The code will set if the radio detects a internal cassette failure.CD MECHANICAL FAILUREWhen Monitored: Continuously with the ignition and CD player turned on.Set Condition: The code will set if the radio detects a CD mechanical failure.140
AUDIOCASSETTE PLAYER INOP — ContinuedINTERNAL FAILUREPOSSIBLE CAUSESTEST ACTION APPLICABILITY1 NOTE: If a DTC is set, erase the DTC and attempt to reset the DTC. If DTCresets, follow this test.This is an internal radio failure.View repairAllRepairReplace the Radio.Perform BODY VERIFICATION TEST - VER 1.141
AUDIOSymptom:CD CHANGER MECHANICAL FAILUREWhen Monitored and Set Condition:CD CHANGER MECHANICAL FAILUREWhen Monitored: Continuously with the ignition and CD Changer turned on.Set Condition: The code will set if the CD Changer detects a mechanical failure.INTERNAL FAILUREPOSSIBLE CAUSESTEST ACTION APPLICABILITY1 NOTE: Erase DTC and attempt to reset. If DTC resets, follow this test.This is an internal CD Changer failure.View repairAllRepairReplace the CD Changer.Perform BODY VERIFICATION TEST - VER 1.142
AUDIOSymptom:CD CHANGER READ FAILUREWhen Monitored and Set Condition:CD CHANGER READ FAILUREWhen Monitored: Continuously with the ignition and CD Changer turned on.Set Condition: The code will set if a CD that is not formatted as a music CD is installedin the CD Changer.CD CHANGER READ FAILUREPOSSIBLE CAUSESTEST ACTION APPLICABILITY1 Replace the problem CD with a good, clean, unscratched, music CD.Turn the radio on and select the good CD.With the DRBIII, read DTC’s.Does the DRBIII display CD CHANGER READ FAILURE?AllYes → Replace the CD Changer.Perform BODY VERIFICATION TEST - VER 1.No → Test Complete.143
AUDIOSymptom:CD CHANGER TEMPERATURE HIGHWhen Monitored and Set Condition:CD CHANGER TEMPERATURE HIGHWhen Monitored: Continuously with the ignition and CD Changer turned on.Set Condition: The code will set if the temperature inside the CD Changer is above +65°C (+145° F).HIGH TEMPERATURE FAILUREPOSSIBLE CAUSESTEST ACTION APPLICABILITY1 With the DRBIII, erase the audio DTC’s.Start the engine and allow the engine to reach normal operating temperature.If the vehicle has been in the hot sunlight or extreme cold move the vehicle indoorsand open the doors to allow the inside temperature to stabilize.The CD Changer will operate between -23° C and 65° C (-10° F and +145° F).With the DRBIII, read DTC’s.Does the DRBIII display CD CHANGER TEMPERATURE HIGH?AllYes → Replace the CD Changer.Perform BODY VERIFICATION TEST - VER 1.No → Test Complete.144
AUDIOSymptom:CD READ FAILUREWhen Monitored and Set Condition:CD READ FAILUREWhen Monitored: Continuously with the ignition and the radio CD player turned on.Set Condition: The code will set if a CD that is not formatted as a music CD is installedin the radio CD player.CD READ FAILUREPOSSIBLE CAUSESTEST ACTION APPLICABILITY1 Replace the problem CD with a good, clean, unscratched, music CD.Turn the radio CD player on.With the DRBIII, read DTC’s.Does the DRBIII display CD READ FAILURE?AllYes → Replace the Radio.Perform BODY VERIFICATION TEST - VER 1.No → Test Complete.145
AUDIOSymptom:CD TEMPERATURE HIGHWhen Monitored and Set Condition:CD TEMPERATURE HIGHWhen Monitored: Continuously with the ignition and the radio CD player turned on.Set Condition: The code will set if the temperature inside the radio CD player is above+70° C (+156° F).HIGH TEMPERATURE FAILUREPOSSIBLE CAUSESTEST ACTION APPLICABILITY1 With the DRBIII, erase the audio DTC’s.Start the engine and allow the engine to reach normal operating temperature.If the vehicle has been in the hot sunlight or extreme cold move the vehicle indoorsand open the doors to allow the inside temperature to stabilize.The radio CD player will operate between -23° C and 70° C (-10° F and +156° F).With the DRBIII, read DTC’s.Does the DRBIII display CD TEMPERATURE HIGH?AllYes → Replace the Radio.Perform BODY VERIFICATION TEST - VER 1.No → Test Complete.146
AUDIOSymptom:NO ANTENNA CONNECTIONWhen Monitored and Set Condition:NO ANTENNA CONNECTIONWhen Monitored: With the ignition on and the radio in seek up/down mode.Set Condition: With the radio in seek or scan mode for two minutes and the radio does notdetect an antenna connection or does not receive a radio station signal.BAD ANTENNA CONNECTIONTEST ANTENNARADIOPOSSIBLE CAUSESTEST ACTION APPLICABILITY1 Turn the ignition off.Disconnect the Radio Antenna connector.Inspect the Radio Antenna connection.Was the Antenna connection clean and tight?AllYes → Go To 2No → Repair Antenna connection as needed.Perform BODY VERIFICATION TEST - VER 1.2 Refer to the Audio System in the service information and test the Antenna inaccordance with the service procedure.Is the Antenna ok?AllYes → Go To 3No → Repair or replace the Antenna assembly as necessary.Perform BODY VERIFICATION TEST - VER 1.3 Note: Reconnect all previously disconnected components.Turn the ignition and Radio on.With the DRBIII, erase the audio DTC’s, put the radio in seek up and seek downmode for approximately 2 minutes before proceeding.With the DRBIII, read the audio DTC’s.Did this DTC reset?AllYes → Replace the Radio.Perform BODY VERIFICATION TEST - VER 1.No → Test Complete.147
AUDIOSymptom:POWER AMP SHUTDOWN - BASE AUDIO SYSTEMWhen Monitored and Set Condition:POWER AMP SHUTDOWN - BASE AUDIO SYSTEMWhen Monitored: Ignition in RUN and IOD fuse installed.Set Condition: The radio has sensed a short on the output for more than 10 seconds.POSSIBLE CAUSESDETERMINE FAULTFRONT SHORTED SPEAKERREAR SHORTED SPEAKER(+) CIRCUIT SHORTED TO GROUND(-) CIRCUIT SHORTED TO GROUNDSPEAKER (+) & (-) CIRCUITS SHORTED TOGETHERSPEAKER SECTION <strong>OF</strong> RADIOTEST ACTION APPLICABILITY1 Turn the ignition on.Turn the Radio on.With the DRBIII, erase the audio DTC’s.Cycle the ignition switch from off to on and wait 10 seconds.With the DRBIII, read the audio DTC’s.Does the DRBIII display POWER AMP SHUTDOWN?AllYes → Go To 2No → Refer to the wiring diagrams located in the service information tohelp isolate a possible intermittent short.Perform BODY VERIFICATION TEST - VER 1.2 Turn the ignition off.NOTE: Perform this procedure after disconnecting each front speaker andeach I/P speaker (if equipped) connector.Disconnect each front speaker and each I/P speaker (if equipped) harness connectorone at a time.Turn the ignition on.Turn the radio on.With the DRBIII, erase the audio DTCs.Cycle the ignition switch from off to on and wait 10 seconds.With the DRBIII, read DTC’s.Does the DRBIII display POWER AMP SHUTDOWN with all the speakersdisconnected?AllYes → Go To 3No → Replace the Speaker that when disconnected the DTC did notreset.Perform BODY VERIFICATION TEST - VER 1.148
AUDIOPOWER AMP SHUTDOWN - BASE AUDIO SYSTEM — ContinuedTEST ACTION APPLICABILITY3 Turn the ignition off.NOTE: Perform this procedure after disconnecting each rear speakerconnector.Disconnect each rear speaker harness connector one at a time.Turn the ignition on.Turn the radio on.With the DRBIII, erase the audio DTCs.Cycle the ignition switch from off to on and wait 10 seconds.With the DRBIII, read DTC’s.Does the DRBIII display POWER AMP SHUTDOWN with all the rear speakersdisconnected?AllYes → Go To 4No → Replace the Speaker that when disconnected the DTC did notreset.Perform BODY VERIFICATION TEST - VER 1.4 Turn the ignition off.Disconnect each front and rear speaker harness connectors.Disconnect the Radio harness connector.Measure the resistance between ground and each speaker (+) circuit.Is the resistance below 1000.0 (1K) ohms?AllYes → Repair the speaker (+) circuit for a short to ground.Perform BODY VERIFICATION TEST - VER 1.No → Go To 55 Turn the ignition off.Disconnect each front and rear speaker harness connectors.Disconnect the Radio harness connector.Measure the resistance between ground and each speaker (-) circuit.Is the resistance below 1000.0 (1K) ohms?AllYes → Repair the speaker (-) circuit for a short to ground.Perform BODY VERIFICATION TEST - VER 1.No → Go To 66 Turn the ignition off.Disconnect each front and rear speaker harness connectors.Disconnect the Radio harness connector.Measure the resistance between each speaker (+) circuit and each speaker (-) circuit.Is the resistance below 1000.0 (1K) ohms for any of the measurements?AllYes → Repair the speaker circuits shorted together.Perform BODY VERIFICATION TEST - VER 1.No → Go To 77 If there are no possible causes remaining, view repair. AllRepairReplace the Radio.Perform BODY VERIFICATION TEST - VER 1.149
AUDIOSymptom:POWER AMP SHUTDOWN - PREMIUM AUDIO SYSTEMWhen Monitored and Set Condition:POWER AMP SHUTDOWN - PREMIUM AUDIO SYSTEMWhen Monitored: Ignition in RUN and IOD fuse installed.Set Condition: The radio has sensed a short on the output for more than 10 seconds.POSSIBLE CAUSESDETERMINE FAULTSPEAKER SECTION <strong>OF</strong> POWER AMPLIFIER(+) CIRCUIT SHORTED TO GROUND(-) CIRCUIT SHORTED TO GROUNDSPEAKER (+) & (-) CIRCUITS SHORTED TOGETHERSPEAKER SECTION <strong>OF</strong> RADIOTEST ACTION APPLICABILITY1 Turn the ignition on.Turn the Radio on.With the DRBIII, erase the audio DTC’s.Cycle the ignition switch from off to on and wait 10 seconds.With the DRBIII, read the audio DTC’s.Does the DRBIII display POWER AMP SHUTDOWN?AllYes → Go To 2No → Refer to the wiring diagrams located in the service information tohelp isolate a possible short.Perform BODY VERIFICATION TEST - VER 1.2 Turn the ignition off.Disconnect the Power Amplifier harness connectors.Turn the ignition on.Turn the radio on.With the DRBIII, erase the audio DTCs.Cycle the ignition switch from off to on and wait 10 seconds.With the DRBIII, read DTC’s.Does the DRBIII display POWER AMP SHUTDOWN?AllYes → Go To 3No → Replace the Power Amplifier in accordance with the serviceinformation.Perform BODY VERIFICATION TEST - VER 1.150
AUDIOPOWER AMP SHUTDOWN - PREMIUM AUDIO SYSTEM — ContinuedTEST ACTION APPLICABILITY3 Turn the ignition off.Disconnect the Power Amplifier harness connectors.Disconnect the Radio harness connector.Measure the resistance between ground and any speaker (+) circuit.Is the resistance below 1000.0 (1K) ohms?AllYes → Repair the speaker (+) circuit for a short to ground.Perform BODY VERIFICATION TEST - VER 1.No → Go To 44 Turn the ignition off.Disconnect the Power Amplifier harness connectors.Disconnect the Radio harness connector.Measure the resistance between ground and any speaker (-) circuit.Is the resistance below 1000.0 (1K) ohms?AllYes → Repair the speaker (-) circuit for a short to ground.Perform BODY VERIFICATION TEST - VER 1.No → Go To 55 Turn the ignition off.Disconnect the Power Amplifier harness connectors.Disconnect the Radio harness connector.Measure the resistance between each speaker (+) circuit and each speaker (-) circuit.Is the resistance below 1000.0 (1K) ohms for any of the measurements?AllYes → Repair the speaker circuits shorted together.Perform BODY VERIFICATION TEST - VER 1.No → Go To 66 If there are no possible causes remaining, view repair. AllRepairReplace the Radio.Perform BODY VERIFICATION TEST - VER 1.151
AUDIOSymptom:RADIO DIMMING SHORTED HIGHWhen Monitored and Set Condition:RADIO DIMMING SHORTED HIGHWhen Monitored: Ignition in RUN and IOD fuse installed.Set Condition: The BCM is trying to activate the radio dimming output (park lamps onand parade mode requested). The code will set if the BCM pulls this input low andexcessive current is sinked into the BCM.POSSIBLE CAUSESDIMMER SECTION <strong>OF</strong> RADIOPANEL LAMPS DRIVER CIRCUIT SHORTED TO VOLTAGEBODY CONTROL MODULETEST ACTION APPLICABILITY1 Turn the ignition off.Disconnect the Radio harness connector.Turn the ignition on.Turn the park lamps on.Measure the voltage of the Panel Lamps Driver circuit at the Radio connector.Rotate the dimmer switch from full low intensity to full high intensity.Does the voltage increase from approximately 3.5 volts to approximately 12.0 volts?AllYes → Replace the Radio.Perform BODY VERIFICATION TEST - VER 1.No → Go To 22 Turn the ignition off.Disconnect the Radio harness connector.Disconnect the BCM C1 harness connector.Turn the ignition on.Measure the voltage of the Panel Lamps Driver circuit at the Radio connector.Is the voltage above 1.0 volt?AllYes → Repair the Panel Lamps Driver circuit for a short to voltage.Perform BODY VERIFICATION TEST - VER 1.No → Replace the Body Control Module in accordance with the serviceinformation.Perform BODY VERIFICATION TEST - VER 1.152
AUDIOSymptom:REMOTE RADIO SWITCH SHORTED TO GROUNDWhen Monitored and Set Condition:REMOTE RADIO SWITCH SHORTED TO GROUNDWhen Monitored: Ignition in RUN and IOD fuse installed.Set Condition: The code will set if the BCM detects a short to ground on the Radio ControlMUX circuit for more than 5 seconds.POSSIBLE CAUSESLEFT REMOTE RADIO SWITCH SHORTED TO GROUNDRIGHT REMOTE RADIO SWITCH SHORTED TO GROUNDRADIO CONTROL MUX CIRCUIT SHORTED TO GROUND AT THE SWITCHRADIO CONTROL MUX CIRCUIT SHORTED TO THE RETURN CIRCUIT AT THE SWITCHCLOCKSPRING SHORTED TO GROUNDRADIO CONTROL MUX CIRCUIT SHORTED TO GROUNDRADIO CONTROL MUX CKT SHORTED TO THE RADIO CONTROL MUX RETURN CKTBODY CONTROL MODULETEST ACTION APPLICABILITY1 WARNING: Turn the ignition off, disconnect the battery and wait 2 minutesbefore proceeding.CAUTION: Do not place an intact undeployed airbag module face down ona hard surface, the airbag module will propel into the air if accidentlydeployed.Remove the Driver Airbag Module.Disconnect the Left Remote Radio Switch harness connector.Turn the ignition on, reconnect the battery.With the DRB, enter Body Computer then Sensors and monitor the Radio Control SWvoltageIs the voltage approximately 5.0 volts?AllYes → Replace the Left Remote Radio Switch.Perform BODY VERIFICATION TEST - VER 1.No → Go To 2153
AUDIOREMOTE RADIO SWITCH SHORTED TO GROUND — ContinuedTEST ACTION APPLICABILITY2 WARNING: Turn the ignition off, disconnect the battery and wait 2 minutesbefore proceeding.CAUTION: Do not place an intact undeployed airbag module face down ona hard surface, the airbag module will propel into the air if accidentlydeployed.Remove the Driver Airbag Module.Disconnect the Right Remote Radio Switch harness connector.Turn the ignition on, reconnect the battery.With the DRB, enter Body Computer then Sensors and monitor the Radio Control SWvoltageIs the voltage approximately 5.0 volts?AllYes → Replace the Right Remote Radio Switch.Perform BODY VERIFICATION TEST - VER 1.No → Go To 33 Turn the ignition off.Disconnect the Clockspring C4 harness connector.Turn the ignition on.With the DRB, enter Body Computer then Sensors and monitor the Radio Control SWvoltage.Is the voltage approximately 5.0 volts?AllYes → Go To 4No → Go To 54 Turn the ignition off.Disconnect the Clockspring C4 harness connector.NOTE: Ensure both remote radio switches are disconnected.Measure the resistance between ground and the Radio Control MUX circuit at theclockspring C4 harness connector.Is the resistance below 5.0 ohms?AllYes → Repair the Radio Control MUX circuit for a short to groundbetween the clockspring and the remote radio switches.Perform BODY VERIFICATION TEST - VER 1.No → Repair the Radio Control MUX circuit for a short to the RadioControl MUX Return circuit between the clockspring and theremote radio switches.Perform BODY VERIFICATION TEST - VER 1.5 Turn the ignition off.Disconnect the Clockspring C3 harness connector.Turn the ignition on.With the DRB, enter Body Computer then Sensors and monitor the Radio Control SWvoltage.Is the voltage approximately 5.0 volts?AllYes → Replace the Clockspring.Perform BODY VERIFICATION TEST - VER 1.No → Go To 6154
AUDIOREMOTE RADIO SWITCH SHORTED TO GROUND — ContinuedTEST ACTION APPLICABILITY6 Turn the ignition off.Disconnect the Clockspring C3 harness connector.Disconnect the BCM C2 harness connector.Measure the resistance between ground and the Radio Control MUX circuit.Is the resistance below 5.0 ohms?AllYes → Repair the Radio Control MUX circuit for a short to groundbetween the clockspring and the BCM.Perform BODY VERIFICATION TEST - VER 1.No → Go To 77 Turn the ignition off.Disconnect the Clockspring C3 harness connector.Disconnect the BCM C2 harness connector.Measure the resistance between the Radio Control MUX circuit and the RadioControl MUX Return circuit.Is the resistance below 5.0 ohms?AllYes → Repair the Radio Control MUX circuit for a short to the RadioControl MUX Return circuit between the clockspring and theBCM.Perform BODY VERIFICATION TEST - VER 1.No → Go To 88 If there are no possible causes remaining, view repair. AllRepairReplace the Body Control Module.Perform BODY VERIFICATION TEST - VER 1.155
AUDIOSymptom:*NO SOUND FROM ALL SPEAKERSPOSSIBLE CAUSESINTERMITTENT SHORT - FUSE #5POWER AMPLIFIER - INTERNAL SHORTRADIO - FUSED B+ CKT SHORTEDFUSED B+ CIRCUIT SHORTED TO GROUNDINTERMITTENT SHORT - FUSE #30RADIO - FUSED IGNITION SWITCH CKT SHORTEDFUSED IGNITION SWITCH OUTPUT CIRCUIT SHORTED TO GROUNDOPEN FUSED B+ CIRCUIT TO RADIOOPEN FUSED IGNITION SWITCH OUTPUT CKT TO RADIOOPEN RADIO GROUND CIRCUITOPEN FUSED B+ CIRCUIT TO POWER AMPLIFIEROPEN GROUND CIRCUIT TO POWER AMPLIFIEROPEN ENABLE SIGNAL TO AMPLIFIER CIRCUITENABLE SIGNAL TO AMPLIFIER CIRCUIT SHORTED TO GROUNDRADIO (NO SPEAKER OUTPUT)RADIO (NO ENABLE SIGNAL TO AMPILIFER)POWER AMPLIFIER (NO OUTPUT)TEST ACTION APPLICABILITY1 Turn the ignition off.Remove and inspect fuse #5 in the Junction Block.Is the fuse open?AllYes → Go To 2No → Go To 52 Replace fuse #5 in the Junction Block.Turn the radio on.Remove and inspect fuse #5 in the Junction Block.Is the fuse open?AllYes → Go To 3No → Replace fuse #5 in the Junction Block. Refer to the wiringdiagrams located in the service information to help isolate apossible intermittent short to ground condition.Perform BODY VERIFICATION TEST - VER 1.156
AUDIO*NO SOUND FROM ALL SPEAKERS — ContinuedTEST ACTION APPLICABILITY3 NOTE: If vehicle is not equipped with a power amplifier, answer yes to thequestion.Turn the ignition off.Disconnect the Power Amplifier harness connector.Replace fuse #5 in the Junction Block.Turn the radio on.Remove and inspect fuse #5 in the Junction Block.Is the fuse open?AllYes → Go To 4No → Replace the Power Amplifier.Perform BODY VERIFICATION TEST - VER 1.4 Turn the ignition off.Disconnect the Radio harness connector.Replace fuse #5 in the Junction Block.Remove and inspect fuse #5 in the Junction Block.Is the fuse open?AllYes → Repair the Fused B+ circuit for a short to ground.Perform BODY VERIFICATION TEST - VER 1.No → Replace the Radio.Perform BODY VERIFICATION TEST - VER 1.5 Turn the ignition off.Remove and inspect fuse #30 in the Junction Block.Is the fuse open?AllYes → Go To 6No → Go To 86 Turn the ignition off.Replace fuse #30 in the Junction Block.Turn the ignition on.Turn the radio on.Turn the ignition off.Remove and inspect fuse #30 in the Junction Block.Is the fuse open?AllYes → Go To 7No → Replace fuse #30 in the Junction Block. Refer to the wiringdiagrams located in the service information to help isolate apossible intermittent short to ground condition.Perform BODY VERIFICATION TEST - VER 1.7 Turn the ignition off.Disconnect the Radio harness connector.Replace fuse #30 in the Junction Block.Cycle the ignition switch from on to off.Remove and inspect fuse #30 in the Junction Block.Is the fuse open?AllYes → Repair the Fused Ignition Switch Output circuit for a short toground.Perform BODY VERIFICATION TEST - VER 1.No → Replace the Radio.Perform BODY VERIFICATION TEST - VER 1.157
AUDIO*NO SOUND FROM ALL SPEAKERS — ContinuedTEST ACTION APPLICABILITY8 Turn the ignition off.Disconnect the Radio harness connector.Using a 12-volt test light connected to ground, probe the Fused B+ circuit.Is the test light illuminated?AllYes → Go To 9No → Repair the Fused B+ circuit for an open.Perform BODY VERIFICATION TEST - VER 1.9 Turn the ignition off.Disconnect the Radio harness connector.Turn the ignition on.Using a 12-volt test light connected to ground, probe the Fused Ignition SwitchOutput circuit.Is the test light illuminated?AllYes → Go To 10No → Repair the Fused Ignition Switch Output circuit for an open.Perform BODY VERIFICATION TEST - VER 1.10 Turn the ignition off.Disconnect the Radio harness connector.Using a 12-volt test light connected to 12-volts, probe the radio ground circuit.Is the test light illuminated?AllYes → Go To 11No → Repair the ground circuit for an open.Perform BODY VERIFICATION TEST - VER 1.11 NOTE: If vehicle is not equipped with a power amplifier, answer yes to thequestion.Turn the ignition off.Disconnect the Power Amplifier harness connector.Using a 12-volt test light connected to ground, probe both Fused B+ circuits.Is the test light illuminated for both circuits?AllYes → Go To 12No → Repair the Fused B+ circuit for an open.Perform BODY VERIFICATION TEST - VER 1.12 NOTE: If vehicle is not equipped with a power amplifier, answer yes to thequestion.Turn the ignition off.Disconnect the Power Amplifier harness connector.Using a 12-volt test light connected to 12-volts, probe both Ground circuits.Is the test light illuminated for both circuits?AllYes → Go To 13No → Repair the Ground circuit for an open.Perform BODY VERIFICATION TEST - VER 1.158
AUDIO*NO SOUND FROM ALL SPEAKERS — ContinuedTEST ACTION APPLICABILITY13 NOTE: If vehicle is not equipped with a power amplifier, answer yes to thequestion.Turn the ignition off.Disconnect the Radio harness connector.Disconnect the Power Amplifier harness connector.Measure the resistance of the Enable Signal to Amplifier circuit between the Radioconnector and the Power Amplifier connector.Is the resistance below 5.0 ohms?AllYes → Go To 14No → Repair the Enable Signal to Amplifier circuit for an open.Perform BODY VERIFICATION TEST - VER 1.14 NOTE: If vehicle is not equipped with a power amplifier, answer no to thequestion.Turn the ignition off.Disconnect the Radio harness connector.Disconnect the Power Amplifier harness connector.Measure the resistance between ground and the Enable Signal to Amplifier circuit.Is the resistance below 5.0 ohms?AllYes → Repair the Enable Signal to Amplifier circuit for a short toground.Perform BODY VERIFICATION TEST - VER 1.No → Go To 1515 NOTE: If vehicle is not equipped with a power amplifier, answer no to thequestion.While back probing, measure the voltage of any speaker (+) circuit in the Radioconnector.Turn the ignition and radio on.Is the voltage approximately 5.5 volts?AllYes → Go To 16No → Replace the Radio.Perform BODY VERIFICATION TEST - VER 1.16 Turn the ignition off.Disconnect the Power Amplifier harness connector.Turn the ignition and Radio on.Measure the voltage of the Enable Signal to Amplifier circuit in the Power Amplifierconnector.Is the voltage above 10.0 volts?AllYes → Replace the Power Amplifier.Perform BODY VERIFICATION TEST - VER 1.No → Replace the Radio.Perform BODY VERIFICATION TEST - VER 1.159
AUDIOSymptom:*REMOTE RADIO CONTROLS INOPERATIVEPOSSIBLE CAUSESOPEN RADIO CONTROL MUX CIRCUIT AT THE SWITCHOPEN RADIO CONTROL MUX RETURN CIRCUIT AT THE SWITCHREMOTE RADIO SWITCHBODY CONTROL MODULE - INTERNAL SHORTOPEN CLOCKSPRINGOPEN RADIO CONTROL MUX CIRCUITOPEN RADIO CONTROL MUX RETURN CIRCUITBODY CONTROL MODULE - OPEN INTERNALTEST ACTION APPLICABILITY1 NOTE: If any DTCs are set, diagnose the DTC before continuing.Turn the ignition and radio on.Operate both remote radio switches.Are both remote radio control switches inoperative?AllYes → Go To 2No → Go To 72 Turn the ignition off.Disconnect the Clockspring C3 harness connector.Turn the ignition on.With the DRB, enter Body Computer then Sensors and monitor the Radio Control SWvoltage.Is the voltage approximately 5.0 volts?AllYes → Go To 3No → Replace the Body Control Module.Perform BODY VERIFICATION TEST - VER 1.3 Turn the ignition off.Disconnect the Clockspring C3 harness connector.Turn the ignition on.Connect a jumper wire between cavity 1 and cavity 2 at the Clockspring C3 connector.With the DRB, enter Body Computer then Sensors and monitor the Radio Control SWvoltage.Is the voltage approximately 0.0 volts?AllYes → Check the circuits between the clockspring connector and thesplice for an open. If ok, replace the Clockspring.Perform BODY VERIFICATION TEST - VER 1.No → Go To 4160
AUDIO*REMOTE RADIO CONTROLS INOPERATIVE — ContinuedTEST ACTION APPLICABILITY4 Turn the ignition off.Disconnect the Clockspring C3 harness connector.Disconnect the BCM C2 harness connector.Measure the resistance of the Radio Control MUX circuit between the BCM C2connector and the Clockspring C3 connector.Is the resistance below 5.0 ohms?AllYes → Go To 5No → Repair the Radio Control MUX circuit for an open between theclockspring and the BCM.Perform BODY VERIFICATION TEST - VER 1.5 Turn the ignition off.Disconnect the Clockspring C3 harness connector.Disconnect the BCM C2 harness connector.Measure the resistance of the Radio Control MUX Return circuit between the BCMC2 connector and the Clockspring C3 connector.Is the resistance below 5.0 ohms?AllYes → Go To 6No → Repair the Radio Control MUX Return circuit for an open betweenthe clockspring and the BCM.Perform BODY VERIFICATION TEST - VER 1.6 If there are no possible causes remaining, view repair. AllRepairReplace the Body Control Module.Perform BODY VERIFICATION TEST - VER 1.7 WARNING: Turn the ignition off, disconnect the battery and wait 2 minutesbefore proceeding.CAUTION: Do not place an intact undeployed airbag module face down ona hard surface, the airbag module will propel into the air if accidentlydeployed.Remove the Driver Airbag Module.Disconnect both remote radio switch harness connectors.Turn the ignition on, reconnect the battery.Measure the voltage of the Radio Control MUX circuit at the inoperative remoteradio switch.Is the voltage approximately 5.0 volts?AllYes → Go To 8No → Repair the Radio Control MUX circuit for an open between theinoperative switch and the splice.Perform BODY VERIFICATION TEST - VER 1.161
AUDIO*REMOTE RADIO CONTROLS INOPERATIVE — ContinuedTEST ACTION APPLICABILITY8 WARNING: Turn the ignition off, disconnect the battery and wait 2 minutesbefore proceeding.CAUTION: Do not place an intact undeployed airbag module face down ona hard surface, the airbag module will propel into the air if accidentlydeployed.Remove the Driver Airbag Module.Disconnect both remote radio switch harness connectors.Disconnect the Clockspring C4 harness connector.Measure the resistance of the Radio Control MUX Return circuit between theinoperative remote radio switch and the clockspring connector.Is the resistance below 5.0 ohms?AllYes → Go To 9No → Repair the Radio Control MUX Return circuit for an open betweenthe inoperative switch and the clockspring.Perform BODY VERIFICATION TEST - VER 1.9 If there are no possible causes remaining, view repair. AllRepairReplace the inoperative Remote Radio Switch.Perform BODY VERIFICATION TEST - VER 1.162
CHIMESymptom:CHIME INOPERATIVE WITH KEY IN IGNITION, DRIVER DOOROPENPOSSIBLE CAUSESOPEN KEY-IN SWITCHKEY-IN IGN SWITCH GROUND CIRCUIT OPENKEY-IN IGN SWITCH SENSE CIRCUIT OPENBODY CONTROL MODULE - KEY-IN IGNITION OPENDOOR AJAR PROBLEMSTEST ACTION APPLICABILITY1 Note: Ensure the interior lamps turn on and off properly.Note: Ensure the exterior lamps turn on and off properly.Remove the key from the ignition switch.With the DRBIII select: Body, INPUT OUTPUT, KEY IN IGN SWInsert the key in to the ignition switch.With the DRBIII, read key in ignition switch status.Does the DRBIII display; KEY IN IGN SW :CLOSED?AllYes → Refer to Door Ajar information for the related symptoms.Perform BODY VERIFICATION TEST - VER 1.No → Go To 22 Disconnect the Ignition switch C2 connector.With the ignition key in.Using an Ohmmeter, check the resistance across the Ignition SwitchIs the resistance above 10.0 ohms?AllYes → Replace the Ignition Switch.Perform BODY VERIFICATION TEST - VER 1.No → Go To 33 Turn ignition off.Disconnect the Ignition Switch C2 connector.Measure the resistance between ground and the Ground circuit.Is the resistance below 5.0 ohms?AllYes → Go To 4No → Repair the open Key-in Ignition Switch Ground circuit.Perform BODY VERIFICATION TEST - VER 1.4 Turn ignition off.Disconnect the Ignition Switch C2 connector.Disconnect the Body Control Module C1 connector.Measure the resistance of the Key-in Ignition Switch Sense circuit between the BCMC1 connector and the Ignition Switch C2 connector.Is the resistance below 5.0 ohms?AllYes → Go To 5No → Repair the open Key-in Ignition Switch Sense Wire.Perform BODY VERIFICATION TEST - VER 1.163
CHIMECHIME INOPERATIVE WITH KEY IN IGNITION, DRIVER DOOR OPEN —ContinuedTEST ACTION APPLICABILITY5 If there are no possible causes remaining, view Repair. AllRepairReplace the Body Control Module.Perform BODY VERIFICATION TEST - VER 1.164
CHIMESymptom:*CHIME INOPERATIVE AT ALL TIMESPOSSIBLE CAUSESACTUATES OKBODY CONTROL MODULE - CHIME INOPERATIVETEST ACTION APPLICABILITY1 Turn the ignition on.Close all doors.With the DRBIII, actuate the Chime.Does the chime sound when actuated by the DRB?AllYes → If the chime operates as it should, check for other reasons that thechime is being inoperative. Refer to symptom list for relatedproblems.Perform BODY VERIFICATION TEST - VER 1.No → Replace the Body Control Module.Perform BODY VERIFICATION TEST - VER 1.165
CHIMESymptom:*CHIME INOPERATIVE WITH DRIVERS SEAT BELT UNFASTENEDPOSSIBLE CAUSESSEAT BELT STATUS INCORRECT ON DRBSEAT BELT SWITCH OPENGROUND WIRE OPENJUNCTION BLOCK - SEAT BELT SWITCH SENSE OPENSEAT BELT SWITCH SENSE WIRE OPENTEST ACTION APPLICABILITY1 Ensure the Drivers Seat Belt is not fastened.With the DRBIII select, Body Computer and then Input/Output.Turn the ignition on.Read the Seat Belt Sw Status on the DRBIII.Does the DRBIII display Seat Belt Sw Closed?AllYes → Replace the Body Control Module.Perform BODY VERIFICATION TEST - VER 1.No → Go To 22 Disconnect the Seat Belt Switch connector.Connect a jumper wire between Seat Belt Switch Sense circuit and the Groundcircuit in the Seat Belt Switch connector.With the DRBIII select Body, Body Computer and then inputs/Outputs.Turn the ignition on.Read the Seat Belt Sw Status.Does the DRBIII display Seat Belt Sw Closed?AllYes → Replace the Seat Belt Switch.Perform BODY VERIFICATION TEST - VER 1.No → Go To 33 Disconnect the Seat Belt Switch connector.Connect a jumper wire between the Seat Belt Switch Sense circuit and chassisground.With the DRB III select: Body, Body Computer, Input Output.Read the Seat Belt Sw, status.Does the DRB III show Seat Belt Sw: CLOSED?AllYes → Repair the open Ground wire.Perform BODY VERIFICATION TEST - VER 1.No → Go To 4166
CHIME*CHIME INOPERATIVE WITH DRIVERS SEAT BELT UNFASTENED —ContinuedTEST ACTION APPLICABILITY4 Turn the ignition off.Lower the Junction Block and gain access to the Junction Block C1 connector but donot disconnect.Back probe a jumper wire between the Seat Belt Switch Sense circuit in the JunctionBlock C1 connector cavity 19 in the upper right corner to ground.Remove the Body Control Module from the Junction Block.Measure the resistance between ground and the Seat Belt Switch Sense ckt in theJunction Block - Body Control Module connector.Is the resistance below 5.0 ohms?AllYes → Go To 5No → Replace the Junction Block.Perform BODY VERIFICATION TEST - VER 1.5 Lower the Junction Block and gain access to the Junction Block C1 connector, but donot disconnect.Back probe a jumper wire between the Seat Belt Switch Sense circuit in the JunctionBlock C1 connector cavity 19 in the upper right corner to ground.With the DRB III select: Body, Body Computer, Input Output.Read the Seat Belt Sw status.Does the DRB III show Seat Belt Sw: CLOSED?AllYes → Repair the open Seat Belt Switch Sense wire.Perform BODY VERIFICATION TEST - VER 1.No → Test Complete.167
CHIMESymptom:*CHIME INOPERATIVE WITH EXTERIOR LAMPS, DRIVER DOOROPENDRB TEST HEADLAMP SWITCHDOOR AJAR PROBLEMSEXTERIOR LIGHTING PROBLEMSPOSSIBLE CAUSESTEST ACTION APPLICABILITY1 Note: Ensure the interior lamps turn on and off properly.Note: Ensure the exterior lamps turn on and off properly.Remove the key from the ignition switch.With the DRBIII select: Body, Monitor Display, Lighting Monitor.Open the Driver door.With the DRBIII, read the Driver Door Switch status.Does the DRBIII display Closed?AllYes → Go To 2No → Refer to Door Ajar information for the related symptoms.Perform BODY VERIFICATION TEST - VER 1.2 Note: Ensure the interior lamps turn on and off properly.Note: Ensure the exterior lamps turn on and off properly.Remove the key from the ignition switch.With the DRB III select: Body, Monitor Display, Lighting Monitor.Read the Headlamp Switch voltage while turning the Parklamps on.Does the DRBIII display: 2.0 to 3.2 volts?AllYes → Replace the Body Control Module.Perform BODY VERIFICATION TEST - VER 1.No → Refer to Exterior Lighting information for the related symptoms.Perform BODY VERIFICATION TEST - VER 1.168
CHIMESymptom:*CHIME SOUNDS WITH DRIVER DOOR OPENPOSSIBLE CAUSESKEY-IN IGN SWITCH STATUS WRONGKEY-IN IGNITION SWITCH CIRCUIT SHORTEDKEY-IN IGN SWITCH SENSE WIRE SHORT TO GROUNDBODY CONTROL MODULE - KEY-IN IGNITION SHORTEDTEST ACTION APPLICABILITY1 Note: Ensure the interior lamps turn on and off properly.Note: Ensure the exterior lamps turn on and off properly.Remove the key from the ignition switch.With the DRB III select: Body, Body Computer, Input Output.Turn off; Headlamps and Parklamps.Read the Key-In Ignition status.Does the DRB III show Key-In Ign OPEN?AllYes → No problem found at this time.Perform BODY VERIFICATION TEST - VER 1.No → Go To 22 Disconnect the Ignition Switch C2 connector.With the DRB III select: Body, Body Computer, Input Output.Read the Key-In Ignition status.Does the DRB III show: Key-In Ign, CLOSED?AllYes → Go To 3No → Replace the Ignition Switch.Perform BODY VERIFICATION TEST - VER 1.3 Turn ignition off.Disconnect the Ignition Switch C2 connector.Disconnect the Body Control Module C1 connector.Measure the resistance of the Key-in Ignition Switch Sense circuit to chassis ground.Is the resistance below 100.0 ohms?AllYes → Repair the Key-in Ignition Switch Sense wire for a short toground.Perform BODY VERIFICATION TEST - VER 1.No → Go To 44 If there are no possible causes remaining, view Repair. AllRepairReplace the Body Control Module.Perform BODY VERIFICATION TEST - VER 1.169
CHIMESymptom:*CHIME SOUNDS WITH DRIVER SEAT BELT FASTENEDPOSSIBLE CAUSESSEAT BELT SWITCH STATUS WRONGSEAT BELT SWITCH SHORTEDBODY CONTROL MODULE - SEAT BELT SWITCH SHORTEDSEAT BELT SWITCH SENSE WIRE SHORT TO GROUNDJUNCTION BLOCK - SEAT BELT SWITCH SENSE SHORTEDTEST ACTION APPLICABILITY1 Ensure the drivers seat belt is fastened.With the DRB III select: Body, Body Computer, Input Output.Turn the ignition on.Read the Seat Belt Sw, status.Does the DRB III show Seat Belt Sw: CLOSED?AllYes → Go To 2No → Replace the Body Control Module.Perform BODY VERIFICATION TEST - VER 1.2 Disconnect the Seat Belt Switch connector.With the DRB III select: Body, Body Computer, Input Output.Turn the ignition on.Read the Seat Belt Sw. status.Does the DRB III show Seat Belt Sw: CLOSED?AllYes → Go To 3No → Replace the Seat Belt Switch.Perform BODY VERIFICATION TEST - VER 1.3 Remove the BCM from the Junction Block.Disconnect the Seat Belt Switch connector.Turn the ignition off.Measure the resistance between ground and the Seat Belt Switch Sense circuit in theSeat Belt Switch connector..Is the resistance below 100.0 ohms?AllYes → Go To 4No → Replace the Body Control Module.Perform BODY VERIFICATION TEST - VER 1.4 Turn the ignition off.Disconnect the Seat Belt Switch connector.Remove the BCM from the Junction Block.Disconnect the Junction Block C1 connector.Measure the resistance between ground and the Seat Belt Switch Sense circuit in theSeat Belt Switch connector..Is the resistance below 100.0 ohms?AllYes → Repair the Seat Belt Switch Sense wire for a short to ground.Perform BODY VERIFICATION TEST - VER 1.No → Go To 5170
CHIME*CHIME SOUNDS WITH DRIVER SEAT BELT FASTENED — ContinuedTEST ACTION APPLICABILITY5 If there are no possible causes remaining, view Repair. AllRepairReplace the Junction Block.Perform BODY VERIFICATION TEST - VER 1.171
CHIMESymptom:*VEHICLE SPEED WARNING CHIME PROBLEMPOSSIBLE CAUSESCOUNTRY CODE IN BODY CONTROL MODULEBODY CONTROL MODULETEST ACTION APPLICABILITY1 Ensure there is communication between the BCM and the PCM and that there areno related DTC’s before continuing.NOTE: The high speed warning Chime is for Gulf Coast Countries only.With the DRBIII, read the Country Code setting in module display.Is the country code setting correct?AllYes → Replace the Body Control Module in accordance with the serviceinformation.Perform BODY VERIFICATION TEST - VER 1.No → Select the correct country code for the Body Control Module.Perform BODY VERIFICATION TEST - VER 1.172
COMMUNICATIONSymptom:BATTERY IOD DISCONNECT AT BCMWhen Monitored and Set Condition:BATTERY IOD DISCONNECT AT BCMWhen Monitored: Each time the DRB request DTC’s from the BCM, the BCM check forbattery voltage on the IOD circuit.Set Condition: The DTC will set if the BCM detects a low or no voltage condition on theIOD circuit.POSSIBLE CAUSESVERIFYING ACTIVE DTCPDC FUSE #15CHECK FUSED B+ FEED TO JUNCTION BLOCKJUNCTION BLOCK IOD FAILUREBODY CONTROL MODULEFUSED B(+) CIRCUIT SHORTED TO GROUNDJUNCTION BLOCK FUSE #7TEST ACTION APPLICABILITY1 Connect the DRB to the Data Link Connector.Turn the ignition on.With the DRB, erase BCM DTC’s.Turn the ignition off then turn the ignition on.With the DRB, read BCM DTC’s.NOTE: If DTC is active check Junction Block fuse #7 for an open.Does the DRB display: Battery IOD Disconnect at BCM?AllYes → Go To 2No → No problem found at this time. Use the wiring diagrams located inthe service information to help isolate a possible intermittentwiring problem.Perform BODY VERIFICATION TEST - VER 1.2 Inspect fuse #15 in the Power Distribution Center.Is the fuse open?AllYes → Re-install or replace PDC fuse #15. Use the wiring diagramslocated in the service information to help isolate a possibleintermittent wiring problem.Perform BODY VERIFICATION TEST - VER 1.No → Go To 3173
COMMUNICATIONBATTERY IOD DISCONNECT AT BCM — ContinuedTEST ACTION APPLICABILITY3 Turn the ignition off.Disconnect the Junction Block C4 harness connector.Using a 12-volt test light connected to ground, probe the Fused B+ circuit in theJunction Block C4 connector (cavity 1).Is the test light illuminated?AllYes → Go To 4No → Repair the Fused B+ circuit for an open between the JunctionBlock and the PDC.Perform BODY VERIFICATION TEST - VER 1.4 Inspect the IOD fuse in the Junction Block (Fuse #7).Is the fuse open?AllYes → Go To 5No → Go To 65 Turn the ignition off.Remove Fuse #7 from the Junction Block.Measure the resistance between ground and the Fused B+ circuit at the junctionblock fuse #7 (output side of fuse).Is the resistance below 100.0 ohms?AllYes → Refer to the wiring diagrams located in the service information tohelp isolate a short to ground condition.Perform BODY VERIFICATION TEST - VER 1.No → Replace the fuse.Perform BODY VERIFICATION TEST - VER 1.6 Install fuse #7 in the Junction Block.Remove the BCM from the Junction Block.Using a 12-volt test light connected to ground, probe the Fused B+ circuit in thejunction block body control module connector cavity 26.Is the test light illuminated?AllYes → Replace the Body Control Module in accordance with the serviceinformation.Perform BODY VERIFICATION TEST - VER 1.No → Replace the Junction Block in accordance with the service information.Perform BODY VERIFICATION TEST - VER 1.174
COMMUNICATIONSymptom:BCM EEPROM CHECKSUM FAILUREWhen Monitored and Set Condition:BCM EEPROM CHECKSUM FAILUREWhen Monitored: Each time the DRB request DTC’s from the BCM, the BCM runs anEEPROM checksum test.Set Condition: The DTC will set if the BCM detects an EEPROM checksum failure.BCM INTERNAL EEPROM FAILUREPOSSIBLE CAUSESTEST ACTION APPLICABILITY1 Connect the DRB to the Data Link Connector.Turn the ignition on.With the DRB, erase BCM DTC’s.Turn the ignition off then turn the ignition on.With the DRB, read BCM DTC’s.Did this DTC reset?AllYes → Replace the Body Control Module in accordance with the serviceinformation.Perform BODY VERIFICATION TEST - VER 1.No → Test Complete.175
COMMUNICATIONSymptom:BCM FLASH CHECKSUM FAILUREWhen Monitored and Set Condition:BCM FLASH CHECKSUM FAILUREWhen Monitored: Each time the DRB performs the flash process, the BCM runs a flashchecksum test.Set Condition: The DTC will set if the BCM detects a flash checksum failure.POSSIBLE CAUSESBCM INTERNAL FLASH CHECKSUM FAILURETEST ACTION APPLICABILITY1 Connect the DRB to the Data Link Connector.Turn the ignition on.With the DRB, erase BCM DTC’s.Turn the ignition off then turn the ignition on.With the DRB, read BCM DTC’s.Did this DTC reset?AllYes → Reflash or Replace the Body Control Module in accordance withthe service information.Perform BODY VERIFICATION TEST - VER 1.No → Test Complete.176
COMMUNICATIONSymptom:DDM MESSAGE NOT RECEIVEDWhen Monitored and Set Condition:DDM MESSAGE NOT RECEIVEDWhen Monitored: With the ignition in run, and the IOD fuse installed.Set Condition: The BCM does not receive any messages from the Driver Door Module(DDM) for at least 30 seconds.POSSIBLE CAUSESATTEMPT TO COMMUNICATE WITH THE DOOR MODULESBODY CONTROL MODULETEST ACTION APPLICABILITY1 Turn the ignition on.With the DRB, enter Body then Door Module.Was the DRB able to I/D or communicate with the Door Modules?AllYes → Go To 2No → Refer to the Communication category and perform the symptomBus +/- Signals Open or No Response from Driver Door Module.Perform BODY VERIFICATION TEST - VER 1.2 With the DRB, erase DTC’s.Turn the ignition on and wait approximately 1 minute.With the DRB, read DTC’s.Did this DTC reset?AllYes → Replace the Body Control Module in accordance with the serviceinformation.Perform BODY VERIFICATION TEST - VER 1.No → Test Complete.177
COMMUNICATIONSymptom:MIC MESSAGE NOT RECEIVED AT BCMWhen Monitored and Set Condition:MIC MESSAGE NOT RECEIVED AT BCMWhen Monitored: With the ignition in run, and the IOD fuse installed.Set Condition: The BCM does not receive any messages from the Instrument Cluster(MIC) for at least 30 seconds.POSSIBLE CAUSESATTEMPT TO COMMUNICATE WITH THE INSTRUMENT CLUSTER (MIC)BODY CONTROL MODULETEST ACTION APPLICABILITY1 Turn the ignition on.With the DRB, enter Body then Electro/Mech Cluster.Was the DRB able to I/D or communicate with the Instrument Cluster (MIC)?AllYes → Go To 2No → Refer to the Communication category for the related symptom(s).Perform BODY VERIFICATION TEST - VER 1.2 With the DRB, erase DTC’s.Turn the ignition on and wait approximately 1 minute.With the DRB, read DTC’s.Did this DTC reset?AllYes → Replace the Body Control Module in accordance with the serviceinformation.Perform BODY VERIFICATION TEST - VER 1.No → Test Complete.178
COMMUNICATIONSymptom:NO PCI MESSAGES FROM CD CHANGERWhen Monitored and Set Condition:NO PCI MESSAGES FROM CD CHANGERWhen Monitored: With the ignition on and the radio on.Set Condition: If the DRB interrogates the CD changer and does not receive the properresponse from the CD changer.POSSIBLE CAUSESCD CHANGER (DIN) CABLECD CHANGER PCI BUS CIRCUIT OPENIGNITION SWITCH OUTPUT CIRCUIT OPENRADIO GROUND CKT OPENCD CHANGERTEST ACTION APPLICABILITY1 Turn the ignition off.Disconnect the Radio C2 connector (DIN cable) from the Radio and the CD Changer.Visually inspect the cable for damage.In the next step check for open wires in the DIN cable.Measure the resistance of the each DIN cable circuit between the Radio DIN cableconnector and the CD Changer DIN cable connector.In the next step check for wires shorted to the DIN cable metal connectors.Measure the resistance between each Radio C2 connector ( DIN cable) circuit and thecable’s metal connector.Are the DIN cable circuits shorted together or open?AllYes → Replace the CD Changer (DIN) cable.Perform BODY VERIFICATION TEST - VER 1.No → Go To 2179
COMMUNICATIONNO PCI MESSAGES FROM CD CHANGER — ContinuedTEST ACTION APPLICABILITY2 Use Scope input cable CH7058, Cable to Probe adapter CH7062, and the red andblack test probes.Connect the scope input cable to the channel one connector on the DRB. Attach thered and black leads and the cable to probe adapter to the scope input cable.With the DRBIII select Pep Module Tools.Select lab scope.Select Live Data.Select 12 volt square wave.Press F2 for Scope.Press F2 and use the down arrow to set voltage range to 20 volts. Set Probe to x10.Press F2 again when complete.Disconnect the CD Changer harness connector (DIN cable).Connect the Black lead to the chassis ground. Connect the Red lead to the PCI Buscircuit in the CD Changer DIN Cable connector.Reconnect the Radio C2 (DIN Cable) harness connector.Turn the ignition on.Turn the Radio and CD Changer on.Observe the voltage display on the DRB Lab Scope.Does the voltage pulse from 0 to approximately 7.5 volts?AllYes → Go To 3No → Repair the PCI Bus circuit for an open.Perform BODY VERIFICATION TEST - VER 1.3 Turn the ignition off.Disconnect the CD Changer harness connector (DIN cable).Turn the ignition on.Turn the Radio and the CD Changer on.Using a 12-volt test light connected to ground, probe the ignition switch outputcircuit in the CD Changer DIN Cable connector.Is the test light illuminated?AllYes → Go To 4No → Replace the Radio.Perform BODY VERIFICATION TEST - VER 1.4 Turn the ignition off.Disconnect the CD Changer harness connector (DIN cable).Using a 12-volt test light connected to 12-volts, probe each CD Changer groundcircuit in the CD Changer connector (DIN cable).Is the test light illuminated for each circuit?AllYes → Replace the CD Changer.Perform BODY VERIFICATION TEST - VER 1.No → Replace the Radio.Perform BODY VERIFICATION TEST - VER 1.180
COMMUNICATIONSymptom:PCM MESSAGE NOT RECEIVED AT BCMWhen Monitored and Set Condition:PCM MESSAGE NOT RECEIVED AT BCMWhen Monitored: With the ignition in run, and the IOD fuse installed.Set Condition: The BCM does not receive any messages from the PCM for at least 30seconds.POSSIBLE CAUSESPCM MESSAGE NOT RECEIVED AT BCMATTEMPT TO COMMUNICATE WITH THE PCMPCI BUS CIRCUIT OPENPOWERTRAIN CONTROL MODULETEST ACTION APPLICABILITY1 Turn the ignition on.With the DRB, enter Body Computer, System Tests then PCM Monitor.Does the DRB display: PCM is active on BUS?AllYes → Replace the Body Control Module in accordance with the serviceinformation..Perform BODY VERIFICATION TEST - VER 1.No → Go To 22 Turn the ignition on.With the DRB, attempt to communicate with the PCM.Was the DRB able to communicate with the PCM?AllYes → Go To 3No → Refer to the communication category and perform the appropriatesymptom.Perform BODY VERIFICATION TEST - VER 1.3 Turn the ignition off.Disconnect the PCM harness connectors.Connect the diagnostic junction port tester #8339 to the diagnostic junction port.Note: Do not connect the tester to the DRB.Measure the resistance of the PCI Bus circuit between the diagnostic junction porttester and the PCM connector.Is the resistance below 5.0 ohms?AllYes → Replace the Powertrain Control Module in accordance with theservice information.Perform BODY VERIFICATION TEST - VER 1.No → Repair the PCI Bus circuit for an open.Perform BODY VERIFICATION TEST - VER 1.181
COMMUNICATIONSymptom:PDM MESSAGE NOT RECEIVEDWhen Monitored and Set Condition:PDM MESSAGE NOT RECEIVEDWhen Monitored: With the ignition in run, and the IOD fuse installed.Set Condition: The BCM does not receive any messages from the Passenger Door Module(PDM) for at least 30 seconds.POSSIBLE CAUSESATTEMPT TO COMMUNICATE WITH THE DOOR MODULESBODY CONTROL MODULETEST ACTION APPLICABILITY1 Turn the ignition on.With the DRB, enter Body then Door Module.Was the DRB able to I/D or communicate with the Door Modules?AllYes → Go To 2No → Refer to the Communication category and perform the symptomBus +/- Signals Open or No Response from Passenger DoorModule.Perform BODY VERIFICATION TEST - VER 1.2 With the DRB, erase DTC’s.Turn the ignition on and wait approximately 1 minute.With the DRB, read DTC’s.Did this DTC reset?AllYes → Replace the Body Control Module in accordance with the serviceinformation.Perform BODY VERIFICATION TEST - VER 1.No → Test Complete.182
COMMUNICATIONSymptom:RAIN SENSOR MESSAGES NOT RECEIVEDWhen Monitored and Set Condition:RAIN SENSOR MESSAGES NOT RECEIVEDWhen Monitored: With the ignition in run, and the IOD fuse installed.Set Condition: The BCM does not receive any messages from the rain sensor module.POSSIBLE CAUSESATTEMPT TO COMMUNICATE WITH THE RAIN SENSOR MODULEBODY CONTROL MODULETEST ACTION APPLICABILITY1 Turn the ignition on.With the DRB, attempt to communicate with the rain sensor module.Was the DRB able to I/D or communicate with the rain sensor module?AllYes → Go To 2No → Refer to the Communication category for the related symptom(s).Perform BODY VERIFICATION TEST - VER 1.2 With the DRB, erase DTC’s.Turn the ignition on and wait approximately 1 minute.With the DRB, read DTC’s.Did this DTC reset?AllYes → Replace the Body Control Module in accordance with the serviceinformation.Perform BODY VERIFICATION TEST - VER 1.No → Test Complete.183
COMMUNICATIONSymptom:*BUS +/- SIGNALS OPEN OR NO RESPONSE FROM AUTOMATICZONE CONTROL MODULEPOSSIBLE CAUSESATTEMPT TO COMMUNICATE WITH THE BCMFUSED B(+) CKT OPENFUSED IGNITION SWITCH OUTPUT CIRCUIT OPENOPEN PCI BUS CIRCUITAUTOMATIC ZONE CONTROL MODULETEST ACTION APPLICABILITY1 Turn the ignition on.With the DRB, enter Body then Body Computer.Was the DRB able to I/D or communicate with the BCM?AllYes → Go To 2No → Refer to the symptom list for problems related to no communicationwith the BCM.Perform BODY VERIFICATION TEST - VER 1.2 Turn the ignition off.Disconnect the Automatic Zone Control Module C2 harness connector.Using a 12-volt test light connected to ground, probe the Fused B+ circuit.Is the test light illuminated?AllYes → Go To 3No → Repair the Fused B+ circuit for an open or short. Refer to thewiring diagrams in the service information.Perform BODY VERIFICATION TEST - VER 1.3 Turn the ignition off.Disconnect the Automatic Zone Control Module C2 harness connector.Turn the ignition on.Using a 12-volt test light connected to ground, probe the Fused Ignition SwitchOutput circuit.Is the test light illuminated?AllYes → Go To 4No → Repair the Fused Ignition Switch Output circuit for an open orshort. Refer to the wiring diagrams in the service information.Perform BODY VERIFICATION TEST - VER 1.184
COMMUNICATION*BUS +/- SIGNALS OPEN OR NO RESPONSE FROM AUTOMATIC ZONECONTROL MODULE — ContinuedTEST ACTION APPLICABILITY4 Note: Ensure there is PCI Bus communication with other modules on thevehicle before proceeding. If not, refer to the symptom list from the menuand repair as necessary.Disconnect the Automatic Zone Control Module C2 harness connector.Use Scope input cable CH7058, Cable to Probe adapter CH7062, and the red andblack test probes.Connect the scope input cable to the channel one connector on the DRB. Attach thered and black leads and the cable to probe adapter to the scope input cable.With the DRBIII select Pep Module Tools.Select lab scope.Select Live Data.Select 12 volt square wave.Press F2 for Scope.Press F2 and use the down arrow to set voltage range to 20 volts. Set the probe to x10.Press F2 again when complete.Connect the Black lead to the chassis ground. Connect the Red lead to the PCI Buscircuit in the AZC connector.Turn the ignition on.Observe the voltage display on the DRB Lab Scope.Does the voltage pulse from 0 to approximately 7.5 volts?AllYes → Go To 5No → Repair the PCI Bus circuit for an open.Perform BODY VERIFICATION TEST - VER 1.5 If there are no possible causes remaining, view repair. AllRepairReplace the Automatic Zone Control Module in accordance withthe service information.Perform BODY VERIFICATION TEST - VER 1.185
COMMUNICATIONSymptom:*BUS +/- SIGNALS OPEN OR NO RESPONSE FROM BODY CON-TROL MODULEPOSSIBLE CAUSESATTEMPT TO COMMUNICATE WITH ANOTHER MODULEOPEN GROUND CIRCUITOPEN PCI BUS CIRCUITBODY CONTROL MODULETEST ACTION APPLICABILITY1 Turn the ignition on.With the DRB, attempt to communicate with the Airbag Control Module (ACM).With the DRB, attempt to communicate with the Controller Antilock Brake (CAB)module.Was the DRB able to I/D or communicate with the ACM and the CAB?AllYes → Go To 2No → Refer to symptom list for problems related to the PCI BusCommunication Failure.Perform BODY VERIFICATION TEST - VER 1.2 Turn the ignition off.Disconnect the BCM C1 harness connector.Using a 12-volt test light connected to 12-volts, probe the ground circuit (cavity 1).Is the test light illuminated?AllYes → Go To 3No → Repair the ground circuit for an open.Perform BODY VERIFICATION TEST - VER 1.186
COMMUNICATION*BUS +/- SIGNALS OPEN OR NO RESPONSE FROM BODY CONTROLMODULE — ContinuedTEST ACTION APPLICABILITY3 Note: Ensure there is PCI Bus communication with other modules on thevehicle before proceeding. If not, refer to the symptom list from the menuand repair as necessary.Disconnect the BCM C1 harness connector.Use Scope input cable CH7058, Cable to Probe adapter CH7062, and the red andblack test probes.Connect the scope input cable to the channel one connector on the DRB. Attach thered and black leads and the cable to probe adapter to the scope input cable.With the DRBIII select Pep Module Tools.Select lab scope.Select Live Data.Select 12 volt square wave.Press F2 for Scope.Press F2 and use the down arrow to set voltage range to 20 volts. Set Probe to x10.Press F2 again when complete.Connect the Black lead to the chassis ground. Connect the Red lead to the PCI Buscircuit in the BCM connector.Turn the ignition on.Observe the voltage display on the DRB Lab Scope.Does the voltage pulse from 0 to approximately 7.5 volts?AllYes → Go To 4No → Repair the PCI Bus circuit for an open.Perform BODY VERIFICATION TEST - VER 1.4 If there are no possible causes remaining, view repair. AllRepairReplace the Body Control Module in accordance with the serviceinformation.Perform BODY VERIFICATION TEST - VER 1.187
COMMUNICATIONSymptom:*BUS +/- SIGNALS OPEN OR NO RESPONSE FROM DRIVER DOORMODULEOPEN FUSED B+ CIRCUITOPEN GROUND CIRCUITOPEN PCI BUS CIRCUITDRIVER DOOR MODULEPOSSIBLE CAUSESTEST ACTION APPLICABILITY1 Note: Ensure there is PCI Bus communication with other modules on thevehicle before proceeding. If not, refer to the symptom list from the menuand repair as necessary.Turn the ignition off.Disconnect the Driver Door Module C1 harness connector.Using a 12-volt test light connected to ground, probe the Fused B+ circuit.Is the test light illuminated?AllYes → Go To 2No → Repair the Fused B+ circuit for an open or short, refer to thewiring diagrams in the service information.Perform BODY VERIFICATION TEST - VER 1.2 Note: Ensure there is PCI Bus communication with other modules on thevehicle before proceeding. If not, refer to the symptom list from the menuand repair as necessary.Turn the ignition off.Disconnect the Driver Door Module C1 harness connector.Using a 12-volt test light connected to 12-volts, probe the ground circuit.Is the test light illuminated?AllYes → Go To 3No → Repair the ground circuit for an open.Perform BODY VERIFICATION TEST - VER 1.188
COMMUNICATION*BUS +/- SIGNALS OPEN OR NO RESPONSE FROM DRIVER DOORMODULE — ContinuedTEST ACTION APPLICABILITY3 Note: Ensure there is PCI Bus communication with other modules on thevehicle before proceeding. If not, refer to the symptom list from the menuand repair as necessary.Disconnect the Driver Door Module C1 harness connector.Use Scope input cable CH7058, Cable to Probe adapter CH7062, and the red andblack test probes.Connect the scope input cable to the channel one connector on the DRB. Attach thered and black leads and the cable to probe adapter to the scope input cable.With the DRBIII select Pep Module Tools.Select lab scope.Select Live Data.Select 12 volt square wave.Press F2 for Scope.Press F2 and use the down arrow to set voltage range to 20 volts. Set Probe to x10.Press F2 again when complete.Connect the Black lead to the chassis ground. Connect the Red lead to the PCI Buscircuit in the Driver Door Module connector.Turn the ignition on.Observe the voltage display on the DRB Lab Scope.Does the voltage pulse from 0 to approximately 7.5 volts?AllYes → Go To 4No → Repair the PCI Bus circuit for an open.Perform BODY VERIFICATION TEST - VER 1.4 If there are no possible causes remaining, view repair. AllRepairReplace the Driver Door Module in accordance with the serviceinformation.Perform BODY VERIFICATION TEST - VER 1.189
COMMUNICATIONSymptom:*BUS +/- SIGNALS OPEN OR NO RESPONSE FROM INSTRUMENTCLUSTERPOSSIBLE CAUSESATTEMPT TO COMMUNICATE WITH THE BCMOPEN GROUND CIRCUITOPEN FUSED IGNITION SWITCH OUTPUT CIRCUITOPEN FUSED B+ CIRCUITOPEN PCI BUS CIRCUITINSTRUMENT CLUSTERTEST ACTION APPLICABILITY1 Turn the ignition on.With the DRB, enter Body then Body Computer.Was the DRB able to I/D or communicate with the BCM?AllYes → Go To 2No → Refer to the symptom list for problems related to no communicationwith the BCM.Perform BODY VERIFICATION TEST - VER 1.2 Turn the ignition off.Turn all lights off.Disconnect the Instrument Cluster harness connector.Using a 12-volt test light connected to 12-volts, probe each ground circuit.Is the test light illuminated for each circuit?AllYes → Go To 3No → Repair the ground circuit for an open.Perform BODY VERIFICATION TEST - VER 1.3 Turn the ignition off.Disconnect the Instrument Cluster harness connector.Turn the ignition on.Using a 12-volt test light connected to ground, probe the Fused Ignition SwitchOutput circuit.Is the test light illuminated?AllYes → Go To 4No → Repair the Fused Ignition Switch Output circuit for an open.Perform BODY VERIFICATION TEST - VER 1.4 Turn the ignition off.Disconnect the Instrument Cluster harness connector.Using a 12-volt test light connected to ground, probe the Fused B+ circuit.Is the test light illuminated?AllYes → Go To 5No → Repair the Fused B+ circuit for an open.Perform BODY VERIFICATION TEST - VER 1.190
COMMUNICATION*BUS +/- SIGNALS OPEN OR NO RESPONSE FROM INSTRUMENT CLUS-TER — ContinuedTEST ACTION APPLICABILITY5 Note: Ensure there is PCI Bus communication with other modules on thevehicle before proceeding. If not, refer to the symptom list from the menuand repair as necessary.Disconnect the Instrument Cluster harness connector.Use Scope input cable CH7058, Cable to Probe adapter CH7062, and the red andblack test probes.Connect the scope input cable to the channel one connector on the DRB. Attach thered and black leads and the cable to probe adapter to the scope input cable.With the DRBIII select Pep Module Tools.Select lab scope.Select Live Data.Select 12 volt square wave.Press F2 for Scope.Press F2 and use the down arrow to set voltage range to 20 volts. Set Probe to x10.Press F2 again when complete.Connect the Black lead to the chassis ground. Connect the Red lead to the PCI Buscircuit in the Instrument Cluster connector.Turn the ignition on.Observe the voltage display on the DRB Lab Scope.Does the voltage pulse from 0 to approximately 7.5 volts?AllYes → Go To 6No → Repair the PCI Bus circuit for an open.Perform BODY VERIFICATION TEST - VER 1.6 If there are no possible causes remaining, view repair. AllRepairReplace the Instrument Cluster in accordance with the serviceinformation.Perform BODY VERIFICATION TEST - VER 1.191
COMMUNICATIONSymptom:*BUS +/- SIGNALS OPEN OR NO RESPONSE FROM PASSENGERDOOR MODULEOPEN FUSED B+ CIRCUITOPEN GROUND CIRCUITOPEN PCI BUS CIRCUITPASSENGER DOOR MODULEPOSSIBLE CAUSESTEST ACTION APPLICABILITY1 Note: Ensure there is PCI Bus communication with other modules on thevehicle before proceeding. If not, refer to the symptom list from the menuand repair as necessary.Turn the ignition off.Disconnect the Passenger Door Module C1 harness connector.Using a 12-volt test light connected to ground, probe the Fused B+ circuit.Is the test light illuminated?AllYes → Go To 2No → Repair the Fused B+ circuit for an open or short, refer to thewiring diagrams in the service information.Perform BODY VERIFICATION TEST - VER 1.2 Note: Ensure there is PCI Bus communication with other modules on thevehicle before proceeding. If not, refer to the symptom list from the menuand repair as necessary.Turn the ignition off.Disconnect the Passenger Door Module C1 harness connector.Using a 12-volt test light connected to 12-volts, probe the ground circuit.Is the test light illuminated?AllYes → Go To 3No → Repair the ground circuit for an open.Perform BODY VERIFICATION TEST - VER 1.192
COMMUNICATION*BUS +/- SIGNALS OPEN OR NO RESPONSE FROM PASSENGER DOORMODULE — ContinuedTEST ACTION APPLICABILITY3 Note: Ensure there is PCI Bus communication with other modules on thevehicle before proceeding. If not, refer to the symptom list from the menuand repair as necessary.Disconnect the Passenger Door Module C1 harness connector.Use Scope input cable CH7058, Cable to Probe adapter CH7062, and the red andblack test probes.Connect the scope input cable to the channel one connector on the DRB. Attach thered and black leads and the cable to probe adapter to the scope input cable.With the DRBIII select Pep Module Tools.Select lab scope.Select Live Data.Select 12 volt square wave.Press F2 for Scope.Press F2 and use the down arrow to set voltage range to 20 volts. Set Probe to x10.Press F2 again when complete.Connect the Black lead to the chassis ground. Connect the Red lead to the PCI Buscircuit in the Passenger Door Module connector.Turn the ignition on.Observe the voltage display on the DRB Lab Scope.Does the voltage pulse from 0 to approximately 7.5 volts?AllYes → Go To 4No → Repair the PCI Bus circuit for an open.Perform BODY VERIFICATION TEST - VER 1.4 If there are no possible causes remaining, view repair. AllRepairReplace the Passenger Door Module in accordance with theservice information.Perform BODY VERIFICATION TEST - VER 1.193
COMMUNICATIONSymptom:*BUS +/- SIGNALS OPEN OR NO RESPONSE FROM SEAT MODULEPOSSIBLE CAUSESATTEMPT TO COMMUNICATE WITH THE BCMFUSED B(+) CKT OPENGROUND CIRCUIT OPENOPEN PCI BUS CIRCUITSEAT MODULETEST ACTION APPLICABILITY1 Turn the ignition on.With the DRB, enter Body then Body Computer.Was the DRB able to I/D or communicate with the BCM?AllYes → Go To 2No → Refer to the symptom list for problems related to no communicationwith the BCM.Perform VERIFICATION TEST -MEMORY SYSTEM.2 Turn the ignition off.Disconnect the Seat Module C2 harness connector.Using a 12-volt test light connected to ground, probe both Fused B+ circuits.Is the test light illuminated for both circuits?AllYes → Go To 3No → Repair the Fused B+ circuit for an open.Perform VERIFICATION TEST -MEMORY SYSTEM.3 Turn the ignition off.Disconnect the Seat Module harness connectors.Using a 12-volt test light connected to 12-volts, probe each ground circuit.Is the test light illuminated for each circuit?AllYes → Go To 4No → Repair the ground circuit for an open.Perform VERIFICATION TEST -MEMORY SYSTEM.194
COMMUNICATION*BUS +/- SIGNALS OPEN OR NO RESPONSE FROM SEAT MODULE —ContinuedTEST ACTION APPLICABILITY4 Note: Ensure there is PCI Bus communication with other modules on thevehicle before proceeding. If not, refer to the symptom list from the menuand repair as necessary.Turn the ignition off.Disconnect the Seat Module C1 harness connector.Use Scope input cable CH7058, Cable to Probe adapter CH7062, and the red andblack test probes.Connect the scope input cable to the channel one connector on the DRB. Attach thered and black leads and the cable to probe adapter to the scope input cable.With the DRBIII select Pep Module Tools.Select lab scope.Select Live Data.Select 12 volt square wave.Press F2 for Scope.Press F2 and use the down arrow to set voltage range to 20 volts. Press F2 againwhen complete.Connect the Black lead to the chassis ground. Connect the Red lead to the PCI Buscircuit in the Seat Module C1 connector.Turn the ignition on.Observe the voltage display on the DRB Lab Scope.Does the voltage pulse from 0 to approximately 7.5 volts?AllYes → Replace the Seat Module in accordance with the service information.Perform VERIFICATION TEST -MEMORY SYSTEM.No → Repair the PCI Bus circuit for an open.Perform VERIFICATION TEST -MEMORY SYSTEM.195
COMMUNICATIONSymptom:*BUS +/- SIGNALS OPEN OR NO RESPONSE FROM SENTRY KEYIMMOBILIZER MODULEPOSSIBLE CAUSESATTEMPT TO COMMUNICATE WITH THE BCMGROUND CIRCUIT OPENFUSED IGNITION SWITCH OUTPUT CIRCUIT OPENFUSED B(+) CIRCUIT OPENOPEN PCI BUS CIRCUITSENTRY KEY IMMOBILIZER MODULETEST ACTION APPLICABILITY1 Turn the ignition on.With the DRB, enter Body then Body Computer.Was the DRB able to I/D or communicate with the BCM?AllYes → Go To 2No → Refer to the symptom list for problems related to no communicationwith the BCM.Perform SKIS VERIFICATION.2 Turn the ignition off.Disconnect the SKIM harness connector.Using a 12-volt test light connected to 12-volts, probe the ground circuit.Is the test light illuminated?AllYes → Go To 3No → Repair the ground circuit for an open.Perform SKIS VERIFICATION.3 Turn the ignition off.Disconnect the SKIM harness connector.Turn the ignition on.Using a 12-volt test light connected to ground, probe the Fused Ignition SwitchOutput circuit.Is the test light illuminated?AllYes → Go To 4No → Repair the Fused Ignition Switch Output circuit for an open.Perform SKIS VERIFICATION.4 Turn the ignition off.Disconnect the SKIM harness connector.Using a 12-volt test light connected to ground, probe the Fused B(+) circuit.Is the test light illuminated?AllYes → Go To 5No → Repair the Fused B+ circuit for an open.Perform SKIS VERIFICATION.196
COMMUNICATION*BUS +/- SIGNALS OPEN OR NO RESPONSE FROM SENTRY KEY IMMO-BILIZER MODULE — ContinuedTEST ACTION APPLICABILITY5 Note: Ensure there is PCI Bus communication with other modules on thevehicle before proceeding. If not, refer to the symptom list from the menuand repair as necessary.Disconnect the SKIM harness connector.Use Scope input cable CH7058, Cable to Probe adapter CH7062, and the red andblack test probes.Connect the scope input cable to the channel one connector on the DRB. Attach thered and black leads and the cable to probe adapter to the scope input cable.With the DRBIII select Pep Module Tools.Select lab scope.Select Live Data.Select 12 volt square wave.Press F2 for Scope.Press F2 and use the down arrow to set voltage range to 20 volts. Set Probe to x10.Press F2 again when complete.Connect the Black lead to the chassis ground. Connect the Red lead to the PCI Buscircuit in the SKIM connector.Turn the ignition on.Observe the voltage display on the DRB Lab Scope.Does the voltage pulse from 0 to approximately 7.5 volts?AllYes → Go To 6No → Repair the PCI Bus circuit for an open.Perform SKIS VERIFICATION.6 If there are no possible causes remaining, view repair. AllRepairReplace and program the Sentry Key Immobilizer Module inaccordance with the Service Information.Perform SKIS VERIFICATION.197
COMMUNICATIONSymptom:*BUS +/- SIGNALS OPEN OR NO RESPONSE FROM VEHICLEINFORMATION CENTERPOSSIBLE CAUSESGROUND CIRCUIT OPENFUSED IGNITION SWITCH OUTPUT CIRCUIT OPENOPEN PCI BUS CIRCUITVEHICLE INFORMATION CENTER (VIC)TEST ACTION APPLICABILITY1 NOTE: Ensure there is PCI Bus communication with other modules on thevehicle before proceeding. If not, refer to the symptom list from the menuand repair as necessary.Turn the ignition off.Disconnect the Vehicle Information Center harness connector.Using a 12-volt test light connected to 12-volts, probe the ground circuit.Is the test light illuminated?AllYes → Go To 2No → Repair the ground circuit for an open.Perform BODY VERIFICATION TEST - VER 1.2 NOTE: Ensure there is PCI Bus communication with other modules on thevehicle before proceeding. If not, refer to the symptom list from the menuand repair as necessary.Turn the ignition off.Disconnect the Vehicle Information Center harness connector.Turn the ignition on.Using a 12-volt test light connected to ground, probe the Fused Ignition SwitchOutput circuit.Is the test light illuminated?AllYes → Go To 3No → Repair the Fused Ignition Switch Output circuit for an open.Perform BODY VERIFICATION TEST - VER 1.198
COMMUNICATION*BUS +/- SIGNALS OPEN OR NO RESPONSE FROM VEHICLE INFORMA-TION CENTER — ContinuedTEST ACTION APPLICABILITY3 Note: Ensure there is PCI Bus communication with other modules on thevehicle before proceeding. If not, refer to the symptom list from the menuand repair as necessary.Disconnect the Vehicle Information Center harness connector.Use Scope input cable CH7058, Cable to Probe adapter CH7062, and the red andblack test probes.Connect the scope input cable to the channel one connector on the DRB. Attach thered and black leads and the cable to probe adapter to the scope input cable.With the DRBIII select Pep Module Tools.Select lab scope.Select Live Data.Select 12 volt square wave.Press F2 for Scope.Press F2 and use the down arrow to set voltage range to 20 volts. Set Probe to x10.Press F2 again when complete.Connect the Black lead to the chassis ground. Connect the Red lead to the PCI Buscircuit in the VIC connector.Turn the ignition on.Observe the voltage display on the DRB Lab Scope.Does the voltage pulse from 0 to approximately 7.5 volts?AllYes → Go To 4No → Repair the PCI Bus circuit for an open.Perform BODY VERIFICATION TEST - VER 1.4 If there are no possible causes remaining, view repair. AllRepairReplace the Vehicle Information Center in accordance with theservice information.Perform BODY VERIFICATION TEST - VER 1.199
COMMUNICATIONSymptom:*NO RESPONSE FROM ADJUS<strong>TABLE</strong> PEDALS MODULEPOSSIBLE CAUSESATTEMPT TO COMMUNICATE WITH THE BCMFUSED B(+) CKT OPENGROUND CKT OPENOPEN PCI BUS CIRCUITADJUS<strong>TABLE</strong> PEDALS MODULETEST ACTION APPLICABILITY1 Turn the ignition on.With the DRB, enter Body then Body Computer.Was the DRB able to I/D or communicate with the BCM?AllYes → Go To 2No → Refer to the symptom list for problems related to no communicationwith the BCM.Perform ADJUS<strong>TABLE</strong> PEDALS VERIFICATION TEST - VER1.2 Turn the ignition off.Disconnect the Adjustable Pedals Module harness connector.Using a 12-volt test light connected to ground, probe the Fused B+ circuit.Is the test light illuminated?AllYes → Go To 3No → Repair the Fused B+ circuit for an open or short. Refer to thewiring diagrams in the service information.Perform ADJUS<strong>TABLE</strong> PEDALS VERIFICATION TEST - VER1.3 Turn the ignition off.Disconnect the Adjustable Pedals Module harness connector.Using a 12-volt test light connected to 12-volts, probe each ground circuit.Is the test light illuminated for each circuit?AllYes → Go To 4No → Repair the Ground circuit for an open.Perform ADJUS<strong>TABLE</strong> PEDALS VERIFICATION TEST - VER1.200
COMMUNICATION*NO RESPONSE FROM ADJUS<strong>TABLE</strong> PEDALS MODULE — ContinuedTEST ACTION APPLICABILITY4 Note: Ensure there is PCI Bus communication with other modules on thevehicle before proceeding. If not, refer to the symptom list from the menuand repair as necessary.Disconnect the Adjustable Pedals Module harness connector.Use Scope input cable CH7058, Cable to Probe adapter CH7062, and the red andblack test probes.Connect the scope input cable to the channel one connector on the DRB. Attach thered and black leads and the cable to probe adapter to the scope input cable.With the DRBIII select Pep Module Tools.Select lab scope.Select Live Data.Select 12 volt square wave.Press F2 for Scope.Press F2 and use the down arrow to set voltage range to 20 volts. Set the probe to x10.Press F2 again when complete.Connect the Black lead to the chassis ground. Connect the Red lead to the PCI Buscircuit in the Adjustable Pedals Module connector.Turn the ignition on.Observe the voltage display on the DRB Lab Scope.Does the voltage pulse from 0 to approximately 7.5 volts?AllYes → Replace the Adjustable Pedals Module in accordance with theservice information.Perform ADJUS<strong>TABLE</strong> PEDALS VERIFICATION TEST - VER1.No → Repair the PCI Bus circuit for an open.Perform ADJUS<strong>TABLE</strong> PEDALS VERIFICATION TEST - VER1.201
COMMUNICATIONSymptom:*NO RESPONSE FROM AIRBAG CONTROL MODULECHECKING FOR VOLTAGE AT ACMGROUND CIRCUIT OPENOPEN PCI BUS CIRCUITAIRBAG CONTROL MODULEPOSSIBLE CAUSESTEST ACTION APPLICABILITY1 NOTE: Ensure there is PCI Bus communication with other modules on thevehicle before proceeding. If not, refer to the symptom list from the menuand repair as necessary.Ensure that the battery is fully charged.WARNING: TURN THE IGNITION <strong>OF</strong>F, DISCONNECT THE BATTERY ANDWAIT TWO MINUTES BEFORE PROCEEDING.Disconnect the Airbag Control Module harness connectors.Connect the appropriate Load Tool ACM adaptor to the ACM connector.Turn the ignition on and then reconnect the Battery.Using a 12-volt test light connected to ground, probe the Fused Ignition SwitchOutput (Run) Circuit and the Fused Ignition Switch Output (Run/Start) Circuit atthe ACM connector.NOTE: One open circuit will not cause a NO RESPONSE condition.Is the test light illuminated on both circuits?AllYes → Go To 2No → Repair the Fused Ignition Switch Output (Run) and FusedIgnition Switch Output (Run/Start) circuits for an open.Perform AIRBAG VERIFICATION TEST - VER 1.NOTE: When reconnecting airbag system components, the ignition must beturned off and the battery must be disconnected.2 WARNING: TURN THE IGNITION <strong>OF</strong>F, DISCONNECT THE BATTERY ANDWAIT TWO MINUTES BEFORE PROCEEDING.Disconnect the Airbag Control Module harness connectors.Connect the appropriate Load Tool ACM adaptor to the ACM connector.Using a 12-volt test light connected to 12-volts, probe the ground circuit.NOTE: Make sure test light is connected to the Battery positive terminal.Is the test light illuminated?AllYes → Go To 3No → Repair the ground circuit for an open.Perform AIRBAG VERIFICATION TEST - VER 1.Note: When reconnecting Airbag system components, the ignition must beturned off and the battery must be disconnected.202
COMMUNICATION*NO RESPONSE FROM AIRBAG CONTROL MODULE — ContinuedTEST ACTION APPLICABILITY3 Note: Ensure there is PCI Bus communication with other modules on thevehicle before proceeding. If not, refer to the symptom list from the menuand repair as necessary.Turn the ignition off and wait 2 minutes before proceeding.Disconnect the Airbag Control Module harness connectors.Connect the appropriate Load Tool ACM adaptor to the ACM connector.Use Scope input cable CH7058, Cable to Probe adapter CH7062, and the red andblack test probes.Connect the scope input cable to the channel one connector on the DRB. Attach thered and black leads and the cable to probe adapter to the scope input cable.With the DRBIII select Pep Module Tools.Select lab scope.Select Live Data.Select 12 volt square wave.Press F2 for Scope.Press F2 and use the down arrow to set voltage range to 20 volts. Set Probe to x10.Press F2 again when complete.Connect the Black lead to the chassis ground. Connect the Red lead to the PCI Buscircuit in the ACM connector.Turn the ignition on.Observe the voltage display on the DRB Lab Scope.Does the voltage pulse from 0 to approximately 7.5 volts?AllYes → Replace the Airbag Control Module in accordance with the ServiceInformation.Perform AIRBAG VERIFICATION TEST - VER 1.No → Repair the PCI Bus circuit for an open.Perform AIRBAG VERIFICATION TEST - VER 1.NOTE: When reconnecting Airbag system components, the ignition must beturned off and the battery must be disconnected.203
COMMUNICATIONSymptom:*NO RESPONSE FROM AMPLIFIERPOSSIBLE CAUSESATTEMPT TO COMMUNICATE WITH THE RADIOGROUND CIRCUIT OPENFUSED B(+) CIRCUIT OPENOPEN PCI BUS CIRCUITAMPLIFIERTEST ACTION APPLICABILITY1 Turn the ignition on.NOTE: The Radio must be turned on for the DRB to get a response from theAmplifier.With the DRB, attempt to communicate with the Radio.Was the DRB able to I/D or communicate with the Radio?AllYes → Go To 2No → Refer to the symptom list for problems related to no communicationwith the Radio.Perform BODY VERIFICATION TEST - VER 1.2 Turn the ignition off.Disconnect the Amplifier C1 harness connector.Using a 12-volt test light connected to 12-volts, probe both ground circuits.Is the test light illuminated for both circuits?AllYes → Go To 3No → Repair the ground circuit for an open.Perform BODY VERIFICATION TEST - VER 1.3 Turn the ignition off.Disconnect the Amplifier C1 harness connector.Using a 12-volt test light connected to ground, probe both Fused B(+) circuits.Is the test light illuminated for both circuits?AllYes → Go To 4No → Repair the Fused B+ circuit for an open.Perform BODY VERIFICATION TEST - VER 1.204
COMMUNICATION*NO RESPONSE FROM AMPLIFIER — ContinuedTEST ACTION APPLICABILITY4 Note: Ensure there is PCI Bus communication with other modules on thevehicle before proceeding. If not, refer to the symptom list from the menuand repair as necessary.Disconnect the Amplifier C1 harness connector.Use Scope input cable CH7058, Cable to Probe adapter CH7062, and the red andblack test probes.Connect the scope input cable to the channel one connector on the DRB. Attach thered and black leads and the cable to probe adapter to the scope input cable.With the DRBIII select Pep Module Tools.Select lab scope.Select Live Data.Select 12 volt square wave.Press F2 for Scope.Press F2 and use the down arrow to set voltage range to 20 volts. Set Probe to x10.Press F2 again when complete.Connect the Black lead to the chassis ground. Connect the Red lead to the PCI Buscircuit in the Amplifier connector.Turn the ignition on.Observe the voltage display on the DRB Lab Scope.Does the voltage pulse from 0 to approximately 7.5 volts?AllYes → Replace the Amplifier in accordance with the Service Information.Perform BODY VERIFICATION TEST - VER 1.No → Repair the PCI Bus circuit for an open.Perform BODY VERIFICATION TEST - VER 1.205
COMMUNICATIONSymptom:*NO RESPONSE FROM CONTROLLER ANTILOCK BRAKEPOSSIBLE CAUSESNO RESPONSE FROM CABREPLACE FUSE #19CONTROLLER ANTILOCK BRAKE SHORTED TO GROUNDFUSED IGNITION SWITCH OUTPUT CIRCUIT SHORTED TO GROUNDJUNCTION BLOCK SHORTED TO GROUNDGROUND CIRCUIT OPENOPEN FUSED IGNITION SWITCH OUTPUT CIRCUITOPEN PCI BUS CIRCUITCONTROLLER ANTILOCK BRAKETEST ACTION APPLICABILITY1 Turn the ignition on.Note: As soon as one or more module communicates with the DRB, answerthe question.With the DRB, attempt to communicate with the Airbag Control Module (ACM).With the DRB, attempt to communicate with the Body Control Module (BCM).Was the DRB able to I/D or establish communications with either of the modules?AllYes → Go To 2No → Refer to the Communications category and perform the symptomPCI Bus Communication Failure.Perform ABS VERIFICATION TEST - VER 1.2 Turn the ignition off.Remove and inspect fuse #19 in the junction block.Is the fuse open?AllYes → Go To 3No → Go To 63 Turn the ignition off.Replace Fuse #19 in the junction block.Turn the ignition on.Remove and inspect fuse #19 in the junction block.Is the fuse open?AllYes → Go To 4No → Check the Fused Ignition Switch Output circuit for an intermittentshort to ground, refer to the wiring diagrams in the serviceinformation.Perform ABS VERIFICATION TEST - VER 1.206
COMMUNICATION*NO RESPONSE FROM CONTROLLER ANTILOCK BRAKE — ContinuedTEST ACTION APPLICABILITY4 Turn the ignition off.Replace fuse #19 in the junction block.Disconnect the CAB harness connector.Turn the ignition on.Remove and inpsect fuse #19 in the junction block.Is the fuse open?AllYes → Go To 5No → Replace the Controller Antilock Brake in accordance with theService Information.Perform ABS VERIFICATION TEST - VER 1.5 Turn the ignition off.Disconnect the CAB harness connector.Disconnect the Junction Block C2 harness connector.Measure the resistance between ground and the Fused Ignition Switch Outputcircuit.Is the resistance below 5.0 ohms?AllYes → Repair the Fused Ignition Switch Output circuit for a short toground.Perform ABS VERIFICATION TEST - VER 1.No → Replace the Junction Block in accordance with the service information.Perform ABS VERIFICATION TEST - VER 1.6 Turn the ignition off.Disconnect the CAB harness connector.Using a 12-volt test light connected to 12-volts, probe each ground circuit.Is the test light illuminated for each circuit?AllYes → Go To 7No → Repair the ground circuit(s) for an open.Perform ABS VERIFICATION TEST - VER 1.7 Turn the ignition off.Note: Ensure fuse #19 is installed in the junction block.Disconnect the CAB harness connector.Turn the ignition on.Using a 12-volt test light connected to ground, probe the Fused Ignition SwitchOutput circuit.Is the test light illuminated?AllYes → Go To 8No → Repair the Fused Ignition Switch Output circuit for an open.Perform ABS VERIFICATION TEST - VER 1.207
COMMUNICATION*NO RESPONSE FROM CONTROLLER ANTILOCK BRAKE — ContinuedTEST ACTION APPLICABILITY8 Note: Ensure there is PCI Bus communication with other modules on thevehicle before proceeding. If not, refer to the symptom list from the menuand repair as necessary.Disconnect the CAB harness connector.Use Scope input cable CH7058, Cable to Probe adapter CH7062, and the red andblack test probes.Connect the scope input cable to the channel one connector on the DRB. Attach thered and black leads and the cable to probe adapter to the scope input cable.With the DRBIII select Pep Module Tools.Select lab scope.Select Live Data.Select 12 volt square wave.Press F2 for Scope.Press F2 and use the down arrow to set voltage range to 20 volts. Set Probe to x10.Press F2 again when complete.Connect the Black lead to the chassis ground. Connect the Red lead to the PCI Buscircuit in the CAB connector.Turn the ignition on.Observe the voltage display on the DRB Lab Scope.Does the voltage pulse from 0 to approximately 7.5 volts?AllYes → Go To 9No → Repair the PCI Bus circuit for an open.Perform ABS VERIFICATION TEST - VER 1.9 If there are no possible causes remaining, view repair. AllRepairReplace the Controller Antilock Brake in accordance with theService Information.Perform ABS VERIFICATION TEST - VER 1.208
COMMUNICATIONSymptom:*NO RESPONSE FROM ECM (PCI BUS) - DIESEL ONLYECM PCI NO RESPONSEPCI BUS CIRCUIT OPENENGINE CONTROL MODULEPOSSIBLE CAUSESTEST ACTION APPLICABILITY1 Turn the ignition on.NOTE: As soon as one or more module communicates with the DRB, answerthe question.With the DRB, enter Body then Body Computer.With the DRB, enter Anti-Lock Brakes.With the DRB, enter Body then Electro/Mechanical Cluster (MIC).With the DRB, enter Passive Restraints then Airbag.Were you able to establish communications with any of the modules?AllYes → Go To 2No → Refer to symptom PCI Bus Communication Failure in the Communicationscategory.Perform ROAD TEST VERIFICATION - VER-2.2 With the DRB read ECM Diagnostic Trouble Codes. This is to ensure power andgrounds to the ECM are operational.NOTE: If the DRB will not read ECM DTCs, follow the NO RESPONSE TOECM (SCI only) symptom path, if vehicle will start. For NO START Conditionsfollow the no start symptom in the powertrain diagnostic information.Turn the ignition off.Disconnect the ECM C1 harness connector.Use Scope input cable CH7058, Cable to Probe adapter CH7062, and the red andblack test probes.Connect the scope input cable to the channel one connector on the DRB. Attach thered and black leads and the cable to probe adapter to the scope input cable.With the DRBIII select Pep Module Tools.Select lab scope.Select Live Data.Select 12 volt square wave.Press F2 for Scope.Press F2 and use the down arrow to set voltage range to 20 volts. Set Probe to x10.Press F2 again when complete.Connect the Black lead to ground. Connect the Red lead to the PCI Bus circuit in theECM connector.Turn the ignition on.Observe the voltage display on the DRB Lab Scope.Does the voltage pulse from 0 to approximately 7.5 volts?AllYes → Replace and program the Engine Control Module in accordancewith the Service Information.Perform ROAD TEST VERIFICATION - VER-2.No → Repair the PCI Bus circuit for an open.Perform ROAD TEST VERIFICATION - VER-2.209
COMMUNICATIONSymptom:*NO RESPONSE FROM ECM (SCI ONLY) - DIESEL ONLYPOSSIBLE CAUSESCHECK ECM POWERS AND GROUNDSSCI TRANSMIT CIRCUIT SHORTED TO VOLTAGETRANSMISSION CONTROL MODULESCI TRANSMIT CIRCUIT SHORTED TO GROUNDSCI TRANSMIT CIRCUIT OPENENGINE CONTROL MODULETEST ACTION APPLICABILITY1 Perform the symptom Checking ECM Power and Ground Circuits in the Driveabilitycategory.Did the vehicle pass this test?AllYes → Go To 2No → Repair as necessary.Perform ROAD TEST VERIFICATION - VER-2.2 Turn the ignition off.Disconnect the ECM harness connectors.Disconnect the DRB from the DLC.Measure the resistance between ground and the SCI Transmit circuit.Is the resistance below 5.0 ohms?AllYes → Go To 3No → Go To 43 Turn the ignition off.Disconnect the TCM C1 harness connector.Measure the resistance between ground and the SCI Transmit circuit.Is the resistance below 5.0 ohms?AllYes → Repair the SCI Transmit circuit for a short to ground.Perform ROAD TEST VERIFICATION - VER-2.No → Replace the Transmission Control Module in accordance with theservice information.Perform ROAD TEST VERIFICATION - VER-2.4 Turn the ignition off.Disconnect the DRB from the DLC.Disconnect the ECM harness connectors.Disconnect the TCM C1 harness connector.Turn the ignition on.Measure the voltage of the SCI Transmit circuit at the DLC connector (cav 7).Is the voltage above 1.0 volt?AllYes → Repair the SCI Transmit circuit for a short to voltage.Perform ROAD TEST VERIFICATION - VER-2.No → Go To 5210
COMMUNICATION*NO RESPONSE FROM ECM (SCI ONLY) - DIESEL ONLY — ContinuedTEST ACTION APPLICABILITY5 Turn the ignition off.Disconnect the ECM harness connectors.Disconnect the DRB from the DLC.Measure the resistance of the SCI Transmit circuit between the ECM connector andthe DLC.Is the resistance below 5.0 ohms?AllYes → Go To 6No → Repair the SCI Transmit circuit for an open.Perform ROAD TEST VERIFICATION - VER-2.6 If there are no possible causes remaining, view repair. AllRepairReplace and program the Engine Control Module in accordancewith the Service Information.Perform ROAD TEST VERIFICATION - VER-2.211
COMMUNICATIONSymptom:*NO RESPONSE FROM INTRUSION TRANSCEIVER MODULEPOSSIBLE CAUSESATTEMPT TO COMMUNICATE WITH THE BCMGROUND CIRCUIT OPENFUSED B(+) CIRCUIT OPENOPEN PCI BUS CIRCUITINTRUSION TRANSCEIVER MODULETEST ACTION APPLICABILITY1 Turn the ignition on.With the DRB, attempt to communicate with the BCM.Was the DRB able to I/D or communicate with the BCM?AllYes → Go To 2No → Refer to the symptom list for problems related to no communicationwith the BCM.Perform BODY VERIFICATION TEST - VER 1.2 Turn the ignition off.Disconnect the Intrusion Transceiver Module harness connector.Using a 12-volt test light connected to 12-volts, probe the ground circuit.Is the test light illuminated?AllYes → Go To 3No → Repair the ground circuit for an open.Perform BODY VERIFICATION TEST - VER 1.3 Turn the ignition off.Disconnect the Intrusion Transceiver Module harness connector.Using a 12-volt test light connected to ground, probe the Fused B(+) circuit.Is the test light illuminated?AllYes → Go To 4No → Repair the Fused B+ circuit for an open.Perform BODY VERIFICATION TEST - VER 1.212
COMMUNICATION*NO RESPONSE FROM INTRUSION TRANSCEIVER MODULE —ContinuedTEST ACTION APPLICABILITY4 Note: Ensure there is PCI Bus communication with other modules on thevehicle before proceeding. If not, refer to the symptom list from the menuand repair as necessary.Disconnect the Intrusion Transceiver Module harness connector.Use Scope input cable CH7058, Cable to Probe adapter CH7062, and the red andblack test probes.Connect the scope input cable to the channel one connector on the DRB. Attach thered and black leads and the cable to probe adapter to the scope input cable.With the DRBIII select Pep Module Tools.Select lab scope.Select Live Data.Select 12 volt square wave.Press F2 for Scope.Press F2 and use the down arrow to set voltage range to 20 volts. Set Probe to x10.Press F2 again when complete.Connect the Black lead to the chassis ground. Connect the Red lead to the PCI Buscircuit in the ITM connector.Turn the ignition on.Observe the voltage display on the DRB Lab Scope.Does the voltage pulse from 0 to approximately 7.5 volts?AllYes → Replace the Intrusion Transceiver Module in accordance with theService Information.Perform BODY VERIFICATION TEST - VER 1.No → Repair the PCI Bus circuit for an open.Perform BODY VERIFICATION TEST - VER 1.213
COMMUNICATIONSymptom:*NO RESPONSE FROM PCM (PCI BUS) - GAS ONLYPCM PCI NO RESPONSEPCI BUS CIRCUIT OPENPOWERTRAIN CONTROL MODULEPOSSIBLE CAUSESTEST ACTION APPLICABILITY1 Turn the ignition on.NOTE: As soon as one or more module communicates with the DRB, answerthe question.With the DRBIII, enter Body then Body Computer.With the DRBIII, enter Anti-Lock Brakes.With the DRBIII, enter Body then Electro/Mechanical Cluster (MIC).With the DRBIII, enter Passive Restraints then Airbag.Were you able to establish communications with any of the modules?AllYes → Go To 2No → Refer to symptom PCI Bus Communication Failure in the Communicationscategory.Perform POWERTRAIN VERIFICATION TEST VER - 1.2 With the DRBIII read PCM Diagnostic Trouble Codes. This is to ensure power andgrounds to the PCM are operational.NOTE: If the DRB will not read PCM DTC’s, follow the NO RESPONSE TOPCM (SCI only) symptom path.NOTE: If the vehicle will not start and the DRBIII displays a no responsemessage, refer to the appropriate symptom in the powertrain diagnosticprocedures.Turn the ignition off.Disconnect the PCM C3 harness connector.Use Scope input cable CH7058, Cable to Probe adapter CH7062, and the red andblack test probes.Connect the scope input cable to the channel one connector on the DRBIII. Attachthe red and black leads and the cable to probe adapter to the scope input cable.With the DRBIII select Pep Module Tools.Select lab scope.Select Live Data.Select 12 volt square wave.Press F2 for Scope.Press F2 and use the down arrow to set voltage range to 20 volts. Set Probe to x10.Press F2 again when complete.Connect the Black lead to the PCM ground. Connect the Red lead to the PCI Buscircuit in the PCM connector.Turn the ignition on.Observe the voltage display on the DRBIII Lab Scope.Does the voltage pulse from 0 to approximately 7.5 volts?AllYes → Replace and program the Powertrain Control Module in accordancewith the Service Information.Perform POWERTRAIN VERIFICATION TEST VER - 1.No → Repair the PCI Bus circuit for an open.Perform POWERTRAIN VERIFICATION TEST VER - 1.214
COMMUNICATIONSymptom:*NO RESPONSE FROM PCM (SCI ONLY) - GAS ONLYPOSSIBLE CAUSESCHECK PCM POWERS AND GROUNDSSCI TRANSMIT CIRCUIT SHORTED TO VOLTAGESCI RECEIVE CIRCUIT SHORTED TO VOLTAGETRANSMISSION CONTROL MODULESCI CIRCUITS SHORTED TOGETHERSCI TRANSMIT CIRCUIT SHORTED TO GROUNDSCI RECEIVE CIRCUIT SHORTED TO GROUNDSCI RECEIVE CIRCUIT OPENSCI TRANSMIT CIRCUIT OPENPOWERTRAIN CONTROL MODULETEST ACTION APPLICABILITY1 Perform the symptom Checking PCM Power and Ground Circuits in the Driveabilitycategory.NOTE: With the DRBIII in the generic scan tool mode, attempt to communicatewith the PCM.NOTE: If the DRBIII can communicate with the PCM in the generic scantool mode, it may not be necessary to perform this step.Did the vehicle pass this test?AllYes → Go To 2No → Repair as necessary.Perform POWERTRAIN VERIFICATION TEST VER - 1.2 Turn the ignition off.Disconnect the PCM C3 harness connector.Disconnect the DRBIII from the DLC.Measure the resistance between ground and the SCI Transmit circuit.Is the resistance below 5.0 ohms?AllYes → Go To 3No → Go To 43 Turn the ignition off.Disconnect the TCM harness connector (if equipped).NOTE: If vehicle is not equipped with a TCM, answer yes to the question.Measure the resistance between ground and the SCI Transmit circuit.Is the resistance below 5.0 ohms?AllYes → Repair the SCI Transmit circuit for a short to ground.Perform POWERTRAIN VERIFICATION TEST VER - 1.No → Replace the Transmission Control Module in accordance with theservice information.Perform POWERTRAIN VERIFICATION TEST VER - 1.215
COMMUNICATION*NO RESPONSE FROM PCM (SCI ONLY) - GAS ONLY — ContinuedTEST ACTION APPLICABILITY4 Turn the ignition off.Disconnect the DRBIII from the DLC.Disconnect the PCM harness connectors.Disconnect the TCM harness connector (if equipped).Turn the ignition on.Measure the voltage of the SCI Transmit circuit.Is the voltage above 1.0 volt?AllYes → Repair the SCI Transmit circuit for a short to voltage.Perform POWERTRAIN VERIFICATION TEST VER - 1.No → Go To 55 Turn the ignition off.Disconnect the DRBIII from the DLC.Disconnect the PCM harness connectors.Turn the ignition on.Measure the voltage of the SCI Receive circuit.Is the voltage above 1.0 volt?AllYes → Repair the SCI Receive circuit for a short to voltage.Perform POWERTRAIN VERIFICATION TEST VER - 1.No → Go To 66 Turn the ignition off.Disconnect the DRBIII from the DLC.Disconnect the PCM harness connectors.Measure the resistance between the SCI Transmit circuit and the SCI Receive circuitat the PCM connector.Is the resistance below 5.0 ohms?AllYes → Repair the short between the SCI Transmit and the SCI Receivecircuits.Perform POWERTRAIN VERIFICATION TEST VER - 1.No → Go To 77 Turn the ignition off.Disconnect the PCM C3 harness connector.Disconnect the DRBIII from the DLC.Measure the resistance between ground and the SCI Receive circuit.Is the resistance below 5.0 ohms?AllYes → Repair the SCI Receive circuit for a short to ground.Perform POWERTRAIN VERIFICATION TEST VER - 1.No → Go To 88 Turn the ignition off.Disconnect the PCM C3 harness connector.Disconnect the DRBIII from the DLC.Measure the resistance of the SCI Receive circuit between the PCM C3 connector andthe DLC.Is the resistance below 5.0 ohms?AllYes → Go To 9No → Repair the SCI Receive circuit for an open.Perform POWERTRAIN VERIFICATION TEST VER - 1.216
COMMUNICATION*NO RESPONSE FROM PCM (SCI ONLY) - GAS ONLY — ContinuedTEST ACTION APPLICABILITY9 Turn the ignition off.Disconnect the PCM C3 harness connector.Disconnect the DRBIII from the DLC.Measure the resistance of the SCI Transmit circuit between the PCM C3 connectorand the DLC.Is the resistance below 5.0 ohms?AllYes → Go To 10No → Repair the SCI Transmit circuit for an open.Perform POWERTRAIN VERIFICATION TEST VER - 1.10 If there are no possible causes remaining, view repair. AllRepairReplace and program the Powertrain Control Module in accordancewith the Service Information.Perform POWERTRAIN VERIFICATION TEST VER - 1.217
COMMUNICATIONSymptom:*NO RESPONSE FROM RADIOPOSSIBLE CAUSESNO RESPONSE FROM RADIOREPLACE FUSE #30RADIO SHORTED TO GROUNDFUSED IGNITION SWITCH OUTPUT CIRCUIT SHORTED TO GROUNDJUNCTION BLOCK SHORTED TO GROUNDOPEN FUSED IGNITION SWITCH OUTPUT CIRCUITOPEN FUSED B+ CIRCUITRADIO GROUND CIRCUIT OPENOPEN PCI BUS CIRCUITRADIOTEST ACTION APPLICABILITY1 Turn the ignition on.Note: As soon as one or more module communicates with the DRB, answerthe question.With the DRB, attempt to communicate with the Airbag Control Module (ACM).With the DRB, attempt to communicate with the Body Control Module (BCM).Was the DRB able to I/D or establish communications with either of the modules?AllYes → Go To 2No → Refer to the Communications category and perform the symptomPCI Bus Communication Failure.Perform BODY VERIFICATION TEST - VER 1.2 Turn the ignition off.Remove and inspect fuse #30 in the junction block.Is the fuse open?AllYes → Go To 3No → Go To 63 Turn the ignition off.Replace Fuse #30 in the junction block.Turn the ignition on.Turn the Radio on.Remove and inspect fuse #30 in the junction block.Is the fuse open?AllYes → Go To 4No → Check the Fused Ignition Switch Output circuit for an intermittentshort to ground, refer to the wiring diagrams in the serviceinformation.Perform BODY VERIFICATION TEST - VER 1.218
COMMUNICATION*NO RESPONSE FROM RADIO — ContinuedTEST ACTION APPLICABILITY4 Turn the ignition off.Replace fuse #30 in the junction block.Disconnect the Radio C1 harness connector.Turn the ignition on.Remove and inpsect fuse #30 in the junction block.Is the fuse open?AllYes → Go To 5No → Replace the Radio.Perform BODY VERIFICATION TEST - VER 1.5 Turn the ignition off.Disconnect the Radio C1 harness connector.Disconnect the Junction Block C3 harness connector.Measure the resistance between ground and the Fused Ignition Switch Outputcircuit.Is the resistance below 5.0 ohms?AllYes → Repair the Fused Ignition Switch Output circuit for a short toground.Perform BODY VERIFICATION TEST - VER 1.No → Replace the Junction Block in accordance with the service information.Perform BODY VERIFICATION TEST - VER 1.6 Turn the ignition off.Note: Ensure fuse #30 is installed in the junction block.Disconnect the Radio C1 harness connector.Turn the ignition on.Using a 12-volt test light connected to ground, probe the Fused Ignition SwitchOutput circuit.Is the test light illuminated?AllYes → Go To 7No → Repair the Fused Ignition Switch Output circuit for an open.Perform BODY VERIFICATION TEST - VER 1.7 Turn the ignition off.Disconnect the Radio C1 harness connector.Using a 12-volt test light connected to ground, probe each Fused B+ circuit.Is the test light illuminated for each circuit?AllYes → Go To 8No → Repair the Fused B+ circuit for an open. Refer to the wiringdiagrams located in the Service Information.Perform BODY VERIFICATION TEST - VER 1.8 Turn the ignition off.Disconnect the Radio C1 harness connector.Using a 12-volt test light connected to 12-volts, probe each ground circuit.Is the test light illuminated for each circuit?AllYes → Go To 9No → Repair the ground circuit for an open.Perform BODY VERIFICATION TEST - VER 1.219
COMMUNICATION*NO RESPONSE FROM RADIO — ContinuedTEST ACTION APPLICABILITY9 Note: Ensure there is PCI Bus communication with other modules on thevehicle before proceeding. If not, refer to the symptom list from the menuand repair as necessary.Disconnect the Radio C1 harness connector.Use Scope input cable CH7058, Cable to Probe adapter CH7062, and the red andblack test probes.Connect the scope input cable to the channel one connector on the DRB. Attach thered and black leads and the cable to probe adapter to the scope input cable.With the DRBIII select Pep Module Tools.Select lab scope.Select Live Data.Select 12 volt square wave.Press F2 for Scope.Press F2 and use the down arrow to set voltage range to 20 volts. Set Probe to x10.Press F2 again when complete.Connect the Black lead to the chassis ground. Connect the Red lead to the PCI Buscircuit in the Radio connector.Turn the ignition on.Observe the voltage display on the DRB Lab Scope.Does the voltage pulse from 0 to approximately 7.5 volts?AllYes → Go To 10No → Repair the PCI Bus circuit for an open.Perform BODY VERIFICATION TEST - VER 1.10 If there are no possible causes remaining, view repair. AllRepairReplace the Radio.Perform BODY VERIFICATION TEST - VER 1.220
COMMUNICATIONSymptom:*NO RESPONSE FROM RAIN SENSORPOSSIBLE CAUSESATTEMPT TO COMMUNICATE WITH THE BCMFUSED B(+) CKT OPENGROUND CKT OPENOPEN PCI BUS CIRCUITRAIN SENSORTEST ACTION APPLICABILITY1 Turn the ignition on.With the DRB, enter Body then Body Computer.Was the DRB able to I/D or communicate with the BCM?AllYes → Go To 2No → Refer to the symptom list for problems related to no communicationwith the BCM.Perform BODY VERIFICATION TEST - VER 1.2 Turn the ignition off.Disconnect the Rain Sensor harness connector.Using a 12-volt test light connected to ground, probe the Fused B+ circuit.Is the test light illuminated?AllYes → Go To 3No → Repair the Fused B+ circuit for an open or short. Refer to thewiring diagrams in the service information.Perform BODY VERIFICATION TEST - VER 1.3 Turn the ignition off.Disconnect the Rain Sensor harness connector.Using a 12-volt test light connected to 12-volts, probe the ground circuit.Is the test light illuminated?AllYes → Go To 4No → Repair the Ground circuit for an open.Perform BODY VERIFICATION TEST - VER 1.221
COMMUNICATION*NO RESPONSE FROM RAIN SENSOR — ContinuedTEST ACTION APPLICABILITY4 Note: Ensure there is PCI Bus communication with other modules on thevehicle before proceeding. If not, refer to the symptom list from the menuand repair as necessary.Disconnect the Rain Sensor harness connector.Use Scope input cable CH7058, Cable to Probe adapter CH7062, and the red andblack test probes.Connect the scope input cable to the channel one connector on the DRB. Attach thered and black leads and the cable to probe adapter to the scope input cable.With the DRBIII select Pep Module Tools.Select lab scope.Select Live Data.Select 12 volt square wave.Press F2 for Scope.Press F2 and use the down arrow to set voltage range to 20 volts. Set the probe to x10.Press F2 again when complete.Connect the Black lead to the chassis ground. Connect the Red lead to the PCI Buscircuit in the Rain Sensor connector.Turn the ignition on.Observe the voltage display on the DRB Lab Scope.Does the voltage pulse from 0 to approximately 7.5 volts?AllYes → Replace the Rain Sensor in accordance with the service information.Perform BODY VERIFICATION TEST - VER 1.No → Repair the PCI Bus circuit for an open.Perform BODY VERIFICATION TEST - VER 1.222
COMMUNICATIONSymptom:*NO RESPONSE FROM SHIFTER ASSEMBLY - DIESEL ONLYPOSSIBLE CAUSESATTEMPT TO COMMUNICATE WITH THE BCMOPEN GROUND CIRCUITOPEN FUSED IGNITION SWITCH OUTPUT CIRCUITOPEN PCI BUS CIRCUITSHIFTER ASSEMBLYTEST ACTION APPLICABILITY1 Turn the ignition on.With the DRB, enter Body then Body Computer.Was the DRB able to I/D or communicate with the BCM?AllYes → Go To 2No → Refer to the symptom list for problems related to no communicationwith the BCM.Perform W5AJ400 TRANSMISSION VERIFICATION TEST -VER 1.2 Turn the ignition off.Disconnect the Shifter Assembly C1 harness connector.Using a 12-volt test light connected to 12-volts, probe each ground circuit.Is the test light illuminated for each circuit?AllYes → Go To 3No → Repair the ground circuit for an open.Perform W5AJ400 TRANSMISSION VERIFICATION TEST -VER 1.3 Turn the ignition off.Disconnect the Shifter Assembly C1 and C2 harness connectors.Turn the ignition on.Using a 12-volt test light connected to ground, probe each Fused Ignition SwitchOutput circuit.Is the test light illuminated for each circuit?AllYes → Go To 4No → Repair the Fused Ignition Switch Output circuit for an open orshort. Refer to the wiring diagrams in the service information.Perform W5AJ400 TRANSMISSION VERIFICATION TEST -VER 1.223
COMMUNICATION*NO RESPONSE FROM SHIFTER ASSEMBLY - DIESEL ONLY — ContinuedTEST ACTION APPLICABILITY4 Note: Ensure there is PCI Bus communication with other modules on thevehicle before proceeding. If not, refer to the symptom list from the menuand repair as necessary.Disconnect the Shifter Assembly C1 harness connector.Use Scope input cable CH7058, Cable to Probe adapter CH7062, and the red andblack test probes.Connect the scope input cable to the channel one connector on the DRB. Attach thered and black leads and the cable to probe adapter to the scope input cable.With the DRBIII select Pep Module Tools.Select lab scope.Select Live Data.Select 12 volt square wave.Press F2 for Scope.Press F2 and use the down arrow to set voltage range to 20 volts. Set Probe to x10.Press F2 again when complete.Connect the Black lead to the chassis ground. Connect the Red lead to the PCI Buscircuit in the Shifter Assembly connector.Turn the ignition on.Observe the voltage display on the DRB Lab Scope.Does the voltage pulse from 0 to approximately 7.5 volts?AllYes → Replace the Shifter Assembly in accordance with the serviceinformation.Perform W5AJ400 TRANSMISSION VERIFICATION TEST -VER 1.No → Repair the PCI Bus circuit for an open.Perform W5AJ400 TRANSMISSION VERIFICATION TEST -VER 1.224
COMMUNICATIONSymptom:*NO RESPONSE FROM TRANSMISSION CONTROL MODULE - DIE-SEL ONLYPOSSIBLE CAUSESATTEMPT TO COMMUNICATE WITH THE ECMFUSED IGNITION SWITCH OUTPUT (RUN/ST) CIRCUIT OPENGROUND CIRCUIT OPENSCI TRANSMIT CIRCUIT OPENTRANSMISSION CONTROL MODULETEST ACTION APPLICABILITY1 Turn the ignition on.With the DRB, attempt to communicate with the ECM.Was the DRB able to I/D or communicate with the ECM?AllYes → Go To 2No → Refer to the symptom list for problems related to no communicationwith the ECM (SCI Only).Perform W5AJ400 TRANSMISSION VERIFICATION TEST -VER 1.2 Turn the ignition off to the lock position.Disconnect the TCM C1 harness connector.Ignition on, engine not running.Using a 12-volt test light connected to ground, check the Fused Ignition SwitchOutput (Run/St) circuit.NOTE: The test light must illuminate brightly. Compare the brightness tothat of a direct connection to the battery.Does the test light illuminate brightly?AllYes → Go To 3No → Repair the Fused Ignition Switch Output (Run/St) circuit for anopen. Refer to the wiring diagrams in the Service Information.Perform W5AJ400 TRANSMISSION VERIFICATION TEST -VER 1.3 Turn the ignition off to the lock position.Disconnect the TCM C1 harness connector.Using a 12-volt test light connected to 12-volts, check the ground circuit in the TCMharness connector.NOTE: The test light must illuminate brightly. Compare the brightness tothat of a direct connection to the battery.Does the test light illuminate brightly?AllYes → Go To 4No → Repair the Ground circuit for an open.Perform W5AJ400 TRANSMISSION VERIFICATION TEST -VER 1.225
COMMUNICATION*NO RESPONSE FROM TRANSMISSION CONTROL MODULE - DIESELONLY — ContinuedTEST ACTION APPLICABILITY4 Turn the ignition off.Disconnect the TCM C1 harness connector.Disconnect the DRB from the DLC.Measure the resistance of the SCI Transmit circuit between the TCM connector andthe DLC.Is the resistance below 5.0 ohms?AllYes → Replace the Transmission Control Module in accordance with theservice information.Perform W5AJ400 TRANSMISSION VERIFICATION TEST -VER 1.No → Repair the SCI Transmit circuit for an open.Perform W5AJ400 TRANSMISSION VERIFICATION TEST -VER 1.226
COMMUNICATIONSymptom:*NO RESPONSE FROM TRANSMISSION CONTROL MODULE - GASONLYPOSSIBLE CAUSESNO RESPONSE FROM TRANSMISSION CONTROL MODULEFUSED IGNITION SWITCH OUTPUT (RUN/ST) CIRCUIT OPENFUSED IGNITION SWITCH OUTPUT (START) CIRCUIT OPENFUSED B(+) CIRCUIT OPENGROUND CIRCUIT(S) OPENOPEN PCI BUS CIRCUITTRANSMISSION CONTROL MODULETEST ACTION APPLICABILITY1 Ignition on, engine not running.Note: As soon as one or more module communicates with the DRB, answerthe question.With the DRB, attempt to communicate with the Airbag Control Module (ACM).With the DRB, attempt to communicate with the Body Control Module (BCM).Was the DRB able to I/D or establish communications with either of the modules?AllYes → Go To 2No → Refer to the Body Communication category and perform thesymptom PCI Bus Communication Failure.Perform 45RFE/545RFE TRANSMISSION VERIFICATIONTEST - VER 1.2 Turn the ignition off to the lock position.Disconnect the TCM harness connector.Ignition on, engine not running.Using a 12-volt test light connected to ground, check the Fused Ignition SwitchOutput (Run/St) circuit.NOTE: The test light must illuminate brightly. Compare the brightness tothat of a direct connection to the battery.Does the test light illuminate brightly?AllYes → Go To 3No → Repair the Fused Ignition Switch Output (Run/St) circuit for anopen. Refer to the wiring diagrams location in the Service Information.Perform 45RFE/545RFE TRANSMISSION VERIFICATIONTEST - VER 1.227
COMMUNICATION*NO RESPONSE FROM TRANSMISSION CONTROL MODULE - GASONLY — ContinuedTEST ACTION APPLICABILITY3 Turn the ignition off to the lock position.Disconnect the TCM harness connector.Remove the starter relay from the PDC.Using a 12-volt test light connected to ground, check the Fused Ignition SwitchOutput (Start) circuit.NOTE: The test light must illuminate brightly. Compare the brightness tothat of a direct connection to the battery.Observe the test light while momentarily turning the ignition switch to the Startposition.Does the test light illuminate brightly?AllYes → Go To 4No → Repair the Fused Ignition Switch Output (Start) circuit for anopen. Refer to the wiring diagrams located in the Service Information.Perform 45RFE/545RFE TRANSMISSION VERIFICATIONTEST - VER 1.Note: Reinstall the original Starter Relay.4 Turn the ignition off.Disconnect the TCM harness connector.Using a 12-volt test light connected to ground, check the Fused B(+) circuit.NOTE: The test light must illuminate brightly. Compare the brightness tothat of a direct connection to the battery.Does the test light illuminate brightly?AllYes → Go To 5No → Repair the Fused B(+) circuit for an open. Refer to the wiringdiagrams located in the Service Information.Perform 45RFE/545RFE TRANSMISSION VERIFICATIONTEST - VER 1.5 Turn the ignition off to the lock position.Disconnect the TCM harness connector.Using a 12-volt test light connected to 12-volts, check each ground circuit in the TCMharness connector.NOTE: The test light must illuminate brightly. Compare the brightness tothat of a direct connection to the battery.Does the test light illuminate brightly at all the ground circuits?AllYes → Go To 6No → Repair the Ground circuit(s) for an open. Check the main groundconnection to engine block and/or chassis. Refer to the wiringdiagrams located in the Service Information.Perform 45RFE/545RFE TRANSMISSION VERIFICATIONTEST - VER 1.228
COMMUNICATION*NO RESPONSE FROM TRANSMISSION CONTROL MODULE - GASONLY — ContinuedTEST ACTION APPLICABILITY6 Note: Ensure there is PCI Bus communication with other modules on thevehicle before proceeding. If not, refer to the symptom list from the menuand repair as necessary.Disconnect the TCM harness connector.Use Scope input cable CH7058, Cable to Probe adapter CH7062, and the red andblack test probes.Connect the scope input cable to the channel one connector on the DRB. Attach thered and black leads and the cable to probe adapter to the scope input cable.With the DRBIII select Pep Module Tools.Select lab scope.Select Live Data.Select 12 volt square wave.Press F2 for Scope.Press F2 and use the down arrow to set voltage range to 20 volts. Set Probe to x10.Press F2 again when complete.Connect the Black lead to the chassis ground. Connect the Red lead to the PCI Buscircuit in the TCM connector.Turn the ignition on.Observe the voltage display on the DRB Lab Scope.Does the voltage pulse from 0 to approximately 7.5 volts?AllYes → Go To 7No → Repair the PCI Bus circuit for an open.Perform 45RFE/545RFE TRANSMISSION VERIFICATIONTEST - VER 1.7 If there are no possible causes remaining, view repair. AllRepairReplace the Transmission Control Module. WITH THE DRBIIIPERFORM QUICK LEARN.Perform 45RFE/545RFE TRANSMISSION VERIFICATIONTEST - VER 1.229
COMMUNICATIONSymptom:*PCI BUS COMMUNICATION FAILUREPOSSIBLE CAUSESWITH THE DRB PERFORM A MODULE SCANOPEN PCI BUS CIRCUIT AT THE DATA LINK CONNECTORUSING THE DRB, PERFORM THE PCI BUS CONTROL MODEDISCONNECT THE MODULE(S) HARNESS CONNECTORPCI BUS CIRCUIT SHORTED TO VOLTAGEDISCONNECT THE MODULE(S) HARNESS CONNECTORPCI BUS CIRCUIT SHORTED TO GROUNDWIRING HARNESS INTERMITTENT FAILURETEST ACTION APPLICABILITY1 Note: Determine which modules this vehicle is equipped with before beginning.Connect the Diagnostic Junction Port Tester #8339 to the DRB and to the DiagnosticJunction Port.Using the DRB, along with the Diagnostic Junction Port Tester #8339, selectJunction Port Tool then PCI Bus Module Scan and follow the instructions on theDRB.Was the DRB able to scan (I/D or communicate) with any modules?AllYes → Refer to the Communication category for the related symptom(s).(Individual module no responses).Perform BODY VERIFICATION TEST - VER 1.No → Go To 22 Turn the ignition off.Measure the resistance of the PCI Bus circuit between the Data Link Connector andthe Diagnostic Junction Port connector.Is the resistance below 5.0 ohms?AllYes → Go To 3No → Repair the PCI Bus circuit for an open between the DLC and theDiagnostic Junction Port.Perform BODY VERIFICATION TEST - VER 1.230
COMMUNICATION*PCI BUS COMMUNICATION FAILURE — ContinuedTEST ACTION APPLICABILITY3 Note: Determine which modules this vehicle is equipped with before beginning.Connect the Diagnostic Junction Port Tester #8339 to the DRB and to the DiagnosticJunction Port.Using the DRB, along with the Diagnostic Junction Port Tester #8339, selectJunction Port Tool then PCI Bus Control Mode and follow the instructions on theDRB.Note: Perform this function on each pin that is equipped with a PCI Buscircuit.Did the DRB display No Modules Responding from any of the pins that werescanned?AllYes → Go To 4No → Check the PCI Bus circuit between the DLC and the DiagnosticJunction Port connector for a short to voltage or to ground, repairas necessary.Perform BODY VERIFICATION TEST - VER 1.4 Disconnect the Diagnostic Junction Port Tester cable from the DRB. Keep the testerconnected to the Diagnostic Junction Port.Turn the ignition on.Measure the voltage of the PCI Bus circuit on the Diagnostic Junction Port Testerthat the DRB displayed No Modules Responding.Is the voltage steadily above 7.0 volts?AllYes → Go To 5No → Go To 65 Measure the voltage of the PCI Bus circuit on the Diagnostic Junction Port testerthat previously measured above 7.0 volts.Note: Turn the ignition off before disconnecting any module harnessconnector then turn the ignition on.Disconnect the module harness connector(s).NOTE: If the problem occurred on a bus circuit that has more than onemodule on the same circuit, observe the voltmeter while disconnecting eachmodule connector one at a time.Is the voltage steadily above 7.0 volts with the module(s) disconnected?AllYes → Repair the PCI Bus circuit that measured over 7.0 volts for ashort to voltage.Perform BODY VERIFICATION TEST - VER 1.No → Replace the module that when disconnected the short to voltagewas eliminated.Perform BODY VERIFICATION TEST - VER 1.6 Disconnect the Diagnostic Junction Port Tester cable from the DRB. Keep the testerconnected to the Diagnostic Junction Port.Turn the ignition off.Disconnect the negative battery cable.Measure the resistance between ground and the PCI Bus circuit on the DiagnosticJunction Port Tester that the DRB displayed No Modules Responding.Is the resistance below 100.0 ohms?AllYes → Go To 7No → Go To 8231
COMMUNICATION*PCI BUS COMMUNICATION FAILURE — ContinuedTEST ACTION APPLICABILITY7 Disconnect the negative battery cable.Measure the resistance between ground and the PCI Bus circuit at the DiagnosticJunction Port tester that previously measured below 100.0 ohms.Disconnect the module harness connector(s).NOTE: If the problem occurred on a bus circuit that has more than onemodule on the same circuit, observe the ohmmeter while disconnectingeach module connector one at a time.Is the resistance below 100.0 ohms with the module(s) disconnected?AllYes → Repair the PCI Bus circuit that measured below 100.0 ohms for ashort to ground.Perform BODY VERIFICATION TEST - VER 1.No → Replace the module that when disconnected the short to groundwas eliminated.Perform BODY VERIFICATION TEST - VER 1.8 Turn the ignition off.Note: Visually inspect the related wiring harness. Look for any chafed,pierced, pinched, or partially broken wires.Note: Visually inspect the related wire harness connectors. Look for broken,bent, pushed out, or corroded terminals.Were any problems found?AllYes → Repair wiring harness/connectors as necessary.Perform BODY VERIFICATION TEST - VER 1.No → Test Complete.232
COMMUNICATIONSymptom:*UNABLE TO ACCESS DRIVER DOOR MODULE AND/OR PASSEN-GER DOOR MODULE WITH DRBIIIPOSSIBLE CAUSESATTEMPT TO COMMUNICATE WITH THE BCMCHECK BCM DTCSINSPECT JUNCTION BLOCK FUSE #22 AND #28CHECK VOLTAGE SUPPLY TO BCM - JUNCTION BLOCK BCM CONNECTOR CAVITY 5CHECK VOLTAGE SUPPLY TO BCM - JUNCTION BLOCK BCM CONNECTOR CAVITY 25BODY CONTROL MODULETEST ACTION APPLICABILITY1 Turn the ignition on.With the DRB, enter Body then Body Computer.Was the DRB able to I/D or communicate with the BCM?AllYes → Go To 2No → Refer to the symptom list for problems related to no communicationwith the BCM.Perform BODY VERIFICATION TEST - VER 1.2 Turn the ignition on.With the DRB, enter Body then Body Computer and read DTC’s.Are any DTCs present?AllYes → Refer to the appropriate category and perform the diagnostic testassociated with the DTC that is set.Perform BODY VERIFICATION TEST - VER 1.No → Go To 33 Turn the ignition off.Remove and inspect fuse #22 and #28 from the junction block.Is either fuse open?AllYes → Refer to the wiring diagrams in the service information to helpisolate a possible short to ground condition, replace fuse andretest.Perform BODY VERIFICATION TEST - VER 1.No → Go To 4233
COMMUNICATION*UNABLE TO ACCESS DRIVER DOOR MODULE AND/OR PASSENGERDOOR MODULE WITH DRBIII — ContinuedTEST ACTION APPLICABILITY4 Turn the ignition off.Note: Ensure Fuse #22 is installed in the junction block.Remove the BCM from the Junction Block.Turn the ignition on.Using a 12-volt test light connected to ground, probe the Fused Ignition SwitchOutput circuit at the Junction Block Body Control Module connector cavity 5.Is the test light illuminated?AllYes → Go To 5No → Replace the Junction Block in accordance with the service information.Perform BODY VERIFICATION TEST - VER 1.5 Turn the ignition off.NOTE: Ensure Fuse #28 is installed in the junction block.Remove the BCM from the Junction Block.Turn the ignition on.Using a 12-volt test light connected to ground, probe the Fused Ignition SwitchOutput circuit at the Junction Block Body Control Module connector cavity 25.Is the test light illuminated?AllYes → Go To 6No → Replace the Junction Block in accordance with the service information.Perform BODY VERIFICATION TEST - VER 1.6 If there are no possible causes remaining, view repair. AllRepairReplace the Body Control Module in accordance with the serviceinformation.Perform BODY VERIFICATION TEST - VER 1.234
DOOR AJARSymptom:* DRIVER DOOR AJAR CIRCUIT SHORTED TO GROUNDPOSSIBLE CAUSESDRIVER DOOR LOCK MOTOR/AJAR SWITCH SHORTED TO GROUNDDRIVER DOOR AJAR SWITCH SENSE CKT SHORTED TO GROUNDDRIVER DOOR MODULETEST ACTION APPLICABILITY1 With the DRBIII in Inputs/Outputs, read the DR DOOR AJAR SW state.Disconnect the Driver Door Lock Motor/Ajar Switch harness connector.With the DRBIII in Inputs/Outputs, read the DR DOOR AJAR SW state.Does the Switch State change from CLOSED to OPEN?AllYes → Replace the Driver Door Lock Motor/Ajar Switch in accordancewith the Service Information.Perform BODY VERIFICATION TEST - VER 1.No → Go To 22 Disconnect the DDM harness connector.Disconnect the Driver Door Lock Motor/Ajar Switch harness connector.Using a 12-volt Test Light connected to 12-volts, check the Sense circuit.Does the Test Light illuminate?AllYes → Repair the Driver Door Ajar Switch Sense circuit for a short toground.Perform BODY VERIFICATION TEST - VER 1.No → Replace the Driver Door Module.Perform BODY VERIFICATION TEST - VER 1.235
DOOR AJARSymptom:*DRIVER DOOR AJAR CIRCUIT OPENPOSSIBLE CAUSESDRIVER DOOR MODULE NOT RESPONDING TO INPUTOPEN DRIVER DOOR AJAR SWITCH GROUND CKTOPEN DRIVER DOOR LOCK MOTOR/AJAR SWITCHOPEN DRIVER DOOR AJAR SWITCH SENSE CKTDRIVER DOOR MODULETEST ACTION APPLICABILITY1 Open the driver door.With the DRBIII in Inputs/Outputs, read the DRVR DOOR AJAR SW state.Does the DRBIII display CLOSED?AllYes → Replace the Driver Door Module.Perform BODY VERIFICATION TEST - VER 1.No → Go To 22 Disconnect the Driver Door Lock Motor/Ajar switch connectorUsing a 12-volt Test Light connected to 12-volts, check the Ground circuit.Does the light illuminate?AllYes → Go To 3No → Repair the Driver Door Ajar Switch Ground circuit for an open.Perform BODY VERIFICATION TEST - VER 1.3 Disconnect the Driver Door Lock Motor/Ajar Switch connector.With the DRBIII in Inputs/Outputs, read the DRVR DOOR AJAR SW state.Connect a jumper wire between Sense circuit and the Ground circuit.Does the DRBIII display DRVR DOOR AJAR SW: CLOSED?AllYes → Replace the Driver Door Lock Motor/Ajar Switch in accordancewith the Service Information.Perform BODY VERIFICATION TEST - VER 1.No → Go To 44 Disconnect the DDM harness connector.Disconnect the Driver Door Lock Motor/Ajar Switch harness connector.Measure the resistance of the Sense circuit.Is the resistance below 5.0 ohms?AllYes → Replace the Driver Door Module in accordance with the ServiceInformation.Perform BODY VERIFICATION TEST - VER 1.No → Repair the Driver Door Ajar Switch Sense circuit for an open.Perform BODY VERIFICATION TEST - VER 1.236
DOOR AJARSymptom:*HOOD AJAR CIRCUIT OPEN (IF EQUIPPED)POSSIBLE CAUSESBCM NOT RESPONDING TO INPUTGROUND CIRCUIT OPENHOOD AJAR SWITCH OPENHOOD AJAR SWITCH SENSE CIRCUIT OPENBODY CONTROL MODULE, INTERNAL OPENTEST ACTION APPLICABILITY1 Open the hood.With the DRBIII in Inputs/Outputs, read the HOOD AJAR SW state.Does the DRBIII display CLOSED?AllYes → Replace the Body Control Module.Perform BODY VERIFICATION TEST - VER 1.No → Go To 22 Disconnect the Hood Ajar Switch harness connector.Using a 12-volt Test Light connected to 12-volts, check the Ground circuit.Does the test light illuminate?AllYes → Go To 3No → Repair the ground circuit for an open.Perform BODY VERIFICATION TEST - VER 1.3 Disconnect the Hood Ajar Switch harness connector.Connect a jumper wire between the Sense circuit and the Ground circuit.With the DRBIII in Inputs/Outputs, read the HOOD AJAR SW state.Does the DRBIII display CLOSED?AllYes → Replace the Hood Ajar Switch,Perform BODY VERIFICATION TEST - VER 1.No → Go To 44 Disconnect the Hood Ajar Switch harness connector.Disconnect the BCM C1 harness connector.Measure the resistance of the Sense circuit.Is the resistance below 5.0 ohms?AllYes → Replace the Body Control Module.Perform BODY VERIFICATION TEST - VER 1.No → Repair the Hood Ajar Switch Sense circuit for an open.Perform BODY VERIFICATION TEST - VER 1.237
DOOR AJARSymptom:*HOOD AJAR CIRCUIT SHORT TO GROUND (IF EQUIPPED)POSSIBLE CAUSESHOOD AJAR SWITCH SHORT TO GROUNDHOOD AJAR SWITCH SENSE CIRCUIT, SHORT TO GROUNDBCM, SHORT TO GROUNDTEST ACTION APPLICABILITY1 With the DRBIII in Inputs/Outputs, read the Hood Open Sw state.Disconnect the Hood Ajar Switch harness connector.With the DRBIII in Inputs/Outputs, read the HOOD AJAR SW state.Does the Switch State change from CLOSED to OPEN?AllYes → Replace the Hood Ajar Switch in accordance with the ServiceInformation.Perform BODY VERIFICATION TEST - VER 1.No → Go To 22 Disconnect the BCM harness connector.Disconnect the Hood Ajar Switch harness connector.Using a 12-volt Test Light connected to 12-volts, check the Sense circuit.Does the Test Light illuminate?AllYes → Repair the Hood Ajar Switch Sense circuit for a short to ground.Perform BODY VERIFICATION TEST - VER 1.No → Replace the Body Control Module.Perform BODY VERIFICATION TEST - VER 1.238
DOOR AJARSymptom:*LEFT REAR DOOR AJAR CIRCUIT OPENPOSSIBLE CAUSESBCM NOT RESPONDING TO INPUTGROUND CKT OPENLEFT REAR DOOR LOCK MOTOR/AJAR SWITCH OPENLEFT REAR DOOR AJAR SWITCH SENSE CKT OPENJUNCTION BLOCK - OPEN LEFT REAR DOOR AJAR SWITCH SENSE CKTBODY CONTROL MODULE INTERNAL FAULTTEST ACTION APPLICABILITY1 Open the left rear door.With the DRBIII in Inputs/Outputs, read the LR DOOR AJAR SW state.Does the DRBIII display CLOSED?AllYes → Replace the Body Control Module.Perform BODY VERIFICATION TEST - VER 1.No → Go To 22 Disconnect the Left Rear Door Lock Motor/Ajar Switch harness connector.Using a 12-volt Test Light connected to 12-volts, check the Ground circuit.Does the test light illuminate?AllYes → Go To 3No → Repair the ground circuit for an open.Perform BODY VERIFICATION TEST - VER 1.3 Disconnect the Left Rear Door Lock Motor/Ajar Switch harness connector.Connect a jumper wire between the Sense circuit and the Ground circuit.With the DRBIII in Inputs/Outputs, read the LR DOOR AJAR SW state.Does the DRBIII display CLOSED?AllYes → Replace the Left Rear Door Lock Motor/Ajar Switch in accordancewith the Service Information.Perform BODY VERIFICATION TEST - VER 1.No → Go To 44 Disconnect the Left Rear Door Lock Motor/Ajar Switch harness connector.Disconnect the Junction Block C1 harness connector.Measure the resistance of the Sense circuit.Is the resistance below 5.0 ohms?AllYes → Go To 5No → Repair the Left Rear Door Ajar Switch Sense circuit for an open.Perform BODY VERIFICATION TEST - VER 1.239
DOOR AJAR*LEFT REAR DOOR AJAR CIRCUIT OPEN — ContinuedTEST ACTION APPLICABILITY5 Disconnect the Junction Block C1 harness connector.Remove the BCM from the Junction Block.Measure the resistance of the Left Rear Door Ajar Switch Sense circuit across theJunction Block between the C1 connector and the Junction Block-to-BCM connector.Is the resistance below 5.0 ohms?AllYes → Replace the Body Control Module.Perform BODY VERIFICATION TEST - VER 1.No → Replace the Junction Block in accordance with the Service Information.Perform BODY VERIFICATION TEST - VER 1.240
DOOR AJARSymptom:*LEFT REAR DOOR AJAR CIRCUIT SHORTED TO GROUNDPOSSIBLE CAUSESLEFT REAR DOOR LOCK MOTOR/AJAR SWITCH SHORTED TO GROUNDLEFT REAR DOOR AJAR SWITCH SENSE CKT SHORTED TO GROUNDBODY CONTROL MODULE INTERNAL FAULTLEFT REAR DOOR AJAR SWITCH SENSE CKT SHORTED TO GROUND IN JUNCTION BLOCKTEST ACTION APPLICABILITY1 With the DRBIII in Inputs/Outputs, read the LR DOOR AJAR SW state.Disconnect the Left Rear Door Lock Motor/Ajar Switch harness connector.With the DRBIII in Inputs/Outputs, read the LR DOOR AJAR SW state.Does the Switch State change from CLOSED to OPEN?AllYes → Replace the Left Rear Door Lock Motor/Ajar Switch in accordancewith the Service Information.Perform BODY VERIFICATION TEST - VER 1.No → Go To 22 Disconnect the Junction Block C1 harness connector.Disconnect the Left Rear Door Lock Motor/Ajar Switch harness connector.Using a 12-volt Test Light connected to 12-volts, check the Sense circuit.Does the Test Light illuminate?AllYes → Repair the Left Rear Door Ajar Switch Sense circuit for a short toground.Perform BODY VERIFICATION TEST - VER 1.No → Go To 33 Disconnect the BCM from the Junction Block.Using a 12-volt Test Light connected to 12-volts, check the Sense circuit.Does the test light illuminate?AllYes → Replace the Junction Block in accordance with the Service Information.Perform BODY VERIFICATION TEST - VER 1.No → Replace the Body Control Module.Perform BODY VERIFICATION TEST - VER 1.241
DOOR AJARSymptom:*LIFTGATE AJAR CIRCUIT OPENPOSSIBLE CAUSESBCM NOT RESPONDING TO INPUTGROUND CIRCUIT OPENLIFTGATE AJAR SWITCH SENSE CIRCUIT OPENJUNCTION BLOCK - OPEN LIFTGATE AJAR CIRCUITBODY CONTROL MODULE-OPEN LIFTGATE AJAR CIRCUITTEST ACTION APPLICABILITY1 Open the liftgate.With the DRBIII in Inputs/Outputs, read the LIFTGATE AJAR SW state.Does the DRBIII display CLOSED?AllYes → Replace the Body Control Module.Perform BODY VERIFICATION TEST - VER 1.No → Go To 22 Disconnect the Right or Left Liftgate Ajar Switch harness connector.Using a 12-volt Test Light connected to 12-volts, check the Ground circuit.Does the test light illuminate?AllYes → Go To 3No → Repair the Liftgate Ajar Switch Ground circuit for an open.Perform BODY VERIFICATION TEST - VER 1.3 Disconnect the Right or Left Liftgate Ajar Switch harness connector.Disconnect the Junction Block C1 harness connector.Measure the resistance of the Sense circuit.Is the resistance below 5.0 ohms?AllYes → Go To 4No → Repair the Liftgate Ajar Switch Sense circuit for an open.Perform BODY VERIFICATION TEST - VER 1.4 Disconnect the Junction Block C1 harness connector.Remove the BCM from the Junction Block.Measure the resistance of the Liftgate Ajar Switch Sense circuit across the JunctionBlock between the C1 connector and the Junction Block-to-BCM connector.Is the resistance below 5.0 ohms?AllYes → Replace the Body Control Module.Perform BODY VERIFICATION TEST - VER 1.No → Replace the Junction Block in accordance with the Service Information.Perform BODY VERIFICATION TEST - VER 1.242
DOOR AJARSymptom:*LIFTGATE AJAR CIRCUIT SHORT TO GROUNDPOSSIBLE CAUSESLEFT LIFTGATE AJAR SWITCH SHORT TO GROUNDRIGHT LIFTGATE AJAR SWITCH SHORT TO GROUNDLIFTGATE AJAR SWITCH SENSE CIRCUIT, SHORT TO GROUNDLIFTGATE AJAR SWITCH SENSE SHORT IN THE JUNCTION BLOCKBCM, SHORT TO GROUNDTEST ACTION APPLICABILITY1 With the DRBIII in Inputs/Outputs, read the LIFTGATE AJAR SW state.Disconnect the Left Liftgate Ajar Switch harness connector.With the DRBIII in Inputs/Outputs, read the LIFTGATE AJAR SW state.Does the Switch State change from CLOSED to OPEN?AllYes → Replace the Left Liftgate Ajar Switch in accordance with theService Information.Perform BODY VERIFICATION TEST - VER 1.No → Go To 22 With the DRBIII in Inputs/Outputs, read the LIFTGATE AJAR SW state.Disconnect the Right Liftgate Ajar Switch harness connector.With the DRBIII in Inputs/Outputs, read the LIFTGATE AJAR SW state.Does the Switch State change from CLOSED to OPEN?AllYes → Replace the Right Liftgate Ajar Switch in accordance with theService Information.Perform BODY VERIFICATION TEST - VER 1.No → Go To 33 Disconnect the Junction Block C1 harness connector.Disconnect the Right and Left Liftgate Ajar Switch harness connectors.Using a 12-volt Test Light connected to 12-volts, check the Sense circuit.Does the Test Light illuminate?AllYes → Repair the Liftgate Ajar Switch Sense circuit for a short toground.Perform BODY VERIFICATION TEST - VER 1.No → Go To 44 Disconnect the BCM from the Junction Block.Using a 12-volt Test Light connected to 12-volts, check the Liftgate Ajar Switch Sensecircuit.Does the test light illuminate?AllYes → Replace the Junction Block in accordance with the Service Information.Perform BODY VERIFICATION TEST - VER 1.No → Replace the Body Control Module.Perform BODY VERIFICATION TEST - VER 1.243
DOOR AJARSymptom:*LIFTGATE FLIP-UP AJAR CIRCUIT OPENPOSSIBLE CAUSESBCM NOT RESPONDING TO INPUTGROUND CIRCUIT OPENLIFTGATE FLIP-UP AJAR SWITCH OPENLIFTGATE FLIP-UP AJAR SWITCH SENSE CIRCUIT OPENJUNCTION BLOCK - OPEN LIFTGATE FLIP-UP AJAR SWITCH SENSE CIRCUITBODY CONTROL MODULE, INTERNAL OPENTEST ACTION APPLICABILITY1 Open the liftgate flip-up.With the DRBIII in Inputs/Outputs, read the LFTGT FLIP-UP AJAR state.Does the DRBIII display CLOSED?AllYes → Replace the Body Control Module.Perform BODY VERIFICATION TEST - VER 1.No → Go To 22 Disconnect the Liftgate Flip-Up Ajar Switch harness connector.Using a 12-volt Test Light connected to 12-volts, check the Ground circuit.Does the test light illuminate?AllYes → Go To 3No → Repair the ground circuit for an open.Perform BODY VERIFICATION TEST - VER 1.3 Disconnect the Liftgate Flip-Up Ajar Switch harness connector.Connect a jumper wire between the Sense circuit and the Ground circuit.With the DRBIII in Inputs/Outputs, read the LFTGT FLIP-UP AJAR SW state.Does the DRBIII display CLOSED?AllYes → Replace the Liftgate Flip-Up Ajar Switch in accordance with theService Information.Perform BODY VERIFICATION TEST - VER 1.No → Go To 44 Disconnect the Liftgate Flip-Up Ajar Switch harness connector.Disconnect the Junction Block C1 harness connector.Measure the resistance of the Sense circuit.Is the resistance below 5.0 ohms?AllYes → Go To 5No → Repair the Liftgate Flip-Up Ajar Switch Sense circuit for an open.Perform BODY VERIFICATION TEST - VER 1.244
DOOR AJAR*LIFTGATE FLIP-UP AJAR CIRCUIT OPEN — ContinuedTEST ACTION APPLICABILITY5 Disconnect the Junction Block C1 harness connector.Remove the BCM from the Junction Block.Measure the resistance of the Liftgate Flip-Up Ajar Switch Sense circuit across theJunction Block between the C1 connector and the Junction Block-to-BCM connector.Is the resistance below 5.0 ohms?AllYes → Replace the Body Control Module.Perform BODY VERIFICATION TEST - VER 1.No → Replace the Junction Block in accordance with the Service Information.Perform BODY VERIFICATION TEST - VER 1.245
DOOR AJARSymptom:*LIFTGATE FLIP-UP AJAR CIRCUIT SHORT TO GROUNDPOSSIBLE CAUSESLIFTGATE FLIP-UP AJAR SWITCH SHORTED TO GROUNDLIFTGATE FLIP-UP AJAR SWITCH SENSE CKT SHORTED TO GROUNDBODY CONTROL MODULE INTERNAL FAULTLIFTGATE FLIP-UP AJAR SENSE CKT SHORTED TO GROUND IN JUNCTION BLOCKTEST ACTION APPLICABILITY1 With the DRBIII in Inputs/Outputs, read the LIFTGLASS SW state.Disconnect the Liftgate Flip-Up Ajar Switch harness connector.With the DRBIII in Inputs/Outputs, read the LIFTGLASS SW state.Does the Switch State change from CLOSED to OPEN?AllYes → Replace the Liftgate Flip-Up Ajar Switch in accordance with theService Information.Perform BODY VERIFICATION TEST - VER 1.No → Go To 22 Disconnect the Junction Block C1 harness connector.Disconnect the Liftgate Flip-Up Ajar Switch harness connector.Using a 12-volt Test Light connected to 12-volts, check the Sense circuit.Does the Test Light illuminate?AllYes → Repair the Liftgate Flip-Up Ajar Switch Sense circuit for a shortto ground.Perform BODY VERIFICATION TEST - VER 1.No → Go To 33 Disconnect the BCM from the Junction Block.Using a 12-volt Test Light connected to 12-volts, check the Liftgate Flip-Up AjarSwitch Sense circuit.Does the test light illuminate?AllYes → Replace the Junction Block in accordance with the Service Information.Perform BODY VERIFICATION TEST - VER 1.No → Replace the Body Control Module.Perform BODY VERIFICATION TEST - VER 1.246
DOOR AJARSymptom:*PASSENGER DOOR AJAR CIRCUIT OPENPOSSIBLE CAUSESPASSENGER DOOR MODULEOPEN PASSENGER DOOR AJAR SWITCH GROUND CKTOPEN PASSENGER DOOR LOCK MOTOR/AJAR SWITCHOPEN PASSENGER DOOR AJAR SWITCH SENSE CKTPASSENGER DOOR MODULETEST ACTION APPLICABILITY1 Open the passenger door.With the DRBIII in Inputs/Outputs, read the PASS DOOR AJAR SW state.Does the DRBIII display CLOSED?AllYes → Replace the Passenger Door Module.Perform BODY VERIFICATION TEST - VER 1.No → Go To 22 Disconnect the Passenger Door Lock Motor/Ajar switch connectorUsing a 12-volt Test Light connected to 12-volts, check the Ground circuit.Does the light illuminate?AllYes → Go To 3No → Repair the Passenger Door Ajar Switch Ground circuit for anopen.Perform BODY VERIFICATION TEST - VER 1.3 Disconnect the Passenger Door Lock Motor/Ajar Switch harness connector.With the DRBIII in Inputs/Outputs, read the PASS DOOR AJAR SW state.Connect a jumper wire between the Sense circuit and the Ground circuit.Does the DRBIII display PASS DOOR AJAR SW: CLOSED?AllYes → Replace the Passenger Door Lock Motor/Ajar Switch in accordancewith the Service Information.Perform BODY VERIFICATION TEST - VER 1.No → Go To 44 Disconnect the PDM harness connector.Disconnect the Passenger Door Lock Motor/Ajar Switch harness connector.Measure the resistance of the Sense circuit.Is the resistance below 5.0 ohms?AllYes → Replace the Passenger Door Module in accordance with theService Information.Perform BODY VERIFICATION TEST - VER 1.No → Repair the Passenger Door Ajar Switch Sense circuit for an open.Perform BODY VERIFICATION TEST - VER 1.247
DOOR AJARSymptom:*PASSENGER DOOR AJAR CIRCUIT SHORT TO GROUNDPOSSIBLE CAUSESPASSENGER DOOR LOCK MOTOR/AJAR SWITCH SHORTED TO GROUNDPASSENGER DOOR AJAR SWITCH SENSE CKT SHORTED TO GROUNDPASSENGER DOOR MODULETEST ACTION APPLICABILITY1 With the DRBIII in Inputs/Outputs, read the PASS DOOR AJAR SW state.Disconnect the Passenger Door Lock Motor/Ajar Switch harness connector.With the DRBIII in Inputs/Outputs, read the PASS DOOR AJAR SW state.Does the Switch State change from CLOSED to OPEN?AllYes → Replace the Passenger Door Lock Motor/Ajar Switch in accordancewith the Service Information.Perform BODY VERIFICATION TEST - VER 1.No → Go To 22 Disconnect the PDM harness connector.Disconnect the Passenger Door Lock Motor/Ajar Switch harness connector.Using a 12-volt Test Light connected to 12-volts, check the Sense circuit.Does the Test Light illuminate?AllYes → Repair the Passenger Door Ajar Switch Sense circuit for a short toground.Perform BODY VERIFICATION TEST - VER 1.No → Replace the Passenger Door Module in accordance with theService Information.Perform BODY VERIFICATION TEST - VER 1.248
DOOR AJARSymptom:*RIGHT REAR DOOR AJAR CIRCUIT OPENPOSSIBLE CAUSESBCM NOT RESPONDING TO INPUTGROUND CKT OPENRIGHT REAR DOOR AJAR SWITCH OPENRIGHT REAR DOOR AJAR SWITCH SENSE CIRCUIT OPENBODY CONTROL MODULE INTERNAL FAULTTEST ACTION APPLICABILITY1 Open the right rear door.With the DRBIII in Inputs/Outputs, read the RR DOOR AJAR SW state.Does the DRBIII display CLOSED?AllYes → Replace the Body Control Module.Perform BODY VERIFICATION TEST - VER 1.No → Go To 22 Disconnect the Right Rear Door Ajar Switch harness connector.Using a 12-volt Test Light connected to 12-volts, check the Ground circuit.Does the test light illuminate?AllYes → Go To 3No → Repair the ground circuit for an open.Perform BODY VERIFICATION TEST - VER 1.3 Disconnect the Right Rear Door Ajar Switch harness connector.Connect a jumper wire between the Sense circuit and the Ground circuit.With the DRBIII in Inputs/Outputs, read the RR DOOR AJAR SW state.Does the DRBIII display CLOSED?AllYes → Replace the Right Rear Door Lock Motor/Ajar Switch,Perform BODY VERIFICATION TEST - VER 1.No → Go To 44 Disconnect the Right Rear Door Ajar Switch harness connector.Disconnect the BCM C1 harness connector.Measure the resistance of the Sense circuit.Is the resistance below 5.0 ohms?AllYes → Replace the Body Control Module.Perform BODY VERIFICATION TEST - VER 1.No → Repair the Right Rear Door Ajar Switch Sense circuit for an open.Perform BODY VERIFICATION TEST - VER 1.249
DOOR AJARSymptom:*RIGHT REAR DOOR AJAR CIRCUIT SHORT TO GROUNDPOSSIBLE CAUSESRIGHT REAR DOOR LOCK MOTOR/AJAR SWITCH SHORTED TO GROUNDRIGHT REAR DOOR AJAR SWITCH SENSE CKT SHORTED TO GROUNDBODY CONTROL MODULE INTERNAL FAULTTEST ACTION APPLICABILITY1 With the DRBIII in Inputs/Outputs, read the RR DOOR AJAR SW state.Disconnect the Right Rear Door Lock Motor/Ajar Switch harness connector.With the DRBIII in Inputs/Outputs, read the RR DOOR AJAR SW state.Does the Switch State change from CLOSED to OPEN?AllYes → Replace the Right Rear Door Lock Motor/Ajar Switch in accordancewith the Service Information.Perform BODY VERIFICATION TEST - VER 1.No → Go To 22 Disconnect the BCM harness connector.Disconnect the Right Rear Door Lock Motor/Ajar Switch harness connector.Using a 12-volt Test Light connected to 12-volts, check the Sense circuit.Does the Test Light illuminate?AllYes → Repair the Right Rear Door Ajar Switch Sense circuit for a shortto ground.Perform BODY VERIFICATION TEST - VER 1.No → Replace the Body Control Module.Perform BODY VERIFICATION TEST - VER 1.250
ELECTRICALLY HEATED SYSTEMSSymptom:DRIVER SEAT HEAT OUTPUT OPEN/SHT TO BATTERY (LAREDO)When Monitored and Set Condition:DRIVER SEAT HEAT OUTPUT OPEN/SHT TO BATTERY (LAREDO)When Monitored: With the ignition on, during the heated seat operation.Set Condition: This condition is set immediately after the Heated Seat Module loses theseat heat element output.POSSIBLE CAUSESDTC PRESENTDRIVER SEAT HEATER SYSTEM SHORT TO BATTERYDRIVER SEAT HEATER B(+) DRIVER CKT SHORTED TO VOLTAGEDRIVER HEATED SEAT CUSHION SHORTED TO VOLTAGEDRIVER SEAT HEATER GROUND CKT SHORTED TO VOLTAGEHEATED SEAT DRIVER CKT SHORTED TO VOLTAGEDRIVER HEATED SEAT CUSHION OPENDRIVER SEAT BACK HEATER OPENHEATED SEAT DRIVER CKT OPENDRIVER SEAT HEATER GROUND CKT OPENDRIVER SEAT HEATER B(+) DRIVER CKT OPENTEST ACTION APPLICABILITY1 With the DRBIII, erase DTCs.Start the engine.Turn the driver seat heater on and operate in both ranges.With the DRBIII, read DTCs.Did the DRIVER SEAT HEAT OUTPUT OPEN/SHORT TO BATTERY DTC return?AllYes → Go To 2No → The conditions required to set the code are currently not present.Using the wiring diagram/schematic as a guide, inspect thewiring and connectors.Perform VERIFICATION TEST -MEMORY SYSTEM.251
ELECTRICALLY HEATED SYSTEMSDRIVER SEAT HEAT OUTPUT OPEN/SHT TO BATTERY (LAREDO) —ContinuedTEST ACTION APPLICABILITY2 NOTE: Raise the seat to the highest position to gain access to the connectors.The HSM is located at the front of the seat and the Seat Heaterconnectors are at the rear of the seat.Turn the ignition off.Disconnect the Heated Seat Module C2 harness connector.Measure the total resistance of the Driver Seat Heat System between the Driver SeatHeater B(+) Driver and the Driver Seat Heater Ground circuits in the HSM C2connector.Is the resistance below 50.0 ohms?AllYes → Go To 3No → Go To 73 NOTE: Raise the seat to the highest position to gain access to the connectors.The HSM is located at the front of the seat and the Seat Heaterconnectors are at the rear of the seat.Turn the ignition off.Disconnect the Heated Seat Module C2 harness connector.Turn the ignition on.Measure the voltage of the Driver Seat Heater B(+) Driver circuit.Is ANY voltage present on the Driver Seat Heater B(+) Driver circuit?AllYes → Go To 4No → Replace the Heated Seat Module.Perform VERIFICATION TEST -MEMORY SYSTEM.4 NOTE: Raise the seat to the highest position to gain access to the connectors.The HSM is located at the front of the seat and the Seat Heaterconnectors are at the rear of the seat.Turn the ignition off.Disconnect the Heated Seat Module C2 harness connector.Disconnect the Driver Heated Seat Cushion 4-way connector.Turn the ignition on.Measure the voltage of the Driver Seat Heater B(+) Driver circuit.Is there ANY voltage on the Driver Seat Heater B(+) Driver circuit?AllYes → Repair the Driver Seat Heater B(+) Driver circuit for a short tovoltage.Perform VERIFICATION TEST -MEMORY SYSTEM.No → Go To 55 NOTE: Raise the seat to the highest position to gain access to the connectors.The HSM is located at the front of the seat and the Seat Heaterconnectors are at the rear of the seat.Turn the ignition off.Disconnect the Heated Seat Module C2 harness connector.Disconnect the Driver Heated Seat Back 4-way connector.Turn the ignition on.Measure the voltage of the Driver Seat Heater Ground circuit.Is there ANY voltage on the Driver Seat Heater Ground circuit?AllYes → Go To 6No → Replace the Driver Heated Seat Cushion.Perform VERIFICATION TEST -MEMORY SYSTEM.252
ELECTRICALLY HEATED SYSTEMSDRIVER SEAT HEAT OUTPUT OPEN/SHT TO BATTERY (LAREDO) —ContinuedTEST ACTION APPLICABILITY6 NOTE: Raise the seat to the highest position to gain access to the connectors.The HSM is located at the front of the seat and the Seat Heaterconnectors are at the rear of the seat.Turn the ignition off.Disconnect the Heated Seat Module C2 harness connector.Disconnect the Driver Heated Seat Back 2-way (green) connector.Disconnect the Driver Heated Seat Cushion 4-way connector.Turn the ignition on.Measure the voltage of the Driver Seat Heater Ground circuit.Is there ANY voltage on the Driver Seat Heater Ground circuit?AllYes → Repair the Driver Seat Heater Ground circuit for a short tovoltage.Perform VERIFICATION TEST -MEMORY SYSTEM.No → Repair the Heated Seat Driver circuit for a short to voltage.Perform VERIFICATION TEST -MEMORY SYSTEM.7 NOTE: Raise the seat to the highest position to gain access to the connectors.The HSM is located at the front of the seat and the Seat Heaterconnectors are at the rear of the seat.Disconnect the Driver Heated Seat Cushion 4-way connector.Measure the resistance of the CUSHION SEAT HEATER ELEMENT.Connect one lead to the Heated Seat Driver circuit (cushion side) and the other leadto the Driver Seat Heater B(+) Driver circuit (cushion side) in the Driver Heated SeatCushion 4 way connector.Is the resistance below 3.0 ohms?AllYes → Go To 8No → Replace the Driver Heated Seat Cushion / Bolster.Perform VERIFICATION TEST -MEMORY SYSTEM.8 NOTE: Raise the seat to the highest position to gain access to the connectors.The HSM is located at the front of the seat and the Seat Heaterconnectors are at the rear of the seat.Disconnect the Driver Heated Seat Back 2-way (green) connector.Measure the resistance of the SEAT BACK HEATER ELEMENT.Connect one lead to the Heated Seat Driver circuit (seat back side) and the other leadto the Driver Seat Heater Ground circuit (seat back side) in the Driver Heated Seat2-way connector.Is the resistance below 3.0 ohms?AllYes → Go To 9No → Replace the Driver Heated Seat Back.Perform VERIFICATION TEST -MEMORY SYSTEM.253
ELECTRICALLY HEATED SYSTEMSDRIVER SEAT HEAT OUTPUT OPEN/SHT TO BATTERY (LAREDO) —ContinuedTEST ACTION APPLICABILITY9 NOTE: Raise the seat to the highest position to gain access to the connectors.The HSM is located at the front of the seat and the Seat Heaterconnectors are at the rear of the seat.Disconnect the Driver Heated Seat Back 2-way (green) connector.Disconnect the Driver Heated Seat Cushion 4-way connector.Measure the resistance of the Heated Seat Driver circuit between the Driver HeatedSeat Back 2-way connector (harness side) and the Driver Heated Seat Cushion 4-wayconnector (harness side).Is the resistance below 5.0 ohms?AllYes → Go To 10No → Repair the open Heated Seat Driver circuit.Perform VERIFICATION TEST -MEMORY SYSTEM.10 NOTE: Raise the seat to the highest position to gain access to the connectors.The HSM is located at the front of the seat and the Seat Heaterconnectors are at the rear of the seat.Disconnect the Driver Heated Seat Back 2-way (green) connector.Disconnect the HSM C2 harness connector.Measure the resistance of the Driver Seat Heater Ground circuit between the SeatBack 2-way connector (harness side) and the Heated Seat Module connector.Is the resistance below 5.0 ohms?AllYes → Go To 11No → Repair the Driver Seat Heater Ground circuit for an open.Perform VERIFICATION TEST -MEMORY SYSTEM.11 NOTE: Raise the seat to the highest position to gain access to the connectors.The HSM is located at the front of the seat and the Seat Heaterconnectors are at the rear of the seat.Turn the ignition off.Disconnect the Driver Heated Seat Cushion 4-way connector.Disconnect the Heated Seat Module C2 harness connector.Measure the resistance of the Driver Seat Heater B(+) Driver circuit between theHSM C2 connector and the Driver Heated Seat Cushion 4-way connector (harnessside).Is the resistance below 5.0 ohms?AllYes → Test Complete.No → Repair the open Driver Seat Heater B(+) Driver circuit.Perform VERIFICATION TEST -MEMORY SYSTEM.254
ELECTRICALLY HEATED SYSTEMSSymptom:DRIVER SEAT HEAT OUTPUT OPEN/SHT TO BATTERY (LIMITED)When Monitored and Set Condition:DRIVER SEAT HEAT OUTPUT OPEN/SHT TO BATTERY (LIMITED)When Monitored: With the ignition, during the heated seat operation.Set Condition: This condition is set immediately after the Heated Seat Module loses theseat heat element output.POSSIBLE CAUSESDTC PRESENTHEATED SEAT MODULEDRIVER SEAT HEATER B+ DRIVER CKT SHORTED TO VOLTAGEDRIVER HEATED SEAT CUSHION SHORTED TO VOLTAGEDRIVER SEAT HEATER GROUND CKT (1) SHORTED TO VOLTAGEDRIVER SEAT HEATED GROUND CKT (2) SHORTED TO VOLTAGECONNECTOR TO SPLICE - CUSHION SIDE - OPENDRIVER SEAT HEATER B(+) DRIVER CKT OPENDRIVER SEAT HEATER GROUND CKT (JUMPER) OPENDRIVER SEAT HEATER GROUND CKT (1) OPENDRIVER SEAT HEATER GROUND CKT (2) OPENTEST ACTION APPLICABILITY1 With the DRBIII, erase DTCs.Start the engine.Turn the driver seat heater on and operate in both ranges.With the DRBIII, read DTCs.Did the DRIVER SEAT HEAT OUTPUT OPEN/SHORT TO BATTERY DTC return?AllYes → Go To 2No → The conditions required to set the code are currently not present.Using the wiring diagram/schematic as a guide, inspect thewiring and connectors.Perform VERIFICATION TEST -MEMORY SYSTEM.255
ELECTRICALLY HEATED SYSTEMSDRIVER SEAT HEAT OUTPUT OPEN/SHT TO BATTERY (LIMITED) —ContinuedTEST ACTION APPLICABILITY2 NOTE: Raise the seat to the highest position to gain access to the connectors.The HSM is located at the front of the seat and the Seat Heaterconnectors are at the rear of the seat.Turn the ignition off.Disconnect the Heated Seat Module C2 harness connector.Measure the total resistance of the Driver Seat Heater System from the Driver SeatHeater B(+) Driver to the Driver Seat Heater Ground in the HSM C2 connectorIs the resistance below 50.0 ohms?AllYes → Go To 3No → Go To 73 NOTE: Raise the seat to the highest position to gain access to the connectors.The HSM is located at the front of the seat and the Seat Heaterconnectors are at the rear of the seat.Turn the ignition off.Disconnect the Heated Seat Module C2 harness connector.Turn the ignition on.Measure the voltage of the Driver Seat Heater B(+) Driver circuit.Is ANY voltage present on the Driver Seat Heater B(+) Driver circuit?AllYes → Go To 4No → Replace the Heated Seat Module.Perform VERIFICATION TEST -MEMORY SYSTEM.4 NOTE: Raise the seat to the highest position to gain access to the connectors.The HSM is located at the front of the seat and the Seat Heaterconnectors are at the rear of the seat.Turn the ignition off.Disconnect the Heated Seat Module C2 harness connector.Disconnect the Driver Heated Seat Cushion 4-way connector.Turn the ignition on.Measure the voltage of the Driver Seat Heater B(+) Driver circuit.Is there ANY voltage on the Driver Seat Heater B(+) Driver circuit?AllYes → Repair the Driver Seat Heater B(+) Driver circuit for a short tovoltage.Perform VERIFICATION TEST -MEMORY SYSTEM.No → Go To 55 NOTE: Raise the seat to the highest position to gain access to the connectors.The HSM is located at the front of the seat and the Seat Heaterconnectors are at the rear of the seat.Turn the ignition off.Disconnect the HSM C2 harness connector.Disconnect the Driver Heated Seat Back 4-way connector.Turn the ignition on.Measure the voltage of the Driver Seat Heater Ground circuit at the HSM C2connector.Is there ANY voltage on the Driver Seat Heater Ground circuit?AllYes → Go To 6No → Replace the Driver Heated Seat Cushion / Bolster.Perform VERIFICATION TEST -MEMORY SYSTEM.256
ELECTRICALLY HEATED SYSTEMSDRIVER SEAT HEAT OUTPUT OPEN/SHT TO BATTERY (LIMITED) —ContinuedTEST ACTION APPLICABILITY6 NOTE: Raise the seat to the highest position to gain access to the connectors.The HSM is located at the front of the seat and the Seat Heaterconnectors are at the rear of the seat.Turn the ignition off.Disconnect the HSM C2 harness connector.Disconnect the Driver Heated Seat Cushion 4-way connector.Disconnect the Driver Heated Seat Back 2-way connector.Turn the ignition on.Measure the voltage of the Driver Seat Heater Ground circuit at the HSM C2connector.Is there ANY voltage on the Driver Seat Heater Ground circuit?AllYes → Repair the Driver Seat Heater Ground circuit for a short tovoltage between the HSM C2 connector and the Driver HeatedSeat Back 2-way connector.Perform VERIFICATION TEST -MEMORY SYSTEM.No → Repair the Driver Seat Heater Ground circuit for a short tovoltage between the Driver Heated Seat Back 2-way connectorand the Driver Heated Seat Cushion 4-way connector.Perform VERIFICATION TEST -MEMORY SYSTEM.7 NOTE: Raise the seat to the highest position to gain access to the connectors.The HSM is located at the front of the seat and the Seat Heaterconnectors are at the rear of the seat.Turn the ignition off.Disconnect the HSM C2 harness connector.Disconnect the Driver Heated Seat Cushion 4-way connector.Connect a jumper wire from the Driver Seat Heater B+ Driver circuit to the DriverSeat Heater Ground circuit at the Driver Heated Seat Cushion 4-way connector(harness side).Measure the resistance of the Driver Seat Heater B+ Driver circuit and the DriverSeat Heater Ground circuit in the HSM C2 connector.Is the resistance below 5.0 ohms?AllYes → Repair the open circuit in either the Driver Seat Heater Groundor the Driver Seat Heater B(+) Driver wiring between the HSMC2 connector and the splice in the seat.Perform VERIFICATION TEST -MEMORY SYSTEM.No → Go To 88 NOTE: Raise the seat to the highest position to gain access to the connectors.The HSM is located at the front of the seat and the Seat Heaterconnectors are at the rear of the seat.Turn the ignition off.Disconnect the Heated Seat Module C2 harness connector.Disconnect the Driver Heated Seat Cushion 4-way connector.Measure the resistance of the Driver Seat Heater B(+) Driver circuit between theHSM C2 connector and the Driver Heated Seat Cushion 4-way connector (harnessside).Is the resistance below 5.0 ohms?AllYes → Go To 9No → Repair the open Driver Seat Heater B(+) Driver circuit.Perform VERIFICATION TEST -MEMORY SYSTEM.257
ELECTRICALLY HEATED SYSTEMSDRIVER SEAT HEAT OUTPUT OPEN/SHT TO BATTERY (LIMITED) —ContinuedTEST ACTION APPLICABILITY9 NOTE: Raise the seat to the highest position to gain access to the connectors.The HSM is located at the front of the seat and the Seat Heaterconnectors are at the rear of the seat.Disconnect the Driver Heated Seat Back 2-way (green) connector.Measure the resistance of the Driver Seat Heater Ground circuit (jumper).Is the resistance below 5.0 ohms?AllYes → Go To 10No → Repair the open Driver Seat Heater Ground (jumper) circuit.Perform VERIFICATION TEST -MEMORY SYSTEM.10 NOTE: Raise the seat to the highest position to gain access to the connectors.The HSM is located at the front of the seat and the Seat Heaterconnectors are at the rear of the seat.Turn the ignition off.Disconnect the Driver Heated Seat Back 2-way (green) connector.Disconnect the Driver Heated Seat Cushion 4-way connector.Measure the resistance of the Driver Seat Heater Ground circuit between the 2connectors.Is the resistance below 5.0 ohms?AllYes → Go To 11No → Repair the open Driver Seat Heater Ground circuit between theDriver Heated Seat Back 2-way connector and the Driver HeatedSeat Cushion 4-way connector.Perform VERIFICATION TEST -MEMORY SYSTEM.11 NOTE: Raise the seat to the highest position to gain access to the connectors.The HSM is located at the front of the seat and the Seat Heaterconnectors are at the rear of the seat.Turn the ignition off.Disconnect the Driver Heated Seat Back 2-way (green) connector.Disconnect the HSM C2 harness connector.Measure the resistance of the Driver Seat Heater Ground circuit between the SeatBack 2-way connector (harness side) and the Heated Seat Module C2 connector.Is the resistance below 5.0 ohms?AllYes → Test Complete.No → Repair the Driver Seat Heater Ground circuit for an open.Perform VERIFICATION TEST -MEMORY SYSTEM.258
ELECTRICALLY HEATED SYSTEMSSymptom:DRIVER SEAT HEAT OUTPUT SHORT TO GND (LIMITED)When Monitored and Set Condition:DRIVER SEAT HEAT OUTPUT SHORT TO GND (LIMITED)When Monitored: With the ignition on, during the heated seat operation.Set Condition: This condition is set immediately after the Heated Seat Module detects anoutput shorted to ground.POSSIBLE CAUSESDTC PRESENTHEATED SEAT MODULEDRIVER SEAT HEATER B(+) DRIVER CKT SHORTED TO DRIVER SEAT HEATER GROUNDDRIVER SEAT HEATER B(+) DRIVER CKT SHORTED TO GROUNDHEATED SEAT MODULEDRIVER HEATED SEAT CUSHION SHORTED TO GROUNDDRIVER HEATED SEAT BACK SHORTED TO GROUNDTEST ACTION APPLICABILITY1 With the DRBIII, erase DTCs.Start the engine.Turn the driver seat heater on and operate in both ranges.With the DRBIII, read DTCs.Did the DRIVER SEAT HEAT OUTPUT SHORT TO GROUND DTC return?AllYes → Go To 2No → The conditions required to set the code are currently not present.Using the wiring diagram/schematic as a guide, inspect thewiring and connectors.Perform VERIFICATION TEST -MEMORY SYSTEM.2 Using the DRBIII, select: Body - Memory Seat Module - Erase DTC’s.NOTE: Raise the seat to the highest position to gain access to the connectors.The HSM is located at the front of the seat and the Seat Heaterconnectors are at the rear of the seat.Turn the ignition off.Disconnect the Driver Heated Seat Cushion 4-way connector.Turn the ignition on.Turn the driver heated seat on.With the DRBIII, read DTC’s.Does the DRBIII still show Driver Seat Heat Output Short to Gnd?AllYes → Go To 3No → Go To 5259
ELECTRICALLY HEATED SYSTEMSDRIVER SEAT HEAT OUTPUT SHORT TO GND (LIMITED) — ContinuedTEST ACTION APPLICABILITY3 NOTE: Raise the seat to the highest position to gain access to the connectors.The HSM is located at the front of the seat and the Seat Heaterconnectors are at the rear of the seat.Turn the ignition off.Disconnect the Heated Seat Module C2 harness connector.Disconnect the Driver Heated Seat Cushion 4-way connector.Measure the resistance of the Driver Seat Heater B(+) Driver circuit to the DriverSeat Heater Ground circuit in the HSM C2 connector.Is the resistance below 1000.0 ohms?AllYes → Repair the Driver Seat Heater B(+) Driver circuit for a short tothe Driver Seat Heater Ground circuit.Perform VERIFICATION TEST -MEMORY SYSTEM.No → Go To 44 NOTE: Raise the seat to the highest position to gain access to the connectors.The HSM is located at the front of the seat and the Seat Heaterconnectors are at the rear of the seat.Turn the ignition off.Disconnect the Heated Seat Module C2 harness connector.Disconnect the Driver Heated Seat Cushion 4-way connector.Measure the resistance of the Driver Seat Heater B(+) Driver circuit to ground.Is the resistance below 5.0 ohms?AllYes → Repair the Driver Seat Heater B(+) Driver circuit for a short toground.Perform VERIFICATION TEST -MEMORY SYSTEM.No → Replace the Heated Seat Module.Perform VERIFICATION TEST -MEMORY SYSTEM.5 NOTE: Raise the seat to the highest position to gain access to the connectors.The HSM is located at the front of the seat and the Seat Heaterconnectors are at the rear of the seat.Turn the ignition off.Disconnect the Driver Heated Seat Cushion 4-way connector.Measure the resistance of the Driver Seat Heater B(+) Driver circuit in the DriverHeated Seat Cushion connector (cushion side) to ground.Is the resistance below 100.0 ohms?AllYes → Go To 6No → Replace the Heated Seat Module.Perform VERIFICATION TEST -MEMORY SYSTEM.6 NOTE: Raise the seat to the highest position to gain access to the connectors.The HSM is located at the front of the seat and the Seat Heaterconnectors are at the rear of the seat.Turn the ignition off.Disconnect the Driver Heated Seat Cushion 4-way connector.Disconnect the Driver Heated Seat Back 2-way (black) connector.Measure the resistance of the Driver Seat Heater B(+) Driver circuit in the DriverHeated Seat Cushion connector (cushion side) to ground.Is the resistance below 1000.0 ohms?AllYes → Replace the Driver Heated Seat Cushion.Perform VERIFICATION TEST -MEMORY SYSTEM.No → Replace the Driver Heated Seat Back.Perform VERIFICATION TEST -MEMORY SYSTEM.260
ELECTRICALLY HEATED SYSTEMSSymptom:DRIVER SEAT HEAT OUTPUT SHORT TO GROUND (LAREDO)When Monitored and Set Condition:DRIVER SEAT HEAT OUTPUT SHORT TO GROUND (LAREDO)When Monitored: With the ignition on, during the heated seat operation.Set Condition: This condition is set immediately after the Heated Seat Module detects anoutput shorted to ground.POSSIBLE CAUSESDTC PRESENTDRIVER SEAT HEATER B(+) DRIVER CKT SHORTED TO DRIVER SEAT HEATER GROUNDDRIVER SEAT HEATER B(+) DRIVER CKT SHORTED TO GROUNDDRIVER SEAT CUSHION SHORTED TO GROUNDHEATED SEAT MODULETEST ACTION APPLICABILITY1 With the DRBIII, erase DTCs.Start the engine.Turn the driver seat heater on and operate in both ranges.With the DRBIII, read DTCs.Did the DRIVER SEAT HEAT OUTPUT SHORT TO GROUND DTC return?AllYes → Go To 2No → The conditions required to set the code are currently not present.Using the wiring diagram/schematic as a guide, inspect thewiring and connectors.Perform VERIFICATION TEST -MEMORY SYSTEM.2 NOTE: Raise the seat to the highest position to gain access to the connectors.The HSM is located at the front of the seat and the Seat Heaterconnectors are at the rear of the seat.Using the DRBIII, select: Body - Memory Seat Module - Erase DTC’s.Turn the ignition off.Disconnect the Driver Heated Seat Cushion 4-way connector.Start the engine.Turn the driver seat heater on and operate at both ranges.With the DRBIII, read DTC’s.Does the DRBIII still show Driver Seat Heat Output Short to Gnd?AllYes → Go To 3No → Go To 5261
ELECTRICALLY HEATED SYSTEMSDRIVER SEAT HEAT OUTPUT SHORT TO GROUND (LAREDO) —ContinuedTEST ACTION APPLICABILITY3 NOTE: Raise the seat to the highest position to gain access to the connectors.The HSM is located at the front of the seat and the Seat Heaterconnectors are at the rear of the seat.Turn the ignition off.Disconnect the Heated Seat Module C2 harness connector.Disconnect the Driver Heated Seat Cushion 4-way connector.Measure the resistance of the Driver Seat Heater B(+) Driver circuit to the DriverSeat Heater Ground circuit in the HSM C2 connector.Is the resistance below 1000.0 ohms?AllYes → Repair the Driver Seat Heater B(+) Driver circuit for a short tothe Driver Seat Heater Ground circuit.Perform VERIFICATION TEST -MEMORY SYSTEM.No → Go To 44 NOTE: Raise the seat to the highest position to gain access to the connectors.The HSM is located at the front of the seat and the Seat Heaterconnectors are at the rear of the seat.Turn the ignition off.Disconnect the Heated Seat Module C2 harness connector.Disconnect the Driver Heated Seat Cushion 4-way connector.Measure the resistance of the Driver Seat Heater B(+) Driver circuit to ground.Is the resistance below 5.0 ohms?AllYes → Repair the Driver Seat Heater B(+) Driver circuit for a short toground.Perform VERIFICATION TEST -MEMORY SYSTEM.No → Replace the Heated Seat Module.Perform VERIFICATION TEST -MEMORY SYSTEM.5 NOTE: Raise the seat to the highest position to gain access to the connectors.The HSM is located at the front of the seat and the Seat Heaterconnectors are at the rear of the seat.Turn the ignition on.Disconnect the Driver Heated Seat Cushion 4-way connector.Measure the resistance of the Driver Seat Cushion connector (cushion side) toground.Is the resistance below 100.0 ohms?AllYes → Replace the Driver Heater Cushion.Perform VERIFICATION TEST -MEMORY SYSTEM.No → Test Complete.262
ELECTRICALLY HEATED SYSTEMSSymptom:DRIVER THERMISTOR OUT <strong>OF</strong> RANGE HIGHWhen Monitored and Set Condition:DRIVER THERMISTOR OUT <strong>OF</strong> RANGE HIGHWhen Monitored: With the ignition on, during the heated seat operation.Set Condition: This condition is immediately set when the Heated Seat Module senses agreater value than the value stored in EEPROM.POSSIBLE CAUSESDRIVER HEATED SEAT SENSOR SHORTEDDRIVER SEAT TEMPERATURE SENSOR INPUT CIRCUIT SHORTED TO BATTERYDRIVER SEAT TEMPERATURE SENSOR INPUT CIRCUIT SHORTED TO 5 VOLT SUPPLYSEAT SENSOR 5-VOLT SUPPLY CIRCUIT SHORTED TO GROUNDHEATED SEAT MODULE - SENSOR SHORTEDTEST ACTION APPLICABILITY1 NOTE: Raise the seat to the highest position to gain access to the connectors.The HSM is located at the front of the seat and the Seat Heaterconnectors are at the rear of the seat.Turn the ignition off.Disconnect the Driver Heated Seat Cushion 4-way connector.Measure the resistance between the Seat Sensor 5 Volt Supply circuit and the DriverSeat Temperature Sensor Input circuit at the driver heated seat cushion (cushionside) connector.Is the resistance below 800 ohms at room temperature?AllYes → Replace the Driver Heated Seat Cushion Cover - sensor shorted..Perform VERIFICATION TEST -MEMORY SYSTEM.No → Go To 22 NOTE: Raise the seat to the highest position to gain access to the connectors.The HSM is located at the front of the seat and the Seat Heaterconnectors are at the rear of the seat.Turn the ignition off.Disconnect the Heated Seat Module C1 harness connector.Disconnect the Driver Heated Seat Cushion 4-way connector.Turn the ignition on.Measure the voltage between the Driver Seat Temperature Sensor Input circuit andground.Is the voltage above 5.5 volts?AllYes → Repair the Driver Seat Temperature Sensor Input circuit for ashort to battery.Perform VERIFICATION TEST -MEMORY SYSTEM.No → Go To 3263
ELECTRICALLY HEATED SYSTEMSDRIVER THERMISTOR OUT <strong>OF</strong> RANGE HIGH — ContinuedTEST ACTION APPLICABILITY3 NOTE: Raise the seat to the highest position to gain access to the connectors.The HSM is located at the front of the seat and the Seat Heaterconnectors are at the rear of the seat.Turn the ignition off.Disconnect the Heated Seat Module C1 harness connector.Disconnect the Driver Heated Seat Cushion 4-way connector.Turn the ignition on.Measure the voltage between the Driver Seat Temperature Sensor Input circuit andground.Is there ANY voltage on the Driver Seat Temperature Sensor Input circuit?AllYes → Repair the Driver Seat Temperature Sensor Input circuit for ashort to 5 volt supply.Perform VERIFICATION TEST -MEMORY SYSTEM.No → Go To 44 NOTE: Raise the seat to the highest position to gain access to the connectors.The HSM is located at the front of the seat and the Seat Heaterconnectors are at the rear of the seat.Turn the ignition off.Disconnect the Heated Seat Module C1 harness connector.Disconnect the Driver Heated Seat Cushion 4-way connector.Turn the ignition on.Measure the resistance of the Seat Sensor 5 Volt Supply circuit to ground.Is the resistance below 1000.0 ohms?AllYes → Repair the Seat Sensor 5 Volt Supply circuit for a short to ground.Perform VERIFICATION TEST -MEMORY SYSTEM.No → Replace the Heated Seat Module.Perform VERIFICATION TEST -MEMORY SYSTEM.264
ELECTRICALLY HEATED SYSTEMSSymptom:DRIVER THERMISTOR OUT <strong>OF</strong> RANGE LOWWhen Monitored and Set Condition:DRIVER THERMISTOR OUT <strong>OF</strong> RANGE LOWWhen Monitored: With the ignition on, during the heated seat operation.Set Condition: This condition is immediately set when the Heated Seat Module senses alesser value than the value stored in EEPROM.POSSIBLE CAUSESDRIVER HEATED SEAT CUSHION SENSOR OPENDRIVER SEAT TEMPERATURE SENSOR INPUT CKT SHORTED TO GROUNDDRIVER HEATED SEAT CUSHION FAILED SENSORDRIVER SEAT TEMPERATURE SENSOR INPUT CKT OPENSEAT SENSOR 5-VOLT SUPPLY CKT OPENHEATED SEAT MODULEHEATED SEAT MODULE - 5 VOLT SUPPLY OPENTEST ACTION APPLICABILITY1 NOTE: Raise the seat to the highest position to gain access to the connectors.The HSM is located at the front of the seat and the Seat Heaterconnectors are at the rear of the seat.Turn the ignition off.Disconnect the Driver Heated Seat Cushion 4-way connector.Turn the ignition on.Measure the voltage between the Seat Sensor 5 Volt Supply circuit and ground.Is the voltage below 4.5 volts?AllYes → Go To 2No → Go To 32 NOTE: Raise the seat to the highest position to gain access to the connectors.The HSM is located at the front of the seat and the Seat Heaterconnectors are at the rear of the seat.Turn the ignition off.Disconnect the Heated Seat Module C1 connector.Disconnect the Driver Heated Seat Cushion 4-way connector.Measure the resistance of the Seat Sensor 5 Volt Supply circuit between the HeatedSeat Module connector and the Driver Heated Seat Cushion (harness side) connector.Is the resistance below 5.0 ohms?AllYes → Replace the Heated Seat Module - 5 volt supply open.Perform VERIFICATION TEST -MEMORY SYSTEM.No → Repair the open Seat Sensor 5 Volt Supply circuit.Perform VERIFICATION TEST -MEMORY SYSTEM.265
ELECTRICALLY HEATED SYSTEMSDRIVER THERMISTOR OUT <strong>OF</strong> RANGE LOW — ContinuedTEST ACTION APPLICABILITY3 NOTE: Raise the seat to the highest position to gain access to the connectors.The HSM is located at the front of the seat and the Seat Heaterconnectors are at the rear of the seat.Turn the ignition off.Disconnect the Driver Heated Seat Cushion 4-way connector.Measure the resistance between the Seat Sensor 5 Volt Supply circuit and the DriverSeat Temperature Sensor Input circuit at the driver heated seat cushion (cushionside) connector.Is the resistance above 70,000 (70K) ohms at room temperature?AllYes → Replace the Driver Heated Seat Cushion.Perform VERIFICATION TEST -MEMORY SYSTEM.No → Go To 44 NOTE: Raise the seat to the highest position to gain access to the connectors.The HSM is located at the front of the seat and the Seat Heaterconnectors are at the rear of the seat.Turn the ignition off.Disconnect the Heated Seat Module C1 harness connector.Disconnect the Driver Heated Seat Cushion 4-way connector.Measure the resistance of the Driver Seat Temperature Sensor Input circuit (harnessside) and ground.Is the resistance below 1,000.0 ohms?AllYes → Repair the Driver Seat Temperature Sensor Input circuit for ashort to ground.Perform VERIFICATION TEST -MEMORY SYSTEM.No → Go To 55 NOTE: Raise the seat to the highest position to gain access to the connectors.The HSM is located at the front of the seat and the Seat Heaterconnectors are at the rear of the seat.Turn the ignition off.Disconnect the Driver Heated Seat Cushion 4-way connector.Measure the resistance between the Driver Seat Temp Sensor Input circuit (cushionside) and ground.Is the resistance below 1000.0 ohms?AllYes → Replace the Driver Heated Seat Cushion.Perform VERIFICATION TEST -MEMORY SYSTEM.No → Go To 66 NOTE: Raise the seat to the highest position to gain access to the connectors.The HSM is located at the front of the seat and the Seat Heaterconnectors are at the rear of the seat.Turn the ignition off.Disconnect the Heated Seat Module C1 connector.Disconnect the Driver Heated Seat Cushion 4-way connector.Measure the resistance of the Driver Seat Temperature Sensor Input circuit from theHeated Seat Module connector to the Driver Heated Seat Cushion connector.Is the resistance below 5.0 ohms?AllYes → Replace the Heated Seat Module.Perform VERIFICATION TEST -MEMORY SYSTEM.No → Repair the open Driver Seat Temperature Sensor Input circuit.Perform VERIFICATION TEST -MEMORY SYSTEM.266
ELECTRICALLY HEATED SYSTEMSSymptom:PASSENGER SEAT HEAT OUTPUT OPEN/SHT TO BATTERY(LAREDO)When Monitored and Set Condition:PASSENGER SEAT HEAT OUTPUT OPEN/SHT TO BATTERY (LAREDO)When Monitored: With the ignition on, during the heated seat operation.Set Condition: This condition is set immediately after the Heated Seat Module loses theseat heat element output.POSSIBLE CAUSESDTC PRESENTPASSENGER SEAT HEATER SYSTEM SHORTED TO VOLTAGEPASSENGER SEAT HEATER B(+) DRIVER CKT SHORTED TO VOLTAGEPASSENGER HEATED SEAT CUSHION SHORTED TO VOLTAGEPASSENGER SEAT HEATER GROUND CKT SHORTED TO VOLTAGEHEATED SEAT DRIVER CKT SHORTED TO VOLTAGEPASSENGER HEATED SEAT CUSHION OPENPASSENGER SEAT BACK HEATER OPENHEATED SEAT DRIVER CKT OPENPASSENGER SEAT HEATER GROUND CKT OPENPASSENGER SEAT HEATER B(+) DRIVER CKT OPENTEST ACTION APPLICABILITY1 With the DRBIII, erase DTCs.Start the engine.Turn the passenger seat heater on and operate in both ranges.With the DRBIII, read DTCs.Did the PASSENGER SEAT HEAT OUTPUT OPEN/SHORT TO BATTERY DTCreturn?AllYes → Go To 2No → The conditions required to set the code are currently not present.Using the wiring diagram/schematic as a guide, inspect thewiring and connectors.Perform VERIFICATION TEST -MEMORY SYSTEM.267
ELECTRICALLY HEATED SYSTEMSPASSENGER SEAT HEAT OUTPUT OPEN/SHT TO BATTERY (LAREDO)— ContinuedTEST ACTION APPLICABILITY2 NOTE: Raise the seat to the highest position to gain access to the connectors.The HSM is located at the front of the seat and the Seat Heaterconnectors are at the rear of the seat.Turn the ignition off.Disconnect the Heated Seat Module C2 harness connector.Measure the total resistance of the Passenger Seat Heater System between thePassenger Seat Heater B(+) Driver and the Passenger Seat Heater Ground circuitsin the HSM C2 connector.Is the resistance below 50.0 ohms?AllYes → Go To 3No → Go To 73 NOTE: Raise the seat to the highest position to gain access to the connectors.The HSM is located at the front of the seat and the Seat Heaterconnectors are at the rear of the seat.Turn the ignition off.Disconnect the Heated Seat Module C2 harness connector.Turn the ignition on.Measure the voltage of the Passenger Seat Heater B(+) Driver circuit.Is ANY voltage present on the Passenger Seat Heater B(+) Driver circuit?AllYes → Go To 4No → Replace the Heated Seat Module.Perform VERIFICATION TEST -MEMORY SYSTEM.4 NOTE: Raise the seat to the highest position to gain access to the connectors.The HSM is located at the front of the seat and the Seat Heaterconnectors are at the rear of the seat.Turn the ignition off.Disconnect the Heated Seat Module C2 harness connector.Disconnect the Passenger Heated Seat Cushion 4-way connector.Turn the ignition on.Measure the voltage of the Passenger Seat Heater B(+) Driver circuit.Is there ANY voltage on the Passenger Seat Heater B(+) Driver circuit?AllYes → Repair the Passenger Seat Heater B(+) Driver circuit for a shortto voltage.Perform VERIFICATION TEST -MEMORY SYSTEM.No → Go To 55 NOTE: Raise the seat to the highest position to gain access to the connectors.The HSM is located at the front of the seat and the Seat Heaterconnectors are at the rear of the seat.Turn the ignition off.Disconnect the Heated Seat Module C2 harness connector.Disconnect the Passenger Heated Seat Back 4-way connector.Turn the ignition on.Measure the voltage of the Passenger Seat Heater Ground circuit.Is there ANY voltage on the Passenger Seat Heater Ground circuit?AllYes → Go To 6No → Replace the Passenger Heated Seat Cushion / Bolster.Perform VERIFICATION TEST -MEMORY SYSTEM.268
ELECTRICALLY HEATED SYSTEMSPASSENGER SEAT HEAT OUTPUT OPEN/SHT TO BATTERY (LAREDO)— ContinuedTEST ACTION APPLICABILITY6 NOTE: Raise the seat to the highest position to gain access to the connectors.The HSM is located at the front of the seat and the Seat Heaterconnectors are at the rear of the seat.Turn the ignition off.Disconnect the Heated Seat Module C2 harness connector.Disconnect the Passenger Heated Seat Back 2-way (green) connector.Disconnect the Passenger Heated Seat Cushion 4-way connector.Turn the ignition on.Measure the voltage of the Passenger Seat Heater Ground circuit.Is there ANY voltage on the Passenger Seat Heater Ground circuit?AllYes → Repair the Passenger Seat Heater Ground circuit for a short tovoltage.Perform VERIFICATION TEST -MEMORY SYSTEM.No → Repair the Heated Seat Driver circuit for a short to voltage.Perform VERIFICATION TEST -MEMORY SYSTEM.7 NOTE: Raise the seat to the highest position to gain access to the connectors.The HSM is located at the front of the seat and the Seat Heaterconnectors are at the rear of the seat.Disconnect the Passenger Heated Seat Cushion 4-way connector.Measure the resistance of the CUSHION SEAT HEATER ELEMENT.Connect one lead to the Heated Seat Driver circuit (cushion side) and the other leadto the Passenger Seat Heater B(+) Driver circuit (cushion side) in the PassengerHeated Seat Cushion 4 way connector.Is the resistance below 2.0 ohms?AllYes → Go To 8No → Replace the Passenger Heated Seat Cushion / Bolster.Perform VERIFICATION TEST -MEMORY SYSTEM.8 NOTE: Raise the seat to the highest position to gain access to the connectors.The HSM is located at the front of the seat and the Seat Heaterconnectors are at the rear of the seat.Disconnect the Passenger Heated Seat Back 2-way (green) connector.Measure the resistance of the SEAT BACK HEATER ELEMENT.Connect one lead to the Heated Seat Driver circuit (seat back side) and the other leadto the Passenger Seat Heater Ground circuit (seat back side) in the Passenger HeatedSeat 2-way connector.Is the resistance below 2.0 ohms?AllYes → Go To 9No → Replace the Passenger Heated Seat Back.Perform VERIFICATION TEST -MEMORY SYSTEM.269
ELECTRICALLY HEATED SYSTEMSPASSENGER SEAT HEAT OUTPUT OPEN/SHT TO BATTERY (LAREDO)— ContinuedTEST ACTION APPLICABILITY9 NOTE: Raise the seat to the highest position to gain access to the connectors.The HSM is located at the front of the seat and the Seat Heaterconnectors are at the rear of the seat.Disconnect the Passenger Heated Seat Back 2-way (green) connector.Disconnect the Passenger Heated Seat Cushion 4-way connector.Measure the resistance of the Heated Seat Driver circuit between the PassengerHeated Seat Back 2-way connector (harness side) and the Passenger Heated SeatCushion 4-way connector (harness side).Is the resistance below 5.0 ohms?AllYes → Go To 10No → Repair the open Heated Seat Driver circuit.Perform VERIFICATION TEST -MEMORY SYSTEM.10 NOTE: Raise the seat to the highest position to gain access to the connectors.The HSM is located at the front of the seat and the Seat Heaterconnectors are at the rear of the seat.Disconnect the Passenger Heated Seat Back 2-way (green) connector.Disconnect the HSM C2 harness connector.Measure the resistance of the Passenger Seat Heater Ground circuit between theSeat Back 2-way connector (harness side) and the Heated Seat Module connector.Is the resistance below 5.0 ohms?AllYes → Go To 11No → Repair the Passenger Seat Heater Ground circuit for an open.Perform VERIFICATION TEST -MEMORY SYSTEM.11 NOTE: Raise the seat to the highest position to gain access to the connectors.The HSM is located at the front of the seat and the Seat Heaterconnectors are at the rear of the seat.Turn the ignition off.Disconnect the Passenger Heated Seat Cushion 4-way connector.Disconnect the Heated Seat Module C2 harness connector.Measure the resistance of the Passenger Seat Heater B(+) Driver circuit between theHSM C2 connector and the Passenger Heated Seat Cushion 4-way connector(harness side).Is the resistance below 5.0 ohms?AllYes → Test Complete.No → Repair the open Passenger Seat Heater B(+) Driver circuit.Perform VERIFICATION TEST -MEMORY SYSTEM.270
ELECTRICALLY HEATED SYSTEMSSymptom:PASSENGER SEAT HEAT OUTPUT OPEN/SHT TO BATTERY (LIM-ITED)When Monitored and Set Condition:PASSENGER SEAT HEAT OUTPUT OPEN/SHT TO BATTERY (LIMITED)When Monitored: With the ignition on, during the heated seat operation.Set Condition: This condition is set immediately after the Heated Seat Module loses theseat heat element output.POSSIBLE CAUSESDTC PRESENTHEATED SEAT MODULEPASSENGER SEAT HEATER B(+) DRIVER CKT SHORTED TO VOLTAGEPASSENGER HEATED SEAT CUSHION SHORTED TO VOLTAGEPASSENGER SEAT HEATER GROUND CKT (1) SHORTED TO VOLTAGEPASSENGER SEAT HEATED GROUND CKT (2) SHORTED TO VOLTAGECONNECTOR TO SPLICE - CUSHION SIDE - OPENPASSENGER SEAT HEATER B(+) DRIVER CKT OPENPASSENGER SEAT HEATER GROUND CKT (JUMPER) OPENPASSENGER SEAT HEATER GROUND CKT (1) OPENPASSENGER SEAT HEATER GROUND CKT (2) OPENTEST ACTION APPLICABILITY1 With the DRBIII, erase DTCs.Start the engine.Turn the driver seat heater on and operate in both ranges.With the DRBIII, read DTCs.Did the PASSENGER SEAT HEAT OUTPUT OPEN/SHORT TO BATTERY DTCreturn?AllYes → Go To 2No → The conditions required to set the code are currently not present.Using the wiring diagram/schematic as a guide, inspect thewiring and connectors.Perform VERIFICATION TEST -MEMORY SYSTEM.271
ELECTRICALLY HEATED SYSTEMSPASSENGER SEAT HEAT OUTPUT OPEN/SHT TO BATTERY (LIMITED)— ContinuedTEST ACTION APPLICABILITY2 NOTE: Raise the seat to the highest position to gain access to the connectors.The HSM is located at the front of the seat and the Seat Heaterconnectors are at the rear of the seat.Turn the ignition off.Disconnect the Heated Seat Module C2 harness connector.Measure the total resistance of the Passenger Seat Heater System from thePassenger Seat Heater B(+) Driver to the Passenger Seat Heater Ground circuits inthe HSM C2 connector.Is the resistance below 50.0 ohms?AllYes → Go To 3No → Go To 73 NOTE: Raise the seat to the highest position to gain access to the connectors.The HSM is located at the front of the seat and the Seat Heaterconnectors are at the rear of the seat.Turn the ignition off.Disconnect the Heated Seat Module C2 harness connector.Turn the ignition on.Measure the voltage of the Passenger Seat Heater B(+) Driver circuit.Is ANY voltage present on the Passenger Seat Heater B(+) Driver circuit?AllYes → Go To 4No → Replace the Heated Seat Module.Perform VERIFICATION TEST -MEMORY SYSTEM.4 NOTE: Raise the seat to the highest position to gain access to the connectors.The HSM is located at the front of the seat and the Seat Heaterconnectors are at the rear of the seat.Turn the ignition off.Disconnect the Heated Seat Module C2 harness connector.Disconnect the Passenger Heated Seat Cushion 4-way connector.Turn the ignition on.Measure the voltage of the Passenger Seat Heater B(+) Driver circuit.Is there ANY voltage on the Passenger Seat Heater B(+) Driver circuit?AllYes → Repair the Passenger Seat Heater B(+) Driver circuit for a shortto voltage.Perform VERIFICATION TEST -MEMORY SYSTEM.No → Go To 55 NOTE: Raise the seat to the highest position to gain access to the connectors.The HSM is located at the front of the seat and the Seat Heaterconnectors are at the rear of the seat.Turn the ignition off.Disconnect the HSM C2 harness connector.Disconnect the Passenger Heated Seat Back 4-way connector.Turn the ignition on.Measure the voltage of the Passenger Seat Heater Ground circuit at the HSM C2connector.Is there ANY voltage on the Passenger Seat Heater Ground circuit?AllYes → Go To 6No → Replace the Passenger Heated Seat Cushion / Bolster.Perform VERIFICATION TEST -MEMORY SYSTEM.272
ELECTRICALLY HEATED SYSTEMSPASSENGER SEAT HEAT OUTPUT OPEN/SHT TO BATTERY (LIMITED)— ContinuedTEST ACTION APPLICABILITY6 NOTE: Raise the seat to the highest position to gain access to the connectors.The HSM is located at the front of the seat and the Seat Heaterconnectors are at the rear of the seat.Turn the ignition off.Disconnect the HSM C2 harness connector.Disconnect the Passenger Heated Seat Cushion 4-way connector.Disconnect the Passenger Heated Seat Back 2-way connector.Turn the ignition on.Measure the voltage of the Passenger Seat Heater Ground circuit at the HSM C2connector.Is there ANY voltage on the Passenger Seat Heater Ground circuit?AllYes → Repair the Passenger Seat Heater Ground circuit for a short tovoltage between the HSM C2 connector and the PassengerHeated Seat Back 2-way connector.Perform VERIFICATION TEST -MEMORY SYSTEM.No → Repair the Passenger Seat Heater Ground circuit for a short tovoltage between the Passenger Heated Seat Back 2-way connectorand the Passenger Heated Seat Cushion 4-way connector.Perform VERIFICATION TEST -MEMORY SYSTEM.7 NOTE: Raise the seat to the highest position to gain access to the connectors.The HSM is located at the front of the seat and the Seat Heaterconnectors are at the rear of the seat.Turn the ignition off.Disconnect the HSM C2 harness connector.Disconnect the Passenger Heated Seat Cushion 4-way connector.Connect a jumper wire from the Passenger Seat Heater B+ Driver circuit to thePassenger Seat Heater Ground circuit at the Passenger Heated Seat Cushion 4-wayconnector (harness side).Measure the resistance of the Passenger Seat Heater B+ Driver circuit and thePassenger Seat Heater Ground circuit in the HSM C2 connector.Is the resistance below 5.0 ohms?AllYes → Repair the open circuit in either the Passenger Seat HeaterGround or the Passenger Seat Heater B(+) Driver wiring betweenthe HSM C2 connector and the splice in the seat.Perform VERIFICATION TEST -MEMORY SYSTEM.No → Go To 88 NOTE: Raise the seat to the highest position to gain access to the connectors.The HSM is located at the front of the seat and the Seat Heaterconnectors are at the rear of the seat.Turn the ignition off.Disconnect the Heated Seat Module C2 harness connector.Disconnect the Passenger Heated Seat Cushion 4-way connector.Measure the resistance of the Passenger Seat Heater B(+) Driver circuit between theHSM C2 connector and the Passenger Heated Seat Cushion 4-way connector(harness side).Is the resistance below 5.0 ohms?AllYes → Go To 9No → Repair the open Passenger Seat Heater B(+) Driver circuit.Perform VERIFICATION TEST -MEMORY SYSTEM.273
ELECTRICALLY HEATED SYSTEMSPASSENGER SEAT HEAT OUTPUT OPEN/SHT TO BATTERY (LIMITED)— ContinuedTEST ACTION APPLICABILITY9 NOTE: Raise the seat to the highest position to gain access to the connectors.The HSM is located at the front of the seat and the Seat Heaterconnectors are at the rear of the seat.Disconnect the Passenger Heated Seat Back 2-way (green) connector.Measure the resistance of the Passenger Seat Heater Ground circuit (jumper).Is the resistance below 5.0 ohms?AllYes → Go To 10No → Repair the open Driver Seat Heater Ground (jumper) circuit.Perform VERIFICATION TEST -MEMORY SYSTEM.10 NOTE: Raise the seat to the highest position to gain access to the connectors.The HSM is located at the front of the seat and the Seat Heaterconnectors are at the rear of the seat.Turn the ignition off.Disconnect the Passenger Heated Seat Back 2-way (green) connector.Disconnect the Passenger Heated Seat Cushion 4-way connector.Measure the resistance of the Passenger Seat Heater Ground circuit.Connect one lead to the Passenger Seat Heater Ground circuit at the PassengerHeated Seat Back 2-way connector and the other lead to the Passenger Seat HeaterGround circuit in the Passenger Heated Seat Cushion 4-way connector.Is the resistance below 5.0 ohms?AllYes → Go To 11No → Repair the open Passenger Seat Heater Ground circuit betweenthe Passenger Heated Seat Back 2-way connector and the PassengerHeated Seat Cushion 4-way connector.Perform VERIFICATION TEST -MEMORY SYSTEM.11 NOTE: Raise the seat to the highest position to gain access to the connectors.The HSM is located at the front of the seat and the Seat Heaterconnectors are at the rear of the seat.Turn the ignition off.Disconnect the Passenger Heated Seat Back 2-way (green) connector.Disconnect the HSM C2 harness connector.Measure the resistance of the Passenger Seat Heater Ground circuit between theSeat Back 2-way connector (harness side) and the Heated Seat Module C2 connector.Is the resistance below 5.0 ohms?AllYes → Test Complete.No → Repair the Passenger Seat Heater Ground circuit for an open.Perform VERIFICATION TEST -MEMORY SYSTEM.274
ELECTRICALLY HEATED SYSTEMSSymptom:PASSENGER SEAT HEAT OUTPUT SHORT TO GND (LAREDO)When Monitored and Set Condition:PASSENGER SEAT HEAT OUTPUT SHORT TO GND (LAREDO)When Monitored: With the ignition on, during the heated seat operation.Set Condition: This condition is set immediately after the Heated Seat Module detects anoutput shorted to ground.POSSIBLE CAUSESDTC PRESENTPASSENGER SEAT HEATER B(+) DRIVER CKT SHORTED TO GROUNDHEATED SEAT MODULEPASSENGER HEATED SEAT CUSHION SHORTED TO GROUNDPASSENGER HEATED SEAT BACK SHORTED TO GROUNDHEATED SEAT DRIVER CKT SHORTED TO GROUNDHEATED SEAT MODULETEST ACTION APPLICABILITY1 With the DRBIII, erase DTCs.Start the engine.Turn the passenger seat heater on and operate in both ranges.With the DRBIII, read DTCs.Did the PASSENGER SEAT HEAT OUTPUT SHORT TO GROUND DTC return?AllYes → Go To 2No → The conditions required to set the code are currently not present.Using the wiring diagram/schematic as a guide, inspect thewiring and connectors.Perform VERIFICATION TEST -MEMORY SYSTEM.2 Using the DRBIII, select: Body - Memory Seat Module - Erase DTC’s.NOTE: Raise the seat to the highest position to gain access to the connectors.The HSM is located at the front of the seat and the Seat Heaterconnectors are at the rear of the seat.Turn the ignition off.Disconnect the Passenger Heated Seat Cushion 4-way connector.Start the engine.Turn the passenger seat heater on and operate at both ranges.With the DRBIII, read DTC’s.Does the DRBIII still show Passenger Seat Heat Output Short to Gnd?AllYes → Go To 3No → Go To 4275
ELECTRICALLY HEATED SYSTEMSPASSENGER SEAT HEAT OUTPUT SHORT TO GND (LAREDO) —ContinuedTEST ACTION APPLICABILITY3 NOTE: Raise the seat to the highest position to gain access to the connectors.The HSM is located at the front of the seat and the Seat Heaterconnectors are at the rear of the seat.Turn the ignition off.Disconnect the Heated Seat Module C2 harness connector.Disconnect the Passenger Heated Seat Cushion 4-way connector.Measure the resistance of the Passenger Seat Heater B(+) Driver circuit to ground.Is the resistance below 5.0 ohms?AllYes → Repair the Passenger Seat Heater B(+) Driver circuit for a shortto ground.Perform VERIFICATION TEST -MEMORY SYSTEM.No → Replace the Heated Seat Module.Perform VERIFICATION TEST -MEMORY SYSTEM.4 NOTE: Raise the seat to the highest position to gain access to the connectors.The HSM is located at the front of the seat and the Seat Heaterconnectors are at the rear of the seat.Turn the ignition off.Disconnect the Passenger Heated Seat Cushion 4-way connector.Measure the resistance of the Passenger Seat Heater B(+) Driver circuit in thePassenger Heated Seat Cushion connector (cushion side) to ground.Is the resistance below 100.0 ohms?AllYes → Replace the Passenger Heated Seat Cushion.Perform VERIFICATION TEST -MEMORY SYSTEM.No → Go To 55 NOTE: Raise the seat to the highest position to gain access to the connectors.The HSM is located at the front of the seat and the Seat Heaterconnectors are at the rear of the seat.Turn the ignition off.Disconnect the Passenger Heated Seat Back 2-way (green) connector.Measure the resistance of the Heated Seat Driver circuit, in the Passenger HeatedSeat Back connector (seat back side) to ground.Is the resistance below 1000.0 ohms?AllYes → Replace the Passenger Heated Seat Back.Perform VERIFICATION TEST -MEMORY SYSTEM.No → Go To 66 NOTE: Raise the seat to the highest position to gain access to the connectors.The HSM is located at the front of the seat and the Seat Heaterconnectors are at the rear of the seat.Turn the ignition off.Disconnect the Passenger Heated Seat Cushion 4-way (green) connector.Disconnect the Passenger Heated Seat Back 2-way (green) connector.Measure the resistance of the Heated Seat Driver circuit to ground.Is the resistance below 1000.0 ohms?AllYes → Repair the Heated Seat Driver circuit for a short to ground.Perform VERIFICATION TEST -MEMORY SYSTEM.No → Test Complete.276
ELECTRICALLY HEATED SYSTEMSSymptom:PASSENGER SEAT HEAT OUTPUT SHORT TO GND (LIMITED)When Monitored and Set Condition:PASSENGER SEAT HEAT OUTPUT SHORT TO GND (LIMITED)When Monitored: With the ignition on, during the heated seat operation.Set Condition: This condition is set immediately after the Heated Seat Module detects anoutput shorted to ground.POSSIBLE CAUSESDTC PRESENTPASSENGER SEAT HEATER B(+) DRIVER CKT SHORTED TO GROUNDPASSENGER SEAT HEATER B(+) DRIVER CKT SHORTED TO PASSENGER SEAT HEATERGROUNDHEATED SEAT MODULEHEATED SEAT MODULEPASSENGER HEATED SEAT CUSHION SHORTED TO GROUNDPASSENGER HEATED SEAT BACK SHORTED TO GROUNDTEST ACTION APPLICABILITY1 With the DRBIII, erase DTCs.Start the engine.Turn the passenger seat heater on and operate in both ranges.With the DRBIII, read DTCs.Did the PASSENGER SEAT HEAT OUTPUT SHORT TO GROUND DTC return?AllYes → Go To 2No → The conditions required to set the code are currently not present.Using the wiring diagram/schematic as a guide, inspect thewiring and connectors.Perform VERIFICATION TEST -MEMORY SYSTEM.2 Using the DRBIII, select: Body - Memory Seat Module - Erase DTC’s.NOTE: Raise the seat to the highest position to gain access to the connectors.The HSM is located at the front of the seat and the Seat Heaterconnectors are at the rear of the seat.Turn the ignition off.Disconnect the Passenger Heated Seat Cushion 4-way connector.Start the engine.Turn the Passenger Seat Heater on and operate in both ranges.With the DRBIII, read DTC’s.Does the DRBIII still show Passenger Seat Heat Output Short to Gnd?AllYes → Go To 3No → Go To 5277
ELECTRICALLY HEATED SYSTEMSPASSENGER SEAT HEAT OUTPUT SHORT TO GND (LIMITED) —ContinuedTEST ACTION APPLICABILITY3 NOTE: Raise the seat to the highest position to gain access to the connectors.The HSM is located at the front of the seat and the Seat Heaterconnectors are at the rear of the seat.Turn the ignition off.Disconnect the Heated Seat Module C2 harness connector.Disconnect the Passenger Heated Seat Cushion 4-way connector.Measure the resistance of the Passenger Seat Heater B(+) Driver circuit to thePassenger Seat Heater Ground circuit in the HSM C2 connector.Is the resistance below 1000.0 ohms?AllYes → Repair the Passenger Seat Heater B(+) Driver circuit for a shortto the Passenger Seat Heater Ground circuit.Perform VERIFICATION TEST -MEMORY SYSTEM.No → Go To 44 NOTE: Raise the seat to the highest position to gain access to the connectors.The HSM is located at the front of the seat and the Seat Heaterconnectors are at the rear of the seat.Turn the ignition off.Disconnect the Heated Seat Module C2 harness connector.Disconnect the Passenger Heated Seat Cushion 4-way connector.Measure the resistance of the Passenger Seat Heater B(+) Driver circuit to ground.Is the resistance below 5.0 ohms?AllYes → Repair the Passenger Seat Heater B(+) Driver circuit for a shortto ground.Perform VERIFICATION TEST -MEMORY SYSTEM.No → Test Complete.5 NOTE: Raise the seat to the highest position to gain access to the connectors.The HSM is located at the front of the seat and the Seat Heaterconnectors are at the rear of the seat.Turn the ignition off.Disconnect the Passenger Heated Seat Cushion 4-way connector.Measure the resistance of the Passenger Seat Heater B(+) Driver circuit in thePassenger Heated Seat Cushion connector (cushion side) to ground.Is the resistance below 100.0 ohms?AllYes → Go To 6No → Replace the Heated Seat Module.Perform VERIFICATION TEST -MEMORY SYSTEM.6 NOTE: Raise the seat to the highest position to gain access to the connectors.The HSM is located at the front of the seat and the Seat Heaterconnectors are at the rear of the seat.Turn the ignition off.Disconnect the Passenger Heated Seat Cushion 4-way connector.Disconnect the Passenger Heated Seat Back 2-way (black) connector.Measure the resistance of the Passenger Seat Heater B(+) Driver circuit in thePassenger Heated Seat Cushion connector (cushion side) to ground.Is the resistance below 1000.0 ohms?AllYes → Replace the Passenger Heated Seat Cushion.Perform VERIFICATION TEST -MEMORY SYSTEM.No → Replace the Passenger Heated Seat Back.Perform VERIFICATION TEST -MEMORY SYSTEM.278
ELECTRICALLY HEATED SYSTEMSSymptom:PASSENGER THERMISTOR OUT <strong>OF</strong> RANGE HIGHWhen Monitored and Set Condition:PASSENGER THERMISTOR OUT <strong>OF</strong> RANGE HIGHWhen Monitored: With the ignition on, during the heated seat operation.Set Condition: This condition is immediately set when the Heated Seat Module senses agreater value than the value stored in EEPROM.POSSIBLE CAUSESPASSENGER SEAT SENSOR SHORTEDPASSENGER SEAT TEMPERATURE SENSOR INPUT CIRCUIT SHORTED TO BATTERYPASSENGER SEAT TEMPERATURE SENSOR INPUT CKT SHORTED TO 5 VOLTSHEATED SEAT MODULE - SENSOR SHORTEDSEAT SENSOR 5-VOLT SUPPLY CKT SHORTED TO GROUNDTEST ACTION APPLICABILITY1 NOTE: Raise the seat to the highest position to gain access to the connectors.The HSM is located at the front of the seat and the Seat Heaterconnectors are at the rear of the seat.Turn the ignition off.Disconnect the Passenger Heated Seat Cushion 4-way connector.Measure the resistance between the Seat Sensor 5 Volt Supply circuit and thePassenger Seat Temperature Sensor Input circuit at the Passenger Heated SeatCushion (cushion side) connector.Is the resistance below 800 ohms at room temperature?AllYes → Replace the Passenger Heated Seat Cushion - sensor shorted..Perform VERIFICATION TEST -MEMORY SYSTEM.No → Go To 22 NOTE: Raise the seat to the highest position to gain access to the connectors.The HSM is located at the front of the seat and the Seat Heaterconnectors are at the rear of the seat.Turn the ignition off.Disconnect the Heated Seat Module C1 harness connector.Disconnect the Passenger Heated Seat Cushion 4-way connector.Turn the ignition on.Measure the voltage between the Passenger Seat Temperature Sensor Input circuitand ground.Is the voltage above 5.5 volts?AllYes → Repair the Passenger Seat Temperature Sensor Input circuit for ashort to battery.Perform VERIFICATION TEST -MEMORY SYSTEM.No → Go To 3279
ELECTRICALLY HEATED SYSTEMSPASSENGER THERMISTOR OUT <strong>OF</strong> RANGE HIGH — ContinuedTEST ACTION APPLICABILITY3 NOTE: Raise the seat to the highest position to gain access to the connectors.The HSM is located at the front of the seat and the Seat Heaterconnectors are at the rear of the seat.Turn the ignition off.Disconnect the Heated Seat Module C1 harness connector.Disconnect the Passenger Heated Seat Cushion 4-way connector.Turn the ignition on.Measure the voltage between the Passenger Seat Temperature Sensor Input circuitand ground.Is there ANY voltage on the Passenger Seat Temperature Sensor Input circuit?AllYes → Repair the Passenger Seat Temperature Sensor Input circuit for ashort to voltage.Perform VERIFICATION TEST -MEMORY SYSTEM.No → Go To 44 NOTE: Raise the seat to the highest position to gain access to the connectors.The HSM is located at the front of the seat and the Seat Heaterconnectors are at the rear of the seat.Turn the ignition off.Disconnect the Heated Seat Module C1 connector.Disconnect the Passenger Heated Seat Cushion 4-way (green) connector.Measure the resistance of the Seat Sensor 5 Volt Supply circuit to ground.Is the resistance below 1000.0 ohms?AllYes → Repair the open Seat Sensor 5-Volt Supply circuit.Perform VERIFICATION TEST -MEMORY SYSTEM.No → Replace the Heated Seat Module.Perform VERIFICATION TEST -MEMORY SYSTEM.280
ELECTRICALLY HEATED SYSTEMSSymptom:PASSENGER THERMISTOR OUT <strong>OF</strong> RANGE LOWWhen Monitored and Set Condition:PASSENGER THERMISTOR OUT <strong>OF</strong> RANGE LOWWhen Monitored: With the ignition on, during the heated seat operation.Set Condition: This condition is immediately set when the Heated Seat Module senses alesser value than the value stored in EEPROM.POSSIBLE CAUSESPASSENGER HEATED SEAT CUSHION SENSOR OPENPASSENGER SEAT TEMPERATURE SENSOR INPUT CKT SHORTED TO GROUNDPASSENGER HEATED SEAT CUSHION SENSOR SHORT TO GROUNDPASSENGER SEAT TEMPERATURE SENSOR INPUT CKT OPENHEATED SEAT MODULESEAT SENSOR 5-VOLT SUPPLY CKT OPENHEATED SEAT MODULE-5 VOLTS OPENTEST ACTION APPLICABILITY1 NOTE: Raise the seat to the highest position to gain access to the connectors.The HSM is located at the front of the seat and the Seat Heaterconnectors are at the rear of the seat.Turn the ignition off.Disconnect the Passenger Heated Seat Cushion 4-way connector.Turn the ignition on.Measure the voltage between the Seat Sensor 5 Volt Supply circuit and ground.Is the voltage below 4.5 volts?AllYes → Go To 2No → Go To 32 NOTE: Raise the seat to the highest position to gain access to the connectors.The HSM is located at the front of the seat and the Seat Heaterconnectors are at the rear of the seat.Turn the ignition off.Disconnect the Heated Seat Module C1 connector.Disconnect the Passenger Heated Seat Cushion 4-way connector.Measure the resistance of the Seat Sensor 5 Volt Supply circuit between the HeatedSeat Module connector and the Passenger Heated Seat Cushion (harness side)connector.Is the resistance below 5.0 ohms?AllYes → Replace the Heated Seat Module.Perform VERIFICATION TEST -MEMORY SYSTEM.No → Repair the open Seat Sensor 5 Volt Supply circuit.Perform VERIFICATION TEST -MEMORY SYSTEM.281
ELECTRICALLY HEATED SYSTEMSPASSENGER THERMISTOR OUT <strong>OF</strong> RANGE LOW — ContinuedTEST ACTION APPLICABILITY3 NOTE: Raise the seat to the highest position to gain access to the connectors.The HSM is located at the front of the seat and the Seat Heaterconnectors are at the rear of the seat.Turn the ignition off.Disconnect the Passenger Heated Seat Cushion 4-way connector.Measure the resistance between the Seat Sensor 5 Volt Supply circuit and thePassenger Seat Temperature Sensor Input circuit at the Passenger Heated SeatCushion (cushion side) connector.Is the resistance above 70,000 (70K) ohms at room temperature?AllYes → Replace the Passenger Heated Seat Cushion.Perform VERIFICATION TEST -MEMORY SYSTEM.No → Go To 44 NOTE: Raise the seat to the highest position to gain access to the connectors.The HSM is located at the front of the seat and the Seat Heaterconnectors are at the rear of the seat.Turn the ignition off.Disconnect the Heated Seat Module C1 harness connector.Disconnect the Passenger Heated Seat Cushion 4-way connector.Measure the resistance of the Passenger Seat Temperature Sensor Input circuit toground.Is the resistance below 1,000.0 ohms?AllYes → Repair the Passenger Seat Temperature Sensor Input circuit for ashort to ground.Perform VERIFICATION TEST -MEMORY SYSTEM.No → Go To 55 NOTE: Raise the seat to the highest position to gain access to the connectors.The HSM is located at the front of the seat and the Seat Heaterconnectors are at the rear of the seat.Turn the ignition off.Disconnect the Passenger Heated Seat Cushion 4-way connector.Measure the resistance between the Passenger Seat Temp Sensor Input circuit andground.Is the resistance below 1000.0 ohms?AllYes → Replace the Passenger Seat Cushion CoverPerform VERIFICATION TEST -MEMORY SYSTEM.No → Go To 66 NOTE: Raise the seat to the highest position to gain access to the connectors.The HSM is located at the front of the seat and the Seat Heaterconnectors are at the rear of the seat.Turn the ignition off.Disconnect the Heated Seat Module C1 connector.Disconnect the Passenger Heated Seat Cushion 4-way connector.Measure the resistance of the Passenger Seat Temperature Sensor Input circuit fromthe Heated Seat Module connector to the Passenger Heated Seat Cushion connector.Is the resistance below 5.0 ohms?AllYes → Replace the Heated Seat Module.Perform VERIFICATION TEST -MEMORY SYSTEM.No → Repair the open Passenger Seat Temperature Sensor Input circuit.Perform VERIFICATION TEST -MEMORY SYSTEM.282
ELECTRICALLY HEATED SYSTEMSSymptom:REAR DEF RELAY SHORTED HIWhen Monitored and Set Condition:REAR DEF RELAY SHORTED HIWhen Monitored: With the ignition key in the run position.Set Condition: The BCM attempts to activate the rear defogger relay and sensesexcessive current on the circuit.REAR DEFOGGER RELAYJUNCTION BLOCKBODY CONTROL MODULEPOSSIBLE CAUSESTEST ACTION APPLICABILITY1 Turn the ignition off.Lower the Junction Block and remove the Rear Window Defogger Relay.Connect a test light between cavities 85 & 86 of the Rear Window Defogger Relayconnector.Turn the ignition on.With the DRBIII, actuate the R Defog Relay and observe the test light.Does the test light flash on and off when the relay is actuated?AllYes → Replace the Rear Window Defogger Relay.Perform VERIFICATION TEST -MEMORY SYSTEM.No → Go To 22 Turn the ignition off.Lower the Junction Block and remove the Rear Window Defogger Relay.Disconnect and remove the Body Control Module.Turn the ignition on.Measure the voltage at cavities 85 & 86 of the Relay connector.Is the voltage above 1.0 volts at BOTH cavities? (Note: there should only be voltageon one cavity)AllYes → Replace the Junction Block.Perform VERIFICATION TEST -MEMORY SYSTEM.No → Replace the Body Control Module.Perform VERIFICATION TEST -MEMORY SYSTEM.283
ELECTRICALLY HEATED SYSTEMSSymptom:REAR DEFOGGER RELAY OPENWhen Monitored and Set Condition:REAR DEFOGGER RELAY OPENWhen Monitored: With the ignition in the run position.Set Condition: The rear defogger relay output of the BCM does not have battery voltage.POSSIBLE CAUSESFUSED B(+) CKT SHORTED TO GROUNDREAR DEFOGGER RELAY OUTPUT CKT SHORTED TO GROUNDPDC FUSE #2 OPENFUSED B(+) CKT OPENREAR WINDOW DEFOGGER RELAYREAR WINDOW DEFOGGER RELAY CONTROL SHORT TO GROUND.JUNCTION BLOCKBODY CONTROL MODULETEST ACTION APPLICABILITY1 Turn the ignition off.Remove and inspect the PDC fuse #2.Is the PDC fuse #2 open?AllYes → Go To 2No → Go To 42 Turn the ignition off.Lower the Junction Block and remove the Rear Window Defogger Relay.Measure the resistance of the Fused B(+) circuits in the Rear Window Defogger Relayconnector to ground.Is the resistance below 5.0 ohms?AllYes → Repair the Fused B(+) circuit for a short to ground.Perform VERIFICATION TEST -MEMORY SYSTEM.No → Go To 3284
ELECTRICALLY HEATED SYSTEMSREAR DEFOGGER RELAY OPEN — ContinuedTEST ACTION APPLICABILITY3 Turn the ignition off.Disconnect the Rear Window Defogger connector at the rear window Grid.Remove the Rear Window Defogger Relay from the Junction Block.Measure the resistance between ground and the Rear Window Defogger RelayOutput circuit at the Rear Window Defogger connector.Is the resistance below 5.0 ohms?AllYes → Repair the Rear Window Defogger Relay Output circuit for a shortto ground.Perform VERIFICATION TEST -MEMORY SYSTEM.No → Replace PDC fuse #2.Perform VERIFICATION TEST -MEMORY SYSTEM.4 Turn the ignition off.Lower the Junction Block and remove the Rear Window Defogger Relay.Turn the ignition on.Measure the voltage of the Fused B(+) circuit in the Rear Window Defogger Relayconnector.Is the voltage above 10.0 volts?AllYes → Go To 5No → Repair the open Fused B(+) circuit from PDC fuse #2.Perform VERIFICATION TEST -MEMORY SYSTEM.5 Turn the ignition off.Lower the Junction Block and remove the Rear Window Defogger Relay.Connect a test light between cavities 85 & 86 of the Rear Window Defogger Relayconnector.Turn the ignition on.With the DRBIII, actuate the R Defog Relay and observe the test light.Does the test light flash on and off when the relay is actuated?AllYes → Replace the Rear Window Defogger Relay.Perform VERIFICATION TEST -MEMORY SYSTEM.No → Go To 66 Turn the ignition off.Lower the Junction Block and remove the Rear Window Defogger Relay.Disconnect and remove the Body Control Module.Measure the resistance of the Rear Window Defogger Relay Control circuit to ground.Is the resistance below 1000.0 ohms?AllYes → Replace the Junction Block.Perform VERIFICATION TEST -MEMORY SYSTEM.No → Go To 77 Turn the ignition off.Lower the Junction Block and remove the Rear Window Defogger Relay.Disconnect and remove the Body Control Module.Measure the resistance of the Rear Window Defogger Relay Control circuit betweenthe relay connector and the J/B-BCM connector in the Junction Block.Is the resistance below 5.0 ohms?AllYes → Replace the Body Control Module.Perform VERIFICATION TEST -MEMORY SYSTEM.No → Replace the Junction Block.Perform VERIFICATION TEST -MEMORY SYSTEM.285
ELECTRICALLY HEATED SYSTEMSSymptom:*DRIVER SEAT BACK HEATER INOPERATIVE (LIMITED)POSSIBLE CAUSESDRIVER SEAT BACK HEATER OPEN (LIMITED)INTERMITTENT CONDITIONTEST ACTION APPLICABILITY1 NOTE: This test is only valid on Limited models where the Seat Cushionheats properly but the Seat Back does not heat.Start the Engine.Turn the Heated Seat Switch on.Does the Seat Cushion warm up but the Seat Back does not?AllYes → Check for an open circuit in the Seat Back. If okay, replace theHeated Seat Back.Perform VERIFICATION TEST -MEMORY SYSTEM.No → The condition that caused this symptom is currently not present.Inspect the related wiring harness for a possible intermittentcondition. Look for any chafed, pierced, pinched or partiallybroken wires.Perform VERIFICATION TEST -MEMORY SYSTEM.286
ELECTRICALLY HEATED SYSTEMSSymptom:*DRIVER SEAT BOLSTER HEATER INOPERATIVE (LIMITED)POSSIBLE CAUSESDRIVER HEATED SEAT BOLSTER OPEN (LIMITED)INTERMITTENT CONDITIONTEST ACTION APPLICABILITY1 NOTE: This test is only valid on Limited models where the Seat Back andSeat Cushion heats properly but the Seat Bolsters do not.Start the Engine.Turn the Heated Seat Switch on.Does the Seat Back and Seat Cushion warm up but the Seat Bolsters do not?AllYes → Check for an open circuit in the Seat. If okay, replace the HeatedSeat Cushion Cover.Perform VERIFICATION TEST -MEMORY SYSTEM.No → The condition that caused this symptom is currently not present.Inspect the related wiring harness for a possible intermittentcondition. Look for any chafed, pierced, pinched or partiallybroken wires.Perform VERIFICATION TEST -MEMORY SYSTEM.287
ELECTRICALLY HEATED SYSTEMSSymptom:*DRIVER SEAT CUSHION HEATER INOPERATIVE (LIMITED)POSSIBLE CAUSESDRIVER HEATED SEAT CUSHION OPEN (LIMITED)INTERMITTENT CONDITIONTEST ACTION APPLICABILITY1 NOTE: This test is only valid on Limited models where the Seat Back heatsproperly but the Seat Cushion does not heat.Start the Engine.Turn the Heated Seat Switch on.Does the Seat Back warm up but the Seat Cushion does not?AllYes → Check for an open circuit in the Seat. If okay, replace the HeatedSeat Cushion.Perform VERIFICATION TEST -MEMORY SYSTEM.No → The condition that caused this symptom is currently not present.Inspect the related wiring harness for a possible intermittentcondition. Look for any chafed, pierced, pinched or partiallybroken wires.Perform VERIFICATION TEST -MEMORY SYSTEM.288
ELECTRICALLY HEATED SYSTEMSSymptom:*HEATED SEATS INOPERATIVE DUE TO KEY-IN IGNITIONSWITCH INPUTPOSSIBLE CAUSESOBSERVE THE KEY-IN IGNITION SWITCH STATUSIGNITION SWITCH OPENKEY-IN IGNITION SWITCH GROUND CIRCUIT OPENKEY-IN IGNITION SWITCH SENSE CIRCUIT OPENBCM-INCORRECT KEY-IN IGNITION SWITCH STATUSTEST ACTION APPLICABILITY1 Note: Ensure that the Key is still in the Ignition Switch.With the DRBIII enter Body Computer then Input Output and read the Key-InIgnition Switch status.Does the DRB display: KEY-IN IGN: CLOSED ?AllYes → Test complete.Perform VERIFICATION TEST -MEMORY SYSTEM.No → Go To 22 Turn the ignition off.Disconnect the Ignition Switch harness connector.Connect a jumper between the Key-In Ignition Switch Sense circuit and Groundcircuit.With the DRBIII enter Body Computer then Input Output and observe the Key-InIgnition Switch status.Does the DRBIII display KEY-IN IGN: CLOSED?AllYes → Replace the Ignition Switch.Perform VERIFICATION TEST -MEMORY SYSTEM.No → Go To 33 Turn the ignition off.Disconnect the Ignition Switch harness connector.Turn all lights off.Measure the resistance between ground and the ground circuit in the ignition switchconnector.Is the resistance below 5.0 ohms ?AllYes → Go To 4No → Repair the ground circuit for an open.Perform VERIFICATION TEST -MEMORY SYSTEM.289
ELECTRICALLY HEATED SYSTEMS*HEATED SEATS INOPERATIVE DUE TO KEY-IN IGNITION SWITCHINPUT — ContinuedTEST ACTION APPLICABILITY4 Turn the ignition off.Disconnect the Ignition Switch harness connector.Disconnect the Body Control Module C1 harness connector.Measure the resistance of the Key-In Ignition Switch Sense circuit between theignition switch connector and the BCM C1 connector.Is the resistance below 5.0 ohms?AllYes → Go To 5No → Repair the Key-In Ignition Switch Sense circuit for an open.Perform VERIFICATION TEST -MEMORY SYSTEM.5 If there are no possible causes remaining, view repair. AllRepairReplace and program the Body Control Module in accordance withthe Service Information.Perform VERIFICATION TEST -MEMORY SYSTEM.290
ELECTRICALLY HEATED SYSTEMSSymptom:*PASSENGER SEAT BACK HEATER INOPERATIVE (LIMITED)POSSIBLE CAUSESPASSENGER HEATED SEAT BACK OPEN (LIMITED)INTERMITTENT CONDITIONTEST ACTION APPLICABILITY1 NOTE: This test is only valid on Limited models where the Seat Cushionheats properly but the Seat Back does not heat.Start the Engine.Turn the Heated Seat Switch on.Does the Seat Cushion warm up but the Seat Back does not?AllYes → Check for an open circuit in the Seat. If okay, replace the HeatedSeat Back.Perform VERIFICATION TEST -MEMORY SYSTEM.No → The condition that caused this symptom is currently not present.Inspect the related wiring harness for a possible intermittentcondition. Look for any chafed, pierced, pinched or partiallybroken wires.Perform VERIFICATION TEST -MEMORY SYSTEM.291
ELECTRICALLY HEATED SYSTEMSSymptom:*PASSENGER SEAT BOLSTER HEATER INOPERATIVE (LIMITED)POSSIBLE CAUSESPASSENGER HEATED SEAT BOLSTER OPEN (LIMITED)INTERMITTENT CONDITIONTEST ACTION APPLICABILITY1 NOTE: This test is only valid on Limited models where the Seat Back andSeat Cushion heats properly but the e Bolster does not.Start the Engine.Turn the Heated Seat Switch on.Does the Seat Back and Seat Cushion warm up but the Seat Bolster does not?AllYes → Check for an open circuit in the Seat. If okay, replace the HeatedSeat Cushion Cover.Perform VERIFICATION TEST -MEMORY SYSTEM.No → The condition that caused this symptom is currently not present.Inspect the related wiring harness for a possible intermittentcondition. Look for any chafed, pierced, pinched or partiallybroken wires.Perform VERIFICATION TEST -MEMORY SYSTEM.292
ELECTRICALLY HEATED SYSTEMSSymptom:*PASSENGER SEAT CUSHION HEATER INOPERATIVE (LIMITED)POSSIBLE CAUSESPASSENGER HEATED SEAT CUSHION OPEN (LIMITED)INTERMITTENT CONDITIONTEST ACTION APPLICABILITY1 NOTE: This test is only valid on Limited models where the Seat Back heatsproperly but the Seat Cushion does not heat.Start the Engine.Turn the Heated Seat Switch on.Does the Seat Back warm up but the Seat Cushion does not?AllYes → Check for an open circuit in the Seat. If okay, replace the HeatedSeat Cushion.Perform VERIFICATION TEST -MEMORY SYSTEM.No → The condition that caused this symptom is currently not present.Inspect the related wiring harness for a possible intermittentcondition. Look for any chafed, pierced, pinched or partiallybroken wires.Perform VERIFICATION TEST -MEMORY SYSTEM.293
ELECTRICALLY HEATED SYSTEMSSymptom:*REAR WINDOW DEFOGGER GRID INOPERATIVEPOSSIBLE CAUSESREAR DEFOGGER RELAY DTC’SINTERMITTENT CONDITIONREAR WINDOW DEFOGGER GROUND CKTREAR WINDOW DEFOGGER GRID OPENREAR WINDOW DEFOGGER RELAY OUTPUT OPENREAR WINDOW DEFOGGER RELAYREAR WINDOW DEFOGGER RELAY OUTPUT SHORTED TO GROUNDREPLACE FAULTY FUSEFUSED B(+) CKT OPEN AT RELAYSUBSTITUTE RELAYJUNCTION BLOCKREAR WINDOW DEFOGGER SWITCH SENSE CKT OPENREAR WINDOW DEFOGGER SWITCH SENSE CKT SHORTED TO GROUNDREAR WINDOW DEFOGGER SWITCH SENSE CKT SHORTED TO VOLTAGEAUTOMATIC ZONE CONTROL MODULEBODY CONTROL MODULETEST ACTION APPLICABILITY1 With the DRBIII, read the Body Computer DTC’s.AllAre there any Rear Defogger Relay DTC’s present?Yes → Refer to the symptom list for problems related to Rear DefoggerRelay DTC’s.Perform BODY VERIFICATION TEST - VER 1.No → Go To 22 Toggle the Rear Defogger switch and observe the indicator.Does the indicator toggle on and off when the switch is pressed?AllYes → Go To 3No → Go To 53 Turn the ignition and all lights off.Open the liftgate.Measure the resistance between ground and the Rear Window Defogger Groundcircuit.Is the resistance below 5.0 ohms?AllYes → Go To 4No → Repair the open Rear Window Defogger Ground circuit.Perform BODY VERIFICATION TEST - VER 1.294
ELECTRICALLY HEATED SYSTEMS*REAR WINDOW DEFOGGER GRID INOPERATIVE — ContinuedTEST ACTION APPLICABILITY4 Turn the ignition on.Turn the Rear Window Defogger on.Measure the voltage between the Rear Window Defogger Relay Output circuit at thedefogger grid on the rear window to ground.Is the voltage above 12.0 volts?AllYes → Repair the open in the Rear Window Defogger Grid.Perform BODY VERIFICATION TEST - VER 1.No → Repair the open Rear Window Defogger Relay Output circuit.Perform BODY VERIFICATION TEST - VER 1.5 Turn the ignition on.With the DRBIII, read the R DEFOG SWITCH Input/Output display.Toggle the Rear Window Defogger Switch on and off and observe the DRB.Does the DRBIII show that the Rear Defog Switch is toggling on and off?AllYes → Go To 6No → Go To 126 Remove and inspect the PDC fuse #2.Is the PDC fuse #2 open?AllYes → Go To 7No → Go To 97 Remove the Rear Window Defogger Relay from the Junction Block.Measure the resistance of the Rear Window Defogger Relay coil in cavities 85 and 86.Is the resistance between 50.0 and 100.0 ohms?AllYes → Go To 8No → Replace the Rear Window Defogger Relay and replace PDC fuse#2 if necessary.Perform BODY VERIFICATION TEST - VER 1.8 Disconnect the Rear Window Defogger connector at the rear window grid.Remove the Rear Window Defogger Relay from the Junction Block.Measure the resistance between ground and the Rear Window Defogger RelayOutput circuit at the Rear Window Defogger connector.Is the resistance below 5.0 ohms?AllYes → Repair the Rear Window Defogger Relay Output circuit for a shortto ground.Perform BODY VERIFICATION TEST - VER 1.No → Replace the PDC fuse #2.Perform BODY VERIFICATION TEST - VER 1.9 Lower the Junction Block and remove the Rear Window Defogger Relay.Turn the ignition on.Measure the voltage of the Fused B(+) circuit in the Rear Window Defogger Relayconnector.Is the voltage above 10.0 volts?AllYes → Go To 10No → Repair the open Fused B(+) circuit from PDC fuse #2.Perform BODY VERIFICATION TEST - VER 1.295
ELECTRICALLY HEATED SYSTEMS*REAR WINDOW DEFOGGER GRID INOPERATIVE — ContinuedTEST ACTION APPLICABILITY10 Lower the Junction Block and remove the Rear Window Defogger Relay.Install a known good relay in the Rear Window Defogger Relay connector.Turn the ignition on.Check the Rear Window Defogger for proper operation.Does the system operate properly now?AllYes → Replace the original Rear Window Defogger Relay.Perform BODY VERIFICATION TEST - VER 1.No → Go To 1111 With the DRBIII, actuate the R DEFOG RELAY.Using a 12-volt Test Light connected to ground, back probe the Rear WindowDefogger Relay Output circuit in the Junction Block C1 connected.Does the test light flash on and off when the relay is actuated?AllYes → The condition that caused this symptom is currently not present.Inspect the related wiring harness for a possible intermittentcondition. Look for any chafed, pierced, pinched or partiallybroken wires.Perform BODY VERIFICATION TEST - VER 1.No → Replace the Junction Block.Perform BODY VERIFICATION TEST - VER 1.12 Turn the ignition off.Disconnect the BCM C2 connector.Disconnect the Temperature Control C1 connector.NOTE: Check connectors - Clean/repair as necessary.Measure the resistance of the Rear Window Defogger Switch Sense circuit betweenthe BCM connector and the AZC connector.Is the resistance below 5.0 ohms?AllYes → Go To 13No → Repair the open Rear Window Defogger Switch Sense circuit.Perform BODY VERIFICATION TEST - VER 1.13 Turn the ignition off.Disconnect the BCM C2 connector.Disconnect the Temperature Control C1 connector.Measure the resistance between ground and the Rear Window Defogger SwitchSense circuit.Is the resistance below 5.0 ohms?AllYes → Repair the Rear Window Defogger Switch Sense circuit for a shortto ground.Perform BODY VERIFICATION TEST - VER 1.No → Go To 14296
ELECTRICALLY HEATED SYSTEMS*REAR WINDOW DEFOGGER GRID INOPERATIVE — ContinuedTEST ACTION APPLICABILITY14 Turn the ignition off.Disconnect the BCM C2 connector.Disconnect the Temperature Control C1 connector.NOTE: Check connectors - Clean/repair as necessary.Turn the ignition on.Measure the voltage between the Rear Window Defogger Switch Sense circuit andground.Is there any voltage present?AllYes → Repair the Rear Window Switch Sense circuit for a short tovoltage.Perform BODY VERIFICATION TEST - VER 1.No → Go To 1515 NOTE: Ensure the BCM is connected before proceeding.Turn the ignition off.Disconnect the Temperature Control C1 connector.Connect a jumper wire between the Rear Window Defogger Switch Sense circuit inthe Temperature Control connector to ground.Turn the ignition on.With the DRBIII, read the R DEFOG SWITCH status.Does the DRBIII display R DEFOG SWITCH: CLOSED?AllYes → Replace the Automatic Zone Control Module.Perform BODY VERIFICATION TEST - VER 1.No → Replace the Body Control Module.Perform BODY VERIFICATION TEST - VER 1.297
ELECTRICALLY HEATED SYSTEMSSymptom:*REAR WINDOW DEFOGGER SWITCH INDICATOR INOPERATIVEPOSSIBLE CAUSESFUSED REAR WINDOW DEFOGGER RELAY OUTPUT CKT SHORTED TO GROUNDJUNCTION BLOCK FUSE #11FUSED REAR WINDOW DEFOGGER RELAY OUTPUT CKT OPENTEMPERATURE CONTROL HEAD (AZC OR MANUAL)TEST ACTION APPLICABILITY1 Inspect Junction Block fuse #11.Is Junction Block fuse #11 open?AllYes → Go To 2No → Go To 32 Turn the ignition off.Disconnect the Temperature Control Head C1 connector.Measure the resistance of the Fused Rear Window Defog Relay Output circuit toground (from the output side of fuse #11)Is the resistance below 5.0 ohms?AllYes → Repair the Fused Rear Window Defogger Relay Output circuit fora short to ground.Perform BODY VERIFICATION TEST - VER 1.No → Replace the Junction Block fuse #11.Perform BODY VERIFICATION TEST - VER 1.3 Turn the ignition off.Disconnect the Temperature Control Head C1 connector.Remove the Rear Window Defogger Relay.NOTE: Check connectors - Clean/repair as necessary.Ensure that Junction Block fuse #11 is installed.Measure the resistance of the Fused rear Window Defogger Relay Output circuit fromthe relay output terminal to the Temperature Control Head C1 connector.Is the resistance below 5.0 ohms?AllYes → Replace the Temperature Control Head (AZC or manual).Perform BODY VERIFICATION TEST - VER 1.No → Repair the open Fused Rear Window Defogger Relay Outputcircuit.Perform BODY VERIFICATION TEST - VER 1.298
EXTERIOR LIGHTINGSymptom:FOG LAMP RELAY CKT SHORTED HIWhen Monitored and Set Condition:FOG LAMP RELAY CKT SHORTED HIWhen Monitored: Ignition in run position.Set Condition: The BCM detects excessive current on the fog lamp relay control circuit.POSSIBLE CAUSESFOG LAMP RELAYFOG LAMP RELAY CONTROL SH TO B(+)BCM INTERNAL DEFECT FOG LAMP CONTROL SHORT TO BATTERYTEST ACTION APPLICABILITY1 Install a known good relay in place of the Fog Lamp Relay.AllDoes the system operate correctly?Yes → Replace the Fog Lamp Relay.Perform BODY VERIFICATION TEST - VER 1.No → Go To 22 Remove the Fog Lamp Relay from the Junction Block.Turn ignition off. Remove the Body Control Module from the Junction Block.Turn ignition on.Measure voltage of the Fog Lamp Relay control circuit at the Junction Block toground.Is the voltage greater than 1.0 volt?AllYes → Replace the Junction Block.Perform BODY VERIFICATION TEST - VER 1.No → Replace the Body Control Module.Perform BODY VERIFICATION TEST - VER 1.299
EXTERIOR LIGHTINGSymptom:FOG LAMP RELAY CKT SHORTED LO/OPENWhen Monitored and Set Condition:FOG LAMP RELAY CKT SHORTED LO/OPENWhen Monitored: With the ignition switch in the on position.Set Condition: This DTC sets if no voltage is seen at the fog lamp relay control circuitcavity.POSSIBLE CAUSESFOG LAMP RELAY COIL SHORTEDFOG LAMP RELAY OUTPUT CKT SHORTFOG LAMP RELAY MISSINGOPEN B(+)OPEN FUSED B+ TO FOG RELAYFOG LAMP RELAYFOG LAMP RELAY CONTROL CKT OPENFOG LAMP RELAY CONTROL CKT SHORTED TO GROUNDBCM FOG LAMP RELAY CONTROLFUSE #24TEST ACTION APPLICABILITY1 Check Junction Block fuse #24.Is fuse #24 open?AllYes → Go To 2No → Go To 42 Remove the Fog Lamp Relay from the Junction Block.Using an ohmmeter measure the Fog lamp relay coil terminals 85 and 86.Is the resistance between 70 and 80 ohms?AllYes → Go To 3No → Replace the Fog Lamp Relay.Perform BODY VERIFICATION TEST - VER 1.3 Remove the Fog Lamp Relay from the Junction Block.Using an ohmmeter measure the Fog Lamp Relay Output circuit to ground.Is the resistance below 0.5 ohms?AllYes → Repair the relay output circuit for a short to ground and replacethe fuse if necessary.Perform BODY VERIFICATION TEST - VER 1.No → Replace the fuse.Perform BODY VERIFICATION TEST - VER 1.300
EXTERIOR LIGHTINGFOG LAMP RELAY CKT SHORTED LO/OPEN — ContinuedTEST ACTION APPLICABILITY4 Looking at the Junction Block, see if the Fog Lamp Relay is present.AllIs the relay present?Yes → Go To 5No → Install the missing relay.Perform BODY VERIFICATION TEST - VER 1.5 For the results of this test to be valid voltage must be present at the Junction BlockC5 connector cavity #3.Measure the voltage of the B(+) circuit to fuse #24.Is the voltage above 10.0 volts?AllYes → Go To 6No → Replace the Junction Block.Perform BODY VERIFICATION TEST - VER 1.6 Remove the Fog Lamp Relay from the Junction Block.Measure Fused B+ cavities for the Fog Lamp Relay in the Junction Block.Is the voltage above 10.0 volts at both cavities?AllYes → Go To 7No → Replace the junction block.Perform BODY VERIFICATION TEST - VER 1.7 Install a known good relay in place of the Fog Lamp Relay.Does the system operate correctly?AllYes → Replace the Fog Lamp Relay.Perform BODY VERIFICATION TEST - VER 1.No → Go To 88 Remove the Fog Lamp Relay from the Junction Block.Turn ignition off. Remove the Body Control Module from the Junction Block.Measure the resistance of the Fog Lamp Relay Control circuit between the relay andthe Body Control Module.Is the resistance below 5.0 ohms?AllYes → Go To 9No → Replace the Junction Block.Perform BODY VERIFICATION TEST - VER 1.9 Remove the fog lamp relay from the Junction Block.Turn ignition off. Remove the Body Control Module from the Junction Block.Measure the resistance of the Fog Lamp Relay Control circuit to ground.Is the resistance below 10.0 ohms?AllYes → Replace the Junction Block.Perform BODY VERIFICATION TEST - VER 1.No → Go To 1010 If there are no possible causes remaining, view repair. AllRepairReplace the Body Control Module.Perform BODY VERIFICATION TEST - VER 1.301
EXTERIOR LIGHTINGSymptom:HAZARD RELAY CKT SHORTED HIWhen Monitored and Set Condition:HAZARD RELAY CKT SHORTED HIWhen Monitored: Ignition in RUN and IOD fuse/connector installed.Set Condition: This code is set if the BCM tries to activate the hazard lamps andexcessive current is sinked into the BCM.POSSIBLE CAUSESCOMBO FLASHER INTERNAL SHORT TO B(+)HAZARD SWITCH SENSE CIRCUIT SHORTED TO B(+)BCM HAZARD CIRCUIT SHORT TO VOLTAGETEST ACTION APPLICABILITY1 Remove the combination flasher from the junction blockWith the DRB III erase BCM DTC’s.Operate either the panic feature on the RKE fob or trigger the vehicle theft alarm.With the DRB re-read the BCM trouble codes.Did the Hazard relay ckt shorted Hi trouble code reset?AllYes → Go To 2No → Replace the Combination Flasher.Perform BODY VERIFICATION TEST - VER 1.2 Remove the Combination Flasher from the Junction Block.Turn ignition off. Remove the Body Control Module from the Junction Block.Turn ignition on.Using a voltmeter measure the Hazard switch sense ckt cavity 9 to ground at thecombination flasher socket in the Junction Block.Was the voltage greater than 1.0 volt?AllYes → Repair the Hazard Switch Sense circuit for a short to voltage.Perform BODY VERIFICATION TEST - VER 1.No → Go To 33 If there are no possible causes remaining, view repair. AllRepairReplace the Body Control Module.Perform BODY VERIFICATION TEST - VER 1.302
EXTERIOR LIGHTINGSymptom:HEADLAMP SW OPEN CKTWhen Monitored and Set Condition:HEADLAMP SW OPEN CKTWhen Monitored: Ignition in RUN and IOD fuse/connector installed.Set Condition: This DTC sets if the BCM detects voltage on the MUX circuit above 4.8volts.POSSIBLE CAUSESHEADLAMP MUX VOLTS > 4.9HEADLAMP SWITCH MUX OPENHEADLAMP SWITCH RETURN OPENBCM HEADLAMP MUXTEST ACTION APPLICABILITY1 Disconnect the left multi-function switch connector.Turn ignition on.Connect a jumper wire between headlamp switch MUX and headlamp switch returnat the left multifunction switch.With the DRBIII in Body Sensors, read the Headlamp sw volts.Does the DRB display Headlamp switch 0.0 volts?AllNo → Go To 2Yes → Replace the left multi-function switchPerform BODY VERIFICATION TEST - VER 1.2 Turn the ignition off.Disconnect the left multi-function switch connector.Disconnect the Body Control Module C-1 connector.Measure the resistance of the headlamp switch mux circuit from the BCM C1connector to the left multi-function switch connector.Is the resistance below 5.0 ohms?AllYes → Go To 3No → Repair the open Headlamp Switch Mux circuit.Perform BODY VERIFICATION TEST - VER 1.3 Turn ignition off.Disconnect the left multi-function switch connector.Disconnect the Body Control Module-C1 connector.Using an ohmmeter measure the Headlamp Switch Return circuit from BCM to leftmulti-function.Is the resistance below 5.0 ohms?AllYes → Go To 4No → Repair the open headlamp switch return circuit.Perform BODY VERIFICATION TEST - VER 1.303
EXTERIOR LIGHTINGHEADLAMP SW OPEN CKT — ContinuedTEST ACTION APPLICABILITY4 If there are no possible causes remaining, view repair. AllRepairReplace the Body Control Module.Perform BODY VERIFICATION TEST - VER 1.304
EXTERIOR LIGHTINGSymptom:HEADLAMP SW SHORT TO GROUNDWhen Monitored and Set Condition:HEADLAMP SW SHORT TO GROUNDWhen Monitored: Ignition in RUN and IOD fuse/connector installed.Set Condition: This DTC sets if the BCM detects voltage on the MUX circuit below 0.3volts.POSSIBLE CAUSESHEADLAMP SWITCH MUX SHORTEDLEFT MULTI-FUNTION SWITCH SHORTEDBCMTEST ACTION APPLICABILITY1 Disconnect the left multi-function switch connector.Turn ignition on.Does the DRB display Headlamp switch 5.0 volts?AllNo → Go To 2Yes → Replace the left multi-function switch.Perform BODY VERIFICATION TEST - VER 1.2 Turn the ignition off.Disconnect the left multi-function switch connector.Disconnect the Body Control Module C-1 connector.Measure the resistance of the headlamp switch mux circuit to ground at the leftmulti-function switch connector.Is the resistance below 5.0 ohms?AllYes → Repair the Headlamp Switch Mux circuit for a short to ground.Perform BODY VERIFICATION TEST - VER 1.No → Go To 33 If there are no possible causes remaining, view repair. AllRepairReplace the Body Control ModulePerform BODY VERIFICATION TEST - VER 1.305
EXTERIOR LIGHTINGSymptom:HIGH BEAM RELAY CKT SHORTED HIWhen Monitored and Set Condition:HIGH BEAM RELAY CKT SHORTED HIWhen Monitored: Ignition in RUN and IOD fuse/connector installed.Set Condition: This condition is set when the BCM is trying to activate the High beamrelay and excessive current is sinked into the BCM.POSSIBLE CAUSESHI BEAM RELAYHIGH BEAM RELAY CONTROL CIRCUIT SHORTED TO B(+)BCM HIGH BEAM CONTROL SHORT TO BATTERYTEST ACTION APPLICABILITY1 Install a known good relay in place of the High Beam relay.AllDoes the system now operate correctly?Yes → Replace the High Beam relay.Perform BODY VERIFICATION TEST - VER 1.No → Go To 22 Remove the High Beam relay from the Junction Block.Turn ignition off. Remove the Body Control Module from the Junction Block.Turn ignition on.Using a voltmeter measure the High Beam Relay control ckt cavity 86 to ground atthe Junction Block.Was the voltage greater than 1.0 volt?AllYes → Replace the Junction Block.Perform BODY VERIFICATION TEST - VER 1.No → Replace the Body Control Module.Perform BODY VERIFICATION TEST - VER 1.306
EXTERIOR LIGHTINGSymptom:LOW BEAM RELAY CKT SHORTED HIWhen Monitored and Set Condition:LOW BEAM RELAY CKT SHORTED HIWhen Monitored: Ignition in RUN and IOD fuse/connector installed.Set Condition: This condition is set when the BCM is trying to activate the lo beam relayand excessive current is sinked into the BCM.POSSIBLE CAUSESLOW BEAM RELAYLOW BEAM RELAY CONTROL SHORTED TO B(+)BCM LOW BEAM CONTROL SHORT TO BATTERYTEST ACTION APPLICABILITY1 Install a known good relay in place of the Low Beam relay.AllDoes the system now operate correctly?Yes → Replace the Low Beam relay.Perform BODY VERIFICATION TEST - VER 1.No → Go To 22 Remove the Low Beam relay from the Junction Block.Turn ignition off. Remove the Body Control Module from the Junction Block.Turn ignition on.Using a voltmeter measure the Low Beam Relay control ckt cavity 86 to ground at theJunction Block.Was the voltage greater than 1.0 volt?AllYes → Replace the Junction Block.Perform BODY VERIFICATION TEST - VER 1.No → Replace the Body Control Module.Perform BODY VERIFICATION TEST - VER 1.307
EXTERIOR LIGHTINGSymptom:LOW BEAM RELAY CKT SHORTED LO/OPENWhen Monitored and Set Condition:LOW BEAM RELAY CKT SHORTED LO/OPENWhen Monitored: Ignition in RUN and IOD fuse/connector installed.Set Condition: This condition detects if the lo beam relay has not been installed in thevehicle by monitoring the BCM lo beam relay output for battery voltage applied.POSSIBLE CAUSESLOW BEAM RELAYOPEN FUSED B(+)LOW BEAM RELAY CTL CKT OPENLOW BEAM RELAY CONTROL CIRCUIT SHORTED TO GROUNDBCM LOW BEAM CONTROL CIRCUIT SHORTED LOW/OPENLOW BEAM RELAY MISSINGTEST ACTION APPLICABILITY1 Install a known good relay in place of the Low Beam relay.AllDoes the system now operate correctly?Yes → Replace the Low Beam relay.Perform BODY VERIFICATION TEST - VER 1.No → Go To 22 Looking at the Junction Block, see if the relay is present.Is the relay present?AllYes → Go To 3No → Install the correct relay.Perform BODY VERIFICATION TEST - VER 1.3 For the results of this test to be valid, voltage must be present at the Junction BlockC5 connector cavity #1.Measure the voltage of the fused B(+) circuits to Low Beam relay cavities #30 and#85.Is the voltage above 10.0 volts at both cavities?AllYes → Go To 4No → Replace the Junction Block.Perform BODY VERIFICATION TEST - VER 1.308
EXTERIOR LIGHTINGLOW BEAM RELAY CKT SHORTED LO/OPEN — ContinuedTEST ACTION APPLICABILITY4 Remove the Low Beam relay from the Junction Block.Turn ignition off. Remove the Body Control Module from the Junction Block.Using an ohmmeter measure the Low Beam Relay control circuit from relay cavity 86to the Junction Block Body Control Module connector cavity 4.Was the resistance below 5.0 ohms?AllYes → Go To 5No → Replace the Junction Block.Perform BODY VERIFICATION TEST - VER 1.5 Turn ignition off. Remove the Body Control Module from the Junction Block.Remove the Low Beam Relay from the junction block.Measure the resistance of the Low Beam Relay Control circuit.Is the resistance below 5.0 ohms?AllYes → Go To 6No → Replace the Junction Block.Perform BODY VERIFICATION TEST - VER 1.6 If there are no possible causes remaining, view repair. AllRepairReplace the Body Control Module.Perform BODY VERIFICATION TEST - VER 1.309
EXTERIOR LIGHTINGSymptom:PARK LAMP RELAY CKT SHORTED HIWhen Monitored and Set Condition:PARK LAMP RELAY CKT SHORTED HIWhen Monitored: Ignition in RUN and IOD fuse/connector installed.Set Condition: This condition is set when the BCM is trying to activate the park relay andexcessive current is detected on the control circuit.POSSIBLE CAUSESPARK LAMP RELAYBCM PARK LAMP CONTROL SHORT TO BATTERYPARK LAMP RELAY CONTROL SH TO B(+)TEST ACTION APPLICABILITY1 Install a known good relay in place of the Park Lamp relay.AllDoes the system now operate correctly?Yes → Replace the Park Lamp relay.Perform BODY VERIFICATION TEST - VER 1.No → Go To 22 Remove the park lamp relay from the Junction Block.Turn ignition off. Remove the Body Control Module from the Junction Block.Turn ignition on.Using a voltmeter measure the Park Lamp Relay control ckt cavity 86 to ground atthe Junction Block.Was the voltage greater than 1.0 volt?AllYes → Replace the Junction Block.Perform BODY VERIFICATION TEST - VER 1.No → Replace the Body Control Module.Perform BODY VERIFICATION TEST - VER 1.310
EXTERIOR LIGHTINGSymptom:PARK LAMP RELAY CKT SHORTED LO/OPENWhen Monitored and Set Condition:PARK LAMP RELAY CKT SHORTED LO/OPENWhen Monitored: Ignition in RUN and IOD fuse/connector installed.Set Condition: The DTC is is set if the BCM detects excessive current on the park lamprelay control circuit.POSSIBLE CAUSESPARK LAMP RELAY OUTPUT CIRCUIT SHORTPARK LAMP RELAY MISSINGPARK LAMP RELAYPARK LAMP RELAY CTL CKT OPENOPEN FUSED B(+) TO PARK RELAYOPEN B(+)BCM PARKLAMP CONTROL CIRCUIT SHORTED LOW/OPENFUSE #6TEST ACTION APPLICABILITY1 Check J/B fuse #6.Is fuse #6 open?AllYes → Go To 2No → Go To 32 Remove the park lamp relay from the Junction Block.Using an ohmmeter measure the park lamp relay output circuit from relay cavity 30to ground.Is the resistance below 0.6 ohms?AllYes → Repair the relay output circuit for a short to ground and replacethe fuse if necessary.Perform BODY VERIFICATION TEST - VER 1.No → Replace the fuse.Perform BODY VERIFICATION TEST - VER 1.3 Looking at the Junction Block, see if the Park Lamp Relay is present.Is the relay present?AllYes → Go To 4No → Install the missing relay.Perform BODY VERIFICATION TEST - VER 1.311
EXTERIOR LIGHTINGPARK LAMP RELAY CKT SHORTED LO/OPEN — ContinuedTEST ACTION APPLICABILITY4 Install a known good relay in place of the Park Lamp relay.AllDoes the system now operate correctly?Yes → Replace the Parklamp Relay.Perform BODY VERIFICATION TEST - VER 1.No → Go To 55 Remove the Park Lamp relay from the Junction Block.Turn ignition off. Remove the Body Control Module from the Junction Block.Using an ohmmeter measure the Park Lamp Relay control circuit from relay cavity86 to the Junction Block Body Control Module connector cavity 1.Was the resistance below 5.0 ohms?AllYes → Go To 6No → Replace the Junction Block.Perform BODY VERIFICATION TEST - VER 1.6 For the results of this test to be valid, voltage must be present at the Junction BlockC5 connector cavity #1.Measure the voltage of the B(+) circuit to fuse #6.Is the voltage above 10.0 volts?AllYes → Go To 7No → Replace the Junction Block.Perform BODY VERIFICATION TEST - VER 1.7 Remove the Park Lamp Relay from the Junction Block.Measure cavities 85 and 87 (fused B(+)) for the Park Lamp Relay at the JunctionBlock.Is the voltage above 10.0 volts at both cavities?AllYes → Go To 8No → Replace the junction block.Perform BODY VERIFICATION TEST - VER 1.8 If there are no possible causes remaining, view repair. AllRepairReplace the Body Control Module.Perform BODY VERIFICATION TEST - VER 1.312
EXTERIOR LIGHTINGSymptom:REAR FOG LAMP RELAY CKT OPENWhen Monitored and Set Condition:REAR FOG LAMP RELAY CKT OPENWhen Monitored: Ignition switch in the On position and the IOD fuse installed.Set Condition: This DTC sets if the BCM does not detect any voltage on the controlcircuit.POSSIBLE CAUSESJUNCTION BLOCK - REAR FOG LAMP RELAY CONTROL CKT SHORTED TO GROUNDREAR FOG LAMP RELAY OPENJUNCTION BLOCK - REAR FOG LAMP RELAY CONTROL CKT OPENBODY CONTROL MODULEINSPECT FUSE #27JUNCTION BLOCK - FUSED B+ CKT SHORTED TO GROUNDREAR FOG LAMP RELAY SHORTEDREAR FOG LAMP RELAY OUTPUT CIRCUIT SHORTED TO GROUNDTEST ACTION APPLICABILITY1 Remove the Rear Fog Lamp Relay from the Junction Block.Using a 12-volt Test Light connected to ground, probe cavity 85 of the Rear Fog LampRelay connector.Is the test light illuminated?AllYes → Go To 2No → Go To 62 Remove the Rear Fog Lamp Relay from the Junction Block.Turn the ignition on.Using a 12-volt Test Light connected to 12-volts, probe cavity 86 of the Rear FogLamp Relay connector.With the DRB enter Body, Body Computer, then Actuator Tests.While monitoring the test light, actuate the Rear Fog Lamp Relay.Does the test light flash on and off as the relay is actuated?AllYes → Replace the Rear Fog Lamp Relay.Perform BODY VERIFICATION TEST - VER 1.No → Go To 3313
EXTERIOR LIGHTINGREAR FOG LAMP RELAY CKT OPEN — ContinuedTEST ACTION APPLICABILITY3 Turn the ignition off.Remove the Rear Fog Lamp Relay from the Junction Block.Remove the BCM from the Junction Block.Measure the resistance between ground and cavity 86 of the Rear Fog Lamp Relayconnector.Is the resistance below 5.0 ohms?AllYes → Replace the Junction Block.Perform BODY VERIFICATION TEST - VER 1.No → Go To 44 Turn the ignition off.Remove the Rear Fog Lamp Relay from the Junction Block.Remove the BCM from the Junction Block.Measure the resistance of the Rear Fog Lamp Relay Control circuit between the RearFog Lamp Relay connector cavity 86 and the Junction Block BCM connector cavity13.Is the resistance below 5.0 ohms?AllYes → Go To 5No → Replace the Junction Block.Perform BODY VERIFICATION TEST - VER 1.5 If there are no possible causes remaining, view repair. AllRepairReplace the Body Control Module.Perform BODY VERIFICATION TEST - VER 1.6 Inspect fuse #27 in the Junction Block.Is the fuse open?AllYes → Go To 7No → Check the B+ feed circuit from the PDC fuse for an open or short.If ok, replace the Junction Block.Perform BODY VERIFICATION TEST - VER 1.7 Remove the Rear Fog Lamp Relay from the Junction Block.Turn the ignition off.Measure the resistance between ground and cavity 30 of the Rear Fog Lamp Relayconnector.Is the resistance below 5.0 ohms?AllYes → Replace the Junction Block.Perform BODY VERIFICATION TEST - VER 1.No → Go To 88 Turn the ignition off.Remove the Rear Fog Lamp Relay from the Junction Block.Remove the BCM from the Junction Block.Measure the resistance between ground and cavity 86 of the Rear Fog Lamp Relayconnector.Is the resistance below 5.0 ohms?AllYes → Replace the Junction Block.Perform BODY VERIFICATION TEST - VER 1.No → Go To 9314
EXTERIOR LIGHTINGREAR FOG LAMP RELAY CKT OPEN — ContinuedTEST ACTION APPLICABILITY9 Turn the ignition off.Remove the Rear Fog Lamp Relay from the Junction Block.Replace Fuse #27 in the Junction Block with a good fuse.Connect a jumper wire between cavity 30 and cavity 87 of the Rear Fog Lamp Relayconnector.Inspect fuse #27 in the Junction Block.Is the fuse open?AllYes → Check the Rear Fog Lamp Relay Output circuit for a short toground. If ok, replace the Junction Block.Perform BODY VERIFICATION TEST - VER 1.No → Replace the Rear Fog Lamp Relay.Perform BODY VERIFICATION TEST - VER 1.315
EXTERIOR LIGHTINGSymptom:REAR FOG RELAY OUTPUT SHORTED HIWhen Monitored and Set Condition:REAR FOG RELAY OUTPUT SHORTED HIWhen Monitored: Ignition switch in the On position and the IOD fuse installed.Set Condition: This condition is set when the BCM is trying to activate the rear fog lamprelay and excessive current is detected on the control circuit.POSSIBLE CAUSESREAR FOG LAMP RELAY SHORTED TO VOLTAGEJUNCTION BLOCK - REAR FOG LAMP RELAY CONTROL CKT SHORTED TO VOLTAGEBODY CONTROL MODULETEST ACTION APPLICABILITY1 Remove the Rear Fog Lamp Relay from the Junction Block.Turn the ignition on.Measure the voltage of the Rear Fog Lamp Relay Control circuit (cavity 86) in theRear Fog Lamp Relay connector.Is the voltage above 1.0 volt?AllYes → Go To 2No → Replace the Rear Fog Lamp Relay.Perform BODY VERIFICATION TEST - VER 1.2 Turn the ignition off.Remove the Rear Fog Lamp Relay from the Junction Block.Remove the BCM from the Junction Block.Turn the ignition on.Measure the voltage of the Rear Fog Lamp Relay Control circuit (cavity 86) in theRear Fog Lamp Relay connector.Is the voltage above 1.0 volt?AllYes → Replace the Junction Block.Perform BODY VERIFICATION TEST - VER 1.No → Replace the Body Control Module.Perform BODY VERIFICATION TEST - VER 1.316
EXTERIOR LIGHTINGSymptom List:*AUTO HEADLAMPS WILL NOT TURN <strong>OF</strong>F*AUTO HEADLAMPS WILL NOT TURN ONTest Note:All symptoms listed above are diagnosed using the same tests.The title for the tests will be *AUTO HEADLAMPS WILL NOTTURN <strong>OF</strong>F.POSSIBLE CAUSESHEADLAMP SWITCH FUNCTIONAUTOMATIC HEADLAMP LIGHT SENSOR OPENULTRALIGHT SENSOR SIGNAL OPENBCM ULTRALIGHT SENSE CIRCUIT OPENAUTO HEADLAMP SENSOR CIRCUIT SHORTEDULTRALIGHT SENSOR SIGNAL SHORTED TO GROUNDBCM ULTRALIGHT SENSE CIRCUIT SHORTEDTEST ACTION APPLICABILITY1 With the DRB III read the AUTO HEADLAMP SENSE VOLTS under sensors whileshinning a shop light on the Auto Headlamp Light sensor and then covering it up.The Auto Headlamp Sense voltage should change from approximately 0.0 to 5.0volts, Choose outcome.AllA. Voltage in rangeGo To 2B. Stays above 4.8 voltsGo To 3C. Stays below 0.5 voltsGo To 72 With the DRB III under Body sensors, read the HEADLAMP SW VOLTS.Move the Headlamp switch to the different modes and compare the values to valuesshown. Headlamp switch <strong>OF</strong>F 4.4 VOLTS Parking lamps ON 3.2 VOLTS HeadlampsON 2.0 VOLTS Auto headlamps ON 0.6 VOLTSDo the values on the the DRB match.AllYes → Test Complete.No → Replace the Left Multifunction Switch.Perform BODY VERIFICATION TEST - VER 1.317
EXTERIOR LIGHTING*AUTO HEADLAMPS WILL NOT TURN <strong>OF</strong>F — ContinuedTEST ACTION APPLICABILITY3 With the DRB III under Body sensors, read the HEADLAMP SW VOLTS.Move the Headlamp switch to the different modes and compare the values to valuesshown. Headlamp switch <strong>OF</strong>F 4.4 VOLTS Parking lamps ON 3.2 VOLTS HeadlampsON 2.0 VOLTS Auto headlamps ON 0.6 VOLTSDo the values on the the DRB match.AllYes → Go To 4No → Replace the Left Multifunction Switch.Perform BODY VERIFICATION TEST - VER 1.4 Disconnect the Automatic headlamp light sensor/VTSS led 4-way connector.Connect a jumper from the ultra light sensor signal ckt to the ultra light sensorreturn ckt.With the DRB III in sensors read Auto head sensor volts.Does the DRB III show Auto head sensor volts under .5 volts?AllYes → Replace the Automatic Headlamp Light Sensor/VTSS LED.Perform BODY VERIFICATION TEST - VER 1.No → Go To 55 Disconnect the Auto headlamp light sensor 4-way connector.Disconnect the BCM C2 connector.Using an ohmmeter measure the ultralight sense circuit from the Auto headlamplight sensor 4-way to the BCM C2 connector.Is the resistance below 5.0 ohms?AllYes → Go To 6No → Repair the open Ultralight Sensor Signal circuit.Perform BODY VERIFICATION TEST - VER 1.6 If there are no possible causes remaining, view repair. AllRepairReplace the Body Control Module.Perform BODY VERIFICATION TEST - VER 1.7 With the DRB III under Body sensors, read the HEADLAMP SW VOLTS.Move the Headlamp switch to the different modes and compare the values to valuesshown. Headlamp switch <strong>OF</strong>F 4.4 VOLTS Parking lamps ON 3.2 VOLTS HeadlampsON 2.0 VOLTS Auto headlamps ON 0.6 VOLTSDo the values on the the DRB match.AllYes → Go To 8No → Replace the Left Multifunction Switch.Perform BODY VERIFICATION TEST - VER 1.8 Disconnect the Automatic headlamp light sensor/VTSS led 4-way connector.With the DRB III in sensors read Auto Headlamp sensor volts.Does the DRB III display Auto Headlamp sensor above 4.8 volts?AllYes → Replace the Auto Headlamp Light Sensor/VTSS LED.Perform BODY VERIFICATION TEST - VER 1.No → Go To 9318
EXTERIOR LIGHTING*AUTO HEADLAMPS WILL NOT TURN <strong>OF</strong>F — ContinuedTEST ACTION APPLICABILITY9 Disconnect the Auto headlamp light sensor 4-way connector.Disconnect the BCM C2 connector.Using an ohmmeter measure the ultralight sense signal circuit from the Autoheadlamp light sensor 4-way to ground.Is the resistance below 5.0 ohms?AllYes → Repair the Ultralight Sensor Signal circuit for a short to ground.Perform BODY VERIFICATION TEST - VER 1.No → Go To 1010 If there are no possible causes remaining, view repair. AllRepairReplace the Body Control Module.Perform BODY VERIFICATION TEST - VER 1.319
EXTERIOR LIGHTINGSymptom:*FLASH TO PASS INOPERATIVEPOSSIBLE CAUSESJUNCTION BLOCK HIGH BEAM RELAY CONTROL OPENLEFT MULTI-FUNCTION SWITCHHIGH BEAM RELAY CONTROL CIRCUIT OPEN TO LEFT MULTI-FUNCTION SWITCHTEST ACTION APPLICABILITY1 The High Beam Headlamps must be operational for the result of this test to be valid.Disconnect the Left Multi-Function switch harness connector.Measure the voltage of the High Beam Relay control circuit in the Left Multi-Function switch connector.Is the voltage above 10.0 volts?AllYes → Replace the Left Multi-Function Switch.Perform BODY VERIFICATION TEST - VER 1.No → Go To 22 Turn ignition off.Disconnect the left multi-function switch connector.Disconnect the Junction Block C-3 harness connector.Using an ohmmeter measure the High Beam Relay control circuit from the leftmulti-function switch connector to the Junction Block C-3 connector.Was the resistance below 5.0 ohms?AllYes → Replace the Junction Block.Perform BODY VERIFICATION TEST - VER 1.No → Repair the High Beam Relay Control circuit for an open.Perform BODY VERIFICATION TEST - VER 1.320
EXTERIOR LIGHTINGSymptom:*FOG LAMPS WILL NOT TURN <strong>OF</strong>FPOSSIBLE CAUSESFOG LAMP RELAYJUNCTION BLOCKFOG LAMP RELAY OUTPUT CIRCUIT SHORT TO BATTERYFOG LAMP SWITCH SENSE SHORTEDFOG LAMP SWITCH OPEN/SHORTEDBODY CONTROL MODULETEST ACTION APPLICABILITY1 With the DRB III under Body Input/Outputs, read the Fog lamp switch state whileturning the Fog lamp switch on and off.Did the fog lamp switch state change?AllYes → Go To 2No → Go To 42 Install a known good relay in place of the Fog Lamp relay.Does the system now operate correctly?AllYes → Replace the Fog Lamp Relay.Perform BODY VERIFICATION TEST - VER 1.No → Go To 33 Disconnect the Junction Block C-2 harness connector.Did the fog lamps turn off?AllYes → Replace the Junction Block.Perform BODY VERIFICATION TEST - VER 1.No → Repair the Relay Output circuit for a short to voltage.Perform BODY VERIFICATION TEST - VER 1.4 Disconnect the left multi-function switch connector if not already disconnected.Disconnect the BCM C2 connectorMeasure the fog lamp switch sense circuit to ground at the left multi-function switchconnector.Is the resistance below 5.0 ohms?AllYes → Repair the Fog Lamp Switch Sense for a short to ground.Perform BODY VERIFICATION TEST - VER 1.No → Go To 5321
EXTERIOR LIGHTING*FOG LAMPS WILL NOT TURN <strong>OF</strong>F — ContinuedTEST ACTION APPLICABILITY5 Disconnect the left multi-function switch connector.With the DRB III under Body Input Outputs read the Fog Lamp switch state whileconnecting a jumper from the Fog lamp switch sense to the Headlamp switch returnat the left multifunctionDid the fog lamp switch state change?AllYes → Replace the Left Multifunction Switch.Perform BODY VERIFICATION TEST - VER 1.No → Go To 66 If there are no possible causes remaining, view repair. AllRepairReplace the Body Control Module.Perform BODY VERIFICATION TEST - VER 1.322
EXTERIOR LIGHTINGSymptom:*FOG LAMPS WILL NOT TURN ONPOSSIBLE CAUSESJUNCTION BLOCK FOG LAMP RELAY OUTPUT CIRCUITFOG LAMP SWITCH SENSE SHORTEDOPEN B(+)FOG LAMP RELAY OUTPUT CKT OPENFOG LAMP RELAYFOG LAMP RELAY CTL CKT OPENFOG LAMP RELAY CTL CKT SHORTED TO GROUNDBCM FOG LAMP RELAY CONTROLBCM FOG LAMP SENSE SHORTEDFOG LAMP SWITCH OPEN/SHORTEDFOG LAMP RELAY OUTPUT WIRE SHORT TO GROUNDFUSE #24TEST ACTION APPLICABILITY1 With the DRB III under Body Input Outputs read the Fog lamp switch state whileturning the Fog lamp switch on and off.Did the fog lamp switch state change?AllYes → Go To 2No → Go To 112 Check Junction Block fuse #24.Is fuse #24 open?AllYes → Go To 3No → Go To 53 Remove the fog lamp relay from the Junction Block.Using an ohmmeter measure the fog lamp relay output circuit from relay cavity 87to ground.Is the resistance below 0.5 ohms?AllYes → Go To 4No → Replace the fuse.Perform BODY VERIFICATION TEST - VER 1.323
EXTERIOR LIGHTING*FOG LAMPS WILL NOT TURN ON — ContinuedTEST ACTION APPLICABILITY4 Remove the fog lamp relay from the Junction Block.Disconnect the Junction Block C2 connector.Using an ohmmeter measure the fog lamp relay output circuit from relay cavity 87to ground.Is the resistance below 0.5 ohms?AllYes → Replace the Junction Block.Perform BODY VERIFICATION TEST - VER 1.No → Repair the relay output wire for a short to ground and replace thefuse if necessary.Perform BODY VERIFICATION TEST - VER 1.5 For the results of this test to be valid, voltage must be present at the Junction BlockC5 connector cavity 3.Measure the voltage of the B(+) circuit to fuse #24.Is the voltage above 10.0 volts?AllYes → Go To 6No → Replace the Junction Block.Perform BODY VERIFICATION TEST - VER 1.6 Install a known good relay in place of the Fog Lamp relay.Does the system now operate correctly?AllYes → Replace the Fog Lamp relay.Perform BODY VERIFICATION TEST - VER 1.No → Go To 77 Remove the Fog Lamp relay from the Junction Block.Disconnect a Fog Lamp bulb connector.Using an ohmmeter measure the Fog Lamp relay output circuit from relay cavity 87to the fog lamp bulb connector.Is the resistance below 0.5 ohms?AllYes → Go To 8No → Repair the open fog lamp relay output circuit.Perform BODY VERIFICATION TEST - VER 1.8 Remove the Fog Lamp Relay from the Junction Block.Turn ignition off. Remove the Body Control Module from the Junction Block.Using an ohmmeter measure the Fog Lamp Relay control circuit from relay cavity 86to the Junction Block Body Control Module connector cavity 2.Was the resistance below 5.0 ohms?AllYes → Go To 9No → Replace the Junction Block.Perform BODY VERIFICATION TEST - VER 1.9 Remove the fog lamp relay from the Junction Block.Turn ignition off. Remove the Body Control Module from the Junction Block.Using an ohmmeter measure the Fog Lamp Relay control ckt cavity 86 to ground atthe Junction Block.Was the resistance below 10 ohms?AllYes → Replace the Junction Block.Perform BODY VERIFICATION TEST - VER 1.No → Go To 10324
EXTERIOR LIGHTING*FOG LAMPS WILL NOT TURN ON — ContinuedTEST ACTION APPLICABILITY10 If there are no possible causes remaining, view repair. AllRepairReplace the Body Control Module.Perform BODY VERIFICATION TEST - VER 1.11 Disconnect the left multi-function switch connector.With the DRBIII under Body Input Outputs read the Fog Lamp switch state whileconnecting a jumper from the Fog Lamp Switch Sense to the Headlamp switch returnat the left multi-function switch connector.Did the fog lamp switch state change?AllYes → Replace the Left Multi-function switch.Perform BODY VERIFICATION TEST - VER 1.No → Go To 1212 Disconnect the left multi-function switch connector if not already disconnected.Disconnect the BCM C2 connectorMeasure the Fog Lamp switch sense circuit to ground at the left multi-functionswitch connector.Is the resistance below 5.0 ohms?AllYes → Repair the Fog lamp switch sense for a short to ground.Perform BODY VERIFICATION TEST - VER 1.No → Go To 1313 If there are no possible causes remaining, view repair. AllRepairReplace the Body Control Module.Perform BODY VERIFICATION TEST - VER 1.325
EXTERIOR LIGHTINGSymptom:*HIGH BEAM HEADLAMPS WILL NOT TURN <strong>OF</strong>FPOSSIBLE CAUSESHIGH BEAM RELAY CONTROL WIRE SHORT TO GROUNDJUNCTION BLOCK HIGH BEAM CONTROL SHORT TO GROUNDLEFT MULTI-FUNCTION SWITCH FLASH TO PASS CIRCUITLEFT MULTI-FUNCTION SWITCH HIGH BEAM SENSE CIRCUIT SHORTEDHIGH BEAM RELAY OUTPUT SHORTED B+HIGH BEAM RELAYHIGH BEAM SWITCH SENSE SHORTEDBCM DEF HIGH BEAM SWITCH SENSE SHORTEDBCM HIGH BEAM RELAY CONTROL SHORTEDTEST ACTION APPLICABILITY1 With the DRBIII under Body Input Outputs, read the High beam switch state whileturning the High Beam switch on and off.Did the high beam switch state change?AllYes → Go To 2No → Go To 72 Install a known good relay in place of the High Beam relay.Does the system now operate correctly?AllYes → Replace the High Beam relay.Perform BODY VERIFICATION TEST - VER 1.No → Go To 33 Remove the High beam relay from the junction block.Are the High beam lamps still on?AllYes → Repair the High beam relay output for a short to voltage.Perform BODY VERIFICATION TEST - VER 1.No → Go To 44 Turn ignition off.Remove the High Beam Relay from the Junction Block.Remove the Body Control Module from the Junction Block.Measure the resistance of the High Beam Relay Control circuit to ground at the relayconnector.Is the resistance below 10.0 ohms?AllYes → Go To 5No → Replace the Body Control Module.Perform BODY VERIFICATION TEST - VER 1.326
EXTERIOR LIGHTING*HIGH BEAM HEADLAMPS WILL NOT TURN <strong>OF</strong>F — ContinuedTEST ACTION APPLICABILITY5 Disconnect the left multi-function switch connector.Measure the resistance of the High Beam Relay Control circuit between the relayconnector and ground.Is the resistance below 10.0 ohms?AllYes → Go To 6No → Replace the left multi-function switch.Perform BODY VERIFICATION TEST - VER 1.6 Disconnect the Junction Block C3 connector.Measure the resistance of the High Beam Relay Control circuit between the relayconnector and ground.Is the resistance below 10.0 ohms?AllYes → Replace the Junction Block.Perform BODY VERIFICATION TEST - VER 1.No → Repair the High Beam Relay Control wire for a short to ground.Perform BODY VERIFICATION TEST - VER 1.7 Disconnect the left multi-function switch connector.Did the High Beam Lamps turn off?AllYes → Replace the left multi-function switch.Perform BODY VERIFICATION TEST - VER 1.No → Go To 88 Disconnect the left multi-function switch connector if not already disconnected.Disconnect the BCM C2 connectorMeasure the high beam switch sense circuit to ground at the left multi-functionswitch connector.Is the resistance below 5.0 ohms?AllYes → Repair the high beam switch sense for a short to ground.Perform BODY VERIFICATION TEST - VER 1.No → Replace the Body Control Module.Perform BODY VERIFICATION TEST - VER 1.327
EXTERIOR LIGHTINGSymptom:*HIGH BEAM HEADLAMPS WILL NOT TURN ONPOSSIBLE CAUSESFUSED HIGH BEAM RELAY OUTPUT SHORT TO GROUNDHIGH BEAM RELAY OUTPUT CKT OPENOPEN FUSED B(+)HIIGH BEAM RELAYFUSESHIGH BEAM SWITCH SENSE OPENHIGH BEAM RELAY CONTROL CIRCUIT OPENBCM HIGH BEAM CONTROL CIRCUITBCM HIGH BEAM SWITCH SENSE OPENJUMPER HIGH BEAM SWITCH SENSE TO GROUNDTEST ACTION APPLICABILITY1 With the DRB III under Body Input Outputs read the High beam switch state whileturning the high beam switch on and off.Did the high beam switch state change?AllYes → Go To 2No → Go To 92 Check Junction Block fuses #3 and #16.Are the fuses open?AllYes → Go To 3No → Go To 43 Using an ohmmeter measure the fused high Beam relay output circuit from the #3fuse and then the #16 fuse to ground.Is the resistance below 0.4 ohms?AllYes → Repair the fused high beam relay output for a short to ground andreplace the fuse if necessary.Perform BODY VERIFICATION TEST - VER 1.No → Replace the fuse(s).Perform BODY VERIFICATION TEST - VER 1.4 Install a known good relay in place of the High Beam relay.Does the system now operate correctly?AllYes → Replace the High Beam relay.Perform BODY VERIFICATION TEST - VER 1.No → Go To 5328
EXTERIOR LIGHTING*HIGH BEAM HEADLAMPS WILL NOT TURN ON — ContinuedTEST ACTION APPLICABILITY5 For the results of this test to be valid, voltage must present at the Junction Block C5connector cavity #1.Measure the voltage of the fused B(+) circuits to High Beam relay cavities #30 and#85.Is the voltage above 10.0 volts at both cavities?AllYes → Go To 6No → Replace the Junction Block.Perform BODY VERIFICATION TEST - VER 1.6 Remove the High Beam relay from the Junction Block.Using an ohmmeter measure the High Beam relay output circuit from relay cavity 87to the right high beam fuse #16 and then the left high beam fuse #3 in the JunctionBlock.Is the resistance below 5.0 ohms from cavity 87 to both high beam fuses?AllYes → Go To 7No → Replace the Junction Block.Perform BODY VERIFICATION TEST - VER 1.7 Remove the High Beam relay from the Junction Block.Turn ignition off. Remove the Body Control Module from the Junction Block.Measure the High Beam Relay control circuit from relay cavity to the Junction BlockBody Control Module connector.Was the resistance below 5.0 ohms?AllYes → Go To 8No → Replace the Junction Block.Perform BODY VERIFICATION TEST - VER 1.8 If there are no possible causes remaining, view repair. AllRepairReplace the Body Control Module.Perform BODY VERIFICATION TEST - VER 1.9 Disconnect the Left-Multifunction switch.With the DRBIII under Body Input Outputs read the High beam switch state whilejumping the high beam switch sense to ground.Did the high beam switch state change?AllYes → Replace the Left-Multifunction switch.Perform BODY VERIFICATION TEST - VER 1.No → Go To 1010 Disconnect the left multi-function switch connector if not already disconnected.Disconnect the BCM C2 connectorMeasure the High beam switch sense circuit from the left multi-function switchconnector to the BCM C2 connector.Is the resistance below 5.0 ohms?AllYes → Replace the Body Control Module.Perform BODY VERIFICATION TEST - VER 1.No → Repair the open High beam switch sense circuit.Perform BODY VERIFICATION TEST - VER 1.329
EXTERIOR LIGHTINGSymptom:*LOW BEAM HEADLAMPS WILL NOT TURN <strong>OF</strong>FPOSSIBLE CAUSESLOW BEAM RELAYLOW BEAM RELAY OUTPUT SHT B(+)LOW BEAM RELAY CTL CKT SHORTED TO GROUNDHEADLAMP SWITCH FUNCTIONBCM LOW BEAM LAMPS WILL NOT TURN <strong>OF</strong>FTEST ACTION APPLICABILITY1 With the DRBIII under Body sensors read the HEADLAMP SW VOLTS.Move the Headlamp switch to the different modes and compare the values to valuesshown. Headlamp switch <strong>OF</strong>F 4.4 VOLTS Parking lamps ON 3.2 VOLTS HeadlampsON 2.0 VOLTS Auto headlamps ON 0.6 VOLTSDo the values on the the DRB match.AllYes → Go To 2No → Replace the left multifunction switch.Perform BODY VERIFICATION TEST - VER 1.2 Install a known good relay in place of the Low Beam relay.Does the system now operate correctly?AllYes → Replace the Low Beam relay.Perform BODY VERIFICATION TEST - VER 1.No → Go To 33 Remove the low beam relay from the Junction Block.Did the lamps turn off?AllYes → Go To 4No → Repair the low beam relay output circuit for a short to batteryPerform BODY VERIFICATION TEST - VER 1.4 Reinstall the Low Beam Relay if previously removed.Turn ignition off. Remove the Body Control Module from the Junction Block.Turn the ignition on.Did the low beam headlamps turn off?AllYes → Go To 5No → Replace the Junction Block.Perform BODY VERIFICATION TEST - VER 1.5 If there are no possible causes remaining, view repair. AllRepairReplace the Body Control Module.Perform BODY VERIFICATION TEST - VER 1.330
EXTERIOR LIGHTINGSymptom:*LOW BEAM HEADLAMPS WILL NOT TURN ONPOSSIBLE CAUSESHEADLAMP SWITCH FUNCTIONLOW BEAM RELAYLOW BEAM RELAY OUTPUT CKT OPENFUSELOW BEAM RELAY OUTPUT CKT SHORTEDBCM HEADLAMP MUX INOPTEST ACTION APPLICABILITY1 Check Junction Block fuses #14 and #15.AllIs one or both fuses open?Yes → Go To 2No → Go To 32 Remove the Low Beam relay from the Junction Block.Remove both of the Low Beam relay fuses #14 and #15.Using an ohmmeter measure the Low Beam relay output circuit from relay cavity 87to ground.Is the resistance below 0.4 ohms?AllYes → Repair the relay output circuit for a short to ground and replacethe fuse if necessary.Perform BODY VERIFICATION TEST - VER 1.No → Replace the fuse.Perform BODY VERIFICATION TEST - VER 1.3 With the DRB III under Body sensors, read the HEADLAMP SW VOLTS.Move the Headlamp switch to the different modes and compare the values to valuesshown. Headlamp switch <strong>OF</strong>F 4.4 VOLTS Parking lamps ON 3.2 VOLTS HeadlampsON 2.0 VOLTS Auto headlamps ON 0.6 VOLTSDo the values on the the DRB match.AllYes → Go To 4No → Replace the left multifunction switch.Perform BODY VERIFICATION TEST - VER 1.4 Install a known good relay in place of the Low Beam relay.Does the system now operate correctly?AllYes → Replace the Low Beam relay.Perform BODY VERIFICATION TEST - VER 1.No → Go To 5331
EXTERIOR LIGHTING*LOW BEAM HEADLAMPS WILL NOT TURN ON — ContinuedTEST ACTION APPLICABILITY5 Remove the Low Beam relay from the Junction Block.Ensure fuses #14 and #15 are installed in the Junction Block.Using an ohmmeter measure the Low Beam relay output circuit from relay cavity 87to either the right or left front lighting module connectors.Is the resistance below 5.0 ohms?AllYes → Go To 6No → Replace the Junction Block.Perform BODY VERIFICATION TEST - VER 1.6 If there are no possible causes remaining, view repair. AllRepairReplace the Body Control Module.Perform BODY VERIFICATION TEST - VER 1.332
EXTERIOR LIGHTINGSymptom:*PARK LAMPS WILL NOT TURN <strong>OF</strong>FPOSSIBLE CAUSESHEADLAMP SWITCH FUNCTIONPARK LAMP RELAYPARK LAMP OUTPUT SHT B(+)PARK LAMP RELAY CTL CKT SHORTED TO GROUNDBCM PARK LAMP CONTROL CKTTEST ACTION APPLICABILITY1 With the DRBIII under Body sensors read the HEADLAMP SW VOLTS.Move the Headlamp switch to the different modes and compare the values to valuesshown. Headlamp switch <strong>OF</strong>F 4.4 VOLTS Parking lamps ON 3.2 VOLTS HeadlampsON 2.0 VOLTS Auto headlamps ON 0.6 VOLTSDo the values on the the DRB match.AllYes → Go To 2No → Replace the left multifunction switch.Perform BODY VERIFICATION TEST - VER 1.2 Install a known good relay in place of the park lamp relay.Does the system now operate correctly?AllYes → Replace the parklamp relay.Perform BODY VERIFICATION TEST - VER 1.No → Go To 33 Remove the Park Lamp relay from the Junction Block.Did the lamps turn off?AllYes → Go To 4No → Repair the park lamp relay output circuit for a short to batteryPerform BODY VERIFICATION TEST - VER 1.4 Install the park lamp relay if removed in previous test.Turn ignition off. Remove the Body Control Module from the Junction Block.Turn ignition on.Did the park lamps turn off?AllYes → Replace the Body Control Module.Perform BODY VERIFICATION TEST - VER 1.No → Replace the Junction Block.Perform BODY VERIFICATION TEST - VER 1.333
EXTERIOR LIGHTINGSymptom:*PARK LAMPS WILL NOT TURN ONPOSSIBLE CAUSESCHECK BCM FOR DTCSHEADLAMP SWITCH FUNCTIONPARK LAMP RELAYPARK LAMP RELAY OUTPUT CKT OPENBCM HEADLAMP MUX INOPTEST ACTION APPLICABILITY1 Turn the ignition on.With the DRBIII check the BCM for any DTCs.Are any DTCs set?AllYes → Refer to symptom list and perform the appropriate symptom.Perform BODY VERIFICATION TEST - VER 1.No → Go To 22 With the DRBIII under Body sensors read the HEADLAMP SW VOLTS.Move the Headlamp switch to the different modes and compare the values to valuesshown. Headlamp switch <strong>OF</strong>F 4.4 VOLTS Parking lamps ON 3.2 VOLTS HeadlampsON 2.0 VOLTS Auto headlamps ON 0.6 VOLTSDo the values on the the DRB match.AllYes → Go To 3No → Replace the left multifunction switch.Perform BODY VERIFICATION TEST - VER 1.3 Install a known good relay in place of the park lamp relay.Does the system now operate correctly?AllYes → Replace the parklamp relay.Perform BODY VERIFICATION TEST - VER 1.No → Go To 44 Remove the park lamp relay from the Junction Block.Disconnect the appropriate lighting module connector.Using an ohmmeter measure the park lamp relay output circuit from relay cavity 30to the appropriate lighting module connector.Is the resistance below 5.0 ohms?AllYes → Go To 5No → Repair the open park lamp relay output circuit.Perform BODY VERIFICATION TEST - VER 1.5 If there are no possible causes remaining, view repair. AllRepairReplace the Body Control Module.Perform BODY VERIFICATION TEST - VER 1.334
EXTERIOR LIGHTINGSymptom:*REAR FOG LAMPS WILL NOT TURN <strong>OF</strong>FPOSSIBLE CAUSESCHECK BCM FOR DTCSCHECK THE LEFT MULTI-FUNCTION SWITCH OPERATIONREAR FOG LAMP RELAYBODY CONTROL MODULEJUNCTION BLOCK - REAR FOG LAMP RELAY OUTPUT CIRCUIT SHORTED TO GROUNDREAR FOG LAMP RELAY OUTPUT CIRCUIT SHORTED TO VOLTAGETEST ACTION APPLICABILITY1 Turn the ignition on.With the DRBIII check the BCM for any DTCs.Are any DTCs set?AllYes → Refer to symptom list and perform the appropriate symptom.Perform BODY VERIFICATION TEST - VER 1.No → Go To 22 Turn the Left Multi-Function Switch to the off position.With the DRBIII enter Body Computer sensors and monitor the Headlamp SWvoltage.Does the DRB display voltage at approximately 0.6 volts?AllYes → Replace the Left Multi-Function Switch.Perform BODY VERIFICATION TEST - VER 1.No → Go To 33 Install a substitute relay in place of the Rear Fog Lamp Relay.Note: Ensure the Left Multi-Function Switch is in the off position.Did the Rear Fog Lamps turn off?AllYes → Replace the Rear Fog Lamp Relay.Perform BODY VERIFICATION TEST - VER 1.No → Go To 44 Turn the ignition off.Remove the BCM from the Junction Block.Did the rear fog lamps turn off?AllYes → Replace the Body Control Module.Perform BODY VERIFICATION TEST - VER 1.No → Go To 5335
EXTERIOR LIGHTING*REAR FOG LAMPS WILL NOT TURN <strong>OF</strong>F — ContinuedTEST ACTION APPLICABILITY5 Disconnect the Junction Block C1 harness connector.AllDid the rear fog lamps turn off?Yes → Replace the Junction Block.Perform BODY VERIFICATION TEST - VER 1.No → Repair the Rear Fog Lamp Relay Output circuit for a short tovoltage.Perform BODY VERIFICATION TEST - VER 1.336
EXTERIOR LIGHTINGSymptom:*REAR FOG LAMPS WILL NOT TURN ONPOSSIBLE CAUSESCHECK BCM FOR DTCSCHECK THE LEFT MULTI-FUNCTION SWITCH OPERATIONJUNCTION BLOCK - FUSED B+ CIRCUIT OPENREAR FOG LAMP RELAYREAR FOG LAMP RELAY OUTPUT CIRCUIT OPENJUNCTION BLOCK - REAR FOG LAMP RELAY OUTPUT CIRCUIT OPENBODY CONTROL MODULETEST ACTION APPLICABILITY1 Turn the ignition on.With the DRB check the BCM for any DTCs.Are any DTCs set?AllYes → Refer to symptom list and perform the appropriate symptom.Perform BODY VERIFICATION TEST - VER 1.No → Go To 22 Turn the Left Multi-Function Switch to the rear fog lamp position.With the DRB enter Body, Body Computer, then sensors and monitor the HeadlampSw voltage.Does the DRB display voltage at approximately 0.6 volts?AllYes → Go To 3No → Replace the Left Multi-Function Switch.Perform BODY VERIFICATION TEST - VER 1.3 Remove the Rear Fog Lamp Relay from the Junction Block.Using a 12-volt Test Light connected to ground, probe cavity 30 of the Rear Fog LampRelay connector.Is the test light illuminated?AllYes → Go To 4No → Replace the Junction Block.Perform BODY VERIFICATION TEST - VER 1.4 Install a substitute relay in place of the Rear Fog Lamp Relay.Turn the Rear Fog Lamps on.Did the Rear Fog Lamps turn on?AllYes → Replace the Rear Fog Lamp Relay.Perform BODY VERIFICATION TEST - VER 1.No → Go To 5337
EXTERIOR LIGHTING*REAR FOG LAMPS WILL NOT TURN ON — ContinuedTEST ACTION APPLICABILITY5 Turn the Rear Fog Lamps on.Using a 12-volt Test Light connected to ground, backprobe the Rear Fog Lamp RelayOutput circuit at the Junction Block C1 connector cavity 5.Is the test light illuminated?AllYes → Repair the Rear Fog Lamp Relay Output circuit for an open.Perform BODY VERIFICATION TEST - VER 1.No → Go To 66 Turn the ignition off.Remove the BCM from the Junction Block.Connect a jumper wire between ground and the J/B BCM connector cavity 13(Junction Block side).Do the Rear Fog Lamps turn on when the jumper wire is connected?AllYes → Replace the Body Control Module.Perform BODY VERIFICATION TEST - VER 1.No → Replace the Junction Block.Perform BODY VERIFICATION TEST - VER 1.338
HEATING & A/CSymptom:AMBIENT AIR TEMP FAILURE (AZC) (ACTIVE)When Monitored and Set Condition:AMBIENT AIR TEMP FAILURE (AZC) (ACTIVE)When Monitored: Every 8 seconds with the ignition on.Set Condition: When an outside air temperature signal is expected is not received in themaximum allowed time.AZC - AMBIENT AIR TEMP SENSORAMBIENT AIR TEMP FAILUREPOSSIBLE CAUSESTEST ACTION APPLICABILITY1 Turn the ignition on.Note: Ensure the DRB is capable of communicating with the BCM beforecontinuing.With the DRB, enter Body, Automatic Temp Control, Monitor Display then PCI BusInfo and observe the outside air temp display.Is the correct Outside Air Temp displayed?AllYes → Replace the AZC Module.With the DRB, Reset Module after repair/replacement is completed.Perform BODY VERIFICATION TEST - VER 1.No → Refer to the Overhead Console category and perform the symptomrelated to the ambient air temperature sensor.With the DRB, Reset Module after repair/replacement is completed.Perform BODY VERIFICATION TEST - VER 1.339
HEATING & A/CSymptom:AMBIENT AIR TEMP FAILURE (AZC) (STORED)When Monitored and Set Condition:AMBIENT AIR TEMP FAILURE (AZC) (STORED)When Monitored: Every 8 seconds with the ignition on.Set Condition: When an outside air temperature signal is expected is not received in themaximum allowed time.POSSIBLE CAUSESAZC MODULE STORED CODES PRESENTSTORED CODES TEST COMPLETETEST ACTION APPLICABILITY1 Note: Active codes must be resolved before diagnosing stored codes.Anytime a code becomes active during this test, proceed to the conclusion question.Turn the ignition on.With the DRB, erase any stored DTC’s.Monitor the DRB for active codes during the following test steps.Turn the mode select switch to the panel position with the fan control on low.Manually sweep the driver and passenger temperature control knobs from cold to hotthen back to cold.Manually sweep the blower motor control knob through all positions.Manually sweep the mode select switch knob through all positions.Manually press the recirculation mode switch on, wait 30 seconds then press it off.Manually press the A/C mode switch on, wait 30 seconds then press it off.With the DRB, perform the AZC self test.With the DRB, actuate all of the AZC door motors.Place the vehicle on a hoist, and raise the wheels off the floor.Start engine. Place the transmission in drive. Brake off.WARNING: Be sure to keep hands and feet clear of rotating wheels. Keepclear of the engine’s moving partsDid any AZC code become active during this test?AllYes → Return to the Symptom List and choose the active code.Perform BODY VERIFICATION TEST - VER 1.No → No problem found at this time. Erase all codes before returningvehicle to customer.Perform BODY VERIFICATION TEST - VER 1.340
HEATING & A/CSymptom:BLOWER SELECT SW OPEN (AZC) (ACTIVE)When Monitored and Set Condition:BLOWER SELECT SW OPEN (AZC) (ACTIVE)When Monitored: Ignition in RUN and IOD fuse installed.Set Condition: This condition is set if the AZC reads the blower switch value and it isabove 250 A/D counts.POSSIBLE CAUSESBLOWER MOTOR SWITCH FAILED OPENTEST ACTION APPLICABILITY1 When this code is present the AZC Module must be replaced.AllView repairRepairReplace the AZC Module.With the DRB, Reset Module after repair/replacement is completed.Perform BODY VERIFICATION TEST - VER 1.341
HEATING & A/CSymptom:BLOWER SELECT SW OPEN (AZC) (STORED)When Monitored and Set Condition:BLOWER SELECT SW OPEN (AZC) (STORED)When Monitored: Ignition in RUN and IOD fuse installed.Set Condition: This condition is set if the AZC reads the blower switch value and it isabove 250 A/D counts.POSSIBLE CAUSESAZC MODULE STORED CODES PRESENTSTORED CODES TEST COMPLETETEST ACTION APPLICABILITY1 Note: Active codes must be resolved before diagnosing stored codes.Anytime a code becomes active during this test, proceed to the conclusion question.Turn the ignition on.With the DRB, erase any stored DTC’s.Monitor the DRB for active codes during the following test steps.Turn the mode select switch to the panel position with the fan control on low.Manually sweep the driver and passenger temperature control knobs from cold to hotthen back to cold.Manually sweep the blower motor control knob through all positions.Manually sweep the mode select switch knob through all positions.Manually press the recirculation mode switch on, wait 30 seconds then press it off.Manually press the A/C mode switch on, wait 30 seconds then press it off.With the DRB, perform the AZC self test.With the DRB, actuate all of the AZC door motors.Place the vehicle on a hoist, and raise the wheels off the floor.Start engine. Place the transmission in drive. Brake off.WARNING: Be sure to keep hands and feet clear of rotating wheels. Keepclear of the engine’s moving partsDid any AZC code become active during this test?AllYes → Return to the Symptom List and choose the active code.Perform BODY VERIFICATION TEST - VER 1.No → No problem found at this time. Erase all codes before returningvehicle to customer.Perform BODY VERIFICATION TEST - VER 1.342
HEATING & A/CSymptom:BLOWER SELECT SW SHORTED (AZC) (ACTIVE)When Monitored and Set Condition:BLOWER SELECT SW SHORTED (AZC) (ACTIVE)When Monitored: Ignition in RUN and IOD fuse installed.Set Condition: This condition is set if the AZC reads the blower switch value and it isbelow 5 A/D counts.POSSIBLE CAUSESBLOWER MOTOR SWITCH FAILED SHORTEDTEST ACTION APPLICABILITY1 When this code is present the AZC Module must be replaced.AllView repairRepairReplace the AZC Module.With the DRB, Reset Module after repair/replacement is completed.Perform BODY VERIFICATION TEST - VER 1.343
HEATING & A/CSymptom:BLOWER SELECT SW SHORTED (AZC) (STORED)When Monitored and Set Condition:BLOWER SELECT SW SHORTED (AZC) (STORED)When Monitored: Ignition in RUN and IOD fuse installed.Set Condition: This condition is set if the AZC reads the blower switch value and it isbelow 5 A/D counts.POSSIBLE CAUSESAZC MODULE STORED CODES PRESENTSTORED CODES TEST COMPLETETEST ACTION APPLICABILITY1 Note: Active codes must be resolved before diagnosing stored codes.Anytime a code becomes active during this test, proceed to the conclusion question.Turn the ignition on.With the DRB, erase any stored DTC’s.Monitor the DRB for active codes during the following test steps.Turn the mode select switch to the panel position with the fan control on low.Manually sweep the driver and passenger temperature control knobs from cold to hotthen back to cold.Manually sweep the blower motor control knob through all positions.Manually sweep the mode select switch knob through all positions.With the DRB, perform the AZC self test.With the DRB, actuate all of the AZC door motors.Place the vehicle on a hoist, and raise the wheels off the floor.Start engine. Place the transmission in drive. Brake off.WARNING: Be sure to keep hands and feet clear of rotating wheels. Keepclear of the engine’s moving partsDid any AZC code become active during this test?AllYes → Return to the Symptom List and choose the active code.Perform BODY VERIFICATION TEST - VER 1.No → No problem found at this time. Erase all codes before returningvehicle to customer.Perform BODY VERIFICATION TEST - VER 1.344
HEATING & A/CSymptom:CAL CHECKSUM FAILURE (AZC) (ACTIVE)When Monitored and Set Condition:CAL CHECKSUM FAILURE (AZC) (ACTIVE)When Monitored: Ignition in RUN and IOD fuse installed after a battery disconnect.Set Condition: This condition is set if the calibrated check sum does not match the storedvalue.AZC - CAL CHECKSUM FAILUREPOSSIBLE CAUSESTEST ACTION APPLICABILITY1 When this code is present the AZC Module must be replaced.AllView repairRepairReplace the AZC Module.With the DRB, Reset Module after repair/replacement is completed.Perform BODY VERIFICATION TEST - VER 1.345
HEATING & A/CSymptom:CAL CHECKSUM FAILURE (AZC) (STORED)When Monitored and Set Condition:CAL CHECKSUM FAILURE (AZC) (STORED)When Monitored: Ignition in RUN and IOD fuse installed after a battery disconnect.Set Condition: This condition is set if the calibrated check sum does not match the storedvalue.POSSIBLE CAUSESAZC MODULE STORED CODES PRESENTSTORED CODES TEST COMPLETETEST ACTION APPLICABILITY1 Note: Active codes must be resolved before diagnosing stored codes.Anytime a code becomes active during this test, proceed to the conclusion question.Turn the ignition on.With the DRB, erase any stored DTC’s.Monitor the DRB for active codes during the following test steps.Turn the mode select switch to the panel position with the fan control on low.Manually sweep the driver and passenger temperature control knobs from cold to hotthen back to cold.Manually sweep the blower motor control knob through all positions.Manually sweep the mode select switch knob through all positions.With the DRB, perform the AZC self test.With the DRB, actuate all of the AZC door motors.Place the vehicle on a hoist, and raise the wheels off the floor.Start engine. Place the transmission in drive. Brake off.WARNING: Be sure to keep hands and feet clear of rotating wheels. Keepclear of the engine’s moving partsDid any AZC code become active during this test?AllYes → Return to the Symptom List and choose the active code.Perform BODY VERIFICATION TEST - VER 1.No → No problem found at this time. Erase all codes before returningvehicle to customer.Perform BODY VERIFICATION TEST - VER 1.346
HEATING & A/CSymptom:COUNTRY CODE FAILURE (AZC) (ACTIVE)When Monitored and Set Condition:COUNTRY CODE FAILURE (AZC) (ACTIVE)When Monitored: Every 8 seconds with the ignition on.Set Condition: This condition is set if the AZC does not receive the country code messagewithin 8 seconds.COUNTRY CODE FAILUREPROGRAM COUNTRY CODEPOSSIBLE CAUSESTEST ACTION APPLICABILITY1 Turn the ignition on.With the DRB, enter Body, Body Computer then Module Display and observe thecountry code.Compare the country code to the VIN.Does the country code match the VIN?AllYes → Replace the AZC Module.With the DRB, Reset Module after repair/replacement is completed.Perform BODY VERIFICATION TEST - VER 1.No → Program the correct country code into the BCM and retest vehicle.With the DRB, Reset Module after repair/replacement is completed.Perform BODY VERIFICATION TEST - VER 1.347
HEATING & A/CSymptom:COUNTRY CODE FAILURE (AZC) (STORED)When Monitored and Set Condition:COUNTRY CODE FAILURE (AZC) (STORED)When Monitored: Every 8 seconds with the ignition on.Set Condition: This condition is set if the AZC does not receive the country code messagewithin 8 seconds.POSSIBLE CAUSESAZC MODULE STORED CODES PRESENTSTORED CODES TEST COMPLETETEST ACTION APPLICABILITY1 Note: Active codes must be resolved before diagnosing stored codes.Anytime a code becomes active during this test, proceed to the conclusion question.Turn the ignition on.With the DRB, erase any stored DTC’s.Monitor the DRB for active codes during the following test steps.Turn the mode select switch to the panel position with the fan control on low.Manually sweep the driver and passenger temperature control knobs from cold to hotthen back to cold.Manually sweep the blower motor control knob through all positions.Manually sweep the mode select switch knob through all positions.With the DRB, perform the AZC self test.With the DRB, actuate all of the AZC door motors.Place the vehicle on a hoist, and raise the wheels off the floor.Start engine. Place the transmission in drive. Brake off.WARNING: Be sure to keep hands and feet clear of rotating wheels. Keepclear of the engine’s moving partsDid any AZC code become active during this test?AllYes → Return to the Symptom List and choose the active code.Perform BODY VERIFICATION TEST - VER 1.No → No problem found at this time. Erase all codes before returningvehicle to customer.Perform BODY VERIFICATION TEST - VER 1.348
HEATING & A/CSymptom:DEFECTIVE I/R SENSOR (AZC) (ACTIVE)When Monitored and Set Condition:DEFECTIVE I/R SENSOR (AZC) (ACTIVE)When Monitored: Ignition in RUN and IOD fuse installed.Set Condition: This condition is set if the AZC cannot read the I/R sensor values and orthe I/R sensor values are not within a defined range of the HVAC air door motor counts.AZC - DEFECTIVE I/R SENSORPOSSIBLE CAUSESTEST ACTION APPLICABILITY1 When this code is present the AZC Module must be replaced.AllView repairRepairReplace the AZC Module.With the DRB, Reset Module after repair/replacement is completed.Perform BODY VERIFICATION TEST - VER 1.349
HEATING & A/CSymptom:DEFECTIVE I/R SENSOR (AZC) (STORED)When Monitored and Set Condition:DEFECTIVE I/R SENSOR (AZC) (STORED)When Monitored: Ignition in RUN and IOD fuse installed.Set Condition: This condition is set if the AZC cannot read the I/R sensor values and orthe I/R sensor values are not within a defined range of the HVAC air door motor counts.POSSIBLE CAUSESAZC MODULE STORED CODES PRESENTSTORED CODES TEST COMPLETETEST ACTION APPLICABILITY1 Note: Active codes must be resolved before diagnosing stored codes.Anytime a code becomes active during this test, proceed to the conclusion question.Turn the ignition on.With the DRB, erase any stored DTC’s.Monitor the DRB for active codes during the following test steps.Turn the mode select switch to the panel position with the fan control on low.Manually sweep the driver and passenger temperature control knobs from cold to hotthen back to cold.Manually sweep the blower motor control knob through all positions.Manually sweep the mode select switch knob through all positions.With the DRB, perform the AZC self test.With the DRB, actuate all of the AZC door motors.Place the vehicle on a hoist, and raise the wheels off the floor.Start engine. Place the transmission in drive. Brake off.WARNING: Be sure to keep hands and feet clear of rotating wheels. Keepclear of the engine’s moving partsDid any AZC code become active during this test?AllYes → Return to the Symptom List and choose the active code.Perform BODY VERIFICATION TEST - VER 1.No → No problem found at this time. Erase all codes before returningvehicle to customer.Perform BODY VERIFICATION TEST - VER 1.350
HEATING & A/CSymptom:DRIVER BLEND DOOR NOT RESPONDING (AZC) (ACTIVE)When Monitored and Set Condition:DRIVER BLEND DOOR NOT RESPONDING (AZC) (ACTIVE)When Monitored: Ignition in RUN and IOD fuse installed.Set Condition: This condition is set if the AZC does not receive feedback pulses within 5seconds of the drive voltage being applied.POSSIBLE CAUSESDRIVER CIRCUIT (B) SHORTED TO GROUNDDRIVER CIRCUIT (A) SHORTED TO GROUNDDRIVER CIRCUITS (A) AND (B) SHORTED TOGETHERAZC MODULE DRIVER BLEND DOOR NOT RESPONDINGDRIVER CIRCUIT (A) OPENDRIVER CIRCUIT (B) OPENDRIVER BLEND DOOR MOTORTEST ACTION APPLICABILITY1 Turn the ignition off.Disconnect the Driver Blend Door Motor/Actuator harness connector.Disconnect the AZC module C1 and C2 harness connectors.Measure the resistance between ground and the Driver Blend Door Driver (B) circuit.Is the resistance below 5.0 ohms?AllYes → Repair the Driver Blend Door Driver (B) circuit for a short toground.With the DRB, Reset Module after repair/replacement is completed.Perform BODY VERIFICATION TEST - VER 1.No → Go To 22 Turn the ignition off.Disconnect the Driver Blend Door Motor/Actuator harness connector.Disconnect the AZC module C1 and C2 harness connectors.Measure the resistance between ground and the Driver Blend Door Driver (A) circuit.Is the resistance below 5.0 ohms?AllYes → Repair the Driver Blend Door Driver (A) circuit for a short toground.With the DRB, Reset Module after repair/replacement is completed.Perform BODY VERIFICATION TEST - VER 1.No → Go To 3351
HEATING & A/CDRIVER BLEND DOOR NOT RESPONDING (AZC) (ACTIVE) — ContinuedTEST ACTION APPLICABILITY3 Turn the ignition off.Disconnect the Driver Blend Door Motor/Actuator harness connector.Disconnect the AZC module C1 and C2 harness connectors.Measure the resistance between the Driver Blend Door Driver (B) circuit and theDriver Blend Door Driver (A) circuit.Is the resistance below 5.0 ohms?AllYes → Repair the Driver Blend Door Driver (B) circuit for a short to theDriver Blend Door Driver (A) circuit.With the DRB, Reset Module after repair/replacement is completed.Perform BODY VERIFICATION TEST - VER 1.No → Go To 44 Turn the ignition off.Disconnect the Driver Blend Door Motor/Actuator harness connector.Disconnect the AZC module C1 and C2 harness connectors.Measure the resistance of the Driver Blend Door Driver (A) circuit between the AZCModule C1 connector and the Driver Blend Door Motor/Actuator connector.Is the resistance below 5.0 ohms?AllYes → Go To 5No → Repair the Driver Blend Door Driver (A) circuit for an open.With the DRB, Reset Module after repair/replacement is completed.Perform BODY VERIFICATION TEST - VER 1.5 Turn the ignition off.Disconnect the Driver Blend Door Motor/Actuator harness connector.Disconnect the AZC module C1 and C2 harness connectors.Measure the resistance of the Driver Blend Door Driver (B) circuit between the AZCModule C2 connector and the Driver Blend Door Motor/Actuator connector.Is the resistance below 5.0 ohms?AllYes → Go To 6No → Repair the Driver Blend Door Driver (B) circuit for an open.With the DRB, Reset Module after repair/replacement is completed.Perform BODY VERIFICATION TEST - VER 1.6 Turn the ignition off.Make sure that the Driver Blend Door Motor harness connector is connected to theDriver Blend Door Motor.Disconnect the AZC module C1 and C2 harness connectors.Measure the resistance between the Driver Blend Door Driver (B) circuit and theDriver Blend Door Driver (A) circuit.Is the resistance between 26.0 and 46.0 ohms?AllYes → Replace the AZC Module.With the DRB, Reset Module after repair/replacement is completed.Perform BODY VERIFICATION TEST - VER 1.No → Go To 7352
HEATING & A/CDRIVER BLEND DOOR NOT RESPONDING (AZC) (ACTIVE) — ContinuedTEST ACTION APPLICABILITY7 If there are no possible causes remaining, view repair. AllRepairReplace the Driver Blend Door Motor.With the DRB, Reset Module after repair/replacement is completed.Perform BODY VERIFICATION TEST - VER 1.353
HEATING & A/CSymptom:DRIVER BLEND DOOR NOT RESPONDING (AZC) (STORED)When Monitored and Set Condition:DRIVER BLEND DOOR NOT RESPONDING (AZC) (STORED)When Monitored: Ignition in RUN and IOD fuse installed.Set Condition: This condition is set if the AZC does not receive feedback pulses within 5seconds of the drive voltage being applied.POSSIBLE CAUSESAZC MODULE STORED CODES PRESENTSTORED CODES TEST COMPLETETEST ACTION APPLICABILITY1 Note: Active codes must be resolved before diagnosing stored codes.Anytime a code becomes active during this test, proceed to the conclusion question.Turn the ignition on.With the DRB, erase any stored DTC’s.Monitor the DRB for active codes during the following test steps.Turn the mode select switch to the panel position with the fan control on low.Manually sweep the driver and passenger temperature control knobs from cold to hotthen back to cold.Manually sweep the blower motor control knob through all positions.Manually sweep the mode select switch knob through all positions.With the DRB, perform the AZC self test.With the DRB, actuate all of the AZC door motors.Place the vehicle on a hoist, and raise the wheels off the floor.Start engine. Place the transmission in drive. Brake off.WARNING: Be sure to keep hands and feet clear of rotating wheels. Keepclear of the engine’s moving partsDid any AZC code become active during this test?AllYes → Return to the Symptom List and choose the active code.Perform BODY VERIFICATION TEST - VER 1.No → No problem found at this time. Erase all codes before returningvehicle to customer.Perform BODY VERIFICATION TEST - VER 1.354
HEATING & A/CSymptom:DRIVER BLEND DOOR RANGE TOO LARGE (AZC) (ACTIVE)When Monitored and Set Condition:DRIVER BLEND DOOR RANGE TOO LARGE (AZC) (ACTIVE)When Monitored: Ignition in RUN and IOD fuse installed.Set Condition: This condition is set when the AZC monitors the travel range duringsystem initialization and the measured range is greater than expected.POSSIBLE CAUSESCHECK THE AZC MODULE FOR DTCSDRIVER CIRCUIT (B) SHORTED TO GROUNDDRIVER CIRCUIT (A) SHORTED TO GROUNDDRIVER BLEND DOOR MOTORDRIVER BLEND DOOR MOTORCHECK BLEND DOOR LINKAGEAZC MODULETEST ACTION APPLICABILITY1 Turn the ignition on.With the DRB, read the active AZC DTC’s.Is the Driver Blend Door Not Responding DTC set?AllYes → Refer to the Heating and A/C category and perform the symptomDriver Blend Door Not Responding.With the DRB, Reset Module after repair/replacement is completed.Perform BODY VERIFICATION TEST - VER 1.No → Go To 22 Turn the ignition off.Disconnect the Driver Blend Door Motor/Actuator harness connector.Disconnect the AZC module C1 and C2 harness connectors.Measure the resistance between ground and the Driver Blend Door Driver (B) circuit.Is the resistance below 5.0 ohms?AllYes → Repair the Driver Blend Door Driver (B) circuit for a short toground.With the DRB, Reset Module after repair/replacement is completed.Perform BODY VERIFICATION TEST - VER 1.No → Go To 3355
HEATING & A/CDRIVER BLEND DOOR RANGE TOO LARGE (AZC) (ACTIVE) — ContinuedTEST ACTION APPLICABILITY3 Turn the ignition off.Disconnect the Driver Blend Door Motor/Actuator harness connector.Disconnect the AZC module C1 and C2 harness connectors.Measure the resistance between ground and the Driver Blend Door Driver (A) circuit.Is the resistance below 5.0 ohms?AllYes → Repair the Driver Blend Door Driver (A) circuit for a short toground.With the DRB, Reset Module after repair/replacement is completed.Perform BODY VERIFICATION TEST - VER 1.No → Go To 44 Turn the ignition off.Remove the Driver Blend Door Motor/Actuator from the vehicle.By hand, attempt to rotate the driver blend door motor in both directions.Did the blend door motor turn in either direction?AllYes → Replace the Driver Blend Door Motor.With the DRB, Reset Module after repair/replacement is completed.Perform BODY VERIFICATION TEST - VER 1.No → Go To 55 Remove the Driver Blend Door Motor from the vehicle. Rotate the blend door (dooronly), this should rotate approximately 45 degrees from stop to stop.Inspect the blend door linkage for excessive wear or missing linkage.Were any mechanical problems found?AllYes → Repair or replace the blend door/linkage as necessary.With the DRB, Reset Module after repair/replacement is completed.Perform BODY VERIFICATION TEST - VER 1.No → Replace the AZC Module.With the DRB, Reset Module after repair/replacement is completed.Perform BODY VERIFICATION TEST - VER 1.356
HEATING & A/CSymptom:DRIVER BLEND DOOR RANGE TOO LARGE (AZC) (STORED)When Monitored and Set Condition:DRIVER BLEND DOOR RANGE TOO LARGE (AZC) (STORED)When Monitored: Ignition in RUN and IOD fuse installed.Set Condition: This condition is set when the AZC monitors the travel range duringsystem initialization and the measured range is greater than expected.POSSIBLE CAUSESAZC MODULE STORED CODES PRESENTSTORED CODES TEST COMPLETETEST ACTION APPLICABILITY1 Note: Active codes must be resolved before diagnosing stored codes.Anytime a code becomes active during this test, proceed to the conclusion question.Turn the ignition on.With the DRB, erase any stored DTC’s.Monitor the DRB for active codes during the following test steps.Turn the mode select switch to the panel position with the fan control on low.Manually sweep the driver and passenger temperature control knobs from cold to hotthen back to cold.Manually sweep the blower motor control knob through all positions.Manually sweep the mode select switch knob through all positions.With the DRB, perform the AZC self test.With the DRB, actuate all of the AZC door motors.Place the vehicle on a hoist, and raise the wheels off the floor.Start engine. Place the transmission in drive. Brake off.WARNING: Be sure to keep hands and feet clear of rotating wheels. Keepclear of the engine’s moving partsDid any AZC code become active during this test?AllYes → Return to the Symptom List and choose the active code.Perform BODY VERIFICATION TEST - VER 1.No → No problem found at this time. Erase all codes before returningvehicle to customer.Perform BODY VERIFICATION TEST - VER 1.357
HEATING & A/CSymptom:DRIVER BLEND DOOR RANGE TOO SMALL (AZC) (ACTIVE)When Monitored and Set Condition:DRIVER BLEND DOOR RANGE TOO SMALL (AZC) (ACTIVE)When Monitored: Ignition in RUN and IOD fuse installed.Set Condition: This condition is set when the AZC monitors the travel range duringsystem initialization and the measured range is less than expected.POSSIBLE CAUSESCHECK THE AZC MODULE FOR DTCSCHECK THE AZC SIGNAL TOO DRIVER BLEND DOOROBSTRUCTED BLEND DOORDRIVER BLEND DOOR MOTORTEST ACTION APPLICABILITY1 Turn the ignition on.With the DRB, read the active AZC DTC’s.Is the Driver Blend Door Not Responding DTC set?AllYes → Refer to the Heating and A/C category and perform the symptomDriver Blend Door Not Responding.With the DRB, Reset Module after repair/replacement is completed.Perform BODY VERIFICATION TEST - VER 1.No → Go To 22 Turn the ignition off.Disconnect the Driver Blend Door Motor/Actuator harness connector.Connect a 12-volt Test Light across the Driver Blend Door Motor/Actuator harnessconnector.Turn the ignition on.While monitoring the test light, turn the driver blend control knob from lo to hi.Note: Observe test light for approximately 30 seconds.Does the test light start to flash and stay flashing?AllYes → Go To 3No → Replace the AZC Module.With the DRB, Reset Module after repair/replacement is completed.Perform BODY VERIFICATION TEST - VER 1.358
HEATING & A/CDRIVER BLEND DOOR RANGE TOO SMALL (AZC) (ACTIVE) — ContinuedTEST ACTION APPLICABILITY3 Remove the Driver Blend Door Motor from the vehicle. Rotate the blend door (dooronly), this should rotate approximately 45 degrees from stop to stop.Does the blend door move smoothly in both directions?AllYes → Replace the Driver Blend Door Motor/Actuator.With the DRB, Reset Module after repair/replacement is completed.Perform BODY VERIFICATION TEST - VER 1.No → Repair or replace the blend door as necessary.With the DRB, Reset Module after repair/replacement is completed.Perform BODY VERIFICATION TEST - VER 1.359
HEATING & A/CSymptom:DRIVER BLEND DOOR RANGE TOO SMALL (AZC) (STORED)When Monitored and Set Condition:DRIVER BLEND DOOR RANGE TOO SMALL (AZC) (STORED)When Monitored: Ignition in RUN and IOD fuse installed.Set Condition: This condition is set when the AZC monitors the travel range duringsystem initialization and the measured range is less than expected.POSSIBLE CAUSESAZC MODULE STORED CODES PRESENTSTORED CODES TEST COMPLETETEST ACTION APPLICABILITY1 Note: Active codes must be resolved before diagnosing stored codes.Anytime a code becomes active during this test, proceed to the conclusion question.Turn the ignition on.With the DRB, erase any stored DTC’s.Monitor the DRB for active codes during the following test steps.Turn the mode select switch to the panel position with the fan control on low.Manually sweep the driver and passenger temperature control knobs from cold to hotthen back to cold.Manually sweep the blower motor control knob through all positions.Manually sweep the mode select switch knob through all positions.With the DRB, perform the AZC self test.With the DRB, actuate all of the AZC door motors.Place the vehicle on a hoist, and raise the wheels off the floor.Start engine. Place the transmission in drive. Brake off.WARNING: Be sure to keep hands and feet clear of rotating wheels. Keepclear of the engine’s moving partsDid any AZC code become active during this test?AllYes → Return to the Symptom List and choose the active code.Perform BODY VERIFICATION TEST - VER 1.No → No problem found at this time. Erase all codes before returningvehicle to customer.Perform BODY VERIFICATION TEST - VER 1.360
HEATING & A/CSymptom:ENGINE COOLANT RESPONSE FAILURE (AZC) (ACTIVE)When Monitored and Set Condition:ENGINE COOLANT RESPONSE FAILURE (AZC) (ACTIVE)When Monitored: Every 8 seconds with the ignition on.Set Condition: This condition is set if the AZC does not receive the engine coolantresponse message within 8 seconds.POSSIBLE CAUSESCHECK THE PCM FOR ANY DTCSOBSERVE THE ECT DISPLAY IN THE INSTRUMENT CLUSTERAUTOMATIC ZONE CONTROL MODULETEST ACTION APPLICABILITY1 Turn the ignition on.With the DRB check the PCM for any DTCs.Are any DTCs present?AllYes → Refer to the Powertrain Diagnostic Information.With the DRB, Reset Module after repair/replacement is completed.Perform BODY VERIFICATION TEST - VER 1.No → Go To 22 Turn the ignition on.With the DRB, enter Body, Electro/Mech Cluster (MIC), Monitor Display then PCIBus Engine Info and monitor the engine coolant temperature display.Does the DRB display approximately the correct engine coolant temperature?AllYes → Go To 3No → Replace and program the Powertrain Control Module in accordancewith the Service Information.With the DRB, Reset Module after repair/replacement is completed.Perform BODY VERIFICATION TEST - VER 1.3 With the DRB, erase the AZC DTC’s.Turn the ignition on, wait 1 minute, then check for any AZC DTCs.Did this DTC reset?AllYes → Replace the AZC Module.With the DRB, Reset Module after repair/replacement is completed.Perform BODY VERIFICATION TEST - VER 1.No → Test Complete.361
HEATING & A/CSymptom:ENGINE COOLANT RESPONSE FAILURE (AZC) (STORED)When Monitored and Set Condition:ENGINE COOLANT RESPONSE FAILURE (AZC) (STORED)When Monitored: Every 8 seconds with the ignition on.Set Condition: This condition is set if the AZC does not receive the engine coolantresponse message within 8 seconds.POSSIBLE CAUSESAZC MODULE STORED CODES PRESENTSTORED CODES TEST COMPLETETEST ACTION APPLICABILITY1 Note: Active codes must be resolved before diagnosing stored codes.Anytime a code becomes active during this test, proceed to the conclusion question.Turn the ignition on.With the DRB, erase any stored DTC’s.Monitor the DRB for active codes during the following test steps.Turn the mode select switch to the panel position with the fan control on low.Manually sweep the driver and passenger temperature control knobs from cold to hotthen back to cold.Manually sweep the blower motor control knob through all positions.Manually sweep the mode select switch knob through all positions.With the DRB, perform the AZC self test.With the DRB, actuate all of the AZC door motors.Place the vehicle on a hoist, and raise the wheels off the floor.Start engine. Place the transmission in drive. Brake off.WARNING: Be sure to keep hands and feet clear of rotating wheels. Keepclear of the engine’s moving partsDid any AZC code become active during this test?AllYes → Return to the Symptom List and choose the active code.Perform BODY VERIFICATION TEST - VER 1.No → No problem found at this time. Erase all codes before returningvehicle to customer.Perform BODY VERIFICATION TEST - VER 1.362
HEATING & A/CSymptom:ENGINE RPM FAILURE (AZC) (ACTIVE)When Monitored and Set Condition:ENGINE RPM FAILURE (AZC) (ACTIVE)When Monitored: Every 8 seconds with the ignition on.Set Condition: This condition is set if the AZC does not receive the engine RPM responsemessage within 8 seconds.POSSIBLE CAUSESCHECK THE PCM FOR ANY DTCSOBSERVE THE RPM DISPLAY IN THE INSTRUMENT CLUSTERAUTOMATIC ZONE CONTROL MODULETEST ACTION APPLICABILITY1 Turn the ignition on.With the DRB check the PCM for any DTCs.Are any DTCs present?AllYes → Refer to the Powertrain Diagnostic Information.With the DRB, Reset Module after repair/replacement is completed.Perform BODY VERIFICATION TEST - VER 1.No → Go To 22 Turn the ignition on.With the DRB, enter Body, Electro/Mech Cluster (MIC), Monitor Display then PCIBus Engine Info and monitor the engine RPM display.Start the engine.Does the DRB display approximately the correct engine RPM?AllYes → Go To 3No → Replace and program the Powertrain Control Module in accordancewith the Service Information.With the DRB, Reset Module after repair/replacement is completed.Perform BODY VERIFICATION TEST - VER 1.3 With the DRB, erase the AZC DTC’s.Start the engine, wait 1 minute, then check for any AZC DTCs.Did this DTC reset?AllYes → Replace the AZC Module.With the DRB, Reset Module after repair/replacement is completed.Perform BODY VERIFICATION TEST - VER 1.No → Test Complete.363
HEATING & A/CSymptom:ENGINE RPM FAILURE (AZC) (STORED)When Monitored and Set Condition:ENGINE RPM FAILURE (AZC) (STORED)When Monitored: Every 8 seconds with the ignition on.Set Condition: This condition is set if the AZC does not receive the engine RPM responsemessage within 8 seconds.POSSIBLE CAUSESAZC MODULE STORED CODES PRESENTSTORED CODES TEST COMPLETETEST ACTION APPLICABILITY1 Note: Active codes must be resolved before diagnosing stored codes.Anytime a code becomes active during this test, proceed to the conclusion question.Turn the ignition on.With the DRB, erase any stored DTC’s.Monitor the DRB for active codes during the following test steps.Turn the mode select switch to the panel position with the fan control on low.Manually sweep the driver and passenger temperature control knobs from cold to hotthen back to cold.Manually sweep the blower motor control knob through all positions.Manually sweep the mode select switch knob through all positions.With the DRB, perform the AZC self test.With the DRB, actuate all of the AZC door motors.Place the vehicle on a hoist, and raise the wheels off the floor.Start engine. Place the transmission in drive. Brake off.WARNING: Be sure to keep hands and feet clear of rotating wheels. Keepclear of the engine’s moving partsDid any AZC code become active during this test?AllYes → Return to the Symptom List and choose the active code.Perform BODY VERIFICATION TEST - VER 1.No → No problem found at this time. Erase all codes before returningvehicle to customer.Perform BODY VERIFICATION TEST - VER 1.364
HEATING & A/CSymptom:EVAP TEMP SENSOR OPEN (MTC & AZC)When Monitored and Set Condition:EVAP TEMP SENSOR OPEN (MTC & AZC)When Monitored: With the ignition on.Set Condition: This DTC is displayed if the BCM detects an abnormally high voltage onthe Evaporator Temperature Sensor Signal circuit.POSSIBLE CAUSESEVAPORATOR TEMPERATURE SENSOR SIGNAL CIRCUIT SHORTED TO VOLTAGEBODY CONTROL MODULEEVAPORATOR TEMPERATURE SENSOR SIGNAL CIRCUIT OPENSENSOR GROUND CIRCUIT OPENEVAPORATOR TEMPERATURE SENSORWIRING HARNESS INSPECTIONTEST ACTION APPLICABILITY1 Turn the ignition on.With the DRBIII, erase all BCM DTC’s.Cycle the ignition switch from off to on and wait 10 seconds.With the DRBIII, read the BCM DTC’s.Does the DRBIII display this DTC?AllYes → Go To 2No → Go To 62 Turn the ignition off.Disconnect the BCM C2 harness connector.Turn the ignition on.Measure the voltage of the Evaporator Temperature Sensor Signal circuit.Is there any voltage present?AllYes → Repair the Evaporator Temperature Sensor Signal circuit for ashort to voltage.Perform BODY VERIFICATION TEST - VER 1.No → Go To 3365
HEATING & A/CEVAP TEMP SENSOR OPEN (MTC & AZC) — ContinuedTEST ACTION APPLICABILITY3 Turn the ignition off.Disconnect the BCM C2 harness connector.Measure the resistance between the Evaporator Temperature Sensor Signal circuitand the Sensor Ground circuit. The approximate circuit resistance should be:2,874 ohms @ 38°C (100°F).3,214 ohms @ 35°C (95°F).3,659 ohms @ 32°C (90°F).4,125 ohms @ 29°C (85°F).4,615 ohms @ 27°C (80°F).5,238 ohms @ 24°C (75°F).5,902 ohms @ 21°C (70°F).6,733 ohms @ 18°C (65°F).7,633 ohms @ 16°C (60°F).8,611 ohms @ 13°C (55°F).9,838 ohms @ 10°C (50°F).11,199 ohms @ 7°C (45°F).13,125 ohms @ 4°C (40°F).14,883 ohms @ 2°C (35°F).17,143 ohms @ -1°C (30°F).Is the resistance within the specifications?AllYes → Replace and program the Body Control Module in accordancewith the Service Information.Perform BODY VERIFICATION TEST - VER 1.No → Go To 44 Turn the ignition off.Disconnect the BCM C2 harness connector.Disconnect the Evaporator Temperature Sensor harness connector.Measure the resistance of the Evaporator Temperature Sensor Signal circuit betweenthe BCM C2 harness connector and the Evaporator Temperature Sensor harnessconnector.Is the resistance below 5.0 ohms?AllYes → Go To 5No → Repair the Evaporator Temperature Sensor Signal circuit for anopen.Perform BODY VERIFICATION TEST - VER 1.5 Turn the ignition off.Disconnect the BCM C2 harness connector.Disconnect the Evaporator Temperature Sensor harness connector.Measure the resistance of the Sensor Ground circuit between the BCM C2 harnessconnector and the Evaporator Temperature Sensor harness connector.Is the resistance below 5.0 ohms?AllYes → Rplace the Evaporator Temperature Sensor in accordance withthe Service Information.Perform BODY VERIFICATION TEST - VER 1.No → Repair the Sensor Ground circuit for an open.Perform BODY VERIFICATION TEST - VER 1.366
HEATING & A/CEVAP TEMP SENSOR OPEN (MTC & AZC) — ContinuedTEST ACTION APPLICABILITY6 Turn the ignition off.NOTE: Visually inspect the related wiring harness and circuits. Look forany chafed, pierced, pinched, or partially broken wires.NOTE: Visually inspect the related wiring harness connectors. Look forbroken, bent, pushed out, or corroded terminals.NOTE: Refer to any Technical Service Bulletins (TSB) that may apply.Were any problems found?AllYes → Repair as necessary.Perform BODY VERIFICATION TEST - VER 1.No → Test Complete.367
HEATING & A/CSymptom:EVAP TEMP SENSOR SHORTED (MTC & AZC)When Monitored and Set Condition:EVAP TEMP SENSOR SHORTED (MTC & AZC)When Monitored: With the ignition on.Set Condition: This DTC is displayed if the BCM detects an abnormally low voltage onthe Evaporator Temperature Sensor Signal circuit.POSSIBLE CAUSESEVAPORATOR TEMPERATURE SENSOREVAPORATOR TEMPERATURE SENSOR SIGNAL CIRCUIT SHORT TO GROUNDEVAPORATOR TEMPERATURE SENSOR SIGNAL CIRCUIT SHORT TO SENSOR GROUND CIR-CUITBODY CONTROL MODULEWIRING HARNESS INSPECTIONTEST ACTION APPLICABILITY1 Turn the ignition on.With the DRBIII, erase all BCM DTC’s.Cycle the ignition switch from off to on and wait 10 seconds.With the DRBIII, read the BCM DTC’s.Does the DRBIII display this DTC?AllYes → Go To 2No → Go To 52 Turn the ignition off.Disconnect the Evaporator Temperature Sensor harness connector.Turn the ignition on.With the DRBIII, erase all BCM DTC’s.Cycle the ignition switch from off to on and wait 10 seconds.With the DRBIII, read the BCM DTC’s.Does the DRBIII display: Evap Temp Sensor Open?AllYes → Replace the Evaporator Temperature Sensor in accordance withthe Service Information.Perform BODY VERIFICATION TEST - VER 1.No → Go To 3368
HEATING & A/CEVAP TEMP SENSOR SHORTED (MTC & AZC) — ContinuedTEST ACTION APPLICABILITY3 Turn the ignition off.Disconnect the BCM C2 harness connector.Disconnect the Evaporator Temperature Sensor harness connector.Measure the resistance between ground and the Evaporator Temperature SensorSignal circuit.Is the resistance above 100k ohms?AllYes → Go To 4No → Repair the Evaporator Temperature Sensor Signal circuit for ashort to ground.Perform BODY VERIFICATION TEST - VER 1.4 Turn the ignition off.Disconnect the Body Control Module C2 harness connector.Disconnect the Evaporator Temperature Sensor harness connector.Measure the resistance between the Evaporator Temperature Sensor Signal circuitand the Sensor Ground circuit.Is the resistance above 100k ohms?AllYes → Replace and program the Body Control Module in accordancewith the Service Information.Perform BODY VERIFICATION TEST - VER 1.No → Repair the Evaporator Temperature Sensor Signal circuit for ashort to Sensor Ground.Perform BODY VERIFICATION TEST - VER 1.5 Turn the ignition off.NOTE: Visually inspect the related wiring harness and circuits. Look forany chafed, pierced, pinched, or partially broken wires.NOTE: Visually inspect the related wiring harness connectors. Look forbroken, bent, pushed out, or corroded terminals.NOTE: Refer to any Technical Service Bulletins (TSB) that may apply.Were any problems found?AllYes → Repair as necessary.Perform BODY VERIFICATION TEST - VER 1.No → Test Complete.369
HEATING & A/CSymptom:IAT RESPONSE FAILURE (AZC) (ACTIVE)When Monitored and Set Condition:IAT RESPONSE FAILURE (AZC) (ACTIVE)When Monitored: Every 8 seconds with the ignition on.Set Condition: This condition is set if the AZC does not receive the intake air temperatureresponse message within 8 seconds.POSSIBLE CAUSESCHECK THE PCM FOR ANY DTCSAUTOMATIC ZONE CONTROL MODULETEST ACTION APPLICABILITY1 Turn the ignition on.With the DRB check the PCM for any DTCs.Are any DTCs present?AllYes → Refer to the Powertrain Diagnostic Information.With the DRB, Reset Module after repair/replacement is completed.Perform BODY VERIFICATION TEST - VER 1.No → Go To 22 With the DRB, erase the AZC DTC’s.Turn the ignition on, wait 1 minute, then check for any AZC DTCs.Did this DTC reset?AllYes → Replace the AZC Module.With the DRB, Reset Module after repair/replacement is completed.Perform BODY VERIFICATION TEST - VER 1.No → Test Complete.370
HEATING & A/CSymptom:IAT RESPONSE FAILURE (AZC) (STORED)When Monitored and Set Condition:IAT RESPONSE FAILURE (AZC) (STORED)When Monitored: Every 8 seconds with the ignition on.Set Condition: This condition is set if the AZC does not receive the intake air temperatureresponse message within 8 seconds.POSSIBLE CAUSESAZC MODULE STORED CODES PRESENTSTORED CODES TEST COMPLETETEST ACTION APPLICABILITY1 Note: Active codes must be resolved before diagnosing stored codes.Anytime a code becomes active during this test, proceed to the conclusion question.Turn the ignition on.With the DRB, erase any stored DTC’s.Monitor the DRB for active codes during the following test steps.Turn the mode select switch to the panel position with the fan control on low.Manually sweep the driver and passenger temperature control knobs from cold to hotthen back to cold.Manually sweep the blower motor control knob through all positions.Manually sweep the mode select switch knob through all positions.With the DRB, perform the AZC self test.With the DRB, actuate all of the AZC door motors.Place the vehicle on a hoist, and raise the wheels off the floor.Start engine. Place the transmission in drive. Brake off.WARNING: Be sure to keep hands and feet clear of rotating wheels. Keepclear of the engine’s moving partsDid any AZC code become active during this test?AllYes → Return to the Symptom List and choose the active code.Perform BODY VERIFICATION TEST - VER 1.No → No problem found at this time. Erase all codes before returningvehicle to customer.Perform BODY VERIFICATION TEST - VER 1.371
HEATING & A/CSymptom:MODE DOOR RANGE TOO LARGE (AZC) (ACTIVE)When Monitored and Set Condition:MODE DOOR RANGE TOO LARGE (AZC) (ACTIVE)When Monitored: Ignition in RUN and IOD fuse installed.Set Condition: This condition is set when the AZC monitors the travel range duringsystem initialization and the measured range is greater than expected.POSSIBLE CAUSESCHECK THE AZC MODULE FOR DTCSMODE DOOR DRIVER CIRCUIT (B) SHORTED TO GROUNDMODE DOOR DRIVER CIRCUIT (A) SHORTED TO GROUNDMODE DOOR MOTORMODE DOOR MOTORCHECK MODE DOOR LINKAGEAZC MODULETEST ACTION APPLICABILITY1 Turn the ignition on.With the DRB, read the active AZC DTC’s.Is the Mode Motor Not Responding DTC set?AllYes → Refer to the Heating and A/C category and perform the symptomMode Motor Not Responding.With the DRB, Reset Module after repair/replacement is completed.Perform BODY VERIFICATION TEST - VER 1.No → Go To 22 Turn the ignition off.Disconnect the Mode Door Motor/Actuator harness connector.Disconnect the AZC module C1 harness connector.Measure the resistance between ground and the Mode Door Driver (B) circuit.Is the resistance below 5.0 ohms?AllYes → Repair the Mode Door Driver (B) circuit for a short to ground.With the DRB, Reset Module after repair/replacement is completed.Perform BODY VERIFICATION TEST - VER 1.No → Go To 3372
HEATING & A/CMODE DOOR RANGE TOO LARGE (AZC) (ACTIVE) — ContinuedTEST ACTION APPLICABILITY3 Turn the ignition off.Disconnect the Mode Door Motor/Actuator harness connector.Disconnect the AZC module C1 harness connector.Measure the resistance between ground and the Mode Door Driver (A) circuit.Is the resistance below 5.0 ohms?AllYes → Repair the Mode Door Driver (A) circuit for a short to ground.With the DRB, Reset Module after repair/replacement is completed.Perform BODY VERIFICATION TEST - VER 1.No → Go To 44 Turn the ignition off.Remove the Mode Door Motor/Actuator from the vehicle.By hand, attempt to rotate the mode door motor in both directions.Did the mode door motor turn in either direction?AllYes → Replace the Mode Door Motor.With the DRB, Reset Module after repair/replacement is completed.Perform BODY VERIFICATION TEST - VER 1.No → Go To 55 Remove the Mode Door Motor from the vehicle. Rotate the mode doors (doors only),these should rotate approximately 45 degrees from stop to stop.Inspect the mode door linkage for excessive wear or missing linkage.Were any mechanical problems found?AllYes → Repair or replace the mode door/linkage as necessary.With the DRB, Reset Module after repair/replacement is completed.Perform BODY VERIFICATION TEST - VER 1.No → Replace the AZC Module.With the DRB, Reset Module after repair/replacement is completed.Perform BODY VERIFICATION TEST - VER 1.373
HEATING & A/CSymptom:MODE DOOR RANGE TOO LARGE (AZC) (STORED)When Monitored and Set Condition:MODE DOOR RANGE TOO LARGE (AZC) (STORED)When Monitored: Ignition in RUN and IOD fuse installed.Set Condition: This condition is set when the AZC monitors the travel range duringsystem initialization and the measured range is greater than expected.POSSIBLE CAUSESAZC MODULE STORED CODES PRESENTSTORED CODES TEST COMPLETETEST ACTION APPLICABILITY1 Note: Active codes must be resolved before diagnosing stored codes.Anytime a code becomes active during this test, proceed to the conclusion question.Turn the ignition on.With the DRB, erase any stored DTC’s.Monitor the DRB for active codes during the following test steps.Turn the mode select switch to the panel position with the fan control on low.Manually sweep the driver and passenger temperature control knobs from cold to hotthen back to cold.Manually sweep the blower motor control knob through all positions.Manually sweep the mode select switch knob through all positions.With the DRB, perform the AZC self test.With the DRB, actuate all of the AZC door motors.Place the vehicle on a hoist, and raise the wheels off the floor.Start engine. Place the transmission in drive. Brake off.WARNING: Be sure to keep hands and feet clear of rotating wheels. Keepclear of the engine’s moving partsDid any AZC code become active during this test?AllYes → Return to the Symptom List and choose the active code.Perform BODY VERIFICATION TEST - VER 1.No → No problem found at this time. Erase all codes before returningvehicle to customer.Perform BODY VERIFICATION TEST - VER 1.374
HEATING & A/CSymptom:MODE DOOR RANGE TOO SMALL (AZC) (ACTIVE)When Monitored and Set Condition:MODE DOOR RANGE TOO SMALL (AZC) (ACTIVE)When Monitored: Ignition in RUN and IOD fuse installed.Set Condition: This condition is set when the AZC monitors the travel range duringsystem initialization and the measured range is less than expected.POSSIBLE CAUSESCHECK THE AZC MODULE FOR DTCSCHECK THE AZC SIGNAL TOO MODE DOOROBSTRUCTED MODE DOORMODE DOOR MOTORTEST ACTION APPLICABILITY1 Turn the ignition on.With the DRB, read the active AZC DTC’s.Is the Mode Motor Not Responding DTC set?AllYes → Refer to the Heating and A/C category and perform the symptomMode Motor Not Responding.With the DRB, Reset Module after repair/replacement is completed.Perform BODY VERIFICATION TEST - VER 1.No → Go To 22 Turn the ignition off.Disconnect the Mode Door Motor/Actuator harness connector.Connect a 12-volt Test Light across the Mode Door Motor/Actuator harness connector.Turn the ignition on.While monitoring the test light, turn the mode control knob in each position.Note: Observe test light for approximately 30 seconds.Does the test light start to flash and stay flashing?AllYes → Go To 3No → Replace the AZC Module.With the DRB, Reset Module after repair/replacement is completed.Perform BODY VERIFICATION TEST - VER 1.375
HEATING & A/CMODE DOOR RANGE TOO SMALL (AZC) (ACTIVE) — ContinuedTEST ACTION APPLICABILITY3 Remove the Mode Door Motor from the vehicle. Rotate the mode doors (doors only),these should rotate approximately 45 degrees from stop to stop.Do the mode doors move smoothly in both directions?AllYes → Replace the Mode Door Motor.With the DRB, Reset Module after repair/replacement is completed.Perform BODY VERIFICATION TEST - VER 1.No → Repair or replace the mode door as necessary.With the DRB, Reset Module after repair/replacement is completed.Perform BODY VERIFICATION TEST - VER 1.376
HEATING & A/CSymptom:MODE DOOR RANGE TOO SMALL (AZC) (STORED)When Monitored and Set Condition:MODE DOOR RANGE TOO SMALL (AZC) (STORED)When Monitored: Ignition in RUN and IOD fuse installed.Set Condition: This condition is set when the AZC monitors the travel range duringsystem initialization and the measured range is less than expected.POSSIBLE CAUSESAZC MODULE STORED CODES PRESENTSTORED CODES TEST COMPLETETEST ACTION APPLICABILITY1 Note: Active codes must be resolved before diagnosing stored codes.Anytime a code becomes active during this test, proceed to the conclusion question.Turn the ignition on.With the DRB, erase any stored DTC’s.Monitor the DRB for active codes during the following test steps.Turn the mode select switch to the panel position with the fan control on low.Manually sweep the driver and passenger temperature control knobs from cold to hotthen back to cold.Manually sweep the blower motor control knob through all positions.Manually sweep the mode select switch knob through all positions.With the DRB, perform the AZC self test.With the DRB, actuate all of the AZC door motors.Place the vehicle on a hoist, and raise the wheels off the floor.Start engine. Place the transmission in drive. Brake off.WARNING: Be sure to keep hands and feet clear of rotating wheels. Keepclear of the engine’s moving partsDid any AZC code become active during this test?AllYes → Return to the Symptom List and choose the active code.Perform BODY VERIFICATION TEST - VER 1.No → No problem found at this time. Erase all codes before returningvehicle to customer.Perform BODY VERIFICATION TEST - VER 1.377
HEATING & A/CSymptom:MODE MOTOR NOT RESPONDING (AZC) (ACTIVE)When Monitored and Set Condition:MODE MOTOR NOT RESPONDING (AZC) (ACTIVE)When Monitored: Ignition in RUN and IOD fuse installed.Set Condition: This condition is set if the AZC does not receive feedback pulses within 5seconds of the drive voltage being applied.POSSIBLE CAUSESMODE DOOR DRIVER CIRCUIT (B) SHORTED TO GROUNDMODE DOOR DRIVER CIRCUIT (A) SHORTED TO GROUNDMODE DOOR DRIVER CIRCUITS (A) AND (B) SHORTED TOGETHERAZC MODULE MODE DOOR NOT RESPONDINGMODE DOOR DRIVER CIRCUIT (A) OPENMODE DOOR DRIVER CIRCUIT (B) OPENMODE DOOR MOTORTEST ACTION APPLICABILITY1 Turn the ignition off.Disconnect the Mode Door Motor/Actuator harness connector.Disconnect the AZC module C1 harness connector.Measure the resistance between ground and the Mode Door Driver (B) circuit.Is the resistance below 5.0 ohms?AllYes → Repair the Mode Door Driver (B) circuit for a short to ground.With the DRB, Reset Module after repair/replacement is completed.Perform BODY VERIFICATION TEST - VER 1.No → Go To 22 Turn the ignition off.Disconnect the Mode Door Motor/Actuator harness connector.Disconnect the AZC module C1 harness connector.Measure the resistance between ground and the Mode Door Driver (A) circuit.Is the resistance below 5.0 ohms?AllYes → Repair the Mode Door Driver (A) circuit for a short to ground.With the DRB, Reset Module after repair/replacement is completed.Perform BODY VERIFICATION TEST - VER 1.No → Go To 3378
HEATING & A/CMODE MOTOR NOT RESPONDING (AZC) (ACTIVE) — ContinuedTEST ACTION APPLICABILITY3 Turn the ignition off.Disconnect the Mode Door Motor/Actuator harness connector.Disconnect the AZC module C1 harness connector.Measure the resistance between the Mode Door Driver (B) circuit and the Mode DoorDriver (A) circuit.Is the resistance below 5.0 ohms?AllYes → Repair the Mode Door Driver (B) circuit for a short to the ModeDoor Driver (A) circuit.With the DRB, Reset Module after repair/replacement is completed.Perform BODY VERIFICATION TEST - VER 1.No → Go To 44 Turn the ignition off.Disconnect the Mode Door Motor/Actuator harness connector.Disconnect the AZC module C1 harness connector.Measure the resistance of the Mode Door Driver (A) circuit between the AZC ModuleC1 connector and the Mode Door Motor/Actuator connector.Is the resistance below 5.0 ohms?AllYes → Go To 5No → Repair the Mode Door Driver (A) circuit for an open.With the DRB, Reset Module after repair/replacement is completed.Perform BODY VERIFICATION TEST - VER 1.5 Turn the ignition off.Disconnect the Mode Door Motor/Actuator harness connector.Disconnect the AZC module C1 harness connector.Measure the resistance of the Mode Door Driver (B) circuit between the AZC ModuleC1 connector and the Mode Door Motor/Actuator connector.Is the resistance below 5.0 ohms?AllYes → Go To 6No → Repair the Mode Door Driver (B) circuit for an open.With the DRB, Reset Module after repair/replacement is completed.Perform BODY VERIFICATION TEST - VER 1.6 Turn the ignition off.Make sure that the Mode Door Motor harness connector is connected to the ModeDoor Motor.Disconnect the AZC module C1 harness connector.Measure the resistance between the Mode Door Driver (B) circuit and the Mode DoorDriver (A) circuit.Is the resistance between 26.0 and 46.0 ohms?AllYes → Replace the AZC Module.With the DRB, Reset Module after repair/replacement is completed.Perform BODY VERIFICATION TEST - VER 1.No → Go To 7379
HEATING & A/CMODE MOTOR NOT RESPONDING (AZC) (ACTIVE) — ContinuedTEST ACTION APPLICABILITY7 If there are no possible causes remaining, view repair. AllRepairReplace the Mode Door Motor.With the DRB, Reset Module after repair/replacement is completed.Perform BODY VERIFICATION TEST - VER 1.380
HEATING & A/CSymptom:MODE MOTOR NOT RESPONDING (AZC) (STORED)When Monitored and Set Condition:MODE MOTOR NOT RESPONDING (AZC) (STORED)When Monitored: Ignition in RUN and IOD fuse installed.Set Condition: This condition is set if the AZC does not receive feedback pulses within 5seconds of the drive voltage being applied.POSSIBLE CAUSESAZC MODULE STORED CODES PRESENTSTORED CODES TEST COMPLETETEST ACTION APPLICABILITY1 Note: Active codes must be resolved before diagnosing stored codes.Anytime a code becomes active during this test, proceed to the conclusion question.Turn the ignition on.With the DRB, erase any stored DTC’s.Monitor the DRB for active codes during the following test steps.Turn the mode select switch to the panel position with the fan control on low.Manually sweep the driver and passenger temperature control knobs from cold to hotthen back to cold.Manually sweep the blower motor control knob through all positions.Manually sweep the mode select switch knob through all positions.With the DRB, perform the AZC self test.With the DRB, actuate all of the AZC door motors.Place the vehicle on a hoist, and raise the wheels off the floor.Start engine. Place the transmission in drive. Brake off.WARNING: Be sure to keep hands and feet clear of rotating wheels. Keepclear of the engine’s moving partsDid any AZC code become active during this test?AllYes → Return to the Symptom List and choose the active code.Perform BODY VERIFICATION TEST - VER 1.No → No problem found at this time. Erase all codes before returningvehicle to customer.Perform BODY VERIFICATION TEST - VER 1.381
HEATING & A/CSymptom:MODE SELECT SW OPEN (AZC) (ACTIVE)When Monitored and Set Condition:MODE SELECT SW OPEN (AZC) (ACTIVE)When Monitored: Ignition in RUN and IOD fuse installed.Set Condition: This condition is set if the AZC reads the mode select switch value and itis above 250 A/D counts.POSSIBLE CAUSESMODE SELECT SWITCH FAILED OPENTEST ACTION APPLICABILITY1 When this code is present the AZC Module must be replaced.AllView repairRepairReplace the AZC Module.With the DRB, Reset Module after repair/replacement is completed.Perform BODY VERIFICATION TEST - VER 1.382
HEATING & A/CSymptom:MODE SELECT SW OPEN (AZC) (STORED)When Monitored and Set Condition:MODE SELECT SW OPEN (AZC) (STORED)When Monitored: Ignition in RUN and IOD fuse installed.Set Condition: This condition is set if the AZC reads the mode select switch value and itis above 250 A/D counts.POSSIBLE CAUSESAZC MODULE STORED CODES PRESENTSTORED CODES TEST COMPLETETEST ACTION APPLICABILITY1 Note: Active codes must be resolved before diagnosing stored codes.Anytime a code becomes active during this test, proceed to the conclusion question.Turn the ignition on.With the DRB, erase any stored DTC’s.Monitor the DRB for active codes during the following test steps.Turn the mode select switch to the panel position with the fan control on low.Manually sweep the driver and passenger temperature control knobs from cold to hotthen back to cold.Manually sweep the blower motor control knob through all positions.Manually sweep the mode select switch knob through all positions.Manually press the recirculation mode switch on, wait 30 seconds then press it off.Manually press the A/C mode switch on, wait 30 seconds then press it off.With the DRB, perform the AZC self test.With the DRB, actuate all of the AZC door motors.Place the vehicle on a hoist, and raise the wheels off the floor.Start engine. Place the transmission in drive. Brake off.WARNING: Be sure to keep hands and feet clear of rotating wheels. Keepclear of the engine’s moving partsDid any AZC code become active during this test?AllYes → Return to the Symptom List and choose the active code.Perform BODY VERIFICATION TEST - VER 1.No → No problem found at this time. Erase all codes before returningvehicle to customer.Perform BODY VERIFICATION TEST - VER 1.383
HEATING & A/CSymptom:MODE SELECT SW SHORTED (AZC) (ACTIVE)When Monitored and Set Condition:MODE SELECT SW SHORTED (AZC) (ACTIVE)When Monitored: Ignition in RUN and IOD fuse installed.Set Condition: This condition is set if the AZC reads the mode select switch value and itis below 5 A/D counts.POSSIBLE CAUSESMODE SELECT SWITCH FAILED SHORTEDTEST ACTION APPLICABILITY1 When this code is present the AZC Module must be replaced.AllView repairRepairReplace the AZC Module.With the DRB, Reset Module after repair/replacement is completed.Perform BODY VERIFICATION TEST - VER 1.384
HEATING & A/CSymptom:MODE SELECT SW SHORTED (AZC) (STORED)When Monitored and Set Condition:MODE SELECT SW SHORTED (AZC) (STORED)When Monitored: Ignition in RUN and IOD fuse installed.Set Condition: This condition is set if the AZC reads the mode select switch value and itis below 5 A/D counts.POSSIBLE CAUSESAZC MODULE STORED CODES PRESENTSTORED CODES TEST COMPLETETEST ACTION APPLICABILITY1 Note: Active codes must be resolved before diagnosing stored codes.Anytime a code becomes active during this test, proceed to the conclusion question.Turn the ignition on.With the DRB, erase any stored DTC’s.Monitor the DRB for active codes during the following test steps.Turn the mode select switch to the panel position with the fan control on low.Manually sweep the driver and passenger temperature control knobs from cold to hotthen back to cold.Manually sweep the blower motor control knob through all positions.Manually sweep the mode select switch knob through all positions.With the DRB, perform the AZC self test.With the DRB, actuate all of the AZC door motors.Place the vehicle on a hoist, and raise the wheels off the floor.Start engine. Place the transmission in drive. Brake off.WARNING: Be sure to keep hands and feet clear of rotating wheels. Keepclear of the engine’s moving partsDid any AZC code become active during this test?AllYes → Return to the Symptom List and choose the active code.Perform BODY VERIFICATION TEST - VER 1.No → No problem found at this time. Erase all codes before returningvehicle to customer.Perform BODY VERIFICATION TEST - VER 1.385
HEATING & A/CSymptom:PASS BLEND DOOR NOT RESPONDING (AZC) (ACTIVE)When Monitored and Set Condition:PASS BLEND DOOR NOT RESPONDING (AZC) (ACTIVE)When Monitored: Ignition in RUN and IOD fuse installed.Set Condition: This condition is set if the AZC does not receive feedback pulses within 5seconds of the drive voltage being applied.POSSIBLE CAUSESDRIVER CIRCUIT (B) SHORTED TO GROUNDDRIVER CIRCUIT (A) SHORTED TO GROUNDDRIVER CIRCUITS (A) AND (B) SHORTED TOGETHERAZC MODULE PASSENGER BLEND DOOR NOT RESPONDINGDRIVER CIRCUIT (A) OPENDRIVER CIRCUIT (B) OPENPASSENGER BLEND DOOR MOTORTEST ACTION APPLICABILITY1 Turn the ignition off.Disconnect the in-line C202 harness connector.Disconnect the AZC module C2 harness connector.Measure the resistance between ground and the Passenger Blend Door Driver (B)circuit.Is the resistance below 5.0 ohms?AllYes → Repair the Passenger Blend Door Driver (B) circuit for a short toground.With the DRB, Reset Module after repair/replacement is completed.Perform BODY VERIFICATION TEST - VER 1.No → Go To 22 Turn the ignition off.Disconnect the in-line C202 harness connector.Disconnect the AZC module C2 harness connector.Measure the resistance between ground and the Passenger Blend Door Driver (A)circuit.Is the resistance below 5.0 ohms?AllYes → Repair the Passenger Blend Door Driver (A) circuit for a short toground.With the DRB, Reset Module after repair/replacement is completed.Perform BODY VERIFICATION TEST - VER 1.No → Go To 3386
HEATING & A/CPASS BLEND DOOR NOT RESPONDING (AZC) (ACTIVE) — ContinuedTEST ACTION APPLICABILITY3 Turn the ignition off.Disconnect the in-line C202 harness connector.Disconnect the AZC module C2 harness connector.Measure the resistance between the Passenger Blend Door Driver (B) circuit and thePassenger Blend Door Driver (A) circuit.Is the resistance below 5.0 ohms?AllYes → Repair the Passenger Blend Door Driver (B) circuit for a short tothe Passenger Blend Door Driver (A) circuit.With the DRB, Reset Module after repair/replacement is completed.Perform BODY VERIFICATION TEST - VER 1.No → Go To 44 Turn the ignition off.Disconnect the in-line C202 harness connector.Disconnect the AZC module C2 harness connector.Measure the resistance of the Passenger Blend Door Driver (A) circuit between theAZC Module C2 connector and the in-line C202 connector.Is the resistance below 5.0 ohms?AllYes → Go To 5No → Repair the Passenger Blend Door Driver (A) circuit for an open.With the DRB, Reset Module after repair/replacement is completed.Perform BODY VERIFICATION TEST - VER 1.5 Turn the ignition off.Disconnect the in-line C202 harness connector.Disconnect the AZC module C2 harness connector.Measure the resistance of the Passenger Blend Door Driver (B) circuit between theAZC Module C2 connector and the in-line C202 connector.Is the resistance below 5.0 ohms?AllYes → Go To 6No → Repair the Passenger Blend Door Driver (B) circuit for an open.With the DRB, Reset Module after repair/replacement is completed.Perform BODY VERIFICATION TEST - VER 1.6 Turn the ignition off.Make sure that the in-line C202 harness connector is connected.Disconnect the AZC module C2 harness connector.Measure the resistance between the Passenger Blend Door Driver (B) circuit and thePassenger Blend Door Driver (A) circuit.Is the resistance between 26.0 and 46.0 ohms?AllYes → Replace the AZC Module.With the DRB, Reset Module after repair/replacement is completed.Perform BODY VERIFICATION TEST - VER 1.No → Go To 7387
HEATING & A/CPASS BLEND DOOR NOT RESPONDING (AZC) (ACTIVE) — ContinuedTEST ACTION APPLICABILITY7 Note: Before replacing the passenger blend door motor, inspect the wiringharness between the in-line C202 connector and the blend door motor forany opens or shorts. Repair as necessary.If there are no possible causes remaining, view repair.AllRepairReplace the Passenger Blend Door Motor.With the DRB, Reset Module after repair/replacement is completed.Perform BODY VERIFICATION TEST - VER 1.388
HEATING & A/CSymptom:PASS BLEND DOOR NOT RESPONDING (AZC) (STORED)When Monitored and Set Condition:PASS BLEND DOOR NOT RESPONDING (AZC) (STORED)When Monitored: Ignition in RUN and IOD fuse installed.Set Condition: This condition is set if the AZC does not receive feedback pulses within 5seconds of the drive voltage being applied.POSSIBLE CAUSESAZC MODULE STORED CODES PRESENTSTORED CODES TEST COMPLETETEST ACTION APPLICABILITY1 Note: Active codes must be resolved before diagnosing stored codes.Anytime a code becomes active during this test, proceed to the conclusion question.Turn the ignition on.With the DRB, erase any stored DTC’s.Monitor the DRB for active codes during the following test steps.Turn the mode select switch to the panel position with the fan control on low.Manually sweep the driver and passenger temperature control knobs from cold to hotthen back to cold.Manually sweep the blower motor control knob through all positions.Manually sweep the mode select switch knob through all positions.With the DRB, perform the AZC self test.With the DRB, actuate all of the AZC door motors.Place the vehicle on a hoist, and raise the wheels off the floor.Start engine. Place the transmission in drive. Brake off.WARNING: Be sure to keep hands and feet clear of rotating wheels. Keepclear of the engine’s moving partsDid any AZC code become active during this test?AllYes → Return to the Symptom List and choose the active code.Perform BODY VERIFICATION TEST - VER 1.No → No problem found at this time. Erase all codes before returningvehicle to customer.Perform BODY VERIFICATION TEST - VER 1.389
HEATING & A/CSymptom:PASS BLEND DOOR RANGE TOO LARGE (AZC) (ACTIVE)When Monitored and Set Condition:PASS BLEND DOOR RANGE TOO LARGE (AZC) (ACTIVE)When Monitored: Ignition in RUN and IOD fuse installed.Set Condition: This condition is set when the AZC monitors the travel range duringsystem initialization and the measured range is greater than expected.POSSIBLE CAUSESCHECK THE AZC MODULE FOR DTCSDRIVER CIRCUIT (B) SHORTED TO GROUNDDRIVER CIRCUIT (A) SHORTED TO GROUNDPASSENGER BLEND DOOR MOTORPASSENGER BLEND DOOR MOTORCHECK BLEND DOOR LINKAGEAZC MODULETEST ACTION APPLICABILITY1 Turn the ignition on.With the DRB, read the active AZC DTC’s.Is the Pass Blend Door Not Responding DTC set?AllYes → Refer to the Heating and A/C category and perform the symptomPass Blend Door Not Responding.With the DRB, Reset Module after repair/replacement is completed.Perform BODY VERIFICATION TEST - VER 1.No → Go To 22 Turn the ignition off.Disconnect the in-line C202 harness connector.Disconnect the AZC module C2 harness connector.Measure the resistance between ground and the Passenger Blend Door Driver (B)circuit.Is the resistance below 5.0 ohms?AllYes → Repair the Passenger Blend Door Driver (B) circuit for a short toground.With the DRB, Reset Module after repair/replacement is completed.Perform BODY VERIFICATION TEST - VER 1.No → Go To 3390
HEATING & A/CPASS BLEND DOOR RANGE TOO LARGE (AZC) (ACTIVE) — ContinuedTEST ACTION APPLICABILITY3 Turn the ignition off.Disconnect the in-line C202 harness connector.Disconnect the AZC module C2 harness connector.Measure the resistance between ground and the Passenger Blend Door Driver (A)circuit.Is the resistance below 5.0 ohms?AllYes → Repair the Passenger Blend Door Driver (A) circuit for a short toground.With the DRB, Reset Module after repair/replacement is completed.Perform BODY VERIFICATION TEST - VER 1.No → Go To 44 Turn the ignition off.Remove the Passenger Blend Door Motor/Actuator from the vehicle.By hand, attempt to rotate the passenger blend door motor in both directions.Did the blend door motor turn in either direction?AllYes → Replace the Passenger Blend Door Motor.With the DRB, Reset Module after repair/replacement is completed.Perform BODY VERIFICATION TEST - VER 1.No → Go To 55 Remove the Passenger Blend Door Motor from the vehicle. Rotate the blend door(door only), this should rotate approximately 45 degrees from stop to stop.Inspect the blend door linkage for excessive wear or missing linkage.Were any mechanical problems found?AllYes → Repair or replace the blend door/linkage as necessary.With the DRB, Reset Module after repair/replacement is completed.Perform BODY VERIFICATION TEST - VER 1.No → Replace the AZC Module.With the DRB, Reset Module after repair/replacement is completed.Perform BODY VERIFICATION TEST - VER 1.391
HEATING & A/CSymptom:PASS BLEND DOOR RANGE TOO LARGE (AZC) (STORED)When Monitored and Set Condition:PASS BLEND DOOR RANGE TOO LARGE (AZC) (STORED)When Monitored: Ignition in RUN and IOD fuse installed.Set Condition: This condition is set when the AZC monitors the travel range duringsystem initialization and the measured range is greater than expected.POSSIBLE CAUSESAZC MODULE STORED CODES PRESENTSTORED CODES TEST COMPLETETEST ACTION APPLICABILITY1 Note: Active codes must be resolved before diagnosing stored codes.Anytime a code becomes active during this test, proceed to the conclusion question.Turn the ignition on.With the DRB, erase any stored DTC’s.Monitor the DRB for active codes during the following test steps.Turn the mode select switch to the panel position with the fan control on low.Manually sweep the driver and passenger temperature control knobs from cold to hotthen back to cold.Manually sweep the blower motor control knob through all positions.Manually sweep the mode select switch knob through all positions.With the DRB, perform the AZC self test.With the DRB, actuate all of the AZC door motors.Place the vehicle on a hoist, and raise the wheels off the floor.Start engine. Place the transmission in drive. Brake off.WARNING: Be sure to keep hands and feet clear of rotating wheels. Keepclear of the engine’s moving partsDid any AZC code become active during this test?AllYes → Return to the Symptom List and choose the active code.Perform BODY VERIFICATION TEST - VER 1.No → No problem found at this time. Erase all codes before returningvehicle to customer.Perform BODY VERIFICATION TEST - VER 1.392
HEATING & A/CSymptom:PASS BLEND DOOR RANGE TOO SMALL (AZC) (ACTIVE)When Monitored and Set Condition:PASS BLEND DOOR RANGE TOO SMALL (AZC) (ACTIVE)When Monitored: Ignition in RUN and IOD fuse installed.Set Condition: This condition is set when the AZC monitors the travel range duringsystem initialization and the measured range is less than expected.POSSIBLE CAUSESCHECK THE AZC MODULE FOR DTCSCHECK THE AZC SIGNAL TOO PASSENGER BLEND DOOROBSTRUCTED BLEND DOORPASSENGER BLEND DOOR MOTORTEST ACTION APPLICABILITY1 Turn the ignition on.With the DRB, read the active AZC DTC’s.Is the Pass Blend Door Not Responding DTC set?AllYes → Refer to the Heating and A/C category and perform the symptomPass Blend Door Not Responding.With the DRB, Reset Module after repair/replacement is completed.Perform BODY VERIFICATION TEST - VER 1.No → Go To 22 Turn the ignition off.Disconnect the in-line C202 harness connector.Connect a 12-volt Test Light across the passenger blend door driver (A) circuit andthe passenger blend door driver (B) circuit at the C202 harness connector (AZCharness side).Turn the ignition on.While monitoring the test light, turn the passenger blend control knob from lo to hi.Note: Observe test light for approximately 30 seconds.Does the test light start to flash and stay flashing?AllYes → Go To 3No → Replace the AZC Module.With the DRB, Reset Module after repair/replacement is completed.Perform BODY VERIFICATION TEST - VER 1.393
HEATING & A/CPASS BLEND DOOR RANGE TOO SMALL (AZC) (ACTIVE) — ContinuedTEST ACTION APPLICABILITY3 Remove the Passenger Blend Door Motor from the vehicle. Rotate the blend door(door only), this should rotate approximately 45 degrees from stop to stop.Does the blend door move smoothly in both directions?AllYes → Replace the Passenger Blend Door Motor/Actuator.With the DRB, Reset Module after repair/replacement is completed.Perform BODY VERIFICATION TEST - VER 1.No → Repair or replace the blend door as necessary.With the DRB, Reset Module after repair/replacement is completed.Perform BODY VERIFICATION TEST - VER 1.394
HEATING & A/CSymptom:PASS BLEND DOOR RANGE TOO SMALL (AZC) (STORED)When Monitored and Set Condition:PASS BLEND DOOR RANGE TOO SMALL (AZC) (STORED)When Monitored: Ignition in RUN and IOD fuse installed.Set Condition: This condition is set when the AZC monitors the travel range duringsystem initialization and the measured range is less than expected.POSSIBLE CAUSESAZC MODULE STORED CODES PRESENTSTORED CODES TEST COMPLETETEST ACTION APPLICABILITY1 Note: Active codes must be resolved before diagnosing stored codes.Anytime a code becomes active during this test, proceed to the conclusion question.Turn the ignition on.With the DRB, erase any stored DTC’s.Monitor the DRB for active codes during the following test steps.Turn the mode select switch to the panel position with the fan control on low.Manually sweep the driver and passenger temperature control knobs from cold to hotthen back to cold.Manually sweep the blower motor control knob through all positions.Manually sweep the mode select switch knob through all positions.With the DRB, perform the AZC self test.With the DRB, actuate all of the AZC door motors.Place the vehicle on a hoist, and raise the wheels off the floor.Start engine. Place the transmission in drive. Brake off.WARNING: Be sure to keep hands and feet clear of rotating wheels. Keepclear of the engine’s moving partsDid any AZC code become active during this test?AllYes → Return to the Symptom List and choose the active code.Perform BODY VERIFICATION TEST - VER 1.No → No problem found at this time. Erase all codes before returningvehicle to customer.Perform BODY VERIFICATION TEST - VER 1.395
HEATING & A/CSymptom:RECIRC DOOR RANGE TOO LARGE (AZC) (ACTIVE)When Monitored and Set Condition:RECIRC DOOR RANGE TOO LARGE (AZC) (ACTIVE)When Monitored: Ignition in RUN and IOD fuse installed.Set Condition: This condition is set when the AZC monitors the travel range duringsystem initialization and the measured range is greater than expected.POSSIBLE CAUSESCHECK THE AZC MODULE FOR DTCSDRIVER CIRCUIT (B) SHORTED TO GROUNDDRIVER CIRCUIT (A) SHORTED TO GROUNDRECIRCULATION DOOR MOTORRECIRCULATION DOOR MOTORCHECK RECIRCULATION DOOR LINKAGEAZC MODULETEST ACTION APPLICABILITY1 Turn the ignition on.With the DRB, read the active AZC DTC’s.Is the Recirc Motor Not Responding DTC set?AllYes → Refer to the Heating and A/C category and perform the symptomRecirc Motor Not Responding.Perform BODY VERIFICATION TEST - VER 1.No → Go To 22 Turn the ignition off.Disconnect the in-line C202 harness connector.Disconnect the AZC module C1 harness connector.Measure the resistance between ground and the Recirculation Door Driver (B)circuit.Is the resistance below 5.0 ohms?AllYes → Repair the Recirculation Door Driver (B) circuit for a short toground.Perform BODY VERIFICATION TEST - VER 1.No → Go To 3396
HEATING & A/CRECIRC DOOR RANGE TOO LARGE (AZC) (ACTIVE) — ContinuedTEST ACTION APPLICABILITY3 Turn the ignition off.Disconnect the in-line C202 harness connector.Disconnect the AZC module C1 harness connector.Measure the resistance between ground and the Recirculation Door Driver (A)circuit.Is the resistance below 5.0 ohms?AllYes → Repair the Recirculation Door Driver (A) circuit for a short toground.Perform BODY VERIFICATION TEST - VER 1.No → Go To 44 Turn the ignition off.Remove the Recirculation Door Motor/Actuator from the vehicle.By hand, attempt to rotate the recirculation door motor in both directions.Did the recirculation door motor turn in either direction?AllYes → Replace the Recirculation Door Motor/Actuator.Perform BODY VERIFICATION TEST - VER 1.No → Go To 55 Remove the Recirculation Door Motor from the vehicle. Rotate the recirculation door(door only), this should rotate approximately 45 degrees from stop to stop.Inspect the recirculation door linkage for excessive wear or missing linkage.Were any mechanical problems found?AllYes → Repair or replace the recirculation door/linkage as necessary.Perform BODY VERIFICATION TEST - VER 1.No → Replace the AZC Module.Perform BODY VERIFICATION TEST - VER 1.397
HEATING & A/CSymptom:RECIRC DOOR RANGE TOO LARGE (AZC) (STORED)When Monitored and Set Condition:RECIRC DOOR RANGE TOO LARGE (AZC) (STORED)When Monitored: Ignition in RUN and IOD fuse installed.Set Condition: This condition is set when the AZC monitors the travel range duringsystem initialization and the measured range is greater than expected.POSSIBLE CAUSESAZC MODULE STORED CODES PRESENTSTORED CODES TEST COMPLETETEST ACTION APPLICABILITY1 Note: Active codes must be resolved before diagnosing stored codes.Anytime a code becomes active during this test, proceed to the conclusion question.Turn the ignition on.With the DRB, erase any stored DTC’s.Monitor the DRB for active codes during the following test steps.Turn the mode select switch to the panel position with the fan control on low.Manually sweep the driver and passenger temperature control knobs from cold to hotthen back to cold.Manually sweep the blower motor control knob through all positions.Manually sweep the mode select switch knob through all positions.With the DRB, perform the AZC self test.With the DRB, actuate all of the AZC door motors.Place the vehicle on a hoist, and raise the wheels off the floor.Start engine. Place the transmission in drive. Brake off.WARNING: Be sure to keep hands and feet clear of rotating wheels. Keepclear of the engine’s moving partsDid any AZC code become active during this test?AllYes → Return to the Symptom List and choose the active code.Perform BODY VERIFICATION TEST - VER 1.No → No problem found at this time. Erase all codes before returningvehicle to customer.Perform BODY VERIFICATION TEST - VER 1.398
HEATING & A/CSymptom:RECIRC DOOR RANGE TOO SMALL (AZC) (ACTIVE)When Monitored and Set Condition:RECIRC DOOR RANGE TOO SMALL (AZC) (ACTIVE)When Monitored: Ignition in RUN and IOD fuse installed.Set Condition: This condition is set when the AZC monitors the travel range duringsystem initialization and the measured range is less than expected.POSSIBLE CAUSESCHECK THE AZC MODULE FOR DTCSCHECK THE AZC SIGNAL TOO RECIRCULATION DOOROBSTRUCTED RECIRC DOORRECIRCULATION DOOR MOTORTEST ACTION APPLICABILITY1 Turn the ignition on.With the DRB, read the active AZC DTC’s.Is the Recirc Motor Not Responding DTC set?AllYes → Refer to the Heating and A/C category and perform the symptomRecirc Motor Not Responding.With the DRB, Reset Module after repair/replacement is completed.Perform BODY VERIFICATION TEST - VER 1.No → Go To 22 Turn the ignition off.Disconnect the in-line C202 harness connector.Connect a 12-volt Test Light across the recirculation door driver (A) circuit and therecirculation door driver (B) circuit at the C202 harness connector (AZC harnessside).Turn the ignition on.While monitoring the test light, press the recirculation control button from off to on.Note: Observe test light for approximately 30 seconds.Does the test light start to flash and stay flashing?AllYes → Go To 3No → Replace the AZC Module.With the DRB, Reset Module after repair/replacement is completed.Perform BODY VERIFICATION TEST - VER 1.399
HEATING & A/CRECIRC DOOR RANGE TOO SMALL (AZC) (ACTIVE) — ContinuedTEST ACTION APPLICABILITY3 Remove the Recirculation Door Motor from the vehicle. Rotate the recirculation door(door only), this should rotate approximately 45 degrees from stop to stop.Does the recirculation door move smoothly in both directions?AllYes → Replace the Recirculation Door Motor/Actuator.With the DRB, Reset Module after repair/replacement is completed.Perform BODY VERIFICATION TEST - VER 1.No → Repair or replace the recirculation door as necessary.With the DRB, Reset Module after repair/replacement is completed.Perform BODY VERIFICATION TEST - VER 1.400
HEATING & A/CSymptom:RECIRC DOOR RANGE TOO SMALL (AZC) (STORED)When Monitored and Set Condition:RECIRC DOOR RANGE TOO SMALL (AZC) (STORED)When Monitored: Ignition in RUN and IOD fuse installed.Set Condition: This condition is set when the AZC monitors the travel range duringsystem initialization and the measured range is less than expected.POSSIBLE CAUSESAZC MODULE STORED CODES PRESENTSTORED CODES TEST COMPLETETEST ACTION APPLICABILITY1 Note: Active codes must be resolved before diagnosing stored codes.Anytime a code becomes active during this test, proceed to the conclusion question.Turn the ignition on.With the DRB, erase any stored DTC’s.Monitor the DRB for active codes during the following test steps.Turn the mode select switch to the panel position with the fan control on low.Manually sweep the driver and passenger temperature control knobs from cold to hotthen back to cold.Manually sweep the blower motor control knob through all positions.Manually sweep the mode select switch knob through all positions.With the DRB, perform the AZC self test.With the DRB, actuate all of the AZC door motors.Place the vehicle on a hoist, and raise the wheels off the floor.Start engine. Place the transmission in drive. Brake off.WARNING: Be sure to keep hands and feet clear of rotating wheels. Keepclear of the engine’s moving partsDid any AZC code become active during this test?AllYes → Return to the Symptom List and choose the active code.Perform BODY VERIFICATION TEST - VER 1.No → No problem found at this time. Erase all codes before returningvehicle to customer.Perform BODY VERIFICATION TEST - VER 1.401
HEATING & A/CSymptom:RECIRC MOTOR NOT RESPONDING (AZC) (ACTIVE)When Monitored and Set Condition:RECIRC MOTOR NOT RESPONDING (AZC) (ACTIVE)When Monitored: Ignition in RUN and IOD fuse installed.Set Condition: This condition is set if the AZC does not receive feedback pulses within 5seconds of the drive voltage being applied.POSSIBLE CAUSESDRIVER CIRCUIT (B) SHORTED TO GROUNDDRIVER CIRCUIT (A) SHORTED TO GROUNDDRIVER CIRCUITS (A) AND (B) SHORTED TOGETHERAZC MODULE RECIRCULATION MOTOR NOT RESPONDINGDRIVER CIRCUIT (A) OPENDRIVER CIRCUIT (B) OPENRECIRCULATION DOOR MOTORTEST ACTION APPLICABILITY1 Turn the ignition off.Disconnect the in-line C202 harness connector.Disconnect the AZC module C1 harness connector.Measure the resistance between ground and the Recirculation Door Driver (B)circuit.Is the resistance below 5.0 ohms?AllYes → Repair the Recirculation Door Driver (B) circuit for a short toground.With the DRB, Reset Module after repair/replacement is completed.Perform BODY VERIFICATION TEST - VER 1.No → Go To 22 Turn the ignition off.Disconnect the in-line C202 harness connector.Disconnect the AZC module C1 harness connector.Measure the resistance between ground and the Recirculation Door Driver (A)circuit.Is the resistance below 5.0 ohms?AllYes → Repair the Recirculation Door Driver (A) circuit for a short toground.With the DRB, Reset Module after repair/replacement is completed.Perform BODY VERIFICATION TEST - VER 1.No → Go To 3402
HEATING & A/CRECIRC MOTOR NOT RESPONDING (AZC) (ACTIVE) — ContinuedTEST ACTION APPLICABILITY3 Turn the ignition off.Disconnect the in-line C202 harness connector.Disconnect the AZC module C1 harness connector.Measure the resistance between the Recirculation Door Driver (B) circuit and theRecirculation Door Driver (A) circuit.Is the resistance below 5.0 ohms?AllYes → Repair the Recirculation Door Driver (B) circuit for a short to theRecirculation Door Driver (A) circuit.With the DRB, Reset Module after repair/replacement is completed.Perform BODY VERIFICATION TEST - VER 1.No → Go To 44 Turn the ignition off.Disconnect the in-line C202 harness connector.Disconnect the AZC module C1 harness connector.Measure the resistance of the Recirculation Door Driver (A) circuit between the AZCModule C1 connector and the in-line C202 connector.Is the resistance below 5.0 ohms?AllYes → Go To 5No → Repair the Recirculation Door Driver (A) circuit for an open.With the DRB, Reset Module after repair/replacement is completed.Perform BODY VERIFICATION TEST - VER 1.5 Turn the ignition off.Disconnect the in-line C202 harness connector.Disconnect the AZC module C1 harness connector.Measure the resistance of the Recirculation Door Driver (B) circuit between the AZCModule C1 connector and the in-line C202 connector.Is the resistance below 5.0 ohms?AllYes → Go To 6No → Repair the Recirculation Door Driver (B) circuit for an open.With the DRB, Reset Module after repair/replacement is completed.Perform BODY VERIFICATION TEST - VER 1.6 Turn the ignition off.Make sure that the in-line C202 harness connector is connected.Disconnect the AZC module C1 harness connector.Measure the resistance between the Recirculation Door Driver (B) circuit and theRecirculation Door Driver (A) circuit.Is the resistance between 26.0 and 46.0 ohms?AllYes → Replace the AZC Module.With the DRB, Reset Module after repair/replacement is completed.Perform BODY VERIFICATION TEST - VER 1.No → Go To 7403
HEATING & A/CRECIRC MOTOR NOT RESPONDING (AZC) (ACTIVE) — ContinuedTEST ACTION APPLICABILITY7 Note: Before replacing the recirculation door motor, inspect the wiringharness between the in-line C202 connector and the recirculation doormotor for any opens or shorts. Repair as necessary.If there are no possible causes remaining, view repair.AllRepairReplace the Recirculation Door Motor.With the DRB, Reset Module after repair/replacement is completed.Perform BODY VERIFICATION TEST - VER 1.404
HEATING & A/CSymptom:RECIRC MOTOR NOT RESPONDING (AZC) (STORED)When Monitored and Set Condition:RECIRC MOTOR NOT RESPONDING (AZC) (STORED)When Monitored: Ignition in RUN and IOD fuse installed.Set Condition: This condition is set if the AZC does not receive feedback pulses within 5seconds of the drive voltage being applied.POSSIBLE CAUSESAZC MODULE STORED CODES PRESENTSTORED CODES TEST COMPLETETEST ACTION APPLICABILITY1 Note: Active codes must be resolved before diagnosing stored codes.Anytime a code becomes active during this test, proceed to the conclusion question.Turn the ignition on.With the DRB, erase any stored DTC’s.Monitor the DRB for active codes during the following test steps.Turn the mode select switch to the panel position with the fan control on low.Manually sweep the driver and passenger temperature control knobs from cold to hotthen back to cold.Manually sweep the mode select switch knob through all positions.With the DRB, perform the AZC self test.With the DRB, actuate all of the AZC door motors.Place the vehicle on a hoist, and raise the wheels off the floor.Start engine. Place the transmission in drive. Brake off.WARNING: Be sure to keep hands and feet clear of rotating wheels. Keepclear of the engine’s moving partsDid any AZC code become active during this test?AllYes → Return to the Symptom List and choose the active code.Perform BODY VERIFICATION TEST - VER 1.No → No problem found at this time. Erase all codes before returningvehicle to customer.Perform BODY VERIFICATION TEST - VER 1.405
HEATING & A/CSymptom:VEHICLE SPEED FAILURE (AZC) (ACTIVE)When Monitored and Set Condition:VEHICLE SPEED FAILURE (AZC) (ACTIVE)When Monitored: Every 8 seconds with the ignition on.Set Condition: This condition is set if the AZC does not receive the vehicle speed responsemessage within 8 seconds.POSSIBLE CAUSESCHECK THE PCM FOR ANY DTCSOBSERVE THE VEHICLE SPEED DISPLAY IN THE INSTRUMENT CLUSTERAUTOMATIC ZONE CONTROL MODULETEST ACTION APPLICABILITY1 Turn the ignition on.With the DRB check the PCM for any DTCs.Are any DTCs present?AllYes → Refer to the Powertrain Diagnostic Information.With the DRB, Reset Module after repair/replacement is completed.Perform BODY VERIFICATION TEST - VER 1.No → Go To 22 Raise the drive wheels off the ground.Warning: Be sure to keep hands and feet clear of rotating wheels.With the DRB, enter Body, Electro/Mech Cluster (MIC), Monitor Display then PCIBus Engine Info and monitor the vehicle speed display.Start the engine and place the transmission in any forward gear.Does the DRB display vehicle speed above zero?AllYes → Go To 3No → Replace and program the Powertrain Control Module in accordancewith the Service Information.With the DRB, Reset Module after repair/replacement is completed.Perform BODY VERIFICATION TEST - VER 1.3 With the DRB, erase the AZC DTC’s.Test drive vehicle, then check for any AZC DTCs.Did this DTC reset?AllYes → Replace the AZC Module.With the DRB, Reset Module after repair/replacement is completed.Perform BODY VERIFICATION TEST - VER 1.No → Test Complete.406
HEATING & A/CSymptom:VEHICLE SPEED FAILURE (AZC) (STORED)When Monitored and Set Condition:VEHICLE SPEED FAILURE (AZC) (STORED)When Monitored: Every 8 seconds with the ignition on.Set Condition: This condition is set if the AZC does not receive the vehicle speed responsemessage within 8 seconds.POSSIBLE CAUSESAZC MODULE STORED CODES PRESENTSTORED CODES TEST COMPLETETEST ACTION APPLICABILITY1 Note: Active codes must be resolved before diagnosing stored codes.Anytime a code becomes active during this test, proceed to the conclusion question.Turn the ignition on.With the DRB, erase any stored DTC’s.Monitor the DRB for active codes during the following test steps.Turn the mode select switch to the panel position with the fan control on low.Manually sweep the driver and passenger temperature control knobs from cold to hotthen back to cold.Manually sweep the blower motor control knob through all positions.Manually sweep the mode select switch knob through all positions.With the DRB, perform the AZC self test.With the DRB, actuate all of the AZC door motors.Place the vehicle on a hoist, and raise the wheels off the floor.Start engine. Place the transmission in drive. Brake off.WARNING: Be sure to keep hands and feet clear of rotating wheels. Keepclear of the engine’s moving partsDid any AZC code become active during this test?AllYes → Return to the Symptom List and choose the active code.Perform BODY VERIFICATION TEST - VER 1.No → No problem found at this time. Erase all codes before returningvehicle to customer.Perform BODY VERIFICATION TEST - VER 1.407
HEATING & A/CSymptom:VEHICLE VIN FAILURE (AZC) (ACTIVE)When Monitored and Set Condition:VEHICLE VIN FAILURE (AZC) (ACTIVE)When Monitored: Every 8 seconds with the ignition on.Set Condition: This condition is set if the AZC does not receive the vehicle VIN responsemessage within 8 seconds.VEHICLE VIN FAILUREPOWERTRAIN CONTROL MODULEPOSSIBLE CAUSESTEST ACTION APPLICABILITY1 Turn the ignition on.With the DRB, enter Engine then Miscellaneous.Compare the VIN that is programmed into the PCM with the VIN plate on thevehicle.Do the VIN(s) match?AllYes → Replace the AZC Module.With the DRB, Reset Module after repair/replacement is completed.Perform BODY VERIFICATION TEST - VER 1.No → Replace and program the Powertrain Control Module in accordancewith the Service Information.With the DRB, Reset Module after repair/replacement is completed.Perform BODY VERIFICATION TEST - VER 1.408
HEATING & A/CSymptom:VEHICLE VIN FAILURE (AZC) (STORED)When Monitored and Set Condition:VEHICLE VIN FAILURE (AZC) (STORED)When Monitored: Every 8 seconds with the ignition on.Set Condition: This condition is set if the AZC does not receive the vehicle VIN responsemessage within 8 seconds.POSSIBLE CAUSESAZC MODULE STORED CODES PRESENTSTORED CODES TEST COMPLETETEST ACTION APPLICABILITY1 Note: Active codes must be resolved before diagnosing stored codes.Anytime a code becomes active during this test, proceed to the conclusion question.Turn the ignition on.With the DRB, erase any stored DTC’s.Monitor the DRB for active codes during the following test steps.Turn the mode select switch to the panel position with the fan control on low.Manually sweep the driver and passenger temperature control knobs from cold to hotthen back to cold.Manually sweep the blower motor control knob through all positions.Manually sweep the mode select switch knob through all positions.With the DRB, perform the AZC self test.With the DRB, actuate all of the AZC door motors.Place the vehicle on a hoist, and raise the wheels off the floor.Start engine. Place the transmission in drive. Brake off.WARNING: Be sure to keep hands and feet clear of rotating wheels. Keepclear of the engine’s moving partsDid any AZC code become active during this test?AllYes → Return to the Symptom List and choose the active code.Perform BODY VERIFICATION TEST - VER 1.No → No problem found at this time. Erase all codes before returningvehicle to customer.Perform BODY VERIFICATION TEST - VER 1.409
HEATING & A/CSymptom:VF DIMMING FAILURE (AZC) (ACTIVE)When Monitored and Set Condition:VF DIMMING FAILURE (AZC) (ACTIVE)When Monitored: Every 8 seconds with the ignition on.Set Condition: This condition is set if the AZC does not receive the VF dimming responsemessage within 8 seconds.AZC - VF DIMMING FAILUREBODY CONTROL MODULEPOSSIBLE CAUSESTEST ACTION APPLICABILITY1 With the DRB, read the BCM codes. These BCM DTC’S must NOT be present beforecontinuing, for THIS test to be valid: Head Lamp SW Open CKT, Headlamp Sw Shortto Ground, DIM SW Open CKT, DIM SW Short to Ground.With the DRB, enter Automatic Temp Control, Monitor Display then PCI Bus Infoand look for the VF DIM Msg Present.Does the DRB display: VF DIM Msg present: Yes?AllYes → Replace the AZC Module.With the DRB, Reset Module after repair/replacement is completed.Perform BODY VERIFICATION TEST - VER 1.No → Replace the Body Control Module.With the DRB, Reset Module after repair/replacement is completed.Perform BODY VERIFICATION TEST - VER 1.410
HEATING & A/CSymptom:VF DIMMING FAILURE (AZC) (STORED)When Monitored and Set Condition:VF DIMMING FAILURE (AZC) (STORED)When Monitored: Every 8 seconds with the ignition on.Set Condition: This condition is set if the AZC does not receive the VF dimming responsemessage within 8 seconds.POSSIBLE CAUSESAZC MODULE STORED CODES PRESENTSTORED CODES TEST COMPLETETEST ACTION APPLICABILITY1 Note: Active codes must be resolved before diagnosing stored codes.Anytime a code becomes active during this test, proceed to the conclusion question.Turn the ignition on.With the DRB, erase any stored DTC’s.Monitor the DRB for active codes during the following test steps.Turn the mode select switch to the panel position with the fan control on low.Manually sweep the driver and passenger temperature control knobs from cold to hotthen back to cold.Manually sweep the blower motor control knob through all positions.Manually sweep the mode select switch knob through all positions.With the DRB, perform the AZC self test.With the DRB, actuate all of the AZC door motors.Place the vehicle on a hoist, and raise the wheels off the floor.Start engine. Place the transmission in drive. Brake off.WARNING: Be sure to keep hands and feet clear of rotating wheels. Keepclear of the engine’s moving partsDid any AZC code become active during this test?AllYes → Return to the Symptom List and choose the active code.Perform BODY VERIFICATION TEST - VER 1.No → No problem found at this time. Erase all codes before returningvehicle to customer.Perform BODY VERIFICATION TEST - VER 1.411
HEATING & A/CSymptom:*A/C SWITCH SIGNAL NOT OPERATING PROPERLY (MTC & AZC)POSSIBLE CAUSESA/C OPERATES WITH A/C SELECT SWITCH <strong>OF</strong>FA/C INOPERABLE WITH NO DTCS PRESENTTEST ACTION APPLICABILITY1 NOTE: This test applies to both manual and automatic temperature controlsystems.Which condition is present?AllA/C Operates With A/C Select Switch OffRefer to *A/C Operates With A/C Select Switch Off in the PowertrainDiagnostic Information.Perform BODY VERIFICATION TEST - VER 1.A/C Inoperable With No DTCS PresentFor vehicles gasoline engines, refer to *Checking A/C SystemOperation With No DTCs in the Powertrain Diagnostic Information.For vehicles with diesel engines, refer to *A/C Inoperative inthe Powertrain Diagnostic Information.Perform BODY VERIFICATION TEST - VER 1.412
HEATING & A/CSymptom:*BLOWER MOTOR ALWAYS RUNS AT ONE SPEED ONLY (AZC)POSSIBLE CAUSESBLOWER MOTOR CONTROL CKT SHORTED TO GROUNDBLOWER MOTOR CONTROL CIRCUIT SHORTED TO BLOWER MOTOR HIGH DRIVER CIRCUITAZC MODULE, FAN STUCK ON ONE SPEED ONLYBLOWER MOTOR CONTROLLERTEST ACTION APPLICABILITY1 Turn the ignition off.Disconnect the Blower Motor Controller harness connector.Disconnect the AZC module C2 harness connector.Measure the resistance between ground and the Blower Motor Control circuit.Is the resistance below 5.0 ohms?AllYes → Repair the Blower Motor Control circuit for a short to ground.Perform BODY VERIFICATION TEST - VER 1.No → Go To 22 Turn the ignition off.Disconnect the Blower Motor Controller harness connector.Disconnect the Blower Motor harness connector.Measure the resistance between the Blower Motor Control circuit and the BlowerMotor High Driver circuit.Is the resistance below 5.0 ohms?AllYes → Repair the Blower Motor Control circuit for a short to the BlowerMotor High Driver circuit.Perform BODY VERIFICATION TEST - VER 1.No → Go To 33 Turn the ignition off. Reconnect all previous disconnected components.Use the DRB oscilloscope, select Lab Scope and set the following lab scope parameters.Set voltage range to +10.0v. Set probe to X10. Set time to 20ms/Div.Using the oscilloscope lead, backprobe the Blower Motor Control circuit at the BlowerMotor Controller harness connector.Turn the ignition on.Set the blower switch to LO then slowly move to HI while observing the DRB display.The Scope patten should appear similar to what is provided in the reference material(Section 8.0). The voltage should cycle from approximately 0.5 volts, up to 5.0 volts inthe low speed fan position.The duty cycle pattern should change smoothly as the blower switch is turned fromLO to HI. The pattern should completely flatline when the blower speed reaches theHI setting.Does the DRB display a duty cycle pattern that changes from approximately 0.5 to5.0 volts in LO?AllYes → Go To 4No → Replace the AZC Module.Perform BODY VERIFICATION TEST - VER 1.NOTE: With the DRB, Reset Module after repair/replacement is completed.413
HEATING & A/C*BLOWER MOTOR ALWAYS RUNS AT ONE SPEED ONLY (AZC) —ContinuedTEST ACTION APPLICABILITY4 If there are no possible causes remaining, view repair. AllRepairReplace the Blower Motor Controller.Perform BODY VERIFICATION TEST - VER 1.414
HEATING & A/CSymptom:*BLOWER MOTOR INOPERATIVE (AZC)POSSIBLE CAUSESPDC FUSE #1BLOWER MOTOR SUPPLY CIRCUIT SHORTED TO GROUNDBLOWER MOTOR SHORTED TO GROUNDBLOWER MOTOR CONTROLLER SHORTRD TO GROUNDCHECK FOR POWER TO THE BLOWER MOTOR CONTROLLERGROUND CIRCUIT OPENBLOWER MOTOR CONTROL CIRCUIT SHORTED TO VOLTAGEBLOWER MOTOR CONTROL CIRCUIT OPENBLOWER MOTOR CONTROLLER OPENAUTOMATIC ZONE CONTROL MODULE OPENBLOWER MOTOR OPENBLOWER MOTOR CONTROLLER OPENTEST ACTION APPLICABILITY1 Turn the ignition off.Remove and inspect Power Distribution Center (PDC) Fuse #1.Is the fuse open?AllYes → Go To 2No → Go To 52 Replace PDC Fuse #1.Turn the ignition on.Operate the blower motor in all speeds.Start the engine and operate the AZC system in all modes and speeds.Does the blower motor operate properly without blowing the fuse?AllYes → Refer to the wiring diagrams located in the service information tohelp isolate a possible intermittent short to ground condition.Perform BODY VERIFICATION TEST - VER 1.No → Go To 33 Turn the ignition off.Disconnect the Blower Motor Controller harness connector.Measure the resistance between ground and the Blower Motor Supply circuit.Is the resistance below 10K ohms?AllYes → Repair the Blower Motor Supply circuit for a short to ground.Replace PDC Fuse #1.Perform BODY VERIFICATION TEST - VER 1.No → Go To 4415
HEATING & A/C*BLOWER MOTOR INOPERATIVE (AZC) — ContinuedTEST ACTION APPLICABILITY4 Turn the ignition off.Disconnect the Blower Motor Controller harness connector.Disconnect the Blower Motor harness connector.Replace PDC Fuse #1.CAUTION: Do not allow the jumper wire contacts to touch one anotherwhen connecting them to the Blower Motor. Doing so will cause the resultsof this test will be inaccurate.Connect a jumper wire between Pin #1 on the Blower Motor and the Blower MotorSupply circuit in the Blower Motor Controller harness connector.Connect a jumper wire between Pin #2 on the Blower Motor and the Ground circuitin the Blower Motor Controller harness connector.Does the Blower Motor operate at full speed without blowing the fuse?AllYes → Replace the Blower Motor Controller in accordance with theService Information.Perform BODY VERIFICATION TEST - VER 1.No → Replace the Blower Motor in accordance with the Service Information.Replace PDC Fuse #1.Perform BODY VERIFICATION TEST - VER 1.5 Ensure PDC Fuse #1 is installed.Disconnect the Blower Motor Controller harness connector.NOTE: The test light must illuminate brightly. Compare the brightness tothat of a direct connection to the battery.Using a 12-volt test light connected to ground, back probe the Blower Motor Supplycircuit in the Blower Motor Controller harness connector.Does the test light illuminate brightly?AllYes → Go To 6No → Repair the Blower Motor Supply circuit for an open.Perform BODY VERIFICATION TEST - VER 1.6 Turn the ignition off.Disconnect the Blower Motor Controller harness connector.Measure the resistance between ground and the Ground circuit.Is the resistance below 5.0 ohms?AllYes → Go To 7No → Repair the Ground circuit for an open.Perform BODY VERIFICATION TEST - VER 1.7 Turn the ignition off.Disconnect the Blower Motor Controller harness connector.Disconnect the Automatic Zone Control Module C2 harness connector.Turn the ignition on.Measure the voltage of the Blower Motor Control circuit.Is there any voltage present?AllYes → Repair the Blower Motor Control circuit for a short to voltage.Perform BODY VERIFICATION TEST - VER 1.No → Go To 8416
HEATING & A/C*BLOWER MOTOR INOPERATIVE (AZC) — ContinuedTEST ACTION APPLICABILITY8 Turn the ignition off.Disconnect the Blower Motor Controller harness connector.Disconnect the Automatic Zone Control Module C2 harness connector.Measure the resistance of the Blower Motor Control circuit between the BlowerMotor Controller harness connector and the Automatic Zone Control Module C2harness connector.Is the resistance below 5.0 ohms?AllYes → Go To 9No → Repair the Blower Motor Control circuit for an open.Perform BODY VERIFICATION TEST - VER 1.9 Turn the ignition off.Make sure that the Blower Motor Controller harness connector is connected to theBlower Motor Controller.Make sure that the Automatic Zone Control Module C2 harness connector isconnected to the Automatic Zone Control Module.While back probing, measure the voltage of the Blower Motor Control circuit in theAutomatic Zone Control Module C2 harness connector.Is the voltage above 4.0 volts?AllYes → Go To 10No → Replace the Blower Motor Controller in accordance with theService Information.Perform BODY VERIFICATION TEST - VER 1.10 Turn the ignition off. Reconnect all previous disconnected components.Use the DRB oscilloscope, select Lab Scope and set the following lab scope parameters.Set voltage range to +10.0v. Set probe to X10. Set time to 20ms/Div.Using the oscilloscope lead, back probe the Blower Motor Control circuit at theBlower Motor Controller harness connector.Turn the ignition on.Set the blower switch to LO then slowly move to HI while observing the DRB display.The Scope patten should appear similar to what is provided in the reference material(Section 8.0). The voltage should cycle from approximately 0.5 volts, up to 5.0 volts inthe low speed fan position.The duty cycle pattern should change smoothly as the blower switch is turned fromLO to HI. The pattern should completely flat line when the blower speed reaches theHI setting.Does the DRB display a duty cycle pattern that changes from approximately 0.5 to5.0 volts in LO?AllYes → Go To 11No → Replace the Automatic Zone Control Module in accordance withthe Service Information.Perform BODY VERIFICATION TEST - VER 1.NOTE: With the DRB, Reset Module after repair/replacement is completed.417
HEATING & A/C*BLOWER MOTOR INOPERATIVE (AZC) — ContinuedTEST ACTION APPLICABILITY11 Turn the ignition off.Disconnect the Blower Motor Controller harness connector.Disconnect the Blower Motor harness connector.CAUTION: Do not allow the jumper wire contacts to touch one anotherwhen connecting them to the Blower Motor. Doing so will cause the resultsof this test will be inaccurate.Connect a jumper wire between Pin #1 on the Blower Motor and the Blower MotorSupply circuit in the Blower Motor Controller harness connector.Connect a jumper wire between Pin #2 on the Blower Motor and the Ground circuitin the Blower Motor Controller harness connector.Does the Blower Motor operate at full speed?AllYes → Replace the Blower Motor Controller in accordance with theService Information.Perform BODY VERIFICATION TEST - VER 1.No → Replace the Blower Motor in accordance with the Service Information.Perform BODY VERIFICATION TEST - VER 1.418
INSTRUMENT CLUSTERSymptom List:ABS LAMP CIRCUIT SHORTAIRBAG LAMP DRIVER FAILUREBRAKE LAMP CIRCUIT SHORTTest Note:All symptoms listed above are diagnosed using the same tests.The title for the tests will be ABS LAMP CIRCUIT SHORT.When Monitored and Set Condition:ABS LAMP CIRCUIT SHORTWhen Monitored: 10 seconds after ignition on.Set Condition: The Instrument Cluster detects a short in the ABS lamp driver circuit.AIRBAG LAMP DRIVER FAILUREWhen Monitored: 10 seconds after ignition on.Set Condition: The Instrument Cluster detects a short in the Airbag lamp driver circuit.BRAKE LAMP CIRCUIT SHORTWhen Monitored: With the ignition on. (NOTE: The Instrument Cluster can not monitorwith parking brake engaged)Set Condition: The Instrument Cluster detects a short in the Brake indicator drivercircuit.INSTRUMENT CLUSTERPOSSIBLE CAUSESTEST ACTION APPLICABILITY1 This is an internal cluster failure.If there are no possible causes remaining, view repair.AllRepairReplace Instrument Cluster in accordance with the Service Information.Perform BODY VERIFICATION TEST - VER 1.419
INSTRUMENT CLUSTERSymptom List:ABS LAMP OPENAIRBAG LAMP OPENBRAKE LAMP OPENTest Note:All symptoms listed above are diagnosed using the same tests.The title for the tests will be ABS LAMP OPEN.When Monitored and Set Condition:ABS LAMP OPENWhen Monitored: 10 seconds after ignition on.Set Condition: The Instrument Cluster detects an open in the ABS indicator bulb.AIRBAG LAMP OPENWhen Monitored: 10 seconds after ignition onSet Condition: The Instrument Cluster detects an open in the Airbag indicator bulb.BRAKE LAMP OPENWhen Monitored: With the ignition on. (NOTE: The Instrument Cluster can not monitorwhile the parking brake is engaged.)Set Condition: The Instrument Cluster detects an open in the Brake indicator bulb.INDICATOR LAMP OPENINSTRUMENT CLUSTERPOSSIBLE CAUSESTEST ACTION APPLICABILITY1 Turn the ignition off.Remove and inspect the indicator bulb in question.Replace the indicator bulb and socket as necessary.Turn the ignition on.Observe the indicator in question during the bulb check.Did the indicator illuminate?AllYes → Clear DTC and verify proper operation.Perform BODY VERIFICATION TEST - VER 1.No → Replace the Instrument Cluster in accordance with the ServiceInformation.Perform BODY VERIFICATION TEST - VER 1.420
INSTRUMENT CLUSTERSymptom:ABS MESSAGE NOT RECEIVED BY MICWhen Monitored and Set Condition:ABS MESSAGE NOT RECEIVED BY MICWhen Monitored: Monitored during ignition on.Set Condition: The Instrument Cluster detects no ABS messages received for 6 seconds.NO RESPONSE - PCI BUS - ABSINTERMITTENT CONDITIONINSTRUMENT CLUSTERPOSSIBLE CAUSESTEST ACTION APPLICABILITY1 Turn the ignition on.With the DRBIII, attempt to I/D or communicate with the ABS Module.Is there a response from the ABS Module?AllYes → Go To 2No → Refer to symptom *NO RESPONSE FROM CAB CONTROLLERin the COMMUNICATION category.Perform BODY VERIFICATION TEST - VER 1.2 With the DRBIII, erase the DTC from Instrument Cluster.Cycle the ignition and wait approximately 1 minute.With the DRBIII, read DTCs.Did this DTC reset?AllYes → Replace the Instrument Cluster in accordance with the ServiceInformation.Perform BODY VERIFICATION TEST - VER 1.No → The condition is not present at this time. Monitor DRBIIIparameters while wiggling the related wire harness. Refer to anyTechnical Service Bulletins (TSB) that may apply. Visually inspectthe related wiring harness and connector terminals.Perform BODY VERIFICATION TEST - VER 1.421
INSTRUMENT CLUSTERSymptom:ACM MESSAGE NOT RECEIVED BY MICWhen Monitored and Set Condition:ACM MESSAGE NOT RECEIVED BY MICWhen Monitored: Monitored during ignition on.Set Condition: No ACM messages received for 6 seconds.NO RESPONSE - PCI BUS - ACMINTERMITTENT CONDITIONINSTRUMENT CLUSTERPOSSIBLE CAUSESTEST ACTION APPLICABILITY1 Turn the ignition on.With the DRBIII, attempt to I/D or communicate with the ACM.Is there a response from the ACM Module?AllYes → Go To 2No → Refer to symptom *NO RESPONSE FROM ACM in the COMMU-NICATION category.Perform BODY VERIFICATION TEST - VER 1.2 With the DRBIII, erase the DTC from Instrument Cluster.Cycle the ignition and wait approximately 1 minute.With the DRBIII, read DTCs.Did this DTC reset?AllYes → Replace the Instrument Cluster in accordance with the ServiceInformation.Perform BODY VERIFICATION TEST - VER 1.No → The condition is not present at this time. Monitor DRBIIIparameters while wiggling the related wire harness. Refer to anyTechnical Service Bulletins (TSB) that may apply. Visually inspectthe related wiring harness and connector terminals.Perform BODY VERIFICATION TEST - VER 1.422
INSTRUMENT CLUSTERSymptom:BCM MESSAGES NOT RECEIVED BY MICWhen Monitored and Set Condition:BCM MESSAGES NOT RECEIVED BY MICWhen Monitored: Monitored during ignition on.Set Condition: No BCM messages received for 6 seconds.NO RESPONSE - PCI BUS - BCMINTERMITTENT CONDITIONINSTRUMENT CLUSTERPOSSIBLE CAUSESTEST ACTION APPLICABILITY1 Turn the ignition on.With the DRBIII, attempt to I/D or communicate with the BCM.Is there a response from the Body Control Module?AllYes → Go To 2No → Refer to symptom *BUS +/- SIGNALS OPEN FROM BCM in theCOMMUNICATION categoryPerform BODY VERIFICATION TEST - VER 1.2 With the DRBIII, erase the DTC from Instrument Cluster.Cycle the ignition and wait approximately 1 minute.With the DRBIII, read DTCs.Did this DTC reset?AllYes → Replace the Instrument Cluster in accordance with the ServiceInformation.Perform BODY VERIFICATION TEST - VER 1.No → The condition is not present at this time. Monitor DRBIIIparameters while wiggling the related wire harness. Refer to anyTechinical Service Bulletins (TSB) that may apply. Visually inspectthe related wiring harness and connector terminals.Perform BODY VERIFICATION TEST - VER 1.423
INSTRUMENT CLUSTERSymptom:CHECKSUM FAILUREWhen Monitored and Set Condition:CHECKSUM FAILUREWhen Monitored: With the ignition on.Set Condition: The Instrument Cluster detects EEPROM failure during the internal selfcheck.INSTRUMENT CLUSTERPOSSIBLE CAUSESTEST ACTION APPLICABILITY1 With the DRBIII, erase DTCs.Cycle the ignition and wait approximately 1 minute.With the DRBIII, read DTCs.Did this DTC reset?AllYes → Replace the Instrument Cluster in accordance with the ServiceInformation.Perform BODY VERIFICATION TEST - VER 1.No → Test Complete.424
INSTRUMENT CLUSTERSymptom:EATX MESSAGE STATUSINTERMITTENT CONDITIONNO RESPONSE - PCI BUS - EATXINSTRUMENT CLUSTERPOSSIBLE CAUSESTEST ACTION APPLICABILITY1 Turn the ignition on.With the DRBIII, attempt to I/D or communicate with the EATX.Is there a response from the Transmission Control Module?AllYes → Go To 2No → Refer to symptom *NO RESPONSE FROM TRANSMISSIONCONTROL MODULE in the COMMUNICATION category.Perform BODY VERIFICATION TEST - VER 1.2 Turn the ignition on.With the DRBIII, erase DTCs.Cycle the ignition and wait approximately 1 minute.With the DRBIII, read DTCs.Did this DTC reset?AllYes → Replace the Instrument Cluster in accordance with the ServiceInformation.Perform BODY VERIFICATION TEST - VER 1.No → The condition is not present at this time. Monitor DRBIIIparameters while wiggling the related wire harness. Refer to anyTechnical Service Bulletins (TSB) that may apply. Visually inspectthe related wiring harness and connector terminals.Perform BODY VERIFICATION TEST - VER 1.425
INSTRUMENT CLUSTERSymptom:NO PCI BUS COMMUNICATIONPOSSIBLE CAUSESNO RESPONSE - PCI BUSINTERMITTENT CONDITIONNO RESPONSE - PCI BUS - INSTRUMENT CLUSTERINSTRUMENT CLUSTERTEST ACTION APPLICABILITY1 Turn the ignition on.NOTE: When the Instrument Cluster detects no PCI Bus, the VF will displayno bus.With the DRBIII, attempt to communicate with other modules on the PCI Bus.Was the DRBIII able to communicate with other modules?AllYes → Go To 2No → Refer to the COMMUNICATION category for the related symptom(s).Perform BODY VERIFICATION TEST - VER 1.2 Turn the ignition on.With the DRBIII, select System Monitors, then J1850 Module Scan.Does the DRBIII display MIC PRESENT on the BUS?AllYes → Go To 3No → Refer to symptom No Response from Instrument Cluster in theCommunication category.Perform BODY VERIFICATION TEST - VER 1.3 With the DRBIII, erase DTCs.Cycle the ignition and wait approximately 1 minute.With the DRBIII, read DTCs.Did this DTC reset?AllYes → Replace the Instrument Cluster in accordance with the ServiceInformation.Perform BODY VERIFICATION TEST - VER 1.No → The condition is not present at this time. Monitor DRBIIIparameters while wiggling the related wire harness. Refer to anyTechnical Service Bulletins (TSB) that may apply. Visually inspectthe related wiring harness and connector terminals.Perform BODY VERIFICATION TEST - VER 1.426
INSTRUMENT CLUSTERSymptom:PCM MESSAGE NOT RECEIVED BY MICWhen Monitored and Set Condition:PCM MESSAGE NOT RECEIVED BY MICWhen Monitored: With the ignition on.Set Condition: The Instrument Cluster detects no PCM bus messages received for 6seconds.NO RESPONSE - PCI BUS - PCMINTERMITTENT CONDITIONINSTRUMENT CLUSTERPOSSIBLE CAUSESTEST ACTION APPLICABILITY1 Turn the ignition on.With the DRBIII, select Body Controller and system test.Does the DRB display PCM active on the bus?AllYes → Go To 2No → Refer to symptom *NO RESPONSE FROM PCM (PCI BUS) in theCOMMUNICATION category.Perform BODY VERIFICATION TEST - VER 1.2 With the DRBIII, erase the DTC from Instrument Cluster.Cycle the ignition and wait approximately 1 minute.With the DRBIII, read DTCs.Did this DTC reset?AllYes → Replace the Instrument Cluster in accordance with the ServiceInformation.Perform BODY VERIFICATION TEST - VER 1.No → The conditionis not present at this time. Monitor DRBIII parameterswhile wiggling the related wire harness. Refer to anyTechnical Service Bulletins (TSB) that may apply. Wisually inspectthe related wiring harness and connector terminals.Perform BODY VERIFICATION TEST - VER 1.427
INSTRUMENT CLUSTERSymptom:SKIM MESSAGE NOT RECEIVED BY MICWhen Monitored and Set Condition:SKIM MESSAGE NOT RECEIVED BY MICWhen Monitored: Monitored during ignition on.Set Condition: No SKIM messages received for 6 seconds.NO RESPONSE - PCI BUS - SKIMINTERMITTENT CONDITIONINSTRUMENT CLUSTERPOSSIBLE CAUSESTEST ACTION APPLICABILITY1 Turn the ignition on.With the DRBIII, select THEFT ALARM, then SKIM.Is there a response from the SKIM Module?AllYes → Go To 2No → Refer to symptom BUS +/- SIGNALS OPEN FROM SKIM in theCOMMUNICATIONS category.Perform BODY VERIFICATION TEST - VER 1.2 With the DRBIII, erase the DTC from Instrument Cluster.Cycle the ignition and wait approximately 1 minute.With the DRBIII, read DTCs.Did this DTC reset?AllYes → Replace the Instrument Cluster in accordance with the ServiceInformation.Perform BODY VERIFICATION TEST - VER 1.No → The condition is not present at this time. Monitor DRBIIIparameters while wiggling the related wire harness. Refer to anyTechnical Service Bulletins (TSB) that may apply. Visually inspectthe related wiring harness and connector terminals.Perform BODY VERIFICATION TEST - VER 1.428
INSTRUMENT CLUSTERSymptom:*AIRBAG INDICATOR NOT OPERATING PROPERLYACM DTC PRESENTINSTRUMENT CLUSTERPOSSIBLE CAUSESTEST ACTION APPLICABILITY1 Turn the ignition from the Lock to the Run position. This will start the Airbag bulbcheck.Did the Airbag indicator illuminate?AllYes → Go To 2No → Replace the Instrument Cluster in accordance with the ServiceInformation.Perform BODY VERIFICATION TEST - VER 1.2 With the DRBIII, read DTCs.Are there any Airbag or Instrument Cluster DTCs present?AllYes → Refer to symptom list for problems related to Airbag or InstrumentCluster.Perform BODY VERIFICATION TEST - VER 1.No → Test Complete.429
INSTRUMENT CLUSTERSymptom:*ALL GAUGES INOPERATIVEPOSSIBLE CAUSESFUSED B(+) CIRCUIT SHORT TO GROUNDFUSED IGNITION SWITCH OUTPUT CIRCUIT SHORT TO GROUNDGROUND CIRCUIT OPENINSTRUMENT CLUSTERTEST ACTION APPLICABILITY1 NOTE: Ensure there is PCI Bus Communication with the InstrumentCluster, PCM and BCM before proceeding with this test.Turn the ignition off.Remove and inspect the Junction Block Fuse #17.If the fuse is open, replace with proper rated fuse.Turn the ignition on and wait approximately 1 minute.Turn the ignition off.Remove and inspect the Junction Block Fuse #17.Is the fuse open?AllYes → Go To 2No → Go To 32 Turn the ignition off.Remove the Junction Block Fuse #17Disconnect the Instrument Cluster harness connector.Measure the resistance between ground and the Fused B(+) circuit.Is the resistance below 100 ohms?AllYes → Repair the fused B(+) circuit for a short to ground.Perform BODY VERIFICATION TEST - VER 1.No → Go To 33 Turn the ignition off.Remove and inspect the Junction Block Fuse #22.If the fuse is open, replace with proper rated fuse.Turn the ignition on and wait approximately 1 minute.Turn the ignition off.Remove and inspect the Junction Block Fuse #22.Is the fuse open?AllYes → Go To 4No → Go To 5430
INSTRUMENT CLUSTER*ALL GAUGES INOPERATIVE — ContinuedTEST ACTION APPLICABILITY4 Turn the ignition off.Disconnect the Instrument Cluster harness connector.Measure the resistance between ground and the Fused Ignition Switch Outputcircuit.Is the resistance below 100 ohms?AllYes → Repair the Fused Ignition Switch Output circuit for a short toground.Perform BODY VERIFICATION TEST - VER 1.No → Go To 55 Turn the ignition off.Turn all interior and exterior lights off.Disconnect the Instrument Cluster harness connector.Close all vehicle doors.Measure the resistance of both Instrument Cluster Ground circuits.Was the resistance in either ground circuit above 5.0 ohms?AllYes → Repair the Instrument Cluster Ground circuit for an open.Perform BODY VERIFICATION TEST - VER 1.No → Replace the Instrument Cluster in accordance with the ServiceInformation.Perform BODY VERIFICATION TEST - VER 1.431
INSTRUMENT CLUSTERSymptom:*BRAKE INDICATOR INOPERATIVEPOSSIBLE CAUSESBRAKE FLUID LEVEL SWITCHPARK BRAKE SWITCHRED BRAKE WARNING INDICATOR DRIVER CIRCUIT OPENINSTRUMENT CLUSTERTEST ACTION APPLICABILITY1 NOTE: Diagnose and repair any Brake, MIC, or Communication DTCsbefore proceeding with this test.Is the BRAKE indicator only inoperative with the Park Brake engaged?AllYes → Go To 2No → Replace the Brake Fluid Level Switch in accordance with theService Information.Perform BODY VERIFICATION TEST - VER 1.2 Disconnect the Park Brake Switch harness connector.Connect a jumper wire between the Red Brake Warning Indicator Driver circuit andground.Turn the ignition on.Observe the BRAKE indicator.Did the BRAKE indicator illuminate?AllYes → Replace the Park Brake Switch in accordance with the ServiceInformation.Perform BODY VERIFICATION TEST - VER 1.No → Go To 33 Turn the ignition off.Disconnect the Park Brake Switch harness connector.Disconnect the Instrument Cluster harness connector.Measure the resistance of the Red Brake Warning Indicator Driver circuit.Is the resistance above 5.0 ohms?AllYes → Repair the Red Brake Warning Indicator Driver circuit for anopen.Perform BODY VERIFICATION TEST - VER 1.No → Replace the Instrument Cluster in accordance with the ServiceInformation.Perform BODY VERIFICATION TEST - VER 1.432
INSTRUMENT CLUSTERSymptom:*BRAKE WARNING INDICATOR ALWAYS ONPOSSIBLE CAUSESDTC PRESENTRED BRAKE WARNING INDICATOR SWITCHRED BRAKE WARNING INDICATOR DRIVER CIRCUIT SHORT TO GROUNDPARK BRAKE SWITCHPARK BRAKE - RED BRAKE WARNING INDICATOR DRIVER CIRCUIT SHORT TO GROUNDINSTRUMENT CLUSTERTEST ACTION APPLICABILITY1 NOTE: Ensure that the Brake Fluid Level is properly filled and the BrakeFluid Level Switch harness connector is properly connected.With the DRBIII, erase DTCs.Cycle the ignition and wait approximately 15 seconds.With the DRBIII, read DTCs.Does the DRBIII display any Brake or MIC Indicator DTCs?AllYes → Refer to symptom list for problems related to BRAKE FLUIDLEVEL SWITCH CIRCUIT or BRAKE LAMP DTCs.Perform BODY VERIFICATION TEST - VER 1.No → Go To 22 Turn the ignition off.Disconnect the Brake Fluid Level Switch harness connector.Measure the resistance of the Red Brake Warning Indicator Switch between pin 1and pin 2.Is the resistance below 100 ohms?AllYes → Replace the Red Brake Warning Indicator (Fluid Level) Switch inaccordance with the Service Information.Perform BODY VERIFICATION TEST - VER 1.No → Go To 33 Turn the ignition off.Disconnect the Red Brake Warning Indicator (Fluid Level) Switch harness connector.Disconnect the CAB harness connector.Measure the resistance between ground and the Red Brake Warning Indicator Drivercircuit.Is the resistance below 5.0 ohms?AllYes → Repair the Red Brake Warning Indicator Driver circuit for a shortto ground.Perform BODY VERIFICATION TEST - VER 1.No → Go To 4433
INSTRUMENT CLUSTER*BRAKE WARNING INDICATOR ALWAYS ON — ContinuedTEST ACTION APPLICABILITY4 NOTE: Ensure that the Brake Fluid Level Switch and Instrument Clusterharness connectors are properly connected.Disconnect the Park Brake Switch harness connector.With the DRBIII in Inputs/Outputs, read the Park Brake Switch state.Does the DRBIII display Open?AllYes → Replace the Park Brake Switch in accordance with the ServiceInformation.Perform BODY VERIFICATION TEST - VER 1.No → Go To 55 Turn the ignition off.Disconnect the Park Brake Switch harness connector.Disconnect the Instrument Cluster harness connector.Measure the resistance between ground and the Park Brake Switch Sense circuit.Is the resistance below 5.0 ohms?AllYes → Repair the Park Brake - Red Brake Warning Indicator Drivercircuit for a short to ground.Perform BODY VERIFICATION TEST - VER 1.No → Replace the Instrument Cluster in accordance with the ServiceInformation.Perform BODY VERIFICATION TEST - VER 1.434
INSTRUMENT CLUSTERSymptom:*CHECK ENGINE INDICATOR NOT OPERATING PROPERLYDTC PRESENTINSTRUMENT CLUSTERPOSSIBLE CAUSESTEST ACTION APPLICABILITY1 Turn the ignition from the Lock to the Run position. This will start the MIL indicatorbulb check.Did the Check Engine indicator illuminate for approximately 4 seconds and then goout?AllYes → Go To 2No → Replace the Instrument Cluster in accordance with the ServiceInformation.Perform BODY VERIFICATION TEST - VER 1.2 Using the DRB read ENGINE DTC’s.Are there any PCM DTC’s present?AllYes → Refer to symptom list for problems related to DRIVEABILITY.Perform BODY VERIFICATION TEST - VER 1.No → Test Complete.435
INSTRUMENT CLUSTERSymptom:*CHECK GAUGES INDICATOR INOPERATIVEDTC PRESENTINSTRUMENT CLUSTERPOSSIBLE CAUSESTEST ACTION APPLICABILITY1 Turn the ignition from the Lock to the Run position. This will start the MIL bulbcheck.Did the Check Engine indicator illuminate for approximately 4 seconds and then goout?AllNo → Replace the Instrument Cluster in accordance with the ServiceInformation.Perform BODY VERIFICATION TEST - VER 1.Yes → Go To 22 Ensure that the engine temperature, oil pressure, and battery voltage are operatingproperly before proceeding with this test.With the DRBIII, read ENGINE DTC’s.Are there any PCM DTC’s present?AllYes → Refer to symptom list for problems related to DRIVEABILITY.Perform BODY VERIFICATION TEST - VER 1.No → Test Complete.436
INSTRUMENT CLUSTERSymptom:*COOLANT LEVEL INDICATOR INOPERATIVE - DIESEL ONLYPOSSIBLE CAUSESCOOLANT LEVEL SENSORGROUND CIRCUIT OPENCOOLANT LEVEL SWITCH SENSE CIRCUIT OPENBODY CONTROL MODULETEST ACTION APPLICABILITY1 Disconnect the Coolant Level Sensor harness connector.Note: Check connectors - Clean/repair as necessary.Turn the ignition on.With the DRB enter Body, Body Computer, then Sensors.Connect a jumper wire between the Coolant Level Switch Sense circuit and theGround circuit.With the DRB observe the Coolant Level Sw voltage.Does the DRB display voltage at 0.0 volt?AllYes → Replace the Coolant Level Sensor.Perform BODY VERIFICATION TEST - VER 1.No → Go To 22 Turn the ignition off.Disconnect the Coolant Level Sensor harness connector.Note: Check connectors - Clean/repair as necessary.Measure the resistance between ground and the Sensor Ground circuit.Is the resistance below 5.0 ohms?AllYes → Go To 3No → Repair the Coolant Level Sensor Ground circuit for an open.Perform BODY VERIFICATION TEST - VER 1.3 Turn the ignition off.Disconnect the Coolant Level Sensor harness connector.Disconnect the BCM C2 harness connector.Note: Check connectors - Clean/repair as necessary.Measure the resistance of the Coolant Level Switch Sense circuit between theCoolant Level Sensor harness connector and the BCM C2 harness connector.Is the resistance below 5.0 ohms?AllYes → Replace the Body Control Module in accordance with the ServiceInformation.Perform BODY VERIFICATION TEST - VER 1.No → Repair the Coolant Level Switch Sense circuit for an open.Perform BODY VERIFICATION TEST - VER 1.437
INSTRUMENT CLUSTERSymptom:*CRUISE ON INDICATOR NOT OPERATING PROPERLYDTC PRESENTINSTRUMENT CLUSTERPOSSIBLE CAUSESTEST ACTION APPLICABILITY1 Turn the ignition on.With the DRBIII, read engine DTC’s.Are there any PCM DTC’s present?AllYes → Refer to the Driveability category for the related symptom(s)involving the Speed Control System.Perform BODY VERIFICATION TEST - VER 1.No → Go To 22 Ensure there is communication with the Instrument Cluster, PCM and the ABSmodules before proceeding with this test.Perform the Instrument Cluster Self Test.The self test can be performed with the DRBIII or manually using the followingprocedure:Turn the ignition off.Press and hold the Trip Reset button.Turn the ignition on.NOTE: The Cruise indicator in the PRNDL should illuminate for approximately5 seconds during the self test.Did the Cruise indicator illuminate for approximately 3 to 6 seconds?AllYes → Test Complete.No → Replace the Instrument Cluster in accordance with the ServiceInformation.Perform BODY VERIFICATION TEST - VER 1.438
INSTRUMENT CLUSTERSymptom:*FUEL GAUGE NOT OPERATING PROPERLYINSTRUMENT CLUSTERFUEL LEVEL SENSORPOSSIBLE CAUSESTEST ACTION APPLICABILITY1 NOTE: Diagnose and repair any PCM or Communication DTCs beforeproceeding with this test.Perform the Instrument Cluster Self Test.The self test can be performed with the DRBIII or manually using the followingprocedure:Turn the ignition off.Press and hold the Trip Reset button.Turn the ignition on.Observe the Fuel gauge during the self test.The Fuel gauge should position the indicator needle at the following calibrationpoints:Empty StopEmpty1/2FullFull StopDid the Fuel gauge position at the proper calibration points?AllYes → Refer to the Service Information for problems related to the FuelSending Unit.Perform BODY VERIFICATION TEST - VER 1.No → Replace the Instrument Cluster in accordance with the ServiceInformation.Perform BODY VERIFICATION TEST - VER 1.439
INSTRUMENT CLUSTERSymptom:*HIGH BEAM INDICATOR INOPERATIVEINSTRUMENT CLUSTERPOSSIBLE CAUSESTEST ACTION APPLICABILITY1 NOTE: Ensure that the Exterior High Beam Headlamps operate properlybefore proceeding with this test.NOTE: Ensure that there is communication between the Instrument Clusterand the BCM before proceeding with this test.Perform the Instrument Cluster Self Test.The self test can be performed with the DRBIII, or manually using the followingprocedure:Turn the ignition off.Press and hold the Trip Reset button.Turn the ignition on.Observe the High Beam indicator during the Self Test.Did the High Beam indicator illuminate for approximately 4 seconds and then turnoff?AllYes → Test Complete.No → Replace the Instrument Cluster in accordance with the ServiceInformation.Perform BODY VERIFICATION TEST - VER 1.440
INSTRUMENT CLUSTERSymptom:*INSTRUMENT CLUSTER DIMMING INOPERATIVEDTC PRESENTILLUMINATION BULB OR SOCKETINSTRUMENT CLUSTERPOSSIBLE CAUSESTEST ACTION APPLICABILITY1 NOTE: Ensure there is communication with the Instrument Cluster and theBCM before proceeding with this test.With the DRBIII, read BCM DTCs.Does the DRBIII display any DTCs?AllYes → Refer to symptom list for problems related to the Interior Lightingcategory.Perform BODY VERIFICATION TEST - VER 1.No → Go To 22 Turn the ignition off.Remove the Instrument Cluster.Remove and check any inoperative illumination bulbs and sockets.Do the bulbs and sockets check okay?AllYes → Replace the Instrument Cluster in accordance with the ServiceInformation.Perform BODY VERIFICATION TEST - VER 1.No → Replace the illumination bulb or socket as necessary in accordancewith the Service Information.Perform BODY VERIFICATION TEST - VER 1.441
INSTRUMENT CLUSTERSymptom:*LOW COOLANT INDICATOR ALWAYS ON - DIESEL ONLYPOSSIBLE CAUSESCOOLANT LEVEL SENSORCOOLANT LEVEL SENSE CIRCUIT SHORT TO GROUNDBODY CONTROL MODULEINSTRUMENT CLUSTERTEST ACTION APPLICABILITY1 NOTE: Ensure that the cooling system is correctly filled and operatingproperly before proceeding with this test.Disconnect the Coolant Level Switch harness connector.Turn the ignition on.With the DRBIII in Body Controls, read the Coolant Level SW voltage.Does the DRBIII display voltage above 4.8 ?AllYes → Replace the Instrument Cluster in accordance with the ServiceInformation.Perform BODY VERIFICATION TEST - VER 1.No → Go To 22 Disconnect the Coolant Level Sensor harness connector.Note: Check connectors - Clean/repair as necessary.Turn the ignition on.With the DRBIII, read the Coolant Level Sw voltage.Does the DRBIII display voltage above 4.8 ?AllYes → Replace the Coolant Level Sensor.Perform BODY VERIFICATION TEST - VER 1.No → Go To 33 Turn the ignition off.Disconnect the Coolant Level Sensor harness connector.Disconnect the Body Control Module C2 harness connector.Note: Check connectors - Clean/repair as necessary.Measure the resistance between ground and the Coolant Level Switch Sense circuit.Is the resistance below 100.0 ohms?AllYes → Repair the Coolant Level Switch Sense circuit for a short toground.Perform BODY VERIFICATION TEST - VER 1.No → Replace the Body Control Module in accordance with the ServiceInformation.Perform BODY VERIFICATION TEST - VER 1.442
INSTRUMENT CLUSTERSymptom:*LOW FUEL INDICATOR INOPERATIVEINSTRUMENT CLUSTERPOSSIBLE CAUSESTEST ACTION APPLICABILITY1 NOTE: The Low Fuel indicator is activated by the MIC using fuel datareceived from the PCM and Fuel Gauge needle position.NOTE: Ensure that MIC and PCM communications and the Fuel Gaugeoperate properly before proceeding with this test.Perform the Instrument Cluster Self Test.The self test can be performed with the DRBIII or manually using the followingprocedure:Turn the ignition off.Press and hold the Trip Reset button.Turn the ignition on.Observe the Low Fuel indicator during the Self Test.Did the Low Fuel indicator illuminate for approximately 4 seconds and then turn off?AllYes → Test Complete.No → Replace the Instrument Cluster in accordance with the ServiceInformation..Perform BODY VERIFICATION TEST - VER 1.443
INSTRUMENT CLUSTERSymptom:*O/D <strong>OF</strong>F INDICATOR INOPERATIVEMIC SELF TESTINSTRUMENT CLUSTERPOSSIBLE CAUSESTEST ACTION APPLICABILITY1 Perform the Instrument Cluster Self Test.The self test can be performed with the DRBIII or manually using the followingprocedure:Turn the ignition off.Press and hold the Trip Reset button.Turn the ignition on.Observe the O/D <strong>OF</strong>F indicator during the Self Test.Did the O/D <strong>OF</strong>F indicator illuminate for approximately 4 seconds and then turn off?AllNo → Replace the Instrument Cluster in accordance with the ServiceInformation.Perform BODY VERIFICATION TEST - VER 1.Yes → Refer to Transmission Diagnostic information for the relatedsymptom(s).Perform BODY VERIFICATION TEST - VER 1.444
INSTRUMENT CLUSTERSymptom:*OIL PRESSURE GAUGE NOT OPERATING PROPERLYDTC PRESENTINSTRUMENT CLUSTERPOSSIBLE CAUSESTEST ACTION APPLICABILITY1 NOTE: With the DRBIII, read Powertrain DTC’s. If any Oil Pressure SensorVolts codes are present, refer to symptom list for problems related toDriveability.Perform the Instrument Cluster Self Test.The self test can be performed with the DRBIII or manually using the followingprocedure:Turn the ignition off.Press and hold the Trip Reset button.Turn the ignition on.The Oil Pressure Gauge should position the indicator needle at the followingcalibration points:40 Psi60 Psi80 PsiLOW PsiObserve the Oil Pressure Gauge during the self test.Did the Oil Pressure Gauge operate correctly during the self test?AllYes → Refer to Driveability Diagnostic information for the related symptom(s).Perform BODY VERIFICATION TEST - VER 1.No → Replace the Instrument Cluster in accordance with the ServiceInformation.Perform BODY VERIFICATION TEST - VER 1.445
INSTRUMENT CLUSTERSymptom:*SEAT BELT INDICATOR INOPERATIVEPOSSIBLE CAUSESSEAT BELT SWITCH GROUND OPENSEAT BELT SWITCHSEAT BELT SWITCH SENSE CIRCUIT OPENJUNCTION BLOCK SEATBELT SWITCH SENSE CIRCUIT OPENINSTRUMENT CLUSTERBODY CONTROL MODULETEST ACTION APPLICABILITY1 Turn the ignition from the Off position to the Run position and observe the bulbcheck.Did the Seat Belt indicator illuminate?AllYes → Go To 2No → Replace the Instrument Cluster in accordance with the ServiceInformation..Perform BODY VERIFICATION TEST - VER 1.2 Turn the ignition off.Disconnect the Seat Belt Switch harness connector.Measure the resistance of the Seat Belt Switch ground circuit.Is the resistance above 5.0 ohms?AllYes → Repair the Seat Belt Switch Ground circuit for an open.Perform BODY VERIFICATION TEST - VER 1.No → Go To 33 Turn the ignition on.Disconnect the Seat Belt Switch harness connector.Connect a jumper wire between the Seatbelt Switch Sense circuit and ground.With the DRBIII in Body Computer Inputs/Outputs read the Seat Belt SW state.Does the DRBIII display SEAT BELT SW: CLOSED?AllYes → Replace the Seat Belt buckle in accordance with the ServiceInformation.Perform BODY VERIFICATION TEST - VER 1.No → Go To 44 Turn the ignition off.Disconnect the Seat Belt Switch harness connector.Disconnect the Junction Block C1 harness connector.Measure the resistance of the Seat Belt Switch Sense circuit.Is the resistance above 5.0 ohms?AllYes → Repair the Seatbelt Switch Sense circuit for an open.Perform BODY VERIFICATION TEST - VER 1.No → Go To 5446
INSTRUMENT CLUSTER*SEAT BELT INDICATOR INOPERATIVE — ContinuedTEST ACTION APPLICABILITY5 Turn the ignition off.Remove the Body Control Module from the Junction Block.Disconnect the Junction Block C1 connector.Measure the resistance of the Junction Block Seat Belt Switch Sense circuit.Is the resistance above 5.0 ohms?AllYes → Replace the Junction Block in accordance with the Service Information.Perform BODY VERIFICATION TEST - VER 1.No → Replace the Body Control Module in accordance with the ServiceInformation.Perform BODY VERIFICATION TEST - VER 1.447
INSTRUMENT CLUSTERSymptom:*SEATBELT INDICATOR ALWAYS ONPOSSIBLE CAUSESSEAT BELT SWITCHBCMSEAT BELT SWITCH SENSE CIRCUIT SHORT TO GROUNDJUNCTION BLOCK SEAT BELT SWITCH SENSE CIRCUIT SHORT TO GROUNDINSTRUMENT CLUSTERTEST ACTION APPLICABILITY1 Buckle the Seat Belt.Turn the ignition on.With the DRBIII in Body Computer Inputs/Outputs, read the Seat Belt SW state.Does the DRBIII display Seat Belt SW: OPEN?AllYes → Replace the Instrument Cluster in accordance with the ServiceInformation.Perform BODY VERIFICATION TEST - VER 1.No → Go To 22 Disconnect the Seat Belt Switch harness connector.Turn the ignition on.Does the DRBIII display Seat Belt SW: OPEN?AllYes → Replace the Seat Belt Buckle in accordance with the ServiceInformation.Perform BODY VERIFICATION TEST - VER 1.No → Go To 33 Turn the ignition off.Disconnect the Junction Block C1 harness connector.Disconnect the Seat Belt Switch harness connector.Measure the resistance between ground and the Seat Belt Switch Sense circuit.Is the resistance below 5.0 ohms?AllYes → Repair the Seat Belt Switch Sense circuit for a short to ground.Perform BODY VERIFICATION TEST - VER 1.No → Go To 44 Turn the ignition off.Remove the Body Control Module from the Junction Block.Disconnect the Junction Block C1 harness connector.Measure the resistance between ground and the Seat Belt Switch Sense circuit at theJunction Block.Is the resistance below 5.0 ohms?AllYes → Replace the Junction Block in accordance with the Service Information.Perform BODY VERIFICATION TEST - VER 1.No → Replace the Body Control Module.Perform BODY VERIFICATION TEST - VER 1.448
INSTRUMENT CLUSTERSymptom:*SKIM INDICATOR INOPERATIVEINSTRUMENT CLUSTERPOSSIBLE CAUSESTEST ACTION APPLICABILITY1 NOTE: Diagnose and repair any SKIM or Communication DTCs beforeproceeding with this test.Turn the ignition from the Off position to the Run position and observe the bulbcheck.Did the Skim indicator illuminate briefly and then turn off?AllNo → Replace the Instrument Cluster in accordance with the ServiceInformation.Perform BODY VERIFICATION TEST - VER 1.Yes → Test Complete.449
INSTRUMENT CLUSTERSymptom:*SPEEDOMETER NOT OPERATING PROPERLYABS TIRE PROGRAMMINGSPEEDOMETER INPUT - PROBLEMINSTRUMENT CLUSTERPOSSIBLE CAUSESTEST ACTION APPLICABILITY1 NOTE: Diagnose any PCM or Communication DTCs before proceeding withthis test.NOTE: Ensure that the ABS module is programmed with the correct tiresize.Perform the Instrument Cluster Self Test using the DRBIII, or manually using thefollowing procedure:Turn the ignition off.Press and hold the Trip Reset button.Turn the ignition on.The Speedometer should position the indicator needle at the following calibrationpoints:0 MPH20 MPH (25 MPH - UK) (40 Km/H)55 MPH (50 MPH - UK) (80 Km/H)75 MPH (75 MPH - UK) (120 Km/H)110 MPH (110 MPH - UK) (230 Km/H) (200 Km/H AUS/JAPAN)Did the Speedometer operate correctly during the self test?AllYes → Go To 2No → Replace the Instrument Cluster in accordance with the ServiceInformation.Perform BODY VERIFICATION TEST - VER 1.2 With the DRBIII, verify that the ABS Tire Size is correctly programmed.Is the Tire Size programmed correctly?AllYes → Refer to Powertrain Diagnostic information for the releatedsymptom(s).Perform BODY VERIFICATION TEST - VER 1.No → Using the Diagnostic (Transmission, or Chassis)/Service ManualInformation as a guide, program the correct tire size and thenverify that the Speedometer is working.Perform BODY VERIFICATION TEST - VER 1.450
INSTRUMENT CLUSTERSymptom:*TACHOMETER NOT OPERATING PROPERLYINTERMITTENT CONDITIONINSTRUMENT CLUSTERPOSSIBLE CAUSESTEST ACTION APPLICABILITY1 NOTE: Diagnose and repair any PCM or Communication DTCs beforeproceeding with this test.Perform the Instrument Cluster Self Test.The self test can be performed using the DRBIII or manually using the followingprocedure:Turn the ignition off.Press and hold the Trip Reset button.Turn the ignition on.Observe the Tachometer during the self test.The Tachometer should position the indicator needle at the following calibrationpoints:0 RPM800 RPM3000 RPM (2500 RPM Diesel)7000 RPM (6000 RPM Diesel)Did the Tachometer position at the proper calibration points?AllYes → The condition is not present at this time. Monitor DRBIIIparameters while wiggling the related wire harness. Refer to anyTechnical Service Bulletins (TSB) that may apply. Visually inspectthe related wiring harness and connector terminals.Perform BODY VERIFICATION TEST - VER 1.No → Replace the Instrument Cluster in accordance with the ServiceInformation.Perform BODY VERIFICATION TEST - VER 1.451
INSTRUMENT CLUSTERSymptom:*TEMPERATURE GAUGE INOPERATIVEINTERMITTENT CONDITIONINSTRUMENT CLUSTERPOSSIBLE CAUSESTEST ACTION APPLICABILITY1 NOTE: Ensure that the cooling system operates properly before proceedingwith this test.NOTE: Diagnose and repair any PCM, MIC, BCM, or Communication DTCsbefore proceeding with this test.Perform the Instrument Cluster self test. The self test can be performed manually orwith using the DRBIII.Turn the ignition off.Press and hold the Trip Reset button.Turn the ignition on.Observe the Temperature gauge during the self test.The Temperature gauge should position the indicator needle at the followingcalibration points:40°C (100°F)100°C (210°F)122°C (250°F)Temp HighTemp CriticalDid the Temperature gauge indicate the proper calibration points?AllYes → The condition is not present at this time. Monitor DRBIIIparameters while wiggling the related wire harness. Refer to anyTechnical Service Bulletins (TSB) that may apply. Visually inspectthe related wiring harness and connector terminals.Perform BODY VERIFICATION TEST - VER 1.No → Replace the Instrument Cluster in accordance with the ServiceInformation.Perform BODY VERIFICATION TEST - VER 1.452
INSTRUMENT CLUSTERSymptom:*TRANS OVER TEMP INDICATOR INOPERATIVEINSTRUMENT CLUSTERPOSSIBLE CAUSESTEST ACTION APPLICABILITY1 NOTE: Diagnose and repair any Transmission, PCM, or CommunicationDTCs before proceeding with this test.Perform the Instrument Cluster Self Test.The self test can be performed with the DRBIII or manually using the followingprocedure:Turn the ignition off.Press and hold the Trip Reset button.Turn the ignition on.Observe the Trans Over Temp indicator during the self test.Did the Trans Temp indicator illuminate for approximately 4 seconds then turn off?AllYes → Test Complete.No → Replace the Instrument Cluster in accordance with the ServiceInformation.Perform BODY VERIFICATION TEST - VER 1.453
INSTRUMENT CLUSTERSymptom:*VOLTMETER INOPERATIVEINTERMITTENT CONDITIONINSTRUMENT CLUSTERPOSSIBLE CAUSESTEST ACTION APPLICABILITY1 NOTE: Diagnose and repair any Charging System faults or PCM DTCsbefore proceeding with this test.NOTE: Ensure that there is communication with the Instrument Clusterand the PCM before proceeding with this test.Perform the Instrument Cluster Self Test. The self test can be performed manuallyor using the DRBIII.Turn the ignition off.Press and hold the Trip Reset button.Turn the ignition on.Observe the Voltmeter during the self test.The Voltmeter should position the indicator needle at the following calibrationpoints:9 Volts14 Volts16 VoltsDid the Voltmeter position the indicator needle at the proper calibration points?AllYes → The condition is not present at this time. Monitor DRBIIIparameters while wiggling the related wire harness. Refer to anyTechnical Service Bulletins (TSB) that may apply. Visually inspectthe related wiring harness and connector terminals.Perform BODY VERIFICATION TEST - VER 1.No → Replace the Instrument Cluster in accordance with the ServiceInformation.Perform BODY VERIFICATION TEST - VER 1.454
INSTRUMENT CLUSTERSymptom:*WATER IN FUEL INDICATOR PROBLEMS - DIESEL ONLYINSTRUMENT CLUSTERPOWERTRAIN FAULT CONDITIONPOSSIBLE CAUSESTEST ACTION APPLICABILITY1 Turn the ignition from the Off position to the Run position.Observe the Water In Fuel indicator during the bulb check.Did the Water In Fuel indicator illuminate briefly and then turn off?AllYes → Refer to the Powertrain Diagnostic information for the relatedsymptom(s).Perform BODY VERIFICATION TEST - VER 1.No → Replace the Instrument Cluster in accordance with the ServiceInformation.Perform BODY VERIFICATION TEST - VER 1.455
INTERIOR LIGHTINGSymptom:DIM SW SHORT TO GROUNDWhen Monitored and Set Condition:DIM SW SHORT TO GROUNDWhen Monitored: Ignition in RUN and IOD fuse/connector installed.Set Condition: The voltage of the Panel Lamps Dimmer Signal circuit has gone below 0.3volts for 5 seconds.POSSIBLE CAUSESLEFT MULTIFUNCTION SWITCH SHORTEDPANEL LAMPS DIMMER SIGNAL CIRCUIT SHORT TO GROUNDHEADLAMP SWITCH RETURN CIRCUIT SHORT TO GROUNDBCMTEST ACTION APPLICABILITY1 Disconnect the Left Multifunction switch connector.Turn ignition on.With the DRBIII in Sensors, read the Panel Lamp voltage.Is the voltage below 4.0 volts?AllYes → Go To 2No → Replace the Left Multifunction switch.Perform BODY VERIFICATION TEST - VER 1.2 Turn ignition off.Disconnect the Left Multi-function switch connector.Disconnect the Body Control Module C1 connector.Measure the resistance of the Panel Lamps Dimmer Signal circuit to a known goodground.Is the resistance below 1000 (1K)ohms?AllYes → Repair the Panel Lamps Dimmer Signal circuit for a short toground.Perform BODY VERIFICATION TEST - VER 1.No → Go To 33 Turn ignition off.Disconnect the Left Multi-function switch connector.Disconnect the Body Control Module C1 connector.Measure the resistance of the Headlamp Switch Return circuit to a known goodground.Is the resistance below 1000 (1K)ohms?AllYes → Repair the Headlamp Switch Return circuit for a short to ground.Perform BODY VERIFICATION TEST - VER 1.No → Go To 4456
INTERIOR LIGHTINGDIM SW SHORT TO GROUND — ContinuedTEST ACTION APPLICABILITY4 If there are no possible causes remaining, view repair. AllRepairReplace the Body Control Module.Perform BODY VERIFICATION TEST - VER 1.457
INTERIOR LIGHTINGSymptom:DIMMER SWITCH OPEN CIRCUITWhen Monitored and Set Condition:DIMMER SWITCH OPEN CIRCUITWhen Monitored: Ignition in RUN and IOD fuse/connector installed.Set Condition: Any time the voltage on the Panel Lamps Dimmer Signal circuit exceeds4.8 volts for 5 seconds.POSSIBLE CAUSESPANEL LAMP DIMMER SWITCHPANEL LAMPS DIMMER SIGNAL CIRCUIT OPENHEADLAMP SWITCH RETURN OPENBCMTEST ACTION APPLICABILITY1 Turn ignition off.Disconnect the Left Multifunction switch connector.Connect a jumper wire between Panel Lamp Dimmer Signal circuit and HeadlampSwitch Return.Turn the ignition on.With the DRBIII in Sensors, read the Panel Lamps voltage.Does the DRBIII display Panel Lamp voltage below 0.5 volts ?AllYes → Replace the Left Multifunction switch.Perform BODY VERIFICATION TEST - VER 1.No → Go To 22 Turn ignition off.Disconnect the Left Multi-function switch connector.Disconnect the Body Control Module C1 connector.Using an ohmmeter measure the Panel Lamps Dimmer Signal circuit from the BCMC1 connector to the left multi-function switch connector.Is the resistance below 5.0 ohms?AllYes → Go To 3No → Repair the open Panel Lamps Dimmer Signal circuit.Perform BODY VERIFICATION TEST - VER 1.3 Turn ignition off.Disconnect the Left Multi-function switch connector.Disconnect the Body Control Module C1 connector.Using an ohmmeter measure the Headlamp Switch Return circuit from BCM to LeftMulti-function.Is the resistance below 5.0 ohms?AllYes → Go To 4No → Repair the open headlamp switch return circuit.Perform BODY VERIFICATION TEST - VER 1.458
INTERIOR LIGHTINGDIMMER SWITCH OPEN CIRCUIT — ContinuedTEST ACTION APPLICABILITY4 If there are no possible causes remaining, view repair AllRepairReplace the Body Control Module.Perform BODY VERIFICATION TEST - VER 1.459
INTERIOR LIGHTINGSymptom:LAMP FADE FAILURE SHORT TO BATTERYWhen Monitored and Set Condition:LAMP FADE FAILURE SHORT TO BATTERYWhen Monitored: Ignition in RUN and IOD fuse/connector installed.Set Condition: The BCM has detected a short to battery on either the Courtesy LampDriver circuit or the Courtesy Lamp Control circuit for 5 seconds.POSSIBLE CAUSESSHORTED COURTESY LAMP BULBCOURTESY LAMP CONTROL CIRCUIT SHORTED TO BATTERYCOURTESY LAMP DRIVER CIRCUIT SHORTED TO BATTERYBCM, COURTESY LAMP CIRCUITTEST ACTION APPLICABILITY1 Note: Repeat this test for each of the following bulbs before proceeding tothe next test: Instrument Panel Courtesy (2), Rear Reading (2), FrontOverhead (2), and Liftgate.Turn ignition off.Remove one of the bulbs listed in the previous pop up message. Note: after this testleave the bulb out.Turn ignition on.Using the DRB erase all BCM DTC’s.Using the DRB read BCM DTC’s.Is the Lamp Fade Failure Short to battery DTC present?AllYes → Go To 2No → Replace bulb, and reinstall all other bulbs removed during testing.Perform BODY VERIFICATION TEST - VER 1.2 Turn ignition off.Remove fuse # 8 from the Junction Block.Disconnect the BCM C1 connector.Turn ignition on.Measure the voltage of the Courtesy Lamp Control circuit in the BCM C1 connector.Is there any voltage?AllYes → Repair the Courtesy Lamp Control circuit for a short to batteryand reinstall all bulbs removed during testing.Perform BODY VERIFICATION TEST - VER 1.No → Go To 3460
INTERIOR LIGHTINGLAMP FADE FAILURE SHORT TO BATTERY — ContinuedTEST ACTION APPLICABILITY3 Turn ignition off.Disconnect Fuse # 8.Disconnect the Junction Block C1 Connector.Turn ignition on.Measure the voltage of the Courtesy Lamp Driver circuit in the Junction Block C1connector (cav 16).Is there any voltage?AllYes → Repair the Courtesy Lamp Driver circuit for a short to batteryand reinstall all bulbs removed during testing.Perform BODY VERIFICATION TEST - VER 1.No → Replace the Body Control Module (BCM) and reinstall all bulbsremoved durning testing.Perform BODY VERIFICATION TEST - VER 1.461
INTERIOR LIGHTINGSymptom:LOAD SHED FAILURE SHORT TO BATTERYWhen Monitored and Set Condition:LOAD SHED FAILURE SHORT TO BATTERYWhen Monitored: Ignition in RUN and IOD fuse/connector installedSet Condition: The BCM has detected a short to battery on the Interior Load Shed circuitfor 5 secondsPOSSIBLE CAUSESSHORTED GLOVE BOX LAMP BULBINTERIOR LAMP LOAD SHED CONTROL SHORT TO BATTERY (COURTESY)INTERIOR LAMP LOAD SHED CONTROL SHORT TO BATTERY (GLOVE BOX)BCM, INTERIOR LAMP LOAD SHED CONTROLTEST ACTION APPLICABILITY1 Turn ignition off.Remove the Glove Box lamp bulb.Turn ignition on.Using the DRB erase all BCM DTC’s.Using the DRB read BCM DTC’s.Is the Load Shed Failure Short to battery DTC present?AllYes → Go To 2No → Replace bulb.Perform BODY VERIFICATION TEST - VER 1.2 Turn ignition off.Ensure the Glove Box is closed with the Lamp switch in the off position.Disconnect the BCM C1 connector.Turn ignition on.Measure the voltage of the Interior Lamp Load Shed Control circuit in the C1connector.Is there any voltage?AllYes → Repair the Interior Lamp Load Shed Control circuit for a short tobattery.Perform BODY VERIFICATION TEST - VER 1.No → Go To 3462
INTERIOR LIGHTINGLOAD SHED FAILURE SHORT TO BATTERY — ContinuedTEST ACTION APPLICABILITY3 Turn ignition off.Ensure all of the Overhead, Rear Reading and Vanity Lamp Switches are in the offposition.Disconnect the Junction Block C-1 connector.Turn ignition on.Measure the voltage of the Interior Lamp Load Shed Control circuit in the J/B C1connector.Is there any voltage?AllYes → Repair the Interior Lamp Load Shed Control circuit for a short tobattery.Perform BODY VERIFICATION TEST - VER 1.No → Replace the Body Control Module (BCM).Perform BODY VERIFICATION TEST - VER 1.463
INTERIOR LIGHTINGSymptom:PANEL LAMP DRIVER FAILUREWhen Monitored and Set Condition:PANEL LAMP DRIVER FAILUREWhen Monitored: Ignition in RUN and IOD fuse/connector installed.Set Condition: This condition is set if the panel lamp driver that illuminates the I/P shutsdown from an over temp condition for at least 5 seconds.POSSIBLE CAUSESDRIVER HEATED SEAT SWITCH SHORTED TO GROUNDPASSENGER HEATED SEAT SWITCH SHORTED TO GROUNDHVAC CONTROL PANEL SHORTED TO GROUNDPRNDL ILLUMINATION SHORTED TO GROUNDASH RECEIVER BULB OR SOCKET SHORTED TO GROUNDRADIO SHORTED TO GROUNDPANEL LAMPS DRIVER CIRCUIT SHORTED TO GROUND (HVAC)PANEL LAMPS DRIVER CIRCUIT SHORTED TO GROUND (PRNDL)PANEL LAMPS DRIVER CIRCUIT SHORTED TO GROUND (RADIO)PANEL LAMPS DRIVER CIRCUIT SHORTED TO GROUND (ASH RECEIVER)PANEL LAMPS DRIVER CIRCUIT SHORTED TO GROUND (HEATED SEATS)BCM, PANEL LAMP DRIVER FAILURETEST ACTION APPLICABILITY1 Turn ignition off.Disconnect the Drivers Heated Seat Switch.Turn ignition on.Erase Body Diagnostic Trouble Codes.Wait 5 seconds then read BCM DTC’s.Is the Panel Lamps Driver DTC present?AllYes → Go To 2No → Replace the drivers heated seat switch.Perform BODY VERIFICATION TEST - VER 1.464
INTERIOR LIGHTINGPANEL LAMP DRIVER FAILURE — ContinuedTEST ACTION APPLICABILITY2 Turn ignition off.Disconnect the Passengers Heated Seat Switch.Turn ignition on.Erase Body Diagnostic Trouble Codes.Wait 5 seconds then read BCM DTC’s.Is the Panel Lamps Driver DTC present?AllYes → Go To 3No → Replace the Passenger Heated Seat Switch.Perform BODY VERIFICATION TEST - VER 1.3 Turn ignition off.Disconnect the appropriate HVAC Control panel connector. C-1 for manual or C-2 forautomatic system.Turn ignition on.Erase Body Diagnostic Trouble Codes.Wait 5 seconds then read BCM DTC’s.Is the Panel Lamps Driver DTC present?AllYes → Go To 4No → Replace the HVAC Control panel assemble.Perform BODY VERIFICATION TEST - VER 1.4 Turn ignition off.Disconnect the PRNDL/Transfer Case Illumination connector.Turn ignition on.Erase Body Diagnostic Trouble Codes.Wait 5 seconds then read BCM DTC’s.Is the Panel Lamps Driver DTC present?AllYes → Go To 5No → Repair or replace the shorted PRNDL/Transfer Case Illumination.Perform BODY VERIFICATION TEST - VER 1.5 Turn ignition off.Disconnect the ash receiver.Turn ignition on.Erase Body Diagnostic Trouble Codes.Wait 5 seconds then read BCM DTC’s.Is the Panel Lamps Driver DTC present?AllYes → Go To 6No → Repair the ash receiver bulb or socket for a short to ground.Perform BODY VERIFICATION TEST - VER 1.6 Turn ignition off.Disconnect the radio C1 connector.Turn ignition on.Erase Body Diagnostic Trouble Codes.Wait 5 seconds then read BCM DTC’s.Is the Panel Lamps Driver DTC present?AllYes → Go To 7No → Repair or replace the Radio.Perform BODY VERIFICATION TEST - VER 1.465
INTERIOR LIGHTINGPANEL LAMP DRIVER FAILURE — ContinuedTEST ACTION APPLICABILITY7 Turn ignition off.Disconnect the appropriate HVAC Control panel connector. C-1 for manual or C-2 forautomatic system.Disconnect the BCM (Body Control Module) C1 connector.Measure the resistance of the Panel Lamps Driver circuit in the BCM C1 connector(cav. 10).Is the resistance below 5.0 ohms?AllYes → Repair the Panel Lamp Driver circuit for a short to ground.Perform BODY VERIFICATION TEST - VER 1.No → Go To 88 Turn ignition off.Disconnect the PRNDL/Transfer Case Illumination connector.Disconnect the BCM (Body Control Module) C1 connector.Measure the resistance of the Panel Lamps Driver circuit in the BCM C1 connector(cav. 9).Is the resistance below 5.0 ohms?AllYes → Repair the Panel Lamp Driver circuit for a short to ground.Perform BODY VERIFICATION TEST - VER 1.No → Go To 99 Turn ignition off.Disconnect the radio C1 connector.Disconnect the BCM (Body Control Module) C1 connector.Measure the resistance of the Panel Lamps Driver circuit in the BCM C1 connector(cav. 13).Is the resistance below 5.0 ohms?AllYes → Repair the Panel Lamp Driver circuit for a short to ground.Perform BODY VERIFICATION TEST - VER 1.No → Go To 1010 Turn ignition off.Disconnect the ash receiver lamp.Disconnect the BCM (Body Control Module) C1 connector.Measure the resistance of the Panel Lamps Driver circuit in the BCM C1 connector(cav. 8).Is the resistance below 5.0 ohms?AllYes → Repair the Panel Lamp Driver circuit for a short to ground.Perform BODY VERIFICATION TEST - VER 1.No → Go To 1111 Turn ignition off.Disconnect the driver and passenger heated seat switches.Disconnect the BCM (Body Control Module) C1 connector.Measure the resistance of the Panel Lamps Driver circuit in the BCM C1 connector(cav. 12).Is the resistance below 5.0 ohms?AllYes → Repair the Panel Lamp Driver circuit for a short to ground.Perform BODY VERIFICATION TEST - VER 1.No → Go To 12466
INTERIOR LIGHTINGPANEL LAMP DRIVER FAILURE — ContinuedTEST ACTION APPLICABILITY12 If there are no possible causes remaining, view repair. AllRepairReplace the Body Control Module.Perform BODY VERIFICATION TEST - VER 1.467
INTERIOR LIGHTINGSymptom:*ALL COURTESY LAMPS INOPERATIVEPOSSIBLE CAUSESFUSE #8 BLOWN CIRCUIT NOT SHORTEDFUSED B+ CIRCUIT OPENFUSED B+ CIRCUIT SHORTED TO GROUNDBCMTEST ACTION APPLICABILITY1 Turn ignition off.Remove and inspect fuse #8.Is the fuse blown?AllYes → Go To 2No → Go To 32 Turn ignition off.Remove fuse #8 from the Junction Block.Measure the resistance of the Fused B+ circuit (upper cavity of fuse #8) to a knowngood ground.Is the resistance below 5.0 ohms?AllYes → Repair the Fused B+ circuit for a short to ground and replace theblown fuse.Perform BODY VERIFICATION TEST - VER 1.No → Replace blown fuse #8.Perform BODY VERIFICATION TEST - VER 1.3 Turn ignition off.Remove fuse #8 from the Junction Block.Remove the driver’s side rear seat overhead reading lamp lens cover.Measure the resistance of the Fused B+ circuit between Fuse #8 (top cavity) and theRear Passenger’s overhead reading lamp (Fused B+ side).Is the resistance below 5.0 ohms?AllYes → Go To 4No → Repair the Fused B+ circuit for an open.Perform BODY VERIFICATION TEST - VER 1.4 If there are no possible causes remaining, view repair. AllRepairReplace BCM (Body Control Module).Perform BODY VERIFICATION TEST - VER 1.468
INTERIOR LIGHTINGSymptom:*ASH TRAY LAMP INOPERATIVEPOSSIBLE CAUSESBCM DTCASH RECEIVER BULB OPENOPEN GROUND CIRCUITPANEL LAMPS DRIVER CIRCUIT OPENBCMTEST ACTION APPLICABILITY1 Read Body Diagnostic Trouble Codes.AllIs there a Park Lamp Relay Circuit Shorted Lo/Open DTC?Yes → Refer to symptom Park Lamp Relay Circuit Shorted Lo/Open inthe Exterior Lighting.Perform BODY VERIFICATION TEST - VER 1.No → Go To 22 Remove and inspect the Ash Receiver bulb.Is the bulb OK?AllYes → Go To 3No → Replace the Ash Receiver bulb.Perform BODY VERIFICATION TEST - VER 1.3 Turn ignition off.Disconnect the Ash Receiver connector.Measure the resistance of the Ground circuit in the Ash Receiver connector.Is the resistance below 5.0 ohms?AllYes → Go To 4No → Repair the open Ground circuit.Perform BODY VERIFICATION TEST - VER 1.4 Turn ignition off.Disconnect the Ash Receiver connector.Disconnect the BCM C1 connector.Measure the resistance of the Panel Lamps Driver circuit between the Ash Receiverconnector and the BCM C1 connector (cav. #8).Is the resistance below 5.0 ohms?AllYes → Go To 5No → Repair the open Panel Lamps Driver circuit.Perform BODY VERIFICATION TEST - VER 1.5 If there are no possible causes remaining, view repair. AllRepairReplace the BCM.Perform BODY VERIFICATION TEST - VER 1.469
INTERIOR LIGHTINGSymptom:*COURTESY LAMPS INOPERATIVE (EXCEPT FRONT DOORS)POSSIBLE CAUSESBULBSOPEN FUSED B(+)COURTESY LAMP CONTROL CIRCUIT OPENBCM, COURTESY LAMPTEST ACTION APPLICABILITY1 Remove and check inoperative bulbs.AllAre the bulbs OK?Yes → Go To 2No → Replace the bulbs.Perform BODY VERIFICATION TEST - VER 1.2 Measure the voltage of the Fused B(+) circuit to the Lamp.Is the voltage above 10.0 volts?AllYes → Go To 3No → Repair the open Fused B(+) circuit back to splice.Perform BODY VERIFICATION TEST - VER 1.3 Turn ignition off.Disconnect the BCM C1 connector.Gain access to an inoperative bulb.Measure the Courtesy Lamp Control circuit from the BCM C1 connector to the bulbconnector.Is the resistance below 5.0 ohms?AllYes → Go To 4No → Repair the open Courtesy Lamp Control circuit.Perform BODY VERIFICATION TEST - VER 1.4 If there are no possible causes remaining, view repair. AllRepairReplace the Body Control Module (BCM).Perform BODY VERIFICATION TEST - VER 1.470
INTERIOR LIGHTINGSymptom:*COURTESY LAMPS INOPERATIVE FROM DOME LAMP SWITCHONLYPOSSIBLE CAUSESDTC PRESENTLEFT MULTI FUNCTION SWITCH DIMMER OPENBCM DIMMER INOPORATIVETEST ACTION APPLICABILITY1 Turn ignition on.Using the DRBIII, read body DTCs.Are there any DTCs present?AllYes → Select the appropriate DTC from the symptom list and performrepair as needed.Perform BODY VERIFICATION TEST - VER 1.No → Go To 22 Turn ignition off.Disconnect the Left Multi Function Switch Connector.Connect an ohmmeter between the Panel Lamps Dimmer Signal circuit and theHeadlamp Switch Return circuit in the Left Multi-Funtion Switch.Observe the ohmmeter while rotating the dimmer on the Left Multi-Function Switch.Did the resistance vary between approximately 60 and 7900 (7.9K) ohms?AllYes → Go To 3No → Replace the Left Multi Function Switch.Perform BODY VERIFICATION TEST - VER 1.3 If there are no possible causes remaining, view repair. AllRepairReplace the Body Control Module.Perform BODY VERIFICATION TEST - VER 1.471
INTERIOR LIGHTINGSymptom:*COURTESY LAMPS INOPERATIVE FROM DRIVERS FRONTDOOR ONLYPOSSIBLE CAUSESOPEN GROUND WIREOPEN DRIVER DOOR AJAR SWITCH SENSEDRIVER DOOR AJAR SWITCHDRIVER DOOR MODULE (AJAR SWITCH OPEN)BODY CONTROL MODULE - DRIVER DOOR AJAR OPENTEST ACTION APPLICABILITY1 Open the Drivers door.With the DRB III select: Body Door Modules Input OutputRead the Drv Door Ajar Sw state.Does the DRB III Show: CLOSED?AllYes → Go To 2No → Go To 32 If there are no possible causes remaining, view repair. AllRepairReplace the Body Control Module.Perform BODY VERIFICATION TEST - VER 1.3 Disconnect the Driver Door Lock Motor/Ajar switch connectorMeasure the resistance of the ground circuit.Is the resistance below 5.0 ohms?AllYes → Go To 4No → Repair the open ground wire to the door ajar switch connector.Perform BODY VERIFICATION TEST - VER 1.4 Disconnect the Driver Door Module C1 connector.Disconnect the Door Lock Motor/Ajar Switch connector.Measure the resistance of the Driver Door Ajar Switch Sense circuit between the doorlock motor/ajar switch connector and the DDM C1 connector.Is the resistance below 5.0 ohms?AllYes → Go To 5No → Repair the open Driver Door Ajar Switch Sense wire.Perform BODY VERIFICATION TEST - VER 1.472
INTERIOR LIGHTING*COURTESY LAMPS INOPERATIVE FROM DRIVERS FRONT DOORONLY — ContinuedTEST ACTION APPLICABILITY5 Remove the inner door trim panel.Disconnect the Driver Door Module C1 connector.Ensure the door is left open during this test.Measure the resistance of the Driver Door Ajar Switch Sense circuit in the DDM C1connector to ground.Is the resistance below 5.0 ohms?AllYes → Go To 6No → Replace the Driver Door Lock Motor/Ajar Switch Assy.Perform BODY VERIFICATION TEST - VER 1.6 If there are no possible causes remaining, view repair. AllRepairReplace the Driver Door Module.Perform BODY VERIFICATION TEST - VER 1.473
INTERIOR LIGHTINGSymptom:*COURTESY LAMPS INOPERATIVE FROM LEFT REAR DOORONLYPOSSIBLE CAUSESOPEN DOOR AJAR SWITCH SENSE (LEFT REAR)OPEN GROUND WIRELEFT REAR DOOR AJAR SWITCHBODY CONTROL MODULE (AJAR SWITCH OPEN)TEST ACTION APPLICABILITY1 Open the Left Rear door.With the DRB III select: Body Computer Input/OutputRead the Left Rear Door Ajar SW state.Does the DRBIII Show: CLOSED?AllYes → Replace the Body Control Module.Perform BODY VERIFICATION TEST - VER 1.No → Go To 22 Remove the inner door trim panel.Disconnect the Junction Block C1 connector.Disconnect the Left Rear Door Lock Motor/Ajar Switch connector.Measure the resistance of the Door Ajar Switch Sense LR circuit between the doorlock motor/ajar switch connector and the Junction Block C1 connector.Is the resistance below 5.0 ohms?AllYes → Go To 3No → Repair the open Door Ajar Switch Sense wire (Left Rear).Perform BODY VERIFICATION TEST - VER 1.3 Disconnect the Driver Rear Door Lock Motor/Ajar switch connectorMeasure the resistance of the ground circuit.Is the resistance below 5.0 ohms?AllYes → Go To 4No → Repair the open ground wire to the door ajar switch connector.Perform BODY VERIFICATION TEST - VER 1.4 Remove the inner door trim panel.Disconnect the Junction Block C1 connector.Ensure the door is left open during this test.Measure the resistance of the Door Ajar Switch Sense (LR) circuit in the JunctionBlock C1 connector to ground.Is the resistance below 5.0 ohms?AllYes → Go To 5No → Replace the Door Lock Motor/Ajar Switch Assy.Perform BODY VERIFICATION TEST - VER 1.474
INTERIOR LIGHTING*COURTESY LAMPS INOPERATIVE FROM LEFT REAR DOOR ONLY —ContinuedTEST ACTION APPLICABILITY5 If there are no possible causes remaining, view repair. AllRepairReplace the Body Control Module.Perform BODY VERIFICATION TEST - VER 1.475
INTERIOR LIGHTINGSymptom:*COURTESY LAMPS INOPERATIVE FROM LIFTGATEPOSSIBLE CAUSESBCM, LAMPS DISABLEDCARGO LAMPCOURTESY LAMP DISABLEOPEN GROUND WIREOPEN LIFTGATE AJAR SWITCH SENSEOPEN LIFTGATE AJAR SWITCHBODY CONTROL MODULE (LIFTGATE AJAR SWITCH OPEN)TEST ACTION APPLICABILITY1 With the DRBIII in Inputs Outputs read the Lift Gate Lmp Disable state whiledepressing the cargo lamp lens switch on and off.Did the disable switch toggle?AllYes → Go To 2No → Go To 72 With the DRB III select: Body Computer Input/OutputRead the Liftgate Sw state with the Liftgate open.Does the DRBIII Show: CLOSED?AllYes → If there are no possible causes remaining, replace the BCM.Perform BODY VERIFICATION TEST - VER 1.No → Go To 33 Disconnect either the right or left side Liftgate Ajar Switch connector.Measure the resistance of the ground circuit.Is the resistance below 5.0 ohms?AllYes → Go To 4No → Repair the open ground wire to the ajar switch connector.Perform BODY VERIFICATION TEST - VER 1.4 Disconnect the Junction Block C1 connector.Disconnect either the right or left side Liftgate Ajar Switch.Measure the resistance of the Liftgate Flip-up Ajar Switch Sense circuit between thedisconnected Flip-up Ajar Switch connector and the Junction Block C1 connector.Is the resistance below 5.0 ohms?AllYes → Go To 5No → Repair the open Liftgate Ajar Switch Sense wire.Perform BODY VERIFICATION TEST - VER 1.476
INTERIOR LIGHTING*COURTESY LAMPS INOPERATIVE FROM LIFTGATE — ContinuedTEST ACTION APPLICABILITY5 Disconnect the suspect faulty right or left Liftgate ajar switch connector.Ensure the latch is in the unlatched position for the particular switch.Using an ohmmeter measure the resistance of the Ajar Switch.Is the resistance below 2.0 ohms?AllYes → Go To 6No → Replace the Liftgate Ajar Switch Assy.Perform BODY VERIFICATION TEST - VER 1.6 If there are no possible causes remaining, view repair. AllRepairReplace the Body Control Module.Perform BODY VERIFICATION TEST - VER 1.7 At the Cargo Lamp connector backprobe and measure the voltage of the liftgatecourtesy lamp disable circuit with switch in both positions.Is the voltage below 0.5 volt in either position?AllYes → If there are no possible causes remaining, replace the BCM.Perform BODY VERIFICATION TEST - VER 1.No → Go To 88 Disconnect the cargo lamp connector.Measure the voltage of the liftgate courtesy lamp disable circuit.Is the voltage above 2.0 volts?AllYes → Repair the courtesy lamp disable circuit for a short to voltage.Perform BODY VERIFICATION TEST - VER 1.No → Replace the Cargo Lamp assemble.Perform BODY VERIFICATION TEST - VER 1.477
INTERIOR LIGHTINGSymptom:*COURTESY LAMPS INOPERATIVE FROM LIFTGATE FLIP-UPGLASS ONLYPOSSIBLE CAUSESOPEN GROUND WIREOPEN LIFTGATE AJAR SWITCH SENSEBCM FLIP-UP AJAR SWITCH OPENOPEN LIFTGATE FLIP-UP AJAR SWITCHTEST ACTION APPLICABILITY1 With the DRB III select: Body Computer Input/OutputRead the Liftglass Sw state with the Liftgate flip-up glass open.Does the DRBIII Show: CLOSED?AllYes → Go To 2No → Go To 32 If there are no potential causes remaining, replace the Body Control Module.View repair options.AllRepairReplace the Body Control Module.Perform BODY VERIFICATION TEST - VER 1.3 Disconnect the Liftgate Flip-up Ajar Switch connectorMeasure the resistance of the ground circuit.Is the resistance below 5.0 ohms?AllYes → Go To 4No → Repair the open ground wire to the ajar switch connector.Perform BODY VERIFICATION TEST - VER 1.4 Disconnect the Junction Block C1 connector.Disconnect a Liftgate Flip-up Ajar Switch.Measure the resistance of the Liftgate Flip-up Ajar Switch Sense circuit between thedisconnected Flip-up Ajar Switch connector and the Junction Block C1 connector.Is the resistance below 5.0 ohms?AllYes → Go To 5No → Repair the open Liftgate Ajar Switch Sense wire.Perform BODY VERIFICATION TEST - VER 1.5 If there are no possible causes remaining, view repair. AllRepairReplace the Liftgate Flip-Up Ajar Switch Assy.Perform BODY VERIFICATION TEST - VER 1.478
INTERIOR LIGHTINGSymptom:*COURTESY LAMPS INOPERATIVE FROM PASSENGER FRONTDOOR ONLYPOSSIBLE CAUSESOPEN GROUND WIREOPEN PASSENGER DOOR AJAR SWITCH SENSE WIREPASSENGER DOOR AJAR SWITCHBCM COURTESY LAMPS INOPERATIVE FROM PASSENGER FRONT DOOR ONLYPASSENGER DOOR MODULE (AJAR SWITCH OPEN)TEST ACTION APPLICABILITY1 Open the passenger door.With the DRB III select: Body Door Modules Input/OutputRead the Pass Door Ajar Sw state.Does the DRBIII Show: CLOSED?AllYes → Replace the BCM.Perform BODY VERIFICATION TEST - VER 1.No → Go To 22 Disconnect the Passenger Door Lock Motor/Ajar switch connectorMeasure the resistance of the ground circuit.Is the resistance below 5.0 ohms?AllYes → Go To 3No → Repair the open ground wire to the door ajar switch connector.Perform BODY VERIFICATION TEST - VER 1.3 Disconnect the Passenger Door Module C1 connector.Disconnect the Door Lock Motor/Ajar Switch connector.Measure the resistance of the Passenger Door Ajar Switch Sense circuit between thedoor lock motor/ajar switch connector and the PDM C1 connector.Is the resistance below 5.0 ohms?AllYes → Go To 4No → Repair the open Passenger Door Ajar Switch Sense wire.Perform BODY VERIFICATION TEST - VER 1.4 Disconnect the Passenger Door Module C1 connector.Ensure the door is left open during this test.Measure the resistance of the Passenger Door Ajar Switch Sense circuit in the PDMC1 connector to ground.Is the resistance below 5.0 ohms?AllYes → Go To 5No → Replace the Passenger Door Lock Motor/Ajar Switch Assy.Perform BODY VERIFICATION TEST - VER 1.479
INTERIOR LIGHTING*COURTESY LAMPS INOPERATIVE FROM PASSENGER FRONT DOORONLY — ContinuedTEST ACTION APPLICABILITY5 If there are no possible causes remaining, view repair. AllRepairReplace the Passenger Door Module.Perform BODY VERIFICATION TEST - VER 1.480
INTERIOR LIGHTINGSymptom:*COURTESY LAMPS INOPERATIVE FROM RIGHT REAR DOORONLYPOSSIBLE CAUSESOPEN GROUND WIREOPEN DOOR AJAR SWITCH SENSE (RR)BODY CONTROL MODULE (AJAR SWITCH OPEN)RIGHT REAR DOOR AJAR SWITCHBCM RIGHT REAR DOOR FAILURETEST ACTION APPLICABILITY1 Open the Right Rear door.With the DRB III select: Body Body Controlller Input/OutputRead the Right Rear Door Ajar Sw state.Does the DRBIII Show: CLOSED?AllYes → Replace the Body Control Module.Perform BODY VERIFICATION TEST - VER 1.No → Go To 22 Disconnect the Passenger Rear Door Lock Motor/Ajar switch connectorMeasure the resistance of the ground circuit.Is the resistance below 5.0 ohms?AllYes → Go To 3No → Repair the open ground wire to the door ajar switch connector.Perform BODY VERIFICATION TEST - VER 1.3 Disconnect the Body Control Module C1 connector.Disconnect the Passenger Rear Door Lock Motor/Ajar Switch connector.Measure the resistance of the Door Ajar Switch Sense (Right Rear) circuit betweenthe door lock motor/ajar switch connector and the Body Control Module C1 connector.Is the resistance below 5.0 ohms?AllYes → Go To 4No → Repair the open Door Ajar Switch Sense wire (RR).Perform BODY VERIFICATION TEST - VER 1.4 Disconnect the Body Control Module C1 connector.Ensure that the door is open during this test.Measure the resistance of the Door Ajar Switch Sense (Right Rear) circuit in the BodyControl Module C1 connector to ground.Is the resistance below 5.0 ohms?AllYes → Go To 5No → Replace the Door Lock Motor/Ajar Switch Assy.Perform BODY VERIFICATION TEST - VER 1.481
INTERIOR LIGHTING*COURTESY LAMPS INOPERATIVE FROM RIGHT REAR DOOR ONLY —ContinuedTEST ACTION APPLICABILITY5 If there are no possible causes remaining, view Repair. AllRepairReplace the Body Control Module.Perform BODY VERIFICATION TEST - VER 1.482
INTERIOR LIGHTINGSymptom:*COURTESY LAMPS ON AT ALL TIMES (EXCEPT BOTH FRONTDOOR COURTESY LAMPS IF EQUIP)POSSIBLE CAUSESJUNCTION BLOCKBCM, COURTESY LAMPS STAY ONCOURTESY LAMP DRIVER CIRCUIT SHORTED TO GROUNDTEST ACTION APPLICABILITY1 Turn ignition off.Ensure the courtesy lamp switch is in the off position.Remove the Body Control Module from the Junction Block.Did the courtesy lamps turn off?AllYes → Replace the Body Control Module.Perform BODY VERIFICATION TEST - VER 1.No → Go To 22 Turn ignition off.Ensure the courtesy lamp switch is in the off position.Disconnect the Junction Block C-1 connector.Measure the Courtesy Lamp Driver circuit from the Junction Block C1 connectorcavity 16 to ground.Is the resistance below 5.0 ohms?AllYes → Repair the Courtesy Lamp Driver circuit for a short to ground.Perform BODY VERIFICATION TEST - VER 1.No → Replace the Junction BlockPerform BODY VERIFICATION TEST - VER 1.483
INTERIOR LIGHTINGSymptom:*DRIVER DOOR COURTESY LAMP INOPERATIVEPOSSIBLE CAUSESBULBOPEN COURTESY LAMP DRIVER CIRCUITOPEN COURTESY LAMP GROUND CIRCUITDRIVER DOOR MODULE COURTESY LAMPTEST ACTION APPLICABILITY1 Remove and inspect the courtesy lamp bulb.AllIs the Courtesy Lamp bulb open?Yes → Replace the bulb.Perform BODY VERIFICATION TEST - VER 1.No → Go To 22 Remove the Driver’s Door Courtesy Lamp Bulb.Disconnect the Driver Door Module C-2 connectorMeasure the Courtesy Lamp Driver circuit from the bulb connector to the DriverDoor Module C-2 connector.Is the resistance below 5.0 ohms?AllYes → Go To 3No → Repair the open Courtesy Lamp Driver circuit.Perform BODY VERIFICATION TEST - VER 1.3 Remove the Driver’s Door Courtesy Lamp Bulb.Disconnect the Driver Door Module C-2 connectorMeasure the Courtesy Lamp Ground circuit from the bulb connector to the DriverDoor Module C-2 connector.Is the resistance below 5.0 ohms?AllYes → Go To 4No → Repair the open Courtesy Lamp Ground circuit.Perform BODY VERIFICATION TEST - VER 1.4 View repair options. AllRepairReplace the Driver Door Module.Perform BODY VERIFICATION TEST - VER 1.484
INTERIOR LIGHTINGSymptom:*GLOVE BOX LAMP INOPERATIVEPOSSIBLE CAUSESGLOVE BOX BULBOPEN FUSED B+ CIRCUITGLOVE BOX SWITCHOPEN GLOVE BOX LAMP DRIVER CIRCUITBCMTEST ACTION APPLICABILITY1 Remove and inspect the Glove Box Bulb.AllIs the bulb OK?Yes → Go To 2No → Replace the Glove Box Bulb.Perform BODY VERIFICATION TEST - VER 1.2 Disconnect the glove box lamp harness connector.Measure the voltage of the Fused B+ circuit.Is the voltage above 10.5 volts?AllYes → Go To 3No → Repair the open Fused B+ circuit.Perform BODY VERIFICATION TEST - VER 1.3 Turn ignition off.Disconnect the glove box lamp harness connector.Disconnect the BCM C1 connector.Measure the resistance of the Glove Box Lamp Driver circuit between the Glove BoxLamp harness connector (cav. 2) and the BCM C1 connector (cav. 23).Is the resistance above 5.0 ohms?AllYes → Go To 4No → Repair the open Glove Box Lamp Driver circuit.Perform BODY VERIFICATION TEST - VER 1.4 Disconnect the glove box lamp harness connector.Connect a test light between cavities 1 and 2 of the Glove Box Lamp harness.Did the test light illuminate?AllYes → Replace the Glove Box Switch.Perform BODY VERIFICATION TEST - VER 1.No → Go To 55 View repair options AllRepairReplace the BCM (Body Control Module).Perform BODY VERIFICATION TEST - VER 1.485
INTERIOR LIGHTINGSymptom:*HEATED SEAT SWITCH ILLUMINATION LAMP INOPERATIVEPOSSIBLE CAUSESDRIVERS HEATED SEAT SWITCH BULB OPENPASSENGER HEATED SEAT SWITCH BULB OPENOPEN GROUND CIRCUIT (DRIVERS SIDE)OPEN GROUND CIRCUIT (PASSENGER SIDE)PANEL LAMPS DRIVER CIRCUIT OPEN (PASSENGER SIDE)PANEL LAMPS DRIVER CIRCUIT OPEN (DRIVERS SIDE)BCMTEST ACTION APPLICABILITY1 Remove and inspect the Drivers Heated Seat Switch bulb.AllIs the bulb OK?Yes → Go To 2No → Replace the Drivers Heated Seat Switch bulb.Perform BODY VERIFICATION TEST - VER 1.2 Remove and inspect the Passenger Heated Seat Switch bulb.Is the bulb OK?AllYes → Go To 3No → Replace the Passenger Heated Seat Switch bulb.Perform BODY VERIFICATION TEST - VER 1.3 Turn ignition off.Disconnect the Drivers Heated Seat Switch connector.Measure the resistance of the Ground circuit in the Drivers Heated Seat Switchconnector.Is the resistance below 5.0 ohms?AllYes → Go To 4No → Repair the open Ground circuit.Perform BODY VERIFICATION TEST - VER 1.4 Turn ignition off.Disconnect the Passenger Heated Seat Switch connector.Measure the resistance of the Ground circuit in the Passenger Heated Seat Switchconnector.Is the resistance below 5.0 ohms?AllYes → Go To 5No → Repair the open Ground circuit.Perform BODY VERIFICATION TEST - VER 1.486
INTERIOR LIGHTING*HEATED SEAT SWITCH ILLUMINATION LAMP INOPERATIVE —ContinuedTEST ACTION APPLICABILITY5 Turn ignition off.Disconnect the Passenger Heated Seat Switch connector.Disconnect the BCM C1 connector.Measure the resistance of the Panel Lamps Driver circuit between the PassengerHeated Seat Switch connector and the BCM C1 connector (cav. #12).Is the resistance below 5.0 ohms?AllYes → Go To 6No → Repair the open Panel Lamps Driver circuit.Perform BODY VERIFICATION TEST - VER 1.6 Turn ignition off.Disconnect the Drivers Heated Seat Switch connector.Disconnect the BCM C1 connector.Measure the resistance of the Panel Lamps Driver circuit between the DriversHeated Seat Switch connector and the BCM C1 connector.Is the resistance below 5.0 ohms?AllYes → Go To 7No → Repair the open Panel Lamps Driver circuit.Perform BODY VERIFICATION TEST - VER 1.7 View repair options. AllRepairReplace the BCM.Perform BODY VERIFICATION TEST - VER 1.487
INTERIOR LIGHTINGSymptom:*HVAC CONTROL ILLUMINATION LAMPS INOPERATIVEPOSSIBLE CAUSESHVAC CONTROL ILLUMINATION INOPERATIVECONTROL HEAD OPEN GROUND CIRCUITPANEL LAMPS DRIVER CIRCUIT OPENBCM (HVAC ILUMINATION)TEST ACTION APPLICABILITY1 Disconnect the appropriate HVAC Control panel connector. C-1 for manual or C-2 forautomatic system.Connect a test light between the HVAC ground circuit and Panel Lamps Drivercircuit in the HVAC connector(s).Turn on the panel lamps and observe the test light.Did the test light illuminate?AllYes → Replace the Heater-A/C Control Panel Assembly.Perform BODY VERIFICATION TEST - VER 1.No → Go To 22 Turn ignition off.Disconnect the HVAC connectors.Measure the resistance of the Ground circuit in the HVAC C1 or C2 (see connectorpinout to determine which connector).Is the resistance below 5.0 ohms?AllYes → Go To 3No → Repair the open HVAC Ground Circuit.Perform BODY VERIFICATION TEST - VER 1.3 Turn ignition off.Disconnect the HVAC connectors.Disconnect the BCM C1 connector.Measure the resistance of the Panel Lamps Driver circuit between the HVAC C1 orC2 connector (refer to connector pinout to determine which connector) and the BCMC1 connector.Is the resistance below 5.0 ohms?AllYes → Go To 4No → Repair the open in the Panel Lamps Driver circuit.Perform BODY VERIFICATION TEST - VER 1.4 View repair options. AllRepairReplace the Body Control Module.Perform BODY VERIFICATION TEST - VER 1.488
INTERIOR LIGHTINGSymptom:*I/P COURTESY LAMPS INOPPOSSIBLE CAUSESBCM I/P COURTESY LAMPS INOPBULBS OPENOPEN FUSED B(+)COURTESY LAMP CONTROL CIRCUIT OPENTEST ACTION APPLICABILITY1 Remove and check inoperative bulbs.AllAre the bulbs OK?Yes → Go To 2No → Replace the bulbs.Perform BODY VERIFICATION TEST - VER 1.2 Measure the voltage of the Fused B(+) circuit to the Lamp.Is the voltage above 10.0 volts?AllYes → Go To 3No → Repair the open Fused B(+) circuit back to splice.Perform BODY VERIFICATION TEST - VER 1.3 Turn ignition off.Disconnect the BCM C1 connector.Gain access to an inoperative bulb.Measure the Courtesy Lamp Control circuit from the BCM C1 connector to the bulbconnector.Is the resistance below 5.0 ohms?AllYes → Replace the Body Control Module.Perform BODY VERIFICATION TEST - VER 1.No → Repair the open Courtesy Lamp Control circuit.Perform BODY VERIFICATION TEST - VER 1.489
INTERIOR LIGHTINGSymptom:*LIFTGATE COURTESY LAMP DISABLE FEATURE INOPERATIVEPOSSIBLE CAUSESOPEN FUSED B(+)OPEN LIFTGATE COURTESY DISABLE CIRCUITLIFTGATE COURTESY DISABLE SWITCHBCM COURTESY DISABLETEST ACTION APPLICABILITY1 Disconnect the Cargo Lamp connector.Measure the voltage of the Fused B(+) circuit at the Cargo Lamp connector.Is the voltage above 10.0 volts?AllYes → Go To 2No → Repair the open Fused B(+) circuit to the Cargo Lamp connector.Perform BODY VERIFICATION TEST - VER 1.2 Disconnect the Cargo Lamp connector.Disconnect the Junction Block C1 connector.Measure the resistance of the Liftgate Courtesy Disable circuit between the CargoLamp connector and the Junction Block C1 connector.Is the resistance below 5.0 ohms?AllYes → Go To 3No → Repair the open Liftgate Courtesy Disable wire.Perform BODY VERIFICATION TEST - VER 1.3 Gain access to the Cargo Lamp connector but do not disconnect.Using a voltmeter backprobe the Liftgate Courtesy Disable circuit at the Cargo Lampconnector while cycling the Disable Switch on and off.Does the voltage toggle from approximatly 10.0 to 0.0 volts?AllYes → Go To 4No → Replace the Liftgate (Cargo) Lamp assemble.Perform BODY VERIFICATION TEST - VER 1.4 View repair options. AllRepairReplace the Body Control Module.Perform BODY VERIFICATION TEST - VER 1.490
INTERIOR LIGHTINGSymptom:*OVERHEAD, REAR AND LIFTGATE LAMPS INOPERATIVEPOSSIBLE CAUSESBULBSOPEN FUSED B(+)COURTESY LAMP DRIVER CIRCUIT OPENBCM COURTESY LAMP DRIVERTEST ACTION APPLICABILITY1 Remove and check inoperative bulbs.AllAre the bulbs OK?Yes → Go To 2No → Replace the bulbs.Perform BODY VERIFICATION TEST - VER 1.2 Measure the voltage of the Fused B(+) circuit to the Lamp.Is the voltage above 10.0 volts?AllYes → Go To 3No → Repair the open Fused B(+) circuit back to splice.Perform BODY VERIFICATION TEST - VER 1.3 Turn ignition off.Disconnect the Junction Block C1 connector.Gain access to an inoperative bulb.Measure the Courtesy Lamp Driver circuit from the Junction Block C1 connectorcavity 16 to the bulb connector.Is the resistance below 5.0 ohms?AllYes → Go To 4No → Repair the open Courtesy Lamp Driver circuit.Perform BODY VERIFICATION TEST - VER 1.4 Turn the Dome Lamp Switch to the ON position.Disconnect Fuse # 8 from the Junction Block.While backprobing, measure the resistance of the Courtesy Lamp Driver circuit atthe Body Control Module C-1 connector cavity # 8.Is the resistance below 5.0 ohms?AllYes → Test Complete.No → Replace the Body Control Module (BCM).Perform BODY VERIFICATION TEST - VER 1.491
INTERIOR LIGHTINGSymptom:*PASSENGER DOOR COURTESY LAMP INOPERATIVEPOSSIBLE CAUSESBULBOPEN COURTESY LAMP DRIVER CIRCUITOPEN COURTESY LAMP GROUND CIRCUITPASSENGER DOOR MODULE COURTESY LAMPTEST ACTION APPLICABILITY1 Remove and inspect the courtesy lamp bulb.AllIs the Courtesy Lamp bulb open?Yes → Replace the bulb.Perform BODY VERIFICATION TEST - VER 1.No → Go To 22 Remove the Passenger Door Courtesy Lamp Bulb.Disconnect the Passenger Door Module C-2 connectorMeasure the Courtesy Lamp Driver circuit from the bulb connector to the PassengerDoor Module C-2 connector.Is the resistance below 5.0 ohms?AllYes → Go To 3No → Repair the open Courtesy Lamp Driver circuit.Perform BODY VERIFICATION TEST - VER 1.3 Remove the Passenger’s Door Courtesy Lamp Bulb.Disconnect the Passenger Door Module C-2 connectorMeasure the Courtesy Lamp Ground circuit from the bulb connector to the PassengerDoor Module C-2 connector.Is the resistance below 5.0 ohms?AllYes → Go To 4No → Repair the open Courtesy Lamp Ground circuit.Perform BODY VERIFICATION TEST - VER 1.4 View repair options. AllRepairReplace the Passenger Door Module.Perform BODY VERIFICATION TEST - VER 1.492
INTERIOR LIGHTINGSymptom:*PRNDL/T-CASE ILLUMINATION LAMPS INOPERATIVEPOSSIBLE CAUSESPRNDL OPEN GROUND CONNECTIONPANEL LAMPS DRIVER CKT OPENPRNDL ILLUMINATIONBODY CONTROL MODULETEST ACTION APPLICABILITY1 Disconnect the PRNDL/Transfer Case Illumination connector.Connect a test light between the ground circuit and the Panel Lamps Driver circuitin the PRNDL/Transfer Case Illumination connector.Turn on the panel lamps and observe the test light.Did the test light illuminate?AllYes → Replace the PRNDL/Transfer Case Illumination assembly.Perform BODY VERIFICATION TEST - VER 1.No → Go To 22 Turn ignition off.Disconnect the PRNDL/Transfer Case Illumination connector.Measure the resistance of the Ground circuit in the PRNDL connector.Is the resistance below 5.0 ohms?AllYes → Go To 3No → Repair the open Ground circuit.Perform BODY VERIFICATION TEST - VER 1.3 Turn ignition off.Disconnect the PRNDL/Transfer Case Illumination connector.Disconnect the BCM C1 connector.Measure the resistance of the Panel Lamps Driver circuit between the PRNDLconnector and the BCM C1 connector.Is the resistance below 5.0 ohms?AllYes → Go To 4No → Repair the open in the Panel Lamps Driver Circuit.Perform BODY VERIFICATION TEST - VER 1.4 View repair options. AllRepairReplace the Body Control Module.Perform BODY VERIFICATION TEST - VER 1.493
INTERIOR LIGHTINGSymptom:*RADIO ILLUMINATION LAMPS INOPERATIVERADIO GROUND CIRCUIT OPENBCM (RADIO ILLUMINATION)PANEL LAMPS DRIVER CKT OPENRADIO ILLUMINATIONPOSSIBLE CAUSESTEST ACTION APPLICABILITY1 Disconnect the Radio C1 connector.Connect a test light between the Radio ground connection and Panel Lamps Drivercircuit in the Radio C1 connector.Turn on the panel lamps and observe the test light.Did the test light illuminate?AllYes → Repair or replace the Radio.Perform BODY VERIFICATION TEST - VER 1.No → Go To 22 Turn the ignition off.Disconnect the Radio ground wire.Measure the resistance between ground and the radio ground wire.Is the resistance below 5.0 ohms?AllYes → Go To 3No → Replace or repair the radio ground strap.Perform BODY VERIFICATION TEST - VER 1.3 Turn ignition off.Disconnect the Radio C1 connector.Disconnect the BCM C1 connector.Measure the resistance of the Panel Lamps Driver circuit between the Radio C1connector and the BCM C1 connector (cav. #13).Is the resistance below 5.0 ohms?AllYes → Go To 4No → Repair the open in the Panel Lamps Driver Circuit.Perform BODY VERIFICATION TEST - VER 1.4 View repair options. AllRepairReplace the BCM.Perform BODY VERIFICATION TEST - VER 1.494
INTERIOR LIGHTINGSymptom:*READING & VANITY LAMPS INOPERATIVEPOSSIBLE CAUSESBULBSCOURTESY LAMP DRIVER CIRCUIT OPENBCM, COURTESY LAMP DRIVERTEST ACTION APPLICABILITY1 Remove and check inoperative bulbs.AllAre the bulbs OK?Yes → Go To 2No → Replace the bulbs.Perform BODY VERIFICATION TEST - VER 1.2 Turn ignition off.Disconnect the Junction Block C1 connector.Gain access to an inoperative bulb.Measure the Courtesy Lamp Driver circuit from the Junction Block C1 connector tothe bulb connector.Is the resistance below 5.0 ohms?AllYes → Go To 3No → Repair the open Courtesy Lamp Driver circuit or Switch.Perform BODY VERIFICATION TEST - VER 1.3 Turn the Dome Lamp Switch to the ON position.Disconnect Fuse # 8 from the Junction Block.While backprobing, measure the resistance of the Courtesy Lamp Driver circuit atthe Body Control Module C-1 connector cavity # 8.Is the resistance below 5.0 ohms?AllYes → Test Complete.No → Replace the defective Body Control Module (BCM).Perform BODY VERIFICATION TEST - VER 1.495
MEMORY SEATSymptom:FRONT RISER SENSOR OUT <strong>OF</strong> RANGE HIGHWhen Monitored and Set Condition:FRONT RISER SENSOR OUT <strong>OF</strong> RANGE HIGHWhen Monitored: Igntion on.Set Condition: This condition is immediately set when the seat motor potentiometerfeeds a value higher than the Memory Seat Module has stored in EEPROM.POSSIBLE CAUSESSEAT SENSOR GROUND WIRE OPENFRONT RISER SENSOR SIGNAL SHORT TO MOTORSEAT SENSOR 5 VOLT SUPPLY SHORT TO BATTERYFRONT RISER POSITION SIGNAL CKT SHORT TO VOLTAGEFRONT RISER SENSOR HIGHMEMORY SEAT MODULE INTERNAL GROUND OPENMEMORY SEAT MODULE FRONT RISER HIGHTEST ACTION APPLICABILITY1 Turn ignition off.Disconnect the Driver Power Seat Front Riser Sensor connector.Measure the resistance of the Seat Position Sensor Ground circuit at the driverpower seat front riser connector.Is the resistance below 5.0 ohms?AllYes → Go To 2No → Go To 72 Ensure all seat and sensor connectors are connected and front riser motor isoperational.With the DRB III select: Body Memory Seat SensorsMonitor the Front Riser Position sensor while operating the seat front riser to bothlimits.Did the voltage ever go above 8.0 volts ONLY when the motor was in operation?AllYes → Replace the Seat Track Assembly.Perform VERIFICATION TEST -MEMORY SYSTEM.No → Go To 3496
MEMORY SEATFRONT RISER SENSOR OUT <strong>OF</strong> RANGE HIGH — ContinuedTEST ACTION APPLICABILITY3 Disconnect the Driver Power Seat Front Riser Sensor connector.Disconnect the Seat Module C1 connector.Turn ignition on.Measure the voltage between the Front Riser Position Signal circuit and ground.Is the voltage above 0.2 volts?AllNo → Go To 4Yes → Repair the Front Riser Position Signal circuit for a short tovoltage.Perform VERIFICATION TEST -MEMORY SYSTEM.4 Disconnect the Seat Front Riser Position Sensor connector.Measure the voltage between the Seat Sensor 5 volt supply circuit and ground.Is the voltage above 5.5 volts?AllYes → Repair the seat sensor 5 volt supply ckt for a short to battery.Perform VERIFICATION TEST -MEMORY SYSTEM.No → Go To 55 Turn ignition off.Disconnect the Driver Power Seat Front Riser Sensor connector.Ensure the Memory Seat Module is fully connected before proceeding.Turn ignition on.With the DRB III in Memory Seat Sensors.Read the Front Riser Position Sensor voltageIs the voltage above 0.2 volts?AllYes → Go To 6No → Replace the Seat Track Assy.Perform VERIFICATION TEST -MEMORY SYSTEM.6 If there are no possible causes remaining, view repair. AllRepairReplace the Memory Seat Module.Perform VERIFICATION TEST -MEMORY SYSTEM.7 Turn ignition off.Disconnect the Seat Module C1 connector.Disconnect the Driver Power Seat Front Riser Sensor connector.Measure the resistance of the Seat Position Sensor Ground wire between the SeatModule connector and the sensor connector.Is the resistance below 5.0 ohms?AllYes → Go To 8No → Repair the open Seat Sensor Ground Wire.Perform VERIFICATION TEST -MEMORY SYSTEM.8 If there are no possible causes remaining, view repair. AllRepairReplace the Memory Seat Module.Perform VERIFICATION TEST -MEMORY SYSTEM.497
MEMORY SEATSymptom:FRONT RISER SENSOR OUT <strong>OF</strong> RANGE LOWWhen Monitored and Set Condition:FRONT RISER SENSOR OUT <strong>OF</strong> RANGE LOWWhen Monitored: Ignition on.Set Condition: This condition is immediately set when the seat motor potentiometerfeeds a value lower than the Memory Seat Module has stored in EEPROM.POSSIBLE CAUSESSEAT SENSOR 5 VOLT SUPPLY SHORT TO GROUNDFRONT RISER SENSOR (LOW)SEAT SENSOR 5 VOLT SUPPLY OPENFRONT RISER POSITION SIGNAL CIRCUIT SHORT TO GROUNDFRONT RISER POSITION SIGNAL CIRCUIT OPENMEMORY SEAT MODULE INTERNAL 5 VOLT LOWMEMORY SEAT MODULE INTERNAL SENSE LOWTEST ACTION APPLICABILITY1 Ensure the Memory Seat Module is fully connected before proceeding.Disconnect the Driver Power Seat Front Riser Sensor connector.Turn ignition on.Measure the voltage of the Seat Sensor 5 Volt Supply circuit.Is the voltage above 4.5 volts?AllYes → Go To 2No → Go To 62 Turn ignition off.Disconnect the Driver Power Seat Front Riser Sensor connector.Connect a jumper wire between Seat Sensor 5 Volt Supply and Front Riser PositionSignal circuits.Ensure the Memory Seat Module is fully connected before proceeding.With the DRBIII select: Body, Memory Seat and Sensors.Turn ignition on.Read the Front Riser Position Sensor voltageIs the voltage above 4.5 volts?AllYes → Replace the Seat Track Assy.Perform VERIFICATION TEST -MEMORY SYSTEM.No → Go To 3498
MEMORY SEATFRONT RISER SENSOR OUT <strong>OF</strong> RANGE LOW — ContinuedTEST ACTION APPLICABILITY3 Turn ignition off.Disconnect the Seat Module C1 connector.Disconnect the Driver Power Seat Front Riser Sensor connector.Measure the resistance of the Front Riser Position Signal circuit to ground.Is the resistance below 1000 (1 K) ohms?AllYes → Repair the Front Riser Position Signal Circuit for a short toground.Perform VERIFICATION TEST -MEMORY SYSTEM.No → Go To 44 Turn ignition off.Disconnect the Driver Power Seat Front Riser Sensor connector.Disconnect the Seat Module C1 connector.Measure the resistance of the Front Riser Position Signal circuit between the Sensorconnector and the Seat Module C1 connector.Is the resistance below 5.0 ohms?AllYes → Go To 5No → Repair the open Front Riser Position Signal circuit.Perform VERIFICATION TEST -MEMORY SYSTEM.5 If there are no possible causes remaining, view repair. AllRepairReplace the Memory Seat Module.Perform VERIFICATION TEST -MEMORY SYSTEM.6 Turn ignition off.Disconnect the Seat Module C1 connector.Measure the resistance of the Seat Sensor 5 Volt Supply circuit to body ground.Is the resistance below 1000 (1 K) ohms?AllYes → Repair the Seat Sensor 5 Volt Supply for a short to ground.Perform VERIFICATION TEST -MEMORY SYSTEM.No → Go To 77 Turn ignition off.Disconnect the Seat Module C1 connector.Disconnect the Driver Power Seat Front Riser Sensor connector.Measure the resistance of the Seat Sensor 5 Volt Supply circuit between the FrontRiser Sensor connector and the Seat Module C1 connector.Is the resistance below 5.0 ohms?AllYes → Go To 8No → Repair the open Seat Sensor 5 Volt Supply circuit.Perform VERIFICATION TEST -MEMORY SYSTEM.8 If there are no possible causes remaining, view repair. AllRepairReplace the Memory Seat Module.Perform VERIFICATION TEST -MEMORY SYSTEM.499
MEMORY SEATSymptom:HORIZONTAL SENSOR OUT <strong>OF</strong> RANGE HIGHWhen Monitored and Set Condition:HORIZONTAL SENSOR OUT <strong>OF</strong> RANGE HIGHWhen Monitored: Ignition on.Set Condition: This condition is immediately set when the seat motor potentiometerfeeds a value higher than the Memory Heated Seat/Mirror Module has stored in EEPROM.POSSIBLE CAUSESSEAT SENSOR GROUND WIRE OPENSEAT HORIZONTAL POSITION SIGNAL SHORT TO MOTORSEAT SENSOR 5 VOLT SUPPLY SHORT TO BATTERYCHECKING SEAT HORIZONTAL POSITION SIGNAL SHORT TO VOLTAGEHORIZONTAL POSITION SENSOR HIGHMEMORY SEAT MODULE INTERNAL GROUND OPENMEMORY SEAT MODULE INTERNAL HIGHTEST ACTION APPLICABILITY1 Turn ignition off.Disconnect the Driver Power Seat Horizontal Position Sensor connectorMeasure the resistance of the Seat Position Sensor Ground circuit to body ground..Is the resistance below 5.0 ohms?AllYes → Go To 2No → Go To 72 Ensure all seat and sensor connectors are connected and front Horizontal motor isoperational.With the DRB III select: Body, Memory Seat, and Sensors.Monitor the Horizontal Position sensor while operating the seat horizontally to bothlimits.Did the voltage ever go above 7.0 volts ONLY when the motor was in operation?AllYes → Replace the Seat Track Assembly.Perform VERIFICATION TEST -MEMORY SYSTEM.No → Go To 33 Disconnect the Driver Power Seat Horizontal Position Sensor connectorTurn ignition on.Measure the voltage between the Seat Sensor 5 volt supply circuit and ground.Is the voltage above 5.5 volts?AllYes → Repair the seat sensor 5 volt supply ckt for a short to battery.Perform VERIFICATION TEST -MEMORY SYSTEM.No → Go To 4500
MEMORY SEATHORIZONTAL SENSOR OUT <strong>OF</strong> RANGE HIGH — ContinuedTEST ACTION APPLICABILITY4 Disconnect the Seat Module C1 connector.Disconnect the Driver Power Seat Horizontal Position Sensor connectorTurn ignition on.Measure the voltage between Seat Horizontal Position Signal circuit and ground.Is there any voltage on the Seat Horizontal Position Signal circuit?AllNo → Go To 5Yes → Repair the Horizontal Position Signal ckt for a short to voltage.Perform VERIFICATION TEST -MEMORY SYSTEM.5 Turn ignition off.Disconnect the Driver Power Seat Horizontal Position Sensor connectorEnsure the Memory Seat Module is fully connected before proceeding.Turn ignition on.With the DRBIII select: Body, Memory Seat and Sensors.Read the Horizontal Position Sensor voltageIs the voltage above 0.2 volts?AllYes → Go To 6No → Replace the Seat Track Assy.Perform VERIFICATION TEST -MEMORY SYSTEM.6 If there are no possible causes remaining, view repair. AllRepairReplace the Memory Seat Module.Perform VERIFICATION TEST -MEMORY SYSTEM.7 Turn ignition off.Disconnect the Driver Power Seat Horizontal Position Sensor connectorDisconnect the Seat Module C1 connector.Measure the resistance of the Seat Position Sensor Ground wire between the SeatModule connector and the sensor connector.Is the resistance below 5.0 ohms?AllYes → Go To 8No → Repair the open Seat Sensor Ground Wire.Perform VERIFICATION TEST -MEMORY SYSTEM.8 If there are no possible causes remaining, view repair. AllRepairReplace the Memory Seat Module.Perform VERIFICATION TEST -MEMORY SYSTEM.501
MEMORY SEATSymptom:HORIZONTAL SENSOR OUT <strong>OF</strong> RANGE LOWWhen Monitored and Set Condition:HORIZONTAL SENSOR OUT <strong>OF</strong> RANGE LOWWhen Monitored: Ignition on.Set Condition: This condition is immediately set when the seat motor potentiometerfeeds a value lower than the Memory Heated Seat/Mirror Module has stored in EEPROM.POSSIBLE CAUSESSEAT SENSOR 5 V SUPPLY SHT GNDHORIZONTAL SENSOR (LOW)SEAT SENSOR 5 VOLT SUPPLY OPENHORIZONTAL POS SIGNAL CKT SHORT TO GROUNDSEAT HORIZONTAL POSITION SIGNAL CKT OPENMEMORY SEAT MODULE INTERNAL 5 VOLT SUPPLYMEMORY SEAT MODULE INTERNAL LOWTEST ACTION APPLICABILITY1 Ensure the Memory Seat Module is fully connected before proceeding.Disconnect the Driver Power Seat Horizontal Sensor connector.Turn ignition on.Measure the voltage of the Seat Sensor 5 Volt Supply circuit.Is the voltage above 4.5 volts?AllYes → Go To 2No → Go To 62 Turn ignition off.Disconnect the Driver Power Seat Horizontal Sensor connector.Connect a jumper wire between Seat Sensor 5 Volt Supply and Seat HorizontalPosition Signal circuits.Ensure the Memory Seat Module is fully connected before proceeding.With the DRB III select: Body Memory Seat Sensors.Turn ignition on.Read the Horizontal Position Sensor voltageIs the voltage above 4.5 volts?AllYes → Replace the Seat Track Assy.Perform VERIFICATION TEST -MEMORY SYSTEM.No → Go To 3502
MEMORY SEATHORIZONTAL SENSOR OUT <strong>OF</strong> RANGE LOW — ContinuedTEST ACTION APPLICABILITY3 Turn ignition off.Disconnect the Seat Module C1 connector.Disconnect the Driver Power Seat Horizontal Sensor connector.Measure the resistance of the Seat Horizontal Position Signal circuit to ground.Is the resistance below 1000 (1 K) ohms?AllYes → Repair the Seat Horizontal Position Signal Ckt for a short toground.Perform VERIFICATION TEST -MEMORY SYSTEM.No → Go To 44 Turn ignition off.Disconnect the Seat Module C1 connector.Disconnect the Driver Power Seat Horizontal Sensor connector.Measure the resistance of the Seat Horizontal Position Signal circuit between theSensor connector and the Seat Module connector.Is the resistance below 5.0 ohms?AllYes → Go To 5No → Repair the open Seat Horizontal Position Signal circuit.Perform VERIFICATION TEST -MEMORY SYSTEM.5 If there are no possible causes remaining, view repair. AllRepairReplace the Memory Seat Module.Perform VERIFICATION TEST -MEMORY SYSTEM.6 Disconnect the Seat Module C1 connector.Turn ignition off.Measure the resistance of the Seat Sensor 5 Volt Supply circuit to ground.Is the resistance below 1000 (1 K) ohms?AllYes → Repair the Seat Sensor 5 Volt Supply for a short to Ground.Perform VERIFICATION TEST -MEMORY SYSTEM.No → Go To 77 Disconnect the Driver Power Seat Horizontal Position Sensor connectorDisconnect the Seat Module C1 connector.Turn ignition off.Measure the resistance of the Seat Sensor 5 Volt Supply circuit between the Sensorconnector and the Module connector.Is the resistance below 5.0 ohms?AllYes → Go To 8No → Repair the open Seat Sensor 5 Volt Supply circuit.Perform VERIFICATION TEST -MEMORY SYSTEM.8 If there are no possible causes remaining, view repair. AllRepairReplace the Memory Seat Module.Perform VERIFICATION TEST -MEMORY SYSTEM.503
MEMORY SEATSymptom:REAR RISER SENSOR OUT <strong>OF</strong> RANGE HIGHWhen Monitored and Set Condition:REAR RISER SENSOR OUT <strong>OF</strong> RANGE HIGHWhen Monitored: Ignition on.Set Condition: This condition is immediately set when the seat motor potentiometerfeeds a value higher than the Memory Heated Seat/Mirror Module has stored in EEPROM.POSSIBLE CAUSESREAR RISER POSITION SIGNAL SHORT TO MOTORSEAT SENSOR GROUND WIRE OPENSEAT SENSOR 5 VOLT SUPPLY SHORT TO BATTERYCHECKING REAR RISER POS SIG SHORT TO VOLTAGEREAR RISER SENSOR (HIGH)MEMORY SEAT MODULE - INTERNAL SHORT HIGHMEMORY SEAT MODULE INTERNAL GROUND OPENTEST ACTION APPLICABILITY1 Turn ignition off.Disconnect the Driver Power Seat Rear Riser Sensor connector.Measure the resistance of the Seat Position Sensor Ground circuit at the driverpower seat rear riser connector.Is the resistance below 5.0 ohms?AllYes → Go To 2No → Go To 72 Ensure all seat and sensor connectors are connected and front riser motor isoperational.With the DRB III select: Body Memory Seat SensorsMonitor the Rear Riser Position sensor while operating the seat rear riser to bothlimits.Did the voltage ever go above 7.0 volts only when the motor was in operation?AllYes → Replace the Seat Track Assembly.Perform VERIFICATION TEST -MEMORY SYSTEM.No → Go To 33 Disconnect the Driver Power Seat Rear Riser Sensor connector.Turn ignition on.Measure the voltage between the Seat Sensor 5 volt supply circuit and ground.Is the voltage above 5.5 volts?AllYes → Repair the seat sensor 5 volt supply ckt for a short to battery.Perform VERIFICATION TEST -MEMORY SYSTEM.No → Go To 4504
MEMORY SEATREAR RISER SENSOR OUT <strong>OF</strong> RANGE HIGH — ContinuedTEST ACTION APPLICABILITY4 Disconnect the Seat Module C1 connector.Disconnect the Driver Power Seat Rear Riser Sensor connector.Turn ignition on.Measure the voltage between Rear Riser Position Signal circuit and ground.Is there any voltage on the Rear Riser Position Signal circuit?AllNo → Go To 5Yes → Repair the Rear Riser Position Signal circuit for a short tovoltage.Perform VERIFICATION TEST -MEMORY SYSTEM.5 Turn ignition off.Disconnect the Driver Power Seat Rear Riser Sensor connector.Ensure the Memory Seat Module is fully connected before proceeding.Turn ignition on.With the DRB III select: Body Memory Seat SensorsRead the Rear Riser Position Sensor voltageIs the voltage above 0.2 volts?AllYes → Go To 6No → Replace the Seat Track Assy.Perform VERIFICATION TEST -MEMORY SYSTEM.6 If there are no possible causes remaining, view repair. AllRepairReplace the Memory Seat Module.Perform VERIFICATION TEST -MEMORY SYSTEM.7 Turn ignition off.Disconnect the Seat Module C1 connector.Disconnect the Driver Power Seat Rear Riser Sensor connector.Measure the resistance of the Seat Position Sensor Ground wire between the SeatModule connector and the sensor connector.Is the resistance below 5.0 ohms?AllYes → Go To 8No → Repair the open Seat Position Sensor Ground Wire.Perform VERIFICATION TEST -MEMORY SYSTEM.8 If there are no possible causes remaining, view repair. AllRepairReplace the Memory Seat Module.Perform VERIFICATION TEST -MEMORY SYSTEM.505
MEMORY SEATSymptom:REAR RISER SENSOR OUT <strong>OF</strong> RANGE LOWWhen Monitored and Set Condition:REAR RISER SENSOR OUT <strong>OF</strong> RANGE LOWWhen Monitored: Ignition on.Set Condition: This condition is immediately set when the seat motor potentiometerfeeds a value lower than the Memory Heated Seat/Mirror Module has stored in EEPROM.POSSIBLE CAUSESSEAT SENSOR 5 V SUPPLY SHORT TO GROUNDREAR RISER SENSOR (LOW)SEAT SENSOR 5 VOLT SUPPLY OPENREAR RISER POS SIGNAL CKT SHORT TO GROUNDREAR RISER POSITION SIGNAL CKT OPENMEMORY SEAT MODULE INTERNAL 5 VOLT LOWMEMORY SEAT MODULE INTERNAL LOWTEST ACTION APPLICABILITY1 Ensure the Memory Seat Module is fully connected before proceeding.Disconnect the Driver Power Seat Rear Riser Sensor connector.Turn ignition on.Measure the voltage of the Seat Sensor 5 Volt Supply circuit.Is the voltage above 4.5 volts?AllYes → Go To 2No → Go To 62 Turn ignition off.Disconnect the Driver Power Seat Rear Riser Sensor connector.Connect a jumper wire between Seat Sensor 5 Volt Supply and Rear Riser PositionSignal circuits.Ensure the Memory Seat Module is fully connected before proceeding.With the DRB III select: Body Memory Seat SensorsTurn ignition on.Read the Rear Riser Position Sensor voltageIs the voltage above 4.5 volts?AllYes → Replace the Seat Track Assy.Perform VERIFICATION TEST -MEMORY SYSTEM.No → Go To 3506
MEMORY SEATREAR RISER SENSOR OUT <strong>OF</strong> RANGE LOW — ContinuedTEST ACTION APPLICABILITY3 Turn ignition off.Disconnect the Seat Module C1 connector.Disconnect the Driver Power Seat Rear Riser Sensor connector.Measure the resistance of the Rear Riser Position Signal circuit to ground.Is the resistance below 1000 (1 K) ohms?AllYes → Repair the Rear Riser Position Signal Ckt for a short to ground.Perform VERIFICATION TEST -MEMORY SYSTEM.No → Go To 44 Turn ignition off.Disconnect the Seat Module C1 connector.Disconnect the Driver Power Seat Rear Riser Sensor connector.Measure the resistance of the Rear Riser Position Signal circuit between the Sensorconnector and the Module connector.Is the resistance below 5.0 ohms?AllYes → Go To 5No → Repair the open Rear Riser Position Signal circuit.Perform VERIFICATION TEST -MEMORY SYSTEM.5 If there are no possible causes remaining, view repair. AllRepairReplace the Memory Seat Module.Perform VERIFICATION TEST -MEMORY SYSTEM.6 Turn ignition off.Disconnect the Seat Module C1 connector.Measure the resistance of the Seat Sensor 5 Volt Supply circuit to ground.Is the resistance below 1000 (1 K) ohms?AllYes → Repair the Seat Sensor 5 Volt Supply for a short to Ground.Perform VERIFICATION TEST -MEMORY SYSTEM.No → Go To 77 Disconnect the Driver Power Seat Rear Riser Sensor connector.Disconnect the Seat Module C1 connector.Turn ignition off.Measure the resistance of the Seat Sensor 5 Volt Supply circuit between the Sensorconnector and the Module connector.Is the resistance below 5.0 ohms?AllYes → Go To 8No → Repair the open Seat Sensor 5 Volt Supply circuit.Perform VERIFICATION TEST -MEMORY SYSTEM.8 If there are no possible causes remaining, view repair. AllRepairReplace the Memory Seat Module.Perform VERIFICATION TEST -MEMORY SYSTEM.507
MEMORY SEATSymptom:RECLINER SENSOR OUT <strong>OF</strong> RANGE HIGHWhen Monitored and Set Condition:RECLINER SENSOR OUT <strong>OF</strong> RANGE HIGHWhen Monitored: Ignition on.Set Condition: This condition is immediately set when the seat motor potentiometerfeeds a value higher than the Memory Heated Seat/Mirror Module has stored in EEPROM.POSSIBLE CAUSESSEAT SENSOR GROUND WIRE OPENRECLINER POSITION SIGNAL SHORT TO MOTORSEAT SENSOR 5 VOLT SUPPLY SHORT TO BATTERYRECLINER POSITION SIGNAL SHORT TO VOLTAGERECLINER POSITION SENSOR HIGHMEMORY SEAT MODULE INTERNAL GROUND OPENMEMORY SEAT MODULE INTERNAL HIGHTEST ACTION APPLICABILITY1 Turn ignition off.Disconnect the Driver Power Seat Recliner Sensor connector.Measure the resistance of the Seat Position Sensor Ground circuit to body ground.Is the resistance below 5.0 ohms?AllYes → Go To 2No → Go To 72 Ensure all seat and sensor connectors are connected and recliner motor is operational.With the DRB III select: Body Memory Seat SensorsMonitor the Recliner Position sensor while operating the seat Recliner to both limits.Did the voltage ever go above 7.0 volts only when the motor was in operation?AllYes → Replace the Seat Track Assembly.Perform VERIFICATION TEST -MEMORY SYSTEM.No → Go To 33 Disconnect the Driver Power Seat Recliner Sensor connector.Turn ignition on.Measure the voltage between the Seat Sensor 5 volt supply circuit and ground.Is the voltage above 5.5 volts?AllYes → Repair the seat sensor 5 volt supply ckt for a short to battery.Perform VERIFICATION TEST -MEMORY SYSTEM.No → Go To 4508
MEMORY SEATRECLINER SENSOR OUT <strong>OF</strong> RANGE HIGH — ContinuedTEST ACTION APPLICABILITY4 Disconnect the Seat Module C1 connector.Disconnect the Driver Power Seat Recliner Sensor connector.Turn ignition on.Measure the voltage between Recliner Position Signal circuit and ground.Is there any voltage on the Recliner Position Signal circuit?AllNo → Go To 5Yes → Repair the Recliner Position Signal ckt for a short to voltage.Perform VERIFICATION TEST -MEMORY SYSTEM.5 Turn ignition off.Disconnect the Driver Power Seat Recliner Position Sensor connectorEnsure the Memory Seat Module is fully connected before proceeding.Turn ignition on.With the DRB III select: Body Memory Seat SensorsRead the Recliner Position Sensor voltageIs the voltage above 0.2 volts?AllYes → Go To 6No → Replace the Seat Track Assy.Perform VERIFICATION TEST -MEMORY SYSTEM.6 If there are no possible causes remaining, view repair. AllRepairReplace the Memory Seat Module.Perform VERIFICATION TEST -MEMORY SYSTEM.7 Turn ignition off.Disconnect the Seat Module C1 connector.Disconnect the Driver Power Seat Recliner Sensor connector.Measure the resistance of the Seat Position Sensor Ground wire between the MSMconnector and the sensor connector.Is the resistance below 5.0 ohms?AllYes → Go To 8No → Repair the open Seat Position Sensor Ground Wire.Perform VERIFICATION TEST -MEMORY SYSTEM.8 If there are no possible causes remaining, view repair. AllRepairReplace the Memory Seat Module.Perform VERIFICATION TEST -MEMORY SYSTEM.509
MEMORY SEATSymptom:RECLINER SENSOR OUT <strong>OF</strong> RANGE LOWWhen Monitored and Set Condition:RECLINER SENSOR OUT <strong>OF</strong> RANGE LOWWhen Monitored: Ignition on.Set Condition: This condition is immediately set when the seat motor potentiometerfeeds a value lower than the Memory Heated Seat/Mirror Module has stored in EEPROM.POSSIBLE CAUSESSEAT SENSOR 5 V SUPPLY SHORT TO GROUNDRECLINER POSITION SENSOR (LOW)SEAT SENSOR 5 VOLT SUPPLY OPENRECLINER POSITION SIGNAL CKT SHORT TO GROUNDRECLINER POSITION SIGNAL CKT OPENMEMORY SEAT MODULE INTERNAL 5 VOLT LOWMEMORY SEAT MODULE INTERNAL (LOW)TEST ACTION APPLICABILITY1 Ensure the Memory Seat Module is fully connected before proceeding.Disconnect the Driver Power Seat Recliner Sensor connector.Turn ignition on.Measure the voltage of the Seat Sensor 5 Volt Supply circuit.Is the voltage above 4.5 volts?AllYes → Go To 2No → Go To 62 Turn ignition off.Disconnect the Driver Power Seat Recliner Sensor connector.Connect a jumper wire between Seat Sensor 5 Volt Supply and Recliner PositionSignal circuits.Ensure the Memory Seat Module is fully connected before proceeding.With the DRB III select: Body Memory Seat SensorsTurn ignition on.Read the Recliner Position Sensor voltageIs the voltage above 4.5 volts?AllYes → Replace the Seat Track Assy.Perform VERIFICATION TEST -MEMORY SYSTEM.No → Go To 3510
MEMORY SEATRECLINER SENSOR OUT <strong>OF</strong> RANGE LOW — ContinuedTEST ACTION APPLICABILITY3 Turn ignition off.Disconnect the Seat Module C1 connector.Disconnect the Driver Power Seat Recliner Sensor connector.Measure the resistance of the Recliner Position Signal circuit to ground.Is the resistance below 1000 (1 K) ohms?AllYes → Repair the Recliner Position Signal Ckt for a short to ground.Perform VERIFICATION TEST -MEMORY SYSTEM.No → Go To 44 Turn ignition off.Disconnect the Seat Module C1 connector.Disconnect the Recliner Position Sensor connector.Measure the resistance of the Recliner Position Signal circuit between the Sensorconnector and the Module connector.Is the resistance below 5.0 ohms?AllYes → Go To 5No → Repair the open Recliner Position Signal circuit.Perform VERIFICATION TEST -MEMORY SYSTEM.5 If there are no possible causes remaining, view repair. AllRepairReplace the Memory Seat Module.Perform VERIFICATION TEST -MEMORY SYSTEM.6 Turn ignition off.Disconnect the Seat Module C1 connector.Measure the resistance of the Seat Sensor 5 Volt Supply circuit to ground.Is the resistance below 1000 (1 K) ohms?AllYes → Repair the Seat Sensor 5 Volt Supply for a short to Ground.Perform VERIFICATION TEST -MEMORY SYSTEM.No → Go To 77 Disconnect the Recliner Position Sensor connector.Disconnect the Seat Module C1 connector.Turn ignition off.Measure the resistance of the Seat Sensor 5 Volt Supply circuit between the Sensorconnector and the Module connector.Is the resistance below 5.0 ohms?AllYes → Go To 8No → Repair the open Seat Sensor 5 Volt Supply circuit.Perform VERIFICATION TEST -MEMORY SYSTEM.8 If there are no possible causes remaining, view repair. AllRepairReplace the Memory Seat Module.Perform VERIFICATION TEST -MEMORY SYSTEM.511
MEMORY SEATSymptom:*DRIVER SEAT FRONT RISER MOVEMENT INOPERATIVEPOSSIBLE CAUSESSEAT FRONT UP DRIVER WIRE OPENSEAT FRONT DOWN DRIVER WIRE OPENSEAT FRONT DOWN SWITCH SENSE WIRE OPENDRIVER FRONT RISER MOTOR INOPERATIVEDRIVER POWER SEAT SWITCHMSM FRONT RISER MOTOR OUTPUTMSM FRONT RISER SWITCH INPUT OPENSEAT FRONT UP SWITCH SENSE WIRE OPENTEST ACTION APPLICABILITY1 Using the DRB III select: Body Memory Seat Module ActuatorsActuate the Front Riser Motor up and then down.Did the Front Riser Motor operate in both directions?AllYes → Go To 2No → Go To 62 Turn ignition off.Refer to service information to remove the seat and gain access to the connectors.Disconnect the Seat Module C1 connector.Disconnect the Driver Power Seat Switch connector.Measure the resistance of the Seat Front Down Switch Sense circuit between theMSM connector and the Seat Switch connector.Is the resistance below 5.0 ohms?AllYes → Go To 3No → Repair the open Seat Front Down Switch Sense wire.Perform VERIFICATION TEST -MEMORY SYSTEM.3 Turn ignition off.Refer to service information to remove the seat and gain access to the connectors.Disconnect the Seat Module C1 connector.Disconnect the Driver Power Seat Switch connector.Measure the resistance of the Seat Front Up Switch Sense circuit between the MSMconnector and the Seat Switch connector.Is the resistance below 5.0 ohms?AllYes → Go To 4No → Repair the open Seat Front Up Switch Sense wire.Perform VERIFICATION TEST -MEMORY SYSTEM.512
MEMORY SEAT*DRIVER SEAT FRONT RISER MOVEMENT INOPERATIVE — ContinuedTEST ACTION APPLICABILITY4 Ensure the Driver Power Seat Switch Is fully connected.Disconnect the Seat Module C1 connector.Connect a test light between the Seat Front Up Switch Sense circuit and the SeatFront Down Switch Sense circuit in the Seat Module connector.Move the Front Riser Switch to the UP and then the DOWN positions and observethe test light.Did the test light illuminate when the switch was moved in BOTH directions?AllYes → Go To 5No → Replace the Driver Power Seat SwitchPerform VERIFICATION TEST -MEMORY SYSTEM.5 If there are no possible causes remaining, view repair. AllRepairReplace the Memory Seat Module.Perform VERIFICATION TEST -MEMORY SYSTEM.6 Refer to service information to remove the seat and gain access to the connectors.Disconnect the Seat Module C2 connector.Disconnect the driver power seat front riser motor connector.Measure the resistance of the Seat Front Up Driver circuit between the Seat Moduleconnector and the seat front riser motor connector.Is the resistance below 5.0 ohms?AllYes → Go To 7No → Repair the Seat Front Up Driver wire for an open.Perform VERIFICATION TEST -MEMORY SYSTEM.7 Turn ignition off.Refer to service information to remove the seat and gain access to the connectors.Disconnect the Seat Module C2 connector.Disconnect the driver power seat front riser motor connector.Measure the resistance of the Seat Front Down Driver circuit between the MSMconnector and the seat front riser motor connector.Is the resistance below 5.0 ohms?AllYes → Go To 8No → Repair the Seat Front Down Driver wire for an open.Perform VERIFICATION TEST -MEMORY SYSTEM.8 Refer to service information to remove the seat and gain access to the connectors.Disconnect the Seat Module C2 connector.Ensure the Front Riser Motor connector is connected at this time.Connect a jumper wire from the Seat Front Up Driver circuit to the Ground circuitin the Seat Module C2 connector.Connect a jumper wire to the Seat Front Down Driver circuit and momentarily touchit to the Fused B(+) circuit.Reverse the Ground and Fused B(+) jumper wires momentarily to run the motor inthe opposite direction.Did the Front Riser Motor run in both directions?AllYes → Go To 9No → Replace the Seat Track Assy.Perform VERIFICATION TEST -MEMORY SYSTEM.513
MEMORY SEAT*DRIVER SEAT FRONT RISER MOVEMENT INOPERATIVE — ContinuedTEST ACTION APPLICABILITY9 If there are no possible causes remaining, view repair. AllRepairReplace the Memory Seat Module.Perform VERIFICATION TEST -MEMORY SYSTEM.514
MEMORY SEATSymptom:*DRIVER SEAT HORIZONTAL MOVEMENT INOPERATIVEPOSSIBLE CAUSESSEAT HORIZONTAL FORWARD DRIVER WIRE OPENSEAT HORIZONTAL FORWARD SWITCH SENSE WIRE OPENSEAT HORIZONTAL REARWARD DRIVER WIRE OPENSEAT HORIZONTAL REARWARD SWITCH SENSE WIRE OPENDRIVER HORIZONTAL MOTOR INOPERATIVEDRIVER POWER SEAT SWITCHMSM HORIZONTAL MOTOR OUTPUT OPENMSM HORIZONTAL SWITCH INPUT OPENTEST ACTION APPLICABILITY1 Using the DRB III select: Body Memory Seat Module ActuatorsActuate the Horizontal Motor Forward and then Rearward.Did the Horizontal Motor operate in both directions?AllYes → Go To 2No → Go To 62 Turn ignition off.Refer to service information for seat removal to gain access to the connectors.Disconnect the Seat Module C1 connector.Disconnect the Driver Power Seat Switch connector.Measure the resistance of the Seat Horizontal Forward Switch Sense circuit betweenthe Seat Module connector and the Seat Switch connector.Is the resistance below 5.0 ohms?AllYes → Go To 3No → Repair the open Seat Horizontal Forward Switch Sense wire.Perform VERIFICATION TEST -MEMORY SYSTEM.3 Turn ignition off.Refer to service information for seat removal to gain access to the connectors.Disconnect the Seat Module C1 connector.Disconnect the Driver Power Seat Switch connector.Measure the resistance of the Seat Horizontal Rearward Switch Sense circuitbetween the Seat Module connector and the Seat Switch connector.Is the resistance below 5.0 ohms?AllYes → Go To 4No → Repair the open Seat Horizontal Rearward Switch Sense wire.Perform VERIFICATION TEST -MEMORY SYSTEM.515
MEMORY SEAT*DRIVER SEAT HORIZONTAL MOVEMENT INOPERATIVE — ContinuedTEST ACTION APPLICABILITY4 Ensure the Driver Power Seat Switch Is fully connected.Disconnect the Seat Module C1 connector.Connect a test light between the Seat Horizontal Forward Switch Sense circuit andthe Seat Horizontal Rearward Switch Sense circuit in the Seat Module connector.Move the Seat Horizontal Switch to the Forward and then the Rearward positionsand observe the test light.Did the test light illuminate when the switch was moved in both directions.AllYes → Go To 5No → Replace the Driver Power Seat SwitchPerform VERIFICATION TEST -MEMORY SYSTEM.5 If there are no possible causes remaining, view repair. AllRepairReplace the Memory Seat Module.Perform VERIFICATION TEST -MEMORY SYSTEM.6 Refer to service information to remove the seat and gain access to the connectors.Disconnect the Seat Module C2 connector.Disconnect the driver power Seat Horizontal Motor connector.Measure the resistance of the Seat Horizontal Forward Driver circuit between theSeat Module connector and the seat horizontal motor connector.Is the resistance below 5.0 ohms?AllYes → Go To 7No → Repair the open Seat Horizontal Forward Driver wire.Perform VERIFICATION TEST -MEMORY SYSTEM.7 Turn ignition off.Refer to service information for seat removal to gain access to the connectors.Disconnect the Seat Module C2 connector.Disconnect the driver power seat horizontal motor connector.Measure the resistance of the Seat Horizontal Rearward Driver circuit between theSeat Module connector and the seat horizontal motor connector.Is the resistance below 5.0 ohms?AllYes → Go To 8No → Repair the open Seat Horizontal Rearward Driver wire.Perform VERIFICATION TEST -MEMORY SYSTEM.8 Refer to service information to remove the seat and gain access to the connectors.Disconnect the Seat Module C2 connector.Ensure the Seat Horizontal Motor connector is connected at this time.Connect a jumper wire from the Seat Horizontal Forward Driver circuit to theGround circuit in the Seat Module C2 connector.Connect a jumper wire to the Seat Horizontal Rearward Driver circuit and momentarilytouch it to the Fused B(+) circuit.Reverse the Ground and Fused B(+) jumper wires momentarily to run the motor inthe opposite direction.Did the Seat Horizontal Motor run in both directions.AllYes → Go To 9No → Replace the Seat Track Assy.Perform VERIFICATION TEST -MEMORY SYSTEM.516
MEMORY SEAT*DRIVER SEAT HORIZONTAL MOVEMENT INOPERATIVE — ContinuedTEST ACTION APPLICABILITY9 If there are no possible causes remaining, view repair. AllRepairReplace the Memory Seat Module.Perform VERIFICATION TEST -MEMORY SYSTEM.517
MEMORY SEATSymptom:*DRIVER SEAT REAR RISER MOVEMENT INOPERATIVEPOSSIBLE CAUSESSEAT REAR DOWN DRIVER WIRE OPENSEAT REAR DOWN SWITCH SENSE WIRE OPENSEAT REAR UP DRIVER WIRE OPENSEAT REAR UP SWITCH SENSE WIRE OPENDRIVER POWER SEAT SWITCH DEFECTIVEDRIVER REAR RISER MOTOR INOPERATIVEMSM REAR RISER MOTOR OUTPUT OPENMSM REAR RISER SWITCH INPUT OPENTEST ACTION APPLICABILITY1 Using the DRB III select: Body Memory Seat Module ActuatorsActuate the Rear Riser Motor Up and then Down.Did the Rear Riser Motor operate in both directions?AllYes → Go To 2No → Go To 62 Turn ignition off.Refer to service information for seat removal to gain access to the connectors.Disconnect the Seat Module C1 connector.Disconnect the Driver Power Seat Switch connector.Measure the resistance of the Seat Rear Down Switch Sense circuit between the SeatModule connector and the Seat Switch connector.Is the resistance below 5.0 ohms?AllYes → Go To 3No → Repair the open Seat Rear Down Switch Sense wire.Perform VERIFICATION TEST -MEMORY SYSTEM.3 Turn ignition off.Raise the Driver Seat as high as possible to gain access to the connectors.Disconnect the Seat Module C1 connector.Disconnect the Driver Power Seat Switch connector.Measure the resistance of the Seat Rear Up Switch Sense circuit between the SeatModule connector and the Seat Switch connector.Is the resistance below 5.0 ohms?AllYes → Go To 4No → Repair the open Seat Rear Up Switch Sense wire.Perform VERIFICATION TEST -MEMORY SYSTEM.518
MEMORY SEAT*DRIVER SEAT REAR RISER MOVEMENT INOPERATIVE — ContinuedTEST ACTION APPLICABILITY4 Ensure the Driver Power Seat Switch Is fully connected.Disconnect the Seat Module C1 connector.Connect a test light between the Seat Rear Up Switch Sense circuit and the SeatRear Down Switch Sense circuit in the seat module connector.Move the Seat Rear Riser Switch to the Up and then the Down positions and observethe test light.Did the test light illuminate when the switch was moved in BOTH directions.AllYes → Go To 5No → Replace the Driver Power Seat SwitchPerform VERIFICATION TEST -MEMORY SYSTEM.5 If there are no possible causes remaining, view repair. AllRepairReplace the Memory Seat Module.Perform VERIFICATION TEST -MEMORY SYSTEM.6 Turn ignition off.Refer to service information for seat removal to gain access to the connectors.Disconnect the Seat Module C2 connector.Disconnect the driver power seat rear riser motor connector.Measure the resistance of the Seat Rear Down Driver circuit between the SeatModule connector and the seat front riser motor connector.Is the resistance below 5.0 ohms?AllYes → Go To 7No → Repair the open Seat Rear Down Driver wire.Perform VERIFICATION TEST -MEMORY SYSTEM.7 Refer to service information for seat removal to gain access to the connectors.Disconnect the Seat Module C2 connector.Disconnect the driver power seat rear riser motor connector.Measure the resistance of the Seat Rear Up Driver circuit between the Seat Moduleconnector and the seat rear riser motor connector.Is the resistance below 5.0 ohms?AllYes → Go To 8No → Repair the open Seat Rear Up Driver wire.Perform VERIFICATION TEST -MEMORY SYSTEM.8 Refer to service information for seat removal to gain access to the connectors.Disconnect the Seat Module C2 connector.Ensure the Seat Horizontal Motor connector is connected at this time.Connect a jumper wire from the Seat Rear Up Driver circuit to the Ground circuit inthe Seat Module C2 connector.Connect a jumper wire to the Seat Rear Down Driver circuit and momentarily touchit to the Fused B(+) circuit.Reverse the Ground and Fused B(+) jumper wires momentarily to run the motor inthe opposite direction.Did the Seat Rear Riser Motor run in both directions.AllYes → Go To 9No → Replace the Seat Track Assy.Perform VERIFICATION TEST -MEMORY SYSTEM.519
MEMORY SEAT*DRIVER SEAT REAR RISER MOVEMENT INOPERATIVE — ContinuedTEST ACTION APPLICABILITY9 If there are no possible causes remaining, view repair. AllRepairReplace the Memory Seat Module.Perform VERIFICATION TEST -MEMORY SYSTEM.520
MEMORY SEATSymptom:*DRIVER SEAT RECLINER MOVEMENT INOPERATIVEPOSSIBLE CAUSESSEAT RECLINER DOWN DRIVER WIRE OPENSEAT RECLINER DOWN SWITCH SENSE WIRE OPENSEAT RECLINER UP DRIVER WIRE OPENSEAT RECLINER UP SWITCH SENSE WIRE OPENDRIVER POWER SEAT SWITCHDRIVER RECLINER MOTOR INOPERATIVEMSM RECLINER MOTOR OUTPUT OPENMSM RECLINER SWITCH INPUT OPENTEST ACTION APPLICABILITY1 Using the DRB III select: Body Memory Seat Module ActuatorsActuate the Recliner Motor Up and then Down.Did the Recliner Motor operate in both directions?AllYes → Go To 2No → Go To 62 Turn ignition off.Refer to service information for seat removal to gain access to the connectors.Disconnect the Seat Module C1 connector.Disconnect the Driver Power Seat Switch connector.Measure the resistance of the Seat Recliner Down Switch Sense circuit between theMSM connector and the Seat Switch connector.Is the resistance below 5.0 ohms?AllYes → Go To 3No → Repair the open Seat Recliner Down Switch Sense wire.Perform VERIFICATION TEST -MEMORY SYSTEM.3 Turn ignition off.Refer to service information for seat removal to gain access to the connectors.Disconnect the Seat Module C1 connector.Disconnect the Driver Power Seat Switch connector.Measure the resistance of the Seat Recliner Up Switch Sense circuit between theSeat Module connector and the Seat Switch connector.Is the resistance below 5.0 ohms?AllYes → Go To 4No → Repair the open Seat Recliner Up Switch Sense wire.Perform VERIFICATION TEST -MEMORY SYSTEM.521
MEMORY SEAT*DRIVER SEAT RECLINER MOVEMENT INOPERATIVE — ContinuedTEST ACTION APPLICABILITY4 Ensure the Driver Power Seat Switch Is fully connected.Disconnect the Seat Module C1 connector.Connect a test light between the Seat Recliner Up Switch Sense circuit and the SeatRecliner Down Switch Sense circuit in the Seat Module connector.Move the Seat Recliner Switch to the Up and then the Down positions and observethe test light.Did the test light illuminate when the switch was moved in BOTH directions.AllYes → Go To 5No → Replace the Driver Power Seat SwitchPerform VERIFICATION TEST -MEMORY SYSTEM.5 If there are no possible causes remaining, view repair. AllRepairReplace the Memory Seat Module.Perform VERIFICATION TEST -MEMORY SYSTEM.6 Turn ignition off.Refer to service information for seat removal to gain access to the connectors.Disconnect the Seat Module C2 connector.Disconnect the driver power Seat Recliner Motor connector.Measure the resistance of the Seat Recliner Down Driver circuit between the SeatModule connector and the seat recliner motor connector.Is the resistance below 5.0 ohms?AllYes → Go To 7No → Repair the open Seat Recliner Down Driver wire.Perform VERIFICATION TEST -MEMORY SYSTEM.7 Turn ignition off.Refer to service information for seat removal to gain access to the connectors.Disconnect the Seat Module C2 connector.Disconnect the driver power Seat Recliner Motor connector.Measure the resistance of the Seat Recliner Up Driver circuit between the SeatModule connector and the seat recliner motor connector.Is the resistance below 5.0 ohms?AllYes → Go To 8No → Repair the open Seat Recliner Up Driver wire.Perform VERIFICATION TEST -MEMORY SYSTEM.8 Refer to service information for seat removal to gain access to the connectors.Disconnect the Seat Module C2 connector.Ensure the Seat Horizontal Motor connector is connected at this time.Connect a jumper wire from the Seat Recliner Up Driver circuit to the Ground circuitin the Seat Module C2 connector.Connect a jumper wire to the Seat Recliner Down Driver ckt and momentarily touchit to the Fused B(+) ckt.Reverse the Ground and Fused B(+) jumper wires momentarily to run the motor inthe opposite direction.Did the Seat Recliner Motor run in both directions.AllYes → Go To 9No → Replace the Seat Track Assy.Perform VERIFICATION TEST -MEMORY SYSTEM.522
MEMORY SEAT*DRIVER SEAT RECLINER MOVEMENT INOPERATIVE — ContinuedTEST ACTION APPLICABILITY9 If there are no possible causes remaining, view repair. AllRepairReplace the Memory Seat Module.Perform VERIFICATION TEST -MEMORY SYSTEM.523
OVERHEAD CONSOLESymptom:AMBIENT TEMPERATURE SENSOR CIRCUIT OPENWhen Monitored and Set Condition:AMBIENT TEMPERATURE SENSOR CIRCUIT OPENWhen Monitored: With the ignition on.Set Condition: The BCM detects the Ambient Temperature Sensor Signal circuit voltageis above 4.8 volts for 5 seconds or more. Customer complaint: EVIC temperature display is-40°C (-40°F).POSSIBLE CAUSESAMBIENT TEMPERATURE SENSOR SIGNAL CIRCUIT SHORT TO VOLTAGEAMBIENT TEMPERATURE SENSORAMBIENT TEMPERATURE SENSOR RETURN CIRCUIT OPENAMBIENT TEMPERATURE SENSOR SIGNAL CIRCUIT OPENBODY CONTROL MODULETEST ACTION APPLICABILITY1 Disconnect the Ambient Temperature Sensor harness connector.Connect a jumper wire between the sensor signal and sensor ground circuits.Close all vehicle doors.Turn the ignition on.With the DRBIII in Sensors, read the Outside Temperature voltage.Is the voltage below 0.5 volts?AllYes → Replace the Ambient Temperature Sensor.Perform BODY VERIFICATION TEST - VER 1.No → Go To 22 Turn the ignition off.Disconnect the Ambient Temperature Sensor harness connector.Disconnect the BCM C2 harness connector.Measure the voltage between the Ambient Temperature Sensor Signal circuit andground.Is there any voltage present?AllYes → Repair the Ambient Temperature Sensor Signal circuit for a shortto voltage.Perform BODY VERIFICATION TEST - VER 1.No → Go To 3524
OVERHEAD CONSOLEAMBIENT TEMPERATURE SENSOR CIRCUIT OPEN — ContinuedTEST ACTION APPLICABILITY3 Turn the ignition off.Disconnect the Ambient Temperature Sensor harness connector.Disconnect the BCM C2 harness connector.Measure the resistance of the Ambient Temperature Sensor Return circuit betweenthe BCM C2 harness connector and the Sensor harness connector.Is the resistance above 5.0 ohms?AllYes → Repair the Ambient Temperature Sensor Return circuit for anopen.Perform BODY VERIFICATION TEST - VER 1.No → Go To 44 Turn the ignition off.Disconnect the BCM C2 harness connector.Disconnect the Ambient Temperature Sensor harness connector.Measure the resistance of the Ambient Temperature Sensor Signal circuit betweenthe BCM C2 harness connector and the Sensor harness connector.Is the resistance above 5.0 ohms?AllYes → Repair the Ambient Temperature Sensor Signal circuit for anopen.Perform BODY VERIFICATION TEST - VER 1.No → Replace the Body Control Module in accordance with the ServiceInformation.Perform BODY VERIFICATION TEST - VER 1.525
OVERHEAD CONSOLESymptom:AMBIENT TEMPERATURE SENSOR CIRCUIT SHORTWhen Monitored and Set Condition:AMBIENT TEMPERATURE SENSOR CIRCUIT SHORTWhen Monitored: With the ignition on.Set Condition: The BCM detects that the Ambient Temperature Sensor signal circuitvoltage is below 0.3 volts for 5 seconds or Customer complaint: EVIC temperature displayis 55°C (130°).POSSIBLE CAUSESAMBIENT TEMPERATURE SENSORAMBIENT TEMPERATURE SENSOR SIGNAL CIRCUIT SHORT TO GROUNDAMBIENT TEMPERATURE SENSOR SIGNAL CIRCUIT SHORT TO SENSOR RETURN CIRCUITBODY CONTROL MODULETEST ACTION APPLICABILITY1 Turn the ignition off.Disconnect the Ambient Temperature Sensor harness connector.Close all vehicle doors.Turn the ignition on.Observe the EVIC display.Does the EVIC display -40° F (-40°C)?AllYes → Replace the Ambient Temperature Sensor.Perform BODY VERIFICATION TEST - VER 1.No → Go To 22 Turn the ignition off.Disconnect the BCM C2 harness connector.Disconnect the Ambient Temperature Sensor harness connector.Measure the resistance between ground and the Ambient Temperature Sensor Signalcircuit.Is the resistance below 5.0 ohms?AllYes → Repair the Ambient Temperature Sensor Signal circuit for a shortto ground.Perform BODY VERIFICATION TEST - VER 1.No → Go To 3526
OVERHEAD CONSOLEAMBIENT TEMPERATURE SENSOR CIRCUIT SHORT — ContinuedTEST ACTION APPLICABILITY3 Turn the ignition off.Disconnect the Ambient Temperature Sensor harness connector.Disconnect the BCM C2 harness connector.Measure the resistance between the Ambient Temperature Sensor Signal circuit andAmbient Temperature Sensor Return circuit.Is the resistance below 5.0 ohms?AllYes → Repair the Ambient Temperature Sensor Signal circuit for a shortto the Sensor Return circuit.Perform BODY VERIFICATION TEST - VER 1.No → Replace the Body Control Module in accordance with the ServiceInformation.Perform BODY VERIFICATION TEST - VER 1.527
OVERHEAD CONSOLESymptom:BUS MESSAGES MISSINGWhen Monitored and Set Condition:BUS MESSAGES MISSINGWhen Monitored: While the EVIC is performing a series of tests on the microprocessor,compass coil, and internal circuitry.Set Condition: This code will set during the self test if the EVIC does not receive PCI Busmessages from the BCM, MIC, or PCM.POSSIBLE CAUSESNO RESPONSE - PCI BUS - BCMNO RESPONSE - PCI BUS - PCMNO REPONSE - PCI BUS - MICELECTRONIC VEHICLE INFORMATION CENTERTEST ACTION APPLICABILITY1 Turn the ignition on.With the DRBIII, attempt to communicate with the BCM.Was the DRBIII able to I/D or communicate with the BCM?AllYes → Go To 2No → Refer to COMMUNICATION category for the related symptom.Perform BODY VERIFICATION TEST - VER 1.2 Turn the ignition on.With the DRBIII, select Body Controller, then System Test.Does the DRBIII display PCM Active on the Bus?AllYes → Go To 3No → Refer to COMMUNICATION category for the related symptom.Perform BODY VERIFICATION TEST - VER 1.3 Turn the ignition on.With the DRBIII, select Electro/Mechanical Instrument Cluster.Is there a response from the Instrument Cluster?AllYes → Replace and program the Electronic Vehicle Information Centerin accordance with the Service Information.Perform BODY VERIFICATION TEST - VER 1.No → Refer to COMMUNICATION category for the related symptom.Perform BODY VERIFICATION TEST - VER 1.528
OVERHEAD CONSOLESymptom:COMPASS TEST FAILUREPOSSIBLE CAUSESELECTRONIC VEHICLE INFORMATION CENTERTEST ACTION APPLICABILITY1 Perform the EVIC self test.Turn the ignition off.Depress and hold the RESET and C/T buttons while turning the ignition on.NOTE: This test may also be performed using the DRBIII.Does the EVIC or DRBIII display FAILED SELF TEST?AllYes → Replace the EVIC in accordance with the Service Information.Perform BODY VERIFICATION TEST - VER 1.No → Test Complete.529
OVERHEAD CONSOLESymptom:COOLANT LEVEL SWITCH CIRCUIT OPEN - GAS ONLYWhen Monitored and Set Condition:COOLANT LEVEL SWITCH CIRCUIT OPEN - GAS ONLYWhen Monitored: With the ignition on.Set Condition: The BCM detects the Coolant Level Sensor Signal voltage is above 4.8volts for 5 seconds or more.POSSIBLE CAUSESCOOLANT LEVEL SENSORCOOLANT LEVEL SENSOR GROUND CIRCUIT OPENCOOLANT LEVEL SENSE CIRCUIT OPENBODY CONTROL MODULETEST ACTION APPLICABILITY1 Turn the ignition off.Disconnect the Coolant Level Sensor harness connector.Turn the ignition on.With the DRBIII, read the Coolant Level Sensor status.Connect a jumper wire between the Coolant Level Sense circuit and the Groundcircuit.With the DRBIII, monitor the Coolant Level Sensor voltage.Does the DRBIII display 0.0 volts?AllYes → Replace the Coolant Level Sensor.Perform BODY VERIFICATION TEST - VER 1.No → Go To 22 Turn the ignition off.Disconnect the Coolant Level Sensor harness connector.Measure the resistance between ground and the Coolant Level Sensor Groundcircuit.Is the resistance below 5.0 ohms?AllYes → Go To 3No → Repair the Coolant Level Sensor Ground circuit for an open.Perform BODY VERIFICATION TEST - VER 1.530
OVERHEAD CONSOLECOOLANT LEVEL SWITCH CIRCUIT OPEN - GAS ONLY — ContinuedTEST ACTION APPLICABILITY3 Turn the ignition off.Disconnect the Coolant Level Sensor harness connector.Disconnect the BCM C2 harness connector.Measure the resistance of the Coolant Level Sense circuit between the Coolant LevelSensor harness connector and the BCM C2 harness connector.Is the resistance below 5.0 ohms?AllYes → Replace the Body Control Module in accordance with the ServiceInformation.Perform BODY VERIFICATION TEST - VER 1.No → Repair the Coolant Level Sense circuit for an open.Perform BODY VERIFICATION TEST - VER 1.531
OVERHEAD CONSOLESymptom:DEMAGNETIZE COMPASSDEMAGNETIZE COMPASSPOSSIBLE CAUSESTEST ACTION APPLICABILITY1 NOTE: A blank compass display indicates that vehicle demagnetizing isrequired.NOTE: After demagnetizing, the vehicle will enter Auto Fast-Cal when theignition is turned on.NOTE: Ensure that the correct compass variance is stored in the compassmemory. See Setting Compass Variance in the Service Information.Refer to the Service Information for the Demagnetizing Procedure.View repair for Verification Test.AllRepairWhen the Demagnetizing Procedure is complete perform theVerification Test.Perform BODY VERIFICATION TEST - VER 1.532
OVERHEAD CONSOLESymptom:EVIC INTERNAL FAILUREWhen Monitored and Set Condition:EVIC INTERNAL FAILUREWhen Monitored: When a SELF TEST command is received from the DRBIII, the EVICperforms a series of tests on the microprocessor, compass coil, and internal circuitry.Set Condition: This code will be set during the self test if the EVIC detects a problem themicroprocessor, compass coil, or internal circuitry.POSSIBLE CAUSESELECTRONIC VEHICLE INFORMATION CENTERTEST ACTION APPLICABILITY1 Perform the EVIC Self Test.Turn the ignition off.Press and hold the C/T button and the RESET button.Turn the ignition on.NOTE: The EVIC Self Test can also be performed using the DRBIII.Turn the ignition on.With the DRBIII, select body, VIC, System Test, then Self Test.Observe the EVIC display following the Self Test.When the trouble code EVIC INTERNAL FAILURE is displayed, View repair.If there are no possible causes remaining, view repair.AllRepairReplace and program the Electronic Vehicle Information Center inaccordance with the service information.Perform BODY VERIFICATION TEST - VER 1.533
OVERHEAD CONSOLESymptom:NO BCM MESSAGES RECEIVEDPOSSIBLE CAUSESDTC PRESENTNO RESPONSE - PCI BUS - BCMELECTRONIC VEHICLE INFORMATION CENTERTEST ACTION APPLICABILITY1 With the DRBIII, erase DTCs.Cycle the ignition and wait approximately 1 minute.With the DRBIII, read DTCs.Did this DTC reset?AllYes → Go To 2No → The condition is not present at this time. Monitor DRBIIIparameters while wiggling the related wire harness. refer to anyTechnical Service Bulletins (TSB) that may apply. Visually inspectthe related wiring harness and connector terminals.Perform BODY VERIFICATION TEST - VER 1.2 Turn the ignition on.With the DRBIII, attempt to I/D or communicate with the BCM.Was the DRBIII able to communicate with the BCM?AllYes → Replace the EVIC in accordance with the Service Information.Perform BODY VERIFICATION TEST - VER 1.No → Refer to the COMMUNICATION category and perform the appropriatesymptom.Perform BODY VERIFICATION TEST - VER 1.534
OVERHEAD CONSOLESymptom:NO PCM MESSAGES RECEIVEDPOSSIBLE CAUSESDTC PRESENTNO RESPONSE - PCI BUS - PCMELECTRONIC VEHICLE INFORMATION CENTERTEST ACTION APPLICABILITY1 With the DRBIII, erase DTCs.Cycle the ignition and wait approximately 1 minute.With the DRBIII, read DTCs.Did this DTC reset?AllYes → Go To 2No → The condition is not present at this time. Monitor DRBIIIparameters while wiggling the related wire harness. Refer to anyTechnical Service Bulletins (TSB) that may apply. Visually inspectthe related wiring harness and connector terminals.Perform BODY VERIFICATION TEST - VER 1.2 Turn the ignition on.With the DRBIII, enter Body Computer, System Tests, then PCM Monitor.Does the DRBIII display PCM Active on the Bus?AllYes → Replace the EVIC in accordance with the Service Information.Perform BODY VERIFICATION TEST - VER 1.No → Refer to the COMMUNICATION category and perform the appropriatesymptom.Perform BODY VERIFICATION TEST - VER 1.535
OVERHEAD CONSOLESymptom:SET COMPASS VARIANCE AS PER SERVICE INFORMATIONSET COMPASS VARIANCEPOSSIBLE CAUSESTEST ACTION APPLICABILITY1 Refer to the Service Information for the Compass Variance procedure.AllView repair for the Verification Test.RepairWhen the Compass Variance procedure is complete perform theVerification Test.Perform BODY VERIFICATION TEST - VER 1.536
OVERHEAD CONSOLESymptom:WASHER FLUID SWITCH FAILUREPOSSIBLE CAUSESWASHER FLUID LEVEL SWITCHWASHER FLUID LEVEL SWITCH GROUND CIRCUIT OPENWASHER FLUID LEVEL SWITCH SENSE CIRCUIT OPENBODY CONTROL MODULETEST ACTION APPLICABILITY1 Turn the ignition off.Disconnect the Washer Fluid Level Switch harness connector.Measure the resistance of the Washer Fluid Level Switch between pin 1 and pin 2.Does the resistance measure greater than 3000 ohms?AllYes → Replace the Washer Fluid Level Switch.Perform BODY VERIFICATION TEST - VER 1.No → Go To 22 Turn the ignition off.Disconnect the Washer Fluid Level Switch harness connector.Measure the resistance between ground and the Washer Fluid Level Switch Groundcircuit.Is the resistance above 5.0 ohms?AllYes → Repair the Washer Fluid Level Switch Ground circuit for an open.Perform BODY VERIFICATION TEST - VER 1.No → Go To 33 Turn the ignition off.Disconnect the Washer Fluid Level Switch harness connector.Disconnect the BCM C2 harness connector.Measure the resistance of the Washer Fluid Switch Sense circuit between the Switchconnector and the BCM connector.Is the resistance below 5.0 ohms?AllYes → Replace the Body Control Module in accordance with the ServiceInformation.Perform BODY VERIFICATION TEST - VER 1.No → Repair the Washer Fluid Level Switch Sense circuit for an open.Perform BODY VERIFICATION TEST - VER 1.537
OVERHEAD CONSOLESymptom List:*AVERAGE FUEL ECONOMY INACCURATE OR WRONG*DISTANCE TO EMPTY INACCURATE OR WRONG*DISTANCE TO SERVICE INACCURATE OR WRONG*ELAPSED IGNITION ON TIME INACCURATE OR WRONG*INSTANT FUEL ECONOMY INACCURATE OR WRONG*TRIP ODOMETER INACCURATE OR WRONGTest Note:All symptoms listed above are diagnosed using the same tests.The title for the tests will be *AVERAGE FUEL ECONOMYINACCURATE OR WRONG.POSSIBLE CAUSESBODY CONTROL MODULEELECTRONIC VEHICLE INFORMATION CENTERTEST ACTION APPLICABILITY1 NOTE: Diagnose and repair any BCM, PCM, or Communication DTCs beforeproceeding with this test.NOTE: Verify the following for proper operation: Fuel Injector Pulse Rate,Speed Signal input, Fuel Level input, correct Tire size and inflation.Perform the EVIC Self Test.The self test can be performed with the DRBIII or manually using the followingprocedure:Turn the ignition off.Press and hold the RESET and C/T buttons.Turn the ignition on.Continue to hold both buttons until the software version is displayed, then releasethe buttons.Observe the EVIC display when the self test is complete.Did the EVIC display FAILED SELF TEST?AllYes → Replace the EVIC in accordance with the Service Information.Perform BODY VERIFICATION TEST - VER 1.No → Replace and program the Body Control Module in accordancewith the Service Information.Perform BODY VERIFICATION TEST - VER 1.538
OVERHEAD CONSOLESymptom:*EVIC DIMMING INOPERATIVEPOSSIBLE CAUSESILLUMINATION BULB OR SOCKETELECTRONIC VEHICLE INFORMATION CENTERTEST ACTION APPLICABILITY1 NOTE: Diagnose and repair any BCM, EVIC, or Communication DTCsbefore proceeding with this test.Turn the ignition off.Remove and inspect the illumination bulb(s) that is inoperative.Is there a problem with the bulb or socket?AllYes → Replace the illumination bulb(s) or socket(s) as necessary.Perform BODY VERIFICATION TEST - VER 1.No → Replace, program, and calibrate the EVIC in accordance with theService Information.Perform BODY VERIFICATION TEST - VER 1.539
OVERHEAD CONSOLESymptom:*EVIC INOPERATIVEPOSSIBLE CAUSESFUSED B(+) CIRCUIT OPENFUSED IGNITION SWITCH OUTPUT CIRCUIT OPENGROUND CIRCUIT OPENELECTRONIC VEHICLE INFORMATION CENTERTEST ACTION APPLICABILITY1 NOTE: Diagnose and repair any BCM, PCM, or COMMUNICATION DTCsbefore proceeding.Turn the ignition off.Disconnect the Overhead Console harness connector.Measure the voltage between the Fused B+ circuit and ground.Is the voltage above 10.5 volts?AllYes → Go To 2No → Repair the Fused B+ circuit for an open.Perform BODY VERIFICATION TEST - VER 1.2 Turn the ignition off.Disconnect the Overhead Console harness connector.Turn the ignition on.Measure the voltage between the Fused Ignition Switch Output circuit and ground.Is the voltage below 10.5 volts?AllYes → Repair the Fused Ignition Switch Output circuit for an open.Perform BODY VERIFICATION TEST - VER 1.No → Go To 33 Turn the ignition off.Disconnect the Overhead Console harness connector.Measure the resistance between ground and the EVIC ground circuit.Is the resistance above 5.0 ohms?AllYes → Repair the Ground circuit for an open.Perform BODY VERIFICATION TEST - VER 1.No → Replace the EVIC in accordance with the Service Information.Perform BODY VERIFICATION TEST - VER 1.540
OVERHEAD CONSOLESymptom:*LOW COOLANT WARNING ALWAYS ON - GAS ONLYPOSSIBLE CAUSESCOOLANT LEVELCOOLANT LEVEL SWITCH SHORTEDCOOLANT LEVEL SWITCH SENSE CIRCUIT SHORT TO GROUNDBODY CONTROL MODULETEST ACTION APPLICABILITY1 NOTE: Ensure that the cooling system operates properly before proceedingwith this test.NOTE: Diagnose and repair any BCM, EVIC, PCM, or Communication DTCsbefore proceeding with this test.Inspect the coolant fluid level.Is the coolant filled to the proper level and the cooling system operating properly?AllYes → Go To 2No → Repair as necessary.Perform BODY VERIFICATION TEST - VER 1.2 Disconnect the Coolant Level Switch harness connector.Turn the ignition on.With the DRBIII, read the Coolant Level Sw voltage.Does the DRBIII display voltage above 4.5?AllYes → Replace the Coolant Level Switch.Perform BODY VERIFICATION TEST - VER 1.No → Go To 33 Disconnect the Coolant Level Sensor harness connector.Disconnect the Body Control Module C2 harness connector.Measure the resistance of the Coolant Level Switch Sense circuit between theCoolant Level Switch connector and ground.Is the resistance below 5.0 ohms?AllYes → Repair the Coolant Level Switch Sense circuit for a short toground.Perform BODY VERIFICATION TEST - VER 1.No → Replace the Body Control Module in accordance with the ServiceInformation.Perform BODY VERIFICATION TEST - VER 1.541
OVERHEAD CONSOLESymptom:*LOW WASHER FLUID MESSAGE ALWAYS ONPOSSIBLE CAUSESWASHER FLUID LEVEL SWITCHWASHER FLUID LEVEL SWITCH SENSE CIRCUIT SHORT TO GROUNDBODY CONTROL MODULETEST ACTION APPLICABILITY1 NOTE: Diagnose and repair any BCM or Communication DTCs beforeproceeding with this test.Turn the ignition off.Disconnect the Washer Fluid Level Switch harness connector.Turn the ignition on.With the DRBIII select the Body, Body Computer, and then Sensors.With the DRBIII, read the Washer Fluid Level Switch voltage.Is the Washer Fluid Level Switch voltage above 5.0 volts?AllYes → Replace the Washer Fluid Level Switch.Perform BODY VERIFICATION TEST - VER 1.No → Go To 22 Turn the ignition off.Disconnect the Washer Fluid Level Switch harness connector.Disconnect the BCM C2 harness connector.Measure the resistance between ground and the Washer Fluid Level Switch Sensecircuit.Is the resistance below 5.0 ohms?AllYes → Repair the Washer Fluid Level Switch Sense circuit for a short toground.Perform BODY VERIFICATION TEST - VER 1.No → Replace the Body Control Module in accordance with the ServiceInformation.Perform BODY VERIFICATION TEST - VER 1.542
OVERHEAD CONSOLESymptom:*TEMPERATURE DISPLAY INACCURATE OR INOPERATIVEPOSSIBLE CAUSESAMBIENT TEMPERATURE SENSORELECTRONIC VEHICLE INFORMATION CENTERTEST ACTION APPLICABILITY1 NOTE: Diagnose and repair any BCM, EVIC, PCM, or Communication DTCsbefore proceeding with this test.NOTE: The Ambient Temperature Sensor is hardwired to the BCM. Ambienttemperature information is transmitted to the EVIC via the PCI Bus.Turn the ignition off.Disconnect the Ambient Temperature Sensor harness connector.Measure the resistance of the Ambient Temperature Sensor using the followingtemperature/resistance values:10°C (50°F) Sensor Resistance = 17.99 - 21.81 Kilohms20°C (68°F) Sensor Resistance = 11.37 - 13.61 Kilohms25°C (77°F) Sensor Resistance = 9.12 - 10.88 Kilohms30°C (86°F) Sensor Resistance = 7.37 - 8.75 Kilohms40°C (104°F) Sensor Resistance = 4.90 - 5.75 Kilohms50°C (122°F) Sensor Resistance = 3.33 - 3.88 KilohmsIs the Ambient Temperature Sensor resistance measurement within the min/maxspecifications?AllYes → Go To 2No → Replace the Ambient Temperature Sensor.Perform BODY VERIFICATION TEST - VER 1.2 Perform the EVIC self test.Turn the ignition off.Press and hold the C/T and Reset buttons.Turn the ignition on.NOTE: The self test can also be performed using the DRBIII.Observe the EVIC display at the conclusion of the self test.Does the EVIC display Passed Self Test?AllYes → Test Complete.No → Replace the EVIC in accordance with the Service Information.Perform BODY VERIFICATION TEST - VER 1.543
POWER DOOR LOCKS/RKESymptom:*ALL DOORS (EXCEPT DRIVER FAIL TO LOCK/UNLOCKPOSSIBLE CAUSESOPEN DOOR LOCK DRIVER WIREOPEN DOOR UNLOCK DRIVER WIREPDM - LOCK/UNLOCK OPENTEST ACTION APPLICABILITY1 Remove the inner door trim panel to gain access to the Door Lock Motor/Ajar Switchconnector.Disconnect the Door Lock Motor/Ajar Switch connector.Disconnect the Passenger Door Module C1 connector.Measure the resistance of the Door Lock Driver circuit between the PDM connectorand the door lock motor connector.Is the resistance below 5.0 ohms?AllYes → Go To 2No → Repair the open Door Lock Driver wire.Perform BODY VERIFICATION TEST - VER 1.2 Remove the inner door trim panel to gain access to the Door Lock Motor/Ajar Switchconnector.Disconnect the Door Lock Motor/Ajar Switch connector.Disconnect the Passenger Door Module C1 connector.Measure the resistance of the Door Unlock Driver circuit between the PDM connectorand the door lock motor connector.Is the resistance below 5.0 ohms?AllYes → Go To 3No → Repair the open Door Unlock Driver wire.Perform BODY VERIFICATION TEST - VER 1.3 If there are no possible causes remaining, view Repair. AllRepairReplace the Passenger Door ModulePerform BODY VERIFICATION TEST - VER 1.544
POWER DOOR LOCKS/RKESymptom:*ALL DOORS (EXCEPT DRIVER) FAIL TO LOCKPOSSIBLE CAUSESDOOR LOCK DRIVER WIRE SHORT TO GROUNDPASSENGER DOOR MODULE - PASSENGER DOORS FAIL TO LOCKTEST ACTION APPLICABILITY1 Remove the inner door trim panel to gain access to the Passenger Door Moduleconnector.Disconnect the Passenger Door Module C1 connector.Measure the resistance of the Door Lock Driver Ckt to body ground.Is the resistance below 20 ohms?AllYes → Repair the Door Lock Driver Wire for a short to ground.Perform BODY VERIFICATION TEST - VER 1.No → Go To 22 If there are no possible causes remaining, view Repair. AllRepairReplace the Passenger Door ModulePerform BODY VERIFICATION TEST - VER 1.545
POWER DOOR LOCKS/RKESymptom:*ALL DOORS (EXCEPT DRIVER) FAILS TO UNLOCKPOSSIBLE CAUSESDOOR UNLOCK DRIVER WIRE SHORT TO GNDPDM DEFECTIVE PASSENGER UNLOCK FAILTEST ACTION APPLICABILITY1 Remove the inner door trim panel to gain access to the Passenger Door Moduleconnector.Disconnect the Passenger Door Module C1 connector.Measure the resistance of the Door Unlock Driver ckt to body ground.Is the resistance below 20 ohms?AllYes → Repair the Door Unlock Driver Wire for a short to ground.Perform BODY VERIFICATION TEST - VER 1.No → Go To 22 If there are no possible causes remaining, view Repair. AllRepairReplace the Passenger Door Module.Perform BODY VERIFICATION TEST - VER 1.546
POWER DOOR LOCKS/RKESymptom:*ALL LOCKS INOPERATIVE FROM DRIVER DOOR MODULEPOSSIBLE CAUSESDDM BUS COMMUNICATON CHECKDDM - LOCKS INOPERATIVETEST ACTION APPLICABILITY1 With the DRBIII, select Body, Door ModulesAllDoes the DRBIII display Part No. and Version No. of the Driver Door Module?Yes → Go To 2No → Refer to symptom *BUS +/- SIGNALS OPEN FROM DRIVERDOOR MODULE in the COMMUNICATION category.Perform BODY VERIFICATION TEST - VER 1.2 If there are no possible causes remaining, view Repair. AllRepairReplace the Driver Door Module.Perform BODY VERIFICATION TEST - VER 1.547
POWER DOOR LOCKS/RKESymptom:*ALL LOCKS INOPERATIVE FROM PASSENGER DOOR MODULEPOSSIBLE CAUSESPDM BUS COMMUNICATION CHECKPDM DEFECTIVE LOCKS INOPTEST ACTION APPLICABILITY1 With the DRBIII, select Body, Door ModulesDoes the DRBIII Display the Part No. and Version No. of the Passenger DoorModule?AllYes → Go To 2No → Refer to symptom BUS +/- SIGNALS OPEN FROM PASSENGERDOOR MODULE in the COMMUNICATION category.Perform BODY VERIFICATION TEST - VER 1.2 If there are no possible causes remaining, view Repair. AllRepairReplace the Passenger Door Module.Perform BODY VERIFICATION TEST - VER 1.548
POWER DOOR LOCKS/RKESymptom:*AUTOMATIC DOOR LOCKS INOPERATIVEPOSSIBLE CAUSESAUTO DOOR LOCKS NOT ENABLEDPCM DTC’S PRESENTDRIVER DOOR MODULE - AUTO LOCKS INOPERATIVETEST ACTION APPLICABILITY1 With the DRB, under CUSTOMER PREFERENCES read the Auto Door Lockstatus.Does the DRB show AUTO DOOR LOCKS ENABLED ?AllYes → Go To 2No → With the DRBIII, enable the Auto Door Locks and retest theSystem.Perform BODY VERIFICATION TEST - VER 1.2 With the DRBIII, read ENGINE DTC’s.Are there any TPS or VEHICLE SPEED DTC’s present?AllYes → Refer to DRIVEABILITY for the related symptom(s).Perform BODY VERIFICATION TEST - VER 1.No → Go To 33 If there are no possible causes remaining, view Repair. AllRepairReplace the Driver Door Module.Perform BODY VERIFICATION TEST - VER 1.549
POWER DOOR LOCKS/RKESymptom:*DOORS LOCK WITH KEY IN IGNITION & FRONT DOOR OPENPOSSIBLE CAUSESDRIVER DOOR AJAR SWITCH STATUS INCORRECTKEY-IN IGNITION SWITCH GROUND CIRCUIT OPENKEY-IN IGNITION SWITCH SENSE CIRCUIT OPENIGNITION SWITCH OPENBCM - DOOR LOCK INHIBIT OPENBODY CONTROL MODULE - KEY-IN IGNITION OPENTEST ACTION APPLICABILITY1 Note: Ensure that the Key is still in the Ignition Switch.With the DRB, read the Key-In Ignition status.Does the DRB show KEY-IN IGN: CLOSED ?AllNo → Go To 2Yes → Go To 62 Turn the ignition off.Disconnect the Ignition Switch C2 connector.Turn all lights off.Measure the resistance of the Ground circuit in the ignition switch C2 connector.Is the resistance below 5.0 ohms ?AllYes → Go To 3No → Repair the open ground circuit.Perform BODY VERIFICATION TEST - VER 1.3 Disconnect the Ignition Switch C2 connector.Disconnect the Body Control Module C1 connector.Measure the resistance of the Key-In Ignition Switch Sense circuit between theignition switch C2 connector and the BCM C1 connector.Is the resistance below 5.0 ohms?AllYes → Go To 4No → Repair the open Key-In Ignition Switch Sense Circuit.Perform BODY VERIFICATION TEST - VER 1.4 Disconnect the Ignition Switch C2 connector.Connect a jumper between the Key-In Ignition Switch Sense and Ground Circuits inthe Ignition Switch C2 Connector.With the DRB, read the Key-In Ignition status.Does the DRB show KEY-IN IGN: CLOSED ?AllYes → Replace the Ignition Switch.Perform BODY VERIFICATION TEST - VER 1.No → Go To 5550
POWER DOOR LOCKS/RKE*DOORS LOCK WITH KEY IN IGNITION & FRONT DOOR OPEN —ContinuedTEST ACTION APPLICABILITY5 If there are no possible causes remaining, view Repair. AllRepairReplace the Body Control Module.Perform BODY VERIFICATION TEST - VER 1.6 Open the Drivers door.With the DRB III select: Body, Door Modules, Input/OutputRead the Drv Door Ajar Sw state.Does the DRB III Show: CLOSED?AllYes → Go To 7No → Refer to symptom DRIVER DOOR AJAR CIRCUIT OPEN in theDOOR AJAR category.Perform BODY VERIFICATION TEST - VER 1.7 If there are no possible causes remaining, view Repair. AllRepairReplace the Body Control Module.Perform BODY VERIFICATION TEST - VER 1.551
POWER DOOR LOCKS/RKESymptom:*DRIVER DOOR FAILS TO LOCKPOSSIBLE CAUSESDRIVER DOOR LOCK DRIVER SHORT TO GNDDDM - DRIVER DOOR LOCK OPENTEST ACTION APPLICABILITY1 Remove the inner door trim panel to gain access to the Driver Door Module C1connector.Disconnect the Driver Door Module C1 connector.Measure the resistance of the Door LOCK Driver circuit in the driver door moduleC1 connector to body ground.Is the resistance below 20 ohms?AllYes → Repair the Driver Door Lock Driver wire for a short to ground.Perform BODY VERIFICATION TEST - VER 1.No → Go To 22 If there are no possible causes remaining, view Repair. AllRepairReplace the Driver Door Module.Perform BODY VERIFICATION TEST - VER 1.552
POWER DOOR LOCKS/RKESymptom:*DRIVER DOOR FAILS TO LOCK & UNLOCKPOSSIBLE CAUSESDRIVER DOOR MODULE - OPEN DOOR LOCK DRIVERDRIVER DOOR UNLOCK DRIVER WIRE OPENOPEN DRIVER DOOR LOCK DRIVER WIREDOOR LOCK MOTOR OPENTEST ACTION APPLICABILITY1 Remove the inner door trim panel to gain access to the Driver Door Module.Disconnect the Driver Door Module C1 connector.Ensure the drivers window is down and the door lock is LOCKED.Connect a jumper wire between the Door Lock Driver ckt and the Ground ckt in theC1 connector.Connect a jumper wire to the Driver Door Unlock Driver ckt and momentarilly touchit to the Fused B(+) ckt and observe the door lock.Did the drivers door UNLOCK?AllYes → Replace the Driver Door Module.Perform BODY VERIFICATION TEST - VER 1.No → Go To 22 Remove the inner door trim panel to gain access to the Door Lock Motor/Ajar Switchconnector.Disconnect the Driver Door Module C1 connector.Disconnect the Door Lock Motor/Ajar Switch connector.Measure the resistance of the Driver Door Unlock Driver circuit between the DDMconnector and the door lock motor connector.Is the resistance below 5.0 ohms?AllYes → Go To 3No → Repair the open Driver Door Unlock Driver wire.Perform BODY VERIFICATION TEST - VER 1.3 Remove the inner door trim panel to gain access to the Door Lock Motor/Ajar Switchconnector.Disconnect the Driver Door Module C1 connector.Disconnect the Door Lock Motor/Ajar Switch connector.Measure the resistance of the Driver Door LOCK Driver circuit between the DDMconnector and the door lock motor connector.Is the resistance below 5.0 ohms?AllYes → Go To 4No → Repair the open Driver Door Lock Driver Wire.Perform BODY VERIFICATION TEST - VER 1.4 If there are no possible causes remaining, view repair. AllRepairReplace the Door Lock Motor.Perform BODY VERIFICATION TEST - VER 1.553
POWER DOOR LOCKS/RKESymptom:*DRIVER DOOR FAILS TO UNLOCKPOSSIBLE CAUSESDRIVER DOOR UNLOCK DRIVER WIRE SHORT TO GNDDDM - DRIVER DOOR UNLOCK OPENTEST ACTION APPLICABILITY1 Remove the inner door trim panel to gain access to the Driver Door Module C1connector.Disconnect the Driver Door Module C1 connector.Measure the resistance of the Driver Door UNLOCK Driver circuit in the driver doormodule C1 connector to body ground.Is the resistance below 20 ohms?AllYes → Repair the Driver Door Unlock Driver Wire for a short to ground.Perform BODY VERIFICATION TEST - VER 1.No → Go To 22 If there are no possible causes remaining, view Repair. AllRepairReplace the Driver Door ModulePerform BODY VERIFICATION TEST - VER 1.554
POWER DOOR LOCKS/RKESymptom:*LEFT REAR DOOR FAILS TO LOCK & UNLOCKPOSSIBLE CAUSESOPEN DOOR LOCK MOTOROPEN DOOR LOCK DRIVER WIREOPEN DOOR UNLOCK DRIVER WIRETEST ACTION APPLICABILITY1 Remove the inner door trim panel to gain access to the Door Lock Motor/Ajar Switchconnector.Disconnect the Left Rear Door Lock Motor/Ajar Switch connector.Ensure the Passenger Door Module C1 connector is connected.Connect a test light between the Door Lock Driver and the Door Unlock Driverterminals in the left rear door lock motor/ajar connector.With the DRB III actuate the Pas Lock Relay and then the Pas Unlock Relay andobserve the test light.Did the test light illuminate when the lock was actuated in both directions?AllYes → Replace the Door Lock Motor.Perform BODY VERIFICATION TEST - VER 1.No → Go To 22 Remove the inner door trim panel to gain access to the Door Lock Motor/Ajar Switchconnector.Disconnect the Door Lock Motor/Ajar Switch connector.Disconnect the Passenger Door Module C1 connector.Measure the resistance of the Door Lock Driver circuit between the PDM C1connector and the door lock motor connector.Is the resistance below 5.0 ohms?AllYes → Go To 3No → Repair the open Door Lock Driver wire.Perform BODY VERIFICATION TEST - VER 1.3 Remove the inner door trim panel to gain access to the Door Lock Motor/Ajar Switchconnector.Disconnect the Door Lock Motor/Ajar Switch connector.Disconnect the Passenger Door Module C1 connector.Measure the resistance of the Door Unlock Driver circuit between the PDM connectorand the door lock motor connector.Is the resistance below 5.0 ohms?AllYes → Test Complete.No → Repair the open Door Unlock Driver wire.Perform BODY VERIFICATION TEST - VER 1.555
POWER DOOR LOCKS/RKESymptom:*LIFTGATE LOCK FAILS TO LOCK/UNLOCKPOSSIBLE CAUSESOPEN LIFTGATE LOCK MOTOROPEN DOOR LOCK DRIVER WIREOPEN DOOR UNLOCK DRIVER WIRETEST ACTION APPLICABILITY1 Remove the liftgate inner door trim panel to gain access to the Liftgate Lock Motorconnector.Disconnect the Liftgate Lock Motor connector.Note: Ensure the Passenger Door Module C1 connector is connected.Connect a test light between the Door Lock Driver and the Door Unlock Driverterminals in the liftgate lock motor connector.With the DRB III actuate the Pas Lock Relay and then the Pas Unlock Relay andobserve the test light.Did the test light illuminate when the lock was actuated in both directions?AllYes → Replace the Liftgate Lock Motor.Perform BODY VERIFICATION TEST - VER 1.No → Go To 22 Remove the liftgate inner door trim panel to gain access to the Liftgate Lock Motorconnector.Disconnect the Liftgate Lock Motor connector.Disconnect the Passenger Door Module C1 connector.Measure the resistance of the Door Lock Driver ckt between the PDM connector andthe liftgate lock motor connector.Is the resistance below 5.0 ohms?AllYes → Go To 3No → Repair the open Door Lock Driver wire.Perform BODY VERIFICATION TEST - VER 1.3 Remove the liftgate inner door trim panel to gain access to the Liftgate Lock Motorconnector.Disconnect the Liftgate Lock Motor connector.Disconnect the Passenger Door Module C1 connector.Measure the resistance of the Door Unlock Driver ckt between the PDM connectorand the liftgate lock motor connector.Is the resistance below 5.0 ohms?AllYes → Test Complete.No → Repair the open Door Unlock Driver wire.Perform BODY VERIFICATION TEST - VER 1.556
POWER DOOR LOCKS/RKESymptom:*PASSENGER DOOR FAILS TO LOCK & UNLOCKPOSSIBLE CAUSESOPEN DOOR LOCK MOTOROPEN DOOR LOCK DRIVER WIREOPEN DOOR UNLOCK DRIVER WIRETEST ACTION APPLICABILITY1 Remove the inner door trim panel to gain access to the Door Lock Motor/Ajar Switchconnector.Disconnect the Door Lock Motor/Ajar Switch connector.Note: Ensure the Passenger Door Module C1 connector is connected.Connect a test light between the Door Lock Driver and the Door Unlock Driverterminals in the passenger door lock motor/ajar connector.With the DRB III actuate the Pas Lock Relay and then the Pas Unlock Relay andobserve the test light.Did the test light illuminate when the lock was actuated in both directions?AllYes → Replace the Door Lock Motor.Perform BODY VERIFICATION TEST - VER 1.No → Go To 22 Remove the inner door trim panel to gain access to the Door Lock Motor/Ajar Switchconnector.Disconnect the Door Lock Motor/Ajar Switch connector.Disconnect the Passenger Door Module C1 connector.Measure the resistance of the Door Lock Driver circuit between the PDM connectorand the door lock motor connector.Is the resistance below 5.0 ohms?AllYes → Go To 3No → Repair the open Door Lock Driver wire.Perform BODY VERIFICATION TEST - VER 1.3 Remove the inner door trim panel to gain access to the Door Lock Motor/Ajar Switchconnector.Disconnect the Door Lock Motor/Ajar Switch connector.Disconnect the Passenger Door Module C1 connector.Measure the resistance of the Door Unlock Driver circuit between the PDM connectorand the door lock motor connector.Is the resistance below 5.0 ohms?AllYes → Test Complete.No → Repair the open Door Unlock Driver wire.Perform BODY VERIFICATION TEST - VER 1.557
POWER DOOR LOCKS/RKESymptom:*RIGHT REAR DOOR FAILS TO LOCK & UNLOCKPOSSIBLE CAUSESOPEN DOOR LOCK MOTOROPEN DOOR LOCK DRIVER WIREOPEN DOOR UNLOCK DRIVER WIRETEST ACTION APPLICABILITY1 Remove the inner door trim panel to gain access to the Door Lock Motor/Ajar Switchconnector.Disconnect the Right Rear Door Lock Motor/Ajar Switch connector.Ensure the Passenger Door Module C1 connector is connected.Connect a test light between the Door Lock Driver and the Door Unlock Driverterminals in the right rear door lock motor/ajar connector.With the DRB III actuate the Pas Lock Relay and then the Pas Unlock Relay andobserve the test light.Did the test light illuminate when the lock was actuated in both directions?AllYes → Replace the Right Rear Door Lock Motor.Perform BODY VERIFICATION TEST - VER 1.No → Go To 22 Remove the inner door trim panel to gain access to the Door Lock Motor/Ajar Switchconnector.Disconnect the Right Rear Door Lock Motor/Ajar Switch connector.Disconnect the Passenger Door Module C1 connector.Measure the resistance of the Door Lock Driver circuit between the PDM connectorand the door lock motor connector.Is the resistance below 5.0 ohms?AllYes → Go To 3No → Repair the open Door Lock Driver wire.Perform BODY VERIFICATION TEST - VER 1.3 Remove the inner door trim panel to gain access to the Door Lock Motor/Ajar Switchconnector.Disconnect the Door Lock Motor/Ajar Switch connector.Disconnect the Passenger Door Module C1 connector.Measure the resistance of the Door Unlock Driver circuit between the PDM connectorand the right rear door lock motor connector.Is the resistance below 5.0 ohms?AllYes → Test Complete.No → Repair the open Door Unlock Driver wire.Perform BODY VERIFICATION TEST - VER 1.558
POWER DOOR LOCKS/RKESymptom:*RKE INOPERATIVE - JAPAN ONLYPOSSIBLE CAUSESGROUND CIRCUIT OPENFUSED B(+) CIRCUIT OPENDIAGNOSTIC OUT CIRCUIT SHORT TO GROUNDDIAGNOSTIC OUT CIRCUIT OPENDRIVER DOOR MODULE - RKE INOPERATIVEREMOTE KEYLESS ENTRY MODULE - OPENTEST ACTION APPLICABILITY1 Remove the driver door trim panel.Disconnect the Remote Keyless Entry module (located near the DDM).Key off. Turn all lights off.Measure the resistance between ground and the Ground circuit.Is the resistance below 10.0 ohms?AllYes → Go To 2No → Repair the open Ground circuit.Perform BODY VERIFICATION TEST - VER 1.2 Remove the driver door trim panel.Disconnect the Remote Keyless Entry module (located near the DDM).Measure the voltage between Fused B(+) circuit and ground.Is the voltage above 10.0 volts?AllYes → Go To 3No → Repair the open Fused B(+) circuit.Perform BODY VERIFICATION TEST - VER 1.3 Remove the driver door trim panel.Disconnect the Remote Keyless Entry module (located near the DDM).Disconnect the Driver Door Module C1 connector.Measure the resistance between ground and the Diagnostic Out circuits (cavities 5 &6).Is the resistance below 1000.0 (1K) ohms?AllYes → Repair the Diagnostic Out circuit for a short to ground.Perform BODY VERIFICATION TEST - VER 1.No → Go To 44 Remove the driver door trim panel.Disconnect the Remote Keyless Entry module (located near the DDM).Disconnect the Driver Door Module C1 connector.Measure the resistance of the Diagnostic Out circuit between the RKE moduleconnector (cavities 5&6)andtheDDMconnector (cavity 8).Is the resistance below 5.0 ohms at all terminals?AllYes → Go To 5No → Repair the open Diagnostic Out circuit.Perform BODY VERIFICATION TEST - VER 1.559
POWER DOOR LOCKS/RKE*RKE INOPERATIVE - JAPAN ONLY — ContinuedTEST ACTION APPLICABILITY5 Remove the driver door trim panel.Disconnect the Remote Keyless Entry module (located near the DDM).Measure the voltage of the Diagnostic Out circuit in the RKE connector.Is the voltage between 4.8 and 5.2 vol6ts?AllYes → Go To 6No → Replace the Driver Door Module.Perform BODY VERIFICATION TEST - VER 1.6 If there are no possible causes remaining, view repair. AllRepairReplace the Remote Keyless Entry Module.Perform BODY VERIFICATION TEST - VER 1.560
POWER DOOR LOCKS/RKESymptom:*RKE TRANSMITTER INOPERATIVEPOSSIBLE CAUSESRKE TRANSMITTER BATTERY VOLTAGE LOWRKE TRANSMITTER NOT PROGRAMMEDRKE TRANSMITTER DEFECTIVEPASSENGER DOOR MODULE DEFECTIVE RKE INOPTEST ACTION APPLICABILITY1 Remove the batteries from the transmitter.Using a voltmeter, test the Batteries.Is the voltage above 3.0 volts in each battery?AllYes → Go To 2No → Replace the Batteries.Perform BODY VERIFICATION TEST - VER 1.2 With the DRB select BODY, DOOR MODULES, MISCELLANEOUS, then PRO-GRAM RKE. Follow instructions on the screen.Exit PROGRAM RKE. Try the Door Locks using the Transmitter.Did the Door Locks respond properly to the Transmitter commands ?AllYes → Repair complete. Using the DRB, program all other Transmittersused with this Vehicle.Perform BODY VERIFICATION TEST - VER 1.No → Go To 33 Secure a known good Transmitter.Using the DRB select BODY, DOOR MODULES, MISCELLANOUS then PROGRAMRKE. Follow the instructions on the DRB screen.Exit PROGRAM RKE. Try the Door Locks using the Transmitter.Did the Door Locks respond properly to the Transmitter commands ?AllYes → Replace the Transmitter. Program all Transmitters that will beused with this Vehicle.Perform BODY VERIFICATION TEST - VER 1.No → Go To 4Note: When repairs are complete ensure all transmitters used with thisvehicle are programmed4 If there are no possible causes remaining, view Repair. AllRepairReplace the Passenger Door Module.Perform BODY VERIFICATION TEST - VER 1.561
POWER DOOR LOCKS/RKESymptom:*RKE TRANSMITTER POOR RANGE - JAPAN ONLYPOSSIBLE CAUSESANTENNA SIGNAL CIRCUIT OPENREMOTE KEYLESS ENTRY MODULE - POOR RANGETEST ACTION APPLICABILITY1 Remove the driver door trim panel.Disconnect the Remote Keyless Entry module (located near the DDM).Measure the resistance of the Antenna Signal circuit between caities 1&2.Is the resistance below 1.0 ohm?AllYes → Go To 2No → Repair the open Antenna Signal circuit.Perform BODY VERIFICATION TEST - VER 1.2 If there are no possible causes remaining, view repair. AllRepairReplace the Remote Keyless Entry Module.Perform BODY VERIFICATION TEST - VER 1.562
POWER MIRRORSymptom:*BOTH MEMORY MIRRORS INOPERATIVEPOSSIBLE CAUSESBOTH MEMORY MIRRORS INOPERATIVETEST ACTION APPLICABILITY1 Ensure the memory seat operates properly before continuing. If not, refer to symptomlist for problems related to MEMORY SYSTEM..If there are no possible causes remaining, view repair.AllRepairReplace the Driver Door Module.Perform BODY VERIFICATION TEST - VER 1.563
POWER MIRRORSymptom:*DRIVER MEMORY MIRROR INOPERATIVEPOSSIBLE CAUSESDRIVER MIRROR SENSOR GROUND WIRE OPENDRIVER DOOR MODULE - SENSOR GROUND OPENDRIVER MIRROR SENSOR GROUND SHORTED TO MIRROR VERTICAL POSITION SIGNALDRIVER MIRROR SENSOR GROUND SHORTED TO MIRROR HORIZONTAL POSITION SIGNALDRIVER DOOR MODULE - MEMORY MIRROR OPENDRIVER MIRROR HORIZONTAL POSITION SIGNAL SHORT TO GROUNDDRIVER MIRROR VERTICAL POSITION SIGNAL SHORT TO GROUNDDRIVER MIRROR HORIZONTAL POSITION SIGNAL WIRE OPENDRIVER MIRROR VERTICAL POSITION SIGNAL WIRE OPENDRIVER POWER MIRROR - MEMORY OPENDRIVER DOOR MODULE - MEMORY CIRCUIT OPENTEST ACTION APPLICABILITY1 Note: The following list of items should be checked before continuing withany power mirror tests.Ensure door ajar switches are working properly before proceeding.Ensure there is communication with the DDM, PDM and the BCM before proceeding.Ensure the mirror directional switches are working properly before proceeding. Ifnot, replace the DDM.Ensure the mirror select switch is working properly before proceeding. If not, replacethe DDM.Ensure both mirrors are operational from the DDM. If not, refer to SERVICEINFORMATION.If all items are operational, continue.AllContinueGo To 22 With the DRBIII read the Drv Mirror Horiz Volts.Operate the mirror from left to right and observe the DRB.Does the voltage vary from approximately 1.0 to 4.0 volts?AllYes → Go To 3No → Go To 53 With the DRBIII read the Drv Mirror Vert Volts.Operate the mirror from down to up and observe the DRB.Does the voltage vary from approximately 1.0 to 4.0 volts?AllYes → Go To 4No → Go To 5564
POWER MIRROR*DRIVER MEMORY MIRROR INOPERATIVE — ContinuedTEST ACTION APPLICABILITY4 If there are no possible causes remaining, view repair. AllRepairReplace the Driver Door Module.Perform BODY VERIFICATION TEST - VER 1.5 Disconnect the Driver Power Mirror connector.Disconnect the DDM C2 connector.Measure the resistance of the Mirror Sensor Ground wire between the Driver PowerMirror connector and the DDM C2 connector.Is the resistance below 5.0 ohms?AllYes → Go To 6No → Repair the open Mirror Sensor Ground wire.Perform BODY VERIFICATION TEST - VER 1.6 Disconnect the Driver Power Mirror connector.Ensure the DDM C2 connector is connected at this time.Turn ignition off. Turn all lights off.Measure the resistance between ground and the Mirror Sensor Ground circuit in theDriver Power Mirror connector..Is the resistance below 5.0 ohms?AllYes → Go To 7No → Replace the Driver Door Module.Perform BODY VERIFICATION TEST - VER 1.7 Disconnect the Driver Power Mirror connector.Measure the voltage between Mirror Horizontal Position Signal circuit and ground.Is the voltage approximately 5.0 volts?AllYes → Go To 8No → Go To 108 Disconnect the Driver Power Mirror connector.Measure the voltage between Mirror Vertical Position Signal circuit and ground.Is the voltage approximately 5.0 volts?AllYes → Go To 9No → Go To 109 If there are no possible causes remaining, view repair. AllRepairReplace the Driver Power Mirror.Perform BODY VERIFICATION TEST - VER 1.10 Disconnect the DDM C2 connector.Disconnect the Driver Power Mirror connector.Measure the resistance between the Mirror Sensor Ground circuit and the MirrorVertical Position Signal circuit in the DDM C2 connector.Is the resistance below 1000.0 ohms?AllYes → Repair the Mirror Sensor Ground wire for a short to the MirrorVertical Position Signal wire.Perform BODY VERIFICATION TEST - VER 1.No → Go To 11565
POWER MIRROR*DRIVER MEMORY MIRROR INOPERATIVE — ContinuedTEST ACTION APPLICABILITY11 Disconnect the DDM C2 connector.Disconnect the Driver Power Mirror connector.Measure the resistance between the Mirror Sensor Ground circuit and the MirrorHorizontal Position Signal circuit in the DDM C2 connector.Is the resistance below 1000.0 ohms?AllYes → Repair the Mirror Sensor Ground wire for a short to the MirrorHorizontal Position Signal wire.Perform BODY VERIFICATION TEST - VER 1.No → Go To 1212 Disconnect the DDM C2 connector.Disconnect the Driver Power Mirror connector.Measure the resistance between ground and the Mirror Horizontal Position Signalcircuit.Is the resistance below 1000.0 ohms?AllYes → Repair the Mirror Horizontal Position Signal wire for a short toground.Perform BODY VERIFICATION TEST - VER 1.No → Go To 1313 Disconnect the DDM C2 connector.Disconnect the Driver Power Mirror connector.Measure the resistance between ground and the Mirror Vertical Position Signalcircuit.Is the resistance below 1000.0 ohms?AllYes → Repair the Mirror Vertical Position Signal wire for a short toground.Perform BODY VERIFICATION TEST - VER 1.No → Go To 1414 Disconnect the DDM C2 connector.Disconnect the Driver Power Mirror connector.Measure the resistance of the Mirror Horizontal Position Signal circuit between theDDM C2 connector and the Driver Power Mirror connector.Is the resistance below 5.0 ohms?AllYes → Go To 15No → Repair the open Mirror Horizontal Position Signal wire.Perform BODY VERIFICATION TEST - VER 1.15 Disconnect the DDM C2 connector.Disconnect the Driver Power Mirror connector.Measure the resistance of the Mirror Vertical Position Signal circuit between theDDM C2 connector and the Driver Power Mirror connector.Is the resistance below 5.0 ohms?AllYes → Go To 16No → Repair the open Mirror Vertical Position Signal wire.Perform BODY VERIFICATION TEST - VER 1.16 If there are no possible causes remaining, view repair. AllRepairReplace the Driver Door Module.Perform BODY VERIFICATION TEST - VER 1.566
POWER MIRRORSymptom:*FOLDING POWER MIRROR INOPERATIVEPOSSIBLE CAUSESFOLDING MIRROR TESTDRIVER POWER MIRROR - FOLDING MIRROR OPENPASSENGER FOLDAWAY MIRROR OPENPOWER FOLDING MIRROR FEED WIRE OPENPOWER FOLDING MIRROR FEED WIRE SHORTED TO GROUNDPOWER FOLDING MIRROR RETURN WIRE OPENPOWER FOLDING MIRROR RETURN WIRE SHORTED TO GROUNDDRIVER DOOR MODULE - FOLDING MIRROR OPENPASSENGER DOOR MODULE - FOLDAWAY MIRROR OPENBOTH FOLDING MIRRORS INOPERATIVEDRIVER POWER MIRROR - SHORT TO GROUNDPASSENGER POWER MIRROR - SHORT TO GROUNDTEST ACTION APPLICABILITY1 Note: The following list of items should be checked before continuing withany power mirror tests.Ensure door ajar switches are working properly before proceeding. If not OK, refer tosymptom list for problems related to INTERIOR LIGHTING.Ensure there is communication with the DDM and the BCM before proceeding. If notOK, refer to symptom list for problems related to COMMUNICATION.Ensure the mirror directional switches are working properly before proceeding. Ifnot, replace the DDM.Ensure the mirror select switch is working properly before proceeding. If not, replacethe DDM.If all items are operational, continue.AllContinueGo To 2567
POWER MIRROR*FOLDING POWER MIRROR INOPERATIVE — ContinuedTEST ACTION APPLICABILITY2 Ensure all doors are closed.Remove the key from the ignition switch.Operate the mirrors from the power foldaway switch and observe both mirrors.What did you observe.AllNeither mirror folded or opened.Replace the Driver Door Module.Perform BODY VERIFICATION TEST - VER 1.Driver mirror failed to fold or open.Go To 3Passenger mirror failed to fold or open.Go To 11Both mirrors folded and opened.Mirrors are operating properly at this time. Check for intermittentfailure from doors and foldaway switches.Perform BODY VERIFICATION TEST - VER 1.3 Key off. Disconnect the Driver Door Module C2 connector.Measure the resistance between ground and the Power Folding Mirror Feed circuitin the DDM C2 connector.Is the resistance below 5.0 ohms?AllYes → Go To 4No → Go To 74 Key off. Disconnect the Passenger Door Module C2 connector.Disconnect the Passenger Power Mirror connector.Measure the resistance between ground and the Power Folding Mirror Feed wire inthe PDM C2 connector.Is the resistance below 5.0 ohms?AllYes → Repair the Power Folding Mirror Feed wire for a short to ground.Perform BODY VERIFICATION TEST - VER 1.No → Go To 55 Key off. Disconnect the Passenger Door Module C2 connector.Disconnect the Passenger Power Mirror connector.Measure the resistance between ground and the Power Folding Mirror Return wirein the PDM C2 connector.Is the resistance below 5.0 ohms?AllYes → Repair the Power Folding Mirror Return wire for a short toground.Perform BODY VERIFICATION TEST - VER 1.No → Go To 66 If there are no possible causes remaining, view repair. AllRepairReplace the Driver Power Mirror.Perform BODY VERIFICATION TEST - VER 1.568
POWER MIRROR*FOLDING POWER MIRROR INOPERATIVE — ContinuedTEST ACTION APPLICABILITY7 Ensure the DDM C2 connector is connected at this time.Disconnect the Driver Power Mirror connector.Connect a 12-volt test light between the Power Folding Mirror Feed and the PowerFolding Mirror Return circuits in the Driver Power Mirror connector.With the DRBIII actuate Drv Foldaway In then the Drv Foldaway Out relays.Did the test light illuminate when the relays were activated in BOTH directions?AllYes → Replace the Driver Foldaway Mirror.Perform BODY VERIFICATION TEST - VER 1.No → Go To 88 Key off. Disconnect the Passenger Door Module C2 connector.Disconnect the Passenger Power Mirror connector.Measure the resistance of the Power Folding Mirror Feed wire between the PDM C2connector and the Passenger Power Mirror connector.Is the resistance below 5.0 ohms?AllYes → Go To 9No → Repair the open Power Folding Mirror Feed wire.Perform BODY VERIFICATION TEST - VER 1.9 Key off. Disconnect the Passenger Door Module C2 connector.Disconnect the Passenger Power Mirror connector.Measure the resistance of the Power Folding Mirror Return wire between the PDMC2 connector and the Driver Power Mirror connector.Is the resistance below 5.0 ohms?AllYes → Go To 10No → Repair the open Power Folding Mirror Return wire.Perform BODY VERIFICATION TEST - VER 1.10 If there are no possible causes remaining, view repair. AllRepairReplace the Driver Door Module.Perform BODY VERIFICATION TEST - VER 1.11 Key off. Disconnect the Passenger Door Module C2 connector.Measure the resistance between ground and the Power Folding Mirror Feed circuitin the PDM C2 connector.Is the resistance below 5.0 ohms?AllYes → Go To 12No → Go To 1512 Key off. Disconnect the Passenger Door Module C2 connector.Disconnect the Passenger Power Mirror connector.Measure the resistance between ground and the Power Folding Mirror Feed wire inthe PDM C2 connector.Is the resistance below 5.0 ohms?AllYes → Repair the Power Folding Mirror Feed wire for a short to ground.Perform BODY VERIFICATION TEST - VER 1.No → Go To 13569
POWER MIRROR*FOLDING POWER MIRROR INOPERATIVE — ContinuedTEST ACTION APPLICABILITY13 Key off. Disconnect the Passenger Door Module C2 connector.Disconnect the Passenger Power Mirror connector.Measure the resistance between ground and the Power Folding Mirror Return wirein the PDM C2 connector.Is the resistance below 5.0 ohms?AllYes → Repair the Power Folding Mirror Return wire for a short toground.Perform BODY VERIFICATION TEST - VER 1.No → Go To 1414 If there are no possible causes remaining, view repair. AllRepairReplace the Passenger Power Mirror.Perform BODY VERIFICATION TEST - VER 1.15 Ensure the PDM C2 connector is connected at this time.Disconnect the Passenger Power Mirror connector.Connect a 12-volt test light between the Power Folding Mirror Feed and the PowerFolding Mirror Return circuits in the Passenger Power Mirror connector.With the DRBIII, actuate Pas Foldaway In then the Pas Foldaway Out relays.Did the test light illuminate when the relays were activated in BOTH directions?AllYes → Replace the Passenger Door Foldaway Mirror.Perform BODY VERIFICATION TEST - VER 1.No → Go To 1616 Key off. Disconnect the Passenger Door Module C2 connector.Disconnect the Passenger Power Mirror connector.Measure the resistance of the Power Folding Mirror Feed wire between the PDM C2connector and the Passenger Power Mirror connector.Is the resistance below 5.0 ohms?AllYes → Go To 17No → Repair the open Power Folding Mirror Feed wire.Perform BODY VERIFICATION TEST - VER 1.17 Key off. Disconnect the Passenger Door Module C2 connector.Disconnect the Passenger Power Mirror connector.Measure the resistance of the Power Folding Mirror Return wire between the PDMC2 connector and the Driver Power Mirror connector.Is the resistance below 5.0 ohms?AllYes → Go To 18No → Repair the open Power Folding Mirror Return wire.Perform BODY VERIFICATION TEST - VER 1.18 If there are no possible causes remaining, view repair. AllRepairReplace the Passenger Door Module.Perform BODY VERIFICATION TEST - VER 1.570
POWER MIRRORSymptom:*PASSENGER MEMORY MIRROR INOPERATIVEPOSSIBLE CAUSESPASSENGER MIRROR SENSOR GROUND WIRE OPENPASSENGER DOOR MODULE - SENSOR GROUND OPENPASSENGER MIRROR SENSOR GROUND SHORTED TO MIRROR VERTICAL POSITION SIGNALPASSENGER MIRROR SENSOR GROUND SHORTED TO MIRROR HORIZONTAL POSITION SIG-NALPASSENGER DOOR MODULE - MEMORY MIRROR OPENPASSENGER MIRROR HORIZONTAL POSITION SIGNAL SHORT TO GROUNDPASSENGER MIRROR VERTICAL POSITION SIGNAL SHORT TO GROUNDPASSENGER MIRROR HORIZONTAL POSITION SIGNAL WIRE OPENPASSENGER MIRROR VERTICAL POSITION SIGNAL WIRE OPENPASSENGER POWER MIRROR - MEMORY OPENPASSENGER DOOR MODULE - MEMORY CIRCUIT OPENTEST ACTION APPLICABILITY1 Note: The following list of items should be checked before continuing withany power mirror tests.Ensure door ajar switches are working properly before proceeding.Ensure there is communication with the DDM, PDM and the BCM before proceeding.Ensure the mirror directional switches are working properly before proceeding. Ifnot, replace the DDM.Ensure the mirror select switch is working properly before proceeding. If not, replacethe DDM.Ensure both mirrors are operational from the DDM. If not, refer to SERVICEINFORMATION.If all items are operational, continue.AllContinueGo To 22 With the DRBIII read the Pas Mirror Horiz Volts.Operate the mirror from left to right and observe the DRB.Does the voltage vary from approximately 1.0 to 4.0 volts?AllYes → Go To 3No → Go To 53 With the DRBIII, read the Pas Mirror Vert Volts.Operate the mirror from down to up and observe the DRB.Does the voltage vary from approximately 1.0 to 4.0 volts?AllYes → Go To 4No → Go To 5571
POWER MIRROR*PASSENGER MEMORY MIRROR INOPERATIVE — ContinuedTEST ACTION APPLICABILITY4 If there are no possible causes remaining, view repair. AllRepairReplace the Passenger Door Module.Perform BODY VERIFICATION TEST - VER 1.5 Disconnect the Passenger Power Mirror connector.Disconnect the PDM C2 connector.Measure the resistance of the Mirror Sensor Ground wire between the PDM C2connector and the Passenger Power Mirror connector.Is the resistance below 5.0 ohms?AllYes → Go To 6No → Repair the open Mirror Sensor Ground wire.Perform BODY VERIFICATION TEST - VER 1.6 Ensure the PDM C2 connector is connected at this time.Disconnect the Passenger Power Mirror connector.Turn the ignition off. Turn all lights off.Measure the resistance between ground and the Mirror Sensor Ground circuit in thePassenger Power Mirror connector.Is the resistance below 5.0 ohms?AllYes → Go To 7No → Replace the Passenger Door Module.Perform BODY VERIFICATION TEST - VER 1.7 Disconnect the Passenger Power Mirror connector.Measure the voltage between Mirror Horizontal Position Signal circuit and ground.Is the voltage approximately 5.0 volts?AllYes → Go To 8No → Go To 108 Disconnect the Passenger Power Mirror connector.Measure the voltage between Mirror Vertical Position Signal circuit and ground.Is the voltage approximately 5.0 volts?AllYes → Go To 9No → Go To 109 If there are no possible causes remaining, view repair. AllRepairReplace the Passenger Power Mirror.Perform BODY VERIFICATION TEST - VER 1.10 Disconnect the Passenger Door Module C2 connector.Disconnect the Passenger Power Mirror connector.Measure the resistance between the Mirror Sensor Ground circuit and the MirrorVertical Position Signal circuit in the PDM C2 connector.Is the resistance below 1000.0 ohms?AllYes → Repair the Mirror Sensor Ground wire for a short to the MirrorVertical Position Signal wire.Perform BODY VERIFICATION TEST - VER 1.No → Go To 11572
POWER MIRROR*PASSENGER MEMORY MIRROR INOPERATIVE — ContinuedTEST ACTION APPLICABILITY11 Disconnect the Passenger Door Module C2 connector.Disconnect the Passenger Power Mirror connector.Measure the resistance between the Mirror Sensor Ground circuit and the MirrorHorizontal Position Signal circuit in the PDM C2 connector.Is the resistance below 1000.0 ohms?AllYes → Repair the Mirror Sensor Ground wire for a short to the MirrorHorizontal Position Signal wire.Perform BODY VERIFICATION TEST - VER 1.No → Go To 1212 Disconnect the Passenger Door Module C2 connector.Disconnect the passenger Power Mirror connector.Measure the resistance between ground and the Mirror Horizontal Position Signalcircuit.Is the resistance below 1000.0 ohms?AllYes → Repair the Mirror Horizontal Position Signal wire for a short toground.Perform BODY VERIFICATION TEST - VER 1.No → Go To 1313 Disconnect the Passenger Door Module C2 connector.Disconnect the Passenger Power Mirror connector.Measure the resistance between ground and the Mirror Vertical Position Signalcircuit.Is the resistance below 1000.0 ohms?AllYes → Repair the Mirror Vertical Position Signal wire for a short toground.Perform BODY VERIFICATION TEST - VER 1.No → Go To 1414 Disconnect the Passenger Door Module C2 connector.Disconnect the Passenger Power Mirror connector.Measure the resistance of the Mirror Horizontal Position Signal circuit between thePDM C2 connector and the Passenger Power Mirror connector.Is the resistance below 5.0 ohms?AllYes → Go To 15No → Repair the open Mirror Horizontal Position Signal wire.Perform BODY VERIFICATION TEST - VER 1.15 Disconnect the Passenger Door Module C2 connector.Disconnect the Passenger Power Mirror connector.Measure the resistance of the Mirror Vertical Position Signal circuit between thePDM C2 connector and the Passenger Power Mirror connector.Is the resistance below 5.0 ohms?AllYes → Go To 16No → Repair the open Mirror Vertical Position Signal wire.Perform BODY VERIFICATION TEST - VER 1.16 If there are no possible causes remaining, view repair. AllRepairReplace the Passenger Door Module.Perform BODY VERIFICATION TEST - VER 1.573
POWER TOPSymptom:ACCESSORY (SUNRO<strong>OF</strong>) DELAY RELAY SHORTED HIWhen Monitored and Set Condition:ACCESSORY (SUNRO<strong>OF</strong>) DELAY RELAY SHORTED HIWhen Monitored: Igniton in RUN and IOD fuse/connector installed.Set Condition: The BCM is trying to activate the sunroof (accy) delay relay. The fault isset when the BCM tries to pull this input low and excessive current is sinked into the BCM.POSSIBLE CAUSESSUNRO<strong>OF</strong> DELAY RELAY COILSUNRO<strong>OF</strong> DELAY RELAY CONTROL CIRCUIT SHORT TO BATTERYSUNRO<strong>OF</strong> SECTION <strong>OF</strong> BCMTEST ACTION APPLICABILITY1 Turn the ignition off.Lower the Junction Block and remove the Sunroof Delay Relay.Measure the resistance of the relay coil across terminals 1 and 2 or (85 and 86) of therelay.What resistance did you measure?AllBelow 65.0 ohmsReplace the Sunroof Delay Relay.Perform BODY VERIFICATION TEST - VER 1.Between 65 and 90 ohmsGo To 22 Turn the ignition off.Lower the Junction Block and remove the Sunroof Delay Relay.Remove the Body Control Module from the Junction Block.Turn ignition on.Measure the voltage of the Sunroof Delay Relay Control circuit at the Junction BlockBCM connector.Is there any voltage present?AllYes → Replace the Junction Block.Perform BODY VERIFICATION TEST - VER 1.No → Go To 33 If there are no possible causes remaining, view Repair. AllRepairReplace the Body Control Module.Perform BODY VERIFICATION TEST - VER 1.574
POWER TOPSymptom:*SUNRO<strong>OF</strong> DELAY INOPERATIVESUNRO<strong>OF</strong> SECTION <strong>OF</strong> BCMREFER TO MOTOR INOPPOSSIBLE CAUSESTEST ACTION APPLICABILITY1 The sunroof will be operational for approximately 45 seconds after the ignition hasbeen turned off. If either front door is opened, power to the sunroof will beimmediately removed.Ensure that both front doors are closed.Turn ignition on.Open and close the sunroof.What happened while opening and closing the sunroof?AllOpened and closed normallyReplace the Body Control Module.Perform BODY VERIFICATION TEST - VER 1.Failed to openRefer to symptom list for problems related to SUNRO<strong>OF</strong> MOTORINOPERATIVE.Failed to closeRefer to symptom list for problems related to SUNRO<strong>OF</strong> MOTORINOPERATIVE.575
POWER TOPSymptom:*SUNRO<strong>OF</strong> MOTOR INOPERATIVEPOSSIBLE CAUSESCHECK DTCOPEN RELAY CONTACTSUNRO<strong>OF</strong> DELAY RELAY COILSUNRO<strong>OF</strong> SWITCH GROUND CIRCUIT OPENBLOWN FUSE #25FUSE #25 DEFECTIVEJUNCTION BLOCK DEFECTIVESUNRO<strong>OF</strong> DELAY RELAY CONTROL J/B OPENSUNRO<strong>OF</strong> OPEN SWITCH OPENSUNRO<strong>OF</strong> DELAY RELAY OUTPUT SHORTED TO GROUNDSUNRO<strong>OF</strong> VENT SWITCH OPENSUNRO<strong>OF</strong> MOTOR B+ WIRE SHORT TO GROUNDSUNRO<strong>OF</strong> MOTOR B- WIRE SHORT TO GROUNDSUNRO<strong>OF</strong> GROUND CIRCUIT OPENSUNRO<strong>OF</strong> MOTOR SHORT TO GROUNDOPEN POWER SUNRO<strong>OF</strong> OPEN CIRCUITOPEN POWER SUNRO<strong>OF</strong> VENT CIRCUITOPEN SUNRO<strong>OF</strong> DELAY RELAY OUTPUT CIRCUITBODY CONTROL MODULE - OPEN RELAY CONTROLSUNRO<strong>OF</strong> ASSEMBLY MODULE OR MOTOR OPENSUNRO<strong>OF</strong> CONTROL MODULE - SHORT TO GROUNDSUNRO<strong>OF</strong> CONTROL MODULE OPENTEST ACTION APPLICABILITY1 With the DRBIII, read Body Computer DTC’s.AllDoes the DRBIII display Accessory Delay Relay Shorted HiYes → Refer to symptom list for problems related to ACCESSORYDELAY RELAY SHORTED HI.Perform BODY VERIFICATION TEST - VER 1.No → Go To 2576
POWER TOP*SUNRO<strong>OF</strong> MOTOR INOPERATIVE — ContinuedTEST ACTION APPLICABILITY2 Turn the ignition off.Lower the Junction Block and remove the Sunroof Delay Relay.Measure the resistance of the relay coil across terminals 1&2or85&86.What resistance did you measure?AllBelow 65.0 ohmsReplace the Sunroof Delay Relay.Perform BODY VERIFICATION TEST - VER 1.Between 65 and 85 ohmsGo To 3Greater than 85 ohmsReplace the Sunroof Delay Relay.Perform BODY VERIFICATION TEST - VER 1.3 Turn ignition off.Lower the Junction Block and remove the Sunroof Delay Relay.Measure the voltage of the Fused B(+) circuit in the Sunroof (accessory) Delay Relaycavity #30 and cavity #85 to ground.Is the voltage above 10.5 volts in both cavities?AllYes → Go To 4No → Go To 164 Lower the Junction Block and remove the Sunroof Delay Relay.Connect a test light between the Fused B(+) ckt and the Sunroof Delay Relay Controlckt (cavities 85 & 86) in the relay connector.Turn the ignition to the Run position and observe the test light..Does the test light illuminate when ignition is in the On position?AllYes → Go To 5No → Go To 145 Turn the ignition off.Remove the Sunroof Delay RelayConnect a jumper wire between the Fused B(+) ckt and the Sunroof Delay RelayOutput ckt (cavities 30 & 87) in the relay connector.Turn the ignition on and operate the sunroof.Did the sunroof motor operate?AllYes → Replace the Sunroof Delay Relay.Perform BODY VERIFICATION TEST - VER 1.No → Go To 66 Turn the ignition off.Turn all lights off.Gain access to the sunroof switch and disconnect the connector.Measure the resistance of the ground circuit at the sunroof switch connector.Is the resistance below 5.0 ohms?AllYes → Go To 7No → Repair the sunroof switch ground circuit for an open.Perform BODY VERIFICATION TEST - VER 1.577
POWER TOP*SUNRO<strong>OF</strong> MOTOR INOPERATIVE — ContinuedTEST ACTION APPLICABILITY7 Turn the ignition off.Gain access to the sunroof switch and disconnect the connector.Connect an ohmmeter between the power sunroof open circuit and the ground circuiton the sunroof switch.When pressing the open button on the sunroof switch does the meter read less than5.0 ohms?AllYes → Go To 8No → Replace the Sunroof Switch.Perform BODY VERIFICATION TEST - VER 1.8 Turn the ignition off.Gain access to the sunroof switch and disconnect the connector.Connect an ohmmeter between the power sunroof vent/close circuit and the groundcircuit on the sunroof switch.When pressing the vent/close button on the sunroof switch does the meter read lessthan 5.0 ohms?AllYes → Go To 9No → Replace the Sunroof Switch.Perform BODY VERIFICATION TEST - VER 1.9 Turn the ignition off.Turn all lights off.Gain access to the power sunroof assembly and disconnect the Sunroof ControlModule connector (necessary to lower the overhead console, remove the A pillartrim, sunvisors, assist handles and sunroof pinch welt).Measure the resistance of the ground circuit in the Sunroof Control Moduleconnector.Is the resistance below 5.0 ohms?AllYes → Go To 10No → Repair the power sunroof assembly open ground circuit.Perform BODY VERIFICATION TEST - VER 1.10 Turn the ignition off.Gain access to the power sunroof assembly and disconnect the Sunroof ControlModule connector (necessary to lower the overhead console, remove the A pillartrim, sunvisors, assist handles and sunroof pinch welt).Gain access to the sunroof switch and disconnect the connector.Measure the resistance of the Power Sunroof Open circuit between the SunroofControl Module and the Sunroof Switch.Is the resistance below 5.0 ohms?AllYes → Go To 11No → Repair the Power Sunroof Open circuit for an open.Perform BODY VERIFICATION TEST - VER 1.578
POWER TOP*SUNRO<strong>OF</strong> MOTOR INOPERATIVE — ContinuedTEST ACTION APPLICABILITY11 Turn the ignition off.Gain access to the power sunroof assembly and disconnect the Sunroof ControlModule connector (necessary to lower the overhead console, remove the A pillartrim, sunvisors, assist handles and sunroof pinch welt).Gain access to the Sunroof Switch and disconnect the connector.Measure the resistance of the Power Sunroof Vent circuit between the SunroofControl Module and the Sunroof Switch.Is the resistance below 5.0 ohms?AllYes → Go To 12No → Repair the Power Sunroof Vent circuit for an open.Perform BODY VERIFICATION TEST - VER 1.12 Turn the ignition off.Lower the Junction Block and remove the Sunroof Delay Relay.Gain access to the power sunroof assembly and disconnect the Sunroof ControlModule connector (necessary to lower the overhead console, remove the A pillartrim, sunvisors, assist handles and sunroof pinch welt).Measure the resistance of the sunroof delay relay output circuit between the powersunroof control module connector and the sunroof delay relay cavity 87.Is the resistance below 5.0 ohms?AllYes → Go To 13No → Repair the Sunroof Delay Relay Output circuit for an open.Perform BODY VERIFICATION TEST - VER 1.13 Remove the headliner as per instructions in Service Information.Disconnect the Sunroof Control Module connector.Momentarily apply Fused 12 volts to the Sunroof Motor B+ circuit and ground theSunroof Motor B- circuit in the Module connector (the motor should run).Reverse the polarity by switching the power and ground (the motor should run in theopposite direction).Did the glass move in both directions?AllYes → Run the motor until the Sunroof is fully closed and replace theSunroof Control ModulePerform BODY VERIFICATION TEST - VER 1.No → Replace the Sunroof Motor.Perform BODY VERIFICATION TEST - VER 1.14 Turn ignition off.Remove the Body Control Module.Lower the Junction Block and remove the Sunroof Delay Relay.Measure the resistance of the Sunroof Delay Relay Control circuit between theJunction Block BCM connector and the Sunroof Delay Relay cavity #86.Is the resistance below 5.0 ohms?AllYes → Go To 15No → Replace the Junction Block.Perform BODY VERIFICATION TEST - VER 1.15 If there are no possible causes remaining, view Repair. AllRepairReplace the Body Control Module.Perform BODY VERIFICATION TEST - VER 1.579
POWER TOP*SUNRO<strong>OF</strong> MOTOR INOPERATIVE — ContinuedTEST ACTION APPLICABILITY16 Turn ignition off.Remove and inspect the Junction Block Fuse #25.Is the fuse open?AllNo → Replace the Junction Block.Perform BODY VERIFICATION TEST - VER 1.Yes → Go To 1717 Replace the juction block fuse #25 with a known good fuse.Turn ignition on and operate the sunroof.Turn the ignition off.Remove and inspect the Junction Block Fuse #25.Is the fuse blown?AllYes → Go To 18No → Replacing the open fuse has corrected the problem. Test complete.Perform BODY VERIFICATION TEST - VER 1.18 Turn ignition off.Remove the Sunroof (accessory) Delay Relay.Remove the Junction Block Fuse #25.Measure the resistance of the Sunroof (accessory) Delay Relay cavity #30 in theJunction Block to ground.Is the resistance below 5.0 ohms?AllYes → Replace the defective Junction Block.Perform BODY VERIFICATION TEST - VER 1.No → Go To 1919 Turn the ignition off.Lower the Junction Block and remove the Sunroof Delay Relay.Gain access to the power sunroof assembly and disconnect the Sunroof ControlModule connector (necessary to lower the overhead console, remove the A pillartrim, sun visors, assist handles and sunroof pinch welt).Measure the resistance of the sunroof delay relay output circuit at the SunroofControl Module connector to ground.Is the resistance below 1000 ohms?AllYes → Repair the Sunroof Delay Relay Output circuit for a short toground.Perform BODY VERIFICATION TEST - VER 1.No → Go To 2020 Remove the headliner as per instructions in Service Information.Disconnect the sunroof motor 2-way connector.Disconnect the Sunroof Control Module connectorMeasure the resistance between ground and the Sunroof Motor B+ circuit.Is the resistance below 1000.0 ohms?AllYes → Repair the Sunroof Motor B+ wire for a short to ground.Perform BODY VERIFICATION TEST - VER 1.No → Go To 21580
POWER TOP*SUNRO<strong>OF</strong> MOTOR INOPERATIVE — ContinuedTEST ACTION APPLICABILITY21 Remove the headliner as per instructions in Service Information.Disconnect the Sunroof Motor 2-way connector.Disconnect the Sunroof Control Module connectorMeasure the resistance between ground and the Sunroof Motor B- circuit.Is the resistance below 1000.0 ohms?AllYes → Repair the Sunroof Motor B- wire for a short to ground.Perform BODY VERIFICATION TEST - VER 1.No → Go To 2222 Remove the headliner as per instructions in Service Information.Disconnect the Sunroof Control Module connector.Ensure the Sunroof Motor connector is connected before proceeding.Measure the resistance between ground and the Sunroof Motor B+ circuit.Is the resistance below 100.0 ohmsAllYes → Replace the Sunroof Motor.Perform BODY VERIFICATION TEST - VER 1.No → Go To 2323 If there are no possible causes remaining, view repair. AllRepairReplace the Sunroof Control Module.Perform BODY VERIFICATION TEST - VER 1.581
POWER WINDOWSSymptom:*ALL POWER WINDOWS INOPERATIVEPOSSIBLE CAUSESMODULE RESPONSEDRIVER DOOR MODULE - WINDOWS INOPERATIVETEST ACTION APPLICABILITY1 With the DRBIII, read the DOOR MODULE status.AllIs the DRBIII able to access Both Door Modules?No → Refer to the COMMUNICATION category for the related symptom(s).Perform BODY VERIFICATION TEST - VER 1.Yes → Replace the Driver Door Module..Perform BODY VERIFICATION TEST - VER 1.582
POWER WINDOWSSymptom:*DRIVER REAR WINDOW INOPERATIVE FROM BOTH SWITCHESPOSSIBLE CAUSESREAR WINDOW SWITCH OPENDRIVER REAR WINDOW DRIVER DOWN WIRE OPENDRIVER REAR WINDOW DRIVER UP WIRE OPENDRIVER REAR WINDOW DRIVER UP WIRE SHORT TO GROUNDDRIVER REAR WINDOW DRIVER DOWN WIRE SHORT TO GROUNDWINDOW DRIVER DOWN WIRE OPENWINDOW DRIVER DOWN WIRE SHORT TO GROUNDWINDOW DRIVER UP WIRE OPENWINDOW DRIVER UP WIRE SHORT TO GROUNDREAR WINDOW MOTOR OPENDRIVER DOOR MODULE - OUTPUT OPENTEST ACTION APPLICABILITY1 Remove the Rear Door Trim Panel.Disconnect the rear window switch connector.Turn the ignition on.Using a 12-volt Test Light connected to ground, check the Driver Rear Window DriverUp and Down circuits.Did the test light illuminate brightly on both circuits?AllYes → Go To 2No → Go To 82 Remove the Rear Door Trim Panel.Disconnect the Driver Rear Power Window Switch connector.Turn the ignition on.Warning: Keep the window area clear as the window SHOULD move up anddown in this test.Connect a jumper wire from the Window Driver Down terminal in the switchconnector to ground.Connect a jumper wire from the Window Driver Up terminal in the switch connectorand momentarily connect it to the Rear Window Driver Up terminal in the switchconnector.Reverse the Jumper wires to run the motor in the opposite direction.Did the Window Motor operate in both directions?AllYes → Replace the Rear Window Switch.Perform BODY VERIFICATION TEST - VER 1.No → Go To 3583
POWER WINDOWS*DRIVER REAR WINDOW INOPERATIVE FROM BOTH SWITCHES —ContinuedTEST ACTION APPLICABILITY3 Remove the Rear Door Trim Panel.Disconnect the Driver Rear Window Switch connector.Disconnect the Driver Rear Power Window Motor connector.Measure the resistance of the Window Driver Down circuit between the windowswitch connector and the window motor connector.Is the resistance below 5.0 ohms?AllYes → Go To 4No → Repair the Window Driver Down wire for an open.Perform BODY VERIFICATION TEST - VER 1.4 Remove the Rear Door Trim Panel.Disconnect the Driver Rear Window Switch connector.Disconnect the Driver Rear Power Window Motor connector.Measure the resistance of the Window Driver Down circuit to ground.Is the resistance below 1000.0 ohms?AllYes → Repair the Window Driver Down wire for a short to ground.Perform BODY VERIFICATION TEST - VER 1.No → Go To 55 Disconnect the Driver Rear Window Switch connector.Disconnect the Driver Rear Power Window Motor connector.Measure the resistance of the Window Driver Up circuit between the window switchconnector and the window motor connector.Is the resistance below 5.0 ohms?AllYes → Go To 6No → Repair the Window Driver Up wire for an open.Perform BODY VERIFICATION TEST - VER 1.6 Disconnect the Driver Rear Window Switch connector.Disconnect the Driver Rear Power Window Motor connector.Measure the resistance of the Window Driver Up circuit to ground.Is the resistance below 1000.0 ohms?AllYes → Repair the Window Driver Up Wire for a short to ground.Perform BODY VERIFICATION TEST - VER 1.No → Go To 77 If there are no possible causes remaining, view repair. AllRepairReplace the Rear Window Motor.Perform BODY VERIFICATION TEST - VER 1.8 Disconnect the Driver Door Module C1 connector.Disconnect the Driver Rear Window Switch connector.Measure the resistance of the Driver Rear Window Driver Down circuit between theDDM connector and the Window Switch connector.Is the resistance below 5.0 ohms?AllYes → Go To 9No → Repair the Driver Rear Window Driver Down wire for an open..Perform BODY VERIFICATION TEST - VER 1.584
POWER WINDOWS*DRIVER REAR WINDOW INOPERATIVE FROM BOTH SWITCHES —ContinuedTEST ACTION APPLICABILITY9 Disconnect the Driver Door Module C1 connector.Disconnect the Driver Rear Widow Switch connector.Measure the resistance of the Driver Rear Window Driver Up circuit between theDDM connector and the Window Switch connector.Is the resistance below 5.0 ohms?AllYes → Go To 10No → Repair the Driver Rear Window Driver Up wire for an open.Perform BODY VERIFICATION TEST - VER 1.10 Disconnect the Driver Door Module C1 connector.Disconnect the Driver Rear Window Switch connector.Measure the resistance of the Driver Rear Window Driver Up circuit to ground..Is the resistance below 1000.0 ohms?AllYes → Repair the Driver Rear Window Driver Up wire for a short toground.Perform BODY VERIFICATION TEST - VER 1.No → Go To 1111 Disconnect the Driver Door Module C1 connector.Disconnect the Driver Rear Window Switch connector.Measure the resistance of the Driver Rear Window Driver Down circuit to ground..Is the resistance below 1000.0 ohms?AllYes → Repair the Driver Rear Window Driver Down wire for a short toground.Perform BODY VERIFICATION TEST - VER 1.No → Go To 1212 If there are no possible causes remaining, view repair. AllRepairReplace the Driver Door Module (output open)Perform BODY VERIFICATION TEST - VER 1.585
POWER WINDOWSSymptom:*DRIVER REAR WINDOW INOPERATIVE FROM DDMPOSSIBLE CAUSESDRIVER DOOR MODULE - DRIVER REAR WINDOW INOPERATIVETEST ACTION APPLICABILITY1 This test assumes that the driver rear window IS operational from the driver reardoor switch. Ensure the driver rear window is operational from the driver rear doorswitch.If is not, refer to symptom list for problems related to DRIVER REAR WINDOWINOPERATIVE FROM BOTH SWITCHES. SWITCHES.If there are no possible causes remaining, view repair.AllRepairReplace the Driver Door Module.Perform BODY VERIFICATION TEST - VER 1.586
POWER WINDOWSSymptom:*DRIVER REAR WINDOW INOPERATIVE FROM REAR SWITCHOPEN GROUND CIRCUITSWITCH DEFECTIVEPOSSIBLE CAUSESTEST ACTION APPLICABILITY1 Note Ensure the Window Lock out Switch on the DDM is operating properlybefore proceeding.Remove the Rear Door Trim Panel.Disconnect the Power Window Switch connector.Measure the resistance of the Ground circuit to ground.Is the resistance below 5.0 ohms?AllYes → Replace the Power Window Switch.Perform BODY VERIFICATION TEST - VER 1.No → Repair the open ground circuit.Perform BODY VERIFICATION TEST - VER 1.587
POWER WINDOWSSymptom:*DRIVER WINDOW INOPERATIVEPOSSIBLE CAUSESDRIVER DOOR MODULE - OPEN SWITCHDRIVER DOOR MODULE - OUTPUT OPENMOTOR CIRCUIT CHECKDRIVER WINDOW DRIVER UP WIRE OPENDRIVER WINDOW DRIVER UP SHORTED TO GROUNDDRIVER WINDOW DRIVER DOWN WIRE OPENDRIVER WINDOW DRIVER UP SHORTED TO VOLTAGEDRIVER WINDOW DRIVER DOWN SHORTED TO GROUNDDRIVER WINDOW DRIVER DOWN SHORTED TO VOLTAGEMOTOR DEFECTIVE OPENMOTOR DEFECTIVE SHORT TO GROUNDTEST ACTION APPLICABILITY1 Connect the DRBIII and select: Body, Door Modules, ActuatorsWith the DRBIII actuate the DRV F WIN UP RLY and then the DRV F WIN DNRLY..Did the window operate up and down?AllYes → Replace the Driver Door Module (switch input open)Perform BODY VERIFICATION TEST - VER 1.No → Go To 22 Disconnect the Driver Door Module C1 connector.Warning: Keep the window area clear as the window SHOULD move up anddown in this test.Connect a jumper wire from the Driver Window Driver Down terminal to the groundterminal.Connect a jumper wire from the Driver Window Driver Up terminal and momentarilyconnect it to the Fused B(+) terminal.Reverse the Jumper wires to run the motor in the opposite direction.Did the window motor operate up and down?AllYes → Replace the Driver Door Module (output open).Perform BODY VERIFICATION TEST - VER 1.No → Go To 3588
POWER WINDOWS*DRIVER WINDOW INOPERATIVE — ContinuedTEST ACTION APPLICABILITY3 Disconnect the Driver Door Module C1 connector.Turn ignition off.Measure and record the total resistance of the motor ckt between the Driver WindowDriver Up ckt and the Driver Window Driver Down ckt in the DDM C1 connector(should be under 5.0 ohms).Measure and record the resistance of the Driver Window Driver Down ckt to groundin the DDM C1 connector (should be infinite).Turn ignition on.Measure and record the voltage of the Driver Window Driver Down ckt to ground inthe DDM C1 connector (should be zero).What were your readingsAllTotal resistance above 5.0 ohmsGo To 4Resistance to gnd less than 1000 ohmsGo To 7Voltage above 0.02 voltsGo To 10None of the aboveCheck and repair any reasons for the window regulator to bind. Ifthe mechanism is OK, replace the power window motor.Perform BODY VERIFICATION TEST - VER 1.4 Disconnect the driver door module C1 connector.Disconnect the driver power window motor connector.Measure the resistance of the Driver Window Driver Up circuit between the DDMconnector and the window motor connector.Is the resistance below 5.0 ohms?AllYes → Go To 5No → Repair the Driver Window Driver up wire for an open.Perform BODY VERIFICATION TEST - VER 1.5 Disconnect the driver door module C1 connector.Disconnect the driver power window motor connector.Measure the resistance of the Driver Window Driver Down circuit between the DDMconnector and the window motor connector.Is the resistance below 5.0 ohms?AllYes → Go To 6No → Repair the Driver Window Driver down wire for an open.Perform BODY VERIFICATION TEST - VER 1.6 If there are no possible causes remaining, view Repair. AllRepairReplace the power window motor.Perform BODY VERIFICATION TEST - VER 1.589
POWER WINDOWS*DRIVER WINDOW INOPERATIVE — ContinuedTEST ACTION APPLICABILITY7 Disconnect the driver door module C1 connector.Disconnect the driver power window motor connector.Measure the resistance of the Driver Window Driver Up circuit to ground.Is the resistance below 100.0 ohms?AllYes → Repair the Driver Window Driver up wire for a short to ground.Perform BODY VERIFICATION TEST - VER 1.No → Go To 88 Disconnect the driver door module C1 connector.Disconnect the driver power window motor connector.Measure the resistance of the Driver Window Driver Down ckt to ground.Is the resistance below 100.0 ohms?AllYes → Repair the Driver Window Driver Down wire for a short toground.Perform BODY VERIFICATION TEST - VER 1.No → Go To 99 If there are no possible causes remaining, view Repair. AllRepairReplace the Power Window Motor (internal short)Perform BODY VERIFICATION TEST - VER 1.10 Disconnect the driver door module C1 connector.Disconnect the driver power window motor connector.Measure the voltage of the Driver Window Driver Up ckt to ground.Is there ANY voltage on the Driver Window Driver Up wire?AllYes → Repair the Driver Window Driver Up wire for a short to voltage.Perform BODY VERIFICATION TEST - VER 1.No → Go To 1111 Disconnect the driver door module C1 connector.Disconnect the driver power window motor connector.Measure the voltage of the Driver Window Driver Down ckt to ground.Is there ANY voltage on the Driver Window Driver Down wire?AllYes → Repair the Driver Window Driver Down wire for a short tovoltage.Perform BODY VERIFICATION TEST - VER 1.No → Test Complete.590
POWER WINDOWSSymptom:*PASSENGER REAR WINDOW INOPERATIVE FROM BOTHSWITCHESPOSSIBLE CAUSESREAR WINDOW SWITCH OPENPASSENGER REAR WINDOW DRIVER DOWN WIRE OPENPASSENGER REAR WINDOW DRIVER UP WIRE OPENPASSENGER REAR WINDOW DRIVER UP WIRE SHORT TO GROUNDPASSENGER REAR WINDOW DRIVER DOWN WIRE SHORT TO GROUNDWINDOW DRIVER DOWN WIRE OPENWINDOW DRIVER DOWN WIRE SHORT TO GROUNDWINDOW DRIVER UP WIRE OPENWINDOW DRIVER UP WIRE SHORT TO GROUNDREAR WINDOW MOTOR OPENPASSENGER DOOR MODULE - OUTPUT OPENTEST ACTION APPLICABILITY1 Remove the Rear Door Trim Panel.Disconnect the rear window switch connector.Turn the ignition on.Using a 12-volt Test Light connected to ground, check the Passenger Rear WindowDriver Up and Down circuits.Did the test light illuminate brightly on both circuits?AllYes → Go To 2No → Go To 82 Remove the Rear Door Trim Panel.Disconnect the Passenger Rear Power Window Switch connector.Turn the ignition on.Warning: Keep the window area clear as the window SHOULD move up anddown in this test.Connect a jumper wire from the Window Driver Down terminal in the switchconnector to ground.Connect a jumper wire from the Window Driver Up terminal in the switch connectorand momentarily connect it to the Rear Window Driver Up terminal in the switchconnector.Reverse the Jumper wires to run the motor in the opposite direction.Did the Window Motor operate in both directions?AllYes → Replace the Rear Window Switch.Perform BODY VERIFICATION TEST - VER 1.No → Go To 3591
POWER WINDOWS*PASSENGER REAR WINDOW INOPERATIVE FROM BOTH SWITCHES— ContinuedTEST ACTION APPLICABILITY3 Remove the Rear Door Trim Panel.Disconnect the Passenger Rear Window Switch connector.Disconnect the Driver Rear Power Window Motor connector.Measure the resistance of the Window Driver Down circuit between the windowswitch connector and the window motor connector.Is the resistance below 5.0 ohms?AllYes → Go To 4No → Repair the Window Driver Down wire for an open.Perform BODY VERIFICATION TEST - VER 1.4 Remove the Rear Door Trim Panel.Disconnect the Passenger Rear Window Switch connector.Disconnect the Passenger Rear Power Window Motor connector.Measure the resistance of the Window Driver Down circuit to ground.Is the resistance below 1000.0 ohms?AllYes → Repair the Window Driver Down Wire for a short to ground.Perform BODY VERIFICATION TEST - VER 1.No → Go To 55 Disconnect the Passenger Rear Window Switch connector.Disconnect the Passenger Rear Power Window Motor connector.Measure the resistance of the Window Driver Up circuit between the window switchconnector and the window motor connector.Is the resistance below 5.0 ohms?AllYes → Go To 6No → Repair the Window Driver Up wire for an open.Perform BODY VERIFICATION TEST - VER 1.6 Disconnect the Passenger Rear Window Switch connector.Disconnect the Passenger Rear Power Window Motor connector.Measure the resistance of the Window Driver Up circuit to ground.Is the resistance below 1000.0 ohms?AllYes → Repair the Window Driver Up Wire for a short to ground.Perform BODY VERIFICATION TEST - VER 1.No → Go To 77 If there are no possible causes remaining, view repair. AllRepairReplace the Rear Window Motor.Perform BODY VERIFICATION TEST - VER 1.8 Disconnect the Passenger Door Module C1 connector.Disconnect the Passenger Rear Window Switch connector.Measure the resistance of the Passenger Rear Window Driver Down circuit betweenthe PDM connector and the Window Switch connector.Is the resistance below 5.0 ohms?AllYes → Go To 9No → Repair the open Passenger Rear Window Driver Down wire.Perform BODY VERIFICATION TEST - VER 1.592
POWER WINDOWS*PASSENGER REAR WINDOW INOPERATIVE FROM BOTH SWITCHES— ContinuedTEST ACTION APPLICABILITY9 Disconnect the Passenger Door Module C1 connector.Disconnect the Passenger Rear Widow Switch connector.Measure the resistance of the Passenger Rear Window Driver Up circuit between thePDM connector and the Window Switch connector.Is the resistance below 5.0 ohms?AllYes → Go To 10No → Repair the Passenger Rear Window Driver Up wire for an open.Perform BODY VERIFICATION TEST - VER 1.10 Disconnect the Passenger Door Module C1 connector.Disconnect the Passenger Rear Window Switch connector.Measure the resistance of the Passenger Rear Window Driver Up circuit to ground..Is the resistance below 1000.0 ohms?AllYes → Repair the Passenger Rear Window Driver Up wire for a short toground.Perform BODY VERIFICATION TEST - VER 1.No → Go To 1111 Disconnect the Passenger Door Module C1 connector.Disconnect the Passenger Rear Window Switch connector.Measure the resistance of the Passenger Rear Window Driver Down circuit toground..Is the resistance below 1000.0 ohms?AllYes → Repair the Passenger Rear Window Driver Down wire for a shortto ground.Perform BODY VERIFICATION TEST - VER 1.No → Go To 1212 If there are no possible causes remaining, view repair. AllRepairReplace the Passenger Door Module (output open)Perform BODY VERIFICATION TEST - VER 1.593
POWER WINDOWSSymptom:*PASSENGER REAR WINDOW INOPERATIVE FROM DDMPOSSIBLE CAUSESDRIVER DOOR MODULE - PASSENGER REAR WINDOW INOPERATIVETEST ACTION APPLICABILITY1 This test assumes that the passenger rear window IS operational from the passengerwindow switches. If it is not, Refer to symptom list for problems related to PassengerRear Window Inoperative from Both Switches.If there are no possible causes remaining, view Repair.AllRepairReplace the Driver Door Module.Perform BODY VERIFICATION TEST - VER 1.594
POWER WINDOWSSymptom:*PASSENGER REAR WINDOW INOPERATIVE FROM REARSWITCHOPEN GROUND CIRCUITSWITCH DEFECTIVEPOSSIBLE CAUSESTEST ACTION APPLICABILITY1 Note Ensure the Window Lock out Switch on the DDM is operating properlybefore proceeding.Remove the Rear Door Trim Panel.Disconnect the Power Window Switch connector.Turn the ignition off.Turn all lights off.Measure the resistance of the Ground circuit to ground.Is the resistance below 5.0 ohms?AllYes → Replace the Power Window Switch.Perform BODY VERIFICATION TEST - VER 1.No → Repair the open ground circuit.Perform BODY VERIFICATION TEST - VER 1.595
POWER WINDOWSSymptom:*PASSENGER WINDOW INOPERATIVE FROM BOTH SWITCHESPOSSIBLE CAUSESPASSENGER DOOR MODULE - OPEN SWITCHPASSENGER DOOR MODULE - OUTPUT OPENPASSENGER MOTOR CIRCUIT CHECKPASSENGER WINDOW DRIVER DOWN WIRE OPENPASSENGER WINDOW DRIVER UP WIRE OPENPASSENGER WINDOW DRIVER DOWN SHORTED TO GROUNDPASSENGER WINDOW DRIVER UP SHORTED TO GROUNDPASSENGER WINDOW DRIVER DOWN SHORTED TO VOLTAGEPASSENGER WINDOW DRIVER UP SHORTED TO VOLTAGEWINDOW MOTOR OPENWINDOW MOTOR SHORT TO GROUNDTEST ACTION APPLICABILITY1 NOTE: Ensure there is communication with the Passenger and Driver DoorModules before proceeding.Connect the DRBIII and select: Body Door Modules ActuatorsWith the DRBIII actuate the PASS F WIN UP RLY and then the PASS F WIN DNRLY..Did the window operate up and down?AllYes → Replace the Passenger Door Module (switch input open)Perform BODY VERIFICATION TEST - VER 1.No → Go To 22 Disconnect the Passenger Door Module C1 connector.Warning: Keep the window area clear as the window SHOULD move up anddown in this test.Connect a jumper wire from the Passenger Window Driver Down terminal to theground terminal .Connect a jumper wire from the Passenger Window Driver Up terminal andmomentarily connect it to the Fused B(+) terminal.Reverse the Jumper wires to run the motor in the oposite direction.Did the window motor operate up and down?AllYes → Replace the Passenger Door Module (output open).Perform BODY VERIFICATION TEST - VER 1.No → Go To 3596
POWER WINDOWS*PASSENGER WINDOW INOPERATIVE FROM BOTH SWITCHES —ContinuedTEST ACTION APPLICABILITY3 Disconnect the Passenger Door Module C1 connector.Turn ignition off.Measure and record the total resistance of the motor circuit between the PassengerWindow Driver Up circuit and the Passenger Window Driver Down circuit in thePDM C1 connector (should be under 5.0 ohms).Measure and record the resistance of the Passenger Window Driver Down circuit toground in the PDM C1 connector (should be infinite).Turn ignition on.Measure and record the voltage of the Passenger Window Driver Down circuit toground in the PDM C1 connector (should be zero).What were your readingsAllTotal resistance above 5.0 ohmsGo To 4Resistance to gnd less than 1000 ohmsGo To 7Voltage above 0.02 voltsGo To 10None of the aboveCheck and repair any reasons for the window regulator to bind. Ifthe mechanism is OK, replace the power window motor.Perform BODY VERIFICATION TEST - VER 1.4 Disconnect the Passenger Door Module C1 connector.Disconnect the Passenger Power Window Motor connector.Measure the resistance of the Passenger Window Driver Down circuit between thePDM connector and the window motor connector.Is the resistance below 5.0 ohms?AllYes → Go To 5No → Repair the Passenger Window Driver Down wire for an open.Perform BODY VERIFICATION TEST - VER 1.5 Disconnect the Passenger Door Module C1 connector.Disconnect the Passenger Power Window Motor connector.Measure the resistance of the Passenger Window Driver Up circuit between the PDMconnector and the window motor connector.Is the resistance below 5.0 ohms?AllYes → Go To 6No → Repair the Passenger Window Driver Up wire for an open.Perform BODY VERIFICATION TEST - VER 1.6 If there are no possible causes remaining, view Repair. AllRepairReplace the Power Window Motor.Perform BODY VERIFICATION TEST - VER 1.597
POWER WINDOWS*PASSENGER WINDOW INOPERATIVE FROM BOTH SWITCHES —ContinuedTEST ACTION APPLICABILITY7 Disconnect the Passenger Door Module C1 connector.Disconnect the Passenger Power Window Motor connector.Measure the resistance of the Passenger Window Driver Down circuit to ground.Is the resistance below 1000.0 ohms?AllYes → Repair the Passenger Window Driver Down wire for a short toground.Perform BODY VERIFICATION TEST - VER 1.No → Go To 88 Disconnect the Passenger Door Module C1 connector.Disconnect the Passenger Power Window Motor connector.Measure the resistance of the Passenger Window Driver Up circuit to ground.Is the resistance below 1000.0 ohms?AllYes → Repair the Passenger Window Driver Up wire for a short toground.Perform BODY VERIFICATION TEST - VER 1.No → Go To 99 If there are no possible causes remaining, view Repair. AllRepairReplace the Power Window Motor (internal short)Perform BODY VERIFICATION TEST - VER 1.10 Disconnect the Passenger Door Module C1 connector.Disconnect the Passenger Power Window Motor connector.Measure the voltage of the Passenger Window Driver Down circuit to ground.Is there ANY voltage on the Passenger Window Driver Down wire?AllYes → Repair the Passenger Window Driver Down wire for a short tovoltage.Perform BODY VERIFICATION TEST - VER 1.No → Go To 1111 Disconnect the Passenger Door Module C1 connector.Disconnect the Passenger Power Window Motor connector.Measure the voltage of the Passenger Window Driver Up circuit to ground.Is there ANY voltage on the Passenger Window Driver Up wire?AllYes → Repair the Passenger Window Driver Up wire for a short tovoltage.Perform BODY VERIFICATION TEST - VER 1.No → Test Complete.598
POWER WINDOWSSymptom:*PASSENGER WINDOW INOPERATIVE FROM DDMPOSSIBLE CAUSESDRIVER DOOR MODULE - PASSENGER WINDOW INOPERABLETEST ACTION APPLICABILITY1 This test assumes that the passenger window IS operational from the passenger doormodule. If it is not, refer to the symptom Passenger Window Inoperative from BothSwitches in the Power Window category.If there are no possible causes remaining, view Repair.AllRepairReplace the Driver Door Module.Perform BODY VERIFICATION TEST - VER 1.599
POWER WINDOWSSymptom:*PASSENGER WINDOW INOPERATIVE FROM PDMPOSSIBLE CAUSESPASSENGER DOOR MODULE - SWITCH FAILURETEST ACTION APPLICABILITY1 Note Ensure the Window Lock out Switch on the DDM is operating properlybefore proceeding.This test assumes that the passenger window IS operational from the Driver DoorModule. If it is not, refer to symptom Passenger Window Inoperative from BothSwitches in the Power Window category.If there are no possible causes remaining, view Repair.AllRepairReplace the Passenger Door Module.Perform BODY VERIFICATION TEST - VER 1.600
TIRE PRESSURE MONITORINGSymptom List:LF SENSOR BATTERY LOWLF TIRE PRESSURE SENSOR FAILURELR SENSOR BATTERY LOWLR TIRE PRESSURE SENSOR FAILURERF SENSOR BATTERY LOWRF TIRE PRESSURE SENSOR FAILURERR SENSOR BATTERY LOWRR TIRE PRESSURE SENSOR FAILURESPARE TIRE PRESSURE SENSOR FAILURESPARE TIRE SENSOR BATTERY LOWTest Note:All symptoms listed above are diagnosed using the same tests.The title for the tests will be LF SENSOR BATTERY LOW.When Monitored and Set Condition:LF SENSOR BATTERY LOWWhen Monitored: Key ON.Set Condition: When the EVIC detects a low battery condition from the LF Sensor/Transmitter.LF TIRE PRESSURE SENSOR FAILUREWhen Monitored: Key ON.Set Condition: When the EVIC detects a no-transmit condition from the LF Sensor/Transmitter.LR SENSOR BATTERY LOWWhen Monitored: Key ON.Set Condition: When the EVIC detects a low battery condition from the LR Sensor/Transmitter.LR TIRE PRESSURE SENSOR FAILUREWhen Monitored: Key ON.Set Condition: When the EVIC detects a no-transmit condition from the LR Sensor/Transmitter.RF SENSOR BATTERY LOWWhen Monitored: Key ON.Set Condition: When the EVIC detects a low battery condition from the RF Sensor/Transmitter.601
TIRE PRESSURE MONITORINGLF SENSOR BATTERY LOW — ContinuedRF TIRE PRESSURE SENSOR FAILUREWhen Monitored: Key ON.Set Condition: When the EVIC detects a no-transmit condition from the RF Sensor/Transmitter.RR SENSOR BATTERY LOWWhen Monitored: Key ON.Set Condition: When the EVIC detects a low battery condition from the RR Sensor/Transmitter.RR TIRE PRESSURE SENSOR FAILUREWhen Monitored: Key ON.Set Condition: When the EVIC detects a no-transmit condition from the RR Sensor/Transmitter.SPARE TIRE PRESSURE SENSOR FAILUREWhen Monitored: Key ON.Set Condition: When the EVIC detects a no-transmit condition from the Spare TireSensor/Transmitter.SPARE TIRE SENSOR BATTERY LOWWhen Monitored: Key ON.Set Condition: When the EVIC detects a low battery condition from the Spare TireSensor/Transmitter.POSSIBLE CAUSESEVIC INTERNAL FAULTSENSOR/TRANSMITTER INTERNAL FAULTTEST ACTION APPLICABILITY1 Using the procedure in the System Description, retrain the EVICWith the DRBIII, record and erase DTC’s.Drive the vehicle for 10 minutes at 32 km/h (20 mph).With the DRBIII, read DTCs.Does the DRBIII display a Sensor Failure or Sensor Low Battery message?AllYes → Replace the indicated Tire Pressure Sensor/Transmitter.Perform TIRE PRESSURE VERIFICATION TEST.No → Go To 2602
TIRE PRESSURE MONITORINGLF SENSOR BATTERY LOW — ContinuedTEST ACTION APPLICABILITY2 Turn the ignition on.Observe the EVIC display.Does the EVIC display SERVICE TIRE PRESS. SYSTEM?AllYes → Replace the EVIC in accordance with the Service Information.Perform TIRE PRESSURE VERIFICATION TEST.No → Test Complete.603
VEHICLE THEFT/SECURITYSymptom List:BCM MESSAGE NOT RECEIVED (EXPORT ONLY)PRE-ARM TIMEOUT FAILURE (EXPORT ONLY)Test Note:All symptoms listed above are diagnosed using the same tests.The title for the tests will be BCM MESSAGE NOT RE-CEIVED.When Monitored and Set Condition:BCM MESSAGE NOT RECEIVEDWhen Monitored: Whenever the ITM sends bus messages to the BCM.Set Condition: If the ITM does not receive status messages from the BCM.PRE-ARM TIMEOUT FAILUREWhen Monitored: During the VTSS pre-arm process.Set Condition: If the ITM does not receive arm message from the BCM after sixtyseconds.POSSIBLE CAUSESINTERMITTENT CONDITIONITM COMMUNICATION WITH THE BCMINTRUSION TRANSCEIVER MODULETEST ACTION APPLICABILITY1 Turn the ignition on.With the DRB, enter Body Computer.Was the DRB able to I/D or communicate with the Body Computer?AllYes → Go To 2No → Refer to the Communication category for the related symptom(s).Perform BODY VERIFICATION TEST - VER 1.604
VEHICLE THEFT/SECURITYBCM MESSAGE NOT RECEIVED (EXPORT ONLY) — ContinuedTEST ACTION APPLICABILITY2 With the DRB, erase ITM DTC’s.Turn the ignition off.Arm the VTSS and wait 1 minute.Disarm the VTSS and turn the ignition on.With the DRB, read Intrusion Transceiver Module DTC’s.Did this DTC reset?AllYes → Replace the Intrusion Transceiver Module in accordance with theservice information.Perform BODY VERIFICATION TEST - VER 1.No → The condition that caused this symptom is currently not present.Inspect the related wiring harness for a possible intermittentcondition. Look for any chafed, pierced or partially broken wires.Perform BODY VERIFICATION TEST - VER 1.605
VEHICLE THEFT/SECURITYSymptom:HORN RELAY CIRCUIT SHORTED HIPOSSIBLE CAUSESHORN RELAY - INTERNAL SHORT TO VOLTAGEHORN RELAY CONTROL CIRCUIT SHORT TO VOLTAGEBCM - HORN RELAY CONTROL SHORT TO VOLTAGETEST ACTION APPLICABILITY1 Substitute the Horn Relay with a good relay.With the DRBIII, record and erase DTC’s.Press the horn pad several times.With the DRBIII, read DTCs.Did the Horn Relay Ckt Shorted Hi trouble code reset?AllYes → Go To 2No → Replace the original Horn Relay.Perform VTSS VERIFICATION TEST - 1A.2 Turn the ignition off.Remove the Horn Relay from the Power Distribution Center.Remove the Body Control Module from the Junction Block.Turn the ignition on.Measure the voltage between the Horn Relay Control circuit and ground.Is the voltage above 1.0 volt?AllYes → Repair the Horn Relay Control circuit for a short to voltage.Perform VTSS VERIFICATION TEST - 1A.No → Replace the Body Control Module.Perform VTSS VERIFICATION TEST - 1A.606
VEHICLE THEFT/SECURITYSymptom List:ITM - EEPROM FAILURE (EXPORT ONLY)LOOPBACK FAILURE (EXPORT ONLY)Test Note:All symptoms listed above are diagnosed using the same tests.The title for the tests will be ITM - EEPROM FAILURE.When Monitored and Set Condition:ITM - EEPROM FAILUREWhen Monitored: Continuously while the VTSS is armed and during change of the VTSSstate.Set Condition: If the EEPROM erase/write does not correctly complete the operation.LOOPBACK FAILUREWhen Monitored: Continuously while the VTSS is armed, pre-armed or reset.Set Condition: If an internal ITM bus test performed fails.POSSIBLE CAUSESINTERMITTENT CONDITIONINTRUSION TRANSCEIVER MODULETEST ACTION APPLICABILITY1 With the DRBIII, erase the current Intrusion Transceiver Module DTC’s.Turn the ignition off.Arm the VTSS and wait 1 minute.Disarm the VTSS and turn the ignition on.With the DRBIII, read Intrusion Transceiver Module DTC’s.Does the DRBIII display the same DTC?AllYes → Replace the Intrusion Transceiver Module.Perform BODY VERIFICATION TEST - VER 1.No → The condition that caused this symptom is currently not present.Test complete.Perform BODY VERIFICATION TEST - VER 1.607
VEHICLE THEFT/SECURITYSymptom:ITM - TRANSDUCER FAILURE (EXPORT ONLY)When Monitored and Set Condition:ITM - TRANSDUCER FAILUREWhen Monitored: Continuously during VTSS pre-arm mode.Set Condition: The ITM sends a test ultrasonic signal during the pre-arm process. If thetest signal is not correctly received, the code will be set.POSSIBLE CAUSESBLOCKED INTRUSION TRANSCEIVER MODULE SENSORSINTERMITTENT CONDITIONINTRUSION TRANSCEIVER MODULETEST ACTION APPLICABILITY1 With the DRBIII, erase the current Intrusion Transceiver Module DTC’s.Turn the ignition off.Arm the VTSS and wait 1 minute.Disarm the VTSS and turn the ignition on.With the DRBIII, read Intrusion Transceiver Module DTC’s.Does the DRBIII display: ITM Transducer Failure?AllYes → Go To 2No → The condition that caused this symptom is currently not present.Test complete.Perform BODY VERIFICATION TEST - VER 1.2 Inspect the louvers of the Intrusion Transceiver Module for blockage from dust ordebris.Were there any problems found?AllYes → Clean as necessary.Perform VTSS VERIFICATION TEST - 1A.No → Replace the Intrusion Transceiver Module.Perform BODY VERIFICATION TEST - VER 1.608
VEHICLE THEFT/SECURITYSymptom:ITM - VIN MISMATCH (EXPORT ONLY)When Monitored and Set Condition:ITM - VIN MISMATCHWhen Monitored: While the ITM is being disarmed.Set Condition: If the ITM stored VIN does not match with the BCM.POSSIBLE CAUSESINTRUSION TRANSCEIVER MODULEBODY CONTROL MODULECHECK VIN IN BCM AND ITM WITH VIN IN PCMTEST ACTION APPLICABILITY1 NOTE: Do not attempt to use either an ITM and/or a Siren from anothervehicle.With the DRBIII display and record the VIN in the Intrusion Transceiver Module.With the DRBIII select Body Computer.Display and record the VIN in the BCM.With the DRBIII select Engine.Display and record the VIN in the PCM.Does the VIN in the ITM and the VIN in the BCM match the VIN in the PCM?AllYes → Go To 2No → Replace the Module(s) with the incorrect VIN.Perform BODY VERIFICATION TEST - VER 1.2 With the DRBIII, erase the current Intrusion Transceiver Module DTC’s.Turn the ignition off.Arm the VTSS and wait 1 minute.Disarm the VTSS using the RKE and turn the ignition on.With the DRBIII, read Intrusion Transceiver Module DTC’s.Does the DRBIII display: ITM VIN Mismatch?AllYes → Replace the Intrusion Transceiver Module.Perform BODY VERIFICATION TEST - VER 1.No → The condition that caused this symptom is currently not present.Test complete.Perform BODY VERIFICATION TEST - VER 1.609
VEHICLE THEFT/SECURITYSymptom List:NO SERIAL COMMUNICATION (EXPORT ONLY)SIREN COMMUNICATION FAILURE (EXPORT ONLY)Test Note:All symptoms listed above are diagnosed using the same tests.The title for the tests will be NO SERIAL COMMUNICATION.When Monitored and Set Condition:NO SERIAL COMMUNICATIONWhen Monitored: Continuously while the VTSS is armed.Set Condition: If the Intrusion Transceiver Module does not receive messages from theSiren.SIREN COMMUNICATION FAILUREWhen Monitored: Continuously while the VTSS is armed.Set Condition: If the Siren does not receive messages from the Intrusion TransceiverModule.POSSIBLE CAUSESINTERMITTENT CONDITIONOPEN FUSED B+ CIRCUITSIREN SIGNAL CONTROL CIRCUIT OPENSIREN SIGNAL CONTROL CIRCUIT SHORT TO GROUNDINTRUSION TRANSCEIVER MODULEOPEN GROUND CIRCUITVTSS SIRENTEST ACTION APPLICABILITY1 With the DRBIII, erase the current Intrusion Transceiver Module DTC’s.Turn the ignition off.Arm the VTSS and wait 1 minute.Disarm the VTSS and turn the ignition on.Does the DRBIII display the same DTC?AllYes → Go To 2No → The condition that caused this symptom is currently not present.Inspect the related wiring harness for a possible intermittentcondition. Look for any chafed, pierced, pinched or partiallybroken wires.Perform BODY VERIFICATION TEST - VER 1.610
VEHICLE THEFT/SECURITYNO SERIAL COMMUNICATION (EXPORT ONLY) — ContinuedTEST ACTION APPLICABILITY2 Gain access to the VTSS Siren.Disconnect the Siren connector.Measure the voltage of the Fused B(+) circuit in the Siren connector.Is the voltage above 10.0 volts?AllYes → Go To 3No → Repair the Fused B+ circuit for an open.Perform BODY VERIFICATION TEST - VER 1.3 Disconnect the Siren connector.Using a 12-volt test light connected to 12-volts, check the ground circuit.Does the test light illuminate brightly?AllYes → Go To 4No → Repair the ground circuit for an open.Perform VTSS VERIFICATION TEST - 1A.4 Use the DRBIII and set up as follows:Use the Scope input cable CH7058, Cable to Probe adapter CH7062, and the red andblack test probes.Connect the scope input cable to the channel one connector on the DRBIII. Attachthe red and black leads and the cable to probe adapter to the scope input cable.Select DRBIII Standalone.Select lab scope.Select Live.Select 12 volt square wave.Press F2 for Scope.Press F2 and use the down arrow to set voltage range to 20 volts. Press F2 againwhen complete.Disconnect the Siren connector.Connect the black lead to the chassis ground. Connect the red lead to the Siren SignalControl circuit in the Siren connector.Start the engine and hold the engine RPM’s above 600.Observe the voltage displayed on the DRBIII Lab Scope.Is there a voltage square wave present 1 to 2 seconds?AllYes → Replace the VTSS Siren.Perform BODY VERIFICATION TEST - VER 1.No → Go To 55 Disconnect the Siren harness connector.Disconnect the Intrusion Transceiver Module harness connector.Measure the resistance between ground and the Siren Signal Control circuit.Is the resistance above 5.0 ohms?AllYes → Go To 6No → Repair the Siren Signal Control circuit for a short to ground.Perform VTSS VERIFICATION TEST - 1A.611
VEHICLE THEFT/SECURITYNO SERIAL COMMUNICATION (EXPORT ONLY) — ContinuedTEST ACTION APPLICABILITY6 Disconnect the Siren harness connector.Disconnect the Intrusion Transceiver Module harness connector.Measure the resistance of the Siren Signal Control circuit between the IntrusionSensor and the Siren connector.Is the resistance below 5.0 ohms?AllYes → Replace the Intrusion Transceiver Module.Perform BODY VERIFICATION TEST - VER 1.No → Repair the Siren Signal Control circuit for an open.Perform VTSS VERIFICATION TEST - 1A.612
VEHICLE THEFT/SECURITYSymptom:PCM MESSAGE NOT RECEIVED (EXPORT ONLY)When Monitored and Set Condition:PCM MESSAGE NOT RECEIVEDWhen Monitored: With the ignition on.Set Condition: The ITM does not receive PCI bus messages from the PCM for 12 seconds.POSSIBLE CAUSESPCM MESSAGE NOT RECEIVEDATTEMPT TO COMMUNICATE WITH THE PCMPCI BUS CIRCUIT OPENPOWERTRAIN CONTROL MODULETEST ACTION APPLICABILITY1 Turn the ignition on.With the DRB enter System Tests then PCM Monitor.Does the DRB display: PCM is active on BUS?AllYes → With the DRB, erase ITM DTCs. Cycle the ignition switch, wait 1minute then recheck for ITM DTCs. If DTC resets, replace theIntrusion Transceiver Module in accordance with the serviceinformation.Perform BODY VERIFICATION TEST - VER 1.No → Go To 22 Turn the ignition on.With the DRB, attempt to communicate with the PCM.Was the DRB able to communicate with the PCM?AllYes → Go To 3No → Refer to the communication category and perform the appropriatesymptom.Perform BODY VERIFICATION TEST - VER 1.3 Turn the ignition off.Disconnect the PCM C3 harness connector.Connect the diagnostic junction port tester #8339 to the diagnostic junction port.Note: Do not connect the tester to the DRB.Measure the resistance of the PCI Bus circuit between the diagnostic junction porttester and the PCM connector.Is the resistance below 5.0 ohms?AllYes → Replace the Powertrain Control Module in accordance with theservice information.Perform BODY VERIFICATION TEST - VER 1.No → Repair the PCI Bus circuit for an open.Perform BODY VERIFICATION TEST - VER 1.613
VEHICLE THEFT/SECURITYSymptom:SIREN BATTERY HAS BEEN TAMPERED (EXPORT ONLY)When Monitored and Set Condition:SIREN BATTERY HAS BEEN TAMPEREDWhen Monitored: Continuously while the VTSS is armed.Set Condition: If the siren detects the loss of vehicle battery voltage.POSSIBLE CAUSESINTERMITTENT CONDITIONHARNESS TAMPERINGINTRUSION TRANSCEIVER MODULETEST ACTION APPLICABILITY1 Inspect the wiring harness to the siren for any signs of tampering or damage.AllWere there any problems found?Yes → Repair wiring as necessary.Perform VTSS VERIFICATION TEST - 1A.No → Go To 22 With the DRBIII, erase the current Intrusion Transceiver Module DTC’s.Turn the ignition off.Arm the VTSS and wait 1 minute.Disarm the VTSS and turn the ignition on.With the DRBIII, read Intrusion Transceiver Module DTC’s.Does the DRBIII display: Siren Battery Has Been Tampered?AllYes → Replace the Siren in accordance with the Service Information.Perform BODY VERIFICATION TEST - VER 1.No → The condition that caused this symptom is currently not present.Inspect the related wiring harness for a possible intermittentcondition. Look for any chafed, pierced or partially broken wires.Perform BODY VERIFICATION TEST - VER 1.614
VEHICLE THEFT/SECURITYSymptom List:SIREN EEPROM FAILURE (EXPORT ONLY)SIREN INTERNAL BATTERY (EXPORT ONLY)SIREN ROM FAILURE (EXPORT ONLY)Test Note:All symptoms listed above are diagnosed using the same tests.The title for the tests will be SIREN EEPROM FAILURE.When Monitored and Set Condition:SIREN EEPROM FAILUREWhen Monitored: Continuously while the VTSS is armed.Set Condition: If the checksum of the EEPROM does not calculate to the correct value.SIREN INTERNAL BATTERYWhen Monitored: Continuously with engine rpm over 600.Set Condition: When the internal battery within the siren does not charge as expected,the ITM sets this code.SIREN ROM FAILUREWhen Monitored: Continuously while the VTSS is armed.Set Condition: If the checksum of the ROM does not calculate to the correct value.INTERMITTENT CONDITIONSIRENPOSSIBLE CAUSESTEST ACTION APPLICABILITY1 With the DRBIII, erase the current Intrusion Transceiver Module DTC’s.Turn the ignition off.Arm the VTSS and wait 1 minute.Disarm the VTSS and turn the ignition on.With the DRBIII, read Intrusion Transceiver Module DTC’s.Does the DRBIII display the same DTC?AllYes → Replace the Siren.Perform BODY VERIFICATION TEST - VER 1.No → The condition that caused this symptom is currently not present.Test complete.Perform BODY VERIFICATION TEST - VER 1.615
VEHICLE THEFT/SECURITYSymptom:*ALARM TRIPS ON ITS OWNALARM TRIPPED BYINTERMITTENT CONDITIONPOSSIBLE CAUSESTEST ACTION APPLICABILITY1 With the DRBIII, read the Alarm Trip By status.AllWere there any causes displayed?Yes → Refer to Symptom List for problems related to the componentindicated by the DRBIII.Perform VTSS VERIFICATION TEST - 1A.No → Go To 22 NOTE: The condition that caused the alarm is not present at this time. Thefollowing list may help in indentifying the intermittent condition.Refer to any Technical Service Bulletins (TSB) that may apply.Visually inspect related wiring harnesses. Look for chafed, pierced, pinched, orpartially broken wires.Visually inspect the related wiring harness connectors. Look for loose connections,broken, bent, pushed out, or corroded terminals.Were any of the above conditions present?AllYes → Repair as necessaryPerform VTSS VERIFICATION TEST - 1A.No → Test Complete.616
VEHICLE THEFT/SECURITYSymptom:*DRIVERS DOOR KEY FAILS TO DISARM VTSSPOSSIBLE CAUSESDRIVER DOOR MODULE RESETRESET DOOR MODULEOPEN GROUND CIRCUITDRIVER CYLINDER LOCK SWITCH SENSE CIRCUIT SHORTED TO GROUNDOPEN DRIVER CYLINDER LOCK SWITCH SENSE CIRCUITDRIVER CYLINDER LOCK SWITCHTEST ACTION APPLICABILITY1 With the DRBIII in VTSS, Sensor Display, read the Driver Key Cylinder Sw voltage.Rotate the Key in the Door Key Cylinder from the normal position to the unlockposition.Does the Driver Key Cylinder Sw voltage change from 5.0 to 1.6 volts?AllYes → Go To 2No → Go To 32 Reset the DDM by removing and reinstalling the JB POWER Fuse #12 in the PowerDistribution Center.Attempt to disarm the VTSS using the Door Key.Can the VTSS now be disarmed using the Door Key?AllYes → Resetting the Driver Door Module has corrected the problem.Perform BODY VERIFICATION TEST - VER 1.No → Replace the Driver Door Module.Perform BODY VERIFICATION TEST - VER 1.3 Disconnect the Driver Cylinder Lock Switch harness connector.Using a 12-volt Test Light connected to 12-volts, check the Driver Cylinder LockSwitch Ground circuit.Does the test light illuminate?AllYes → Go To 4No → Repair the Driver Cylinder Lock Switch Ground circuit for anopen.Perform VTSS VERIFICATION TEST - 1A.4 Disconnect the Driver Door Module C1 harness connector.Disconnect the Driver Cylinder Lock Switch harness connector.Using a 12-volt Test Light connected to 12-volts, check the Driver Cylinder LockSwitch Sense circuit.Does the test light illuminate?AllYes → Repair the Driver Door Cylinder Lock Switch Sense circuit for ashort to ground.Perform VTSS VERIFICATION TEST - 1A.No → Go To 5617
VEHICLE THEFT/SECURITY*DRIVERS DOOR KEY FAILS TO DISARM VTSS — ContinuedTEST ACTION APPLICABILITY5 Disconnect the Driver Door Module C1 harness connector.Disconnect the Driver Cylinder Lock Switch harness connector.Measure the resistance of the Sense circuit.Is the resistance below 5.0 ohms?AllYes → Replace the Driver Cylinder Lock Switch in accordance with theService Information.Perform VTSS VERIFICATION TEST - 1A.No → Repair the Driver Cylinder Lock Switch Sense circuit for an open.Perform VTSS VERIFICATION TEST - 1A.618
VEHICLE THEFT/SECURITYSymptom:*HAZARD LAMPS FAIL TO FLASH WITH ALARM TRIPPEDPOSSIBLE CAUSESVERIFY HAZARD OPERATIONBCM -- HAZARDS INOPERATIVE WITH VTSS ALARM TRIPPEDJUNCTION BLOCKTEST ACTION APPLICABILITY1 Turn the Hazard Lamps on.Do the Hazard Lamps operate properly?AllYes → Go To 2No → Check and diagnose related Body Control Module DiagnosticTrouble Codes. If no DTCs are present, refer to the ServiceInformation.Perform VTSS VERIFICATION TEST - 1A.2 Remove the BCM from the Junction Block.Connect a jumper wire between cavity 10 of the Junction Block and ground.Do the hazard lamps operate?AllYes → Replace the Body Control Module.Perform VTSS VERIFICATION TEST - 1A.No → Replace the Junction Block in accordance with the Service Information.Perform VTSS VERIFICATION TEST - 1A.619
VEHICLE THEFT/SECURITYSymptom:*HEADLAMPS FAIL TO FLASH WITH ALARM TRIPPEDPOSSIBLE CAUSESVERIFY LOW BEAM OPERATIONBCM -- HEADLAMPS FAIL TO FLASH WHEN VTSS IS IN ALARMTEST ACTION APPLICABILITY1 Turn the Low Beam Headlamps on.Do the Low Beam Headlamps operate properly?AllYes → Replace the Body Control Module.Perform VTSS VERIFICATION TEST - 1A.No → Refer to the Exterior Lighting symptom list and also check forrelated Body Control Module Diagnostic Trouble Codes.Perform VTSS VERIFICATION TEST - 1A.620
VEHICLE THEFT/SECURITYSymptom:*HORN FAILS TO SOUND WITH ALARM TRIPPEDPOSSIBLE CAUSESCHECK HORN OPERATIONJUNCTION BLOCK - OPEN HORN RELAY CONTROL CIRCUITBODY CONTROL MODULE-OPEN HORN RELAY CONTROL CIRCUITTEST ACTION APPLICABILITY1 Push the Horn Button on the Steering Wheel.AllDoes the Horn operate properly?Yes → Go To 2No → Check for and diagnose related Body Control Module DiagnosticTrouble Codes. If there are no DTCs present, refer to the ServiceInformation to diagnose the horn system.Perform VTSS VERIFICATION TEST - 1A.2 Remove the BCM from the junction block.Using a 12-volt test light connected to 12-volts, probe the Horn Relay Control circuitat the J/B side of the Junction Block-to-Body Control Module connector.While monitoring the test light, press the horn button on the steering wheel.Did the test light illuminate when the horn button was pressed?AllYes → Replace the Body Contol Module.Perform VTSS VERIFICATION TEST - 1A.No → Replace the Junction Block in accordance with the Service Information.Perform VTSS VERIFICATION TEST - 1A.621
VEHICLE THEFT/SECURITYSymptom:*INTRUSION TRANSCEIVER MODULE SENSITIVITY (EXPORTONLY)INTERIOR TYPE SELECTED IN ITMPOSSIBLE CAUSESTEST ACTION APPLICABILITY1 With the DRBIII in Miscellaneous, check the Current Status of the Interior Type. AllIs the Interior Type selected correct?Yes → Test Complete.No → Program the correct interior type.Perform BODY VERIFICATION TEST - VER 1.622
VEHICLE THEFT/SECURITYSymptom:*THEFT ALARM WILL NOT ARMPOSSIBLE CAUSESCHECK THE VTSS STATUSCHECK FOR DTCS AND VTSS ARMING INHIBITORSBODY CONTROL MODULE - NO ALARM OUTPUTTEST ACTION APPLICABILITY1 With the DRBIII, check that the Theft Alarm is enabled.AllWas the Theft Alarm enabled?Yes → Go To 2No → With the DRBIII, enable the Vehicle Theft Security System(VTSS).Perform VTSS VERIFICATION TEST - 1A.2 Make sure the liftgate, liftgate flip-up, hood and all doors are closed.Remove the key from the ignition.With the DRBIII, read the active DTC’s, ajar switch states, and the key-in-ignitionswitch state.Does the DRBIII display any closed switches or VTSS related DTCs?AllYes → Refer to the Symptom List and diagnose the appropriate symptomin the CHIME, DOOR AJAR or VTSS category.Perform VTSS VERIFICATION TEST - 1A.No → Replace the Body Control Module.Perform VTSS VERIFICATION TEST - 1A.623
VEHICLE THEFT/SECURITYSymptom:*VTSS DOES NOT TRIP FROM DRIVERS DOORPOSSIBLE CAUSESBCM-NO VTSS TRIP FROM DRVR DOORCHECK DRBIII FOR DRIVER DOOR AJAR RESPONSETEST ACTION APPLICABILITY1 With the DRBIII, read the DRVR DOOR AJAR SW status.Open the driver door.Does the DRBIII display CLOSED?AllYes → Replace the Body Control Module.Perform VTSS VERIFICATION TEST - 1A.No → Refer to symptom DRIVER DOOR AJAR CKT OPEN in theDOOR AJAR category.Perform VTSS VERIFICATION TEST - 1A.624
VEHICLE THEFT/SECURITYSymptom:*VTSS DOES NOT TRIP FROM HOOD (IF EQUIPPED)POSSIBLE CAUSESCHECK DRBIII FOR HOOD AJAR RESPONSEBCM-NO VTSS TRIP FROM HOODTEST ACTION APPLICABILITY1 With the DRBIII, read the HOOD AJAR SW status.Open the hood.Does the DRBIII display CLOSED?AllYes → Replace the Body Control Module.Perform VTSS VERIFICATION TEST - 1A.No → Refer to symptom HOOD AJAR CKT OPEN in the DOOR AJARcategory.Perform VTSS VERIFICATION TEST - 1A.625
VEHICLE THEFT/SECURITYSymptom:*VTSS DOES NOT TRIP FROM LEFT REAR DOORPOSSIBLE CAUSESCHECK DRBIII FOR LEFT REAR DOOR AJAR RESPONSEBCM-NO VTSS TRIP FROM LR DOORTEST ACTION APPLICABILITY1 With the DRBIII, read the LR DOOR AJAR SW status.Open the left rear door.Does the DRBIII display CLOSED?AllYes → Replace the Body Control Module.Perform VTSS VERIFICATION TEST - 1A.No → Refer to symptom LEFT REAR DOOR AJAR CKT OPEN in theDOOR AJAR category.Perform VTSS VERIFICATION TEST - 1A.626
VEHICLE THEFT/SECURITYSymptom:*VTSS DOES NOT TRIP FROM LIFTGATEPOSSIBLE CAUSESCHECK DRBIII FOR LIFTGATE SW RESPONSEBCM-NO VTSS TRIP FROM LIFTGATETEST ACTION APPLICABILITY1 With the DRBIII, read the LIFTGATE SW status.Open the liftgate.Does the DRBIII display CLOSED?AllYes → Replace the Body Control Module.Perform VTSS VERIFICATION TEST - 1A.No → Refer to symptom LIFTGATE AJAR CKT OPEN in the DOORAJAR category.Perform VTSS VERIFICATION TEST - 1A.627
VEHICLE THEFT/SECURITYSymptom:*VTSS DOES NOT TRIP FROM LIFTGATE FLIP-UP GLASS ONLYPOSSIBLE CAUSESCHECK DRBIII FOR LIFTGATE FLIP-UP RESPONSEBCM-NO VTSS TRIP FROM LIFTGATE FLIP-UP GLASSTEST ACTION APPLICABILITY1 With the DRBIII, read the LIFTGLASS SW status.Open the liftgate flip-up glass.Does the DRBIII display CLOSED?AllYes → Replace the Body Control Module.Perform VTSS VERIFICATION TEST - 1A.No → Refer to symptom Lftgate Flip-Up Ajar Circuit Open in the DOORAJAR category.Perform VTSS VERIFICATION TEST - 1A.628
VEHICLE THEFT/SECURITYSymptom:*VTSS DOES NOT TRIP FROM PASSENGER FRONT DOORPOSSIBLE CAUSESCHECK DRBIII FOR PASSENGER DOOR AJAR RESPONSEBCM-NO VTSS TRIP FROM PASSENGER DOORTEST ACTION APPLICABILITY1 With the DRBIII, read the PASS DOOR AJAR SW status.Open the passenger door.Does the DRBIII display CLOSED?AllYes → Replace the Body Control Module.Perform VTSS VERIFICATION TEST - 1A.No → Refer to symptom PASSENGER DOOR AJAR CKT OPEN in theDOOR AJAR category.Perform VTSS VERIFICATION TEST - 1A.629
VEHICLE THEFT/SECURITYSymptom:*VTSS DOES NOT TRIP FROM RIGHT REAR DOORPOSSIBLE CAUSESCHECK DRBIII FOR RIGHT REAR DOOR AJAR RESPONSEBCM-NO VTSS TRIP FROM RR DOORTEST ACTION APPLICABILITY1 With the DRBIII, read the RR DOOR AJAR SW status.Open the right rear door.Does the DRBIII display CLOSED?AllYes → Replace the Body Control Module.Perform VTSS VERIFICATION TEST - 1A.No → Refer to symptom RIGHT REAR DOOR AJAR CKT OPEN in theDOOR AJAR category.Perform VTSS VERIFICATION TEST - 1A.630
VEHICLE THEFT/SECURITYSymptom:*VTSS INDICATOR INOPERATIVEPOSSIBLE CAUSESOPEN VTSS INDICATOR FUSED B(+) SUPPLYOPEN VTSS LEDVTSS INDICATOR DRIVER CIRCUIT OPENBODY CONTROL MODULE--OPEN INTERNAL VTSS DRIVERTEST ACTION APPLICABILITY1 Disconnect the Automatic Headlamp Light Sensor/VTSS LED harness connector.Measure the voltage of the Fused B+ circuit.Is the voltage above 10.0 volts?AllYes → Go To 2No → Repair the VTSS Fused B+ circuit for an open.Perform VTSS VERIFICATION TEST - 1A.2 Disconnect the Automatic Headlamp Light Sensor VTSS/LED harness connector.Using a 12-volt test light connected to 12-volts, check the VTSS Indicator Drivercircuit.Turn the ignition on.With the DRB in Vehicle Theft, actuate the VTSS Indicator lamp.Does the test light illuminate when the VTSS Indicator lamp is actuated?AllYes → Replace the Automatic Headlamp Light Sensor/VTSS LED assembly.Perform VTSS VERIFICATION TEST - 1A.No → Go To 33 Disconnect the Automatic Headlamp Light Sensor/ VTSS LED harness connector.Disconnect the BCM C1 harness connector.Measure the resistance of the VTSS Indicator Driver circuit.Is the resistance below 5.0 ohms?AllYes → Replace the Body Control Module.Perform VTSS VERIFICATION TEST - 1A.No → Repair the VTSS Indicator Driver circuit for an open.Perform VTSS VERIFICATION TEST - 1A.631
WINDSHIELD WIPER & WASHERSymptom:RAIN SENSOR FAULTWhen Monitored and Set Condition:RAIN SENSOR FAULTWhen Monitored: Ignition on.Set Condition: When the BCM detects a fault from the Rain Sensor Module.INTERMITTENT CONDITIONMULTIFUNCTION SWITCHRAIN SENSOR MODULEBODY CONTROL MODULEPOSSIBLE CAUSESTEST ACTION APPLICABILITY1 Turn the ignition on.With the DRBIII, clear all BCM DTC’s.Turn the right side multifunction switch to the AUTO position.With the DRBIII, read the DTC information.Does the DRBIII read: Rain Sensor Fault?AllYes → Go To 2No → The condition that caused the symptom is currently not present.Inspect the related wiring for a possible intermittent condition.Look for any chafed, pierced, pinched, or partially broken wires.Perform BODY VERIFICATION TEST - VER 1.2 Turn the ignition off.Disconnect the right side Multifunction Switch harness connector.Turn the ignition on.With the DRBIII, select Body, Body Control Module and read the MultifunctionSwitch voltage.Does the DRBIII display voltage above 4.75 volts?AllYes → Replace the right side Multifunction Switch.Perform BODY VERIFICATION TEST - VER 1.No → Go To 33 Turn the ignition on.Turn the right side multifunction switch to the AUTO position.Using a spray bottle, spray water on the RSM area of the windshield.Using the DRBIII monitor the wipe commands to the BCM from the RSM.Were any wipe commands transmitted to the BCM from the RSM?AllYes → Replace the Body Control Module.Perform BODY VERIFICATION TEST - VER 1.No → Replace the Rain Sensor Module.Perform BODY VERIFICATION TEST - VER 1.632
WINDSHIELD WIPER & WASHERSymptom:WASHER FLUID SENSOR FAILUREWhen Monitored and Set Condition:WASHER FLUID SENSOR FAILUREWhen Monitored: Ignition key in run position.Set Condition: If the resistance of the washer fluid level sensor input to the BCM is highcausing the voltage to be above 4.8 volts for 5 seconds or more.POSSIBLE CAUSESVERIFYING ACTIVE DTC - WASHER FLUID SENSOR FAILUREWASHER FLUID LEVEL SWITCH CIRCUIT VERIFICATIONTEST ACTION APPLICABILITY1 Turn ignition on.With the DRBIII, Erase BCM DTC’sTurn ignition off then turn ignition on.Turn the wiper switch to each intermittent position, then low and high speedpositions, then push the washer switch.Wait 5 minutes before reading the BCM DTC.With the DRBIII read BCM DTC’s.Does the DRB show WASHER FLUID SENSOR FAILURE?AllYes → Go To 2No → Test Complete, code not present at this time.2 With the DRBIII, access BCM Sensors.Turn ignition on.Read the Washer Fluid level switch voltage.Is the Washer Fluid Level Switch voltage above 4.8 volts?AllYes → Test Complete.No → Replace the Body Control Module.Perform BODY VERIFICATION TEST - VER 1.633
WINDSHIELD WIPER & WASHERSymptom:WIPER ON/<strong>OF</strong>F RELAY SHORTED HIGHWhen Monitored and Set Condition:WIPER ON/<strong>OF</strong>F RELAY SHORTED HIGHWhen Monitored: The ignition must be in the run position and battery voltage suppliedto the BCM on the Fused B(+) circuit.Set Condition: If the BCM detects high current on the wiper on/off relay control circuitthe code will set.POSSIBLE CAUSESVERIFYING ACTIVE DTC - WIPER ON/<strong>OF</strong>F RELAY CONTROL CIRCUIT SHORTED HIGHWIPER ON/<strong>OF</strong>F RELAY COIL SHORTEDWIPER ON/<strong>OF</strong>F RELAY CONTROL CIRCUIT SHORTED TO BATTERYBCM DEFECTIVE - WIPER ON/<strong>OF</strong>F RELAYTEST ACTION APPLICABILITY1 Turn ignition on.With the DRBIII, Erase BCM DTC’sTurn ignition off then turn ignition on.Turn the wiper switch to each intermittent position, then low and high speedpositions.With the DRBIII read BCM DTC’s.Does the DRB show WIPER ON/<strong>OF</strong>F RELAY SHORTED HIGH?AllYes → Go To 2No → Test Complete, code not present at this time.2 Turn ignition off.Remove the On/Off Relay.Note: Check connectors - Clean / repair as necessary.Using an ohmmeter, measure between terminals #85 and #86 of the Wiper On/OffRelay.Is the resistance below 50 ohms?AllYes → Replace the Wiper ON/Off Relay.Perform BODY VERIFICATION TEST - VER 1.No → Go To 3634
WINDSHIELD WIPER & WASHERWIPER ON/<strong>OF</strong>F RELAY SHORTED HIGH — ContinuedTEST ACTION APPLICABILITY3 Turn the Ignition Off.Remove the Wiper On/Off Relay.Disconnect the BCM C1 Connector.Note: Check connectors - Clean/repair as necessary.Turn the Ignition On (Engine Off).Using a voltmeter, measure the Wiper On/Off Relay Control circuit at the BCM C1Connector.Is the voltage above 1.0 volts?AllYes → Repair the Wiper On/Off Relay Control circuit shorted to battery.Perform BODY VERIFICATION TEST - VER 1.No → Go To 44 Turn the Ignition Off.Disconnect the Wiper On/Off Relay.Note: Check connectors - Clean/repair as necessary.Connect a voltmeter between cavity 85 of the On/Off Relay and chassis ground.Turn ignition on.Is the voltage above 1.0 volts?AllYes → Replace the Body Control Module. Wiper On/Off Relay Controlcircuit shorted to battery.Perform BODY VERIFICATION TEST - VER 1.No → Test Complete.635
WINDSHIELD WIPER & WASHERSymptom:WIPER ON/<strong>OF</strong>F RELAY SHORTED LOW/OPEN CIRCUITWhen Monitored and Set Condition:WIPER ON/<strong>OF</strong>F RELAY SHORTED LOW/OPEN CIRCUITWhen Monitored: The ignition must be in the run position and battery voltage suppliedto the BCM on the Fused B(+) circuit.Set Condition: If the BCM cannot sense any voltage on the wiper on/off relay controlcircuit.POSSIBLE CAUSESJUNCTION BLOCK CIRCUIT BREAKER C1 OPENVERIFYING ACTIVE DTC - WIPER ON/<strong>OF</strong>F RELAY CONTROL CIRCUIT SHORTED LOW/OPENFUSED IGNITION SWITCH OUTPUT RUN/ACC CIRCUIT OPENFUSED IGNITION SWITCH OUTPUT CIRCUIT SHORTED TO GROUNDFUSED IGNITION SWITCH OUTPUT RUN/ACC CIRCUIT SHORTED TO GROUNDCOMMON CIRCUIT SHORTED TO GROUNDHIGH SPEED OUTPUT SHORTED TO GROUNDLOW SPEED OUTPUT SHORTED TO GROUNDWIPER ON/<strong>OF</strong>F RELAY CONTROL CIRCUIT OPENWIPER ON/<strong>OF</strong>F RELAY CONTROL CIRCUIT SHORTED TO GROUNDBCM DEFECTIVE- WIPER ON/<strong>OF</strong>F RELAY CIRCUIT SHORTED LOW/OPENTEST ACTION APPLICABILITY1 Turn ignition on.With the DRBIII, Erase BCM DTC’sTurn ignition off then turn ignition on.Turn the wiper switch to each intermittent position, then low and high speedpositions.With the DRBIII read BCM DTC’s.Does the DRB show WIPER ON/<strong>OF</strong>F RELAY OUTPUT SHORTED LOW/OPEN?AllYes → Go To 2No → Test Complete, code not present at this time.2 Disconnect the Junction Block Circuit Breaker C1.Note: Check connectors - Clean/repair as necessary.Install a known good circuit breaker in place of the Junction Block C1 CircuitBreaker.Does the system now operate correctly?AllYes → Replace the Junction Block Circuit Breaker C1.Perform BODY VERIFICATION TEST - VER 1.No → Go To 3636
WINDSHIELD WIPER & WASHERWIPER ON/<strong>OF</strong>F RELAY SHORTED LOW/OPEN CIRCUIT — ContinuedTEST ACTION APPLICABILITY3 Remove the Wiper On/Off Relay.Remove the Junction Block C1 Circuit Breaker.Note: Check connectors - Clean / repair as necessary.Connect a jumper wire between the Junction Block C2-9 Fused Ignition SwitchOutput Run/ACC and ground.Using an Ohmmeter, measure the Fused Ignition Switch Output Run/ACC circuitfrom the Wiper On/Off Relay connector (cavity 86) and ground.Is the resistance below 5.0 Ohms?AllYes → Go To 4No → Repair the open Fused Ignition Switch Output Run/ACC circuit.Perform BODY VERIFICATION TEST - VER 1.4 Turn the Ignition Off.Remove the Junction Block C1 Circuit Breaker.Disconnect the Wiper On/Off Relay.Note: Check connectors - Clean/repair as necessary.Using an ohmmeter, measure the Fused Ignition Switch Output circuit between theOn/Off Relay (Cavity 86) and ground.Is the resistance below 10.0 ohms?AllYes → Repair the Fused Ignition Switch Output Run/ACC circuitshorted to ground.Perform BODY VERIFICATION TEST - VER 1.No → Go To 55 Turn the Ignition Off.Disconnect the Wiper Motor connector.Disconnect the Junction Block C1 Circuit Breaker.Note: Check connectors - Clean/repair as necessary.Using an ohmmeter, measure the Fused Ignition Switch Output Run/ACC circuitbetween the Wiper Motor Connector and ground.Is the resistance below 5.0 ohms?AllYes → Repair the Fused Ignition Switch Output Run/ACC circuit for ashort to ground.Perform BODY VERIFICATION TEST - VER 1.No → Go To 66 Turn the Ignition Off.Remove the Wiper High/Low and On/Off Relays.Note: Check connectors - Clean/repair as necessary.Measure the resistance of the Wiper Relay Common circuit between the High/LowRelay (cavity 30) and ground.Is the resistance below 10.0 ohms?AllNo → Go To 7Yes → Repair the Wiper Relay Common circuit for a short to ground.Perform BODY VERIFICATION TEST - VER 1.637
WINDSHIELD WIPER & WASHERWIPER ON/<strong>OF</strong>F RELAY SHORTED LOW/OPEN CIRCUIT — ContinuedTEST ACTION APPLICABILITY7 Turn the Ignition Off.Disconnect the Wiper High/Low Relay.Disconnect the Wiper Motor connector.Note: Check connectors - Clean/repair as necessary.Using an ohmmeter, measure the High Speed Output circuit at the High/Low Relay(cavity 87).Is the resistance below 10.0 ohms?AllYes → Repair the High Speed Output circuit shorted to ground.Perform BODY VERIFICATION TEST - VER 1.No → Go To 88 Turn the Ignition Off.Remove the Wiper High/Low Relay.Disconnect the Wiper Motor connector.Note: Check connectors - Clean/repair as necessary.Using an ohmmeter, measure the Low Speed Output circuit at the High/Low Relay(cavity 87A).Is the resistance below 10.0 ohms?AllYes → Repair the Low Speed Output circuit shorted to ground.Perform BODY VERIFICATION TEST - VER 1.No → Go To 99 Turn the Ignition Off.Remove the Wiper On/Off Relay.Disconnect the BCM C1 Connector.Note: Check connectors - Clean/repair as necessary.Connect a jumper wire to the Wiper On/Off Relay Control circuit between the BodyControl Module C1 connector and ground.Using a ohmmeter, measure the Wiper On/Off Relay Control circuit between theWiper On/Off Relay cavity 85 of the Power Distribution Center and ground.Is the resistance below 5.0 ohms?AllYes → Go To 10No → Repair the open Wiper On/Off Relay Control circuit.Perform BODY VERIFICATION TEST - VER 1.10 Turn the Ignition Off.Disconnect the Wiper On/Off Relay.Disconnect the BCM C1 Connector.Note: Check connectors - Clean/repair as necessary.Using a ohmmeter, measure the Wiper On/Off Relay Control circuit between theWiper On/Off Relay cavity 85 of the Power Distribution Center and ground.Is the resistance below 5.0 ohms?AllYes → Repair the Wiper On/Off Relay Control circuit shorted to ground.Perform BODY VERIFICATION TEST - VER 1.No → Go To 11638
WINDSHIELD WIPER & WASHERWIPER ON/<strong>OF</strong>F RELAY SHORTED LOW/OPEN CIRCUIT — ContinuedTEST ACTION APPLICABILITY11 Turn the Ignition Off.Disconnect the Wiper On/Off Relay.Note: Check connectors - Clean/repair as necessary.Connect a test light between cavity 85 and 86 of the Wiper On/Off Relay in the PowerDistribution Center.Turn the Ignition On (Engine Off).With the DRBIII actuate the Wiper Relay.Does the test light pulse on and off with the DRBIII actuating the wiper relay?AllYes → Test Complete.No → Replace the Body Control Module,shorted low/open.Perform BODY VERIFICATION TEST - VER 1.Note: Stop the Wiper Motor actuation.639
WINDSHIELD WIPER & WASHERSymptom:WIPER PARK SWITCH FAILUREWhen Monitored and Set Condition:WIPER PARK SWITCH FAILUREWhen Monitored: The ignition must be in the run position and battery voltage suppliedto the BCM on the Fused B(+) circuit.Set Condition: The code will set if the BCM does not detect a low to high voltagetransition on the Wiper Park Switch Sense circuit within 8 seconds after energizing thewiper relay On/Off relay.POSSIBLE CAUSESWIPER PARK SWITCH OPERATIONWIPER PARK SWITCH SENSE CIRCUIT SHORT TO VOLTAGEWIPER PARK SWITCH SENSE CIRCUIT OPENWIPER PARK SWITCH SENSE CIRCUIT SHORT TO GROUNDGROUND CIRCUIT OPENFUSED IGNITION SWITCH OUTPUT RUN/ACC CIRCUIT OPENWIPER MOTOR OPERATIONBCMTEST ACTION APPLICABILITY1 Turn the ignition on.With the DRBIII, erase BCM DTC’s.Cycle the ignition off and then on.Turn the windshield wiper switch to each intermittent position, then low and highspeed positions.Turn the windshield wiper switch to the Low Speed position.With the DRBIII, read BCM DTC’s.Does the DRB display WIPER PARK SWITCH FAILURE?AllYes → Go To 2No → At this time the condition to set the code is not present. Inspectthe related wiring harness and connectors, repair as necessary.Perform BODY VERIFICATION TEST - VER 1.640
WINDSHIELD WIPER & WASHERWIPER PARK SWITCH FAILURE — ContinuedTEST ACTION APPLICABILITY2 Turn the ignition off.Disconnect the Windshield Wiper Motor harness connector.Disconnect the Junction Block C2 harness connector.Turn the ignition on.Measure the voltage of the Wiper Park Switch Sense circuit in the Windshield WiperMotor harness connector.Is there any voltage present?AllYes → Repair the Wiper Park Switch Sense circuit for a short to voltage.Perform BODY VERIFICATION TEST - VER 1.No → Go To 33 Turn the ignition off.Disconnect the Windshield Wiper Motor harness connector.Disconnect the Junction Block C2 harness connector.Measure the resistance of the Wiper Park Switch Sense circuit between the JunctionBlock C2 harness connector and the Wiper Motor harness connector.Is the resistance below 5.0 ohms?AllYes → Go To 4No → Repair the Wiper Park Switch Sense circuit for an open.Perform BODY VERIFICATION TEST - VER 1.4 Turn the ignition off.Disconnect the Windshield Wiper Motor harness connector.Disconnect the Junction Block C2 harness connector.Measure the resistance between ground and the Wiper Park Switch Sense circuit inthe Junction Block C2 harness connector.Is the resistance below 100.0 ohms?AllYes → Repair the Wiper Park Switch Sense circuit for a short to ground.Perform BODY VERIFICATION TEST - VER 1.No → Go To 55 Turn the ignition off.Disconnect the Windshield Wiper Motor harness connector.NOTE: Ensure the ignition switch, all lights and accessories are turned off.Using a 12-volt test light connected to 12-volts, probe the Ground circuit in theWindshield Wiper Motor harness connector.Does the test light illuminate brightly?AllYes → Go To 6No → Repair the Wiper Motor Ground circuit for an open.Perform BODY VERIFICATION TEST - VER 1.6 Disconnect the Wiper Motor connector.Turn ignition on.Using a voltmeter measure the Fused Ignition Switch Output Run/ACC circuit at theWiper Motor connector.Is the voltage above 10 volts?AllYes → Go To 7No → Repair the open Fused Ignition Switch Output Run/ACC circuit.Perform BODY VERIFICATION TEST - VER 1.641
WINDSHIELD WIPER & WASHERWIPER PARK SWITCH FAILURE — ContinuedTEST ACTION APPLICABILITY7 Turn the ignition off.Disconnect the Windshield Wiper Motor harness connector.Turn the ignition on.With the DRBIII in Inputs/Outputs, read the wiper park switch state.Connect one end of a jumper wire to the wiper park switch sense circuit at thewindshield wiper motor harness connector.While observing the DRBIII, connect the other end of the jumper wire to ground forseveral seconds, then disconnect the jumper wire from ground.Did the wiper park switch input change state when connected to ground thendisconnected from ground?AllYes → Replace the Wiper Motor.Perform BODY VERIFICATION TEST - VER 1.No → Replace the Body Control Module.Perform BODY VERIFICATION TEST - VER 1.642
WINDSHIELD WIPER & WASHERSymptom:WIPER SWITCH MUX CKT OPENWhen Monitored and Set Condition:WIPER SWITCH MUX CKT OPENWhen Monitored: The ignition must be in the run position and battery voltage suppliedto the BCM on the Fused B(+) circuit.Set Condition: If the voltage on the wiper switch MUX circuit is above 4.8 volts for morethan 5 seconds the code will set.POSSIBLE CAUSESVERIFYING ACTIVE DTC - WIPER SWITCH MUX CIRCUIT OPENWIPER SWITCH RETURN CIRCUIT OPENWINDSHIELD WIPER SWITCH MUX CIRCUIT OPENRIGHT MULTI - FUNCTION SWITCH DEFECTIVE, WINDSHIELD WIPER SWITCH MUX CKTOPENBCM DEFECTIVE - WIPER MUX CIRCUIT OPENTEST ACTION APPLICABILITY1 Turn ignition on.With the DRBIII, Erase BCM DTC’sTurn ignition off then turn ignition on.Turn the wiper switch to each intermittent position, then low and high speedpositions.With the DRBIII read BCM DTC’s.Does the DRB show WIPER SWITCH MUX CIRCUIT OPEN?AllYes → Go To 2No → Test Complete, code not present at this time.2 Turn ignition off.Disconnect the Right Multi - Function Switch connector.Disconnect the BCM C2 connector.Using an ohmmeter, Measure the resistance of the Wiper Switch Return circuitbetween the BCM C2 connector and the Right Multi - Function connector.Is the resistance below 5.0 ohms?AllYes → Go To 3No → Repair the open Windshield Wiper Switch Return circuit.Perform BODY VERIFICATION TEST - VER 1.643
WINDSHIELD WIPER & WASHERWIPER SWITCH MUX CKT OPEN — ContinuedTEST ACTION APPLICABILITY3 Turn ignition off.Disconnect the Right Multi - Function Switch connector.Disconnect the BCM C2 connector.Using an ohmmeter, Measure the resistance of the Windshield Wiper Switch MUXcircuit between the BCM C2 connector and the Right Multi - Function connector.Is the resistance below 5.0 ohms?AllYes → Go To 4No → Repair the open Windshield Wiper Switch MUX circuit.Perform BODY VERIFICATION TEST - VER 1.4 Turn ignition off.Disconnect the Right Multi - Function Switch Connector.Turn the Windshield Wiper Switch to the <strong>OF</strong>F position.Connect an ohmmeter between the Right Multi - Function Switch terminals #7 and#8.Observe the ohmmeter while turning the Windshield Wiper Switch from the <strong>OF</strong>Fposition to the High speed position.Is the resistance below 40.0 ohms in any positionAllYes → Replace the Right Multi - Function Switch.Perform BODY VERIFICATION TEST - VER 1.No → Go To 55 Turn the Ignition Off.With a jumper, back probe a jumper wire between the Wiper Switch Return Circuitand the Windshield Wiper Switch MUX circuit at the BCM C2 connector.Turn Ignition on.With the DRBIII, read the WIPER MODE SW VOLTS sensor.Does the DRBIII show the sensor volts above 4.8 volts?AllYes → Replace the Body Control Module.Perform BODY VERIFICATION TEST - VER 1.No → Test Complete.644
WINDSHIELD WIPER & WASHERSymptom:WIPER SWITCH MUX CKT SHORT TO GROUNDWhen Monitored and Set Condition:WIPER SWITCH MUX CKT SHORT TO GROUNDWhen Monitored: The ignition must be in the run position and battery voltage suppliedto the BCM on the Fused B(+) circuit.Set Condition: If the voltage on the wiper switch MUX circuit drops below 0.3 volts formore than 5 seconds the code will set.POSSIBLE CAUSESVERIFYING ACTIVE DTC - WIPER SWITCH MUX CIRCUIT SHORTED TO GROUNDWINDSHIELD WIPER SWITCH MUX CIRCUIT SHORTED TO GROUNDRIGHT MULTI - FUNCTION SWITCH DEFECTIVE, WIPER MUX CIRCUIT SHORTED TOGROUNDBCM DEFECTIVE - WIPER MUX CIRCUIT SHORTED TO GROUNDTEST ACTION APPLICABILITY1 Turn ignition on.With the DRBIII, Erase BCM DTC’sTurn ignition off then turn ignition on.Turn the wiper switch to each intermittent position, then low and high speedpositions.With the DRBIII read BCM DTC’s.Does the DRB show WIPER SWITCH MUX CIRCUIT SHORTED TO GROUND?AllYes → Go To 2No → Test Complete, code not present at this time.2 Turn ignition off.Disconnect the Right Multi - Function Switch connector.Disconnect the BCM C2 connector.Using an ohmmeter, Measure the resistance of the Windshield Wiper Switch MUXcircuit between the BCM C2 connector and ground.Is the resistance below 5.0 ohms?AllYes → Repair the Windshield Wiper Switch MUX circuit shorted toground.Perform BODY VERIFICATION TEST - VER 1.No → Go To 3645
WINDSHIELD WIPER & WASHERWIPER SWITCH MUX CKT SHORT TO GROUND — ContinuedTEST ACTION APPLICABILITY3 Turn ignition off.Disconnect the Right Multi - Function Switch Connector.Turn the Windshield Wiper Switch to the <strong>OF</strong>F position.Using an ohmmeter, measure between the Windshield Wiper Switch MUX circuit andthe Wiper Switch Return circuit of the Right Multi - Function Switch.Observe the ohmmeter while turning the Windshield Wiper Switch from the <strong>OF</strong>Fposition to the High speed position.Is the resistance below 40.0 ohms in any position.AllYes → Replace the Right Multi - Function Switch.Perform BODY VERIFICATION TEST - VER 1.No → Go To 44 Turn the Ignition Off.Disconnect the BCM C2 connector.Turn Ignition on.With the DRBIII, read the WIPER MODE SW VOLTS sensor.Does the DRBIII show the sensor volts below 0.3 volts?AllYes → Replace the Body Control Module.Perform BODY VERIFICATION TEST - VER 1.No → Test Complete.646
VERIFICATION TESTSVerification Tests45RFE/545RFE TRANSMISSION VERIFICATION TEST - VER 11. Connect the DRBIII to the Data Link Connector.2. Reconnect any disconnected components.3. With the DRBIII, erase DTC’s.4. With the DRBIII, display Transmission Temperature. Start and run the engine until theTransmission Temperature is HOT above 43° Celsius 110° Fahrenheit.5. Check the Transmission fluid and adjust if necessary. Refer to the Service Information for theFluid Fill procedure.6. NOTE: If the TCM has been replaced or if the transmission has been repaired orreplaced it is necessary to perform the DRBIII Quick Learn Procedure.7. Road test the vehicle. With the DRBIII, monitor TPS. Make fifteen to twenty 1-2, 2-3, and3-4 upshifts and (4 - 4prime for 545RFE only).8. Perform these shifts from a standing start to 97 Km/h 60 MPH with a constant throttleopening of 20 to 25 degrees.9. Below 40 Km/h 25 MPH, make five to eight wide open throttle kickdowns to 1st gear. Allowat least 5 seconds each in 2nd and 3rd gear between each kickdown.10. Check for DTC’s during the road test.11. NOTE: Use the EATX OBDII task manager to run Good Trip time in each gear, thiswill confirm the repair and to ensure that the DTC has not re-matured.Were any Trouble Codes set during the road test?APPLICABILITYAllYes → Refer to the Symptom List for the appropriate diagnostic tests.No → Repair is complete.ABS VERIFICATION TEST - VER 11. Turn the ignition off.2. Connect all previously disconnected components and connectors.3. Ensure all accessories are turned off and the battery is fully charged.4. Ensure that the Ignition is on, and with the DRBIII, erase all Diagnostic Trouble Codes fromALL modules. Start the engine and allow it to run for 2 minutes and fully operate the systemthat was malfunctioning.5. Turn the ignition off and wait 5 seconds. Turn the ignition on and using the DRBIII, readDTC’s from ALL modules.6. If any Diagnostic Trouble Codes are present, return to Symptom list and troubleshoot newor recurring symptom.7. NOTE: For Sensor Signal and Pump Motor faults, the CAB must sense all 4 wheelsat 25 km/h (15 mph) before it will extinguish the ABS Indicator.8. If there are no DTC’s present after turning ignition on, road test the vehicle for at least 5minutes. Perform several antilock braking stops.9. Caution: Ensure braking capability is available before road testing.10. Again, with the DRBIII read DTC’s. If any DTC’s are present, return to Symptom list.11. If there are no Diagnostic Trouble Codes (DTC’s) present, and the customer’s concern canno longer be duplicated, the repair is complete.Are any DTC’s present or is the original concern still present?APPLICABILITYAllYes → Repair is not complete, refer to appropriate symptom.No → Repair is complete.647
VERIFICATION TESTSVerification Tests — ContinuedADJUS<strong>TABLE</strong> PEDALS VERIFICATION TEST - VER 11. If the Adjustable Pedals Module was replaced, program two pedal positions if equipped withmemory function.2. Activate the Adjustable Pedals through the full range of movement.3. Verify that the Adjustable Pedals system is disabled with the vehicle in Reverse.4. Verify that the Adjustable Pedals system is disabled with Speed Control activated.5. With the DRBIII, erase DTCs.6. With the DRBIII, read DTCs.Are any DTC’s present or is the original complaint still present?APPLICABILITYAllYes → Repair is not complete, refer to appropriate symptom.No → Repair is complete.AIRBAG VERIFICATION TEST - VER 11. Remove any special tools or jumper wires and reconnect all previously disconnectedcomponents - except the Battery.2. WARNING: TURN THE IGNITION ON, THEN RECONNECT THE BATTERY.3. Connect the DRBIII to the Data Link Connector - use the most current software available.4. Use the DRBIII and erase the stored codes in all airbag system modules.5. Turn the Ignition Off, and wait 15 seconds before turning the Ignition On.6. Wait one minute, and read active codes and if there are none present read the stored codes.7. Note: If equipped with Airbag On-Off switch, read the DTC’s in all switch positions.8. Note: Read the DTC’s in all airbag system related modules.9. If the DRBIII shows any active or stored codes, return to the Symptom list and follow pathspecified for that trouble code. If no active or stored codes are present, the repair is complete.Are any DTC’s present or is the original condition still present?APPLICABILITYAllYes → Repair is not complete, refer to appropriate symptom.No → Repair is complete.648
VERIFICATION TESTSVerification Tests — ContinuedBODY VERIFICATION TEST - VER 11. Disconnect all jumper wires and reconnect all previously disconnected components andconnectors.2. If the Sentry Key Immobilizer Module (SKIM) or the Powertrain Control Module (PCM) werereplaced, proceed to number 9. If the SKIM or PCM were not replaced, continue to the nextnumber.3. If the Body Control Module was replaced, turn the ignition on for 15 seconds beforeattempting to start (to learn VIN).4. If the vehicle is equipped with VTSS, use the DRBIII and enable VTSS. Program otheroptions as necessary.5. (Export only) If the Intrusion Transceiver Module (ITM) was replaced, use the DRBIII toenable the ITM and Program Interior type.6. (Export only) If the Siren was replaced perform the DRBIII Siren Replacement procedure.7. If the Passenger Door Module was replaced, use the DRBIII and program all RKEtransmitters used with this vehicle.8. If any repairs were made to the HVAC System, disconnect the battery for 30 seconds andthen reconnect or using the DRBIII, recalibrate the HVAC doors. Proceed to number 16.9. Obtain the Vehicle’s unique PIN assigned to it’s original SKIM from either the vehicle’sinvoice or from Chrysler’s Customer Center (1-800-992-1997).10. With the DRBIII, select THEFT ALARM, SKIM, MISCELLANEOUS and select SKIMREPLACED. Enter the 4 digit PIN to put SKIM in Secured Access Mode.11. The DRBIII will prompt you through the following steps. (1) Program the country code intothe SKIM’s memory. (2) Program the vehicle’s VIN into the SKIM’s memory. (3) Transfer thevehicle’s Secret Key data from the PCM.12. Once secured access mode is active, the SKIM will remain in that mode for 60 seconds.13. Using the DRBIII, program all customer keys into the SKIM’s memory. This requires thatthe SKIM be in secured access mode, using the 4 digit code.14. Note: If the PCM is replaced, the VIN and the unique Secret Key data must be transferedfrom the SKIM to the PCM. This procedure requires the SKIM to be placed in secured accessmode using the 4-digit code.15. Note: If 3 attempts are made to enter secured access mode using an incorrect PIN, securedaccess mode will be locked out for 1 hour which causes the DRBIII to display BUS +\-SIGNALS OPEN. To exit this mode, turn ignition to the RUN position for 1 hour.16. Ensure all accessories are turned off and the battery is fully charged.17. Ensure that the Ignition is on, and with the DRBIII, erase all Diagnostic Trouble Codesfrom ALL modules. Start the engine and allow it to run for 2 minutes and fully operate thesystem that was malfunctioning.18. Turn the ignition off and wait 5 seconds. Turn the ignition on and using the DRBIII, readDTC’s from ALL modules.Are any DTC’s present or is the original complaint still present?APPLICABILITYAllYes → Repair is not complete, refer to appropriate symptom.No → Repair is complete.649
VERIFICATION TESTSVerification Tests — ContinuedPOWERTRAIN VERIFICATION TEST VER - 11. Inspect the vehicle to ensure that all engine components are properly installed andconnected. Reassemble and reconnect components as necessary.2. Inspect the engine oil for contamination. If oil contamination is suspected, change the oil andfilter.3. If the PCM was not replaced skip steps 4 through 6 and continue the verification.4. If the PCM was replaced the correct VIN and mileage must be programmed or a DTC will setin the ABS and Air Bag modules. In addition, if the vehicle is equipped with Sentry KeyImmobilizer Module (SKIM), Secret Key data must be updated to enable start.5. For ABS and Air Bag systems: Enter correct VIN and Mileage in PCM. Erase codes in ABSand Air Bag modules.6. For SKIM theft alarm: Connect DRBIII to data link conn. Go to Theft Alarm, SKIM, Misc.and place SKIM in secured access mode, by using the appropriate PIN code for this vehicle.Select Update the Secret Key data. Data will be transferred from SKIM to PCM7. Attempt to start the engine.Is the vehicle still unable to start or are there any DTCs or symptoms remaining?APPLICABILITYAllYes → Check for any related Technical Service Bulletins and/or refer to theappropriate Symptoms list (Diagnostic Procedure).No → Repair is complete.ROAD TEST VERIFICATION - VER-21. Inspect the vehicle to ensure that all engine components are properly installed andconnected. Reassemble and reconnect components as necessary.2. If this verification procedure is being performed after a non-DTC test, perform steps 3 and4.3. Check to see if the initial symptom still exists. If there are no trouble codes and the symptomno longer exists, the repair was successful and testing is now complete.4. If the initial or another symptom exists, the repair is not complete. Check all pertinentTechnical Service Bulletins (TSBs) and return to the Symptom List if necessary.5. For previously read DTCs that have not been dealt with, return to the Symptom List andfollow the diagnostic path for that DTC; otherwise, continue.6. If the Engine Control Module (ECM) has not been changed, perform steps 7 and 8, otherwise,continue with step 9.7. With the DRB, erase all diagnostic trouble codes (DTCs), then disconnect the DRB.8. Turn the ignition off for at least 10 seconds.9. If equipped with a Transfer Case Position Switch, perform step 10, otherwise, continue withstep 11.10. With the ignition switch on, place the Transfer Case Shift Lever in each gear position,stopping for 15 seconds in each position.11. Ensure no DTCs remain by performing steps 12 through 15.12. Road test the vehicle. For some of the road test, go at least 64 km/h (40 MPH). If this testis for an A/C Relay Control Circuit, drive the vehicle for at least 5 minutes with the A/C on.13. At some point, stop the vehicle and turn the engine off for at least 10 seconds, then restartthe engine and continue.14. Upon completion of the road test, turn the engine off and check for DTCs with the DRB.15. If the repaired DTC has reset, the repair is not complete. Check for any pertinent TechnicalService Bulletins (TSBs) and return to the Symptom List. If there are no DTCs, the repair wassuccessful and is now complete.Are any DTCs or symptoms remaining?APPLICABILITYAllYes → Repair is not complete, refer to appropriate symptom.No → Repair is complete.650
VERIFICATION TESTSVerification Tests — ContinuedSKIS VERIFICATION1. Reconnect all previously disconnected components and connectors.2. Obtain the vehicle’s unique Personal Identification Number (PIN) assigned to it’s originalSKIM. This number can be obtained from the vehicle’s invoice or Chrysler’s Customer Center(1-800-992-1997).3. NOTE: When entering the PIN, care should be taken because the SKIM will onlyallow 3 consecutive attempts to enter the correct PIN. If 3 consecutive incorrectPINs are entered, the SKIM will Lock Out the DRB for 1 hour.4. To exit Lock Out mode, the ignition key must remain in the Run position continually for 1hour. Turn off all accessories and connect a battery charger if necessary.5. With the DRB, select Theft Alarm, SKIM and Miscellaneous. Then, select the desiredprocedure and follow the steps that will be displayed.6. If the SKIM has been replaced, ensure all of the vehicle ignition keys are programmed to thenew SKIM.7. NOTE: Prior to returning vehicle to the customer, perform a module scan to besure that all DTCs are erased. Erase any DTCs that are found.8. With the DRB, erase all DTCs. Perform 5 ignition key cycles leaving the key on for at least90 seconds per cycle.9. With the DRB, read the SKIM DTCs.Are there any SKIM DTCs?APPLICABILITYAllYes → Repair is not complete, refer to appropriate symptom.No → Repair is complete.TIRE PRESSURE VERIFICATION TEST1. Perform the EVIC training as instructed in the System Description.2. Using the DRBIII or the EVIC RESET button, set the EVIC to Diagnostics mode (blankscreen).3. NOTE: Set the EVIC as follows:4. Press and hold the EVIC RESET button for five seconds (EVIC will beep).5. Set the EVIC to display BLOCK COUNTERS.6. NOTE: A vehicle graphic will display showing counters at wheel locations.7. Drive the vehicle at 40 km/h (25 mph) for at least 2 minutes.8. Observe that the counters increment at least 3 sensor/transmitter receptions for each wheel.Can the EVIC be trained and do the counters show Sensor/Transmitter receptions?APPLICABILITYAllYes → Repair is complete.No → Refer to Diagnosing System Faults in the Description and Operation forthis system.651
VERIFICATION TESTSVerification Tests — ContinuedVERIFICATION TEST -MEMORY SYSTEM1. Reconnect all previously disconnected components and connectors.2. If any Memory/Heated Seat, or Driver’s Door Module Trouble Codes are present, erase at thistime.3. If the Memory Seat Module was replaced, use the DRB III and Reset Guard Bands.4. With the Memory Switch on the Driver’s Door, program the Driver’s Seat #1 Button to adesired position and Driver #2 Button to a different position.5. Remove the Ignition Key and close all Doors to allow the Body Control Module to time out(30 seconds).6. Verify that both Memory positions can be recalled from the RKE transmitter and theMemory Switch on the Driver’s Door.7. Turn the ignition on, and with the DRBIII, erase all Diagnostic Trouble Codes from ALLmodules. Start the engine and allow it to run for 2 minutes and fully operate the system thatwas malfunctioning.8. Turn the ignition off and wait 5 seconds. Turn the ignition on and using the DRBIII, readDTC’s from ALL modules.Are any DTC’s present or is the original complaint still present?APPLICABILITYAllYes → Repair is not complete, refer to appropriate symptom.No → Repair is complete.VTSS VERIFICATION TEST - 1A1. Ensure all doors, hood, liftgate and liftgate flip-up are closed.2. Open the driver’s door.3. Remove the ignition key (but keep in hand).4. Lower the driver door window and lock the doors with RKE transmitter.5. Close the driver’s door.6. Observe the VTSS Indicator.7. The VTSS Indicator will flash rapidly for approximately 15 seconds and then begin to flashslowly. The VTSS indicator not performing as described, indicates a system fault. Refer tosymptom list for problems related to THEFT ALARM WILL NOT ARM.8. Perform a system test on the VTSS by duplicating the original complaint.9. Disarm the system and with the DRBIII, read DTC’s.10. If the original complaint is corrected and there are no DTC’s the repair is complete.Are any DTC’s present or is the original complaint still present?APPLICABILITYAllYes → Repair is not complete, refer to the appropriate symptom.Perform VTSS VERIFICATION TEST - 1A.No → Repair is complete.652
VERIFICATION TESTSVerification Tests — ContinuedW5AJ400 TRANSMISSION VERIFICATION TEST - VER 11. Connect the DRBIII to the Data Link Connector.2. Reconnect any disconnected components.3. With the DRBIII, erase DTC’s.4. With the DRBIII, display Transmission Temperature. Start and run the engine until theTransmission Temperature is HOT above 43° Celsius 110° Fahrenheit.5. Check the Transmission fluid and adjust if necessary. Refer to the Service Information for theFluid Fill procedure.6. Road test the vehicle. Make fifteen to twenty 1-2, 2-3, and 3-4 upshifts.7. Perform these shifts from a standing start to 72 Km/h 45 MPH with a constant throttleopening of 20 to 25 degrees.8. Below 40 Km/h 25 MPH, make five to eight wide open throttle kickdowns to 1st gear. Allowat least 5 seconds each in 2nd and 3rd gear between each kickdown.9. Check for DTC’s during the road test.10. use the actuate all solenoids command check the fault status ??????????????Were any Trouble Codes set during the road test?APPLICABILITYAllYes → Repair is not complete, refer to appropriate symptom.No → Repair is complete.653
NOTES654
8.0 COMPONENT LOCATIONS8.1 AIRBAG SYSTEMCOMPONENT LOCATIONSCOMPONENTLOCATIONS655
COMPONENTCOMPONENT LOCATIONS8.2 AUDIO SYSTEMLOCATIONS8.3 AUTOMATIC ZONE CONTROL (AZC)8.3.1 AZC MODULE656
8.3.2 HVAC UNITCOMPONENT LOCATIONSCOMPONENTLOCATIONS8.3.3 EVAPORATOR TEMPERATURE SENSOR8.3.4 REAR WINDOW DEFOGGER657
COMPONENTCOMPONENT LOCATIONS8.3 AUTOMATIC ZONE CONTROL (AZC) (Continued)8.3.5 DRB III SCREEN, AZC MODULE BLOWER MOTOR CONTROLLER SIGNALLOCATIONS8.4 CHIME SYSTEM658
8.5 ELECTRONIC VEHICLE INFORMATION CENTER (EVIC)COMPONENT LOCATIONSCOMPONENTLOCATIONS8.6 BODY CONTROL MODULE & JUNCTION BLOCK659
COMPONENTLOCATIONSCOMPONENT LOCATIONS8.7 INSTRUMENT PANEL8.8 POWER DOOR LOCKS8.8.1 FRONT DOOR8.8.2 REAR DOOR660
8.8.3 LIFTGATECOMPONENT LOCATIONSCOMPONENTLOCATIONS8.9 SYSTEM COMPONENT LOCATIONS8.10 VEHICLE THEFT SECURITY SYSTEM (VTSS) & SKIS661
COMPONENTCOMPONENT LOCATIONS8.11 WIPER SYSTEMLOCATIONS662
COMPONENT LOCATIONSCOMPONENTLOCATIONS663
NOTES664
9.0 CONNECTOR PINOUTSCONNECTOR PINOUTSADJUS<strong>TABLE</strong> PEDALS MODULE (EXCEPT BUILT-UP-EXPORT) - GREEN 14 WAYCAV CIRCUIT FUNCTION1 Y151 20LG/BR ADJUS<strong>TABLE</strong> PEDALS SWITCH SENSE (FORWARD)2 Y152 20LG/OR ADJUS<strong>TABLE</strong> PEDALS SWITCH SENSE (REARWARD)3 Q110 16OR/VT ADJUS<strong>TABLE</strong> PEDALS MOTOR (FORWARD)4 F72 16RD/YL FUSED B(+)5 - -6 Q111 16OR/GY ADJUS<strong>TABLE</strong> PEDALS MOTOR (REARWARD)7 Q113 20OR/DB (MEMORY) PEDAL POSITION SENSOR FEED8 Q112 20OR/YL (MEMORY) PEDAL POSITION SENSOR SENSE9 Q114 20OR/TN (MEMORY) PEDAL POSITION SENSOR RETURN10 Z151 16BK GROUND11 Z155 20BK/OR GROUND12 L1 18WT/BR BACK-UP LAMP FEED13 D25 20VT/YL PCI BUS14 Y153 16DB/RD ADJUS<strong>TABLE</strong> PEDALS SWITCH FEEDAIRBAG CONTROL MODULE C1 (ORC C1) - YELLOW 32 WAYCAV CIRCUIT FUNCTION1 R72 20LB/WT (SIDE AIR- PASSENGER CURTAIN SQUIB LINE 2BAGS)2 R74 20LB/YL (SIDE AIR- PASSENGER CURTAIN SQUIB LINE 1BAGS)3 - -4 - -5 - -6 - -7 - -8 - -9 R58 20GY PASSENGER SEAT BELT SWITCH SENSE10 R60 20VT PASSENGER SEAT BELT SWITCH GROUND11 - -12 - -13 - -14 - -15 R132 20LG/VT (SIDE AIR- PASSENGER SIDE IMPACT SENSOR SIGNALBAGS)16 R134 20LB/BR (SIDE AIR- PASSENGER SIDE IMPACT SENSOR GROUNDBAGS)17 R131 20LG/YL (SIDE AIR- DRIVER SIDE IMPACT SENSOR SIGNALBAGS)18 R133 20LB/DG (SIDE AIR- DRIVER SIDE IMPACT SENSOR GROUNDBAGS)19 - -20 - -21 - -22 - -23 R59 20LB DRIVER SEAT BELT SWITCH GROUND24 R57 20DG DRIVER SEAT BELT SWITCH SENSE25 R73 20LB/BR (SIDE AIR- DRIVER CURTAIN SQUIB LINE 2BAGS)26 R75 20LB/OR (SIDE AIR- DRIVER CURTAIN SQUIB LINE 1BAGS)27 - -28 - -29 - -30 - -31 - -32 - -CONNECTORPINOUTS665
CONNECTOR PINOUTSCONNECTORPINOUTSAIRBAG CONTROL MODULE C2 (ORC C2) - YELLOW 32 WAYCAV CIRCUIT FUNCTION1 R45 20DG/LB DRIVER SQUIB 1 LINE 22 R43 20BK/LB DRIVER SQUIB 1 LINE 13 R42 20BK/YL PASSENGER SQUIB 1 LINE 14 R44 20DG/YL PASSENGER SQUIB 1 LINE 25 - -6 - -7 - -8 - -9 R49 20LB LEFT FRONT IMPACT SENSOR SIGNAL10 R47 20DB/LB LEFT FRONT IMPACT SENSOR GROUND11 R46 20BR/LB RIGHT FRONT IMPACT SENSOR GROUND12 R48 20TN RIGHT FRONT IMPACT SENSOR SIGNAL13 - -14 - -15 - -16 F23 18DB/YL FUSED IGNITION SWITCH OUTPUT (RUN)17 Z6 20BK/PK GROUND18 - -19 - -20 - -21 - -22 - -23 D25 20YL/VT/OR PCI BUS24 F14 20LG/YL FUSED IGNITION SWITCH OUTPUT (RUN-START)25 R63 20TN/LB DRIVER SQUIB 2 LINE 226 R61 20OR/LB DRIVER SQUIB 2 LINE 127 R62 20OR/YL PASSENGER SQUIB 2 LINE 228 R64 20TN/YL PASSENGER SQUIB 2 LINE 129 - -30 - -31 - -32 - -AMBIENT TEMPERATURE SENSOR - BLACK 2 WAYCAV CIRCUIT FUNCTION1 G32 20BK/LB AMBIENT TEMPERATURE SENSOR RETURN2 G31 20VT/LG AMBIENT TEMPERATURE SENSOR SIGNALAMBIENT TEMPERATURE SENSOR (SENSOR SIDE)CAV CIRCUIT FUNCTION1 - AMBIENT TEMPERATURE SENSOR SIGNAL2 - SENSOR GROUND666
CONNECTOR PINOUTSANTENNA MODULE (BUILT-UP-EXPORT) - WHITE 2 WAYCAV CIRCUIT FUNCTION1 X64 18BK/WT ENABLE SIGNAL TO AMPLIFIER2 - -AUTOMATIC ZONE CONTROL MODULE C1 (AZC) - WHITE 16 WAYCAV CIRCUIT FUNCTION1 C102 20TN/BK MODE DOOR DRIVER (B)2 - -3 C32 20GY/DB RECIRCULATION DOOR DRIVER (A)4 C100 20YL/DB RECIRCULATION DOOR DRIVER (B)5 - -6 C79 20BK/WT FUSED REAR WINDOW DEFOGGER RELAY OUTPUT7 - -8 Z118 20BK GROUND9 C35 20DG/YL MODE DOOR DRIVER (A)10 C33 20DB/RD DRIVER BLEND DOOR DRIVER (A)11 - -12 - -13 - -14 C81 20LB/WT REAR WINDOW DEFOGGER SWITCH SENSE15 - -16 - -AUTOMATIC ZONE CONTROL MODULE C2 (AZC) - WHITE 12 WAYCAV CIRCUIT FUNCTION1 - -2 C94 20WT/DG PASSENGER BLEND DOOR DRIVER (A)3 C95 20WT/BK DRIVER BLEND DOOR DRIVER (B)4 C96 20WT/DB PASSENGER BLEND DOOR DRIVER (B)5 - -6 E2 20OR PANEL LAMPS DRIVER7 C56 20RD/LG BLOWER MOTOR CONTROL8 D25 20YL/VT/DG PCI BUS9 C103 20DG A/C SWITCH SIGNAL10 - -11 F22 20WT/PK FUSED IGNITION SWITCH OUTPUT (RUN)12 M1 20PK FUSED B(+)CONNECTORPINOUTSBLOWER MOTOR - BLACK 2 WAYCAV CIRCUIT FUNCTION1 C1 12DG BLOWER MOTOR SUPPLY2 C7 12BK/TN BLOWER MOTOR HIGH DRIVER667
CONNECTOR PINOUTSBLOWER MOTOR CONTROLLER (AZC) - BLACK 3 WAYCAV CIRCUIT FUNCTIONA Z118 12BK GROUNDB C56 20RD/LG BLOWER MOTOR CONTROLC C1 12DG BLOWER MOTOR SUPPLYCONNECTORPINOUTSBODY CONTROL MODULE C1 - GRAY 26 WAYCAV CIRCUIT FUNCTION1 Z132 20BK/OR GROUND2 G52 20YL HEADLAMP SWITCH MUX3 E19 20RD PANEL LAMPS DIMMER SIGNAL4 - -5 G70 20BR/TN (BUILT-UP- HOOD AJAR SWITCH SENSEEXPORT LHD RHD)6 G26 20LB KEY-IN IGNITION SWITCH SENSE7 G76 18TN/YL RIGHT REAR DOOR AJAR SWITCH SENSE8 E2 20OR PANEL LAMPS DRIVER9 E2 20OR PANEL LAMPS DRIVER10 E2 20OR PANEL LAMPS DRIVER11 - -12 E2 20OR PANEL LAMPS DRIVER13 E2 20OR PANEL LAMPS DRIVER14 Z132 20BK/OR GROUND15 D25 20YL/VT/WT PCI BUS16 L80 20WT/DG HEADLAMP SWITCH RETURN17 D19 20VT/OR BODY CONTROL MODULE FLASH ENABLE18 - -19 - -20 G69 20BK/OR VTSS INDICATOR DRIVER21 - -22 V14 20RD/VT WIPER ON/<strong>OF</strong>F RELAY CONTROL23 M20 20BR/OR COURTESY LAMP LOAD SHED24 M2 20YL COURTESY LAMP DRIVER25 Z234 20BK GROUND26 - -668
CONNECTOR PINOUTSBODY CONTROL MODULE C2 - GRAY 22 WAYCAV CIRCUIT FUNCTION1 C103 20DG A/C SWITCH SIGNAL2 V10 20BR WASHER PUMP SWITCH SENSE3 V48 20RD/GY WIPER HIGH CONTROL4 L40 20BR HIGH BEAM SWITCH SENSE5 V11 20BK/TN WASHER FLUID SWITCH SENSE6 P134 20TN/LG PASSENGER SEAT HEATER SWITCH MUX7 P133 20TN/DG DRIVER SEAT HEATER SWITCH MUX8 X20 20RD/YL RADIO CONTROL MUX9 G31 20VT/LG AMBIENT TEMPERATURE SENSOR SIGNAL10 L109 20WT ULTRALIGHT SENSOR SIGNAL11 V52 20DG/RD WINDSHIELD WIPER SWITCH MUX12 C81 20LB/WT REAR WINDOW DEFOGGER SWITCH SENSE13 - -14 - -15 L27 20WT/TN FOG LAMP SWITCH SENSE16 C201 20LB/YL EVAPORATOR TEMPERATURE SENSOR SIGNAL17 G18 20PK/BK COOLANT LEVEL SWITCH SENSE18 P132 20OR/BK SEAT HEATER SWITCH SENSOR GROUND19 X10 20RD/BK RADIO CONTROL MUX RETURN20 G32 20BK/LB SENSOR GROUND21 L110 20BK/YL ULTRALIGHT SENSOR RETURN22 V9 20WT/BK WINDSHIELD WIPER SWITCH RETURNCONNECTORPINOUTS669
CONNECTOR PINOUTSCONNECTORPINOUTSC106 (DIESEL) - GRAY (BODY SIDE)CAVCIRCUIT1 F15 20DB/WT2 -3 G31 20VT/LG4 G32 20DB/OR (RHD)4 G32 20BK/LB (LHD)5 G18 20PK/BK6 -7 -8 F12 20DB/WT (LHD)9 -10 Z231 18BK (RHD)11 K4 20BK/LB (LHD)11 G9 18GY/BK (RHD)12 K6 18VT/WT (LHD)13 -14 -15 -16 K173 18LG17 -18 X2 18DG/RD19 C18 18DB (LHD)20 Y42 18OR/DB21 -22 -23 -24 -25 B7 18WT26 B6 18WT/DB27 -28 -29 -30 -31 -32 -33 -34 -35 -36 -37 -38 L13 18BR/YL (BUILT-UP-EXPORT)39 -40 -41 -42 R46 20BR/LB43 R48 20TN44 -45 -46 -47 -48 -49 -50 -51 -52 -53 L7 20BK/YL54 L60 20TN55 -56 -57 L39 20LB58 -59 L44 18VT/RD60 L34 18RD/ORA B10 14BR/WT (LHD)B -C -D -E -F -G -H -J -K -L -M B29 14DG/OR670
CONNECTOR PINOUTSC106 (DIESEL) - GRAY (RIGHT HEADLAMP AND DASH SIDE)CAVCIRCUIT1 F15 18DB/WT2 -3 G31 20VT/LG4 G32 20BK/LB5 G18 20PK/BK6 -7 -8 -9 -10 Z231 18BK (RHD)11 K4 18BK/LB (LHD)11 G9 18GY/BK (RHD)12 K6 18VT/WT (LHD)13 -14 -15 -16 K173 18LG17 -18 X2 18DG/RD19 C18 18DB (LHD)20 Y42 18OR/DB21 -22 -23 -24 -25 B7 18WT26 B6 18WT/DB27 -28 -29 -30 -31 -32 -33 -34 -35 -36 -37 -38 L13 18BR/YL39 -40 -41 -42 R46 18BR/LB43 R47 18TN44 -45 -46 -47 -48 -49 -50 -51 -52 -53 L7 20BK/YL54 L60 20TN55 -56 -57 L39 20LB58 -59 L44 18VT/RD60 L34 18RD/ORA -B -C -D -E -F -G -H -J -K -L -M -CONNECTORPINOUTS671
CONNECTOR PINOUTSCONNECTORPINOUTSC106 (GAS) - GRAY/RHD BLACK/LHD (BODY SIDE)CAVCIRCUIT1 A141 16DG/BK2 G18 20PK/BK (LHD)2 F42 18DG/LG (RHD)3 V3 16BR/WT4 V4 16RD/YL5 V55 16TN/RD6 V6 16DB7 F22 18WT/TN (RHD)7 F22 20WT/PK (LHD)8 F12 20DB/WT9 K52 20PK/BK (LHD)10 K29 20WT/PK (LHD)10 Z231 18BK (RHD)11 K512 18LB (RHD)11 K226 20LB/YL (LHD)12 K107 20OR/YL (LHD)13 K251 18LB (RHD)13 K106 20WT/DG (LHD)14 T41 18BK/WT (LHD)14 C13 20DB/OR (RHD)15 V35 20LG/RD (RHD)16 V36 20TN/RD (RHD)17 G9 18GY/BK (RHD)18 K25 18VT/LG (RHD)19 K51 20DB/YL (RHD)20 K125 18WT/DB (LHD)21 K125 18WT/DB (RHD)22 K31 18BR (RHD)23 -24 -25 B7 18WT26 B6 18WT/DB27 X3 22GY/OR (LHD)27 X3 22BK/RD (RHD)28 G32 20BK/LB (LHD)28 G32 20DB/OR (RHD)29 -30 G31 20VT/LG31 -32 V32 22OR/DG (LHD)33 V30 22DB/RD34 V16 22VT35 V14 22RD/VT36 -37 F45 20YL/RD38 L13 18BR/YL (BUILT-UP-EXPORT)39 -40 Z306 20BK/LG41 Z305 20BK/OR42 R46 20BR/LB43 R48 20TN44 F991 20OR/DB45 B22 18DG/YL (LHD)46 -47 -48 D25 18YL/VT49 D21 20PK50 D20 20LG51 D32 20LG/DG (LHD)52 T41 18BK/WT (RHD)52 T6 18OR/BK (LHD)53 L7 20BK/YL54 L60 20TN55 G18 20PK/BK (RHD)55 V37 22RD/LG (LHD)56 L1 18VT/BK57 L39 20LB58 K4 18BK/LB (LHD)58 K4 20BK/LB (RHD)59 L44 18VT/RD60 L34 18RD/ORA A149 12RD/TNB A148 16LG/RDC C1 12DGD -E A10 12RD/DG (LHD)E A10 10RD/DG (RHD)F A1 12RDG A145 10WT/RDH A146 10OR/WTJ A147 10RD/GYK A148 10PK/WTL A2 12PK/BKM A20 14RD/DB672
CONNECTOR PINOUTSC106 (GAS) - GRAY/RHD BLACK/LHD (RIGHT HEADLAMP AND DASH SIDE)CAVCIRCUIT1 A141 16DG/BK (RHD)1 A141 16DG/WT (LHD)2 F42 18DG/LG (RHD)2 G18 18PK/BK (LHD)3 V3 16BR/WT4 V4 16RD/YL5 V55 16TN/RD6 V6 16DB7 F22 18WT/TN (4.7L RHD)7 F22 20WT/PK (EXCEPT 4.7L RHD)8 F12 18DB/WT9 K52 18PK/BK (LHD)10 K29 18WT/PK (LHD)10 Z231 18BK (RHD)11 K226 18LB/YL (LHD)11 K512 18RD/YL (4.7L RHD)12 K107 18OR/PK (EXCEPT BUILT-UP-EXPORT)13 K106 18WT/DG (EXCEPT BUILT-UP-EXPORT)14 C13 18DB/OR (RHD)14 T41 18BK/WT (LHD)15 V35 20LG/RD (RHD)16 V36 20TN/RD (RHD)17 G9 18GY/BK (RHD)18 K25 18VT/LG (RHD)19 K51 18DB/YL (RHD)20 K125 18WT/DB (EXCEPT BUILT-UP-EXPORT)21 K125 18WT/DB (RHD)22 K31 18BR (RHD)23 -24 -25 B7 18WT26 B6 18WT/DB27 X3 20BK/RD28 G32 20BK/LB29 -30 G31 20VT/LG31 -32 V32 18OR/DG (LHD)33 V30 20DB/RD34 V16 20VT35 V14 20RD/VT36 -37 F45 18YL/RD (LHD/4.7L RHD)37 F45 20YL/RD (RHD)38 L13 18BR/YL (BUILT-UP-EXPORT)39 -40 Z306 20BK/LG41 Z305 20BK/OR42 R46 18BR/LB43 R48 18TN44 F991 20OR/DB45 B22 18DG/YL (LHD)46 -47 -48 D25 18VT/YL (LHD/4.7L RHD)49 D21 18PK (4.0L LHD/4.7L RHD)49 D21 20PK (4.7L LHD)50 D20 20LG (4.7L LHD)50 D20 18LG (4.7L RHD)51 D32 18LG (EXCEPT BUILT-UP-EXPORT)51 D32 18LG/DG (LHD BUILT-UP-EXPORT)52 T41 18BK/WT (RHD)52 T6 18OR/WT (LHD)53 L7 20BK/YL54 L60 20TN55 G18 20PK/BK (RHD)55 V37 18RD/LG (LHD)56 L1 18VT/BK57 L39 20LB58 K4 18BK/LB (LHD)58 K4 20BK/LB (RHD)59 L44 18VT/RD60 L34 18RD/ORA A149 12RD/TNB A148 16LG/RDC C1 12DGD -E A10 12RD/DGF A1 12RDG A145 10WT/RDH A146 10OR/WTJ A147 10RD/GYK A148 10PK/WTL A2 12PK/BKM A20 12RD/DB 2CONNECTORPINOUTS673
CONNECTOR PINOUTSC107 (DIESEL) - GRAY (BODY SIDE)CONNECTORPINOUTSCAVCIRCUIT1 X2 18DG/RD2 V11 20BK/TN3 K4 20BK/LB4 V37 22RD/LG (LHD)4 V37 20RD/LG (RHD)5 V55 16TN/RD6 V6 16DB7 V10 22BR (LHD)7 V10 20BR (RHD)8 -9 K226 18LB/YL (LHD)9 K226 20LB/YL (RHD)10 X3 22GY/OR (LHD)10 X3 22BK/RD (RHD)11 F15 20DB/WT12 F45 20YL/RD13 T41 18BK/WT14 -15 G70 20BR/TN16 G9 18GY/BK (RHD)17 Z231 18BK (RHD)18 -19 -20 -21 F991 20OR/DB22 -23 X75 20GY/LG24 Y42 18OR/DB25 B7 18WT26 B6 18WT/DB27 B4 18LG28 B3 18LG/DB29 B2 18YL30 B1 18YL/DB31 -32 M1 20PK/RD33 F20 18DB/PK34 L50 18WT/TN (RHD)34 L50 18VT/TN (LHD)35 R47 20DB/LB36 T2 18TN/BK37 Z305 20BK/OR38 Z306 20BK/LG39 R49 20LB40 K29 18WT/PK41 C18 20DB (LHD)42 -43 K6 18VT/WT (LHD)44 -45 V16 22VT46 V14 22RD/VT47 L13 18BR/YL48 D25 18YL/VT49 D21 20PK50 K173 18LG51 -52 -53 L7 20BK/YL54 L61 20TN/LG55 L1 18VT/BK56 V20 18BK/WT (LHD)56 V20 20BK/WT (RHD)57 L39 20LB58 F22 20WT/PK (LHD)58 F22 18WT/TN (RHD)59 L43 18VT60 L33 18RDA B10 14BR/WTB A148 16LG/RDC C1 12DGD A149 12RD/TNE -F A1 12RDG A145 10WT/RDH A146 10OR/WTJ A147 10RD/GYK A148 10PK/WTL A2 12PK/BKM B29 14DG/OR674
CONNECTOR PINOUTSC107 (DIESEL) - GRAY (LEFT HEADLAMP AND DASH SIDE)CAVCIRCUIT1 X2 18DG/RD2 V11 20BK/TN3 K4 18BK/LB4 V37 18RD/LG5 V55 16TN/RD6 V6 16DB7 V10 20BR8 -9 K226 18DB/WT10 X3 20BK/RD11 F15 18DB/WT12 F45 18YL/RD13 T41 18BK/WT14 -15 G70 20BR/TN16 G9 18GY/BK (RHD)17 Z231 18BK (RHD)18 -19 -20 -21 F991 20OR/DB22 -23 X75 18GY/LB24 Y42 18OR/DB25 B7 18WT26 B6 18WT/DB27 B4 18LG28 B3 18LG/DB29 B2 18YL30 B1 18YL/DB31 -32 M1 18PK33 F20 18DB/PK34 L50 18WT/TN35 R47 18DB/LB36 T2 18TN/BK37 Z305 20BK/OR38 Z306 20BK/LG39 R49 18LB40 K29 18WT/PK41 C18 18DB (RHD)42 -43 K6 18VT/WT (RHD)44 -45 V16 20VT46 V14 20RD/VT47 L13 18BR/YL48 D25 18VT/YL49 D21 18PK50 K173 18LG51 -52 -53 L7 18BK/YL54 L61 20LG55 L1 18VT/BK56 V20 18BK/WT57 L39 20LB58 F22 18WT/PK59 L43 18VT60 L33 18LG/BRA -B A148 16LG/RDC C1 12DGD A149 12RD/TNE -F A1 12RDG A145 10WT/RDH A146 10OR/WTJ A147 10RD/GYK A148 10PK/WTL A2 12PK/BKM -CONNECTORPINOUTS675
CONNECTOR PINOUTSCONNECTORPINOUTSC107 (GAS) - GRAY/RHD BLACK/LHD (BODY SIDE)CAVCIRCUIT1 V37 20RD/LG (RHD)2 V11 20BK/TN3 V3 16BR/WT (GAS)4 V4 16RD/YL (GAS)5 V55 16TN/RD6 V6 16DB7 V10 20BR (RHD)7 V10 22BR (LHD)8 F12 20DB/WT9 K226 20LB/YL (RHD)9 K52 20PK/BK (LHD)10 L13 18BR/YL (BUILT-UP-EXPORT)11 K512 18LB12 K4 20BK/LB13 -14 T6 18OR/BK (RHD)15 G70 20BR/TN (BUILT-UP-EXPORT)16 G9 18GY/BK (RHD)17 Z231 18BK (RHD)18 -19 D32 20LG/DG (RHD)20 -21 -22 -23 X75 20GY/LG (BUILT-UP-EXPORT)24 F42 18DG/LG (RHD)25 B7 18WT26 B6 18WT/DB27 B4 18LG28 B3 18LG/DB29 B2 18YL30 B1 18YL/DB31 -32 M1 20PK/RD33 F20 18DB/PK34 L50 18VT/TN (LHD)34 L50 18WT/TN (RHD)35 R47 20DB/LB (LHD)36 -37 K51 20DB/YL (RHD)38 K25 18VT/LG (RHD)39 K31 18BR (RHD)39 R49 20DB (LHD)40 K29 18WT/PK (RHD)41 K125 18WT/DB (RHD)42 V32 22OR/DG (RHD)43 R47 20DB/LB (RHD)44 V35 20LG/RD (RHD)45 B22 18DG/YL (LHD)45 V36 20TN/RD (RHD)46 C13 20DB/OR (RHD)47 L13 18BR/YL (RHD)48 D25 18YL/VT49 D21 20PK (RHD)50 R49 20LB (RHD)51 -52 -53 L7 20BK/YL54 L61 20TN/LG55 -56 V20 18BK/WT (LHD)56 V20 20BK/WT (RHD)57 L39 20LB58 -59 L43 18VT60 L33 18RDA -B -C -D -E A10 12RD/DG (LHD)E A10 10RD/DG (RHD)F -G -H -J -K -L -M A20 14RD/DB676
CONNECTOR PINOUTSC107 (GAS) - GRAY/RHD BLACK/LHD (LEFT HEADLAMP AND DASH SIDE)CAVCIRCUIT1 V37 18RD/LG (RHD)2 V11 20BK/TN3 V3 16BR/WT4 V4 16RD/YL5 V55 16TN/RD6 V6 16DB7 V10 20BR8 F12 20DB/WT9 K52 20PK/BK (LHD)9 K226 18LB/YL (RHD)10 -11 K512 18RD/YL (4.7L RHD)12 K4 18BK/LB (RHD)13 -14 T6 18OR/BK (4.0L RHD)14 T6 18OR/WT (4.7L RHD)15 G70 20BR/TN (RHD)16 G9 18GY/BK (RHD)17 Z231 18BK (RHD)18 -19 D32 18LG/DG (RHD)20 -21 -22 -23 X75 18GY/LG (RHD)24 F42 18DG/LG (RHD)25 B7 18WT26 B6 18WT/DB27 B4 18LG28 B3 18LG/DB29 B2 18YL30 B1 18YL/DB31 -32 M1 20PK/RD (LHD)32 M1 18PK (RHD)33 F20 18DB/PK34 L50 18WT/TN35 R47 18DB/LB (LHD)36 -37 K51 18DB/YL (RHD)38 K25 18VT/LG (RHD)39 R49 18LB (LHD)39 K31 18BR (RHD)40 K29 18WT/PK (RHD)41 K125 18WT/DB (RHD)42 V32 18OR/DG (RHD)43 R47 18DB/LB (RHD)44 V35 18LG/RD (RHD)45 B22 18DG/YL (LHD)45 V36 18TN/RD (RHD)46 C13 18DB/OR (RHD)47 L13 18BR/YL (RHD)48 D25 18VT/YL49 D21 18PK (RHD)50 R49 18LB (RHD)51 -52 -53 L7 20BK/YL54 L61 20TN/LG55 -56 V20 18BK/WT57 L39 20LB58 -59 L43 18VT60 L33 18RDA -B -C -D -E A10 12RD/DGF -G -H -J -K -L -M A20 12RD/DBCONNECTORPINOUTS677
CONNECTOR PINOUTSCONNECTORPINOUTSC200 - GRAY/LHD BLACK/RHD (INSTRUMENT PANEL SIDE)CAVCIRCUIT1 X84 18OR/BK2 X86 18OR/RD3 X81 18YL/BK4 X83 18YL/RD5 X53 18DG/OR6 X55 18BR/RD7 X54 18VT8 X56 18DB/PK9 Y152 20LG/BR (EXCEPT BUILT-UP-EXPORT)10 D20 20LG11 Y151 20LG/BR (EXCEPT BUILT-UP-EXPORT)12 Y153 20DB/RD (EXCEPT BUILT-UP-EXPORT)13 X40 20WT/RD14 D25 20YL/VT/GY15 D25 20YL/VT/BR16 D32 20LG/DG17 T41 18BK/WT (DIESEL)18 Z4 20WT/BK19 X41 20WT/DG20 T6 18OR/WT (GAS)21 D21 20PK22 K29 18WT/PK23 X160 20YL24 X112 20RD25 -26 -27 G70 20BR/TN (BUILT-UP-EXPORT)28 R47 20DB/LB29 Z17 20BK30 R49 20LB31 G76 18TN/YL32 T2 20TN/BK (DIESEL)33 -34 -35 X51 18WT/DG36 X57 18DG/WT37 L7 18BK/YL (BUILT-UP-EXPORT)38 L13 20BR/YL (BUILT-UP-EXPORT)39 V10 20BR40 X52 18DB/WT41 X58 18DB/OR42 -43 V13 18BR/LG44 V14 20RD/VT45 -46 V20 18BK/WT47 V22 18BR/YL48 R46 20BR/LB49 X64 18BR/WT50 Z305 20BK/OR51 Z306 20BK/LG52 R48 20TN53 G32 20BK/LB54 G31 20VT/LG55 Z9 16BK56 V11 20BK/TN57 G18 20PK/BK58 V37 20RD/LG59 K4 20BK/LB60 -A -B -C A1 12RDD -E -F -G A2 12PK/BKH C1 12DGJ -K -L -M -678
CONNECTOR PINOUTSC200 - GRAY/LHD BLACK/RHD (LEFT BODY SIDE)CAVCIRCUIT1 X56 18DB/PK (BASE)1 X84 18OR/GY (EXCEPT BASE)2 X86 18OR/RD (EXCEPT BASE)2 X54 18VT (BASE)3 X81 18YL/BK (EXCEPT BASE)3 X55 18BR/RD (BASE)4 X53 18DG/OR (BASE)4 X83 18YL/RD (EXCEPT BASE)5 X53 18DG/OR6 X55 18BR/RD7 X54 18VT8 X56 18DB/PK9 Y152 20LG/OR (EXCEPT BUILT-UP-EXPORT)10 D20 20LG (GAS)11 Y151 20LG/BR (EXCEPT BUILT-UP-EXPORT)12 Y153 20DB/RD (EXCEPT BUILT-UP-EXPORT)13 X40 20RD/WT (CD)14 D25 20YL/VT15 D25 20YL/VT16 D32 20LG/DG (GAS)17 T41 18BK/WT18 Z4 20WT/BK (CD)19 X41 20WT/DG (CD)20 T6 18OR/BK (GAS)21 D21 20PK (GAS)22 K29 18WT/PK23 X160 20YL (CD)24 X112 20RD (CD)25 -26 -27 G70 20BR/TN (BUILT-UP-EXPORT)28 R47 20DB/LB29 Z17 20BK (CD)30 R49 20LB31 G76 20TN/YL (RHD)31 G76 18TN/YL (LHD)32 T2 18TN/BK (DIESEL)33 -34 -35 X51 18WT/DG36 X57 18DG/WT37 L7 18BK/YL (BUILT-UP-EXPORT)38 L13 18BR/YL (BUILT-UP-EXPORT)39 V10 22BR (LHD)39 V10 20BR (RHD)40 X52 18DB/WT41 X58 18DB/OR42 -43 V13 18BR/LG44 V14 22RD/VT45 -46 V20 20BK/WT (RHD)46 V20 18BK/WT (LHD)47 V22 18BR/YL48 R46 20BR/LB (RHD)48 R46 18BK/LB (LHD)49 X64 18BR/WT50 Z305 20BK/OR51 Z306 20BK/LG52 R48 20TN53 G32 20BK/LG (LHD)53 G32 20DB/OR (RHD)54 G31 20VT/LG55 Z9 16BK56 V11 20BK/TN57 G18 20PK/BK58 V37 22RD/LG (LHD)58 V37 20RD/LG (RHD)59 K4 20BK/LB60 -A -B -C A1 12RDD -E -F -G A2 12PK/BKH C1 12DGJ -K -L -M -CONNECTORPINOUTS679
CONNECTOR PINOUTSCONNECTORPINOUTSC202 (AZC) - WHITE (A/C SIDE)CAVCIRCUIT1 C100 20YL/DB (RHD)1 C32 20GY/DB (LHD)2 C100 20YL/DB (LHD)2 C32 20GY/DB (RHD)3 C96 20WT/DB (RHD)3 C33 20DB/RD (LHD)4 C94 20WT/DG (RHD)4 C95 20WT/BK (LHD)5 C95 20WT/BK (RHD)5 C94 20WT/DG (LHD)6 C33 20DB/RD (RHD)6 C96 20WT/DB (LHD)7 C35 20DG/YL (RHD)7 C102 20TN/BK (LHD)8 C35 20DG/YL (LHD)8 C102 20TN/BK (RHD)9 C56 20RD/LG10 -11 C201 20LB/YL12 G32 20BK/LBC202 (AZC) - WHITE (INSTRUMENT PANEL SIDE)CAVCIRCUIT1 C100 20YL/DB (RHD)1 C32 20GY/DB (LHD)2 C100 20YL/DB (LHD)2 C32 20GY/DB (RHD)3 C96 20WT/DB (RHD)3 C33 20DB/RD (LHD)4 C94 20WT/DG (RHD)4 C95 20WT/BK (LHD)5 C95 20WT/BK (RHD)5 C94 20WT/DG (LHD)6 C33 20DB/RD (RHD)6 C96 20WT/DB (LHD)7 C35 20DG/YL (RHD)7 C102 20TN/BK (LHD)8 C35 20DG/YL (LHD)8 C102 20TN/BK (RHD)9 C56 20RD/LG10 -11 C201 20LB/YL12 G32 20BK/LB680
CONNECTOR PINOUTSC202 (MTC) - WHITE (A/C SIDE)CAVCIRCUIT1 -2 C101 20LB/YL3 G32 20BK/LB4 -5 C67 20RD/LB6 -7 -8 -9 -10 C6 14LB11 Z132 20BK/OR12 F22 20WT/PK13 C7 12BK/TN14 C1 12DG15 C4 16TN16 C5 16LGC202 (MTC) - WHITE (INSTRUMENT PANEL SIDE)CAVCIRCUIT1 -2 C201 20LB/YL3 G32 20BK/LB4 -5 C67 20RD/LB6 -7 -8 -9 -10 C6 14LB11 Z132 20BK/OR12 F22 20WT/PK13 C7 12BK/TN14 C1 12DG15 C4 16TN16 C5 16LGCONNECTORPINOUTSC203 (AZC) - WHITE (A/C SIDE)CAVCIRCUIT1 Z118 12BK2 C1 12DG681
CONNECTOR PINOUTSC203 (AZC) - WHITE (INSTRUMENT PANEL SIDE)CAVCIRCUIT1 Z118 12BK2 C1 12DGC317 - (INTRUSION TRANSCEIVER MODULE SIDE)CAVCIRCUIT1 Z155 20BK2 -3 X75 20GY/LG4 -5 D25 20YL/VT6 F70 20PKCONNECTORPINOUTSC317 - (OVERHEAD SIDE)CAVCIRCUIT1 Z155 20BK/OR2 -3 X75 20GY/LG4 -5 D25 20YL/VT6 F70 20PKC318 - (LEFT BODY SIDE (LHD)/ RIGHT BODY SIDE (RHD))CAVCIRCUIT1 R73 20LB/BR2 R75 20LB/ORC318 - (OVERLAY SIDE)CAVCIRCUIT1 R72 20LB/WT (RHD)1 R73 20LB/BR (LHD)2 R74 20LB/YL (RHD)2 R75 20LB/OR (LHD)C319 - (OVERLAY SIDE)CAVCIRCUIT1 R73 20LB/BR (RHD)1 R72 20LB/WT (LHD)2 R75 20LB/OR (RHD)2 R74 20LB/YL (LHD)682
CONNECTOR PINOUTSC319 - (RIGHT BODY SIDE (LHD)/ LEFT BODY SIDE (RHD))CAVCIRCUIT1 R72 20LB/WT (LHD)2 R74 20LB/YL (LHD)CARGO LAMP - WHITE 3 WAYCAV CIRCUIT FUNCTION1 F70 20PK FUSED B(+)2 G73 20LG/OR LIFTGATE COURTESY DISABLE3 M2 20YL/DG COURTESY LAMP DRIVERCLOCKSPRING C2 -4WAYCAV CIRCUIT FUNCTION1 R63 20TN/LB DRIVER SQUIB 2 LINE 22 R61 20OR/LB DRIVER SQUIB 2 LINE 13 R43 20BK/LB DRIVER SQUIB 1 LINE 14 R45 20DG/LB DRIVER SQUIB 1 LINE 2CLOCKSPRING C3 - GRAY 6 WAYCAV CIRCUIT FUNCTION1 X20 20RD/YL RADIO CONTROL MUX2 X10 20RD/BK RADIO CONTROL MUX RETURN3 X3 20GY/OR HORN RELAY CONTROL4 V37 20RD/LG SPEED CONTROL SWITCH SIGNAL5 K4 20BK/LB SENSOR GROUND6 - -CONNECTORPINOUTSCLOCKSPRING C4 - BLACK 2 WAYCAV CIRCUIT FUNCTION1 X20 20RD/YL RADIO CONTROL MUX2 X10 20RD/BK RADIO CONTROL MUX RETURN683
CONNECTOR PINOUTSCOMPACT DISC CHANGER (PREMIUM RADIO) - BLACK 8 WAYCAV CIRCUIT FUNCTION1 X40 20WT/RD AUDIO OUT RIGHT2 C235 20WT/LB SHIELD3 D25 20YL/VT PCI BUS4 X112 20RD IGNITION SWITCH OUTPUT (RUN-ACC)5 X41 20WT/DG AUDIO OUT LEFT6 Z4 20WT/BK GROUND7 Z17 20BK GROUND8 X160 20YL B(+)CONNECTORPINOUTSCONTROLLER ANTILOCK BRAKE - BLACK 24 WAYCAV CIRCUIT FUNCTION1 Z101 12BK/OR GROUND2 B1 18YL/DB RIGHT REAR WHEEL SPEED SENSOR SIGNAL3 B2 18YL RIGHT REAR WHEEL SPEED SENSOR 12 VOLT SUPPLY4 - -5 D25 18VT/YL PCI BUS6 B6 18WT/DB RIGHT FRONT WHEEL SPEED SENSOR SIGNAL7 B7 18WT RIGHT FRONT WHEEL SPEED SENSOR 12 VOLT SUPPLY8 - -9 A20 12RD/DB FUSED B(+)10 F20 18DB/PK FUSED IGNITION SWITCH OUTPUT (RUN)11 D52 18LG/WT (DIESEL) CAN C BUS(+)12 - -13 B22 18DG/YL VEHICLE SPEED SIGNAL14 D51 18DG/YL (DIESEL) CAN C BUS(-)15 - -16 Z102 12BK/OR GROUND17 G9 18GY/BK BRAKE FLUID LEVEL SWITCH SENSE18 L50 18WT/TN PRIMARY BRAKE SWITCH SIGNAL19 B3 18LG/DB LEFT REAR WHEEL SPEED SENSOR SIGNAL20 B4 18LG LEFT REAR WHEEL SPEED SENSOR 12 VOLT SUPPLY21 Z231 18BK GROUND22 B8 18RD/DB LEFT FRONT WHEEL SPEED SENSOR SIGNAL23 B9 18RD LEFT FRONT WHEEL SPEED SENSOR 12 VOLT SUPPLY24 A10 12RD/DG FUSED B(+)COOLANT LEVEL SENSOR - LT. GRAY 2 WAYCAV CIRCUIT FUNCTION1 G18 20PK/BK (RHD) COOLANT LEVEL SWITCH SENSE1 G18 18PK/BK (LHD) COOLANT LEVEL SWITCH SENSE2 Z307 20BK GROUND684
CONNECTOR PINOUTSDATA LINK CONNECTOR - BLACK 16 WAYCAV CIRCUIT FUNCTION1 - -2 D25 20YL/VT PCI BUS3 - -4 Z305 20BK/OR GROUND5 Z306 20BK/LG GROUND6 D32 20LG/DG SCI RECEIVE7 D21 20PK SCI TRANSMIT8 - -9 D19 20VT/OR BODY CONTROL MODULE FLASH ENABLE10 - -11 - -12 - -13 - -14 D20 20LG SCI RECEIVE15 - -16 F33 20PK/RD FUSED B(+)DIAGNOSTIC JUNCTION PORT - BLACK 16 WAYCAV CIRCUIT FUNCTION1 D25 20YL/VT/BR PCI BUS (PCM/ECM TCM PDM CD SKIM)2 D25 20YL/VT/DG (AZC) PCI BUS (AZC)3 D25 20YL/VT/DB PCI BUS (RADIO)4 D25 20YL/VT/OR PCI BUS (ACM)5 D25 20YL/VT/RD PCI BUS (MIC)6 D25 20YL/VT/WT PCI BUS (BCM)7 D25 20YL/VT PCI BUS (DLC)8 D25 20YL/VT/GY PCI BUS (DDM ABS MEM EVIC APM ITM RAIN SENSOR)9 - -10 - -11 D25 20YL/VT (DIESEL) PCI BUS (SHIFTER ASSEMBLY)12 - -13 - -14 - -15 - -16 - -CONNECTORPINOUTSDRIVER AIRBAG SQUIB 1 - BLACK 2 WAYCAV CIRCUIT FUNCTION1 R43 20BK DRIVER SQUIB 1 LINE 12 R45 20BK DRIVER SQUIB 1 LINE 2685
CONNECTOR PINOUTSDRIVER AIRBAG SQUIB 2 - GREEN 2 WAYCAV CIRCUIT FUNCTION1 R63 20TN/LB DRIVER SQUIB 2 LINE 22 R61 20OR/LB DRIVER SQUIB 2 LINE 1CONNECTORPINOUTSDRIVER BLEND DOOR MOTOR/ACTUATOR (LHD) (AZC) - BLACK 2 WAYCAV CIRCUIT FUNCTIONA C95 20WT/BK (LHD) DRIVER BLEND DOOR DRIVER (B)B C33 20DB/RD (LHD) DRIVER BLEND DOOR DRIVER (A)DRIVER BLEND DOOR MOTOR/ACTUATOR (RHD) (AZC)- BLACK 2 WAYCAV CIRCUIT FUNCTIONA C33 20DB/RD (RHD) DRIVER BLEND DOOR DRIVER (A)B C95 20WT/BK (RHD) DRIVER BLEND DOOR DRIVER (B)DRIVER CURTAIN AIRBAG - BLACK 2 WAYCAV CIRCUIT FUNCTION1 R73 20LB/BR DRIVER CURTAIN SQUIB LINE 22 R75 20LB/OR DRIVER CURTAIN SQUIB LINE 1686
CONNECTOR PINOUTSDRIVER CYLINDER LOCK SWITCH - GRAY 2 WAYCAV CIRCUIT FUNCTION1 G73 20LG/OR DRIVER CYLINDER LOCK SWITCH SENSE2 Z1 20BK GROUNDDRIVER DOOR LOCK MOTOR/AJAR SWITCH - BLACK 4 WAYCAV CIRCUIT FUNCTION1 G75 18TN/RD DRIVER DOOR AJAR SWITCH SENSE2 Z1 18BK GROUND3 P34 18PK/BK DRIVER DOOR UNLOCK DRIVER4 P35 18OR/BK DRIVER DOOR LOCK DRIVERDRIVER DOOR MODULE C1 - WHITE 15 WAYCAV CIRCUIT FUNCTION1 A146 12OR/WT FUSED B(+)2 Q23 16RD/WT DRIVER REAR WINDOW DRIVER (DOWN)3 Q13 16DB DRIVER REAR WINDOW DRIVER (UP)4 Z1 12BK GROUND5 P35 18OR/BK DRIVER DOOR LOCK DRIVER6 - -7 P34 18PK/BK DRIVER DOOR UNLOCK DRIVER8 D30 20VT/YL (JAPAN) DIAGNOSTIC OUT9 D25 20YL/VT PCI BUS10 G73 20LG/OR DRIVER CYLINDER LOCK SWITCH SENSE11 G75 18TN/RD DRIVER DOOR AJAR SWITCH SENSE12 E21 20OR/RD DRIVER DOOR SWITCH ILLUMINATION13 Q11 16LB DRIVER WINDOW DRIVER (UP)14 - -15 Q21 16WT DRIVER WINDOW DRIVER (DOWN)CONNECTORPINOUTS687
CONNECTOR PINOUTSDRIVER DOOR MODULE C2 - BLACK 12 WAYCAV CIRCUIT FUNCTION1 P95 20OR MIRROR HORIZONTAL DRIVER2 C118 20BK/WT MIRROR HEATER GROUND3 P64 20VT MIRROR VERTICAL POSITION SIGNAL4 P69 20GY MIRROR SENSOR GROUND5 P65 20DG MIRROR HORIZONTAL POSITION SIGNAL6 C117 20BK MIRROR HEATER 12 VOLT SUPPLY7 P91 20WT MIRROR COMMON DRIVER8 P93 20RD MIRROR VERTICAL DRIVER9 M21 20PK/DG COURTESY LAMP DRIVER10 P110 20YL (BUILT-UP- FOLDING MIRROR RETURNEXPORT)11 P99 20DB (BUILT-UP- FOLDING MIRROR FEEDEXPORT)12 L121 20BK/RD COURTESY LAMP GROUNDCONNECTORPINOUTSDRIVER DOOR MODULE C3 - BLACK 4 WAYCAV CIRCUIT FUNCTION1 BK MEMORY SWITCH RETURN2 BR MEMORY SWITCH MUX3 OR MEMORY SET INDICATOR DRIVER4 GY SWITCH ILLUMINATION DRIVERDRIVER FRONT DOOR COURTESY LAMP - BLACK 2 WAYCAV CIRCUIT FUNCTION1 M21 20PK/DG COURTESY LAMP DRIVER2 L121 20BK/RD COURTESY LAMP GROUNDDRIVER FRONT POWER WINDOW MOTOR - BLACK 2 WAYCAV CIRCUIT FUNCTION1 Q21 16WT DRIVER WINDOW DRIVER (DOWN)2 Q11 16LB DRIVER WINDOW DRIVER (UP)688
CONNECTOR PINOUTSDRIVER HEATED SEAT BACK (PREMIUM I/III) -3WAYCAV CIRCUIT FUNCTION1 P88 16BK/BR HEATED SEAT DRIVER2 Z6 16BK/YL GROUND3 - -DRIVER HEATED SEAT CUSHION (PREMIUM I/III) -4WAYCAV CIRCUIT FUNCTION1 P131 16BK/OR DRIVER SEAT HEATER B(+) DRIVER2 P88 16BK/BR HEATED SEAT DRIVER3 P135 20LB/BK DRIVER SEAT TEMPERATURE SENSOR INPUT4 P29 20BR/WT SEAT SENSOR 5 VOLT SUPPLYDRIVER HEATED SEAT SWITCH - WHITE 6 WAYCAV CIRCUIT FUNCTION1 P133 20TN/DG DRIVER SEAT HEATER SWITCH MUX2 E2 20OR PANEL LAMPS DRIVER3 F22 20WT/PK FUSED IGNITION SWITCH OUTPUT (RUN)4 - -5 Z300 20BK GROUND6 P132 20OR/BK SEAT HEATER SWITCH SENSOR GROUNDCONNECTORPINOUTSDRIVER LUMBAR MOTOR (MIDLINE/PREMIUM) - BLACK 2 WAYCAV CIRCUIT FUNCTION1 P105 16LG/DB LUMBAR FORWARD SWITCH SENSE2 P104 16YL/RD LUMBAR REARWARD SWITCH SENSE689
CONNECTOR PINOUTSDRIVER LUMBAR SWITCH (MIDLINE/PREMIUM) - WHITE 6 WAYCAV CIRCUIT FUNCTION1 - -2 Z1 16BK GROUND3 P105 16LG/DB (RHD) LUMBAR FORWARD SWITCH SENSE3 P104 16YL/RD (LHD) LUMBAR REAR WARD SWITCH SENSE4 P104 16YL/RD (RHD) LUMBAR REAR WARD SWITCH SENSE4 P105 16LG/DB (LHD) LUMBAR FORWARD SWITCH SENSE5 Z1 16BK GROUND6 F35 16RD FUSED B(+)CONNECTORPINOUTSDRIVER POWER MIRROR - BLACK 12 WAYCAV CIRCUIT FUNCTION1 C117 20BK MIRROR HEATER 12 VOLT SUPPLY2 P65 20DG MIRROR HORIZONTAL POSITION SIGNAL3 P69 20GY MIRROR SENSOR GROUND4 P64 20VT MIRROR VERTICAL POSITION SIGNAL5 C118 20BK/WT MIRROR HEATER GROUND6 P95 20OR MIRROR HORIZONTAL DRIVER7 P114 20YL/RD AUTO DAY NIGHT MIRROR(-)8 P99 20DB (BUILT-UP- FOLDING MIRROR FEEDEXPORT)9 P110 20YL (BUILT-UP- FOLDING MIRROR RETURNEXPORT)10 P112 20YL/WT AUTO DAY NIGHT MIRROR(+)11 P93 20RD MIRROR VERTICAL DRIVER12 P91 20WT MIRROR COMMON DRIVERDRIVER POWER SEAT FRONT RISER MOTOR - RED 2 WAYCAV CIRCUIT FUNCTION1 P119 16YL/RD (PREMIUM SEAT FRONT UP DRIVERII/III)1 P19 16YL/LG (EXCEPT DRIVER SEAT FRONT UP DRIVERPREMIUM II/III)2 P121 16RD/GY (PREMIUM SEAT FRONT DOWN DRIVERII/III)2 P21 16RD/LG (EXCEPTPREMIUM II/III)DRIVER SEAT FRONT DOWN DRIVERDRIVER POWER SEAT FRONT RISER MOTOR SENSOR (PREMIUM II/III) -3WAYCAV CIRCUIT FUNCTIONA P28 20BR/RD SEAT POSITION SENSOR GROUNDB P26 20BR FRONT RISER POSITION SIGNALC P29 20BR/WT SEAT SENSOR 5 VOLT SUPPLY690
CONNECTOR PINOUTSDRIVER POWER SEAT HORIZONTAL MOTOR - BLACK 2 WAYCAV CIRCUIT FUNCTION1 P17 16RD/YL (EXCEPT DRIVER SEAT HORIZONTAL REARWARD DRIVERPREMIUM II/III)1 P117 16RD/BR (PREMIUM SEAT HORIZONTAL REARWARD DRIVERII/III)2 P15 16YL/LB (EXCEPT DRIVER SEAT HORIZONTAL FORWARD DRIVERPREMIUM II/III)2 P115 16GY/LG (PREMIUMII/III)SEAT HORIZONTAL FORWARD DRIVERDRIVER POWER SEAT HORIZONTAL MOTOR SENSOR (PREMIUM II/III) - BLACK 3 WAYCAV CIRCUIT FUNCTIONA P29 20BR/WT SEAT SENSOR 5 VOLT SUPPLYB P25 20VT/RD SEAT HORIZONTAL POSITION SIGNALC P28 20BR/RD SEAT POSITION SENSOR GROUNDDRIVER POWER SEAT REAR RISER MOTOR - RED 2 WAYCAV CIRCUIT FUNCTION1 P11 16YL/WT (EXCEPT DRIVER SEAT REAR UP DRIVERPREMIUM II/III)1 P111 16YL/DB (PREMIUM SEAT REAR UP DRIVERII/III)2 P13 16RD/WT (EXCEPT DRIVER SEAT REAR DOWN DRIVERPREMIUM II/III)2 P113 16RD/BK (PREMIUMII/III)SEAT REAR DOWN DRIVERCONNECTORPINOUTSDRIVER POWER SEAT REAR RISER MOTOR SENSOR (PREMIUM II/III) -3WAYCAV CIRCUIT FUNCTIONA P28 20BR/RD SEAT POSITION SENSOR GROUNDB P27 20LB/RD REAR RISER POSITION SIGNALC P29 20BR/WT SEAT SENSOR 5 VOLT SUPPLY691
CONNECTOR PINOUTSDRIVER POWER SEAT RECLINER MOTOR - BLACK 2 WAYCAV CIRCUIT FUNCTIONA P41 16GY/WT (MIDLINE/ DRIVER SEAT RECLINER DOWN DRIVERPREMIUM I)A P141 16GY/WT (PREMIUM SEAT RECLINER DOWN DRIVERII/III)B P43 16GY/LB (MIDLINE/ DRIVER SEAT RECLINER UP DRIVERPREMIUM I)B P143 16GY/LB (PREMIUMII/III)SEAT RECLINER UP DRIVERDRIVER POWER SEAT RECLINER MOTOR SENSOR (PREMIUM II/III) - BLACK 3 WAYCAV CIRCUIT FUNCTIONA P29 20BR/WT SEAT SENSOR 5 VOLT SUPPLYB P47 20LB RECLINER POSITION SIGNALC P28 20BR/RD SEAT POSITION SENSOR GROUNDCONNECTORPINOUTS692
CONNECTOR PINOUTSDRIVER POWER SEAT SWITCH (MIDLINE/PREMIUM) - GREEN 10 WAYCAV CIRCUIT FUNCTION1 Z1 16BK GROUND2 P43 16GY/LB (MIDLINE/ DRIVER SEAT RECLINER UP DRIVERPREMIUM I)2 P43 20GY/LB (PREMIUM RECLINER UP SWITCH SENSEII/III)3 P17 16RD/YL (MIDLINE/ DRIVER SEAT HORIZONTAL REARWARD DRIVERPREMIUM I)3 P17 20RD/YL (PREMIUM DRIVER SEAT HORIZONTAL REARWARD SWITCH SENSEII/III)4 P41 16GY/WT (MIDLINE/ DRIVER SEAT RECLINER DOWN DRIVERPREMIUM I)4 P41 20GY/WT (PREMIUM RECLINER DOWN SWITCH SENSEII/III)5 F35 16RD (MIDLINE/ FUSED B(+)PREMIUM I)5 P9 20RD/LB (PREMIUM SEAT SWITCH B(+) SUPPLYII/III)6 P15 16YL/LB (MIDLINE/ DRIVER SEAT HORIZONTAL FORWARD DRIVERPREMIUM I)6 P15 20YL/LB (PREMIUM DRIVER SEAT HORIZONTAL FORWARD SWITCH SENSEII/III)7 P19 16YL/LG (MIDLINE/ DRIVER SEAT FRONT UP DRIVERPREMIUM I)7 P21 20RD/LG (RHD PRE- DRIVER SEAT FRONT DOWN DRIVERMIUM II/III)7 P19 20YL/LG (PREMIUM SEAT FRONT UP SWITCH SENSEII/III)8 P13 20RD/WT (RHD PRE- DRIVER SEAT REAR DOWN DRIVERMIUM II/III)8 P11 20YL/WT (PREMIUM SEAT REAR UP SWITCH SENSEII/III)8 P11 16YL/WT (MIDLINE/ DRIVER SEAT REAR UP DRIVERPREMIUM I)9 P13 20RD/WT (PREMIUM SEAT REAR DOWN SWITCH SENSEII/III)9 P13 16RD/WT (MIDLINE/ DRIVER SEAT REAR DOWN DRIVERPREMIUM I)9 P11 20YL/WT (RHD PRE- DRIVER SEAT REAR UP DRIVERMIUM II/III)10 P21 16RD/LG (MIDLINE/ DRIVER SEAT FRONT DOWN DRIVERPREMIUM I)10 P21 20RD/LG (PREMIUM SEAT FRONT DOWN SWITCH SENSEII/III)10 P19 20YL/LG (RHD PRE-MIUM II/III)DRIVER SEAT FRONT UP DRIVERCONNECTORPINOUTSDRIVER REAR POWER WINDOW MOTOR - BLACK 2 WAYCAV CIRCUIT FUNCTION1 Q124 16DG/WT WINDOW DRIVER (DOWN)2 Q114 16GY/WT WINDOW DRIVER (UP)693
CONNECTOR PINOUTSDRIVER REAR POWER WINDOW SWITCH - BLUE 6 WAYCAV CIRCUIT FUNCTION1 Q14 16GY DRIVER REAR WINDOW DRIVER UP2 Q114 16GY/WT WINDOW DRIVER UP3 E21 20OR/RD DRIVER REAR DOOR SWITCH ILLUMINATION4 Q24 16DG DRIVER REAR WINDOW DRIVER DOWN5 Q124 16DG/WT WINDOW DRIVER DOWN6 Z1 16BK GROUNDDRIVER SEAT BELT SWITCH -2WAYCAV CIRCUIT FUNCTION1 R57 20DG DRIVER SEAT BELT SWITCH SENSE2 R59 20LB DRIVER SEAT BELT SWITCH GROUNDCONNECTORDRIVER SIDE IMPACT SENSOR - BLACK 4 WAYCAV CIRCUIT FUNCTION1 - -2 - -3 R133 20LB/DG DRIVER SIDE IMPACT SENSOR GROUND4 R131 20LG/YL DRIVER SIDE IMPACT SENSOR SIGNALPINOUTS694
CONNECTOR PINOUTSENGINE CONTROL MODULE C1 (DIESEL) - BLACK 81 WAYCAV CIRCUIT FUNCTION1 Z108 14BK/DG GROUND2 Z108 14BK/DG GROUND3 K20 14DB GENERATOR FIELD CONTROL4 F142 14RD/DG FUSED AUTO SHUT DOWN RELAY OUTPUT5 F142 14RD/DG FUSED AUTO SHUT DOWN RELAY OUTPUT6 D52 18DG/WT CAN C BUS(+)7 D25 20VT/YL PCI BUS8 K944 20BR/DG CAMSHAFT POSITION SENSOR GROUND9 K44 20YL/GY CAMSHAFT POSITION SENSOR SIGNAL10 - -11 Y53 20BK/YL BOOST PRESSURE SENSOR SIGNAL12 K155 20YL/WT MASS AIR FLOW SENSOR SIGNAL13 Y40 20DG/VT FUEL PRESSURE SENSOR SIGNAL14 K22 20RD/DB ACCELERATOR PEDAL POSITION SENSOR 2 SIGNAL15 K81 20DB/DG ACCELERATOR PEDAL POSITION SENSOR 1 SIGNAL16 Y100 20BR/GY FUEL PRESSURE SENSOR GROUND17 - -18 - -19 F300 20RD/BK BATTERY SENSE (+)20 Z11 20BK/WT BATTERY SENSE (-)21 K4 18BK/LB SENSOR GROUND22 F991 20RD/DB FUSED IGNITION SWITCH OUTPUT (RUN-START)23 K6 18VT/WT SENSOR REFERENCE VOLTAGE B24 K3 20BK CRANKSHAFT POSITION SENSOR SIGNAL 125 D51 18WT CAN C BUS(-)26 - -27 - -28 - -29 K77 20BR/WT TRANSFER CASE POSITION SENSOR SIGNAL30 G60 20BR/DB ENGINE OIL PRESSURE SENSOR SIGNAL31 - -32 K25 20VT/DG BATTERY TEMPERATURE SENSOR SIGNAL33 - -34 K255 20WT/DG ACCELERATOR PEDAL POSITION SENSOR 1 GROUND35 Y43 20WT/VT ACCELERATOR PEDAL POSITION SENSOR 1 5-VOLT SUPPLY36 C18 20DB A/C PRESSURE SENSOR SIGNAL37 - -38 V37 20RD/DG SPEED CONTROL SWITCH SIGNAL39 K226 20DB/WT FUEL LEVEL SENSOR SIGNAL40 K2 20DG/RD ENGINE COOLANT TEMPERATURE SENSOR SIGNAL41 K21 20DG/WT INTAKE AIR TEMPERATURE SENSOR SIGNAL42 Y101 20 CRANKSHAFT POSITION SENSOR SHIELD43 K924 20YL CRANKSHAFT POSITION SENSOR SIGNAL 244 - -45 - -46 - -47 L50 20WT/DB PRIMARY BRAKE SWITCH SIGNAL48 K29 20WT/PK SECONDARY BRAKE SWITCH SIGNAL49 - -50 F855 18BR/YL SENSOR REFERENCE VOLTAGE A51 - -52 - -53 - -54 Z189 20BR MASS AIR FLOW SENSOR GROUND55 B22 20DG/YL VEHICLE SPEED SENSOR SIGNAL56 K225 18BK ACCELERATOR PEDAL POSITION SENSOR 2 GROUND57 - -58 K4 20BK/LB WATER IN FUEL SENSOR GROUND59 K900 18GY INTAKE PORT SWIRL ACTUATOR SIGNAL60 K7 20RD/WT FUEL PRESSURE SENSOR 5 VOLT SUPPLY61 K51 20DB/YL AUTO SHUT DOWN RELAY CONTROL62 - -63 - -64 - -65 - -66 - -67 K173 20GY HYDRAULIC RADIATOR FAN SOLENOID CONTROL68 - -69 C13 20DB/RD A/C COMPRESSOR CLUTCH RELAY CONTROL70 - -71 - -72 K236 20GY/PK GLOW PLUG RELAY NO. 2 CONTROL73 - -74 T752 20DG/RD ENGINE STARTER MOTOR RELAY CONTROL75 K132 20BR/BK VISCOUS/CABIN HEATER RELAY CONTROL76 Y42 20BR/BK WASTEGATE SOLENOID CONTROL77 K152 20WT GLOW PLUG RELAY NO. 1 CONTROL78 - -79 - -80 K46 20DB/BK FUEL PRESSURE SOLENOID CONTROL81 K46 20DB/BK FUEL PRESSURE SOLENOID CONTROLCONNECTORPINOUTS695
CONNECTOR PINOUTSCONNECTORPINOUTSENGINE CONTROL MODULE C2 (DIESEL) - BLACK 40 WAYCAV CIRCUIT FUNCTION82 D21 20PK SCI TRANSMIT83 - -84 - -85 - -86 - -87 - -88 - -89 K35 20GY/YL EGR SOLENOID CONTROL90 - -91 - -92 - -93 - -94 G123 20DG/WT WATER IN FUEL SIGNAL95 - -96 - -97 - -98 - -99 - -100 - -101 - -102 - -103 - -104 - -105 - -106 - -107 - -108 - -109 - -110 - -111 - -112 T41 20BK/WT PARK/NEUTRAL POSITION SWITCH SENSE113 - -114 - -115 K14 14BK/YL FUEL INJECTOR NO. 4 CONTROL116 K63 14BK COMMON INJECTOR DRIVER117 - -118 K11 14BK/DB FUEL INJECTOR NO. 1 CONTROL119 K38 14BK/DG FUEL INJECTOR NO. 5 CONTROL120 K12 14BK/VT FUEL INJECTOR NO. 2 CONTROL121 K13 14BK/RD FUEL INJECTOR NO. 3 CONTROLFRONT WASHER PUMP - WHITE 2 WAYCAV CIRCUIT FUNCTION1 V10 20BR WASHER PUMP MOTOR SWITCH SENSE2 Z141 20BK GROUND696
CONNECTOR PINOUTSFRONT WIPER MOTOR - BLACK 6 WAYCAV CIRCUIT FUNCTION1 V6 16DB FUSED IGNITION SWITCH OUTPUT (RUN-ACC)2 V55 16TN/RD WIPER PARK SWITCH SENSE3 - -4 Z141 16BK GROUND5 V3 16BR/WT WIPER HIGH/LOW RELAY LOW SPEED OUTPUT6 V4 16RD/YL WIPER HIGH/LOW RELAY HIGH SPEED OUTPUTHOOD AJAR SWITCH (BUILT-UP-EXPORT) - BLACK 2 WAYCAV CIRCUIT FUNCTION1 G70 20BR/TN HOOD AJAR SWITCH SENSE2 Z141 20BK (DIESEL) GROUND2 Z161 20BK (GAS) GROUNDHORN NO. 1 - BLACK 2 WAYCAV CIRCUIT FUNCTION1 Z307 18BK GROUND2 X2 18DG/RD HORN RELAY OUTPUTCONNECTORPINOUTSHORN NO. 2 - BLACK 2 WAYCAV CIRCUIT FUNCTION1 Z307 18BK GROUND2 X2 18DG/RD HORN RELAY OUTPUT697
CONNECTOR PINOUTSIGNITION SWITCH C1 - WHITE 6 WAYCAV CIRCUIT FUNCTION1 A41 12YL IGNITION SWITCH OUTPUT (START)2 A2 12PK/BK FUSED B(+)3 A22 12BK/OR IGNITION SWITCH OUTPUT (RUN)4 A1 12RD FUSED B(+)5 A31 12RD/BK IGNITION SWITCH OUTPUT (RUN-ACC)6 A21 12DB IGNITION SWITCH OUTPUT (RUN-START)IGNITION SWITCH C2 - BLACK 2 WAYCAV CIRCUIT FUNCTION1 G26 20LB KEY-IN IGNITION SWITCH SENSE2 Z234 20BK GROUNDCONNECTORPINOUTSINSTRUMENT CLUSTER - WHITE 12 WAYCAV CIRCUIT FUNCTION1 L61 20TN/LG LEFT TURN SIGNAL2 L60 20TN RIGHT TURN SIGNAL3 - -4 - -5 G9 20GY/BK RED BRAKE WARNING INDICATOR DRIVER6 F33 20PK/RD FUSED B(+)7 G5 20DB/WT FUSED IGNITION SWITCH OUTPUT (RUN-START)8 D19 20VT/OR BODY CONTROL MODULE FLASH ENABLE9 Z300 20BK GROUND10 D25 20YL/VT/RD PCI BUS11 Z132 20BK/OR GROUND12 - -INTRUSION TRANSCEIVER MODULE (BUILT-UP-EXPORT) - BLACK 6 WAYCAV CIRCUIT FUNCTION1 Z155 20BK GROUND2 - -3 X75 20GY/LG SIREN SIGNAL CONTROL4 - -5 D25 20YL/VT PCI BUS6 F70 20PK FUSED B(+)698
CONNECTOR PINOUTSCONNECTORPINOUTS699
CONNECTOR PINOUTSCONNECTORPINOUTSFUSENO.FUSES (JB)AMPS FUSED CIRCUIT FUNCTION1 - - -2 - - -3 10A L33 18RD FUSED HIGH BEAM RELAY OUTPUT4 15A INTERNAL FUSED B(+)5 25A INTERNAL FUSED B(+)6 15A INTERNAL FUSED B(+)7 10A INTERNAL FUSED B(+)8 15A INTERNAL FUSED B(+)9 20A INTERNAL FUSED B(+)10 20A F72 16RD/YL (EXCEPT BUILT-UP-EXPORT) FUSED B(+)11 10A C15 20BK/WT FUSED REAR WINDOW DEFOGGER RELAY OUTPUT12 10A F991 20OR/DB FUSED IGNITION SWITCH OUTPUT (RUN-START)13 - - -14 10A L43 18VT FUSED LOW BEAM RELAY OUTPUT15 10A L44 18VT/RD FUSED LOW BEAM RELAY OUTPUT16 10A L34 18RD/OR FUSED HIGH BEAM RELAY OUTPUT17 10A INTERNAL FUSED B(+)18 30A F9 20RD/BK FUSED B(+)19 10A F20 18DB/PK FUSED IGNITION SWITCH OUTPUT (RUN)20 10A INTERNAL FUSED IGNITION SWITCH OUTPUT (RUN)21 10A INTERNAL FUSED IGNITION SWITCH OUTPUT (RUN-START)22 10A INTERNAL FUSED IGNITION SWITCH OUTPUT (RUN-START)23 15A F32 20PK/DB FUSED B(+)24 15A INTERNAL FUSED B(+)25 15A INTERNAL FUSED B(+)26 15A F30 18RD FUSED CIGAR LIGHTER RELAY OUTPUT27 15A INTERNAL (BUILT-UP-EXPORT) FUSED B(+)28 10A INTERNAL FUSED IGNITION SWITCH OUTPUT (RUN-ACC)29 10A INTERNAL FUSED IGNITION SWITCH OUTPUT (RUN-ACC)30 10A X12 18RD/WT (RHD) FUSED IGNITION SWITCH OUTPUT (RUN-ACC)30 10A X12 16WT/RD (LHD) FUSED IGNITION SWITCH OUTPUT (RUN-ACC)31 10A F45 20YL/RD FUSED IGNITION SWITCH OUTPUT (START)32 10A F14 18LG/YL FUSED IGNITION SWITCH OUTPUT (RUN-START)33 10A F23 18DB/YL FUSED IGNITION SWITCH OUTPUT (RUN)CIRCUIT BREAKERSCB NO. AMPS FUSED CIRCUIT FUNCTION1 20A V6 16DB FUSED IGNITION SWITCH OUTPUT (RUN-ACC)2 20A INTERNAL FUSED B(+)3 - - -ACCESSORY DELAY RELAYCAV CIRCUIT FUNCTION30 INTERNAL FUSED B(+)85 INTERNAL FUSED B(+)86 INTERNAL ACCESSORY DELAY RELAY CONTROL87 Q30 16TN ACCESSORY DELAY RELAY OUTPUT87A - -700
FOG LAMP RELAYCAV CIRCUIT FUNCTION30 INTERNAL FUSED B(+)30 INTERNAL FUSED B(+)85 INTERNAL FUSED B(+)85 INTERNAL FOG LAMP RELAY CONTROL86 INTERNAL REAR FOG LAMP RELAY CONTROL86 INTERNAL FUSED B(+)87 L95 18DG/YL REAR FOG LAMP RELAY OUTPUT87 INTERNAL FOG LAMP RELAY OUTPUT87A - -87A - -CONNECTOR PINOUTSHIGH BEAM RELAYCAV CIRCUIT FUNCTION30 INTERNAL FUSED B(+)85 INTERNAL HIGH BEAM RELAY CONTROL86 INTERNAL FUSED B(+)87 INTERNAL HIGH BEAM RELAY OUTPUT87A - -LOW BEAM RELAYCAV CIRCUIT FUNCTION30 INTERNAL FUSED B(+)85 INTERNAL FUSED B(+)86 INTERNAL LOW BEAM RELAY CONTROL87 INTERNAL LOW BEAM RELAY OUTPUT87A - -PARK LAMP RELAYCAV CIRCUIT FUNCTION30 INTERNAL PARK LAMP RELAY OUTPUT85 INTERNAL FUSED B(+)86 INTERNAL PARK LAMP RELAY CONTROL87 INTERNAL FUSED B(+)87A INTERNAL GROUNDREAR FOG LAMP RELAY (BUILT-UP-EXPORT)CAV CIRCUIT FUNCTION30 INTERNAL FUSED B(+)85 INTERNAL FUSED B(+)86 INTERNAL REAR FOG LAMP RELAY CONTROL87 L95 18DG/YL REAR FOG LAMP RELAY OUTPUT87A - -CONNECTORPINOUTSREAR WINDOW DEFOGGER RELAYCAV CIRCUIT FUNCTION30 INTERNAL FUSED B(+)85 INTERNAL FUSED B(+)86 INTERNAL REAR WINDOW DEFOGGER RELAY CONTROL87 INTERNAL REAR WINDOW DEFOGGER RELAY OUTPUT87A - -701
CONNECTOR PINOUTSCONNECTORPINOUTSJUNCTION BLOCK BODY CONTROL MODULE - BLACK 26 WAYCAV CIRCUIT FUNCTION1 L308 PARK LAMP RELAY CONTROL2 L26 FOG LAMP RELAY CONTROL3 Q29 ACCESSORY DELAY RELAY CONTROL4 L307 LOW BEAM RELAY CONTROL5 G5 FUSED IGNITION SWITCH OUTPUT (RUN-START)6 X4 HORN RELAY CONTROL7 V16 WIPER HIGH/LOW RELAY CONTROL8 G80 LIFTGATE FLIP-UP AJAR SWITCH SENSE9 L11 HIGH BEAM RELAY CONTROL10 L91 HAZARD SWITCH SENSE11 C80 REAR WINDOW DEFOGGER RELAY CONTROL12 Z2 GROUND13 L96 (BUILT-UP-EXPORT) REAR FOG LAMP RELAY CONTROL14 L7 PARK LAMP RELAY CONTROL15 Z1 GROUND16 M2 COURTESY LAMP DRIVER17 - -18 - -19 M20 COURTESY LAMP LOAD SHED20 V55 WIPER PARK SWITCH SENSE21 G78 LIFTGATE AJAR SWITCH SENSE22 G10 SEAT BELT SWITCH SENSE23 G77 LEFT REAR DOOR AJAR SWITCH SENSE24 G73 LIFTGATE COURTESY DISABLE25 V23 FUSED IGNITION SWITCH OUTPUT (RUN-ACC)26 M1 FUSED B(+)702
CONNECTOR PINOUTSJUNCTION BLOCK C1 - BLACK 52 WAYCAV CIRCUIT FUNCTION1 Q30 16TN ACCESSORY DELAY RELAY OUTPUT2 L63 18DG/RD LEFT TURN SIGNAL3 - -4 - -5 L95 18DG/YL (BUILT-UP- REAR FOG LAMP RELAY OUTPUTEXPORT)6 - -7 - -8 - -9 G73 20LG/OR LIFTGATE COURTESY DISABLE10 G77 20TN/OR DOOR AJAR SWITCH SENSE11 L7 18BK/YL PARK LAMP RELAY OUTPUT12 - -13 - -14 - -15 F37 16RD (LHD EXCEPT FUSED B(+)BASE)15 F37 16RD/LB (RHD) FUSED B(+)16 M2 18YL (RHD) COURTESY LAMP DRIVER16 M2 20YL/DG (LHD) COURTESY LAMP DRIVER17 - -18 - -19 - -20 - -21 - -22 F22 20WT/PK (RHD) -23 - -24 G80 20VT/YL LIFTGATE FLIP-UP AJAR SWITCH SENSE25 G78 20TN/BK LIFTGATE AJAR SWITCH SENSE26 M20 18YL/BK (RHD) COURTESY LAMP LOAD SHED26 M20 20YL/BK (LHD) COURTESY LAMP LOAD SHED27 - -28 - -29 - -30 G5 20DB/WT FUSED IGNITION SWITCH OUTPUT (RUN-START)31 - -32 M1 18PK/RD (RHD) -33 - -34 - -35 F9 14RD/BK FUSED B(+)36 F70 18PK FUSED B(+)37 - -38 - -39 - -40 - -41 F30 14RD/TN (LHD) CIGAR LIGHTER RELAY OUTPUT41 F30 16RD/TN (RHD) CIGAR LIGHTER RELAY OUTPUT42 - -43 - -44 - -45 - -46 - -47 - -48 - -49 - -50 C15 12BK/WT REAR WINDOW DEFOGGER RELAY OUTPUT51 - -52 - -CONNECTORPINOUTS703
CONNECTOR PINOUTSCONNECTORPINOUTSJUNCTION BLOCK C2 (LHD) - BLACK 52 WAYCAV CIRCUIT FUNCTION1 X3 22GY/OR HORN RELAY CONTROL2 - -3 L39 20LB FOG LAMP RELAY OUTPUT4 - -5 L61 20TN/LG LEFT TURN SIGNAL6 - -7 - -8 V6 16DB FUSED IGNITION SWITCH OUTPUT (RUN-ACC)9 V6 16DB (GAS) FUSED IGNITION SWITCH OUTPUT (RUN-ACC)10 L62 18BR/RD RIGHT TURN SIGNAL11 F991 20OR/DB FUSED IGNITION SWITCH OUTPUT (RUN-START)12 L39 20LB FOG LAMP RELAY OUTPUT13 - -14 - -15 V16 22VT WIPER HIGH/LOW RELAY CONTROL16 - -17 - -18 - -19 - -20 L7 20BK/YL PARK LAMP RELAY OUTPUT21 L7 20BK/YL PARK LAMP RELAY OUTPUT22 - -23 - -24 F37 16RD/LB (EXCEPT FUSED B(+)BASE)25 F22 20WT/PK FUSED IGNITION SWITCH OUTPUT (RUN)26 L60 20TN RIGHT TURN SIGNAL27 F45 20YL/RD FUSED IGNITION SWITCH OUTPUT (START)28 V55 16TN/RD WIPER PARK SWITCH SENSE29 - -30 - -31 F72 16RD/YL FUSED B(+)32 M1 20PK/RD FUSED B(+)33 V55 16TN/RD (GAS) WIPER PARK SWITCH SENSE34 - -35 - -36 A146 12OR/WT FUSED B(+)37 - -38 L34 18RD/OR FUSED RIGHT HIGH BEAM OUTPUT39 L43 18VT FUSED LEFT LOW BEAM OUTPUT40 - -41 - -42 F20 18DB/PK FUSED IGNITION SWITCH OUTPUT (RUN)43 F12 20DB/WT FUSED IGNITION SWITCH OUTPUT (RUN-START)44 - -45 A146 12OR/WT FUSED B(+)46 - -47 F32 20PK/DB FUSED B(+)48 - -49 L44 18VT/RD FUSED RIGHT LOW BEAM OUTPUT50 L33 18RD FUSED LEFT HIGH BEAM OUTPUT51 - -52 F60 14RD/WT (EXCEPTBASE)FUSED B(+)704
CONNECTOR PINOUTSJUNCTION BLOCK C2 (RHD) - BLACK 52 WAYCAV CIRCUIT FUNCTION1 X3 22BK/RD HORN RELAY CONTROL2 - -3 L39 20LB FOG LAMP RELAY OUTPUT4 - -5 L61 20TN/LG LEFT TURN SIGNAL6 - -7 - -8 V6 16DB FUSED IGNITION SWITCH OUTPUT (RUN-ACC)9 V6 16DB (GAS) FUSED IGNITION SWITCH OUTPUT (RUN-ACC)10 L62 20BR/RD RIGHT TURN SIGNAL11 F991 20OR/DB (GAS) FUSED IGNITION SWITCH OUTPUT (RUN-START)12 L39 20LB FOG LAMP RELAY OUTPUT13 - -14 - -15 V16 22VT -16 - -17 - -18 - -19 - -20 L7 20BK/YL PARK LAMP RELAY OUTPUT21 L7 18BK/YL PARK LAMP RELAY OUTPUT22 - -23 - -24 F37 16RD/LB FUSED B(+)25 F22 18WT/TN FUSED IGNITION SWITCH OUTPUT (RUN)26 L60 20TN RIGHT TURN SIGNAL27 F45 20YL/RD FUSED IGNITION SWITCH OUTPUT (START)28 V55 16TN/RD WIPER PARK SWITCH SENSE29 - -30 - -31 - -32 M1 20PK/RD FUSED B(+)33 V55 16TN/RD (GAS) WIPER PARK SWITCH SENSE34 - -35 - -36 A146 12OR/WT FUSED B(+)37 - -38 L34 18RD/OR FUSED RIGHT HIGH BEAM OUTPUT39 L43 18VT FUSED LEFT LOW BEAM OUTPUT40 - -41 - -42 F20 18DB/PK FUSED IGNITION SWITCH OUTPUT (RUN)43 F12 20DB/WT (GAS) FUSED IGNITION SWITCH OUTPUT (RUN-START)44 - -45 A146 12OR/WT FUSED B(+)46 - -47 F32 20PK/DB FUSED B(+)48 - -49 L44 18VT/RD FUSED RIGHT LOW BEAM OUTPUT50 L33 18RD FUSED LEFT HIGH BEAM OUTPUT51 - -52 F60 16RD/WT FUSED B(+)CONNECTORPINOUTS705
CONNECTOR PINOUTSCONNECTORPINOUTSJUNCTION BLOCK C3 - BLACK 52 WAYCAV CIRCUIT FUNCTION1 F22 20WT/PK FUSED IGNITION SWITCH OUTPUT (RUN)2 - -3 L60 20TN RIGHT TURN SIGNAL4 L302 20LB/YL RIGHT TURN SWITCH SENSE5 L61 20TN/LG LEFT TURN SIGNAL6 L91 20DB/PK HAZARD SWITCH SENSE7 - -8 L305 20LB/WT LEFT TURN SWITCH SENSE9 - -10 L309 20PK/LG HIGH BEAM RELAY CONTROL11 F23 18DB/YL FUSED IGNITION SWITCH OUTPUT (RUN)12 F22 20WT/PK FUSED IGNITION SWITCH OUTPUT (RUN)13 - -14 F85 16VT/WT FUSED B(+)15 C79 20BK/WT FUSED REAR WINDOW DEFOGGER RELAY OUTPUT16 - -17 - -18 - -19 - -20 - -21 - -22 - -23 - -24 A31 12RD/BK IGNITION SWITCH OUTPUT (RUN-ACC)25 F60 16RD/WT FUSED B(+)26 - -27 A41 12YL IGNITION SWITCH OUTPUT (START)28 F14 20LG/YL FUSED IGNITION SWITCH OUTPUT (RUN-START)29 A22 12BK/OR IGNITION SWITCH OUTPUT (RUN)30 F991 18OR/DB FUSED IGNITION SWITCH OUTPUT (RUN-START)31 Z234 20BK GROUND32 F33 20PK/RD FUSED B(+)33 X12 16WT/RD FUSED IGNITION SWITCH OUTPUT (RUN-ACC)34 M1 20PK FUSED B(+)35 M1 20PK (AZC) FUSED B(+)36 A21 12DB IGNITION SWITCH OUTPUT (RUN-START)37 - -38 F70 20PK/BK FUSED B(+)39 X3 20GY/OR HORN RELAY CONTROL40 F30 16RD FUSED CIGAR LIGHTER RELAY OUTPUT41 F33 20PK/RD FUSED B(+)42 - -43 V23 20BR/PK FUSED IGNITION SWITCH OUTPUT (RUN-ACC)44 M1 20PK FUSED B(+)45 Z132 20BK/OR GROUND46 - -47 - -48 F70 20PK/BK FUSED B(+)49 - -50 G5 20DB/WT FUSED IGNITION SWITCH OUTPUT (RUN-START)51 G5 20DB/WT FUSED IGNITION SWITCH OUTPUT (RUN-START)52 F12 20DB/WT FUSED IGNITION SWITCH OUTPUT (RUN-START)706
CONNECTOR PINOUTSJUNCTION BLOCK C4 - WHITE 2 WAYCAV CIRCUIT FUNCTION1 A148 10PK/WT FUSED B(+)2 A148 10OR/WT FUSED B(+)JUNCTION BLOCK C5 - WHITE 3 WAYCAV CIRCUIT FUNCTION1 A145 10WT/RD FUSED B(+)2 A149 12RD/TN FUSED B(+)3 A147 10RD/GY FUSED B(+)LEFT COURTESY LAMP - BLACK 2 WAYCAV CIRCUIT FUNCTION1 F70 20PK/BK FUSED B(+)2 M2 20YL COURTESY LAMP DRIVERCONNECTORPINOUTSLEFT DOOR HANDLE COURTESY LAMP - WHITE 3 WAYCAV CIRCUIT FUNCTION1 F70 20PK/BK FUSED B(+)2 M20 20YL/BK COURTESY LAMP LOAD SHED3 M2 20YL/DG COURTESY LAMP DRIVER707
CONNECTOR PINOUTSLEFT FOG LAMP - BLACK 2 WAYCAV CIRCUIT FUNCTION1 L39 20LB FOG LAMP RELAY OUTPUT2 Z141 20BK (DIESEL/4.7L GROUNDRHD)2 Z141 18BK (EXCEPTDIESEL/4.7L RHD)GROUNDLEFT FRONT DOOR SPEAKER - WHITE 3 WAYCAV CIRCUIT FUNCTION1 X85 18LB/BK (RHD) LEFT FRONT DOOR SPEAKER (-)1 X85 18LG/DG (LHD) LEFT FRONT DOOR SPEAKER (-)2 - -3 X87 18LB/RD (RHD) LEFT FRONT DOOR SPEAKER (+)3 X87 18LG/RD (LHD) LEFT FRONT DOOR SPEAKER (+)CONNECTORPINOUTSLEFT FRONT IMPACT SENSOR - BLACK 4 WAYCAV CIRCUIT FUNCTION1 - -2 - -3 R47 18DB/LB LEFT FRONT IMPACT SENSOR GROUND4 R49 18LB LEFT FRONT IMPACT SENSOR SIGNALLEFT FRONT PARK LAMP - WHITE 2 WAYCAV CIRCUIT FUNCTION1 Z1 18BK GROUND2 L7 20BK/PK PARK LAMP RELAY OUTPUT708
CONNECTOR PINOUTSLEFT FRONT PARK/TURN SIGNAL LAMP (EXCEPT BUILT-UP-EXPORT) - BLACK 3 WAYCAV CIRCUIT FUNCTION1 L7 20BK/PK PARK LAMP RELAY CONTROL2 Z1 18BK GROUND3 L61 20TN/LG LEFT TURN SIGNALLEFT FRONT SIDE MARKER LAMP (EXCEPT BUILT-UP-EXPORT) - WHITE 2 WAYCAV CIRCUIT FUNCTION1 L7 20BK/PK PARK LAMP RELAY OUTPUT2 L61 20TN/LG LEFT TURN SIGNALCONNECTORPINOUTSLEFT FRONT TURN SIGNAL LAMP (BUILT-UP-EXPORT) - WHITE 2 WAYCAV CIRCUIT FUNCTION1 L61 20TN/LG LEFT TURN SIGNAL2 Z1 18BK GROUND709
CONNECTOR PINOUTSLEFT HIGH BEAM HEADLAMP - BLACK 2 WAYCAV CIRCUIT FUNCTIONA Z1 18BK GROUNDB L33 18RD FUSED LEFT HIGH BEAM OUTPUTLEFT INSTRUMENT PANEL SPEAKER - WHITE 2 WAYCAV CIRCUIT FUNCTION1 X83 18YL/RD LEFT INSTRUMENT PANEL SPEAKER (+)2 X81 18YL/BK LEFT INSTRUMENT PANEL SPEAKER (-)CONNECTORPINOUTSLEFT LIFTGATE AJAR SWITCH - BLACK 2 WAYCAV CIRCUIT FUNCTION1 Z1 20BK GROUND2 G78 20TN/BK LIFTGATE AJAR SWITCH SENSELEFT LOW BEAM HEADLAMP - GRAY 2 WAYCAV CIRCUIT FUNCTIONA Z1 18BK GROUNDB L43 18VT FUSED LEFT LOW BEAM OUTPUT710
CONNECTOR PINOUTSLEFT MULTI-FUNCTION SWITCH - WHITE 11 WAYCAV CIRCUIT FUNCTION1 L27 20WT/TN FOG LAMP SWITCH SENSE2 Z234 20BK GROUND3 - -4 L80 20WT/DG HEADLAMP SWITCH RETURN5 L309 20PK/LG HIGH BEAM RELAY CONTROL6 L40 20BR HIGH BEAM SWITCH SENSE7 L302 20LB/YL RIGHT TURN SWITCH SENSE8 L305 20LB/WT LEFT TURN SWITCH SENSE9 L91 20DB/PK HAZARD SWITCH SENSE10 E19 20RD PANEL LAMPS DIMMER SIGNAL11 G52 20YL HEADLAMP SWITCH MUXLEFT REAR DOOR LOCK MOTOR/AJAR SWITCH - BLACK 4 WAYCAV CIRCUIT FUNCTION1 G77 18TN/YL LEFT REAR DOOR AJAR SWITCH SENSE2 Z1 18BK GROUND3 P36 18PK/VT DOOR UNLOCK DRIVER4 P35 18OR/VT DOOR LOCK DRIVERLEFT REAR DOOR SPEAKER - WHITE 3 WAYCAV CIRCUIT FUNCTION1 X90 18WT/VT LEFT REAR DOOR SPEAKER (+)2 - -3 X92 18TN/DG LEFT REAR DOOR SPEAKER (-)CONNECTORPINOUTSLEFT REMOTE RADIO SWITCH - BLACK 2 WAYCAV CIRCUIT FUNCTION1 X10 20RD/BK RADIO CONTROL MUX RETURN2 X20 20RD/YL RADIO CONTROL MUX711
CONNECTOR PINOUTSLEFT VISOR/VANITY LAMP - BLACK 2 WAYCAV CIRCUIT FUNCTION1 F70 20PK FUSED B(+)2 M20 20YL/BK COURTESY LAMP LOAD SHEDLICENSE LAMP NO. 1 - BLACK 2 WAYCAV CIRCUIT FUNCTION1 L7 18BK/YL PARK LAMP RELAY OUTPUT2 Z1 18BK GROUNDCONNECTORLICENSE LAMP NO. 2 - BLACK 2 WAYCAV CIRCUIT FUNCTION1 L7 18BK/YL PARK LAMP RELAY OUTPUT2 Z1 18BK GROUNDPINOUTSLIFTGATE FLIP-UP AJAR SWITCH - GRAY 2 WAYCAV CIRCUIT FUNCTION1 Z1 20BK GROUND2 G80 20VT/YL LIFTGATE FLIP-UP AJAR SWITCH SENSE712
CONNECTOR PINOUTSLIFTGATE FLIP-UP PUSH BUTTON SWITCH - BLACK 2 WAYCAV CIRCUIT FUNCTION1 P101 18OR/PK LIFTGATE FLIP-UP SWITCH OUTPUT2 F70 18PK FUSED B(+)LIFTGATE FLIP-UP RELEASE SOLENOID - BLACK 2 WAYCAV CIRCUIT FUNCTION1 Z1 18BK GROUND2 P100 18OR/BR LIFTGATE GLASS LIMIT SWITCH OUTPUTLIFTGATE POWER LOCK MOTOR - BLACK 4 WAYCAV CIRCUIT FUNCTION1 P35 18OR/VT DOOR LOCK DRIVER2 P36 18PK/VT DOOR UNLOCK DRIVER3 P101 18OR/PK LIFTGATE FLIP-UP SWITCH OUTPUT4 P100 18OR/BR LIFTGATE GLASS LIMIT SWITCH OUTPUTCONNECTORPINOUTSMANUAL TEMPERATURE CONTROL C1 (MTC) - WHITE 11 WAYCAV CIRCUIT FUNCTION1 C103 20DG A/C SWITCH SIGNAL2 Z123 20BK/OR GROUND3 C67 20RD/LB BLEND AIR DOOR POSITION CONTROL4 C79 20BK/WT FUSED REAR WINDOW DEFOGGER RELAY OUTPUT5 C81 20LB/WT REAR WINDOW DEFOGGER SWITCH SENSE6 F22 20WT/PK FUSED IGNITION SWITCH OUTPUT (RUN)7 E2 20OR PANEL LAMPS DRIVER8 C4 16TN BLOWER MOTOR LOW DRIVER9 C5 16LG BLOWER MOTOR M1 DRIVER10 C6 14LB BLOWER MOTOR M2 DRIVER11 - -713
CONNECTOR PINOUTSMANUAL TEMPERATURE CONTROL C2 (MTC) - WHITE 2 WAYCAV CIRCUIT FUNCTION1 Z118 12BK GROUND2 C7 12BK/TN BLOWER MOTOR HIGH DRIVERCONNECTORPINOUTSMODE DOOR MOTOR/ACTUATOR (AZC) - BLACK 2 WAYCAV CIRCUIT FUNCTIONA C102 20TN/BK (LHD) MODE DOOR DRIVER (B)A C35 20DG/YL (RHD) MODE DOOR DRIVER (A)B C102 20TN/BK (RHD) MODE DOOR DRIVER (B)B C35 20DG/YL (LHD) MODE DOOR DRIVER (A)OVERHEAD MAP/COURTESY LAMP - WHITE 3 WAYCAV CIRCUIT FUNCTION1 F70 20PK FUSED B(+)2 M20 20YL/BK COURTESY LAMP LOAD SHED3 M2 20YL/DG COURTESY LAMP DRIVERPASSENGER AIRBAG - YELLOW 4 WAYCAV CIRCUIT FUNCTION1 R42 20BK/YL PASSENGER SQUIB 1 LINE 12 R44 20DG/YL PASSENGER SQUIB 1 LINE 23 R64 20TN/YL PASSENGER SQUIB 2 LINE 14 R62 20OR/YL PASSENGER SQUIB 2 LINE 2714
CONNECTOR PINOUTSPASSENGER BLEND DOOR MOTOR/ACTUATOR (LHD) (AZC) - BLACK 2 WAYCAV CIRCUIT FUNCTIONA C96 20WT/DB (LHD) PASSENGER BLEND DOOR DRIVER (B)B C94 20WT/DG (LHD) PASSENGER BLEND DOOR DRIVER (A)PASSENGER BLEND DOOR MOTOR/ACTUATOR (RHD) (AZC) - BLACK 2 WAYCAV CIRCUIT FUNCTIONA C94 20WT/DG (RHD) PASSENGER BLEND DOOR DRIVER (A)B C96 20WT/DB (RHD) PASSENGER BLEND DOOR DRIVER (B)CONNECTORPASSENGER CURTAIN AIRBAG - BLACK 2 WAYCAV CIRCUIT FUNCTION1 R72 20LB/WT PASSENGER CURTAIN SQUIB LINE 22 R74 20LB/YL PASSENGER CURTAIN SQUIB LINE 1PINOUTSPASSENGER DOOR LOCK MOTOR/AJAR SWITCH - BLACK 4 WAYCAV CIRCUIT FUNCTION1 G74 18TN/RD PASSENGER DOOR AJAR SWITCH SENSE2 Z1 18BK GROUND3 P36 18PK/VT DOOR UNLOCK DRIVER4 P35 18OR/VT DOOR LOCK DRIVER715
CONNECTOR PINOUTSPASSENGER DOOR MODULE C1 - WHITE 15 WAYCAV CIRCUIT FUNCTION1 A146 12OR/WT FUSED B(+)2 Q24 16DG PASSENGER REAR WINDOW DRIVER (DOWN)3 Q14 16GY PASSENGER REAR WINDOW DRIVER (UP)4 Z1 12BK GROUND5 P35 18OR/VT DOOR LOCK DRIVER6 - -7 P36 18PK/VT DOOR UNLOCK DRIVER8 - -9 D25 20YL/VT PCI BUS10 - -11 G74 18TN/RD PASSENGER DOOR AJAR SWITCH SENSE12 E20 20OR/DB PASSENGER REAR DOOR SWITCH ILLUMINATION13 Q12 16BR PASSENGER WINDOW DRIVER (UP)14 - -15 Q22 16VT PASSENGER WINDOW DRIVER (DOWN)CONNECTORPINOUTSPASSENGER DOOR MODULE C2 - BLACK 12 WAYCAV CIRCUIT FUNCTION1 P95 20OR MIRROR HORIZONTAL DRIVER2 C118 20BK/WT MIRROR HEATED GROUND3 P64 20VT MIRROR VERTICAL POSITION SIGNAL4 P69 20GY MIRROR SENSOR GROUND5 P65 20DG MIRROR HORIZONTAL POSITION SIGNAL6 C117 20BK MIRROR HEATER 12 VOLT SUPPLY7 P91 20WT MIRROR COMMON DRIVER8 P93 20RD MIRROR VERTICAL DRIVER9 M21 20PK/DG COURTESY LAMP DRIVER10 P110 20YL (BUILT-UP- FOLDING MIRROR RETURNEXPORT)11 P99 20DB (BUILT-UP- FOLDING MIRROR FEEDEXPORT)12 L121 20BK/RD COURTESY LAMP GROUNDPASSENGER FRONT DOOR COURTESY LAMP - BLACK 2 WAYCAV CIRCUIT FUNCTION1 M21 20PK/DG COURTESY LAMP DRIVER2 L121 20BK/RD COURTESY LAMP GROUND716
CONNECTOR PINOUTSPASSENGER FRONT POWER WINDOW MOTOR - BLACK 2 WAYCAV CIRCUIT FUNCTION1 Q22 16VT PASSENGER WINDOW DRIVER (DOWN)2 Q12 16BR PASSENGER WINDOW DRIVER (UP)PASSENGER HEATED SEAT BACK (PREMIUM I/III) -3WAYCAV CIRCUIT FUNCTION1 P88 16BK/BR HEATED SEAT DRIVER2 Z5 16BK/VT GROUND3 - -PASSENGER HEATED SEAT CUSHION (PREMIUM I/III) -4WAYCAV CIRCUIT FUNCTION1 P130 16DG/WT PASSENGER SEAT HEATER B(+) DRIVER2 P88 16BK/BR HEATED SEAT DRIVER3 P86 20DG/YL PASSENGER SEAT TEMPERATURE SENSOR INPUT4 P29 20BR/WT SEAT SENSOR 5 VOLT SUPPLYCONNECTORPINOUTSPASSENGER HEATED SEAT SWITCH - BLACK 6 WAYCAV CIRCUIT FUNCTION1 P134 20TN/LG PASSENGER SEAT HEATER SWITCH MUX2 E2 20OR PANEL LAMPS DRIVER3 F22 20WT/PK FUSED IGNITION SWITCH OUTPUT (RUN)4 - -5 Z300 20BK GROUND6 P132 20OR/BK SEAT HEATER SWITCH SENSOR GROUND717
CONNECTOR PINOUTSPASSENGER POWER MIRROR - BLACK 12 WAYCAV CIRCUIT FUNCTION1 C117 20BK MIRROR HEATER 12 VOLT SUPPLY2 P65 20DG MIRROR HORIZONTAL POSITION SIGNAL3 P69 2GY MIRROR SENSOR GROUND4 P64 20VT MIRROR VERTICAL POSITION SIGNAL5 C118 20BK/WT MIRROR HEATER GROUND6 P95 20OR MIRROR HORIZONTAL DRIVER7 - -8 P99 20DB (BUILT-UP- FOLDING MIRROR FEEDEXPORT)9 P110 20YL (BUILT-UP- FOLDING MIRROR RETURNEXPORT)10 - -11 P93 20RD MIRROR VERTICAL DRIVER12 P91 20WT MIRROR COMMON DRIVERCONNECTORPINOUTSPASSENGER REAR POWER WINDOW MOTOR - BLACK 2 WAYCAV CIRCUIT FUNCTION1 Q124 16DG/WT WINDOW DRIVER DOWN2 Q114 16GY/WT WINDOW DRIVER UPPASSENGER REAR POWER WINDOW SWITCH - BLUE 6 WAYCAV CIRCUIT FUNCTION1 Q14 16GY PASSENGER REAR WINDOW DRIVER UP2 Q114 16GY/WT WINDOW DRIVER UP3 E21 20OR/RD PASSENGER REAR DOOR SWITCH ILLUMINATION4 Q24 16DG PASSENGER REAR WINDOW DRIVER DOWN5 Q124 16DG/WT WINDOW DRIVER DOWN6 Z1 16BK GROUNDPASSENGER SEAT BELT SWITCH -2WAYCAV CIRCUIT FUNCTION1 R58 20GY PASSENGER SEAT BELT SWITCH SENSE2 R60 20VT PASSENGER SEAT BELT SWITCH GROUND718
CONNECTOR PINOUTSPASSENGER SIDE IMPACT SENSOR - BLACK 4 WAYCAV CIRCUIT FUNCTION1 - -2 - -3 R134 20LB/BR PASSENGER SIDE IMPACT SENSOR GROUND4 R132 20LG/VT PASSENGER SIDE IMPACT SENSOR SIGNALPOWER AMPLIFIER C1 (PREMIUM RADIO) - WHITE 18 WAYCAV CIRCUIT FUNCTION1 D25 18YL/VT PCI BUS2 F60 16RD/WT FUSED B(+)3 Z9 16BK GROUND4 - -5 X58 18DB/OR RIGHT REAR SPEAKER (-)6 X57 18DG/WT LEFT REAR SPEAKER (-)7 X56 18DB/PK RIGHT FRONT SPEAKER (-)8 X55 18BR/RD LEFT FRONT SPEAKER (-)9 - -10 F60 16RD/WT FUSED B(+)11 Z9 16BK GROUND12 - -13 X64 18BR/WT ENABLE SIGNAL TO AMPLIFIER14 - -15 X52 18DB/WT RIGHT REAR SPEAKER (+)16 X51 18WT/DG LEFT REAR SPEAKER (+)17 X54 18VT RIGHT FRONT SPEAKER (+)18 X53 18DG/OR LEFT FRONT SPEAKER (+)POWER AMPLIFIER C2 (PREMIUM RADIO) - WHITE 12 WAYCAV CIRCUIT FUNCTION1 X90 18WT/VT RIGHT REAR DOOR SPEAKER (+)2 X92 18TN/DG RIGHT REAR DOOR SPEAKER (-)3 X85 18LG/DG LEFT FRONT DOOR SPEAKER (-)4 X83 18YL/RD LEFT INSTRUMENT PANEL SPEAKER (+)5 X84 18OR/GY RIGHT INSTRUMENTAL PANEL SPEAKER (-)6 X93 18DG/WT LEFT REAR DOOR SPEAKER (+)7 X91 18WT/DG LEFT REAR DOOR SPEAKER (-)8 X87 18LG/RD LEFT FRONT DOOR SPEAKER (+)9 X80 18LB/BK RIGHT FRONT DOOR SPEAKER (-)10 X82 18LB/RD RIGHT FRONT DOOR SPEAKER (+)11 X81 18YL/BK LEFT INSTRUMENT PANEL SPEAKER (-)12 X86 18OR/RD RIGHT INSTRUMENT PANEL SPEAKER (+)CONNECTORPINOUTS719
CONNECTOR PINOUTSCONNECTORPINOUTS720
CONNECTOR PINOUTSFUSENO.FUSES (DIESEL)AMPS FUSED CIRCUIT FUNCTION1 40A C1 12DG FUSED B(+)2 40A A149 12RD/TN FUSED B(+)3 50A A145 10WT/RD FUSED B(+)4 40A A10 12RD/DG FUSED B(+)5 - - -6 50A A105 10DB/RD FUSED B(+)7 50A A147 10RD/GY FUSED B(+)8 40A A1 12RD FUSED B(+)9 - - -10 - - -11 50A A110 10VT/RD FUSED B(+)12 50A A146 10OR/WT FUSED B(+)13 40A A14 14RD/WT FUSED B(+)14 40A A2 12PK/BK FUSED B(+)15 50A A148 10PK/WT FUSED B(+)16 20A F15 18DB/WT FUSED AUTO SHUT DOWN RELAY OUTPUT16 20A F15 18 DB/WT FUSED AUTO SHUT DOWN RELAY OUTPUT17 - - -18 15A F62 18RD FUSED B(+)18 15A F62 18RD FUSED B(+)19 - - -20 - - -21 15A A17 14RD/BK FUSED B(+)22 10A F300 18RD/BK FUSED B(+)23 15A A80 18RD/LG FUSED B(+)24 - - -25 20A A20 12RD/DB FUSED B(+)26 20A F142 14OR/DG FUSED AUTO SHUT DOWN RELAY OUTPUT27 20A A148 16LG/RD FUSED B(+)28 - - -CONNECTORPINOUTS721
CONNECTOR PINOUTSCONNECTORPINOUTS722
CONNECTOR PINOUTSFUSENO.FUSES (GAS)AMPS FUSED CIRCUIT FUNCTION1 40A C1 12DG FUSED B(+)2 40A A149 12RD/TN FUSED B(+)3 50A A145 10WT/RD FUSED B(+)4 40A A10 12RD/DG FUSED B(+)5 30A A30 14RD/WT FUSED B(+)5 30A A30 14RD/WT (4.7L) FUSED B(+)6 30A A14 14RD/DG FUSED B(+)7 50A A147 10RD/GY FUSED B(+)8 40A A1 12RD FUSED B(+)9 - - -10 - - -11 - - -12 50A A146 10OR/WT FUSED B(+)13 - - -14 40A A2 12PK/BK FUSED B(+)15 50A A148 10PK/WT FUSED B(+)16 15A F142 18OR/DG FUSED AUTO SHUT DOWN RELAY OUTPUT16 15A F142 18OR/DG FUSED AUTO SHUT DOWN RELAY OUTPUT17 - - -18 15A F62 18RD FUSED B(+)18 15A F62 18RD FUSED B(+)19 10A A7 14RD/BK FUSED B(+)20 - - -21 15A A17 18RD/BK FUSED B(+)22 - - -23 - - -24 20A A62 16VT/LB FUSED B(+)25 20A A20 12RD/DB FUSED B(+)26 15A F42 18DG/LG FUSED AUTO SHUT DOWN RELAY OUTPUT26 15A F42 18DG/LG FUSED AUTO SHUT DOWN RELAY OUTPUT27 20A A148 16LG/RD FUSED B(+)28 15A T15 18YL/BR(4.0L) FUSED TRANSMISSION CONTROL RELAY OUTPUTHORN RELAYCAV CIRCUIT FUNCTION30 F62 18RD FUSED B(+)85 X3 20BK/RD HORN RELAY CONTROL86 F62 18RD FUSED B(+)87 X2 18DG/RD HORN RELAY OUTPUT87 X2 18DG/RD (GAS) HORN RELAY OUTPUT87A - -CONNECTORPINOUTSWIPER HIGH/LOW RELAYCAV CIRCUIT FUNCTION30 V60 16YL/DG (GAS) WIPER ON/<strong>OF</strong>F RELAY OUTPUT30 V60 16TN/RD (DIESEL) WIPER ON/<strong>OF</strong>F RELAY OUTPUT85 V16 20VT WIPER HIGH/LOW RELAY CONTROL86 V6 16DB FUSED IGNITION SWITCH OUTPUT (RUN-ACC)86 V6 16DB (DIESEL) FUSED IGNITION SWITCH OUTPUT (RUN-ACC)87 V4 16RD/YL WIPER HIGH/LOW RELAY HIGH SPEED OUTPUT87A V3 16BR/WT WIPER HIGH/LOW RELAY LOW SPEED OUTPUT723
CONNECTOR PINOUTSWIPER ON/<strong>OF</strong>F RELAYCAV CIRCUIT FUNCTION30 V60 16YL/DG (GAS) WIPER ON/<strong>OF</strong>F RELAY OUTPUT30 V60 16TN/RD (DIESEL) WIPER ON/<strong>OF</strong>F RELAY OUTPUT85 V14 20RD/VT WIPER ON/<strong>OF</strong>F RELAY CONTROL86 V6 16DB FUSED IGNITION SWITCH OUTPUT (RUN-ACC)86 V6 16DB FUSED IGNITION SWITCH OUTPUT (RUN-ACC)87 V6 16DB FUSED IGNITION SWITCH OUTPUT (RUN-ACC)87 V6 16DB FUSED IGNITION SWITCH OUTPUT (RUN-ACC)87A V55 16TN/RD (DIESEL) WIPER PARK SWITCH SENSE87A V55 16TN/RD WIPER PARK SWITCH SENSECONNECTORPINOUTSPOWERTRAIN CONTROL MODULE C1 (GAS) - BLACK 32 WAYCAV CIRCUIT FUNCTION1 K93 14TN/OR COIL DRIVER NO. 32 F991 18OR/DB FUSED IGNITION SWITCH OUTPUT (RUN-START)3 K94 14TN/LG (4.7L) COIL DRIVER NO. 44 K4 18BK/LB SENSOR GROUND5 K96 14TN/LB (4.7L) COIL DRIVER NO. 66 T41 18BK/WT PARK/NEUTRAL POSITION SWITCH SENSE7 K91 14TN/RD COIL DRIVER NO. 18 K24 18GY/BK CRANKSHAFT POSITION SENSOR SIGNAL9 K98 14LB/RD (4.7L) COIL DRIVER NO. 810 K60 18YL/BK IDLE AIR CONTROL NO. 2 DRIVER11 K40 18BR/WT IDLE AIR CONTROL NO. 3 DRIVER12 - -13 - -14 K77 18LG/BK TRANSFER CASE POSITION SENSOR INPUT15 K21 18BK/RD INTAKE AIR TEMPERATURE SENSOR SIGNAL16 K2 18TN/BK ENGINE COOLANT TEMPERATURE SENSOR SIGNAL17 K7 18OR 5 VOLT SUPPLY18 K44 18TN/YL CAMSHAFT POSITION SENSOR SIGNAL19 K39 18GY/BK IDLE AIR CONTROL NO. 1 DRIVER20 K59 18VT/BK IDLE AIR CONTROL NO. 4 DRIVER21 K95 14TN/DG (4.7L) COIL DRIVER NO. 522 A7 14RD/BK FUSED B(+)23 K22 18OR/RD THROTTLE POSITION SENSOR SIGNAL24 K41 18BK/DG OXYGEN SENSOR 1/1 SIGNAL25 K141 18TN/WT OXYGEN SENSOR 1/2 SIGNAL26 K241 18LG/RD (EXCEPT OXYGEN SENSOR 2/1 SIGNAL4.0L BUILT-UP-EXPORT)27 K1 18DG/RD MAP SENSOR SIGNAL28 - -29 K341 18TN/WT (4.0L EX- COIL DRIVER NO. 1CEPT BUILT-UP-EXPORT)29 K341 18PK/WT (4.7L) OXYGEN SENSOR 2/2 SIGNAL30 - -31 Z82 14BK/WT GROUND32 Z81 14BK/TN GROUND724
CONNECTOR PINOUTSPOWERTRAIN CONTROL MODULE C2 (GAS) - WHITE 32 WAYCAV CIRCUIT FUNCTION1 T54 18VT (4.0L) TRANSMISSION TEMPERATURE SENSOR SIGNAL2 K26 18VT (4.7L) FUEL INJECTOR NO. 7 DRIVER3 - -4 K11 18WT/DB FUEL INJECTOR NO. 1 DRIVER5 K13 18YL/WT FUEL INJECTOR NO. 3 DRIVER6 K38 18GY FUEL INJECTOR NO. 5 DRIVER7 K97 14BR (4.7L) COIL DRIVER NO. 78 K88 18PK (4.0L) GOVERNOR PRESSURE SOLENOID CONTROL9 K92 14TN/PK COIL DRIVER NO. 210 K20 18DG GENERATOR FIELD DRIVER11 T20 18LB (4.0L) TORQUE CONVERTER CLUTCH SOLENOID CONTROL12 K58 18BR/DB FUEL INJECTOR NO. 6 DRIVER13 K28 18GY/LB (4.7L) FUEL INJECTOR NO. 8 DRIVER14 - -15 K12 18TN FUEL INJECTOR NO. 2 DRIVER16 K14 18LB/BR FUEL INJECTOR NO. 4 DRIVER17 K173 18LG RADIATOR FAN RELAY CONTROL18 - -19 C18 18DB A/C PRESSURE SIGNAL20 - -21 T60 18BR (4.0L) 3-4 SHIFT SOLENOID CONTROL22 - -23 G60 18GY/YL ENGINE OIL PRESSURE SENSOR SIGNAL24 - -25 T13 18DB/BK (4.0L) OUTPUT SPEED SENSOR GROUND26 - -27 B22 18DG/YL VEHICLE SPEED SENSOR SIGNAL28 T14 18LG/WT (4.0L) OUTPUT SPEED SENSOR SIGNAL29 T25 18LG/RD (4.0L) GOVERNOR PRESSURE SENSOR SIGNAL30 K30 18PK/YL (4.0L) TRANSMISSION CONTROL RELAY CONTROL31 K6 18VT/BK 5 VOLT SUPPLY32 - -CONNECTORPINOUTS725
CONNECTOR PINOUTSCONNECTORPINOUTSPOWERTRAIN CONTROL MODULE C3 (GAS) - GRAY 32 WAYCAV CIRCUIT FUNCTION1 C13 18DB/OR A/C COMPRESSOR CLUTCH RELAY CONTROL2 - -3 K51 18DB/YL AUTOMATIC SHUT DOWN RELAY CONTROL4 V36 18TN/RD SPEED CONTROL VACUUM SOLENOID CONTROL5 V35 18LG/RD SPEED CONTROL VENT SOLENOID CONTROL6 - -7 K42 18DB/LG (4.7L HIGH KNOCK SENSOR SIGNALOUTPUT)8 K99 18BR/OR OXYGEN SENSOR 1/1 HEATER CONTROL9 K512 18RD/YL (4.7L) OXYGEN SENSOR DOWNSTREAM RELAY CONTROL10 K106 18WT/DG (EXCEPT LEAK DETECTION PUMP SOLENOID CONTROLBUILT-UP-EXPORT)11 V32 18OR/DG SPEED CONTROL SUPPLY12 F42 18DG/LG FUSED AUTO SHUT DOWN RELAY OUTPUT13 T10 18YL/DG (4.7L RHD) OVERDRIVE <strong>OF</strong>F SWITCH SENSE13 T6 18OR/WT (4.0L LHD) OVERDRIVE <strong>OF</strong>F SWITCH SENSE13 T10 18DG/LG (4.7L LHD) OVERDRIVE <strong>OF</strong>F SWITCH SENSE13 T6 18OR/BK (4.0L RHD) OVERDRIVE <strong>OF</strong>F SWITCH SENSE14 K107 18OR/PK (EXCEPT LEAK DETECTION PUMP SWITCH SENSEBUILT-UP-EXPORT)15 K25 18VT/LG BATTERY TEMPERATURE SENSOR SIGNAL16 K299 18BR/WT OXYGEN SENSOR 2/1 HEATER CONTROL17 - -18 K142 18GY/BK (4.7L HIGH KNOCK SENSOR NO. 2 SIGNALOUTPUT)19 K31 18BR FUEL PUMP RELAY CONTROL20 K52 18PK/BK DUTY CYCLE EVAP/PURGE SOLENOID CONTROL21 - -22 - -23 - -24 K29 18WT/PK SECONDARY BRAKE SWITCH SIGNAL25 K125 18WT/DB GENERATOR SOURCE26 K226 18LB/YL FUEL LEVEL SENSOR SIGNAL27 D21 18PK SCI TRANSMIT28 - -29 D32 18LG (LHD) SCI RECEIVE29 D32 18LG/DG (RHD) SCI RECEIVE30 D25 18VT/YL PCI BUS31 - -32 V37 18RD/LG SPEED CONTROL SWITCH SIGNAL726
CONNECTOR PINOUTSRADIO C1 - GRAY 22 WAYCAV CIRCUIT FUNCTION1 F60 16RD/WT FUSED B(+)2 X12 16WT/RD FUSED IGNITION SWITCH OUTPUT (RUN-ACC)3 E2 20OR PANEL LAMPS DRIVER4 - -5 - -6 - -7 X54 18VT RIGHT FRONT SPEAKER (+)8 X56 18DB/PK RIGHT FRONT SPEAKER (-)9 X55 18BR/RD LEFT FRONT SPEAKER (-)10 X53 18DG/OR LEFT FRONT SPEAKER (+)11 Z9 16BK GROUND12 F60 16RD/WT FUSED B(+)13 X64 18BR/WT ENABLE SIGNAL TO AMPLIFIER14 D25 20YL/VT/DB PCI BUS15 - -16 - -17 - -18 X51 18WT/DG LEFT REAR SPEAKER (+)19 X57 18DG/WT LEFT REAR SPEAKER (-)20 X58 18DB/OR RIGHT REAR SPEAKER (-)21 X52 18DB/WT RIGHT REAR SPEAKER (+)22 Z9 16BK GROUNDRADIO C2 - GRAY 10 WAYCAV CIRCUIT FUNCTION1 X40 20WT/RD AUDIO OUT RIGHT2 Z4 20WT/BK GROUND3 Z5 20BK/LB GROUND4 - -5 X112 20RD IGNITION SWITCH OUTPUT (RUN ACC)6 X41 20WT/DG AUDIO OUT LEFT7 Z17 20BK GROUND8 - -9 - -10 X160 20YL FUSED B(+)CONNECTORPINOUTSRAIN SENSOR (AUTOWIPE) - BLACK 6 WAYCAV CIRCUIT FUNCTION1 - -2 D25 20BK/PK PCI BUS3 - -4 Z155 20BK/OR GROUND5 Q30 20BK/LB FUSED B(+)6 - -727
CONNECTOR PINOUTSREAR WASHER PUMP - BLACK 2 WAYCAV CIRCUIT FUNCTION1 Z141 18BK GROUND2 V20 18BK/WT REAR WASHER PUMP MOTOR CONTROLCONNECTORPINOUTSREAR WIPER MOTOR - BLACK 6 WAYCAV CIRCUIT FUNCTION1 Z1 18BK GROUND2 V13 18BR/LG REAR WIPER MOTOR CONTROL3 G80 20VT/YL LIFTGATE FLIP-UP AJAR SWITCH SENSE4 V22 18BR/YL REAR WIPER MOTOR DELAY CONTROL5 F70 18BK FUSED B(+)6 - -RECIRCULATION DOOR MOTOR/ACTUATOR (AZC) - BLACK 2 WAYCAV CIRCUIT FUNCTIONA C32 20GY/DB (LHD) RECIRCULATION DOOR DRIVER (A)A C100 20YL/DB (RHD) RECIRCULATION DOOR DRIVER (B)B C32 20GY/DB (RHD) RECIRCULATION DOOR DRIVER (A)B C100 20YL/DB (LHD) RECIRCULATION DOOR DRIVER (B)RED BRAKE WARNING INDICATOR SWITCH - GRAY 2 WAYCAV CIRCUIT FUNCTION1 Z231 18BK GROUND2 G9 18GY/BK RED BRAKE WARNING INDICATOR DRIVER728
CONNECTOR PINOUTSREMOTE KEYLESS MODULE (JAPAN) - BLUE 6 WAYCAV CIRCUIT FUNCTION1 K25 20RD/GY ANTENNA SIGNAL2 K25 20RD/GY ANTENNA SIGNAL3 M1 18PK FUSED B(+)4 Z1 18BK GROUND5 D30 20VT/YL DIAGNOSTIC OUT6 D30 20VT/YL DIAGNOSTIC OUTRIGHT COURTESY LAMP - BLACK 2 WAYCAV CIRCUIT FUNCTION1 F70 20PK/BK FUSED B(+)2 M2 20YL COURTESY LAMP DRIVERRIGHT FOG LAMP - BLACK 2 WAYCAV CIRCUIT FUNCTION1 L39 20LB FOG LAMP RELAY OUTPUT2 Z142 18BK GROUNDCONNECTORPINOUTSRIGHT FRONT DOOR SPEAKER - WHITE 3 WAYCAV CIRCUIT FUNCTION1 X80 18LG/DG (RHD) RIGHT FRONT DOOR SPEAKER (-)1 X80 18LB/BK (LHD) RIGHT FRONT DOOR SPEAKER (-)2 - -3 X82 18LG/RD (RHD) RIGHT FRONT DOOR SPEAKER (+)3 X82 18LB/RD (LHD) RIGHT FRONT DOOR SPEAKER (+)729
CONNECTOR PINOUTSRIGHT FRONT IMPACT SENSOR - BLACK 4 WAYCAV CIRCUIT FUNCTION1 - -2 - -3 R46 18BR/LB RIGHT FRONT IMPACT SENSOR GROUND4 R48 18TN RIGHT FRONT IMPACT SENSOR SIGNALRIGHT FRONT PARK LAMP - WHITE 2 WAYCAV CIRCUIT FUNCTION1 Z1 18BK GROUND2 L7 20BK/PK PARK LAMP RELAY OUTPUTCONNECTORPINOUTSRIGHT FRONT PARK/TURN SIGNAL LAMP (EXCEPT BUILT-UP-EXPORT) - BLACK 3 WAYCAV CIRCUIT FUNCTION1 L7 20BK/PK PARK LAMP RELAY OUTPUT2 Z1 18BK GROUND3 L60 20TN RIGHT TURN SIGNAL730
CONNECTOR PINOUTSRIGHT FRONT SIDE MARKER LAMP (EXCEPT BUILT-UP-EXPORT) - WHITE 2 WAYCAV CIRCUIT FUNCTION1 L7 20BK/PK PARK LAMP RELAY OUTPUT2 L60 20TN RIGHT TURN SIGNALRIGHT HIGH BEAM HEADLAMP - BLACK 2 WAYCAV CIRCUIT FUNCTIONA Z1 18BK GROUNDB L34 18RD/OR FUSED RIGHT HIGH BEAM OUTPUTRIGHT INSTRUMENT PANEL SPEAKER - WHITE 2 WAYCAV CIRCUIT FUNCTION1 X86 18OR/RD RIGHT INSTRUMENT PANEL SPEAKER (+)2 X84 18OR/BK RIGHT INSTRUMENT PANEL SPEAKER (-)CONNECTORPINOUTSRIGHT LIFTGATE AJAR SWITCH - BLACK 2 WAYCAV CIRCUIT FUNCTION1 Z1 20BK GROUND2 G78 20TN/BK LIFTGATE AJAR SWITCH SENSE731
CONNECTOR PINOUTSRIGHT LOW BEAM HEADLAMP - GRAY 2 WAYCAV CIRCUIT FUNCTIONA Z1 18BK GROUNDB L44 18VT/RD FUSED RIGHT LOW BEAM OUTPUTCONNECTORPINOUTSRIGHT MULTI-FUNCTION SWITCH - WHITE 10 WAYCAV CIRCUIT FUNCTION1 V23 20BR/PK FUSED IGNITION SWITCH OUTPUT (RUN-ACC)2 V20 18BK/WT REAR WASHER PUMP MOTOR CONTROL3 V10 20BR WASHER PUMP MOTOR SWITCH OUTPUT4 - -5 V13 18BR/LG REAR WIPER MOTOR CONTROL6 V22 18BR/YL REAR WIPER MOTOR DELAY CONTROL7 V9 20WT/BK WINDSHIELD WIPER SWITCH RETURN8 V52 20DG/RD WINDSHIELD WIPER SWITCH MUX9 V48 20RD/GY WIPER HIGH CONTROL10 - -RIGHT REAR DOOR LOCK MOTOR/AJAR SWITCH - BLACK 4 WAYCAV CIRCUIT FUNCTION1 G76 18TN/YL RIGHT REAR DOOR AJAR SWITCH SENSE2 Z1 18BK GROUND3 P36 18PK/VT DOOR UNLOCK DRIVER4 P35 18OR/VT DOOR LOCK DRIVERRIGHT REAR DOOR SPEAKER - WHITE 3 WAYCAV CIRCUIT FUNCTION1 X90 18WT/VT RIGHT REAR DOOR SPEAKER (+)2 - -3 X92 18TN/DG RIGHT REAR DOOR SPEAKER (-)732
CONNECTOR PINOUTSRIGHT REMOTE RADIO SWITCH - BLACK 2 WAYCAV CIRCUIT FUNCTION1 X10 20RD/BK RADIO CONTROL MUX RETURN2 X20 20RD/YL RADIO CONTROL MUXRIGHT VISOR/VANITY LAMP - BLACK 2 WAYCAV CIRCUIT FUNCTION1 F70 20PK FUSED B(+)2 M20 20YL/BK COURTESY LAMP LOAD SHEDSEAT BELT SWITCH - WHITE 2 WAYCAV CIRCUIT FUNCTION1 G10 20LG/RD SEAT BELT SWITCH SENSE2 Z1 20BK GROUNDCONNECTORPINOUTS733
CONNECTOR PINOUTSCONNECTORPINOUTSSEAT MODULE C1 (PREMIUM) - BLACK 20 WAYCAV CIRCUIT FUNCTION1 P15 20YL/LB (PREMIUM SEAT HORIZONTAL FORWARD SWITCH SENSEII/III)2 - -3 P11 20YL/WT(PREMIUM SEAT REAR UP SWITCH SENSEII/III)4 P43 20GY/LB (PREMIUM RECLINER UP SWITCH SENSEII/III)5 P19 20YL/LG (PREMIUM SEAT FRONT UP SWITCH SENSEII/III)6 P86 20DG/YL (PREMIUM PASSENGER SEAT TEMPERATURE SENSOR INPUTI/III)7 P27 20LB/RD (PREMIUM REAR RISER POSITION SIGNALII/III)8 P25 20VT/RD (PREMIUM SEAT HORIZONTAL POSITION SIGNALII/III)9 P135 20LB/BK (PREMIUM DRIVER SEAT TEMPERATURE SENSOR INPUTI/III)10 P28 20BR/RD (PREMIUM SEAT POSITION SENSOR GROUNDII/III)11 P41 20GY/WT (PREMIUM RECLINER DOWN SWITCH SENSEII/III)12 P17 20RD/YL (PREMIUM SEAT HORIZONTAL REARWARD SWITCH SENSEII/III)13 - -14 P21 20RD/LG (PREMIUM SEAT FRONT DOWN SWITCH SENSEII/III)15 P13 20RD/WT (PREMIUM SEAT REAR DOWN SWITCH SENSEII/III)16 P47 20LB (PREMIUM II/III) RECLINER POSITION SIGNAL17 P26 20BR (PREMIUM II/ FRONT RISER POSITION SIGNALIII)18 P29 20BR/WT SEAT SENSOR 5 VOLT SUPPLY19 Z2 20BK/OR GROUND20 D25 20VT/YL PCI BUS734
CONNECTOR PINOUTSSEAT MODULE C2 (PREMIUM) - ORANGE 20 WAYCAV CIRCUIT FUNCTION1 F35 16RD FUSED B(+)2 P131 16BK/OR (PREMIUM DRIVER SEAT HEATER B(+) DRIVERI/III)3 Z1 16BK GROUND4 P119 16YL/RD (PREMIUM SEAT FRONT UP DRIVERII/III)5 P121 16RD/GY (PREMIUM SEAT FRONT DOWN DRIVERII/III)6 P111 16YL/DB (PREMIUM SEAT REAR UP DRIVERII/III)7 P113 16RD/BK (PREMIUM SEAT REAR DOWN DRIVERII/III)8 - -9 P115 16GY/LG (PREMIUM SEAT HORIZONTAL FORWARD DRIVERII/III)10 F35 16RD FUSED B(+)11 P130 16DG/WT (PREMIUM PASSENGER SEAT HEATER B(+) DRIVERI/III)12 Z1 16BK GROUND13 - -14 P9 20RD/LB (PREMIUM SEAT SWITCH B(+) SUPPLYII/III)15 Z6 16BK/YL (PREMIUM GROUNDI/III)16 Z5 16BK/VT (PREMIUM GROUNDI/III)17 - -18 P141 16GY/WT (PREMIUM SEAT RECLINER DOWN DRIVERII/III)19 P143 16GY/LB (PREMIUM SEAT RECLINER UP DRIVERII/III)20 P117 16RD/BR (PREMIUMII/III)SEAT HORIZONTAL REARWARD DRIVERSENTRY KEY IMMOBILIZER MODULE - BLACK 6 WAYCAV CIRCUIT FUNCTION1 M1 20PK FUSED B(+)2 Z132 20BK/OR GROUND3 G5 20DB/WT FUSED IGNITION SWITCH OUTPUT (RUN-START)4 - -5 D25 20YL/VT/BK PCI BUS6 - -CONNECTORPINOUTS735
CONNECTOR PINOUTSSHIFTER ASSEMBLY C1 (DIESEL) - BLACK 12 WAYCAV CIRCUIT FUNCTION1 F991 20OR/DB FUSED IGNITION SWITCH OUTPUT (RUN-START)2 F991 20OR/DB FUSED IGNITION SWITCH OUTPUT (RUN-START)3 F991 20OR/DB FUSED IGNITION SWITCH OUTPUT (RUN-START)4 T2 20TN/BK BACK-UP LAMP RELAY CONTROL5 D25 20OR PCI BUS6 W0 20DB/WT SHIFTER C1 SENSE7 W1 20VT/WT SHIFTER C2 SENSE8 W2 20VT SHIFTER C3 SENSE9 W3 20BK SHIFTER C4 SENSE10 W4 20PK/OR SHIFTER C5 SENSE11 Z234 20WT GROUND12 Z234 20WT GROUNDCONNECTORPINOUTSSHIFTER ASSEMBLY C2 (DIESEL) -6WAYCAV CIRCUIT FUNCTION1 - -2 - -3 F12 20DB/WT FUSED IGNITION SWITCH OUTPUT (RUN-START)4 K2 20WT/PK SECONDARY BRAKE SWITCH SIGNAL5 F991 20OR/DB FUSED IGNITION SWITCH OUTPUT (RUN-START)6 Y1 20DB/PK PARK LOCKOUT SOLENOID CONTROLSIREN (BUILT-UP-EXPORT) -3WAYCAV CIRCUIT FUNCTION1 Z141 18BK GROUND2 X75 18GY/LB (DIESEL) SIREN SIGNAL CONTROL2 X75 18GY/LG (GAS) SIREN SIGNAL CONTROL3 M1 18PK FUSED B(+)SUNRO<strong>OF</strong> CONTROL MODULE -8WAYCAV CIRCUIT FUNCTIONA Q46 20OR/WT SUNRO<strong>OF</strong> MOTOR POSITION SENSOR SIGNALB Q41 20WT SUNRO<strong>OF</strong> OPENC Q43 20VT SUNRO<strong>OF</strong> VENTD Z1 16BK GROUNDE - -F Q30 16DB ACCESSORY DELAY RELAY OUTPUTG Q5 16RD SUNRO<strong>OF</strong> MOTOR B(+)H Q6 16OR SUNRO<strong>OF</strong> MOTOR B(-)736
CONNECTOR PINOUTSSUNRO<strong>OF</strong> MOTOR C1 - WHITE 2 WAYCAV CIRCUIT FUNCTION1 Q5 16RD SUNRO<strong>OF</strong> MOTOR B(+)2 Q6 16OR SUNRO<strong>OF</strong> MOTOR B(-)SUNRO<strong>OF</strong> MOTOR C2 - BLACK 3 WAYCAV CIRCUIT FUNCTION1 Z1 20BK GROUND2 Q46 20OR/WT SUNRO<strong>OF</strong> MOTOR POSITION SENSOR SIGNAL3 - -SUNRO<strong>OF</strong> SWITCH - GRAY 5 WAYCAV CIRCUIT FUNCTION1 Q43 20VT SUNRO<strong>OF</strong> VENT2 - -3 Z150 20BK GROUND4 - -5 Q41 20WT SUNRO<strong>OF</strong> OPENCONNECTORPINOUTS737
CONNECTOR PINOUTSCONNECTORPINOUTSTRANSMISSION CONTROL MODULE (4.7L) - BLACK 60 WAYCAV CIRCUIT FUNCTION1 T1 18LG/BK TRS T1 SENSE2 T2 18TN/BK TRS T2 SENSE3 T3 18VT TRS T3 SENSE4 - -5 - -6 K24 18GY/BK CRANKSHAFT POSITION SENSOR SIGNAL7 D21 18PK SCI TRANSMIT8 F45 18YL/RD FUSED IGNITION SWITCH OUTPUT (START)9 T9 18OR/BK OVERDRIVE PRESSURE SWITCH SENSE10 T10 18YL/DG TORQUE MANAGEMENT REQUEST SENSE11 F991 18OR/DB FUSED IGNITION SWITCH OUTPUT (RUN-START)12 K22 18OR/RD THROTTLE POSITION SENSOR SIGNAL13 T13 18DB/BK SPEED SENSOR GROUND14 T14 18LG/WT OUTPUT SPEED SENSOR SIGNAL15 K30 18PK/YL TRANSMISSION CONTROL RELAY CONTROL16 T16 14RD TRANSMISSION CONTROL RELAY OUTPUT17 T16 14RD TRANSMISSION CONTROL RELAY OUTPUT18 T118 18YL/DB PRESSURE CONTROL SOLENOID CONTROL19 T119 18WT/DB 2C SOLENOID CONTROL20 T120 18LG LR SOLENOID CONTROL21 - -22 - -23 - -24 - -25 - -26 - -27 - -28 - -29 T29 18GY UNDERDRIVE PRESSURE SWITCH SENSE30 T130 14VT/TN LINE PRESSURE SENSOR SIGNAL31 - -32 - -33 - -34 - -35 - -36 T16 14RD TRANSMISSION CONTROL RELAY OUTPUT37 Z113 14BK/WT GROUND38 T138 14GY/LB 5 VOLT SUPPLY39 Z112 14BK/YL GROUND40 T140 18VT/LG MS SOLENOID CONTROL41 T41 18WT TRS T41 SENSE42 T42 18VT/WT TRS T42 SENSE43 D25 18YL/VT PCI BUS44 - -45 - -46 D20 18LG SCI RECEIVE47 T147 18LB 2C PRESSURE SWITCH SENSE48 T48 18DB 4C PRESSURE SWITCH SENSE49 T6 18VT/WT OVERDRIVE <strong>OF</strong>F SWITCH SENSE50 T150 18BR/LB LR PRESSURE SWITCH SENSE51 K4 18BK/LB SENSOR GROUND52 T52 18RD/BK INPUT SPEED SENSOR SIGNAL53 Z114 14BK/LG GROUND54 T54 18VT TRANSMISSION TEMPERATURE SENSOR SIGNAL55 T59 18PK UNDERDRIVE SOLENOID CONTROL56 A30 14RD/WT FUSED B(+)57 Z12 14BK/TN GROUND58 - -59 T159 18DG/WT 4C SOLENOID CONTROL60 T60 18BR OVERDRIVE SOLENOID CONTROL738
CONNECTOR PINOUTSTRANSMISSION CONTROL MODULE C1 (DIESEL) - BLACK 18 WAYCAV CIRCUIT FUNCTION1 D21 20PK SCI TRANSMIT2 - -3 W4 20PK/OR SHIFTER C5 SENSE4 Y1 20DB/PK PARK LOCKOUT SOLENOID CONTROL5 - -6 - -7 T41 20BK/WT PARK/NEUTRAL POSITION SWITCH SENSE8 - -9 - -10 - -23 - -24 - -25 W0 20DB/WT SHIFTER C1 SENSE26 W1 20VT/WT SHIFTER C2 SENSE27 W2 20VT SHIFTER C3 SENSE28 W3 20BK SHIFTER C4 SENSE29 F991 20OR/DB FUSED IGNITION SWITCH OUTPUT (RUN-START)30 Z234 20WT GROUNDTRANSMISSION CONTROL MODULE C2 (DIESEL) - BLACK 14 WAYCAV CIRCUIT FUNCTION12 T52 18RD/BK N2 INPUT SPEED SENSOR13 T39 18GY/LB SENSOR SUPPLY VOLTAGE14 T60 18BR 1-2/4-5 SOLENOID CONTROL15 T159 18DG/WT 3-4 SOLENOID CONTROL16 T119 18WT/DB 2-3 SOLENOID CONTROL17 T120 18LG TCC SOLENOID CONTROL33 T13 18DB/BK SENSOR GROUND34 T54 18VT TEMP SENSOR - P/N SWITCH35 T14 18LG/WT N3 INPUT SPEED SENSOR36 T591 18YL/DB MODULATION PRESSURE SOLENOID CONTROL37 T118 18YL/DB SHIFT PRESSURE SOLENOID CONTROL38 T16 18RD SOLENOID SUPPLY VOLTAGEH1 D52 18LG/WT CAN C BUS(+)L2 D51 18DG/WT CAN C BUS(-)CONNECTORPINOUTSVEHICLE INFORMATION CENTER - BLACK 6 WAYCAV CIRCUIT FUNCTION1 - -2 D25 20YL/VT PCI BUS3 F70 20PK FUSED B(+)4 Z155 20BK/OR GROUND5 G5 20DB/WT FUSED IGNITION SWITCH OUTPUT (RUN-START)6 - -739
CONNECTOR PINOUTSWASHER FLUID LEVEL SWITCH - GRAY 2 WAYCAV CIRCUIT FUNCTION1 V11 20BK/TN WASHER FLUID SWITCH SENSE2 Z141 20BK GROUNDCONNECTORPINOUTS740
10.0 SCHEMATIC DIAGRAMSSCHEMATIC DIAGRAMS10.1 AIRBAG SYSTEMSCHEMATICDIAGRAMS741
SCHEMATIC DIAGRAMS10.2 AUDIO SYSTEM10.2.1 PREMIUM AUDIO SYSTEMSCHEMATICDIAGRAMS742
10.2.2 BASE AUDIO SYSTEMSCHEMATIC DIAGRAMSSCHEMATICDIAGRAMS743
SCHEMATIC DIAGRAMS10.2.3 REMOTE RADIO CONTROLS10.2.4 CD CHANGERSCHEMATICDIAGRAMS744
10.3 HEATING & A/CSCHEMATIC DIAGRAMS10.3.1 AUTOMATIC ZONE CONTROL – LHDSCHEMATICDIAGRAMS745
SCHEMATIC DIAGRAMS10.3.2 AUTOMATIC ZONE CONTROL – RHDSCHEMATICDIAGRAMS746
10.3.3 MANUAL TEMPERATURE CONTROLSCHEMATIC DIAGRAMS10.4 CHIMESCHEMATICDIAGRAMS747
SCHEMATIC DIAGRAMS10.5 DOOR AJAR SYSTEMSCHEMATICDIAGRAMS748
10.6 EVICSCHEMATIC DIAGRAMS10.7 EXTERIOR LIGHTINGSCHEMATICDIAGRAMS749
SCHEMATIC DIAGRAMS10.8 INTERIOR LIGHTINGSCHEMATICDIAGRAMS750
10.9 MECHANICAL INSTRUMENT CLUSTERSCHEMATIC DIAGRAMSSCHEMATICDIAGRAMS751
SCHEMATIC DIAGRAMS10.10 MEMORY HEATED SEATS10.10.1 LAREDO ONLYSCHEMATICDIAGRAMS752
10.10.2 LIMITED ONLYSCHEMATIC DIAGRAMSSCHEMATICDIAGRAMS753
SCHEMATIC DIAGRAMS10.11 POWER DOOR LOCKS10.12 POWER MIRROR SYSTEM10.12.1 DRIVER MIRRORSCHEMATICDIAGRAMS754
10.12.2 PASSENGER MIRRORSCHEMATIC DIAGRAMS10.13 POWER SUNRO<strong>OF</strong>SCHEMATICDIAGRAMS755
SCHEMATIC DIAGRAMS10.14 POWER WINDOWS10.14.1 DRIVER SIDE10.14.2 PASSENGER SIDESCHEMATICDIAGRAMS756
10.15 VEHICLE COMMUNICATIONSCHEMATIC DIAGRAMS10.15.1 VEHICLE COMMUNICATION – LHDSCHEMATICDIAGRAMS757
SCHEMATIC DIAGRAMS10.15.2 VEHICLE COMMUNICATION – RHDSCHEMATICDIAGRAMS758
10.15.3 PCM COMMUNICATIONSCHEMATIC DIAGRAMS10.15.4 ECM COMMUNICATION – DIESELSCHEMATICDIAGRAMS759
SCHEMATIC DIAGRAMS10.16 VEHICLE THEFT SECURITY SYSTEM (VTSS)SCHEMATICDIAGRAMS760
10.16.1 INTRUSION TRANSCEIVER MODULE (EXPORT ONLY)SCHEMATIC DIAGRAMSSCHEMATICDIAGRAMS761
SCHEMATIC DIAGRAMS10.17 WINDSHIELD WIPER SYSTEM10.17.1 FRONT WIPERSSCHEMATICDIAGRAMS762
10.17.2 REAR WIPER SYSTEMSCHEMATIC DIAGRAMSSCHEMATICDIAGRAMS763
NOTES764