MINDRAY PM 8000 Patient Monitor Service Manual - internetMED
MINDRAY PM 8000 Patient Monitor Service Manual - internetMED
MINDRAY PM 8000 Patient Monitor Service Manual - internetMED

You also want an ePaper? Increase the reach of your titles
YUMPU automatically turns print PDFs into web optimized ePapers that Google loves.
<strong>Service</strong> <strong>Manual</strong>of<strong>PM</strong>-<strong>8000</strong>Portable <strong>Patient</strong> <strong>Monitor</strong>
CopyrightSHENZHEN <strong>MINDRAY</strong> ® BIO-MEDICAL ELECTRONICS CO., LTD. 2002Version: 2.0Issued date: 2005/07/24P/N: <strong>8000</strong>-20-10282StatementSHENZHEN <strong>MINDRAY</strong> ® BIO-MEDICAL ELECTRONICS CO., LTD. (hereinafter called Mindray)owns all rights to this unpublished work and intends to maintain this work as confidential. Mindraymay also seek to maintain this work as an unpublished copyright. This publication is to be used solelyfor the purposes of reference, operation, maintenance, or repair of Mindray equipment. No part of thiscan be disseminated for other purposes.In the event of inadvertent or deliberate publication, Mindray intends to enforce its rights to this workunder copyright laws as a published work. Those having access to this work may not copy, use, ordisclose the information in this work unless expressly authorized by Mindray to do so.All information contained in this publication is believed to be correct. Mindray shall not be liable forerrors contained herein nor for incidental or consequential damages in connection with the furnishing,performance, or use of this material. This publication may refer to information and protected bycopyrights or patents and does not convey any license under the patent rights of Mindray, nor the rightsof others. Mindray does not assume any liability arising out of any infringements of patents or otherrights of third parties.Content of this manual is subject to changes without prior notice.PROPERTY OFSHENZHEN <strong>MINDRAY</strong> ® BIO-MEDICAL ELECTRONICS CO., LTD.ALL RIGHTS RESERVEDResponsibility on the manufacturer party<strong>Service</strong> <strong>Manual</strong> of <strong>PM</strong>-<strong>8000</strong> Portable <strong>Patient</strong> <strong>Monitor</strong> (V2.0)I
Mindray is responsible for safety, reliability and performance of this equipment only in the conditionthat:• all installation, expansion, change, modification and repair of this equipment are conducted byMindray qualified personnel; and,• applied electrical appliance is in compliance with relevant National Standards; and,• the monitor is operated under strict observance of this manual.′ NOTE ′This equipment is not intended for family usage.WarningThis monitor is not a device for treatment purpose.It is important for the hospital or organization that employs this equipment to carry out a reasonablemaintenance schedule. Neglect of this may result in machine breakdown or injury of human health.Upon request, Mindray may provide, with compensation, necessary circuit diagrams, calibrationillustration list and other information to help qualified technician to maintain and repair some parts,which Mindray may define as user serviceable.II<strong>Service</strong> <strong>Manual</strong> of <strong>PM</strong>-<strong>8000</strong> Portable <strong>Patient</strong> <strong>Monitor</strong> (V2.0)
WarrantyWorkmanship & MaterialsMindray guarantees new equipment other than accessories to be free from defects in workmanship andmaterials for a period of one year (six months for multi-site probes and SpO2 sensor) from date ofshipment under normal use and service. Mindray's obligation under this warranty is limited to repairing,at Mindray’s option, any part which upon Mindray's examination proves defective.THIS WARRANTY IS EXCLUSIVE AND IS IN LIEU OF ALL OTHER WARRANTIES,EXPRESSED OR IMPLIED, INCLUDING WARRANTIES OF MERCHANT ABILITY ORFITNESS FOR ANY PARTICULAR PURPOSE.ExemptionsMindray's obligation or liability under this warranty does not include any transportation or othercharges or liability for direct, indirect or consequential damages or delay resulting from the improperuse or application of the product or the substitution upon it of parts or accessories not approved byMindray or repaired by anyone other than a Mindray authorized representative.This warranty shall not extend to any instrument which has been subjected to misuse, negligence oraccident; any instrument from which Mindray's original serial number tag or product identificationmarkings have been altered or removed, or any product of any other manufacturer.Safety, Reliability and PerformanceMindray is not responsible for the effects on safety, reliability and performance of the <strong>PM</strong>-<strong>8000</strong>Portable <strong>Patient</strong> <strong>Monitor</strong> if:■ assembly operations, extensions, re-adjusts, modifications or repairs are carried out by personsother than those authorized by Mindray.■ the <strong>PM</strong>-<strong>8000</strong> Portable <strong>Patient</strong> <strong>Monitor</strong> is not used in accordance with the instructions for use, orthe electrical installation of the relevant room does not comply with NFPA 70: National ElectricCode or NFPA 99: Standard for Health Care Facilities (Outside the United States, the relevantroom must comply with all electrical installation regulations mandated by the local and regionalbodies of government).<strong>Service</strong> <strong>Manual</strong> of <strong>PM</strong>-<strong>8000</strong> Portable <strong>Patient</strong> <strong>Monitor</strong> (V2.0)III
Return PolicyReturn ProcedureIn the event that it becomes necessary to return a unit to Mindray, the following procedure should befollowed:1. Obtain return authorization. Contact the Mindray <strong>Service</strong> Department and obtain a Customer<strong>Service</strong> Authorization (Mindray) number. The Mindray number must appear on the outside of theshipping container. Return shipments will not be accepted if the Mindray number is not clearlyvisible. Please provide the model number, serial number, and a brief description of the reason forreturn.2. Freight policy. The customer is responsible for freight charges when equipment is shipped toMindray for service (this includes customs charges).Company ContactAddress: Mindray building keji 12 th road south hi-tech industrialpark nanshan Shenzhen, P.R.ChinaPhone: +86 755 26582658/26582888Fax: +86 755 26582680Free hot line: +86 800 830 3312EC RepresentativeName: Shanghai International Holding Corp. GmbH(Europe)Address: Eiffestrasse 80 D-20537 Hamburg GermanyPhone: +49 40 2513174Fax: +49 40 255726IV<strong>Service</strong> <strong>Manual</strong> of <strong>PM</strong>-<strong>8000</strong> Portable <strong>Patient</strong> <strong>Monitor</strong> (V2.0)
PrefaceThis manual gives detailed description to <strong>PM</strong>-<strong>8000</strong> Portable <strong>Patient</strong> <strong>Monitor</strong> concerning itsperformance, operation, and other safety information. Reading through this manual is the first step forthe user to get familiar with the equipment and make the best out of it.Following symbols indicates some important facts that you have to pay special attention to:WarningPoints to be noted to avoid injury to the patient and the operator.CautionPoints to be noted to avoid damage to the equipment.′ NOTE ′ Points to be noted.This manual is intended for persons who are trained in the use of this field and have adequateexperience in operation of monitoring equipment.<strong>Service</strong> <strong>Manual</strong> of <strong>PM</strong>-<strong>8000</strong> Portable <strong>Patient</strong> <strong>Monitor</strong> (V2.0)V
ContentChapter 1 Introduction ........................................................................................................................1-1I. General.................................................................................................................................... 1-1II. Appearance............................................................................................................................ 1-22.1 Screen display ................................................................................................................. 1-22.2 Button Functions............................................................................................................. 1-62.3 Interfaces................................................................................................................... 1-82.4 Built-in rechargeable battery...................................................................................... 1-10III. Hardware principle................................................................................................................ 1-113.1 Power board ............................................................................................................ 1-123.2 <strong>PM</strong>-<strong>8000</strong> main control board .................................................................................. 1-133.3 Structure diagram.................................................................................................... 1-143.4 Description.............................................................................................................. 1-143.5 Button schematic diagram and principle................................................................. 1-163.6 Maintenance part of TR60-A recorder.......................................................................... 1-17Chapter 2 <strong>Monitor</strong> Functions and Principles ......................................................................................2-1I. Introduction ............................................................................................................................... 2-1II. ECG/RESP parameters............................................................................................................. 2-22.1 ECG................................................................................................................................. 2-22.2 RESP ............................................................................................................................... 2-22.3 NIBP ............................................................................................................................... 2-32.4 SpO2 ............................................................................................................................... 2-32.5 TEMP.............................................................................................................................. 2-42.6 IBP .................................................................................................................................. 2-4Chapter 3 Checks and Tests................................................................................................................3-1I. System checks......................................................................................................................... 3-1II. Testing and calibrating each parameter.................................................................................... 3-9Chapter 4 Troubleshooting .................................................................................................................4-1I. Disassembly graph of each part of <strong>PM</strong>-<strong>8000</strong>............................................................................. 4-1II. Troubleshooting guidance........................................................................................................ 4-2Chapter 5 Installation..........................................................................................................................5-1I. Unpack inspection................................................................................................................. 5-1II. Preparations before power-on................................................................................................ 5-1III. Turn on the power................................................................................................................... 5-1IV. Other precautions.................................................................................................................... 5-1Chapter 6 Basic Operations ................................................................................................................6-1<strong>Service</strong> <strong>Manual</strong> of <strong>PM</strong>-<strong>8000</strong> Portable <strong>Patient</strong> <strong>Monitor</strong> (V2.0) 1
I. Basic operation guidance........................................................................................................... 6-1II. Use <strong>PM</strong>-<strong>8000</strong>............................................................................................................................ 6-1Chapter 7 Cleaning and Disinfection..................................................................................................7-1I. Maintenance checks................................................................................................................ 7-1II. General cleaning....................................................................................................................... 7-1III. Sterilization............................................................................................................................. 7-2IV. Precautions and cleaning ........................................................................................................ 7-3V. IBP transducer cleaning and disinfection(reusable) ........................................................... 7-4VI. TEMP sensor cleaning and disinfection (reusable) ............................................................. 7-6Chapter 8 Maintenance .......................................................................................................................8-1Chapter 9 Network Link .....................................................................................................................9-1I. Network performance ............................................................................................................. 9-1II. Application............................................................................................................................... 9-1Appendix I: System Alarm Prompt................................................................................................... AI-iAppendix II: Product Specifications................................................................................................ AII-i1. Classification...........................................................................................................................AII-i2. Specifications..........................................................................................................................AII-i2 <strong>Service</strong> <strong>Manual</strong> of <strong>PM</strong>-<strong>8000</strong> Portable <strong>Patient</strong> <strong>Monitor</strong> (V2.0)
IntroductionChapter 1 IntroductionI. GeneralEnvironment:TemperatureWorking 0 ~ 40 °CTransport and Storage -20 ~ 60 °CHumidityWorking 15% ~ 95%Transport and Storage 10% ~ 95%AltitudeWorking -500 to 4,600mTransport and Storage -500 to 13,100mPower Supply100~240 (V)AC, 50/60 HzPmax=100VAFUSE T 1.6A<strong>PM</strong>-<strong>8000</strong> Portable <strong>Patient</strong> <strong>Monitor</strong> (Figure 1-1) is adaptable to adult, pediatric and neonatalusage. It can monitor vital signals such as ECG, Respiratory Rate, SpO2, NIBP, TEMP and IBP. Itintegrates parameter measuring modules, display and recorder into one device, featuring incompactness, lightweight and portability. Replaceable built-in battery facilitates the transportation ofpatient. Large high-resolution display provides clear view of 5 waveforms and full monitoringparameters.<strong>PM</strong>-<strong>8000</strong> Portable <strong>Patient</strong> <strong>Monitor</strong> performs monitoring of:ECGHeart Rate (HR)2-channel ECG waveformsArrhythmia and S-T segment analysis(optional)RESPRespiratory Rate (RR)Respiration WaveformSpO2Oxygen Saturation (SpO2), Pulse Rate (PR)SpO2 PlethysmogramNIBPSystolic Pressure (NS), Diastolic Pressure (ND), Mean Pressure (NM)<strong>Service</strong> <strong>Manual</strong> of <strong>PM</strong>-<strong>8000</strong> Portable <strong>Patient</strong> <strong>Monitor</strong> (V2.0) 1-1
IntroductionTEMPIBPTemperature DATAIBP SYS, DIA, MAPIBP waveform<strong>PM</strong>-<strong>8000</strong> provides extensive functions as visual & audible alarm, storage and report printout fortrend data, NIBP measurements, and alarm events, and drug dose calculation, etc.II. AppearanceThe POWER switch is on the right quarter of the front panel (2). The POWER indicator(4)and the BATT indicator (3) light when the device is powered on. The ALARM indicator flashes orlights when alarm occurs (1). Sockets for the sensors are on the right side. The recorder socket is onthe left side. Other sockets and power plug-in are at the back.。Figure 1-1 Front view of <strong>PM</strong>-<strong>8000</strong> Portable <strong>Patient</strong> <strong>Monitor</strong>2.1 Screen displayThe display of <strong>PM</strong>-<strong>8000</strong> may be color or monochrome liquid crystal. (The monitor of <strong>PM</strong>-<strong>8000</strong> isavailable in both monochrome and color liquid crystal).<strong>Patient</strong> parameters, waveforms, alarm messages,bed numbers, date, system status and error messages can be displayed on the screen.The screen is divided into three areas: ← message area1; ↑ waveform area2; → parameter area1-2 <strong>Service</strong> <strong>Manual</strong> of <strong>PM</strong>-<strong>8000</strong> Portable <strong>Patient</strong> <strong>Monitor</strong> (V2.0)
IntroductionFigure 1-2 <strong>PM</strong>-<strong>8000</strong> main screenMessage Area(1)The Message Area is at the top of the screen and used to display operating state of the monitor andstatus of the patient.The messages and their meanings are:【BED No】 Bed number of the patient being monitored【3/1/2001】 Current date【10:23:45】 Current time【M/F】【NAME】Sex of the patient being monitoredname of the patient being monitored. When the user is entering patient name,the name will be displayed at this position. If no patient name is entered, thisposition will be blank.Other information in the Message Area comes up only with respective monitoring status. They are:1. Signs indicating the operating status of the monitor and the sensors are displayed at the right side oftime numeric. When appears, this message will cover the sex and name information of the patient.2. “ ” Indicates that all sounds are disabled manually. It appears when SILENCE button is pressedfor more than 1 seconds.3. “! ” is the sign indicating that the alarm volume is closed. When select the “OFF” option in theALARM SETUP menu, this mark appears indicating that the operator has permanently closed the<strong>Service</strong> <strong>Manual</strong> of <strong>PM</strong>-<strong>8000</strong> Portable <strong>Patient</strong> <strong>Monitor</strong> (V2.0) 1-3
Introductionaudio alarm function. This audio alarm function can resume only after the operator discharges the setupof Close Alarm Volume.′ NOTE ′When “! ” sign appears, the system can not give any audio alarm prompt. Therefore,the operator should be careful in using this function. One method of discharging thisstatus is in the ALARM SETUP menu, select the item that the alarm volume is inNon-close. Another method is to press the SILENCE button so as to make the markchange into a . Then press SILENCE button again, the system will immediatelyrestores the normal alarm status.4. Alarm message is displayed always at the extreme right area on the screen.5. When waveforms on the screen are frozen, “FREEZE” window appears at the bottom of the screen.Waveform/Menu Area(2)Five waveforms can be displayed at the same time. The waveforms from up to down are: 2 channels ofECG waveforms, SpO2 Plethysmogram, IBP, RESP (possibly coming from ECG module). Waveformsto be displayed are user-selectable. Refer to Tracing Waveforms Selection in Operation <strong>Manual</strong> fordetails.The names of the waveforms are displayed to their left. The names of ECG and IBP are user-selectable.Refer to Chapter ECG/RESP <strong>Monitor</strong>ing and Chapter IBP <strong>Monitor</strong>ing in Operation <strong>Manual</strong> fordetails. Gain and filter of this ECG channel are displayed as well. A 1mv scale is marked on the rightof ECG waveform. The IBP waveform scale is displayed in IBP wave area. The three dot lines from upto down respectively represent the highest scale, reference scale and lowest scale of the waveform.These values can be manually set. Refer to Chapter IBP <strong>Monitor</strong>ing in Operation <strong>Manual</strong> for IBPsetup.The same menu always appears at a fixed area on the screen. When the menu is displayed, somewaveforms become invisible. The size of the menu is also fixed, covering the lowest 3, 4 or 5waveforms. If the system exits the menu, the screen will restore its previous look.The waveforms are refreshed in a user-set rate. Refer to the related chapters for details of sweep speed.Parameter Area(3)Parameters are displayed at a fixed position (1~10). They are (from top to bottom):1-4 <strong>Service</strong> <strong>Manual</strong> of <strong>PM</strong>-<strong>8000</strong> Portable <strong>Patient</strong> <strong>Monitor</strong> (V2.0)
IntroductionECG⎯Heart Rate (1, Unit: bpm)Figure 1-3 Main Screen⎯⎯ST-segment analysis of Channel 1 & 2 (2, Unit: mv)Arrhythmia (PVCs) events (3, Unit: event/min)NIBP⎯(From left to right) Systolic, Mean, Diastolic (4, Unit: mmHg or kPa)SpO2⎯SpO2 (5, Unit: %)IBP⎯Blood Pressure: Systolic, Mean, and Diastolic values are displayed from left to right. (6,Unit: mmHg or kPa)RESP⎯Respiration Rate (7, Unit: breath/min)TEMP⎯Temperature (8, Unit:℃ or ℉)<strong>Service</strong> <strong>Manual</strong> of <strong>PM</strong>-<strong>8000</strong> Portable <strong>Patient</strong> <strong>Monitor</strong> (V2.0) 1-5
IntroductionThe above monitoring results are displayed in the Parameter Area.The parameters refresh every second, except that the NIBP value refreshes each time when themeasurement is over.User can select the monitor parameters, and the screen display will change accordingly.Alarm indicator and alarm status:In normal mode, no indicator lights.In alarm mode, the alarm indicator lights or flashes. The color of the indicator indicates the alarm level.2.2 Button FunctionsFigure 1-4 <strong>PM</strong>-<strong>8000</strong> Buttons and KnobAll the operations of <strong>PM</strong>-<strong>8000</strong> can be performed through using the buttons and the rotary knob at thebottom of the screen. Above the buttons are their respective names. They are (from left to right):1POWER Press to turn on/off the monitor.2FREEZEWhen in normal mode, press to enter Freeze mode to freeze all the waveformson the screen. When in Freeze mode, press to restore the waveformrefreshing.1-6 <strong>Service</strong> <strong>Manual</strong> of <strong>PM</strong>-<strong>8000</strong> Portable <strong>Patient</strong> <strong>Monitor</strong> (V2.0)
Introduction3SILENCEPress to suspend alarm for 3 minutes (it can be selected in ALARM SETUPmenu). Press this button for more than 1 seconds to disable all sound signals(heart, beat, pulse tone, key sound), and audio alarm. A symbol “” displaysin the Message Area. Press this key again to restore all sound signals andremove the “” symbol.NOTE:If new alarm occurs under Alarm Suspension/Silence state,Suspension/Silence state will change. For specific rules, see ChapterAlarm.NOTE:Whether an alarm will be reset depends on the status of the alarm cause.But by pressing SILENCE button can permanently shut off audio soundof the ECG Lead Off and SpO2 Sensor Off alarm.4REC/STOPPress to start a real time recording. The recording time is set in RTREC TIME of RECORD submenu (Refer to related sections fordetails). Press during recording to stop the recording. When inFREEZE mode, press to select the waveforms for report printout.Refer to Chapter Recording for details.5STARTPress to inflate the cuff to start a blood pressure measurement. Whenmeasuring, press to cancel the measurement and deflate the cuff.6Rotary KnobThis knob can be used to select and change the settings. Operationcan be performed by turning it clockwise, counterclockwise orpressing it down.Rotary KnobThe square frame that moves when the knob is being turned is called "cursor". Operation can beexecuted at any place where the cursor can stay. When no menu is displayed, turning the knobclockwise can select following hot keys:<strong>Service</strong> <strong>Manual</strong> of <strong>PM</strong>-<strong>8000</strong> Portable <strong>Patient</strong> <strong>Monitor</strong> (V2.0) 1-7
IntroductionChannel 1 ECG leadChannel 1 ECG gainECG filterChannel 2 ECG leadChannel 2 ECG gainIBP LabelECG menuSpO2 menuNIBP menuIBP menuRESP menuTEMP menuWhen the current cursor is placed at any of the first six items, the user can change the current settings.When at any of the last six items, related parameter menu could be called up for setting changes.2.3 InterfacesFor the convenience of operation, different interfaces are in different parts of the monitor.Recorder is on the left side of the monitor while sockets for patient cables and sensors are on the rightside. See the figure below:Figure 1-5 Right side view1-8 <strong>Service</strong> <strong>Manual</strong> of <strong>PM</strong>-<strong>8000</strong> Portable <strong>Patient</strong> <strong>Monitor</strong> (V2.0)
IntroductionThis symbol means “BE CAREFUL". Refer to the manual.Indicates that the instrument is IEC-60601-1 Type CF equipment. The unit displaying thissymbol contains an F-Type isolated (floating) patient applied part providing a high degree ofprotection against shock, and is suitable for use during defibrillation.Figure 1-6 Rear panel<strong>Monitor</strong> interface for external: standard VGA color monitor.Working mode: 640 × 480, 16 color, APA mode.Signal: analog R G B 0.7 Vpp / 750 ohmHor. / Vert. TTL pos. / Neg.Interface D-sub 15 pinPin 1. Red VideoPin 2. Green VideoPin 3. Blue VideoPin 4. GroundPin 5. NCPin 6. Red GroundPin 7. Green GroundPin 8. Blue GroundPin 9. NCPin 10. GroundPin 11. NC<strong>Service</strong> <strong>Manual</strong> of <strong>PM</strong>-<strong>8000</strong> Portable <strong>Patient</strong> <strong>Monitor</strong> (V2.0) 1-9
IntroductionPin 12. NCPin 13 Horizontal Sync.Pin 14. Vertical Sync.Pin 15. NCAppliance: (Installation)1) Install the VGA monitor at a place at least 1.5m away from the patient.(The VGA monitormust be installed at least 1.5m away from the patient.)This monitor is used only as anassistant monitoring device.2) Plug the cable into proper socket before powering on the VGA monitor.3) It is allowable to power on the VGA monitor and <strong>PM</strong>-<strong>8000</strong> at the same time. Or power on<strong>PM</strong>-<strong>8000</strong> after turning on VGA monitor.4) Adjust brightness and contrast properly.(Socket 4)Equipotential grounding terminal for connection with the hospital’s grounding system.ANALOG OUTPUT (Socket 2)Analog signal output terminal for connection with oscillometer and pen recorder.The connection terminal is a BNC Jack.Network Interfaces (Socket 1): Standard RJ45 Socket.WarningThrough network interface only <strong>MINDRAY</strong> Clinical Information Center can be connected in.WarningAccessory equipment connected to the analog and digital interfaces must be certified accordingto the respective IEC standards (e.g. IEC 60950 for data processing equipment and IEC 60601-1for medical equipment). Furthermore all configurations shall comply with the valid version ofthe system standard IEC 60601-1-1. Everybody who connects additional equipment to the signalinput part or signal output part configures a medical system, and is therefore responsible that thesystem complies with the requirements of the valid version of the system standard IEC 60601-1-1.If in doubt, consult the technical service department or your local representative.2.4 Built-in rechargeable battery<strong>PM</strong>-<strong>8000</strong> Portable <strong>Patient</strong> <strong>Monitor</strong> is equipped with a rechargeable battery. The battery in the <strong>Monitor</strong>can automatically recharge when AC INPUT is connected until it is full. A symbol “” is displayed1-10 <strong>Service</strong> <strong>Manual</strong> of <strong>PM</strong>-<strong>8000</strong> Portable <strong>Patient</strong> <strong>Monitor</strong> (V2.0)
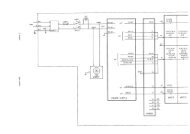
Introductionon the bottom of the screen to indicate the status of recharging, in which the black part represents therelative electric energy of the battery. If the battery is not installed in <strong>PM</strong>-<strong>8000</strong>, battery state will bedisplayed as “ ” to indicate the state. Under the cable socket is the battery slot with cover.WarningDon’t pull off battery when the monitor is working.When operating on battery, the monitor will prompt alarm and shut off automatically when the energyis low. When the electric energy is going out, the monitor will sound continuous level 1 alarm beepingand display “BATTERY TOO LOW” in the Message Area. Connect the monitor to AC power at thismoment can recharge the battery while operating. If keep operating on the battery, the monitor willshut off automatically (about 5 minutes since alarming) upon exhaustion of the battery.Figure 1-7 Battery slot coverIII. Hardware principle<strong>PM</strong>-<strong>8000</strong> block diagramMainPowerInputX16TFT Display8.4 inchs800 X 600X14Power Supply P C BJ3B a tte ryJ6X15J5J4J2TO X4FANP1P5P4(TFT_DIGTAL)P2(CRT)P10P3(FOR 9000 VGA)P12P7(BDM)P11 H o st P .C .B .P13P17(FOR 509C)P15P16J9Key & Alarm P.C .B.J7J8X1R ecorder M oduleX2AlarmL E DSpeakerP6P9P14P8From J2X3X4 R e co rd e r P .S .VGAinterfaceNETIn te rfa ceX5ECG/RESP/TEM PP.B.C.X6 X7 X8SPO2P.C.B.NIB<strong>PM</strong>oduleIB PP.C.B.X9 X10 X11 X12AnalogoutputTEM PTEMPSensorECGECGCableSPO2SpO2SensorCuffNIBPIB PIBPCable<strong>Service</strong> <strong>Manual</strong> of <strong>PM</strong>-<strong>8000</strong> Portable <strong>Patient</strong> <strong>Monitor</strong> (V2.0) 1-11
IntroductionFigure 1-8 <strong>PM</strong>-<strong>8000</strong> connection diagramFollowing are brief description of basic function and operating principle of each part.3.1 Power board<strong>PM</strong>-<strong>8000</strong> power board specifications:AC input voltage:100~240VACAC input current:
Introductionwaveform with the frequency being about 110KHz should exist.Use multimeter to measure the DC voltage of the capacitor C19, which should be 17.5V.Use multimeter to measure the DC voltage of the capacitor C24, which should be 13.8V (voltageafter removing battery).Use multimeter to measure the capacitor C47, which should be 5V.Tests after powering on the monitor:Use multimeter to measure the regulator ZD3 whose DC voltage should be 5V.Use multimeter to measure the regulator ZD4 whose DC voltage should be 12V.Use multimeter to measure the capacitor C54 whose DC voltage should be 17.2V.3.2 <strong>PM</strong>-<strong>8000</strong> main control boardPower supplyInput voltage: +12V±5%;+5V±5%;The main control board uses the COLDFIRE series embedded microprocessor 5206emanufactured by MOTOROLA Company. It also adopts 3.3V low-voltage power supply to reduce thepower consumption. Other main components on the main control board include: Flash, SRAM, FPGA,network controller, etc, all of which require 3.3V power. The capacity of the Flash has been increasedto 2MB, which employs two parallel-connected 512Kx16 chips and therefore uses 32-bit characterwidth to support CPU to operate at the highest possible speed instead of accessing to DRAM foroperation. The main control board has also a 4MB memory, which is made up of twoparallel-connected 1M ×16-bit chips. Because no executing program is required to be loaded, onlyone RTC is used. This chip uses one 225maH dry cell as the spare power supply. In addition, one 2KBE 2 PROM is used to store parameters. The main control board supports a resolution of 800x600 andprovides three interfaces: a LVDS interface, a 6BIT DIGITAL interface, and a VGA interface. Themonitor displays both characters and waveforms in an overlapping way on the whole screen in thesame color. The characters and waveforms can be browsed in a scrolling way. The support systemneeds 10 serial ports, and the baud rate (4800/9600/19.2k/38.4k/76.8k) can be online selected bysoftware and interface buffer drives. The main control board adopts the network controller AX88796(3.3V, 10MHz), which has inside 16K high-speed buffer SRAM. The MAX5102 8-bit single-way D/Aconverter is used to fulfil analog output. 5V and 12V stabilized voltage supplies are introduced fromthe power board, and therefore 3.3V and 2.5V working supplies are respectively generated. Amongthem, 2.5V is to be used for the internal verification of FPGA.<strong>Service</strong> <strong>Manual</strong> of <strong>PM</strong>-<strong>8000</strong> Portable <strong>Patient</strong> <strong>Monitor</strong> (V2.0) 1-13
Introduction3.3 Structure diagramRTC/E 2 PROM/WatchDRAMFlash/SRAMDisplaydrivingcircuitCPUNetworkcontrollerInterruptmanagement circuitFPGAMulti-wayseriali t fAudioalarm/sparebatteryFigure 1-10 Structure diagram3.4 Description3.3V low-voltage power supply component is adopted. The external power is 5V, which is convertedby the DC/DC converter into 3.3V and 2.5V, the latter voltage being especially used for FPGA. Themain control board are connected with the external devices via following interfaces and input: thepower supply connected with the interface board, the 9-way serial port, TFT interface, analog VGAinterface, network interface, analog output and a spare serial port, etc. The BDM interface is reservedon the board for the aim of software testing and download.■ CPUIt use Coldfire5206e. Clock rate is 54MHz, working voltage is 3.3V.■ FLASHIt use tow parallel-connected 512Kx16 FLASH memories. The output terminal PP1 of CPU is used torealize write-protection of FLASH. It is effective in low-level state.。■ DRAM<strong>PM</strong>-<strong>8000</strong> main control board uses two parallel-connected 1Mx16 DRAM, which construct 4M addressspace.■ DisplayThe resolution is 800x600. Frequency is 38MHz. It works in an appropriate SVGA mode. VRAMadopts 16-bit structure and is divided into character screen and waveform screen. On the left side of the1-14 <strong>Service</strong> <strong>Manual</strong> of <strong>PM</strong>-<strong>8000</strong> Portable <strong>Patient</strong> <strong>Monitor</strong> (V2.0)
Introductioncharacter screen is the corresponding waveform screen. The right side to the character screen is used todisplay data and flashing alarms. The user can select color and dot energy. Besides the user can scrollthe waveform for clear and complete observation.■ LVDS interfaceThrough the way of time-sharing sampling, the LVDS interface converts multi-way CMOS/TTLsignals into one-way low-voltage double-frequency difference signals, which are further to be output tothe outside). LVDS interface is generally realized by special integrated circuit. The special LVDS chipused for display is DS90CF363A. This chip converts 18-way display pixel signals and 3-way displaycontrol signals with a total of 21-way messages into 3-way LVDS signals. Four ways of differencesignals including these 3 ways of signals and a way of phase-locked frequency are transmitted to thedisplay screen. On the one side of the screen, these signals are restored for driving the screen. Theworking frequency of DS90CF363A is 20~65MHz.■ Reset and parameter storageThe main control board uses an integrated chip CS124C161, which has the functions of both power-onreset and parameter storage. This chip has a E 2 PROM with the capacity of 2K. It can be used toon-line modify and store various nonvolatile parameters of the host. The power-on reset andWATCHDOG functions are used to realize reset function of the main control board. When J1 is opencircuit, the software can also disable WATCHDOG by using the output wire PP0 of CPU in order torealize the selftest of WATCHDOG. The bus interface of this chip is I 2 C.■ Data storageThe Main control board uses one non-power-down SRAM having its internal battery to storemonitoring data. Its capacity is 2M.■ Network controllerThe network controller adopts special chip AX88796. Its working clock is 25MHz. It also has internal16K high-speed buffer SRAM. The data bus of this chip is 16-bit width.<strong>Service</strong> <strong>Manual</strong> of <strong>PM</strong>-<strong>8000</strong> Portable <strong>Patient</strong> <strong>Monitor</strong> (V2.0) 1-15
Introduction3.5 Button schematic diagram and principleBUTTONWatch dogCPU(AT89C 2051)RAM128x8button and encoderscan circuitbutton signalinputFLASH2KX8serialcom m unicateMain controlboardENCODERAlarm indicatorcontrolcircuitaudible effectgenerating/contol circuitvolumecontrolRCBANDPASSFILTERPOWERCONVERSIONspeakerFigure 1-11 Button schematic diagram3.5.1 Principle introduction:The circuit has three main parts;■ Alarm audio signal circuit: audible effect generating circuit is made up of nine components, whichare U3, D1, D2, D3, Q1, C2, R15 and R9. The length of the generated aftersound is controlled by thedischarge loop constructed by C2 and R15. P3.5 is used to generate alarm square waveforms (about700Hz). When P3.3 is 1 and Q1 is on, alarm is activated, C2 is quickly charged to the full capacity andR10 outputs to the next phase. When P3.3 is 0, alarm is terminated, C2 discharges by using R15 so asto produce aftersound effect. D3 and D9 are used to overlap heart beat sound. When P3.2 is 1, thesquare waveform of P3.5 generates “heart beat sound” and “rotary encoder sound” through controllingthe time length of the conduction of P3.2. Together with R17, R18 or R19, R10 may respectivelyconstruct potential-dividing network of different proportion, and consequently control the state of P3.4and P3.7, decide make-and-break of Q2 and Q3 so as to realize the function of adjusting 3-level soundvolume.■ RC bandpass filter: The alarm signal is square waveform with the frequency of about 700Hz. Toremove the DC component (low-frequency component) in the square waveform, a one-phase bandpassfilter is added before LM386. This filter is made up of R22, C13, C11 and the input resistance Rin ofLM386.■ Audio amplifying circuit constructed by LM386: Generation of the visual alarm signal: Theflashing of the indicator in red or green is realized by controling the state of singlechip P1.6 and P1.7.Scanning of buttons and encoder: Determine whether a button or the encoder is pressred through theway of scanning the state of singlechips P1.0~P1.2. Determine whether encoder is turned and itsturning direction by scanning the state of P1.4 and P1.5.3.5.2 Important measurement points1-16 <strong>Service</strong> <strong>Manual</strong> of <strong>PM</strong>-<strong>8000</strong> Portable <strong>Patient</strong> <strong>Monitor</strong> (V2.0)
1. Test if the 5V power supply works normally (after fuse FU1);2. Test if the crystal oscillator starts oscillating when the voltage is about between 1.5~3.5V.Introduction3.6 Maintenance part of TR60-A recorder3.6.1 Diagram5vThermal HeadPower8.3v->5vMotordrivercpld 9536adcpuOptoSenserpower 8.3v->3.3vsignalFigure 1-12 Schematic diagram of TR60-A drive boardThe main function parts of the recorder are:3.6.2 Thermal headThe thermal head is the pivot component of recorder. It is PTMBL1300A thermal head manufacturedby ALPS company.3.6.3 CPU systemThe CPU system is the core of the drive board. Its task is to receive the data from the host and generatelattice messages after calculation using specified algorithm. These messages are then sent to thethermal head to be printed out. The CPU system can at the same time collect messages about boththermal head and drive board, have these messages displayed and sent to the host.3.6.4 Power conversionThe thermal head requires two power supplies: 8.3V and 5V. CPU needs 3.3V power. 5V and 3.3V aregenerated on the drive board. Components using these two power supplies are SPX5205M5 andAS1117.3.6.5 Motor driveA small motor is used to control the paper movement at the thermal head. The processor on the driveboard uses two motor drives IC LB1843V to control and drive the motor. These two ICs are able todrive the motor using constant-current. The logic drive level of the thermal head used on theCPLD9536 drive board is 5V CMOS. The processor works under 3.3V. The system uses a CPLDX9536XL, by which the output logic of the OC gate is generated, therefore converting 3.3V level into5V.3.6.6 Test points are listed out in the table below:<strong>Service</strong> <strong>Manual</strong> of <strong>PM</strong>-<strong>8000</strong> Portable <strong>Patient</strong> <strong>Monitor</strong> (V2.0) 1-17
IntroductionNo. Name Position Function1 VH P1.1 or P1.2 Power input: 7.8~8.4V2 GND P1.4 or TP16 Power and signal grounding termals3 VPP U3.8 Thermal head heating and motor power: 8~8.4V4 VDD U9.2 Logic component power of the drive board:3.0~3.6V5 VCC U4.5 Logic power of the thermal head: 4.75~5.25V6 RESET TP30 CPU reset signal, high level after power-on:(>2.4V)。1-18 <strong>Service</strong> <strong>Manual</strong> of <strong>PM</strong>-<strong>8000</strong> Portable <strong>Patient</strong> <strong>Monitor</strong> (V2.0)
<strong>Monitor</strong>ing Functions and PrinciplesChapter 2 <strong>Monitor</strong> Functions andPrinciplesI. Introduction<strong>PM</strong>-<strong>8000</strong> portable patient monitor uses parameter module as the basic unit to acquire signals. Theresults are transmitted to the main control board via keyset to finally process and display the data andwaveforms. The commands of the main control board and status messages of modules are transmittedalso through the keyset. The keyset is additionally used to realize power switching and conversion. Thestructure of the whole system is shown in the figure below:---------------------------------------- Medical Staff ----------------------------------------keyboard Display RecorderPowerMaincontrolboardNetworkinterfaceECG/RESPNIBPSpO2IBP/TEMP------------------------------------------------ <strong>Patient</strong> ---------------------------------------------Figure 2-1 System structure diagramAs shown in the above figure, the four modules of parameters execute real-time monitoring of NIBP,SpO2, ECG/RESP/TEMP, IBP respectively through using cuff and measuring cables. The results aretransmitted to the main control board for display. When required, the results can also be printed out viarecorder. Coming up is the detailed information of functions.<strong>Service</strong> <strong>Manual</strong> of <strong>PM</strong>-<strong>8000</strong> Portable <strong>Patient</strong> <strong>Monitor</strong> (V2.0) 2-1
IntroductionII. ECG/RESP parameters2.1 ECGMain functions concerning ECG1)lead: 3-lead, 5-lead2)lead method; I, II, III, avR, avL, avF, V, CAL3)Floating input4)right-foot drive5)lead-off detection6)dual-channel ECG amplification, simultaneously processing ECG signals of any two leads.The ECG circuit is responsible for processing the ECG signals of human body. The circuit consists offollowing parts;1) input circuit: the ECG electrodes are connected into the circuit through the cable. This circuit ismainly used to protect ECG input stage, filter the signals so as to remove the outside interference.2) buffer amplifying circuit: used to convert the impedance of ECG signals, so as to ensure that theECG has a very high input impedance but only low output impedance.3) right-foot drive circuit: the middle output point of the buffer amplifying circuit is reverselyamplified and then fed to the RL of the 5-lead ECG to maintain the human body in a equipotential state.This method can reduce the interference and raise the common-mode rejection ratio of the circuit.4) lead-off detection: based on the theory that the lead-off may cause the output of the bufferamplifying circuit to change, we can use the comparator to accurately determine if the lead has fallenoff. In this way, the level can also be converted into TTl level for the singlechip to test.5) lead connection circuit: under the control of singlechip and as per requirement, we can connectdifferent lead electrodes into the main amplifying circuit for amplification.6) main amplifying circuit: a measurement amplifier constructed by three standard operationamplifiers.7) Last stage processing circuit: used mainly to couple ECG signals, program control the magnitude ofthe gain, filter the waveform and move the level, amplify the signal and send it to the analog-to-digitalconverter.2.2 RESPThe <strong>Monitor</strong> measures temperature by measuring the changes in resistance of a thermistor located inthe temperature lead. When a person is respiring, his chest goes up and down. This movement equals to2-2 <strong>Service</strong> <strong>Manual</strong> of <strong>PM</strong>-<strong>8000</strong> Portable <strong>Patient</strong> <strong>Monitor</strong> (V2.0)
<strong>Monitor</strong>ing Functions and Principlesthe impedance changes between electrodes RL and LL. The monitor converts the high-frequencysignals passing through RL and LL into amplitude-modulated high-frequency signals, which are thendemodulated and amplified into electronic signals varying with the respiration changes and thentransmitted to analog-digital converter. RESP module is made up of a respiration circuit board and acoupling transformer. The circuit includes such parts as oscillation, coupling, demodulation,preliminary amplification, and high-gain amplification, etc.2.3 NIBPThe monitor measures non-invasive blood pressure using the oscillometric method. Following aredetailed measurement procedures. Inflate the cuff encircled around the upper arm until the pressure inthe cuff blocking the blood flow in the artery of the upper arm. Then deflate the cuff according to therequirement of a certain algorithm. With the pressure decreasing in the cuff, the artery blood willpalpitate with the pulse, which results in pulsation in the cuff. Through the pressure sensor connectedwith the inflating pipe of the cuff, a pulsation signal palpitating with the pulse will be generated. Afterbeing filtered by a high-pass filter (about 1Hz), this signal becomes pulsating signal and is amplified.Then the amplified signal is converted into digital signal by A/D. After using the single chip to processthis digital signal, we may obtain systolic pressure, diastolic pressure and mean pressure. Be careful tochoose appropriate cuffs for neonatal, pediatric and adult patients so as to avoid generatingmeasurement errors. NIBP module also has protection circuit to prevent the cuff from being inflated toa very high pressure. The main operating modes of NIBP are;1) adult/pediatric/neonate: select according to the patient shape, weight and age.2) manual measurement, auto measurement, continuous measurement. <strong>Manual</strong> measurement is alsocalled single measurement. It means the monitor only performs one measurement for each time. Automeasurement means to perform one measurement within selected cycle. Time interval can be set up as1, 2, 3, 4, 5, 10, 15, 30, 60, 90, 120, 180, 240 and 480 minutes. Continuous measurement means afterbeing activated, the monitor will perform quick measurement continuously within 5 minutes.Continuous measurement is effective in monitoring changes of blood pressure.2.4 SpO2SpO2 Plethysmogram measurement is employed to determine the oxygen saturation of hemoglobin inthe arterial blood. If, for example, 97% hemoglobin molecules in the red blood cells of the arterialblood combine with oxygen, then the blood has a SpO2 oxygen saturation of 97%. The SpO2 numericon the monitor will read 97% .The SpO2 numeric shows the percentage of hemoglobin moleculeswhich have combined with oxygen molecules to form oxyhemoglobin. The SpO2/PLETH parametercan also provide a pulse rate signal and a plethysmogram wave. Arterial oxygen saturation is measured<strong>Service</strong> <strong>Manual</strong> of <strong>PM</strong>-<strong>8000</strong> Portable <strong>Patient</strong> <strong>Monitor</strong> (V2.0) 2-3
Introductionby a method called pulse oximetry. It is a continuous, non-invasive method based on the differentabsorption spectra of reduced hemoglobin and oxyhemoglobin. It measures how much light, sent fromlight sources on one side of the sensor, is transmitted through patient tissue (such as a finger or an ear),to a receiver on the other side.The sensor measurement wavelengths are nominally 660nm for the Red LED and 940nm for InfraredLED. Maximum optical power output for LED is 4 mW. The amount of light transmitted depends onmany factors, most of which are constant. However, one of these factors, the blood flow in the arteries,varies with time, because it is pulsating. By measuring the light absorption during a pulsation, it ispossible to derive the oxygen saturation of the arterial blood. Detecting the pulsation gives a PLETHwaveform and pulse rate signal. The SpO 2 value and the PLETH waveform can be displayed on themain screen.2.5 TEMPTechnical specifications:Measurement and alarm range: 0 ~ 50 °CResolution:0.1°CAccuracy:±0.1°CRefreshing time:about 1 secondAverage time constant:< 10 seconds2.6 IBPIBP monitors arterial pressure, central venous pressure and pulmonary arterial pressure.Measurement method:Stab and implant the catheter into the blood vessel of the part to be measured. The end of the catheterlocated outside human body connects directly with the pressure transducer. Injectate normal saline intothe catheter. Because the liquid can transfer pressure, the pressure inside the blood vessel can betransferred to the outside pressure transducer. In this way we can at any time obtain the dynamicwaveform of the changing pressure inside the vessel. By using specified calculating formula, we cancalculate systolic, diastolic and mean pressures.2-4 <strong>Service</strong> <strong>Manual</strong> of <strong>PM</strong>-<strong>8000</strong> Portable <strong>Patient</strong> <strong>Monitor</strong> (V2.0)
Checks and TestsChapter 3 Checks and TestsI. System checksFor the conventional testing contents of <strong>PM</strong>-<strong>8000</strong> portable patient monitor, please refer to its Operation<strong>Manual</strong>. The information in this chapter is only a brief introduction. The following sections are used toemphasize important tests and the information not clearly specified in the Operation <strong>Manual</strong>.1. Device appearance and installation checks1)The shell of the device is clean and has no scratches. The installation is stable. When shaking thedevice, these are no inside leftovers.2)Buttons are smooth and free for operation.3)Labels are complete and sufficient and correct in delivering information.4)Standard configuration is complete, the sockets are installed safely.5)Perform vibration test on the overall device before performing following operating tests.2.Safety tests2.1.Test equipment1. Safety analyzer 501 PRO 12. Leakage current/grounding resistance measurement kit: 13. Connection kit of the application part: 14. Tinsel 20cm X 10cm 12.2.Test procedures2.2.1 Leakage current to earth2.2.1.1 Connection graph for testing is as shown in figure 3-1:Connect one end of the 3-core power wire to AC220V network power, the other endto the leakage current testing kit (A). Insert the 3-core power wire of safetyanalyzer (B) into power output socket of (A). Connect the 3-core power wire of thedevice being tested 1 into AC output of 501. Connect the sensor of theapplication part based on the requirements of (C). Connect the red measurementclip RED of 501 to the ground protection PE terminal. Connect the SUM terminalof (C) to the P terminal of (A). Locate all switches to “OFF” position.(A)-----grounding resistance/leakage current measurement kit(B)-----501 safety analyzer(C)-----application part processing kit1 ------device being tested<strong>Service</strong> <strong>Manual</strong> of <strong>PM</strong>-<strong>8000</strong> Portable <strong>Patient</strong> <strong>Monitor</strong> (V2.0) 3-1
Checks and Tests5 ------application partRED---501 red measurement clipSUM--- kit postFigure 3-1 Leakage current testing connectionbetween grounding terminal and the earth2.2.1.2 Adjust input voltage: When the device being tested is in shutdown state,connect leakage current measurement kit (A) with the input network voltageAC220V. Adjust the booster to raise the testing voltage to 110% (that is 253V) ofthe nominal voltage 230V. This voltage is monitored by the voltage meter of (A).Then turn on the device to let the device be in the operating state, micro-adjust thebooster to make the output voltage keep stablely at 253V. Press the [Ground] keyof the 501 tester and disconnect the grounding wire.2.2.1.3 Leakage current between network source and earth in normal state: pressthe [Leakage] key of the 501 tester and read the leakage current value on it.Connect SW12, in the condition that the application part is connected to the earth,respectively press and release [Polarity] key to toggle between the null line and thelive wire. Then disconnect SW12 and cut off the connection between theapplication part and the earth. Respectively press and release the [Polarity] key.The maximum value of these four measurements should be less than 0.5mA.2.2.1.4 Leakage current between network source and the earth in single faultcondition:Leakage current when connection between null line and live wire is being cut off:press the [Leakage] key of the 501 tester. Then press the [neutral] key of the 501tester, disconnect N line. Respectively press and release the [Polarity] key totoggle between null line and live wire, and imitate the condition that L line is3-2 <strong>Service</strong> <strong>Manual</strong> of <strong>PM</strong>-<strong>8000</strong> Portable <strong>Patient</strong> <strong>Monitor</strong> (V2.0)
Checks and Testsdisconnected. Read the leakage current value on the 501 tester. Connect SW12,respectively press and release the [Polarity] key. Disconnect SW12, respectivelypress and release the [Polarity] key. The maximum value of these fourmeasurements should be less than 1.0mA.2.2.2 Shell leakage current:2.2.2.1 Connection graph for testing is shown in figure 3-2:Connect one end of the 3-core power wire to AC220V network power, the other endto leakage current testing kit (A). Insert the 3-core power wire of safety analyzer(B) into power output socket of (A). Connect the 3-core power wire of the devicebeing tested1 into AC output of 501. Connect the sensor of the application partbased on the requirements of (C). Stick the tinsel A on any position of 1 (neverlet A touch live part, protection earth and the application part).Connect the redclip RED of the 501 tester onto the tinsel A. Connect the SUM terminal of (C) tothe P terminal of (A). Locate all switches to “OFF” position.Figure 3-2 Connection graph for leakage currenttesting between the shell and the earth(A)-----grounding resistance/leakage current measurement kit(B)-----501 safety analyzer(C)-----application part processing kit1 ------device being tested5 ------application partA-------tinselRED---red measurement clip of 501SUM---kit post2.2.2.2 leakage current between the shell to protection earth in the normal state:<strong>Service</strong> <strong>Manual</strong> of <strong>PM</strong>-<strong>8000</strong> Portable <strong>Patient</strong> <strong>Monitor</strong> (V2.0) 3-3
Checks and Tests(adjust the input voltage by referring to 3.1.2) press the [Leakage] of the 501tester and read the leakage current value on the 501. Connect SW, respectivelypress and release the [Polarity] key. Disconnect SW, respectively press and releasethe [Polarity] key. The maximum value of these four measurements should be lessthan 0.1mA.2.2.2.3 Leakage current between the shell and protection earth in single faultcondition:2.2.2.3.1 Leakage current when ground wire is disconnected: press the [Leakage]key of the 501 tester. Press the [Ground] key and disconnect the ground wire.Connect SW and respectively press and release the [Polarity] key. Disconnect SW,respectively press and release the [Polarity] key. The maximum value of these fourmeasurements should be less than 0.5mA.2.2.2.3.2 Leakage current when null line and live wire are disconnected: press the[Leakage] key of the 501 tester. Press the [Neutral] key of the 501 tester.Disconnect N line, respectively press and release the [Polarity] key and togglebetween null line and live wire. Imitate the condition that L line is disconnectedand read the leakage current value on the 501 tester. Connect SW, respectivelypress and release the [Polarity] key. Disconnect SW and respectively press andrelease the [Polarity] key. The maximum value of these four measurements shouldbe less than 0.5mA.2.3 <strong>Patient</strong> leakage current of the application part::2.2.3.1 Connection graph for testing is shown in figure 3-3:Connect one end of the 3-core power wire to AC220V network source, the otherend to leakage current testing kit (A). Insert the 3-core power wire of the 501analyzer into its output socket. Connect the 3-core power wire of the device beingto be tested 1 into AC output of 501. Connect the sensors including RA, LA, LL,RL, V, NIBP, SpO2, TEMP1, TEMP2 and IBP of the application part based on therequirements of (C). Connect the output SUM of (C0 to the RA post of the 501tester. Locate all the switches on the connecting kit of the application part to [OFF]position.3-4 <strong>Service</strong> <strong>Manual</strong> of <strong>PM</strong>-<strong>8000</strong> Portable <strong>Patient</strong> <strong>Monitor</strong> (V2.0)
Checks and TestsFigure 3-3 Connection graph for leakage current testingbetween application part (patient) and the earth(A)-----grounding resistance/leakage current testing kit(B)-----501 safety analyzer(C)-----application part processing kit1 -----device being tested5 -----application partP3----sensor connected with the patientRA----RA terminal of ECG measuring post of 501SUM--- kit post2.2.3.2 <strong>Patient</strong> leakage current in the normal state: (adjust the input voltage byreferring to 3.1.2) Press the [ECG leak] key of 501, then press the arrow on thepanel of 501 to select the RA-GND item. The measured leakage current should beless than 0.01mA.2.2.3.3 <strong>Patient</strong> leakage current in single fault condition:2.2.3.3.1 Press the [ECG leak] key of 501, then press the arrow on the panel of 501to select the RA-GND item. Take turns to operate the [Ground] key (fordisconnecting the ground wire), the [Neutral] key (for disconnecting the null line)and the [Polarity] key (for toggling between null line and live wire). Test the ACleakage current in the above these fault conditions. The maximum current valueshould be less than 0.05mA.2.2.3.3.2 Press the [DC Only] key of 501, take turns to operate the [Ground] key(for disconnecting the ground wire), the [Neutral] key (for disconnecting the null<strong>Service</strong> <strong>Manual</strong> of <strong>PM</strong>-<strong>8000</strong> Portable <strong>Patient</strong> <strong>Monitor</strong> (V2.0) 3-5
Checks and Testsline) and the [Polarity] key (for toggling between null line and live wire). Test theDC leakage current in the above three fault conditions, the maximum current valueshould be less than 0.05mA.2.2.3.4 <strong>Patient</strong> leakage current of the application part when network voltage isadded.2.2.3.4.1 Press the [ECG leak] key of 501, then press the arrow on the panel of 501to select the RA-GND item. Press the [Isolation] key and add network voltage. Testthe leakage current of the added network voltage. The maximum current valueshould be less than 0.05mA.2.2.4 <strong>Patient</strong> auxiliary current:2.2.4.1 Connection graph for testing is shown in figure 3-4Connect one end of the 3-core power wire to AC220V network electical source, theother end to leakage current testing kit (A). Insert the 3-core power wire of the 501analyzer into its output socket. Connect the 3-core power wire of the device beingto be tested 1 into AC output of 501. Connect the sensors of the application partaccording to the requirements of (C). Connect the output RA-P of (C) to the RAbinding post of 501. Short-circuit connect LA-P, LL-P, RL-P, V-P, NIBP-P,SpO2-P, TEMP1-P, TEMP2-P, IBP-P respectively onto the SUM binding post. Thenthrough SUM, use lead to to connect them to the LL binding post.(A)-----grounding resistance/leakage current measurement kit(B)-----501 safety analyzer(C)-----application part processing kit1 -----device being tested5 -----application partP3----sensors connected to the patientRA----RA terminal of the ECG measuring post of 501LL----LL terminal of the ECG measuring post of 501SUM---kit post3-6 <strong>Service</strong> <strong>Manual</strong> of <strong>PM</strong>-<strong>8000</strong> Portable <strong>Patient</strong> <strong>Monitor</strong> (V2.0)
Checks and TestsFigure 3-4 Connection graph for testing patient auxillaryleakage current2.2.4.2 <strong>Patient</strong> auxiliary current in the normal state (adjust the input voltage byreferring to 3.1.2)AC auxiliary current of the RA lead of ECG to other application parts: position theRA on the connection kit of the application part to “ON” and other switches to“OFF”. Connect RA-P to the RA binding post of 501. Connect other patient partsto LL through SUM. Press the [ECG leak] key of 501, then press the arrow on thepanel of 501 to select the RA-LL item. The tested current value should be less than0.01mA.2.2.4.3 <strong>Patient</strong> auxiliary current in single fault condition:2.2.4.3.1 AC auxiliary current of RA lead of ECGT to other application parts (ACvalue of RA). Position the RA on the connection kit of the application part to“ON” and other switches to “OFF”. Connect RA-P to the RA post of 501. Connectother parts to LL through SUM. Press the [ECG leak] key of 501, then press thearrow on the panel of 501 to select the RA-LL item. Take turns to operate the[Ground] key (for disconnecting the ground wire), the [Neutral] key (fordisconnecting the null line) and the [Polarity] key (for toggling between null lineand live wire). Test the current in the above three fault conditions, the maximumcurrent value should be less than 0.05mA.2.2.4.3.2 DC auxiliary current of the RA lead of ECG to other application parts(DC value of RA):Press the [DC Only] key of 501, take turns to operate the [Ground] key (fordisconnecting the ground wire), the [Neutral] key (for disconnecting the null line)and the [Polarity] key (for toggling between null line and live wire). Test thecurrent in the above three fault conditions, the maximum current value should beless than 0.05mA.<strong>Service</strong> <strong>Manual</strong> of <strong>PM</strong>-<strong>8000</strong> Portable <strong>Patient</strong> <strong>Monitor</strong> (V2.0) 3-7
Checks and Tests2.2.5 Testing grounding resistance2.2.5.1 Connection graph for testing ground resistance is shown in figure 3-5:Note: In the graph, P1 and P2 are two binding post of grounding resistance testingkit. Keep the measuring wires “Black” and “Red” as short as possible. Thesectional area of the wire should be larger than 10mm 2 . It is acceptable to use morethan 3 pieces of parallel-connected 10WAG wires. GND is the grounding terminalof either the power wire of the device being tested or the power plug. EP is thegrounding terminal to the device (for the current patient monitor, EP isequipotential binding post). C are all the protecting metal covers (shells) that areconnected to PE. M are all metal screws that are connected onto EP. C and M areall on the device shell.Figure 3-5 Connection graph for testinggrounding resistance2.2.5.2 Testing procedures2.2.5.2.1 Between GND of power wire and EP: Zero the booster on (A), Connectblack wire of P1 to GND of the 3-core power wire, and the red wire to the EPbinding post. Connect network voltage 220V. Slowly adjust and raise the boosteroutput and observe the reading on current meter for (A). Continue to raise thebooster output until the reading of the current meter indicates 25A. Wait for 5seconds and then read the value on the voltage meter (use AC voltage range of themultimeter), which should be less than 5V.2.2.5.2.2 Between GND of power plug and EP: Zero the booster, Connect blackwire of P1 to GND of the 3-core power wire, and the red wire to the EP bindingpost. Connect network voltage 220V. Slowly adjust and raise the booster outputand observe the reading on the current meter. Continue to raise the booster outputuntil the reading of the current meter indicates 25A. Wait for 5 seconds and thenread the value on the voltage meter (use AC voltage range of the multimeter),which should be less than 2.5V.3-8 <strong>Service</strong> <strong>Manual</strong> of <strong>PM</strong>-<strong>8000</strong> Portable <strong>Patient</strong> <strong>Monitor</strong> (V2.0)
Checks and Tests2.2.5.2.3 Between GND of power plug and each C point: Zero the booster on (A),Connect black wire of P1 to GND of the 3-core power wire, and the red wire to theselected C shell (cover). Connect network voltage 220V. Slowly adjust and raisethe booster output and observe the reading on the current meter. Continue to raisethe booster output until the reading of the current meter indicates 25A. Wait for 5seconds and then read the value on the voltage meter (use AC voltage range of themultimeter), which should be less than 2.5V.2.2.5.2.4 Between GND of power plug and each M point: Zero the booster on (A),Connect black wire of P1 to GND of the 3-core power wire, and the red wire to theselected M screw. Connect network voltage 220V. Slowly adjust and raise thebooster output and observe the reading on the current meter. Continue to raise thebooster output until the reading of the current meter indicates 25A. Wait for 5seconds and then read the value on the voltage meter (use AC voltage range of themultimeter), which should be less than 2.5V.II. Testing and calibrating each parameterTesting and calibrating follow parameters are to ensure the accuracy of <strong>PM</strong>-<strong>8000</strong> portable patientmonitor. Calibrating operation should be performed at least once a year. Calibration should be carriedout each time after maintenance.1.Testing ECG and RESP1)Testing toolHuman physiological signals simulator2)Testing procedures1 Use measuring cable to connect thesimulator into the ECG socket of <strong>PM</strong>-<strong>8000</strong>2 Confirm if the number of ECG waveforms displayed on the screen is consistent with that indicatedin the ECG MENU and Factory MENU.3 In default configuration, select lead II for ECG1 and lead I for ECG2 (if there is ECG2)4 Check if ECG waveforms and RESP waveforms are normally displayed.5 Set up the parameters of the simulator as following;HR=30(gain×4)RR=156 Check if the displayed ECG and RESP waveforms, HR and RR values are correct.7 Change the simulator configurationHR=240RR=1208 Check if the displayed ECG and RESP waveforms, HR and RR values are consistent with theparameters set up on the simulator.<strong>Service</strong> <strong>Manual</strong> of <strong>PM</strong>-<strong>8000</strong> Portable <strong>Patient</strong> <strong>Monitor</strong> (V2.0) 3-9
Checks and Tests9 Make the ECG lead fall off, in this condition, the <strong>PM</strong>-<strong>8000</strong> should immediate give alarm.2.Testing NIBP1)Testing toolNIBP simulator2)Testing proceduresUse the NIBP simulator with calibrating function. Calibrate the blood pressure pump and determine itsaccuracy according to the calibrating method given in the Operation <strong>Manual</strong>. If it passes the calibration,continue to perform following tests.1 Select Adult mode for both simulator and <strong>PM</strong>-<strong>8000</strong>2 Select a group of blood pressure values within the measurement range on the NIBP simulator, suchas:NS=90NM=70ND=603 Check if the actual measured values of <strong>PM</strong>-<strong>8000</strong> are consistent to those set up on the simulator.4 Change the setup values on the simulator, and test again.5 Check if the actual measured values are consistent with setup one.3.Testing SpO21)Testing toolSpO 2 simulator2)Testing procedures1 Connect SpO 2 simulator with the SpO 2 probe of <strong>PM</strong>-<strong>8000</strong>2 Set up the parameters of SpO 2 simulator as following:SpO 2 =98PR=703 Check if the displayed SpO 2 and PR values on <strong>PM</strong>-<strong>8000</strong> are consistent with those on thesimulator.(Note: To observe the PR value, select PLETH as the HR source in the ECG menu.)4 Change the setup values of SpO 2 and PR on the simulator.5 Check the displayed values on <strong>PM</strong>-<strong>8000</strong> are consistent with the setup values.6 Make SpO 2 sensor fall off, in this condition, <strong>PM</strong>-<strong>8000</strong> should immediately give alarm.4.Testing TEMP1)Testing toolHuman physiological signals simulator2)Testing procedures1 Connect one end of the TEMP sensor to the simulator and the other end to the TEMP socket of3-10 <strong>Service</strong> <strong>Manual</strong> of <strong>PM</strong>-<strong>8000</strong> Portable <strong>Patient</strong> <strong>Monitor</strong> (V2.0)
Checks and Tests<strong>PM</strong>-<strong>8000</strong>.2 Using the simulator to set up : EMP=34℃.3 Check if the displayed TEMP value on the screen of <strong>PM</strong>-<strong>8000</strong> is 34℃.4 Change the setup value of the simulator to: TEMP=40℃.5 Check if the displayed TEMP value on the screen of <strong>PM</strong>-<strong>8000</strong> is 40℃.5 Testing IBP1)Testing toolHuman physiological signals simulator2)Testing proceduresSet up the BP sensitivity of the simulator to 5uv/v/mmHg, and BP to 0mmHg. Set up the name of IBP1to ART. Access the PRESSURE ZERO option of IBP SETUP MENU of <strong>PM</strong>-<strong>8000</strong>, zero Channel 1 toperform zero calibration for IBP. After the zero calibration is successful, exit the menu to enter themain screen. Set up the BP of the simulator to 200mmHg. Access the CALIBRATION menu of<strong>PM</strong>-<strong>8000</strong> to perform calibration operation. After the calibration is successful, exit the menu.Set up the BP of the simulator respectively to 40mmHg, 100mmHg, and 200mmHg. In the mean time,the screen should respectively display 40±1mmHg, 100±2mmHg, and 200±4mmHg.Set up the output of the simulator as the ART wave. As the result, the screen should display thecorresponding waveform correctly.Plug off the IBP sensor. The screen should display “IBP: SENSOR 1 OFF!” “IBP: SENSOR 2 OFF!”.Plug OHMEDA cable into IBP1 channel, the display of “IBP: SENSOR 1 OFF!”. Should disappearfrom the screen.<strong>Service</strong> <strong>Manual</strong> of <strong>PM</strong>-<strong>8000</strong> Portable <strong>Patient</strong> <strong>Monitor</strong> (V2.0) 3-11
TroubleshootingChapter 4 TroubleshootingI. Disassembly graph of each part of <strong>PM</strong>-<strong>8000</strong>1 Front panel assembly 6 Main bracket assembly2 Rear panel assembly 7 Cross panhead cuspless screw PT3x103 Battery door 8 Cross panhead screw M3x64 Sockets cover 9 Cross panhead screw with gasket M3x85 TR60-A recorder<strong>Service</strong> <strong>Manual</strong> of <strong>PM</strong>-<strong>8000</strong> Portable <strong>Patient</strong> <strong>Monitor</strong> (V2.0) 4-1
Troubleshooting1 Main bracket 10 back board assebmly2 Main control board 11 TFT screen assebmly3 6200 ECG/TEMP/RESP board 12 Power board4 6200 SpO2 board 13 Speaker assembly5 Battery hook 14 Cross panhead screw M3x66 ECG insulation film 15 Recorder power wire7 Parameter sockets assembly 16 Recorder insulation film8 6200 recorder power board 17 Power supply insulation film9 NIBP/IBP bracket assemblyII. Troubleshooting guidanceIn transportation, storage and use of <strong>PM</strong>-<strong>8000</strong>, various factors such as unstable network voltage,changing environmental temperature, falling-down or impact, component aging may all result in<strong>PM</strong>-<strong>8000</strong> failures and therefore affect normal application of the device. In failure conditions,professional personnel with the experience of repairing electronic medical devices should performcomponent-level upkeep as per the failure classification listed in the table below. Component-levelupkeep means based on analyzing, replacing or trial-operating component, we can pinpoint the failureon a certain component of the device, such as power board, main control board, TFT assembly,measuring cable or parameter module, etc. Repair of only some components means component-levelrepair. The repair operation must be conducted by a service engineer with abundant experience andwith the assistance of special equipment and in specific environment and conditions.4-2 <strong>Service</strong> <strong>Manual</strong> of <strong>PM</strong>-<strong>8000</strong> Portable <strong>Patient</strong> <strong>Monitor</strong> (V2.0)
Troubleshooting<strong>PM</strong>-<strong>8000</strong> Component-level <strong>Service</strong> Table2.1 Device failuresFailure Possible cause Solution1fuse damage1replace fuseNo display after power-on,power indicator does not light2power damage2replace poweron, fan does not run. 3component short-circuit 3 anchor the short-circuitcomponentNo display after power-on orblack screen during operation,however, power indicatorlights on and fan runsnormally.Characters are displayednormally, however waveformsare displayed intermittently.An operation or measurementfunction is disabled.Device is occasionally stoned.1main control board failure 1 refer to the information aboutor display failureconfirming display failure1 Data communication error 1Based on error prompt, replacebetween main control board main control board, keyset orand parameter module parameter module so as toconfirm the failure.1 main control board or 1 examine main control boardcorresponding component and corresponding componentdamage1 moment intensive 1 check power supply andinterference of network grounding system2 poor performance of power 2 replace power boardboard3poor performance of main 3 replace main control boardcontrol board4 bad connection of power 4 replace or repair connectorssupply or main controlboard2.2 Display failuresFailure Possible cause SolutionWhen powering on the device,power supply is in normaloperation, however, there is nodisplay or screen goes black1 backlight board damage2 bad connecting wire ofdisplay1 connect external VGA displayand confirm the failure2 repair or replace connecting wire<strong>Service</strong> <strong>Manual</strong> of <strong>PM</strong>-<strong>8000</strong> Portable <strong>Patient</strong> <strong>Monitor</strong> (V2.0) 4-3
Troubleshootingduring normal operation.3 damage of main controlboard3 replace main control board2.3 Operation, recording, network linking failureFailures Possible cause SolutionKeys or rotary encoder isdisabled.Sound is raucous or there is nosound.Recorder cannot executeprinting operation.Record paper goes outdeflection.Cannot be linked into network1 keyboard or rotary encoder isdamaged.2 connecting wire of keyboardis damaged.1 keyboard failure2 Speaker or connecting wirefailure1 Recorder has no paper orpaper bar is not pressed down.2 Recorder failure3 Driving power of therecorder has failure.4 Connecting wire of therecorder is damaged.1 Bad recorder installing orpositioning.1 network linking wire isdamaged.2 main control board failure1 Replace keyboard or rotaryencoder.2 Replace or repair connectingwire of keyboard1 Replace keyboard2 Replace speaker orconnecting wire1 Install paper and press downthe paper bar.2 replace the recorder3 replace the power supply4 replace or repair theconnecting wire of the recorder1 Adjust the installation ofrecorder.1 check and repair networklinking wire.2 replace main control board2.4 Power board failureFailure Possible cause Solution1 short-circuit occurs inFuse is burned upon power-on power supply or other part. 1 Check after power-onFuse is burned although allloads are disconnected. 1 power failure 1 replace power supplyFuse is burned after 1 this part occursconnecting a part.short-circuit.1 replace this partIndicators of power and maincontrol board light on, 1 +12V DC power ishowever, the fan does not run damaged.1 replace the power4-4 <strong>Service</strong> <strong>Manual</strong> of <strong>PM</strong>-<strong>8000</strong> Portable <strong>Patient</strong> <strong>Monitor</strong> (V2.0)
Troubleshootingand the indicator of keysetdoes not light.Indicators of power and maincontrol board do not light on,however, the fan runsnormally and the indicator ofkeyset lights on. 1+5V DC power is damaged. 1 replace the power2.5 Parameter failureNo ECG waveformECG waveform is abnormalor has interferenceNo RESP waveform or RESPwaveform is abnormalTEMP value is incorrectHR value is inaccurate, Arr.And ST analysis are1poor connection of ECGelectrode films2no square waveform existsduring CAL self-test3RL electrode is suspended.4 ECG/RESP module isdamaged.1 Electrodes are connectedincorrectly.2 There is suspendingelectrode film.3 AC power has nogrounding wire.4 ECG filter way isincorrect.5 ECG/RESP module isdamaged.1 Electrodes are connectedincorrectly.2 <strong>Patient</strong> is movingconstantly.3 ECG/RESP module isdamaged.1 Measuring sensor ispoorly connected.1 ECG waveform is notgood.1use new electrode films to ensuregood contact.2replace ECG/RESP module3connect RL electrode.4replace ECG/RESP module1 correctly connect electrode films.2remove electrode films that are notused.3use 3-wire power4select appropriate filter way5replace ECG/RESP module1use RL-LL electrode, connect to thecorrect positions.2 keep patient quiet3 replace ECG/RESP module1 connect TEMP sensor stablely.1 Adjust the connection to make theECG waveform become normal.<strong>Service</strong> <strong>Manual</strong> of <strong>PM</strong>-<strong>8000</strong> Portable <strong>Patient</strong> <strong>Monitor</strong> (V2.0) 4-5
Troubleshootingincorrect.NIBP cuff cannot be inflated.Blood pressure cannot bemeasured occasionally.Error of blood pressuremeasurement is too great.No SpO2 waveformSpO2 waveform has stronginterference.SpO2 value is inaccurate1Air way is folded or hasleakage.1 Cuff becomes loose orpatient is moving.1Cuff size does not fit thepatient.2 NIBP module has badperformance.1Sensor or SpO2 module isdamaged.1patient is moving.2Environment light is veryintensive.1 coloring agent has beeninjected into patient body.1adjust or repair the air way.1Keep the patient quiet, bind the cuffcorrectly and safely.1Use the cuff with appropriate size.2replace NIBP module1replace the sensor and confirm thefailure.1keep the patient quiet.2Weaken the light intensity in theenvironment.1 remove the coloring agent beforeperform measurement.4-6 <strong>Service</strong> <strong>Manual</strong> of <strong>PM</strong>-<strong>8000</strong> Portable <strong>Patient</strong> <strong>Monitor</strong> (V2.0)
InstallationChapter 5 InstallationI. Unpack inspectionOpen the package and take out the packing list. Check if the names, quantity and specifications of thegoods in the package are consistent with those on the packing list. Please note that:1) If the user buys optional parts or other accessories, he should also verify if they are placed in thepackage.2) If the goods in the package are not consistent with those on the packing list, please contact thesupplier.3) If the device or any part is damaged during transportation, please save all packing material andgoods for future inspection and immediately contact the supplier.II. Preparations before power-onBefore connecting the 3-core power wire into the power socket of the <strong>PM</strong>-<strong>8000</strong>, please make followingchecks:1)If the network voltage complies with device requirements.2)To protect the patient and medical personnel from injury, it is recommended to use 3-core powerwire. The power receptacle should be also 3-core type so as to ensure the good groundingperformance of the device. Do not connect 2-core AC power to the <strong>PM</strong>-<strong>8000</strong>.3)When using <strong>PM</strong>-<strong>8000</strong> and other medical devices at the same time, safely connect the equipotentialpost on the rear panel of <strong>PM</strong>-<strong>8000</strong> with equipotential posts of other devices.4)Do not put <strong>PM</strong>-<strong>8000</strong> in any place having liquid leakage.III. Turn on the power1)Connect the 3-core power plug into the AC receptacle.2)Press the power button on the panel of <strong>PM</strong>-<strong>8000</strong>, wait for about 10 seconds, the Start-up pictureappears on the screen, followed by the displays of waveform scanning lines and data screen.IV. Other precautions1)When using <strong>PM</strong>-<strong>8000</strong> and other medical devices at the same time, requirements regarding powerdistribution of medical equipment must be abided by for fear that the leakage currents of devicesoverlap and consequently injury the patient or the medical personnel.2)Do not use <strong>PM</strong>-<strong>8000</strong> in the presence of flammable anesthetics to avoid the hazard of explosion.<strong>Service</strong> <strong>Manual</strong> of <strong>PM</strong>-<strong>8000</strong> Portable <strong>Patient</strong> <strong>Monitor</strong> (V2.0) 5-1
Basic OperationsChapter 6 Basic OperationsI. Basic operation guidanceOn the right side of the front panel of <strong>PM</strong>-<strong>8000</strong>, there are following buttons from up to down:1) POWERUsed to turn on/off the <strong>PM</strong>-<strong>8000</strong>.2) FREEZEWhen in normal mode, press this button to stop waveform refreshing and freeze all the waveforms onthe screen. When in freeze mode, press this button to restore the waveform refreshing.3)SILENCEPress this button to suspend alarm for 2 minutes , in the mean time, the countdown indication barappears on the upper right corner of the screen.Press this button for relative long time to disable all sound signals including alarm sound, heart beat,and key sound. In the mean time, a symbol “ ” appears on the upper side of the screen. In the Silencemode, press this key for a relative long time to restore all sound signals. If press this key for a veryshort time, no operation will be executed.4)REC/STOPIn Non-Freeze mode, press this key to start a real time recording.During recording process, press this key to terminate recording.The recording length is decided by the content in the REC TIME option in the MENU/RECORDmenu.In Freeze mode, press this key to pop up the PRINT menu, in which the user can select the frozenwaveform to be printed. For detailed information, refer to the chapter: Record in the Operation <strong>Manual</strong>.5)NIBPIn Non-measure mode, press this key to inflate the cuff and start a manual NIBP measurement.In Measure mode, if to give up the measurement, press this key to terminate the measurement anddeflate the cuff.Note: In continuous mode, pressing this key means not only giving up the measurement but alsoending the operating way of continuous measurement.II. Use <strong>PM</strong>-<strong>8000</strong>Execute following procedures to use <strong>PM</strong>-<strong>8000</strong> to monitor a patient.1.Read Operation <strong>Manual</strong> carefully<strong>Service</strong> <strong>Manual</strong> of <strong>PM</strong>-<strong>8000</strong> Portable <strong>Patient</strong> <strong>Monitor</strong> (V2.0) 6-1
Basic Operations2.Check if <strong>PM</strong>-<strong>8000</strong> has any damages caused during transportation. Check if any cables, power wires,receptacles and connectors are in poor contacts or loosely connected.3.Turn on the power switch on the rear panel of the <strong>PM</strong>-<strong>8000</strong>. After waiting for about 10 seconds, thescreen displays “System is initializing, please wait…”. Wait for about another 12 seconds,monitoring picture and waveform scanning lines appear on the screen. If turning off this switchduring operation process, the power indicator will light off and the <strong>PM</strong>-<strong>8000</strong> will stop working.4.Check all required functions and verify that the <strong>PM</strong>-<strong>8000</strong> works normally. After that, connect themeasuring cable into the patient limb to start monitoring the patient.6-2 <strong>Service</strong> <strong>Manual</strong> of <strong>PM</strong>-<strong>8000</strong> Portable <strong>Patient</strong> <strong>Monitor</strong> (V2.0)
Cleaning and DisinfectionChapter 7 Cleaning and DisinfectionWarningBefore cleaning the monitor or the sensor, make sure to turn off the power and disconnect the ACpower.I. Maintenance checksBefore using the monitor, do the following:1. Check if there is any mechanical damage;2. Check all the outer cables, inserted modules and accessories;3. Check all the functions of the monitor to make sure that the monitor is in good condition.If finding any damage on the monitor, stop using the monitor on patient.4. The overall check of the monitor, including the safety check, should be performed only by qualifiedperson once every 6 to 12 month and each time after fix up.5. Check the synchronism of the defibrillator according to the maintenance plan of the hospital at leastevery 3 months and by a qualified customer service technician.II. General cleaning1. The <strong>PM</strong>-<strong>8000</strong> <strong>Patient</strong> <strong>Monitor</strong> must be kept dust-free.2. It is recommended to regularly cleaning the monitor shell and the screen. Use only non-causticdetergents such as soap and water.′ Note ′Please pay special attention to the following items to avoid damaging <strong>PM</strong>-<strong>8000</strong>:1. Avoid using ammonia-based or acetone-based cleaners such as acetone.2. Most detergents must be diluted before use. Follow the manufacturer's directionscarefully for dilution.3. Don't use the grinding material, such as steel wool etc.4. Don't let the detergents enter into the chassis of the system. Do not emerge any part of thedevice into any liquid.5. Don't leave the detergents on any part of the device surface.6. Except for those detergents listed in “NOTE” part, following disinfectants can be used on the<strong>Service</strong> <strong>Manual</strong> of <strong>PM</strong>-<strong>8000</strong> Portable <strong>Patient</strong> <strong>Monitor</strong> (V2.0) 7-1
Cleaning and Disinfectioninstrument:■ Diluted Ammonia Water■ Diluted Sodium Hyoichlo (Bleaching agent).′ Note ′The diluted sodium hyoichlo from 500ppm(1:100 diluted bleaching agent) to 5000ppm (1:10bleaching agents) is very effective. The concentration of the diluted sodium hyocihlo depends onhow many organisms (blood, mucus) on the surface of the chassis to be cleaned.■ Diluted Mindrayhylene Oxide 35% -- 37%■ Hydrogen Peroxide 3%■ Alcohol■ Isopropanol′ Note ′<strong>PM</strong>-<strong>8000</strong> monitor and sensor surface can be cleaned with hospital-grade ethanol and dried inair or with crisp and clean cloth.′ Note ′Mindray has no responsibility for the effectiveness of controlling infectious disease using thesechemical agents. Please contact infectious disease experts in your hospital for details.III. SterilizationTo avoid extended damage to the equipment, sterilization is only recommended when stipulated asnecessary in the Hospital Maintenance Schedule. Sterilization facilities should be cleaned first.Recommended sterilization material: Ethylate, and Acetaldehyde.Caution1. Follow the manufacturer’s instruction to dilute the solution, or adopt the lowest possibledensity.2. Do not let liquid enter the monitor.3. No part of this monitor can be subjected to immersion in liquid.4. Do not pour liquid onto the monitor during sterilization.5. Use a moistened cloth to wipe off any agent remained on the monitor.6. To avoid extended damage to the equipment, disinfecting is only recommended whenstipulated as necessary in the Hospital Maintenance Schedule. Disinfecting facilities should becleaned first.Appropriate disinfecting materials for ECG lead, SpO2 sensor, blood pressure cuff, TEMP probe,IBP sensor are introduced Operation <strong>Manual</strong> respectively.7-2 <strong>Service</strong> <strong>Manual</strong> of <strong>PM</strong>-<strong>8000</strong> Portable <strong>Patient</strong> <strong>Monitor</strong> (V2.0)
Cleaning and DisinfectionCautionDo not use EtO gas or formaldehyde to disinfect the monitor.IV. Precautions and cleaningWarningBefore cleaning the monitor or the sensor, make sure to turn off the power and disconnect the ACpower.If ECG cable is damaged or aged, replace with a new ECG cable.1 Cleaning<strong>PM</strong>-<strong>8000</strong> monitor and sensor surface can be cleaned with hospital-grade ethanol and dried in air orwith crisp and clean cloth.2 SterilizationTo avoid extended damage to the equipment, sterilization is only recommended when stipulated asnecessary in the Hospital Maintenance Schedule. Sterilization facilities should be cleaned first.3 Materials recommended for use in sterilizationEthylate: 70%ethanol: 70%Acetaldehyde4 DisinfectionTo avoid extended damage to the equipment, disinfection is only recommended when stipulated asnecessary in the Hospital Maintenance Schedule. Disinfection facilities should be cleaned first.5 Cuff maintenance and cleaningWarning1. Do not squeeze the rubber tube on the cuff.2. Do not allow liquid to enter the connector socket at the front of the monitor to avoid damagingthe monitor.3. Do not wipe the inner part of the connector socket when cleaning the monitor. Wipe the outsideits surface only.4. When the reusable cuff is not connected with the monitor, or being cleaned, always place thecover on the rubber tube to avoid liquid permeation.5. Reusable Blood Pressure CuffThe cuff can be sterilized by means of conventional autoclaving, gas, or radiation sterilization inhot air ovens or disinfected by immersion in decontamination solutions, but remember to removethe rubber bag if you use this method. The cuff should not be dry-cleaned.The cuff can also be machine-washed or hand-washed, the latter method may extend the servicelife of the cuff. Before washing, remove the latex rubber bag. Allow the cuff to dry thoroughly<strong>Service</strong> <strong>Manual</strong> of <strong>PM</strong>-<strong>8000</strong> Portable <strong>Patient</strong> <strong>Monitor</strong> (V2.0) 7-3
Cleaning and Disinfectionafter washing and then reinsert the rubber bag.Figure 7-1 Replace the rubber bag in the cuffTo replace the rubber bag in the cuff, first place the bag on top of the cuff so that the rubber tubesline up with the large opening on the long side of the cuff. Now roll the baglengthwise and insert it into the opening on the long side of the cuff. Hold the tubesand the cuff and shake the complete cuff until the bag is in position. Thread therubber tubes from inside the cuff, and out through the small hole under the internalflap.6. Disposable cuffs are intended for one-patient use only. Do not use the same cuff on anyother patient. Do not sterilize or use autoclave on disposable cuffs. Disposablecuffs can be cleaned using soap solution to prevent infection.′ Note ′For protecting environment, the disposable blood pressure cuffs must be recycled or disposed ofproperly.V. IBP transducer cleaning and disinfection(reusable)After the IBP monitoring operation is completed, remove the tubing and the dome from the transducerand wipe the transducer diaphragm with water. Soaking and/or wiping with soap can clean the7-4 <strong>Service</strong> <strong>Manual</strong> of <strong>PM</strong>-<strong>8000</strong> Portable <strong>Patient</strong> <strong>Monitor</strong> (V2.0)
Cleaning and Disinfectiontransducer and cable and water or cleaning agents such as those listed below:CetylcideWavicide-01WescodyneCidexLysolDo not immerse the connector in any liquid. After cleaning, dry the transducer thoroughly beforestoring. Slight discoloration or temporary increase of surface stickiness of the cable should not beconsidered abnormal If adhesive tape residue must be removed from the transducer cable, double sealtape remover is effective and will cause a minimum of damage to the cable if used sparingly. Acetone,Alcohol, Ammonia and Chloroform, or other strong solvents are not recommended because over timethe vinyl cables will be damaged by these agents.′ Note ′The disposable transducers or domes must not be re-sterilized or re-used.′ Note ′For protecting environment, the disposable transducers or domes must be recycled or disposed ofproperly.Chemical Liquid SterilizationRemove obvious contamination by using the cleaning procedure described previously. Select a sterilantthat your hospital or institution has found to be effective for liquid chemical sterilization of operatingroom equipment. Buffered gluteraldehyed (e.g. Cidex or Hospisept) has been found to be effective. Donot use quaternary cationic detergents such as zephiran chloride. If the whole unit is to be sterilized,immerse the transducer but not the electrical connector into the sterilant for the recommendedsterilizing period. Be sure that the dome is removed. Then rinse all transducer parts except theelectrical connector with sterilized water or saline. The transducer must be thoroughly dried beforestoring.Gas SterilizationFor more complete asepsis, use gas sterilization.Remove obvious contamination by using the cleaning procedure described previously. To inhibit theformation of ethylene glycol when ethylene oxide gas is used as the disinfectant, the transducer shouldbe completely dry.Follow the operating instructions provided by the manufacturer of the gas disinfectant.WarningThe sterilize temperature must not exceed 70°C (150°F). Plastics in the pressure transducer may<strong>Service</strong> <strong>Manual</strong> of <strong>PM</strong>-<strong>8000</strong> Portable <strong>Patient</strong> <strong>Monitor</strong> (V2.0) 7-5
Cleaning and Disinfectiondeform or melt above this temperature.VI. TEMP sensor cleaning and disinfection (reusable)1. The TEMP probe should not be heated above 100℃ (212℉). It should only be subjected briefly totemperatures between 80℃ (176℉) and 100℃ (212℉).2. The probe must not be sterilized in steam.3. Only detergents containing no alcohol can be used for disaffection.4. The rectal probes should be used, if possible, in conjunction with a protective rubber cover.5. To clean the probe, hold the tip with one hand and with the other hand rubbing the probe down inthe direction of the connector using a moist lint-free cloth.′ Note ′Disposable TEMP probe must not be re-sterilized or reused.′ Note ′For protecting environment, the disposable TEMP probe must be recycled or disposed ofproperly.8 SpO2 sensor cleaning and disinfectionWarningDo not subject the sensor to autoclaving.Do not immerse the sensor into any liquid.Do not use any sensor or cable that may be damaged or deteriorated.1. Use a cotton ball or a soft mull moistened with hospital-grade ethanol to wipe the surface of thesensor, and then dry it with a cloth. This cleaning method can also be applied to the luminotron andreceiving unit.2. The cable can be cleaned with 3% hydrogen dioxide, 70% isopropanol, or other active reagent.However, connector of the sensor shall not be subjected to such solution.7-6 <strong>Service</strong> <strong>Manual</strong> of <strong>PM</strong>-<strong>8000</strong> Portable <strong>Patient</strong> <strong>Monitor</strong> (V2.0)
MaintenanceChapter 8 Maintenance<strong>PM</strong>-<strong>8000</strong> portable patient monitor is a type of precision electronic medical device having complexstructure. Maintaining <strong>PM</strong>-<strong>8000</strong> carefully will not only let the device develop its performance to thebest but also ensure the long-term operating accuracy of the device and avoid various errors. Toprevent cross contamination, ensure that the device has undergone cleaning and disinfection beforemaintenance.1. Frequently check the device, cables, sensors and wires for damage.2. Clean the device irregularly according to the actual requirement.3. Perform safety test annually.4. Perform NIBP parameter calibration test annually.5. Calibrate TEMP parameter annually.6. Test overall functions of the device annually.7. Perform safety test once after each opening-chassis repair.8. If finding problems during maintenance, contact your supplier in time.<strong>Service</strong> <strong>Manual</strong> of <strong>PM</strong>-<strong>8000</strong> Portable <strong>Patient</strong> <strong>Monitor</strong> (V2.0) 8-1
Network LinkChapter 9 Network Link<strong>PM</strong>-<strong>8000</strong> can be connected to Mindray Hypervisor III (type 3000) Central Station to constructmonitoring network system. A HyperVisorIII Central Station can connect up to 8 bedside monitors. Atthe Central Station, the user can view all waveforms and parameters of the networked bedside monitorsand modify the alarm setups of the networked bedside monitors as well.In addition, <strong>PM</strong>-<strong>8000</strong> can be connected to Mindray HyperVisorIII (type 3100) Central Station toconstruct monitoring network system. A HyperVisorIII Central Station can connect up to 64 bedsidemonitors. At the Central Station, the user can view all waveforms and parameters of the networkedbedside monitors. However, the user cannot modify the setups of the networked bedside monitors atthe Central Station.I. Network performance1. The maximum length between the bedside monitor and the Central Station (using Hub) is 100m.2. The maximum time length required from starting up the monitor to the successful networking is 40seconds.3. Network data delay
System Alarm PromptAppendix I: System Alarm PromptPROMPT CAUSE MEASURE“BATTERY VOLTAGE TOOLOW”"XX TOO HIGH""XX TOO LOW"When battery voltage is toolow, the monitor willautomatically shut downwithin 5 minutes.XX value exceeds the higheralarm limit.XX value is below the loweralarm limit.Use AC power supplyCheck if the alarm limits areappropriate and the currentsituation of the patient.XX represents the value of parameter such as HR, ST1, ST2, RR, SpO2, IBP, NIBP, etc in the system."ECG WEAK SIGNAL"“NO PULSE”"RESP APNEA""ASYSTOLE""VFIB/VTAC"The ECG signal of thepatient is too small so thatthe system can not performECG analysis.The pulse signal of thepatient is too small so thatthe system can not performpulse analysis.The respiration signal of thepatient is too small so thatthe system cannot performRESP analysis.<strong>Patient</strong> suffers from Arr. ofASYSTOLE.<strong>Patient</strong> suffers from Arr. ofVFIB/VTAC.Check if the electrodes andlead wires are connectedcorrectly and the currentsituation of the patient.Check the connection of thesensor and the current situationof the patient.Check the connection of thelinking wire and the currentsituation of the patient.Check the current situation ofthe patient. Check theconnection of the electrodesand lead wires.Check the current situation ofthe patient. Check theconnection of the electrodesand lead wires.<strong>Service</strong> <strong>Manual</strong> of <strong>PM</strong>-<strong>8000</strong> Portable <strong>Patient</strong> <strong>Monitor</strong> (V2.0)AI-i
System Alarm Prompt"COUPLET""BIGEMINY""TRIGEMINY""R ON T""PVC""TACHY"" BRADY""VT>2"“MISSED BEATS”"PNP""PNC"<strong>Patient</strong> suffers from Arr. ofCOUPLET.<strong>Patient</strong> suffers from Arr. OfBIGEMINY.<strong>Patient</strong> suffers from Arr. ofTRIGEMINY.<strong>Patient</strong> suffers from Arr. ofR ON T.<strong>Patient</strong> suffers from Arr. ofPVC.<strong>Patient</strong> suffers fromTACHY.<strong>Patient</strong> suffers fromBRADY.<strong>Patient</strong> suffers from Arr. ofVT>2.<strong>Patient</strong> suffers from Arr. ofMISSED BEATS.The pacemaker is not paced.No pacemaker signal iscaptured.Check the current situation ofthe patient. Check theconnection of the electrodesand lead wires.Check the current situation ofthe patient. Check theconnection of the electrodesand lead wires.Check the current situation ofthe patient. Check theconnection of the electrodesand lead wires.Check the current situation ofthe patient. Check theconnection of the electrodesand lead wires.Check the connection of thepacemaker.Check the connection ofelectrodes and lead wires.Check the current situation ofthe patient.Check the connection of thepacemaker.Check the connection ofelectrodes and lead wires.AI -ii<strong>Service</strong> <strong>Manual</strong> of <strong>PM</strong>-<strong>8000</strong> Portable <strong>Patient</strong> <strong>Monitor</strong> (V2.0)
System Alarm PromptCheck the current situation ofthe patient."ECG LEAD OFF""ECG V LEAD OFF";"ECG LL LEAD OFF";"ECG LA LEAD OFF";"ECG RA LEAD OFF";ECG lead is not connectedcorrectly.The V lead wire of ECG isnot connected correctly.The LL lead wire of ECG isnot connected correctly.The LA lead wire of ECG isnot connected correctly.The RA lead wire of ECG isnot connected correctly.Check the connection of ECGlead wire.Check the connection of Vlead wire.Check the connection of LLlead wire.Check the connection of LAlead wire.Check the connection of RAlead wire."ECG C LEAD OFF";"ECG F LEAD OFF";"ECG L LEAD OFF";"ECG R LEAD OFF";The C lead wire of ECG isnot connected correctly.The F lead wire of ECG isnot connected correctly.The L lead wire of ECG isnot connected correctly.The R lead wire of ECG isnot connected correctly.Check the connection of C leadwire.Check the connection of F leadwire.Check the connection of L leadwire.Check the connection of R leadwire."SPO2 SENSOR OFF""SEARCH PULSE""TEMP SENSOR OFF"SPO2 sensor is notconnected correctly.SPO2 sensor is notconnected correctly or thepatient arm moves.TEMP sensor is notconnected correctly.Check the connection of SpO2sensor.Check the connection of SpO2sensor. Check the currentsituation of the patient.Check the connection ofTEMP sensor."IBP LEAD OFF"IBP sensor is not connectedcorrectly.Check the connection of IBPsensor.<strong>Service</strong> <strong>Manual</strong> of <strong>PM</strong>-<strong>8000</strong> Portable <strong>Patient</strong> <strong>Monitor</strong> (V2.0)AI-iii
System Alarm Prompt"ECG NOISE"Rather large interferencesignals appear in the ECGsignals.Check the connection of ECGlead wire. Check the currentsituation of the patient. Checkif the patient moves a lot.XX represents all the parameter modules in the system such as ECG, NIBP, SpO2, IBP module, etc."XX ALM LMT ERR""XX RANGE EXCEEDED"The alarm limit of XXparameter is modified bychance.The measured value of XXparameter has exceeded themeasuring range of thesystem.Contact the manufacturer forrepair.Contact the manufacturer forrepair.XX represents the parameter name in the system such as HR, ST1, ST2, RR, SpO2, IBP, NIBP, etc.Re-set up the system time. It is"REAL CLOCK NEEDSET""REAL CLOCK NOT EXIST""SYSTEM WD FAILURE""SYSTEM SOFTWARE ERR""SYSTEM CMOS FULL""SYSTEM CMOS ERR""SYSTEM EPGA FAILURE""SYSTEM FAILURE2""SYSTEM FAILURE3""SYSTEM FAILURE4""SYSTEM FAILURE5""SYSTEM FAILURE6""SYSTEM FAILURE7"When the system displays2000-1-1, the system givesthis prompt reminding theuser that the current systemtime is not right.The system has no cellbattery or the battery has runout of the capacity.The system has seriouserror.better to set up the time justafter the start-up and prior tomonitoring the patient. Aftermodifying the time, the userhad better re-start up themonitor to avoid storing errortime.Install or replace therechargeable battery.Re-start up the system. If thefailure still exists, contact themanufacturer.AI -iv<strong>Service</strong> <strong>Manual</strong> of <strong>PM</strong>-<strong>8000</strong> Portable <strong>Patient</strong> <strong>Monitor</strong> (V2.0)
System Alarm Prompt"SYSTEM FAILURE8""SYSTEM FAILURE9""SYSTEM FAILURE10""SYSTEM FAILURE11""SYSTEM FAILURE12""KEYBOARDNOTAVAILABLE";"KEYBOARD COMM ERR";"KEBOARD ERROR";“KEYBOARD FAILURE”"KEYBOARD ERR1";"KEYBOARD ERR2";The keys on the keyboardcannot be used.The keyboard has failure,which cannot be used.Check the keys to see whetherit is pressed manually or byother object. If the key is notpressed abnormally, contactthe manufacturer for repair.Contact the manufacturer forrepair."NET INIT ERR(G.)""NET INIT ERR(Ram)""NET INIT ERR(Reg)""NET INIT ERR(Mii)""NET INIT ERR(Loop)""NET ERR(Run1)""NET ERR(Run2)""NET ERR(Run3)"The network part in thesystem has failure. Thesystem cannot be linked tothe net.Contact the manufacturer forrepair."5V TOO HIGH""5V TOO LOW""POWER ERR3""POWER ERR4""12V TOO HIGH""12V TOO LOW""POWER ERR7""POWER ERR8""3.3V TOO HIGH"The power part of thesystem has failure.If the prompt appearsrepeatedly, contact themanufacturer for repair.<strong>Service</strong> <strong>Manual</strong> of <strong>PM</strong>-<strong>8000</strong> Portable <strong>Patient</strong> <strong>Monitor</strong> (V2.0)AI-v
System Alarm Prompt"3.3V TOO LOW""CELL BAT TOO HIGH""CELL BAT TOO LOW"Cell battery has problem.The cell battery has lowcapacity or the cell battery isnot installed or theconnection is loose.Replace the battery. If thefailure still exists, contact themanufacturer."RECORDER SELFTESTERR""RECORDER VLT HIGH""RECORDER VLT LOW""RECORDER HEAD HOT""REC HEAD IN WRONGPOSITION"During the selftest, thesystem fails connecting withthe recorder module.The recorder module hasvoltage failure.The continuous recordingtime may be too long.The handle for pressing thepaper is not pressed down.Execute ‘Clear Record Task’function in the recorder setupmenu to re-connect the hostand the recorder. If the failurestill exists, contact themanufacturer for repair.Contact the manufacturer forrepair.After the recorder becomescool, use the recorder foroutput again. If the failure stillexists, contact themanufacturer for repair.Press down the recorder handlefor pressing the paper."RECORDER OUT OFPAPER""RECORDER PAPER JAM""RECORDER COMM ERR""RECORDER S. COMM ERR""RECORDER PAPER W.P."No paper is in the recorder.The paper in the recorder isjammed.The communication of therecorder is abnormal.The paper roll of therecorder is not placed in thePlace the paper into therecorder.Place the recorder correctlyand try again.In the recorder setup menu,execute the function ofclearing record task. Thefunction can make the host andthe recorder connect again. Ifthe failure still exists, contactthe manufacturer for repair.Place the paper roll in thecorrect position.AI -vi<strong>Service</strong> <strong>Manual</strong> of <strong>PM</strong>-<strong>8000</strong> Portable <strong>Patient</strong> <strong>Monitor</strong> (V2.0)
System Alarm Promptcorrection position."REC NOT AVAILABLE"Cannot communicate withthe recorder.In the recorder setup menu,execute the function ofclearing record task. Thefunction can make the host andthe recorder connect again. Ifthe failure still exists, contactthe manufacturer for repair."NIBP INIT ERR""NIBP SELFTEST ERR""NIBP ILLEGALLY RESET""NIBP COMM ERR""LOOSE CUFF""AIR LEAK""NIBP ILLEGALLY RESET""NIBP COMM ERR"NIBP initialization errorDuring NIBP measurement,illegal reset occurs.The NIBP communicationpart has problem.The NIBP cuff is notconnected correctly.The NIBP cuff is notconnected correctly or thereare leaks in the airway.During NIBP measurement,illegal reset occurs.The NIBP communicationpart has problem.Execute the reset program inthe NIBP menu. If the failurestill exists, contact themanufacturer for repair.Check the airway of NIBP tosee if there are clogs. Thenmeasure again, if the failurestill exists, contact themanufacturer for repair.Execute the reset program inthe NIBP menu. If the failurestill exists, contact themanufacturer for repair.Re-connect the NIBP cuff.Check the connection of eachpart or replace with a new cuff.If the failure still exists,contact the manufacturer forrepair.Check the airway of NIBP tosee if there are clogs. Thenmeasure again, if the failurestill exists, contact themanufacturer for repair.Execute the reset program inthe NIBP menu. If the failure<strong>Service</strong> <strong>Manual</strong> of <strong>PM</strong>-<strong>8000</strong> Portable <strong>Patient</strong> <strong>Monitor</strong> (V2.0)AI-vii
System Alarm Promptstill exists, contact themanufacturer for repair."LOOSE CUFF"The NIBP cuff is notconnected correctly.Re-connect the NIBP cuff.Check the connection of eachThe NIBP cuff is not part or replace with a new cuff."AIR LEAK"connected correctly or there If the failure still exists,are leaks in the airway. contact the manufacturer forrepair.Check for the smoothness in"OVER PRESSURE"the airway and patientPerhaps folds exist in thesituation. Measure again, if theairway.failure still exists, contact themanufacturer for repair.Problem happens when Check the connection of eachmeasuring the curve. The part and the patient situation."SIGNAL SATURATED" system cannot perform Measure again, if the failuremeasurement, analysis or still exists, contact thecalculation.manufacturer for repair.Problem happens when Check the connection of eachmeasuring the curve. The part and the patient situation."TIME OUT"system cannot perform Measure again, if the failuremeasurement, analysis or still exists, contact thecalculation.manufacturer for repair.Check if the patient type is setup correctly. Check the"CUFF TYPE ERR"Perhaps the used cuff does connection of each part ornot fit the setup patient type. replace with a new cuff. If thefailure still exists, contact themanufacturer for repair.Check the connection of eachpart or replace with a new cuff."PNEUMATIC LEAK" NIBP airway has leaks. If the failure still exists,contact the manufacturer forrepair."MEASURE FAIL" Problem happens when Check the connection of eachAI -viii<strong>Service</strong> <strong>Manual</strong> of <strong>PM</strong>-<strong>8000</strong> Portable <strong>Patient</strong> <strong>Monitor</strong> (V2.0)
"NIBP SYSTEM FAILURE"measuring the curve. Thesystem cannot performmeasurement, analysis orcalculation.Problem happens whenmeasuring the curve. Thesystem cannot performmeasurement, analysis orcalculation.System Alarm Promptpart and the patient situation.Measure again, if the failurestill exists, contact themanufacturer for repair.Check the connection of eachpart and the patient situation.Measure again, if the failurestill exists, contact themanufacturer for repair.<strong>Service</strong> <strong>Manual</strong> of <strong>PM</strong>-<strong>8000</strong> Portable <strong>Patient</strong> <strong>Monitor</strong> (V2.0)AI-ix
Product SpecificationsAppendix II: Product Specifications1. ClassificationAnti-electroshock typeEMC typeAnti-electroshock degreeHarmful liquid proof degreeWorking systemClass I equipment and internal powered equipmentClass AECG(RESP), SpO2, NIBP, TEMP, IBP CFOrdinary equipment (sealed equipment without liquid proof)Continuous running equipment2. SpecificationsSize and WeightSizeWeight260mm x 137mm x 244mm4.5 kgEnvironmentTemperatureWorking 0 ~ 40 °CTransport and Storage -20 ~ 60 °CHumidityWorking 15% - 95 %Transport and Storage 10% - 95 %(no coagulate)AltitudeWorking -500 to 4,600mTransport and Storage -500 to 13,100mPower Supply100~240 VAC, 50/60 HzPmax=100VAFUSE T 1.6ADisplayDevice<strong>Service</strong> <strong>Manual</strong> of <strong>PM</strong>-<strong>8000</strong> Portable <strong>Patient</strong> <strong>Monitor</strong> (V2.0)AII-i
Product SpecificationsMessages8 inch. Color TFT, 800 x 600 Resolution3 LED indictors5 Waveforms Maximum1 Alarm LED (Yellow/Red)1 Working LED (Green)1 Battery recharge/Standby LED (Yellow)3 Sound Mode corresponding Alarm ModeSignal InterfaceExternal Display Standard VGA( See detail information in Chapter 1.4)AUX OutputBNCECG OutputSensitivity1 V/mv + 5%(reference 10Hz)BNCImpedance50 (ohm)Signal DelayIBP OutputSensitivityImpedanceSignal DelayNurse CallDrive mode:Max. voltage:Max. load current:Through resistance:Isolating voltage:ECG:25ms1 V/100mmhg+ 5% (reference 1Hz)50 (ohm)IBP:55msRelay Driven36 VDC , 25 VAC2A1500 VACRelay drive:ON/OFFBatteryRechargeable 2.3 Ah 12V Lead-Acid batteryOperating time under the normal use and full charge greater than 100minutesOperating time after the first alarm of low battery will be about 5 minutesMaximum charging time of single battery is 4 hours.Recorder (Option)Record Width48 mmPaper Speed25/50 mm/STrace 2Recording types:AII -ii<strong>Service</strong> <strong>Manual</strong> of <strong>PM</strong>-<strong>8000</strong> Portable <strong>Patient</strong> <strong>Monitor</strong> (V2.0)
Product SpecificationsContinuous real-time recording8 second real-time recordingAuto 8 second recordingParameter alarm recordingWaveform freeze recordingTrend graph/table recordingARR events review recordingAlarm event review recordingNIBP review recordingDrug Calculation and titration table recording<strong>Monitor</strong> information recordingOxyCRG recordingRecall and data storageTrend RecallShort1 hrs, 1 Second ResolutionLong 72 hrs, 1 Min. ResolutionAlarm Event Recall60 alarm events of all parameters and 8/16/32seconds of corresponding waveform.NIBP Measurement Recall400 NIBP measurement data.ECGLead Mode5 Leads ( R, L, F, N, C or RA, LA, LL, RL,V)Lead selection I, II, III, avR, avL, avF, V,Waveform2 channelLead modeLead selectionWaveform3 Leads ( R, L, F or RA, LA, LL)I, II, III,1 channelGainHR and AlarmRangeAdultNeo/PedAccuracyResolutionSensitivity×2.5mm/mV, ×5.0mm/mV, ×10mm/mV, ×20mm/mV, auto15 ~ 300 bpm15 ~ 350 bpm± 1% or ± 1bpm,which great1 bpm≥ 200 uV P-P<strong>Service</strong> <strong>Manual</strong> of <strong>PM</strong>-<strong>8000</strong> Portable <strong>Patient</strong> <strong>Monitor</strong> (V2.0)AII-iii
Product SpecificationsDifferential Input Impedance > 5 MOhmCMRR<strong>Monitor</strong> ≥ 105 dBOperation ≥ 105 dBDiagnosis ≥ 90 dBElectrode offset potential ±300mV<strong>Patient</strong> Leakage Current < 10 uARecovery After Defi.< 3 sECG Signal Range ±8 m V ( Vp-p )BandwidthSurgery 1 ~ 20(Hz)<strong>Monitor</strong> 0.5 ~ 40 HzDiagnostic 0.05 ~ 10 HzCalibration Signal 1 mV p-p , Accuracy :±5%ST Segment <strong>Monitor</strong>ing RangeMeasure and Alarm -2.0 ~ +2.0 mVAccuracyARR DetectingTypeAlarmReview-0.8mV~+0.8mV:±0.02mV or ±10%, use the greaterPVCs, ASYSTOLE, VFIB/VTAC, COUPLET, BIGEMINY,TRIGEMINY, R ON T, PVC, TACHY, BRADY, MISSEDBEATS, PNP, PNCAvailableAvailableRESPARATIONMethodImpedance between R-F(RA-LL)Differential Input Impedance >2.5 MOhmMeasuring Impedance Range: 0.3~5.0 ΩBase line Impedance Range: 200Ω ~2.5 KΩBandwidth0.2 ~ 2.0Hz(-3dB)Resp. RateMeasuring and Alarm RangeAdult 0 ~ 120 Br<strong>PM</strong>Neo/Ped 0 ~ 150 Br<strong>PM</strong>Resolution 1 rpmAII -iv<strong>Service</strong> <strong>Manual</strong> of <strong>PM</strong>-<strong>8000</strong> Portable <strong>Patient</strong> <strong>Monitor</strong> (V2.0)
Product SpecificationsAccuracyApean Alarm7~150 Br<strong>PM</strong>:±2 Br<strong>PM</strong> 或 ±2%,which ever is greater0~6 Br<strong>PM</strong>:unspecified10 ~ 40 sNIB<strong>PM</strong>ethodOscillometricMode<strong>Manual</strong>, Auto, STATMeasuring Interval in AUTO Mode1, 2, 3, 4, 5, 10, 15, 30, 60, 90, 120, 180, 240,480 MinMeasuring Period in STAT Mode 5 MinAlarmTypeSYS, DIA, MEANMeasuring and alarm rangeAdult ModeSYS 40 ~ 270 mmHgDIA 10 ~ 210 mmHgMEAN 20 ~ 230mmHgPediatric ModeSYS 40 ~ 200 mmHgDIA 10 ~ 150 mmHgMEAN 20 ~ 165 mmHgNeonatal ModeSYS 40 ~ 135 mmHgDIA10 ~ 100 mmHgMEAN 20 ~ 110 mmHgResolutionPressure 1mmHgAccuracyPressureMaximum Mean errorMaximum Standard deviationOverpressure ProtectionAdult Mode297±3 mmHgPediatric Mode 240±3 mmHgNeonatal Mode 147±3 mmHg±5mmHg±8mmHg<strong>Service</strong> <strong>Manual</strong> of <strong>PM</strong>-<strong>8000</strong> Portable <strong>Patient</strong> <strong>Monitor</strong> (V2.0)AII-v
Product SpecificationsSpO2Measuring Range 0 ~ 100 %Alarm Range 0 ~ 100 %Resolution 1 %Accuracy70% ~ 100% ±2 %0% ~ 69% unspecifiedActualization interval about 1sAlarm Delay10 sPulse RateMeasuring and Alarm Range20~254bpmResolution1bpmAccuracy±3bpmMASIMO SpO2 Specification:RangeSaturation(%SpO2) 1%~100%Pulse Rate(bmp) 25~240AccuracySaturation(%SpO2) - During No Motion ConditionsAdults/pediatric70%~100%±2%0%~69% unspecifiedNeonates70%~100%±3%Saturation(%SpO2) - During Motion Conditions0%~69% unspecifiedAdults/ pediatric/ Neonates70%~100%±3%0%~69% unspecifiedPulse(bpm) - During No Motion Condition25 to 240 ± 3B<strong>PM</strong>Pulse(bpm) - During Motion ConditionResolution25 to 240 ± 5B<strong>PM</strong>AII -vi<strong>Service</strong> <strong>Manual</strong> of <strong>PM</strong>-<strong>8000</strong> Portable <strong>Patient</strong> <strong>Monitor</strong> (V2.0)
Product SpecificationsSaturation(%SpO2) 1%Pulse Rate(bpm) 1TEMPERATUREChannel 2Measuring and Alarm Range 0 ~ 50 °CResolution0.1°CAccuracy±0.1°CActualization interval about 1sAverage Time Constant < 10 sIBP.Channel 1LabelART, PA, CVP, RAP, LAP, ICP, P1, P2Measuring and alarm rangePress SensorResolutionAccuracySensitivityImpedanceActualization intervalARTPACVP/RAP/LAP/ICPP1/P25 uV/V/mmHg300-3000 Ω1 mmHg0 ~ 300 mmHg-6 ~ 120 mmHg-10 ~ 40 mmHg-50 ~ 300 mmHg±2% or ±1mmHg, which greatabout 1s<strong>Service</strong> <strong>Manual</strong> of <strong>PM</strong>-<strong>8000</strong> Portable <strong>Patient</strong> <strong>Monitor</strong> (V2.0)AII-vii
P/N:<strong>8000</strong>-20-10282