CO2 Gas Sensor - Vernier Software & Technology
CO2 Gas Sensor - Vernier Software & Technology
CO2 Gas Sensor - Vernier Software & Technology

Create successful ePaper yourself
Turn your PDF publications into a flip-book with our unique Google optimized e-Paper software.
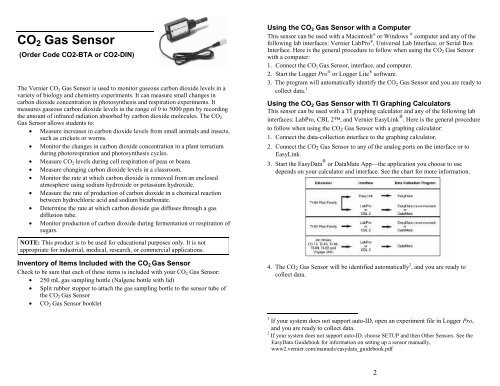
CO 2 <strong>Gas</strong> <strong>Sensor</strong>(Order Code <strong>CO2</strong>-BTA or <strong>CO2</strong>-DIN)The <strong>Vernier</strong> CO 2 <strong>Gas</strong> <strong>Sensor</strong> is used to monitor gaseous carbon dioxide levels in avariety of biology and chemistry experiments. It can measure small changes incarbon dioxide concentration in photosynthesis and respiration experiments. Itmeasures gaseous carbon dioxide levels in the range of 0 to 5000 ppm by recordingthe amount of infrared radiation absorbed by carbon dioxide molecules. The CO 2<strong>Gas</strong> <strong>Sensor</strong> allows students to:• Measure increases in carbon dioxide levels from small animals and insects,such as crickets or worms.• Monitor the changes in carbon dioxide concentration in a plant terrariumduring photorespiration and photosynthesis cycles.• Measure CO 2 levels during cell respiration of peas or beans.• Measure changing carbon dioxide levels in a classroom.• Monitor the rate at which carbon dioxide is removed from an enclosedatmosphere using sodium hydroxide or potassium hydroxide.• Measure the rate of production of carbon dioxide in a chemical reactionbetween hydrochloric acid and sodium bicarbonate.• Determine the rate at which carbon dioxide gas diffuses through a gasdiffusion tube.• Monitor production of carbon dioxide during fermentation or respiration ofsugars.Using the CO 2 <strong>Gas</strong> <strong>Sensor</strong> with a ComputerThis sensor can be used with a Macintosh ® or Windows ® computer and any of thefollowing lab interfaces: <strong>Vernier</strong> LabPro ® , Universal Lab Interface, or Serial BoxInterface. Here is the general procedure to follow when using the CO 2 <strong>Gas</strong> <strong>Sensor</strong>with a computer:1. Connect the CO 2 <strong>Gas</strong> <strong>Sensor</strong>, interface, and computer.2. Start the Logger Pro ® or Logger Lite ® software.3. The program will automatically identify the CO 2 <strong>Gas</strong> <strong>Sensor</strong> and you are ready tocollect data. 1Using the CO 2 <strong>Gas</strong> <strong>Sensor</strong> with TI Graphing CalculatorsThis sensor can be used with a TI graphing calculator and any of the following labinterfaces: LabPro, CBL 2, and <strong>Vernier</strong> EasyLink ® . Here is the general procedureto follow when using the CO 2 <strong>Gas</strong> <strong>Sensor</strong> with a graphing calculator:1. Connect the data-collection interface to the graphing calculator.2. Connect the CO 2 <strong>Gas</strong> <strong>Sensor</strong> to any of the analog ports on the interface or toEasyLink.3. Start the EasyData ® or DataMate App—the application you choose to usedepends on your calculator and interface. See the chart for more information.NOTE: This product is to be used for educational purposes only. It is notappropriate for industrial, medical, research, or commercial applications.Inventory of Items Included with the CO 2 <strong>Gas</strong> <strong>Sensor</strong>Check to be sure that each of these items is included with your CO 2 <strong>Gas</strong> <strong>Sensor</strong>:• 250 mL gas sampling bottle (Nalgene bottle with lid)• Split rubber stopper to attach the gas sampling bottle to the sensor tube ofthe CO 2 <strong>Gas</strong> <strong>Sensor</strong>• CO 2 <strong>Gas</strong> <strong>Sensor</strong> booklet4. The CO 2 <strong>Gas</strong> <strong>Sensor</strong> will be identified automatically 2 , and you are ready tocollect data.1 If your system does not support auto-ID, open an experiment file in Logger Pro,and you are ready to collect data.2 If your system does not support auto-ID, choose SETUP and then Other <strong>Sensor</strong>s. See theEasyData Guidebook for information on setting up a sensor manually,www2.vernier.com/manuals/easydata_guidebook.pdf2
If the data-collection application is not on your calculator, use the followinginstructions to load it onto the calculator.• EasyData App–This program may already be installed on your calculator.Check to see that it is EasyData version 2.0 or newer. If it is not installed or isan older version, it can be downloaded to your computer from the <strong>Vernier</strong> website, www.vernier.com/easy/easydata.html. It can then be transferred from thecomputer to the calculator using TI-Connect and a TI unit-to-computer cable orTI-GRAPH LINK cable. See the <strong>Vernier</strong> web site,www.vernier.com/calc/software/index.html for more information on the Appand Program Transfer Guidebook.• DataMate program–This program can be transferred directly from LabPro orCBL 2 to the TI graphing calculator. Use the calculator-to-calculator link cableto connect the two devices. Put the calculator into Receive mode, and thenpress the Transfer button on the interface.Using the CO 2 <strong>Gas</strong> <strong>Sensor</strong> with Palm Powered HandheldsThis sensor can be used with a Palm Powered handheld and the LabPro. Use thefollowing general setup procedure:1. Connect the Palm Powered handheld, LabPro, and the CO 2 <strong>Gas</strong> <strong>Sensor</strong>.2. Start Data Pro.3. Tap New, or choose New from the Data Pro menu. Tap New again. The CO 2 <strong>Gas</strong><strong>Sensor</strong> will be identified automatically. 3 You are ready to collect data.Taking MeasurementsFollow these steps to collect data using the CO 2 <strong>Gas</strong> <strong>Sensor</strong>:1. Allow the CO 2 <strong>Gas</strong> <strong>Sensor</strong> to warm up for about 90 seconds, 4 then start collectingdata. Note: Since the CO 2 <strong>Gas</strong> <strong>Sensor</strong> updates its reading every second, do not setthe data rate faster than 1 reading per second. Once you have started collectingdata, you should see the red LED on the sensor box turn on each time the sensortakes a new reading—about once every second.2. When you have finished collecting data, simply remove the sensor from the gassampling bottle. We recommend that you leave the slit rubber stopper on thesensor tube. Store the sensor in the box in which it was shipped.Additional Information• Whenever possible, we recommend that you connect the AC Adapter to thecomputer or handheld interface when using the CO 2 <strong>Gas</strong> <strong>Sensor</strong>. The largecurrent required by the CO 2 <strong>Gas</strong> <strong>Sensor</strong> results in a significant decrease inbattery life.3 If your sensor does not auto-ID, tap Setup and set up an experiment.4 While the CO 2 <strong>Gas</strong> <strong>Sensor</strong> is warming up, you will see readings increase to ~5000 ppmand then slowly decrease back to the CO 2 level to which the sensor is exposed.• Only one CO 2 <strong>Gas</strong> <strong>Sensor</strong> can be used at a time with the interface.• The sensor cannot take readings at a CO 2 concentration higher than 5000ppm. Once the CO 2 concentration reaches this level, the computer orhandheld will continue to display a reading of ~5000 ppm until the actuallevel drops below 5000 ppm again.• Even though the sensor responds rather quickly to changes in CO 2concentration, remember that gas has to diffuse through the holes in thesensor tube before any changes in concentration can be detected. Sincediffusion of gases is a fairly slow process, there is a resulting delay in thereadings. Likewise, if you expose the sensor to higher levels of CO 2 (suchas exhaled breath, which can be > 50,000 ppm of CO 2 ), then it may take aminute or more for the CO 2 chamber to exchange the higher concentrationof CO 2 for lower concentrations in its surroundings. Fanning air toward thesensor tube can speed up this process.• To collect data in a controlled environment, we recommend that you use theslit rubber stopper and the 250 mL Nalgene collection bottle that is includedwith your sensor.• Very important: Do not place the sensor tube directly into any liquid. Thesensor is intended only for measuring gaseous, not aqueous, CO 2concentration.SpecificationsMeasurement range of CO 2 <strong>Gas</strong> <strong>Sensor</strong>: 0–5000 ppm CO 2Accuracy (at standard pressure, 1 atm):±100 ppm in the range of 0–1000 ppm±10% of reading in the range of 1000–5000 ppm rangeTypical Resolution: 20 ppmResponse time: 95% of full-scale reading in 120 seconds (faster when air currentsare provided)Warm-up time (connected to powered interface): 90 seconds (maximum)Pressure effect: 0.19% of reading/mm of Hg from standard pressureOutput signal range: 0–2.5 VOutput impedance: 1 kΩInput potential: 5 V (±0.25 V)<strong>Gas</strong> sampling mode: diffusionNormal operating temperature range: 25°C (±5°C)Operating humidity range: 5–95%, non-condensing125Storage temperature range: -40 to 65°CCalibration information:slope (gain): 2000 ppm/Vintercept (offset): 0 ppmlive calibration: performed by push button in outdoor ambient air(~400 ppm)34
This sensor is equipped with circuitry that supports auto-ID. When used withLabPro, Go! Link, EasyLink, or CBL 2, the data-collection software identifiesthe sensor and uses pre-defined parameters to configure an experimentappropriate to the recognized sensor.How the CO 2 <strong>Gas</strong> <strong>Sensor</strong> WorksThe <strong>Vernier</strong> CO 2 <strong>Gas</strong> <strong>Sensor</strong> measures gaseous carbon dioxide levels in the range of0 to 5000 ppm by monitoring the amount of infrared radiation absorbed by carbondioxide molecules. The sensor uses a hot metal filament as an infrared source togenerate infrared radiation (IR). The IR source is located at one end of the sensor’sshaft. At the other end of the shaft is an infrared sensor that measures how muchradiation gets through the sample without being absorbed by the carbon dioxidemolecules. The detector measures infrared radiation absorbed in the narrow bandcentered at 4260 nm. The greater the concentration of the absorbing gas in thesampling tube, the less radiation will make it from the source through the sensor tubeto the IR detector. The temperature increase in the infrared sensor produces a voltagethat is amplified and read by a <strong>Vernier</strong> interface or the CBL 2. Carbon dioxide gasmoves in and out of the sensor tube by diffusion through the eight vent holes in thesensor tube. When the sensor is collecting data, you can see the IR source blinkingon and off. It takes a new reading about once every second.The CO 2 <strong>Gas</strong> <strong>Sensor</strong> typically measures gaseous carbon dioxide concentration inunits of parts per million, or ppm. In gaseous mixtures, 1 part per million refers to 1part by volume in 1 million volume units of the whole. A concentration of 600 ppmfor CO 2 would simply mean that there is 600 L of CO 2 gas for every 1,000,000 L ofair (or 0.6 mL of CO 2 per 1 L of air). As a comparison, the level of carbon dioxide inthe Earth’s troposphere has gradually increased from 317 ppm in 1960 to currentlevels of nearly 370 ppm. Exhaled human breath has a carbon dioxide concentrationof about 50,000 ppm.Do I Need to Calibrate the CO 2 <strong>Gas</strong> <strong>Sensor</strong>? “No”You should not have to perform a new calibration when using the CO 2 <strong>Gas</strong> <strong>Sensor</strong> inthe classroom. We have set the sensor to match our stored calibration beforeshipping it. You can simply use the appropriate calibration file that is stored in yourdata-collection program from <strong>Vernier</strong>.If you do find that you need to reset your CO 2 <strong>Gas</strong> <strong>Sensor</strong>, it can be reset using oneknown CO 2 level. Note: This calibration method is different than the usual two-pointcalibration performed using other <strong>Vernier</strong> sensors. To reset the CO 2 <strong>Gas</strong> <strong>Sensor</strong> inunits of parts per million (ppm):• Place the 250 mL collection bottle (included with your sensor) in the airoutside your building long enough to ensure that its contents are replacedwith fresh air. The calibration will be based on this sample having a carbondioxide concentration of about 400 ppm. 5 While still outdoors (with the slitrubber stopper on the sensor tube of the CO 2 <strong>Gas</strong> <strong>Sensor</strong>), insert the stopperinto the gas sampling bottle containing fresh outside air. Do this by holdingthe stopper, not the probe box. You can now take the bottle and sensor tothe location where the calibration is to be done (either outside or back in theclassroom).• Connect the CO 2 <strong>Gas</strong> <strong>Sensor</strong> to the <strong>Vernier</strong> interface or CBL 2. Start thedata-collection program. Let the sensor warm up by collecting data for atleast 90 seconds. You can monitor the CO 2 reading by simply observing thelive display on the computer data-collection software.• When the CO 2 <strong>Gas</strong> <strong>Sensor</strong> has warmed up(readings should have stabilized), use a paperclip or the point of a mechanical pencil topress down the calibration button. Release thebutton immediately after the Red LED blinksrapidly three times. After about 30 seconds,the reading should stabilize at a value ofapproximately 400 ppm (±50 ppm). If thereading is significantly lower or higher than400 ppm, simple press the button again torepeat the process.Temperature ConsiderationsYour <strong>Vernier</strong> CO 2 <strong>Gas</strong> <strong>Sensor</strong> is designed to operate between 20°C and 30°C. TheCO 2 <strong>Gas</strong> <strong>Sensor</strong> can be used outside of this temperature range; however, you shouldbe aware that there will be a loss in accuracy of readings, even if you do the 1-pointcalibration at the lower or higher temperature. This does not prohibit taking readingsusing incubation temperatures or outdoor readings at temperatures warmer or colderthan the 20 to 30°C range. Allow enough time for your CO 2 <strong>Gas</strong> <strong>Sensor</strong> to stabilizeat the desired operating temperatures.5 The carbon dioxide concentration in the Earth’s atmosphere has steadily increasedthroughout the 20th century to an average level of just below 370 ppm in 1997. Levels inyour area may be slightly higher due to localized influences such as automobile or industrialemissions of carbon dioxide.56
More about Carbon Dioxide ConcentrationThe average increase in the concentration of carbon dioxide in the Earth’satmosphere has been well documented. The graph below shows that theconcentration increased from about 320 to over 360 ppm during the past 40 years.Locally, especially in urban areas, it is not uncommon for this concentration to beabove 380 ppm due to emissions from fossil fuel combustion. The calibration valueof 400 ppm for ambient outside air used with the CO 2 <strong>Gas</strong> <strong>Sensor</strong> is very close tothese values. The ability of carbon dioxide to act as a greenhouse gas by absorbingincreasing amounts of infrared radiation is a growing environmental concern.Increasing global atmospheric carbon dioxide levelsYou can use the CO 2 <strong>Gas</strong> <strong>Sensor</strong> within your classroom or other parts of your schoolbuilding to demonstrate to students the increased levels of carbon dioxide that occurin confined spaces. We often find that carbon dioxide levels within offices withseveral people will reach as high as 1000 to 1200 ppm CO 2 . You can even use thesensor to show that levels are generally higher in lower regions of a room than in theupper reaches. It is also possible to show the effect of turning on air conditioning,room ventilation, or simply opening a car window.Warranty<strong>Vernier</strong> warrants this product to be free from defects in materials and workmanshipfor a period of five years from the date of shipment to the customer. This warrantydoes not cover damage to the product caused by abuse or improper use.<strong>Vernier</strong> <strong>Software</strong> & <strong>Technology</strong>13979 S.W. Millikan Way • Beaverton, OR 97005-2886Toll Free (888) 837-6437 • (503) 277-2299 • FAX (503) 277-2440info@vernier.com • www.vernier.comRev. 8/09/06Logger Pro, Logger Lite, <strong>Vernier</strong> LabPro, Go! Link, <strong>Vernier</strong> EasyLink and other marks shown are our registeredtrademarks in the United States.CBL 2 and CBL, TI-GRAPH LINK, and TI Connect are trademarks of Texas Instruments.All other marks not owned by us that appear herein are the property of their respective owners, who may or may not beaffiliated with, connected to, or sponsored by us.Printed on recycled paper.78