Classic Shaker Side Table - Popular Woodworking Magazine
Classic Shaker Side Table - Popular Woodworking Magazine Classic Shaker Side Table - Popular Woodworking Magazine
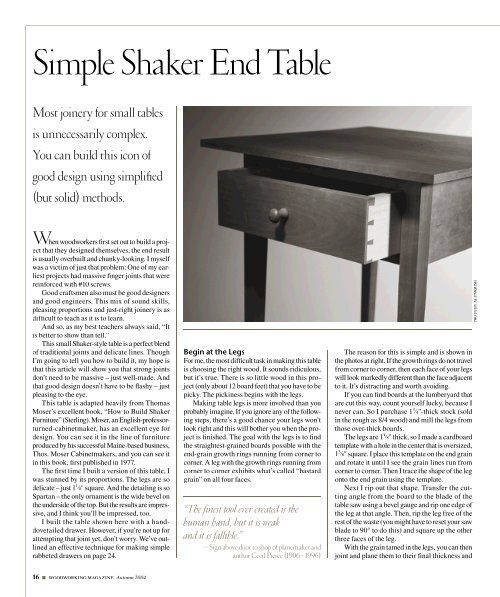
Simple Shaker End TableMost joinery for small tablesis unnecessarily complex.You can build this icon ofgood design using simplified(but solid) methods.WWhen woodworkers first set out to build a projectthat they designed themselves, the end resultis usually overbuilt and chunky-looking. I myselfwas a victim of just that problem: One of my earliestprojects had massive finger joints that werereinforced with #10 screws.Good craftsmen also must be good designersand good engineers. This mix of sound skills,pleasing proportions and just-right joinery is asdifficult to teach as it is to learn.And so, as my best teachers always said, “Itis better to show than tell.”This small Shaker-style table is a perfect blendof traditional joints and delicate lines. ThoughI’m going to tell you how to build it, my hope isthat this article will show you that strong jointsdon’t need to be massive – just well-made. Andthat good design doesn’t have to be flashy – justpleasing to the eye.This table is adapted heavily from ThomasMoser’s excellent book, “How to Build ShakerFurniture” (Sterling). Moser, an English-professorturned-cabinetmaker,has an excellent eye fordesign. You can see it in the line of furnitureproduced by his successful Maine-based business,Thos. Moser Cabinetmakers, and you can see itin this book, first published in 1977.The first time I built a version of this table, Iwas stunned by its proportions. The legs are sodelicate – just 1 1 ⁄ 8 " square. And the detailing is soSpartan – the only ornament is the wide bevel onthe underside of the top. But the results are impressive,and I think you’ll be impressed, too.I built the table shown here with a handdovetaileddrawer. However, if you’re not up forattempting that joint yet, don’t worry. We’ve outlinedan effective technique for making simplerabbeted drawers on page 24.Begin at the LegsFor me, the most difficult task in making this tableis choosing the right wood. It sounds ridiculous,but it’s true. There is so little wood in this project(only about 12 board feet) that you have to bepicky. The pickiness begins with the legs.Making table legs is more involved than youprobably imagine. If you ignore any of the followingsteps, there’s a good chance your legs won’tlook right and this will bother you when the projectis finished. The goal with the legs is to findthe straightest-grained boards possible with theend-grain growth rings running from corner tocorner. A leg with the growth rings running fromcorner to corner exhibits what’s called “bastardgrain” on all four faces.“The finest tool ever created is thehuman hand, but it is weakand it is fallible.”— Sign above door to shop of planemaker andauthor Cecil Pierce (1906 - 1996)The reason for this is simple and is shown inthe photos at right. If the growth rings do not travelfrom corner to corner, then each face of your legswill look markedly different than the face adjacentto it. It’s distracting and worth avoiding.If you can find boards at the lumberyard thatare cut this way, count yourself lucky, because Inever can. So I purchase 1 3 ⁄ 4 "-thick stock (soldin the rough as 8/4 wood) and mill the legs fromthose over-thick boards.The legs are 1 1 ⁄ 8 " thick, so I made a cardboardtemplate with a hole in the center that is oversized,1 3 ⁄ 8 " square. I place this template on the end grainand rotate it until I see the grain lines run fromcorner to corner. Then I trace the shape of the legonto the end grain using the template.Next I rip out that shape. Transfer the cuttingangle from the board to the blade of thetable saw using a bevel gauge and rip one edge ofthe leg at that angle. Then, rip the leg free of therest of the waste (you might have to reset your sawblade to 90° to do this) and square up the otherthree faces of the leg.With the grain tamed in the legs, you can thenjoint and plane them to their final thickness andPHOTO BY AL PARRISH16 ■ woodworking magazine Autumn 2004
width. I prefer to use my thickness planer for thisjob. It gives me more consistent results than tryingto size the parts on my table saw.Choose your best-looking boards for the tabletopand drawer front. Your next-best pieces shouldbe reserved for the aprons. The rest of the stuff isuseful for the parts inside the case that guide thedrawer. Joint and plane all the parts to their finishedthicknesses, then rip and crosscut them totheir finished widths and lengths.Tackle the TopMaking a good-looking and flat tabletop is a skillto itself, so we included a primer on gluing uppanels on page 22. Even if you have mastered theedge joint used for making panels, you shouldkeep a wary eye when it comes to picking theright boards for your tabletop.To make the top look as natural as possible,pay attention to the seams. Never join the straightrift-sawn wood edges of a board to the cathedralgrainwood you typically find in the middle of aboard. This looks horrible. The best arrangementis to join edges with rift grain to similar-lookingedges with rift grain. Shift things around untilthe top looks good. Ignore the adage about alternatingthe growth rings face up and face downon adjacent boards in a tabletop. The warpagepatterns of almost any antique table will quicklypoint out the fallacy of this approach.Glue up your top and set it aside for the adhesiveto cure. It’s time to make mortises.Simple & Sturdy Table JoineryMortise-and-tenon joints are the best ones for atable. Yes, there are metal corner brackets outthere, and a couple of biscuits also could do thejob. But the simple router-table setup we’ve devisedis so simple, straightforward and inexpensivethat there’s no reason to cheat here.Essentially, the mortises are open at the topand milled in the legs using a router in a table anda 3 ⁄ 8 " straight bit. The simplified tenons are cutusing the exact same tools and setup. There is noreason to buy a pricey mortiser or spend hourslearning to make the joint by hand. Both of thoseapproaches are noble; they’re just not necessaryfor this particular table.It’s important to talk about the length of thetenons used for this table. As a rule, you want yourtenons to be as long as possible – within reason,of course. An ideal tenon is 3 ⁄ 4 " to 1 1 ⁄ 4 " long. Butwhen you’re dealing with a small project such asthis, you need to scale your joinery. The legs forthis table are quite delicate, just 1 1 ⁄ 8 " square, sofull-size joints aren’t going to work. And onceyou set the aprons back 3 ⁄ 16 ", as shown in the illustrationon page 19, you get even less room.The maximum length for the tenons in this tableis 3 ⁄ 4 " with the tenons meeting in the middle. Butmaking these mortises open at the top makes afragile shoulder on the inside corner of the leg.Bastard grainFlat-sawnQuartersawnfigureFlat-sawnfigureGetting good-looking legs is all in the growthrings. When the rings run from side to side (right),the leg shows flat-sawn figure on two faces andquartersawn figure on two faces. This won’t lookright. Grain that runs from corner to corner –called bastard grain – creates four faces that alllook the same.Yes, this wastes a little wood, but there isn’t muchwood in this table to begin with. When the grainlines run from corner to corner of your template,mark that shape and head to the table saw.PHOTO BY TIM GRONDINWith the shape of the leg drawn on the end grain,it’s now just a matter of sawing and jointing tothose lines. First cut the angle on the table saw.Then square things up on the saw or jointer.3⁄8The 3 ⁄ 8 "-deep mortises are centered on the ends ofthe legs and are open at the top. This allows youto cut them all with one fence setup. Note that thefront legs receive a mortise on only one face. Theback legs get mortises on two faces.woodworking-magazine.com ■ 17
- Page 3 and 4: WOODWORKINGM AG A Z I N EAutumn 200
- Page 7 and 8: Avoid Drawknife InjuriesDrawknives
- Page 11 and 12: Mark yourstart and stoppoints on ap
- Page 13 and 14: Sharpen a ChiselHere’s the secret
- Page 15 and 16: “The carpenter is not the best wh
- Page 17: Bevel-edge ChiselsFFor any one proj
- Page 21 and 22: 18"14"11œ"2" ø"œ"œ"3ø"5"œ"1˚
- Page 23 and 24: Notch fitsaround legOnce you cut th
- Page 25 and 26: Now you’re ready to glue up your
- Page 27 and 28: One Setup Cuts All the JointsNow th
- Page 29 and 30: Use glue and 5 ⁄ 8 " brads to att
- Page 31 and 32: 6®"2ø"ø"‹Bottom hasrabbet onal
- Page 33 and 34: time measurement starts with the re
- Page 35 and 36: Extras“Believe one who has tried
Simple <strong>Shaker</strong> End <strong>Table</strong>Most joinery for small tablesis unnecessarily complex.You can build this icon ofgood design using simplified(but solid) methods.WWhen woodworkers first set out to build a projectthat they designed themselves, the end resultis usually overbuilt and chunky-looking. I myselfwas a victim of just that problem: One of my earliestprojects had massive finger joints that werereinforced with #10 screws.Good craftsmen also must be good designersand good engineers. This mix of sound skills,pleasing proportions and just-right joinery is asdifficult to teach as it is to learn.And so, as my best teachers always said, “Itis better to show than tell.”This small <strong>Shaker</strong>-style table is a perfect blendof traditional joints and delicate lines. ThoughI’m going to tell you how to build it, my hope isthat this article will show you that strong jointsdon’t need to be massive – just well-made. Andthat good design doesn’t have to be flashy – justpleasing to the eye.This table is adapted heavily from ThomasMoser’s excellent book, “How to Build <strong>Shaker</strong>Furniture” (Sterling). Moser, an English-professorturned-cabinetmaker,has an excellent eye fordesign. You can see it in the line of furnitureproduced by his successful Maine-based business,Thos. Moser Cabinetmakers, and you can see itin this book, first published in 1977.The first time I built a version of this table, Iwas stunned by its proportions. The legs are sodelicate – just 1 1 ⁄ 8 " square. And the detailing is soSpartan – the only ornament is the wide bevel onthe underside of the top. But the results are impressive,and I think you’ll be impressed, too.I built the table shown here with a handdovetaileddrawer. However, if you’re not up forattempting that joint yet, don’t worry. We’ve outlinedan effective technique for making simplerabbeted drawers on page 24.Begin at the LegsFor me, the most difficult task in making this tableis choosing the right wood. It sounds ridiculous,but it’s true. There is so little wood in this project(only about 12 board feet) that you have to bepicky. The pickiness begins with the legs.Making table legs is more involved than youprobably imagine. If you ignore any of the followingsteps, there’s a good chance your legs won’tlook right and this will bother you when the projectis finished. The goal with the legs is to findthe straightest-grained boards possible with theend-grain growth rings running from corner tocorner. A leg with the growth rings running fromcorner to corner exhibits what’s called “bastardgrain” on all four faces.“The finest tool ever created is thehuman hand, but it is weakand it is fallible.”— Sign above door to shop of planemaker andauthor Cecil Pierce (1906 - 1996)The reason for this is simple and is shown inthe photos at right. If the growth rings do not travelfrom corner to corner, then each face of your legswill look markedly different than the face adjacentto it. It’s distracting and worth avoiding.If you can find boards at the lumberyard thatare cut this way, count yourself lucky, because Inever can. So I purchase 1 3 ⁄ 4 "-thick stock (soldin the rough as 8/4 wood) and mill the legs fromthose over-thick boards.The legs are 1 1 ⁄ 8 " thick, so I made a cardboardtemplate with a hole in the center that is oversized,1 3 ⁄ 8 " square. I place this template on the end grainand rotate it until I see the grain lines run fromcorner to corner. Then I trace the shape of the legonto the end grain using the template.Next I rip out that shape. Transfer the cuttingangle from the board to the blade of thetable saw using a bevel gauge and rip one edge ofthe leg at that angle. Then, rip the leg free of therest of the waste (you might have to reset your sawblade to 90° to do this) and square up the otherthree faces of the leg.With the grain tamed in the legs, you can thenjoint and plane them to their final thickness andPHOTO BY AL PARRISH16 ■ woodworking magazine Autumn 2004


