
You also want an ePaper? Increase the reach of your titles
YUMPU automatically turns print PDFs into web optimized ePapers that Google loves.
5www.blackanddecker.co.ukASI300
<strong>English</strong> (Original instructions) 42
163AB726CDE3
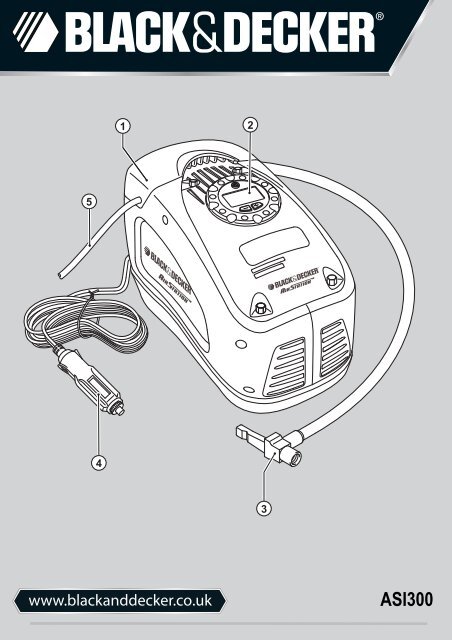
The gauge is intended as a guide only. Tyre pressuresshould be regularly checked with a certified gauge.Before use, check the power supply cord for signs ofdamage, ageing and wear.Do not use the appliance if the power supply cord ormains plug is damaged or defective (where applicable).Electrical safetyThis tool/appliance is double insulated; therefore noearth wire is required. Always check that the powersupply corresponds to the voltage on the ratingplate.Electrical safety can be further improved by using a highsensitivity (30mA / 30mS) Residual Current Device (RCD).If the supply cord is damaged, it must be replaced by themanufacturer or an authorised <strong>Black</strong> & <strong>Decker</strong> <strong>Service</strong>Centre in order to avoid a hazard.The following warning symbols are found on the tool/appliance:Read the instruction manual before using theinflator.Do not expose the appliance to rain or highhumidity.Before performing maintenance or cleaningon the appliance, unplug the supply cord.Do not leave the inflator unattended.Features1. Storage compartment cover2. Pressure gauge3. Air hose with universal valve adaptor4. 12 Volt dc cord and adaptor5. 230 Volt ac cord and plugResidual risksAdditional residual risks may arise when using the tool whichmay not be included in the enclosed safety warnings. Theserisks can arise from misuse, prolonged use etc.Even with the application of the relevant safety regulationsand the implementation of safety devices, certain residualrisks cannot be avoided. These include: Injuries caused by touching any rotating/moving parts. Injuries caused when changing any parts, blades oraccessories.UseInjuries caused by prolonged use of a tool. When usingany tool for prolonged periods make sure you takeregular breaks.Impairment of hearing.Health hazards caused by breathing dust developedwhen using your tool (example:- working with wood,especially oak, beech and MDF).Air hose and cord storageThe air hose (3) and the ac cord (5) are stored in the storagecompartment (1) on top of the Inflator (fig. A). The holes inboth sides of the cover (1) allow for the hose and cord to exitfrom the compartment so that the compartment cover can beclosed while the Inflator is in use. The dc cord (4) is stored inthe storage compartment (9) (fig. D) at the rear of the inflator.Fitting the accessories (fig. B & D)Your inflator is supplied with the standard tapered nozzlesand the needle inflator nozzle (6), these are located on thebase of the unit (fig. D). To use the universal valve adaptor, make sure that thelever is in the up position. Place the valve adapter over the stem of the inflationneedle or tapered nozzle (fig. B). Press the lever on the valve adapter down to lock it inplace. Place the inflation needle or tapered nozzle into the itemto be inflated.Note: Always make sure that the lever is in the up positionwhen not in use.Operate your Inflator only with the universal valve adaptor orwith the included nozzles.Note: Make sure that the universal valve adaptor is firmlylocked in place before turning the Inflator on.Many inflatables have an internal flap that prevents air lossduring inflation. Unless this flap is displaced by the nozzlethe inflatable will not inflate. Push the nozzle firmly into thevalve to make sure that you push this flap out of the way.Store the inflation needle inside one of the tapered nozzlesand snap the tapered nozzles into the storage slots locatedon the bottom of the Inflator (fig. D).Warning! Excessive air pressure may cause a hazardousrisk of bursting or personal injury. Check the manufacturer'smaximum pressure rating for the items being inflated.Note: If the pressure rating for the item being inflated isabove 100 psi, note that the maximum run time is 10minutes, leave to rest for 20 minutes before re-use.5
Pressure gauge (fig. C)Your Inflator is equipped with a built-in pressure gauge (2)that will automatically shut off when a predetermined airpressure is reached. The gauge, which is located on the topof the Inflator, will give a pressure reading in psi, bar or kPa.In the case of vehicle tyres, it is recommended that thepressure reading be verified by checking with a separate tyregauge.Powering the unit (fig. C)Warning! Do not operate the unit from both power sourcesat the same time.230 Vac modeAlways fully extend the 230 Vac cord before each use. Connect the 230 Volt cord (5) to a suitable mainssupply.12 Vdc modeWarning! Do not operate the inflator when the car engine isrunning.Note: Make sure that your 12 Volt accessory socket is live.On some vehicles the accessory socket may only becomelive when the ignition key is in the accessory position. Always fully extend the 12 Vdc cord before each use. Remove the 12 Volt cord from the storage compartmentand plug the 12 Volt adaptor (4) into your vehicle’s12 Volt accessory socket.Quick startWarning! Never leave the inflator running unattended in thismode. It can burst car tyres and other items.To use your inflator immediately, you can do so withoutsetting the automatic shut-off feature: Make sure the display is turned on via either the 12 Vdccord or the AC cord. Press and hold - and + buttons at the same time toselect the required units, psi, bar or kPa. Connect the universal valve adaptor and accessories, ifrequired, to the item to be inflated making sure that thelever of the valve adaptor is in the down position to lockit in place. To turn the inflator on press the on/off switch (7) locatedon the digital gauge. When the item is inflated as required or to turn theinflator off press the on/off switch (7) located on thedigital gauge.Setting the required pressure (fig. C)Warning! Do not leave the inflator running unattended. Itcould burst tyres or other items.Note: You must set the automatic shut-off feature before theunit will operate.When you connect to either an ac or dc power source thedigital display will be illuminated. Press and hold - and + buttons at the same time toselect the required units, psi bar or kPa.Warning! Excessive air pressure may cause a hazardousrisk of bursting or personal injury. Check the manufacturer'smaximum pressure rating for items being inflated. Press the - or + buttons to set the pressure that yourequire. When set, the LCD will flash for 3 seconds and thedigital display will show zero. Connect the universal valve adaptor and accessories ifrequired to the item to be inflated making sure that thelever of the valve adaptor is in the down position to lockit in place. To turn the inflator on, press the on off switch (7) locatedon the digital gauge.Note: If the power source is removed all of the settings willbe lost and will need to be re-entered following theinstructions under the heading 'Setting the requiredpressure'. When the item being inflated has reached the pre-setvalue the unit will automatically turn off.Note: To turn the inflator off at any time, press the on/offswitch (7) located on the digital gauge. Remove the valve adaptor or accessory from theinflated item and disconnect the unit from the powersource.Using your inflator as a pressure gauge Make sure that the unit is powered as described in thesection 'Powering the unit'. Connect the universal valve adaptor and accessories ifrequired to the item to be inflated, making sure that thelever of the valve adaptor is in the down position to lockit in place. The display will now display the actual pressure value inthe item.MaintenanceYour <strong>Black</strong> & <strong>Decker</strong> tool has been designed to operate overa long period of time with a minimum of maintenance.Continuous satisfactory operation depends upon proper toolcare and regular cleaning.Warning! Before performing any maintenance or cleaningon the appliance, unplug the appliance. From time to time wipe the appliance with a damp cloth.Do not use any abrasive or solvent-based cleaner. Donot immerse the appliance in water.6
TroubleshootingProblem Possible cause Possible solutionAppliance willnot start.Cord is notplugged in.Automatic shut-offvalue not set.Preset value maybe below theactual pressure.The fuse in the 12Volt adaptor isblown.Cord or switch isdamaged.Mains plug replacement (U.K. & Ireland only)If a new mains plug needs to be fitted: Safely dispose of the old plug. Connect the brown lead to the live terminal in the newplug. Connect the blue lead to the neutral terminal.Warning! No connection is to be made to the earth terminal.Follow the fitting instructions supplied with good qualityplugs. Recommended fuse: 3 A.Protecting the environmentPlug the tool into aworking outlet.Set the automatic shutofffeature.Adjust the preset valueto a higher value.Replace the fuse withone of the same sizeand type (8A/250V).Have the cord or switchreplaced at a <strong>Black</strong> &<strong>Decker</strong> <strong>Service</strong> Centreor Authorized <strong>Service</strong>Centre.Separate collection. This product must not bedisposed of with normal household waste.Should you find one day that your <strong>Black</strong> & <strong>Decker</strong> productneeds replacement, or if it is of no further use to you, do notdispose of it with household waste. Make this productavailable for separate collection.Separate collection of used products and packagingallows materials to be recycled and used again. Reuseof recycled materials helps preventenvironmental pollution and reduces the demandfor raw materials.Local regulations may provide for separate collection ofelectrical products from the household, at municipal wastesites or by the retailer when you purchase a new product.<strong>Black</strong> & <strong>Decker</strong> provides a facility for the collection andrecycling of <strong>Black</strong> & <strong>Decker</strong> products once they havereached the end of their working life. To take advantage ofthis service please return your product to any authorisedrepair agent who will collect them on our behalf.You can check the location of your nearest authorised repairagent by contacting your local <strong>Black</strong> & <strong>Decker</strong> office at theaddress indicated in this manual. Alternatively, a list ofauthorised <strong>Black</strong> & <strong>Decker</strong> repair agents and full details ofour after-sales service and contacts are available on theInternet at: www.2helpU.com.Technical dataASI300 TYPE 4Input voltage Vac/Vdc 230/12Input current A 0.5/8Noise value db 84Pressure (max) kPa / psi / bar 1103 / 160 / 11.03Weight kg 1.93Guarantee<strong>Black</strong> & <strong>Decker</strong> is confident of the quality of its products andoffers an outstanding guarantee. This guarantee statementis in addition to and in no way prejudices your statutoryrights. The guarantee is valid within the territories of theMember States of the European Union and the EuropeanFree Trade Area.If a <strong>Black</strong> & <strong>Decker</strong> product becomes defective due to faultymaterials, workmanship or lack of conformity, within 24months from the date of purchase, <strong>Black</strong> & <strong>Decker</strong>guarantees to replace defective parts, repair productssubjected to fair wear and tear or replace such products tomake sure of the minimum inconvenience to the customerunless: The product has been used for trade, professional orhire purposes. The product has been subjected to misuse or neglect. The product has sustained damage through foreignobjects, substances or accidents. Repairs have been attempted by persons other thanauthorised repair agents or <strong>Black</strong> & <strong>Decker</strong> servicestaff.7
To claim on the guarantee, you will need to submit proof ofpurchase to the seller or an authorised repair agent. You cancheck the location of your nearest authorised repair agent bycontacting your local <strong>Black</strong> & <strong>Decker</strong> office at the addressindicated in this manual. Alternatively, a list of authorised<strong>Black</strong> & <strong>Decker</strong> repair agents and full details of our aftersalesservice and contacts are available on the Internet at:www.2helpU.comPlease visit our website www.blackanddecker.co.uk toregister your new <strong>Black</strong> & <strong>Decker</strong> product and to be kept upto date on new products and special offers. Furtherinformation on the <strong>Black</strong> & <strong>Decker</strong> brand and our range ofproducts is available at www.blackanddecker.co.uk.8
ASI300TYP.3 - 4Partial support - Only parts shown availableNur die aufgefuerten teile sind lieferbarReparation partielle - Seules les pieces indiquees sont disponiblesSupporto parziale - Sono disponibili soltanto le parti evidenziateSolo estan disponibles las peizas listadasSo se encontram disponiveis as pecas listadasGedeeltelijke ondersteuning - alleen de getoonde onderdelenzijn beschikbaar1345E16094www.2helpU.com 11 - 05 - 10
ENGLISHDo not forget to register your product!www.blackanddecker.co.uk/productregistrationRegister your product online at www.blackanddecker.co.uk/productregistration or send your name, surname and productcode to <strong>Black</strong> & <strong>Decker</strong> in your country.
90564725 REV 0 L-05/10