Complete (13 MB) - Chris Alston's Chassisworks
Complete (13 MB) - Chris Alston's Chassisworks Complete (13 MB) - Chris Alston's Chassisworks
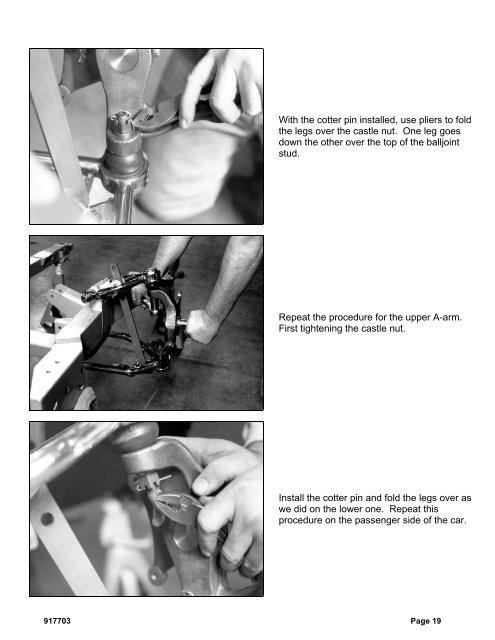
With the cotter pin installed, use pliers to foldthe legs over the castle nut. One leg goesdown the other over the top of the balljointstud.Repeat the procedure for the upper A-arm.First tightening the castle nut.Install the cotter pin and fold the legs over aswe did on the lower one. Repeat thisprocedure on the passenger side of the car.917703 Page 19
- Page 1 and 2: READ ALL INSTRUCTIONS COMPLETELY AN
- Page 3 and 4: CONGRATULATIONSYou have purchased t
- Page 5 and 6: DISCLAIMER OF WARRANTYPurchasers re
- Page 7 and 8: Installing SuspensionNote: The phot
- Page 9 and 10: The balljoint is then screwed into
- Page 11 and 12: Thread the balljoint in as far as p
- Page 13 and 14: Next, chase the threads in the lowe
- Page 15 and 16: If you have to remove the lower A-a
- Page 17 and 18: Next, install the shock simulator a
- Page 24: The first step in aligning the new
- Page 27 and 28: Loosely install the castle nut on t
- Page 29 and 30: The adjustment for both caster andc
- Page 31 and 32: If rotating the tie rod end 360 deg
- Page 33 and 34: Grease the tie rod end with a small
- Page 35 and 36: To prevent the urethane bushingsfro
- Page 37 and 38: Slide the billet aluminum cap over
- Page 39: Insert the lower bushing assembly i
- Page 42 and 43: Next, turn the shock over and tight
- Page 44 and 45: Installing BrakesThe 11 3/4 inch ve
- Page 46 and 47: After the bearing is packed, drop i
- Page 48 and 49: After the wheel bearings are tight,
- Page 50 and 51: Finally, bolt your wheel and tire o
- Page 52 and 53: Attach the tab to the frame rail wi
- Page 54 and 55: You can now final tighten the brake
- Page 56 and 57: Installation of a manual transmissi
- Page 58 and 59: Use the stainless steel 3/8-16 x 1
- Page 60 and 61: To install clutch linkage, bolt the
- Page 62 and 63: These two photos show an engine and
- Page 64 and 65: This is a view of the firewall befo
- Page 66 and 67: Disconnect the steering column from
- Page 68 and 69: Disconnect the brake line clamp by
With the cotter pin installed, use pliers to foldthe legs over the castle nut. One leg goesdown the other over the top of the balljointstud.Repeat the procedure for the upper A-arm.First tightening the castle nut.Install the cotter pin and fold the legs over aswe did on the lower one. Repeat thisprocedure on the passenger side of the car.917703 Page 19


