Solar Power Kit (#6610) - Davis Instruments Corp.
Solar Power Kit (#6610) - Davis Instruments Corp.
Solar Power Kit (#6610) - Davis Instruments Corp.

Create successful ePaper yourself
Turn your PDF publications into a flip-book with our unique Google optimized e-Paper software.
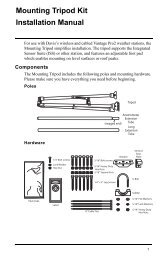
Securing the <strong>Power</strong> CableSecure the power cable to prepare the <strong>Solar</strong> <strong>Power</strong> <strong>Kit</strong> for installation.1. Determine how much ofthe 20’ (6 m) power cable isneeded to reach your WirelessVantage Pro console.2. Pull that length of cablethrough the rubber grommetlocated in the bottomof the shelter.3. Secure the cable inside theshelter with a 4” Cable Tiefastened to the cable tiemount.The cable tie providesstrain relief for the powercable.BatterySecure CableUsingCable Tie MountGrommet<strong>Power</strong> CableSecuring the <strong>Power</strong> CableMounting the <strong>Solar</strong> <strong>Power</strong> <strong>Kit</strong> on a PoleThe U-bolts included with the <strong>Solar</strong> <strong>Power</strong> <strong>Kit</strong> fit poles from 3/4” to 1 1/4”(19mm to 31mm) in diameter.1. While holding the shelteragainst the pole, placea U-bolt around the poleand through the twoholes at the top of theshelter.2. Place a flat washer, a lockwasher and a hex nut oneach of the bolt ends.3. Tighten the nuts using anadjustable wrench or 7/16” wrench, .U-BoltHexNutLockWasherFlatWasher4. Place the second U-boltaround the pole andMounting <strong>Solar</strong> <strong>Power</strong> <strong>Kit</strong> on a Polethrough the two holes at the bottom of the shelter.Put a flat washer, a lock washer, and a hex nut on each bolt end, andtighten the hex nuts.Page 2<strong>Solar</strong> <strong>Power</strong> <strong>Kit</strong> for Wireless Vantage Pro