Footboard Control and Mounting Kit, Rider_UK EN.fm - Triumph ...
Footboard Control and Mounting Kit, Rider_UK EN.fm - Triumph ...
Footboard Control and Mounting Kit, Rider_UK EN.fm - Triumph ...

You also want an ePaper? Increase the reach of your titles
YUMPU automatically turns print PDFs into web optimized ePapers that Google loves.
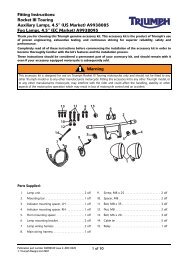
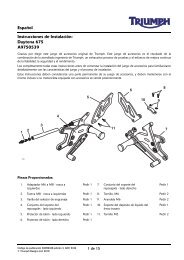
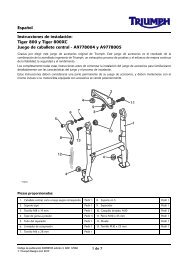
9. Secure the pivot pin with the E-clip from the kit.1Note:• The front of the gear selector rod has a righth<strong>and</strong> thread which is identified by a machinedring on the selector rod. The rear of the gearselector rod has a left h<strong>and</strong> thread.4. Loosen both nuts on the gear selector rod thenunscrew <strong>and</strong> remove the selector rod.32cfxq1. E-clipFitting the <strong>Footboard</strong> <strong>and</strong> <strong>Footboard</strong> clevis -A97581241. Remove the seat, as described in the service manual.2. Disconnect the battery, negative (black) lead first.Left H<strong>and</strong> Side3. Remove the screw then remove the gear changelever. Retain the screw <strong>and</strong> the gear change lever ifthe motorcycle is to be returned to its originalcondition.cfxj1. Nuts2. Gear selector rod3. Machined ring5. Remove the nuts <strong>and</strong> retain for re-use.Retain the gear selector rod if the motorcycle is to bereturned to its original condition.6. Remove the bolts then remove the footrest plate.Retain the bolts <strong>and</strong> the footrest plate if themotorcycle is to be returned to its original condition.12121cfxh1. Screw2. Gear change levercfxwCaution1. Bolts2. Footrest plateIt may be difficult to remove the gear selector rod fromthe ball joints. Do not use excessive force. If necessary,apply a releasing oil to the ball joint threads to aidremoval.4 of 9
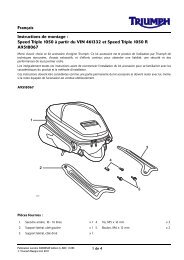
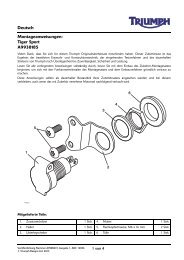
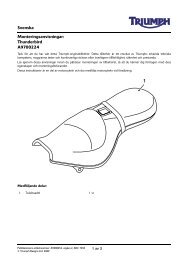
21. Remove the clip from the brake pedal clevis pin.Remove the clevis pin. Retain the clevis pin <strong>and</strong> clipfor re-use.23. Fit the rear brake master cylinder <strong>and</strong> cover to thefootboard clevis from the kit. Tighten the originalbolts to 27 Nm.2 31124c<strong>fm</strong>q1. Clip2. Clevis pin22. Release the bolts securing the master cylinder to thefootrest mounting plate. Retain the footrest plate ifthe motorcycle is to be returned to its originalcondition.Retain the following items for re-use:• Master cylinder;• Master cylinder cover;• Bolts.cfxn1. Footrest plate2. Master cylinder cover3. Master cylinder4. Bolts24. Position the brake pedal from the kit to the pushrod,engage the clevis <strong>and</strong> retain it with the clip. Ensurethe clip is fitted as shown below.12231c<strong>fm</strong>q_51. Clip2. Clevis pinc<strong>fm</strong>q_31. Master cylinder2. Master cylinder cover3. Bolts25. Position the brake pedal return spring to the brakepedal shaft as noted during removal.26. Align the brake pedal to its shaft <strong>and</strong> refit the mastercylinder <strong>and</strong> footrest assembly to the engine bracket.Ensure the end of brake pedal return spring engagesin the hole in the brake pedal.7 of 9
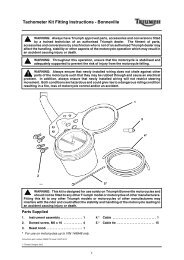
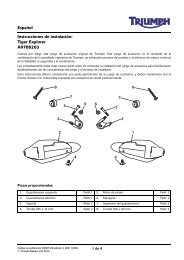
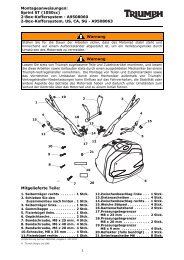
27. Secure the footboard clevis with the M10 x 30 mmbolts from the kit. Tighten the bolts to 50 Nm.29. Fit the footboard clevis cover <strong>and</strong> secure with theM5 x 8 mm screws. Tighten the screws to 6 Nm.1122cfxm1. Footrest plate2. Bolts, M10 x 30 mm28. Fit the original washer <strong>and</strong> a new M8 x 18 mm boltfrom the kit to the brake pedal <strong>and</strong> tighten to22 Nm.1cfxk1. Cover2. Screws, M5 x 8 mm30. Refit the brake fluid reservoir to the frame, positionthe cover <strong>and</strong> secure with the fixing. Tighten to5Nm.31. Incorporating the new washers from the kit to eitherside of the union, fit the brake pipe. Tighten theunion bolt to 25 Nm.cfxl4 31. Brake pedal2. Washer3. Bolt, M8 x 18 mm4. Footrest plate2WarningUse only DOT 4 specification brake fluid as specified inthe service manual. The use of brake fluids other thanthose DOT 4 fluids listed in the service manual mayreduce the efficiency of the braking system leading to anaccident.32. Fill <strong>and</strong> bleed the rear brake system, as described inthe service manual.33. Reconnect the battery, positive (red) lead first.34. Refit the rider’s seat, as described in the servicemanual.35. Check the operation of the rear brake. Rectify asnecessary.8 of 9
WarningIt is dangerous to operate the motorcycle with defectivebrakes; you must have your authorised <strong>Triumph</strong> dealertake remedial action before you attempt to ride themotorcycle again. Failure to take remedial action mayreduce braking efficiency leading to loss of motorcyclecontrol <strong>and</strong> an accident.WarningAfter fitting the footboard kit, operate the motorcycle ina safe area free from traffic to gain familiarity with thenew h<strong>and</strong>ling characteristics. Operation when notfamiliar with the new characteristics of the motorcyclemay result in an accident causing injury or death.WarningIf, after fitment of this accessory kit, you have any doubtabout the performance of any aspect of the motorcycle,contact an authorised <strong>Triumph</strong> dealer <strong>and</strong> do not ridethe motorcycle until the authorised dealer has declaredit fit for use. Riding a motorcycle when there is anydoubt as to any aspect of the performance of themotorcycle may result in loss of control of themotorcycle leading to an accident.WarningNever ride an accessory-equipped motorcycle at speedsabove 80 mph (130 km/h).The presence of accessories will cause changes in thestability <strong>and</strong> h<strong>and</strong>ling of the motorcycle. Failure to allowfor changes in motorcycle stability may lead to loss ofcontrol or an accident.Remember that the 80 mph (130 km/h) limit will bereduced by the fitting of non-approved accessories,incorrect loading, worn tyres, overall motorcyclecondition <strong>and</strong> poor road or weather conditions.WarningOnly operate this <strong>Triumph</strong> motorcycle at high speed inclosed-course on road competition or on closed-courseracetracks. High speed operation should only beattempted by riders who have been instructed in thetechniques necessary for high speed riding <strong>and</strong> arefamiliar with the motorcycle’s characteristics in allconditions.High speed operation in any other circumstances isdangerous <strong>and</strong> will lead to loss of motorcycle control<strong>and</strong> an accident.9 of 9