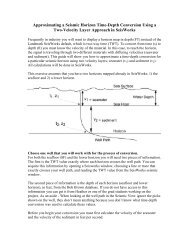
Installation1. Stray currents may exist on the mounting structure (vessel, ROV, towbody,etc), and it is mandatory to keep the head isolated from these currents.2. Aluminum alloy has a higher electrode potential than many commonly usedstructural materials such as steel, stainless steel, and titanium; therefore thealuminum sonar housing will suffer from galvanic corrosion if in direct contactwith them while submerged in seawater.3. If the sonar head is not electrically isolated from the structure, the attachedanodes will attempt to protect the entire structure from galvanic corrosion,rather than just the sonar head. These anodes are not sized for this task, andwill erode very quickly.2.5.2 TitaniumThe optional <strong>8101</strong> Sonar Head housing is composed of titanium, and will notcorrode. However, RESON strongly recommends that it be installed so thatthere is complete electrical isolation between the housing and the mountingstructure. This is done for two reasons.1. Stray currents may exist on the mounting structure (vessel, ROV, towbody,etc). It is advisable to keep the head isolated from these currents.2. Due to the extremely low electrode potential of titanium, it is noble to nearlyall other metals when immersed in seawater. Therefore, if it not isolated, itcan cause galvanic corrosion of the mounting brackets and hardware, andplace an additional load on the mounting structure's sacrificial anodes, causingthem to erode very quickly.2.5.3 IsolationElectrical isolation for both the Titanium and Aluminum heads is typicallyachieved by insulating them from the mounting brackets by the use of nonconductivebushings, washers, and isolation plates. These materials can includedelrin, G-10 glass fiber sheets, and/or high-density polyethylene sheets. ContactRESON Engineering for additional information on sacrificial anodes or schemesfor electrical isolation2.6 Ping Hold-off FeatureThis paragraph applies only to systems that have Dry Firmware version <strong>8101</strong>-2.04-83E4 installed, and not to a standard <strong>8101</strong> system.The addition of the “Ping Hold-off Feature” provides a method to synchronize the<strong>8101</strong> transmissions (pings) to a external controller device. No operator action isrequired, once the appropriate signal source has been connected to the system,as described below.______________________________________________________________________SeaBat <strong>8101</strong> Operator's Manual 2-8 Version 3.02
InstallationThe Ping Hold-off input signal is connected via a connector attached to the dryend of a modified Processor to Head cable. This input signal is opto-isolated, andaccepts TTL, CMOS, RS-232, and similar voltage levels (see Figure 10).Approximately 500 microseconds before the midpoint of each ping, the ping timer(in the sonar head) samples the Ping Hold-off input signal. If the input is OFF, thetimer continues counting and pings normally. If the input is ON, the timer stopscounting, waits for the input to turn OFF, and then resumes counting and pings.Figure 10, Ping Hold-off Details______________________________________________________________________SeaBat <strong>8101</strong> Operator's Manual 2-9 Version 3.02
- Page 2 and 3: This page intentionally left blank_
- Page 4 and 5: ForwardVersion 2.30 - Incorporated
- Page 6 and 7: ForwardThis page intentionally left
- Page 8: Table Of Contents2.4.3 ORIENTATION
- Page 11 and 12: Table Of Contents4.8 OPTION 036, SP
- Page 13 and 14: Table Of Contents6.3.1.26 Motion Se
- Page 15 and 16: Table Of ContentsList of FiguresFig
- Page 17 and 18: Table Of ContentsList of TablesTabl
- Page 19 and 20: General Information1.1 Introduction
- Page 21 and 22: General Information• The Sonar Pr
- Page 23 and 24: General Information1.3 Hardware Com
- Page 25 and 26: General InformationTable 2, SeaBat
- Page 27 and 28: General Information1.3.4 Sonar Head
- Page 29 and 30: General InformationMaterialTable 4,
- Page 31 and 32: General Information1.5 Warranty Inf
- Page 33 and 34: InstallationChapter 2 - Installatio
- Page 35 and 36: InstallationPrior to installation,
- Page 37 and 38: InstallationFigure 8, Sonar Head Ac
- Page 39: Installation2.4.5.4 ROV/UUV Install
- Page 43 and 44: System Operation3.1 IntroductionCha
- Page 45 and 46: System OperationFigure 12, SeaBat 8
- Page 47 and 48: System OperationMain Menu Range Fil
- Page 49 and 50: System OperationBoth the absorption
- Page 51 and 52: System Operation3.6 Display MenuThe
- Page 53 and 54: System Operation3.7.5 HeadTiltThe v
- Page 55 and 56: System Operation3.9.9 OrientedDefin
- Page 57 and 58: System OperationFull-New:RMS-New:Av
- Page 59 and 60: System OperationA single-click of t
- Page 61 and 62: System Operation3.11.4 Communicatio
- Page 63 and 64: System Operation3.11.7 Offset Graph
- Page 65 and 66: System Operation3.13 Changing the D
- Page 67 and 68: Options and UpgradesChapter 4 - Opt
- Page 69 and 70: Options and Upgrades4.5.2 Snippets
- Page 71 and 72: Options and Upgradesther the near s
- Page 73 and 74: Options and UpgradesSee paragraphs
- Page 75 and 76: Options and UpgradesFigure 21, Fair
- Page 77 and 78: Options and UpgradesFigure 23, Stan
- Page 79 and 80: Options and UpgradesFigure 24, Exte
- Page 81 and 82: Options and UpgradesFigure 25, Fibe
- Page 83 and 84: Options and Upgrades4.15.2 Upgrade
- Page 85 and 86: Glossary of TermsChapter 5 - Glossa
- Page 87 and 88: Interface Specification DocumentCha
- Page 89 and 90: Interface Specification Document6.2
- Page 91 and 92:
Interface Specification DocumentThe
- Page 93 and 94:
Interface Specification Document6.3
- Page 95 and 96:
Interface Specification Document6.3
- Page 97 and 98:
Interface Specification Document6.3
- Page 99 and 100:
Interface Specification Document6.3
- Page 101 and 102:
Interface Specification Document6.3
- Page 103 and 104:
Interface Specification Document6.3
- Page 105 and 106:
Interface Specification Document6.3
- Page 107 and 108:
Interface Specification Document6.3
- Page 109 and 110:
Interface Specification Document6.3
- Page 111 and 112:
Interface Specification Document•
- Page 113 and 114:
Interface Specification Document6.3
- Page 115 and 116:
Interface Specification Document6.3
- Page 117 and 118:
Interface Specification Document6.3
- Page 119 and 120:
Interface Specification Document6.3
- Page 121 and 122:
Internal InterfacesChapter 7 - Inte
- Page 123 and 124:
Internal Interfaces• Uplink NRZI
- Page 125 and 126:
Supplemental TextChapter 8 - Supple
- Page 127 and 128:
Supplemental Text8.2.3 Offset Mount
- Page 129 and 130:
Support DocumentationChapter 9 - Su
- Page 131 and 132:
Support DocumentationFigure 34, Sea
- Page 133 and 134:
Support DocumentationFigure 36, Sea
- Page 135 and 136:
Support DocumentationFigure 38, Son
- Page 137 and 138:
Support DocumentationFigure 40, ER
- Page 139 and 140:
Support DocumentationFigure 42, Son
- Page 141 and 142:
Support DocumentationFigure 44, Son
- Page 143 and 144:
Support DocumentationFigure 46, Son
- Page 145 and 146:
Support DocumentationFigure 48, Cab
- Page 147 and 148:
Support DocumentationFigure 49, Cab