

Parking Brake (For Rear Disc Brake) - CelicaTech
Parking Brake (For Rear Disc Brake) - CelicaTech
Parking Brake (For Rear Disc Brake) - CelicaTech

Create successful ePaper yourself
Turn your PDF publications into a flip-book with our unique Google optimized e-Paper software.
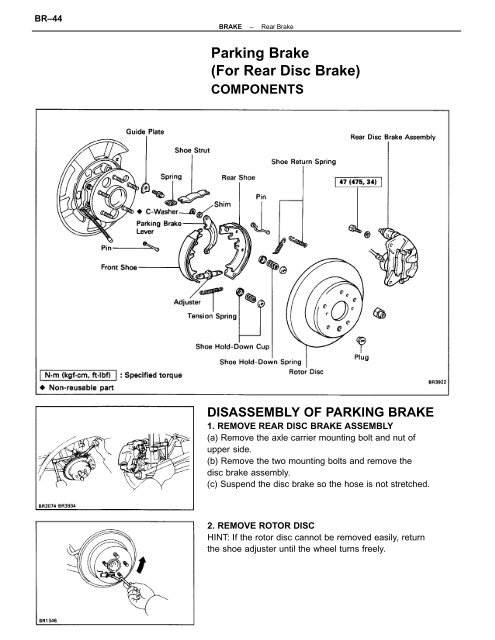
BR–44BRAKE–<strong>Rear</strong> <strong>Brake</strong><strong>Parking</strong> <strong>Brake</strong>(<strong>For</strong> <strong>Rear</strong> <strong>Disc</strong> <strong>Brake</strong>)COMPONENTSDISASSEMBLY OF PARKING BRAKE1. REMOVE REAR DISC BRAKE ASSEMBLY(a) Remove the axle carrier mounting bolt and nut ofupper side.(b) Remove the two mounting bolts and remove thedisc brake assembly.(c) Suspend the disc brake so the hose is not stretched.2. REMOVE ROTOR DISCHINT: If the rotor disc cannot be removed easily, returnthe shoe adjuster until the wheel turns freely.
BRAKE–<strong>Rear</strong> <strong>Brake</strong>BR–453. REMOVE SHOE RETURN SPRINGSUsing needle–nose pliers, remove the shoe return sprin–gs.4. REMOVE FRONT SHOE, ADJUSTER AND TENSIONSPRING(a) Slide out the front shoe and remove the shoe ad–juster.(b) Remove the shoe strut with spring.(c) <strong>Disc</strong>onnect the tension spring and remove the frontshoe.5. REMOVE REAR SHOE(a) Slide out the rear shoe.(b) Remove the tension spring from the rear shoe.(c) <strong>Disc</strong>onnect the parking brake cable from the parkingbrake shoe lever.(d) Remove the shoe hold–down spring cups, springsand pins.
BRAKE–<strong>Rear</strong> <strong>Brake</strong>BR–476. IF NECESSARY, REPLACE SHIM(a) Remove the parking brake lever, and install the cor–rect size shim.(b) Install the parking brake lever with a new C–washer.(c) Remeasure the clearance.
BR–48BRAKE–<strong>Rear</strong> <strong>Brake</strong>ASSEMBLY OF PARKING BRAKE(See page BR–44)HINT: Assemble the parts in the correct direction asshown.1. APPLY HIGH TEMPERATURE GREASE ON BACKINGPLATE AS SHOWNApply high temperature grease to the sliding surfaces ofthe shoe.2. APPLY HIGH TEMPERATURE GREASE TO ADJUSTERAS SHOWN3. CONNECT PARKING BRAKE CABLE TO PARKINGBRAKE LEVER(a) Install the shoe hold–down springs, cups and pins.(b) Connect the parking brake cable to the parkingbrake lever of the rear shoe.
BRAKE–<strong>Rear</strong> <strong>Brake</strong>BR–494. INSTALL REAR SHOESlide in the rear shoe between the shoe hold–downspring cup and the backing plate.CAUTION: Do not allow oil or grease to get on therubbing face.5. INSTALL TENSION SPRING, FRONT SHOE ANDADJUSTER(a) Install the tension spring to the rear shoe.(b) Install the front shoe to the tension spring.(c) Install the adjuster between the front and rear shoes.(d) Install the shoe strut with spring.(e) Slide in the front shoe between the shoe hold–downspring cup and the backing plate.6. INSTALL SHOE RETURN SPRINGSUsing needle–nose pliers, install the shoe return springs.7. INSTALL ROTOR DISC(a) Before installing, polish the disc and shoe surfaceswith sandpaper.(b) Align the hole on the rear axle shaft flange andservice hole on the disc.
BR–50BRAKE–<strong>Rear</strong> <strong>Brake</strong>8. ADJUST PARKING BRAKE SHOE CLEARANCE(a) Temporarily install the hub nuts.(b) Remove the hole plug.(c) Turn the adjuster and expand the shoes until therotor disc locks.(d) Return the adjuster eight notches.(e) Install the hole plug.9. INSTALL REAR DISC BRAKE ASSEMBLY(a) Install the disc brake assembly and torque the twomounting bolts.Torque: 47 N–m (475 kgf–cm, 34 ft–lbf)(b) Install the axle carrier bolt and nut of upper side.Torque: 226 N–m (2,300 kgf–cm, 166 ft–lbf)10. INSTALL REAR WHEEL11. SETTLING PARKING BRAKE SHOES AND DISC(a) Drive the vehicle at about 50 km/h (31 mph) on asafe, level and dry road.(b) With the parking brake release button pushed in,pull on the lever with 88 N (9 kgf, 19.8 lbf) of force.(c) Drive the vehicle for about 400 meters (0.25 mile) inthis condition.(d) Repeat this procedure two or three times.12. RECHECK AND ADJUST PARKING BRAKE LEVERTRAVEL


