RMXS48LVJU - Daikin AC
RMXS48LVJU - Daikin AC
RMXS48LVJU - Daikin AC

You also want an ePaper? Increase the reach of your titles
YUMPU automatically turns print PDFs into web optimized ePapers that Google loves.
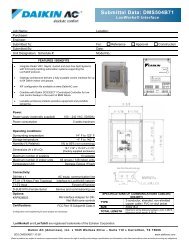
6-2 How to lay the power supply wiring and transmissionwiringLet the power supply wiring and transmission wiring with a conduitpass through one of the knockout holes on the front or side cover,and let the transmission wiring with a conduit pass through anotherknockout hole.• For protection from uninsulated live parts, thread the power supplywiring and the transmission wiring through the included insulationtube and secure it with the included binding band.Insulation tube(accessory)Ground wireInsulation tube(accessory)Binding band(accessory)2 inch(50 mm)or moreBinding band(accessory)Power supplywiring5/8 inch 5/8 inch(15 mm) (15 mm)3 inch(76mm)Transmissionwiring3 inch (76mm)Precautions when knocking out knock holes• Open the knock holes with a hammer or the like.• After knocking out the holes, we recommend you remove burrs inthe knock holes and paint the edges and areas around the edgesusing the repair paint to prevent rusting.• When passing wiring through knock holes, make sure there areno burrs, and protect the wiring with protective tape.BurrIf small animals might enter theunit, block the knock holes with anappropriate material (field supply).(Refer to figure 15)1. Screw2. Unfasten the screw and open the cover.(Refer to figure 16)1. Stop valve attachment plate2. Power supply wiring (including ground wire) or transmissionwiring.3. Backward4. Knockout hole5. Sideways6. Forward7. Electrical Component Box8. Terminal block (X2M)9. Binding band (accessory)10. Connecting power supply wiring11. Ground wire (yellow/green)12. Terminal block (X1M)13. Transmission wiring14. (To X2M [To BP unit] (F1, F2))15. Insulation tube (large) (accessory)16. Insulation tube (small) (accessory)17. Cut off the insulation tube sticking out of the outdoor unit.• Wiring of different thicknesses cannot be connected to the powerterminal block.(Slack in the power wiring may cause abnormal heat.)• Use sleeve-insulated round pressure terminals for connections tothe power terminal block. When none are available, connect wireof the same diameter to both sides, as shown in the figure.Insulating sleeveRound crimp-styleterminalConnect wiresof the same gaugeto both side.Follow the instructions below if the wiring gets very hot due toslack in the power wiring.• For wiring, use the designated power wire and connect firmly,then secure using the included clamping material to prevent outsidepressure being exerted on the terminal block.• Use an appropriate screwdriver for tightening the terminal screws.A screwdriver with a small head will strip the head and makeproper tightening impossible.• Over-tightening the terminal screw may break it.See the table below the tightening torque of the terminal screws.Tightening torque1.76-2.15 ft·lbfM5 Power terminal(2.39-2.91 N·m)0.87-1.06 ft·lbfM4 Shield ground(1.18-1.44 N·m)0.58-0.72 ft·lbfM3 Transmission wiring terminal block(0.8-0.97 N·m)6-3 How to connect the power supply wiringCAUTIONAttach a ground-fault circuit interrupter.• A ground-fault circuit interrupter is required in order to preventelectric shock and fires.Model name Frequency VoltageCAUTIONDo not connectwires of the samegauge to one side.Electric WireDo not connectwires of differentgauges.Good Wrong WrongRatedcurrentfor fusesMaximumoutdoor unitoperatingcurrent<strong>RMXS48LVJU</strong> 60Hz 208/230V 30A 27A• The wiring should be selected in compliance with local specifications.See the table above.• Always turn off the power before doing wiring work.• Grounding should be done in compliance with local laws andregulations.• Attach a ground-fault circuit interrupter.(This unit has an inverter, so an interrupter capable of handlinghigh frequencies is needed to prevent malfunction of the interrupteritself.)• As shown in figure 16, when connecting the power supply wiringto the power supply terminal block, be sure to clamp securely.• Once wiring work is completed, check to make sure there are noloose connections among the electrical parts in the control box.7 English