Scratch Awl - Woodsmith Woodworking Seminars
Scratch Awl - Woodsmith Woodworking Seminars
Scratch Awl - Woodsmith Woodworking Seminars

You also want an ePaper? Increase the reach of your titles
YUMPU automatically turns print PDFs into web optimized ePapers that Google loves.
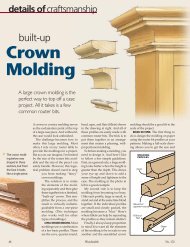
FINETOOLend of the block. The diameter ofthis hole is sized to accept thetwist bit that will be used as theblade. And it’s deep enough tocover the flutes.It’s tempting to drill this holewith the long twist bit. But there’sa problem. Any irregularity in thegrain can “catch” the tip of atwist bit and cause it to wander.If that happens, the blade onthe scratch awl will be crookedwhen you put it in the handle. Soto drill this hole straight into theblank, I used a brad point bit.MOUNT BLOCK. Now you canmount the block on the lathe. It’soriented so the centerpoint onthe tailstock fits into the hole inthe block, see Step 1 below.CUT TENON. After the initialroughing cuts, I turned a shorttenon on the end of the blockthat’s supported by the tailstock,see Step 2. Later, this tenon willbe sized to fit the ferrule. But fornow, leave it a bit thick. (I turneda 3 / 8 "-dia. tenon that’s 1 / 4 " long.)HANDLE LENGTH. To establishthe overall length of the handle,the next step is to make aparting cut near the end of theblock that’s closest to the headstock,see Step 2. It’s best toleave about a 1 /2" of thicknesshere. This provides plenty ofsupport for the spinning block.SHAPE HANDLE. Now it’s just amatter of turning the handle toshape. The thick knob on the endof the handle is formed by rollinga spindle gouge — first to oneside then the other, see Step 3.Note: You’ll need to waste outadditional material to provideclearance for the spindle gouge,see pattern on opposite page.The spindle gouge also makesit easy to shape the neck of thehandle. It sweeps down from theknob, flares out to create a stopfor your thumb, and then taperstoward the shoulder of the tenon.FINAL DETAILS. To completethe handle (and add some visualdetail), I used a skew chisel tocut a series of V-shaped grooves,see Step 4.This is also a good time tolightly sand the handle and applya finish. You don’t need toremove the handle from thelathe to do this. But later, afterremoving the waste at the top ofthe handle, you’ll need to completethe sanding and finishing.Start by drilling a hole in the end of a block to1 accept the blade. Then mount the block on thelathe so the centerpoint of the tailstock fits in the hole.2After roughing out the block, use a parting tool,to turn a tenon on one end. Then cut in at theopposite end to define the top of the handle.3Using a spindle gouge, turn the handle toshape. To ensure a comfortable grip, stop thelathe frequently and check the feel of the handle.It’s easy to add some visual detail to the thick4 part of the handle. Just use a skew chisel to cuta series of V-shaped grooves in the knob.No. 44 ShopNotes 29