Scratch Awl - Woodsmith Woodworking Seminars
Scratch Awl - Woodsmith Woodworking Seminars
Scratch Awl - Woodsmith Woodworking Seminars

You also want an ePaper? Increase the reach of your titles
YUMPU automatically turns print PDFs into web optimized ePapers that Google loves.
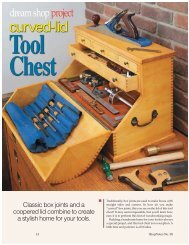
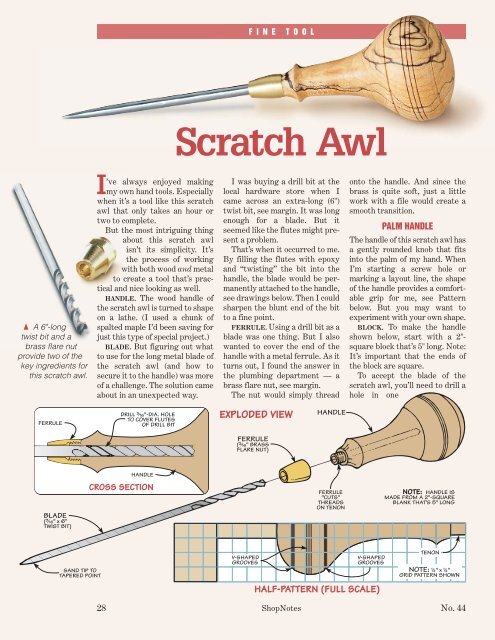
FINETOOLend of the block. The diameter ofthis hole is sized to accept thetwist bit that will be used as theblade. And it’s deep enough tocover the flutes.It’s tempting to drill this holewith the long twist bit. But there’sa problem. Any irregularity in thegrain can “catch” the tip of atwist bit and cause it to wander.If that happens, the blade onthe scratch awl will be crookedwhen you put it in the handle. Soto drill this hole straight into theblank, I used a brad point bit.MOUNT BLOCK. Now you canmount the block on the lathe. It’soriented so the centerpoint onthe tailstock fits into the hole inthe block, see Step 1 below.CUT TENON. After the initialroughing cuts, I turned a shorttenon on the end of the blockthat’s supported by the tailstock,see Step 2. Later, this tenon willbe sized to fit the ferrule. But fornow, leave it a bit thick. (I turneda 3 / 8 "-dia. tenon that’s 1 / 4 " long.)HANDLE LENGTH. To establishthe overall length of the handle,the next step is to make aparting cut near the end of theblock that’s closest to the headstock,see Step 2. It’s best toleave about a 1 /2" of thicknesshere. This provides plenty ofsupport for the spinning block.SHAPE HANDLE. Now it’s just amatter of turning the handle toshape. The thick knob on the endof the handle is formed by rollinga spindle gouge — first to oneside then the other, see Step 3.Note: You’ll need to waste outadditional material to provideclearance for the spindle gouge,see pattern on opposite page.The spindle gouge also makesit easy to shape the neck of thehandle. It sweeps down from theknob, flares out to create a stopfor your thumb, and then taperstoward the shoulder of the tenon.FINAL DETAILS. To completethe handle (and add some visualdetail), I used a skew chisel tocut a series of V-shaped grooves,see Step 4.This is also a good time tolightly sand the handle and applya finish. You don’t need toremove the handle from thelathe to do this. But later, afterremoving the waste at the top ofthe handle, you’ll need to completethe sanding and finishing.Start by drilling a hole in the end of a block to1 accept the blade. Then mount the block on thelathe so the centerpoint of the tailstock fits in the hole.2After roughing out the block, use a parting tool,to turn a tenon on one end. Then cut in at theopposite end to define the top of the handle.3Using a spindle gouge, turn the handle toshape. To ensure a comfortable grip, stop thelathe frequently and check the feel of the handle.It’s easy to add some visual detail to the thick4 part of the handle. Just use a skew chisel to cuta series of V-shaped grooves in the knob.No. 44 ShopNotes 29
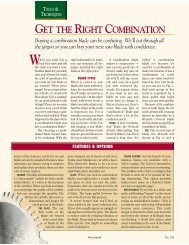
{ After threadingthe flare nut ontothe tenon so it’s“finger tight,” use awrench to turn itthe rest of the way.Adding the Ferrule —————————————————————————Once the finish is dry, the nextstep is to add the brass ferrule.It prevents the end of the handlefrom splitting. Plus, it creates asmooth transition between thehandle and the blade.The ferrule is made by fittingthe brass flare nut onto thetenon at the end of the handle.But the tenon is still a bit thick,so you’ll have to shave off a smallamount of material, see Step 5.The goal here is to removejust a whisker, checking the fitfrequently. Continue this processuntil you can tighten the nutabout halfway onto the tenonwith your fingers. Then completethe job with a wrench, see margin.FILE CORNERS. Once the flarenut is in place, it’s just a matter ofremoving the “corners.” An easya. a.way to do this is to remount thehandle on the lathe and use a smalltriangular file, see Step 6. Note:Be sure to remove the tool rest.One thing to be aware of is the“wall” of the nut is quite thin. Sofile off just enough material toround the corners. Then polishthe ferrule smooth with progressivelyfiner grits of sandpaper. (Iwent up to 600-grit sandpaper.)FINETOOLTo size the tenon for the flare nut, shave off a small5 amount of material and check the fit. Continue theprocess until the nut threads halfway onto the tenon.6Once the flare nut is installed, remove the toolrest and remount the handle. Then turn on thelathe and file the corners using smooth, even strokes.{ To hold the bladeof the scratch awlsecurely in place,fill the flutes of thetwist bit with epoxy.Installing the Blade ————————————————————————All that’s left to complete thescratch awl is to add the longtwist bit that’s used as the blade.REMOVE WASTE. But first,you’ll need to take the handle offthe lathe and remove the waste atthe top end. (I used a handsaw.)INSTALL BIT. After sanding therough spot left by the saw teeth(and touching it up with finish),you can install the bit. To permanentlysecure the bit in the handle,start by coating the flutes withepoxy, see margin. Then simply“twist” the bit into the end of thehandle, see detail ‘a’ in Step 7.SHARPEN BLADE. When theepoxy cures, the next step is tosharpen the blade. An easy wayto do this is to use a belt sanderthat’s clamped in a vise, see Step7. Note: Since this will createsparks, be sure to remove thedust bag on the sander.The idea is to hold the blade ata slight angle to the belt whileyou rotate the handle. What youwant to accomplish here is tosand a 1 1 /2"-long taper on the endof the bit that narrows down to aa.b.fine point, see detail ‘b.’POLISH BLADE. Finally, I polishedthe entire length of theblade starting with 150-gritsandpaper and working my wayup to 600 grit.After using epoxy to secure the blade in the handle, it’s easy to7 sharpen it to a fine point. Just clamp a belt sander in a vise andsand the end of the blade until it tapers to a sharp point.30 ShopNotes No. 44