Oakton StableTemp Ovens Manual
Oakton StableTemp Ovens Manual
Oakton StableTemp Ovens Manual

Create successful ePaper yourself
Turn your PDF publications into a flip-book with our unique Google optimized e-Paper software.
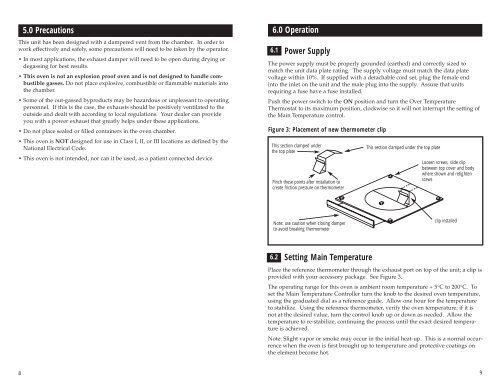
5.0 PrecautionsThis unit has been designed with a dampered vent from the chamber. In order towork effectively and safely, some precautions will need to be taken by the operator.• In most applications, the exhaust damper will need to be open during drying ordegassing for best results.• This oven is not an explosion proof oven and is not designed to handle combustiblegasses. Do not place explosive, combustible or flammable materials intothe chamber.• Some of the out-gassed byproducts may be hazardous or unpleasant to operatingpersonnel. If this is the case, the exhausts should be positively ventilated to theoutside and dealt with according to local regulations. Your dealer can provideyou with a power exhaust that greatly helps under these applications.• Do not place sealed or filled containers in the oven chamber.• This oven is NOT designed for use in Class I, II, or III locations as defined by theNational Electrical Code.• This oven is not intended, nor can it be used, as a patient connected device.6.0 Operation6.1Power SupplyThe power supply must be properly grounded (earthed) and correctly sized tomatch the unit data plate rating. The supply voltage must match the data platevoltage within 10%. If supplied with a detachable cord set, plug the female endinto the inlet on the unit and the male plug into the supply. Assure that unitsrequiring a fuse have a fuse installed.Push the power switch to the ON position and turn the Over TemperatureThermostat to its maximum position, clockwise so it will not interrupt the setting ofthe Main Temperature control.Figure 3: Placement of new thermometer clipThis section clamped underthe top platePinch these points after installation tocreate friction pressure on thermometerThis section clamped under the top plateLoosen screws, slide clipbetween top cover and bodywhere shown and retightenscewsNote: use caution when closing damperto avoid breaking thermometerclip installed6.2Setting Main TemperaturePlace the reference thermometer through the exhaust port on top of the unit; a clip isprovided with your accessory package. See Figure 3.The operating range for this oven is ambient room temperature + 5°C to 200°C. Toset the Main Temperature Controller turn the knob to the desired oven temperature,using the graduated dial as a reference guide. Allow one hour for the temperatureto stabilize. Using the reference thermometer, verify the oven temperature; if it isnot at the desired value, turn the control knob up or down as needed. Allow thetemperature to re-stabilize, continuing the process until the exact desired temperatureis achieved.Note: Slight vapor or smoke may occur in the initial heat-up. This is a normal occurrencewhen the oven is first brought up to temperature and protective coatings onthe element become hot.89