

(jeb@oscalemag.com). - O Scale Trains Magazine Online
(jeb@oscalemag.com). - O Scale Trains Magazine Online
(jeb@oscalemag.com). - O Scale Trains Magazine Online

You also want an ePaper? Increase the reach of your titles
YUMPU automatically turns print PDFs into web optimized ePapers that Google loves.
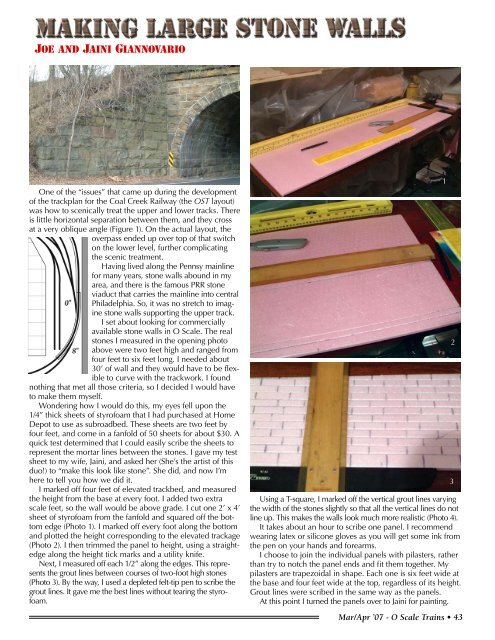
JOE AND JAINI GIANNOVARIOOne of the “issues” that came up during the developmentof the trackplan for the Coal Creek Railway (the OST layout)was how to scenically treat the upper and lower tracks. Thereis little horizontal separation between them, and they crossat a very oblique angle (Figure 1). On the actual layout, theoverpass ended up over top of that switchon the lower level, further <strong>com</strong>plicatingthe scenic treatment.Having lived along the Pennsy mainlinefor many years, stone walls abound in myarea, and there is the famous PRR stoneviaduct that carries the mainline into centralPhiladelphia. So, it was no stretch to imaginestone walls supporting the upper track.I set about looking for <strong>com</strong>merciallyavailable stone walls in O <strong>Scale</strong>. The realstones I measured in the opening photoabove were two feet high and ranged fromfour feet to six feet long. I needed about30’ of wall and they would have to be flexibleto curve with the trackwork. I foundnothing that met all those criteria, so I decided I would haveto make them myself.Wondering how I would do this, my eyes fell upon the1/4” thick sheets of styrofoam that I had purchased at HomeDepot to use as subroadbed. These sheets are two feet byfour feet, and <strong>com</strong>e in a fanfold of 50 sheets for about $30. Aquick test determined that I could easily scribe the sheets torepresent the mortar lines between the stones. I gave my testsheet to my wife, Jaini, and asked her (She’s the artist of thisduo!) to “make this look like stone”. She did, and now I’mhere to tell you how we did it.I marked off four feet of elevated trackbed, and measuredthe height from the base at every foot. I added two extrascale feet, so the wall would be above grade. I cut one 2’ x 4’sheet of styrofoam from the fanfold and squared off the bottomedge (Photo 1). I marked off every foot along the bottomand plotted the height corresponding to the elevated trackage(Photo 2). I then trimmed the panel to height, using a straightedgealong the height tick marks and a utility knife.Next, I measured off each 1/2” along the edges. This representsthe grout lines between courses of two-foot high stones(Photo 3). By the way, I used a depleted felt-tip pen to scribe thegrout lines. It gave me the best lines without tearing the styrofoam.Using a T-square, I marked off the vertical grout lines varyingthe width of the stones slightly so that all the vertical lines do notline up. This makes the walls look much more realistic (Photo 4).It takes about an hour to scribe one panel. I re<strong>com</strong>mendwearing latex or silicone gloves as you will get some ink fromthe pen on your hands and forearms.I choose to join the individual panels with pilasters, ratherthan try to notch the panel ends and fit them together. Mypilasters are trapezoidal in shape. Each one is six feet wide atthe base and four feet wide at the top, regardless of its height.Grout lines were scribed in the same way as the panels.At this point I turned the panels over to Jaini for painting.Mar/Apr ’07 - O <strong>Scale</strong> <strong>Trains</strong> • 43123


