Installation Instructions - Chris Alston's Chassisworks
Installation Instructions - Chris Alston's Chassisworks Installation Instructions - Chris Alston's Chassisworks
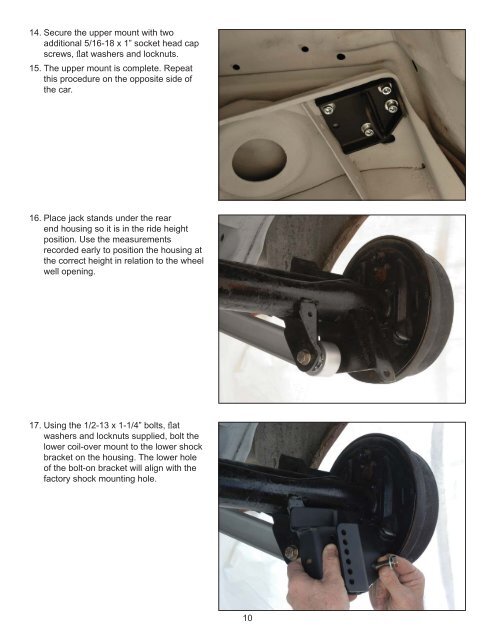
14. Secure the upper mount with twoadditional 5/16-18 x 1” socket head capscrews, fl at washers and locknuts.15. The upper mount is complete. Repeatthis procedure on the opposite side ofthe car.16. Place jack stands under the rearend housing so it is in the ride heightposition. Use the measurementsrecorded early to position the housing atthe correct height in relation to the wheelwell opening.17. Using the 1/2-13 x 1-1/4” bolts, fl atwashers and locknuts supplied, bolt thelower coil-over mount to the lower shockbracket on the housing. The lower holeof the bolt-on bracket will align with thefactory shock mounting hole.10
18. Align the top edge on the coil-overmount parallel to the axle tube, using alevel as shown.19. Tighten the 1/2” bolt securing the coilover bracket to the OEM shock mount.20. Use a clamp to hold the mount in placewhile drilling a second mounting hole.21. Using the mount as a guide drill a 1/2”diameter hole through the OEM bracketas shown.11
- Page 4: 4DRIVER SIDE SHOWN
- Page 7 and 8: 3. Jack the car up and place two ja
- Page 9: 11. Bolt the upper coil-over mount
- Page 13 and 14: 25. Remove the rear lower control a
- Page 15 and 16: Before proceeding, the rearend hous
- Page 17 and 18: 42. The upper mount and coil-over s
- Page 19 and 20: 48. Once the clearance is checked y
- Page 21 and 22: VERIFY RIDE HEIGHT (COIL-OVERS)Afte
- Page 23 and 24: 1. Verify that the springs are supp
14. Secure the upper mount with twoadditional 5/16-18 x 1” socket head capscrews, fl at washers and locknuts.15. The upper mount is complete. Repeatthis procedure on the opposite side ofthe car.16. Place jack stands under the rearend housing so it is in the ride heightposition. Use the measurementsrecorded early to position the housing atthe correct height in relation to the wheelwell opening.17. Using the 1/2-13 x 1-1/4” bolts, fl atwashers and locknuts supplied, bolt thelower coil-over mount to the lower shockbracket on the housing. The lower holeof the bolt-on bracket will align with thefactory shock mounting hole.10


