309029D Automatic Delta Spray Air Spray Gun ... - Graco Inc.
309029D Automatic Delta Spray Air Spray Gun ... - Graco Inc. 309029D Automatic Delta Spray Air Spray Gun ... - Graco Inc.
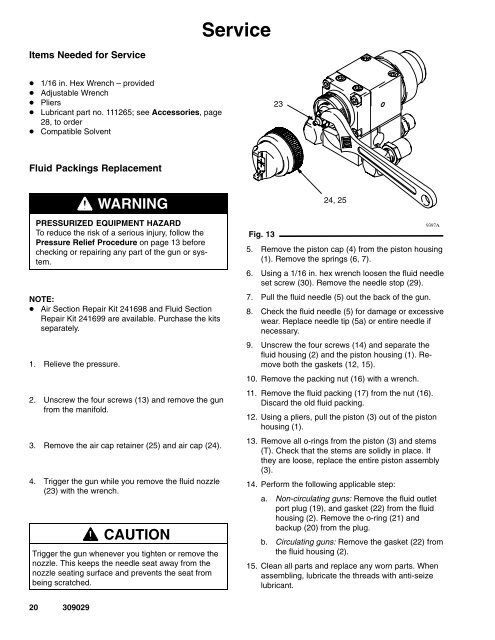
ServiceItems Needed for Service1/16 in. Hex Wrench – providedAdjustable WrenchPliersLubricant part no. 111265; see Accessories, page28, to orderCompatible Solvent23Fluid Packings ReplacementWARNINGPRESSURIZED EQUIPMENT HAZARDTo reduce the risk of a serious injury, follow thePressure Relief Procedure on page 13 beforechecking or repairing any part of the gun or system.NOTE: Air Section Repair Kit 241698 and Fluid SectionRepair Kit 241699 are available. Purchase the kitsseparately.1. Relieve the pressure.2. Unscrew the four screws (13) and remove the gunfrom the manifold.3. Remove the air cap retainer (25) and air cap (24).4. Trigger the gun while you remove the fluid nozzle(23) with the wrench.CAUTIONTrigger the gun whenever you tighten or remove thenozzle. This keeps the needle seat away from thenozzle seating surface and prevents the seat frombeing scratched.Fig. 1324, 255. Remove the piston cap (4) from the piston housing(1). Remove the springs (6, 7).6. Using a 1/16 in. hex wrench loosen the fluid needleset screw (30). Remove the needle stop (29).7. Pull the fluid needle (5) out the back of the gun.8. Check the fluid needle (5) for damage or excessivewear. Replace needle tip (5a) or entire needle ifnecessary.9. Unscrew the four screws (14) and separate thefluid housing (2) and the piston housing (1). Removeboth the gaskets (12, 15).10. Remove the packing nut (16) with a wrench.11. Remove the fluid packing (17) from the nut (16).Discard the old fluid packing.12. Using a pliers, pull the piston (3) out of the pistonhousing (1).13. Remove all o-rings from the piston (3) and stems(T). Check that the stems are solidly in place. Ifthey are loose, replace the entire piston assembly(3).14. Perform the following applicable step:a. Non-circulating guns: Remove the fluid outletport plug (19), and gasket (22) from the fluidhousing (2). Remove the o-ring (21) andbackup (20) from the plug.b. Circulating guns: Remove the gasket (22) fromthe fluid housing (2).15. Clean all parts and replace any worn parts. Whenassembling, lubricate the threads with anti-seizelubricant.20 309029
Service23 1 25 2 2 15* 1 2 10* 3 11* 3 T 4 429245a95 3 17 16 8 12* 9* 3 3 3 3 8* 6 7 30 7 69390ACutaway View;Part No. 241737 Gun ShownSERVICE NOTES:1 Torque to 145–155 in-lb (16.4–17.5 Nm)2 Lubricate threads with anti-seize lubricant34567Lubricate with light-weight oilTighten cap (4) until it bottoms outTorque to 65 in-lb (7.3 Nm)Apply semi-permanent anaerobic sealant.Torque to 4–5 in-lb (0.45–0.56 Nm)8 Torque to 95–105 in-lb (10.7–11.8 Nm)9Apply semi-permanent anaerobic sealant to twothreads at the end of the needle shaft.Fig. 14309029 21
- Page 2 and 3: SymbolsWarning SymbolWARNINGThis sy
- Page 4 and 5: TERMS:Light Fluid:Medium Fluid:Sele
- Page 6 and 7: InstallationThe Delta Spray air spr
- Page 8 and 9: Setup1. Connect the Air LineNOTE: Y
- Page 10 and 11: Setup6. Adjust the Spray PatternWAR
- Page 12 and 13: 12 309029Notes
- Page 14 and 15: Daily Gun Care, Flushing, and Clean
- Page 16 and 17: TroubleshootingWARNINGPRESSURIZED E
- Page 18 and 19: 18 309029Notes
- Page 22 and 23: ServiceReassembly1. Non-circulating
- Page 24 and 25: PartsPart No. 241737 to 241744, Ser
- Page 26 and 27: Part No. 241696, Series AManifold w
- Page 28 and 29: AccessoriesFluid Whip Hose Assembly
- Page 30 and 31: Technical DataMaximum working fluid
- Page 32: Graco Standard WarrantyGraco warran
ServiceItems Needed for Service1/16 in. Hex Wrench – providedAdjustable WrenchPliersLubricant part no. 111265; see Accessories, page28, to orderCompatible Solvent23Fluid Packings ReplacementWARNINGPRESSURIZED EQUIPMENT HAZARDTo reduce the risk of a serious injury, follow thePressure Relief Procedure on page 13 beforechecking or repairing any part of the gun or system.NOTE: <strong>Air</strong> Section Repair Kit 241698 and Fluid SectionRepair Kit 241699 are available. Purchase the kitsseparately.1. Relieve the pressure.2. Unscrew the four screws (13) and remove the gunfrom the manifold.3. Remove the air cap retainer (25) and air cap (24).4. Trigger the gun while you remove the fluid nozzle(23) with the wrench.CAUTIONTrigger the gun whenever you tighten or remove thenozzle. This keeps the needle seat away from thenozzle seating surface and prevents the seat frombeing scratched.Fig. 1324, 255. Remove the piston cap (4) from the piston housing(1). Remove the springs (6, 7).6. Using a 1/16 in. hex wrench loosen the fluid needleset screw (30). Remove the needle stop (29).7. Pull the fluid needle (5) out the back of the gun.8. Check the fluid needle (5) for damage or excessivewear. Replace needle tip (5a) or entire needle ifnecessary.9. Unscrew the four screws (14) and separate thefluid housing (2) and the piston housing (1). Removeboth the gaskets (12, 15).10. Remove the packing nut (16) with a wrench.11. Remove the fluid packing (17) from the nut (16).Discard the old fluid packing.12. Using a pliers, pull the piston (3) out of the pistonhousing (1).13. Remove all o-rings from the piston (3) and stems(T). Check that the stems are solidly in place. Ifthey are loose, replace the entire piston assembly(3).14. Perform the following applicable step:a. Non-circulating guns: Remove the fluid outletport plug (19), and gasket (22) from the fluidhousing (2). Remove the o-ring (21) andbackup (20) from the plug.b. Circulating guns: Remove the gasket (22) fromthe fluid housing (2).15. Clean all parts and replace any worn parts. Whenassembling, lubricate the threads with anti-seizelubricant.20 309029


