Installation and setup of APGs OPOS to interface with Microsoft RMS
Installation and setup of APGs OPOS to interface with Microsoft RMS
Installation and setup of APGs OPOS to interface with Microsoft RMS

You also want an ePaper? Increase the reach of your titles
YUMPU automatically turns print PDFs into web optimized ePapers that Google loves.
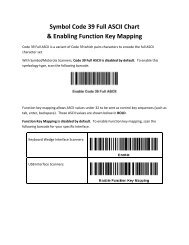
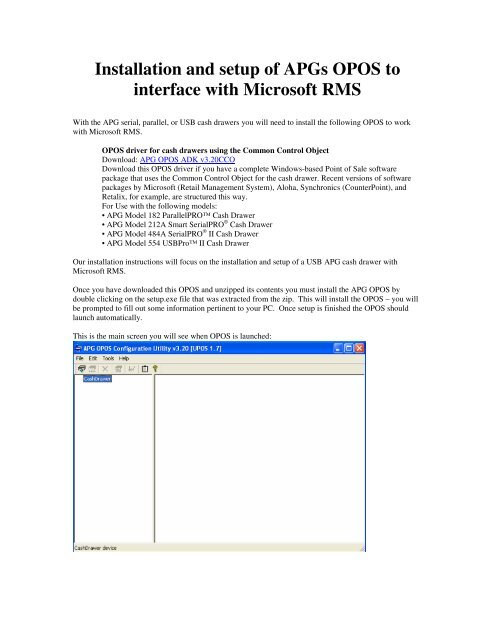
<strong>Installation</strong> <strong>and</strong> <strong>setup</strong> <strong>of</strong> <strong>APGs</strong> <strong>OPOS</strong> <strong>to</strong><strong>interface</strong> <strong>with</strong> Micros<strong>of</strong>t <strong>RMS</strong>With the APG serial, parallel, or USB cash drawers you will need <strong>to</strong> install the following <strong>OPOS</strong> <strong>to</strong> work<strong>with</strong> Micros<strong>of</strong>t <strong>RMS</strong>.<strong>OPOS</strong> driver for cash drawers using the Common Control ObjectDownload: APG <strong>OPOS</strong> ADK v3.20CCODownload this <strong>OPOS</strong> driver if you have a complete Windows-based Point <strong>of</strong> Sale s<strong>of</strong>twarepackage that uses the Common Control Object for the cash drawer. Recent versions <strong>of</strong> s<strong>of</strong>twarepackages by Micros<strong>of</strong>t (Retail Management System), Aloha, Synchronics (CounterPoint), <strong>and</strong>Retalix, for example, are structured this way.For Use <strong>with</strong> the following models:• APG Model 182 ParallelPRO Cash Drawer• APG Model 212A Smart SerialPRO ® Cash Drawer• APG Model 484A SerialPRO ® II Cash Drawer• APG Model 554 USBPro II Cash DrawerOur installation instructions will focus on the installation <strong>and</strong> <strong>setup</strong> <strong>of</strong> a USB APG cash drawer <strong>with</strong>Micros<strong>of</strong>t <strong>RMS</strong>.Once you have downloaded this <strong>OPOS</strong> <strong>and</strong> unzipped its contents you must install the APG <strong>OPOS</strong> bydouble clicking on the <strong>setup</strong>.exe file that was extracted from the zip. This will install the <strong>OPOS</strong> – you willbe prompted <strong>to</strong> fill out some information pertinent <strong>to</strong> your PC. Once <strong>setup</strong> is finished the <strong>OPOS</strong> shouldlaunch au<strong>to</strong>matically.This is the main screen you will see when <strong>OPOS</strong> is launched:
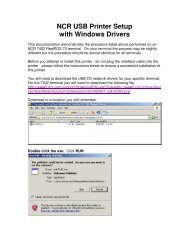
To add your new device you will click Edit > Add Device:Select your type <strong>of</strong> cash drawer:
Give your new device a LDN <strong>and</strong> click next. Remember this name (case sensitive) for <strong>setup</strong> in Micros<strong>of</strong>t<strong>RMS</strong> later:Select what port the cash drawer is installed on:
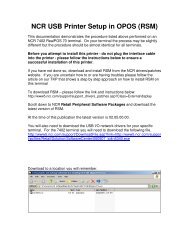
Perform a check health interactive – when prompted click OK <strong>to</strong> open the cash drawer. Now click finish <strong>to</strong>add this device in<strong>to</strong> <strong>OPOS</strong>.
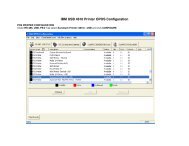
Here you see the new device added in<strong>to</strong> <strong>OPOS</strong> showing its model, its LDN, <strong>and</strong> which port it is on.
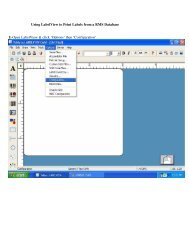
Now you will need <strong>to</strong> open Micros<strong>of</strong>t <strong>RMS</strong> Manager. Click on Database > Registers > Register List.
Click on Properties
Click on Cash Drawer 1, click on “Cash Drawer 1 is enabled for this register”, <strong>and</strong> enter the <strong>OPOS</strong> devicename as the same listed as the LDN in APG’s <strong>OPOS</strong>.Click OK <strong>and</strong> restart each POS station for these changes <strong>to</strong> take effect.