Illustrated Parts Diagram - Allparts Equipment & Accessories
Illustrated Parts Diagram - Allparts Equipment & Accessories
Illustrated Parts Diagram - Allparts Equipment & Accessories

Create successful ePaper yourself
Turn your PDF publications into a flip-book with our unique Google optimized e-Paper software.
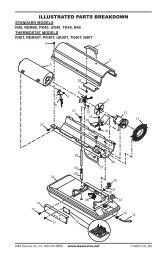
UNPACKINGASSEMBLY(For 100,000 and 150,000Btu/Hr Models Only)1. Remove all packing items applied to heater for shipment.2. Remove all items from carton.3. Check items for any shipping damage. If heater is damaged, promptly informdealer where you bought heater.These models are furnished with wheels and handles. Wheels, handles, and themounting hardware are found in the shipping carton.Tools Needed• Medium Phillips Screwdriver• 3/8" Open or Adjustable Wrench• Hammer1. Slide axle through wheel support frame. Install wheels on axle.IMPORTANT: When installing wheels, point extended hub of wheels towardwheel support frame (see Figure 3).2. Place cap nuts on axle ends. Gently tap with hammer to secure.3. Place heater on wheel support frame. Make sure air inlet end (rear) of heater isover wheels. Line up holes on fuel tank flange with holes on wheel support frame.4. Place front handle and rear handle on top of fuel tank flange. Insert screwsthrough handles, fuel tank flange, and wheel support frame. Attach nut fingertight after each screw is inserted.5. After all screws are inserted, tighten nuts firmly.Front HandleHot AirOutletScrewRearHandleFuel TankFlangeAirInletWheelSupportFrameWheelNutCap NutAxleExtendedHubFigure 3 - Wheel and Handle Assembly, 100/150,000 Btu/Hr Models Only5102685