Create successful ePaper yourself
Turn your PDF publications into a flip-book with our unique Google optimized e-Paper software.
NorthwestTerritoriesPolicy71.09Geographical and Community Names1. Statement of PolicyThe Government of the Northwest Territories recognizes the importance oftraditional names for geographical features and populated places to thelanguage, culture and history of the indigenous people of the NorthwestTerritories and supports the official recognition and preservation of thesenames.2. PrinciplesThe Government of the Northwest Territories will adhere to the followingprinciples when implementing this Policy:(1) Traditional names for geographical features and populated placesshould continue to form an integral part of the language, culture andhistory of the indigenous people of the Northwest Territories.(2) Traditional names for geographical features and populated placesshould be officially recognized to assure their cultural continuity for thepeople of the Northwest Territories.(3) The public should be assured input and participation in the processleading to the official recognition of names for geographical featuresand populated places in the Northwest Territories.3. ScopeThis Policy applies to names for all geographical features and populatedplaces in the Northwest Territories.4. DefinitionsThe following terms apply to this Policy:Geographical Name - the name for a discernible physical feature (e.g.,“Prosperous Lake”).Reformatted 24 November, 1997 Page 1 of 6
10. ConnectionsWhen you connect the amplifier to other equipment, turn off the power andunplug all of the equipment from the supply source. Failure to do so maycause an electric shock and serious personal injury. Read the user manualof the other equipment carefully and follow the instructions when makingthe connections.11. LightningFor additional protection of this amplifier during lightning storms or whenit is left unattended and/or unused for long periods of time, unplug it fromthe wall outlet. This will prevent damage to the amplifier due to lightningand power line surges. Disconnection from the mains power supply canonly be achieved by removing the plug from the mains socket and byexternal disconnecting all poles from the mains.12. Damages that Require ServiceUnplug this amplifier from the mains supply and refer to your dealer/distributoror other authorized repair workshop if any of the following situationsoccur:if liquid has been spilled or objects have fallen into the amplifierif the amplifier has been exposed to rain or moistureif the amplifier has been dropped or damaged in any other wayif the power supply cord or plug has been damagedwhen the amplifier exhibits a distinct change from its normal functionor performancein case the amplifier has been used in a dusty environment for quitea period of time13. ServicingAll service and repair work must be carried out by a dealer/distributor authorizedby CODA. Do not attempt to service this amplifier yourself. Asopening or removing covers may expose you to dangerous voltage orother hazards, the amplifier may only be opened by qualified personnel.Please refer to your dealer/distributor.14. Spare PartsWhen spare parts are required, please ensure that the dealer/distributoronly uses spare parts specified by the manufacturer. The use of unauthorizedspare parts may result in injury and/or damage through fire orelectric shock or other electricity-related hazards.15. Safety CheckUpon completion of any service or repairs to this product, ask the dealer/distributor to perform safety checks to determine that the amplifier worksproperly.Recommendations on how to carry out the safety test can be found inDIN VDE 0701-1 “Maintenance, Modification and Test of Electronic Appliances“.16. CleaningUnplug this amplifier from the wall outlet before cleaning. Do not use liquidor aerosol cleaners. Clean only with dry cloth.17. Packaging and ShippingWhen shipping the <strong>C10</strong> amplifier, always use the original shipping cartonand packing materials. For maximum protection repack the unit as it wasoriginally packed at the factory.IMPORTANT SAFETY INSTRUCTIONSUSER MANUAL v1.0CODA <strong>C10</strong> 3
EXPLANATION OF SYMBOLSCAUTIONRISK OF ELECTRIC SHOCKDO NOT OPENCAUTION – HIGH VOLTAGE HAZARDSEXIST WITHIN THIS PRODUCT.REFER ALL SERVICING TOAUTHORIZED PERSONNEL.THE LIGHTNING FLASH WITH ARROW HEAD SYMBOL IS INTENDED TOALERT THE USER TO THE PRESENCE OF UNINSULATED DANGEROUSVOLTAGE WITHIN THE PRODUCT’S ENCLOSURE.THE EXCLAMATION MARK IS INTENDED TO ALERT THE USERTO IMPORTANT INSTRUCTIONS ALSO FOR MAINTENANCE IN THELITERATURE ACCOMPANYING THE AMPLIFIER.THE LIGHTNING FLASH WITH ARROW HEAD SYMBOL ALERTSTHE USER TO DANGEROUSLY HIGH VOLTAGE ATTHE OUTPUT CONNECTORSCAUTION – RISK OF ELECTRIC SHOCK – DO NOT OPEN.WARNING – TO PREVENT FIRE OR SHOCK HAZARD, DO NOTEXPOSE THIS AMPLIFIER TO RAIN OR MOISTURE.THE AMPLIFIER MAY ONLY BE CONNECTEDTO A SOCKET WITH A PROTECTIVE EARTH CONDUCTOR.4USER MANUAL v1.0CODA <strong>C10</strong>
EC Declaration Of Conformity In Accordance To EC Directives:electromagnetic compatibility (Council Directive 89/336/EEC,as amended by Directives 92/31/EEC and 93/68/EEC);low-voltage electrical equipment (Council Directive 73/23/EEC )Manufacturer´s Name:<strong>Coda</strong> <strong>Audio</strong> GmbHManufacturer´s Address:Boulevard der EU 6D-30539 HannoverGermanyDeclares That The Product With The Model Name:<strong>C10</strong>Conforms To The Following Standards:EN60065 SafetyEN55103-1 EmissionEN55103-2 ImmunityThe operating conditions and application environments presupposed inthe information for use (user manual) are to be kept to accordingly.Please Note: The following formulations have been chosen:<strong>Coda</strong> <strong>Audio</strong> <strong>C10</strong> for the type plate and for the EC declaration of conformity.<strong>C10</strong> for the front face of the applience and for the text in the usermanual.EC DECLARATION OF CONFORMITYHannover, 15.12.2010Svetlomir AlexandrovUSER MANUAL v1.0CODA <strong>C10</strong> 5
CONTENTSP. 2 IMPORTANT SAFETY INSTRUCTIONSP. 4 EXPLANATION OF SYMBOLSP. 5 EC DECLARATION OF CONFORMITYP. 6 CONTENTSP. 7 1 WELCOME1.1 Welcome To CODAP. 8 2 THE AMP2.1 Unpacking2.2 The AmplifierP. 9 2.3 <strong>C10</strong> – The Front2.4 <strong>C10</strong> – The RearP. 10 2.5 Factory settings3 INSTALLATION3.1 MountingP. 11 3.2 Cooling3.3 Wiring3.3.1 Analog Input - XLR Connection3.3.2 Dual Channel OperationP. 12 3.3.3 SPEAKON ConnectionP. 13 3.4 Mains supplyP. 14 4 OPERATION4.1 Screen <strong>User</strong> Interface4.1.1 Screen <strong>User</strong> Interface Elements4.1.2 Handle the Selection BarsP. 15 4.1.3 Hot key Functions4.2 Power On SequenceP. 16 4.3 Indicators4.3.1 Input Selection LED4.3.2 Output Mode LED4.3.3 Clip LED4.3.4 Sensor LED4.3.5 Device Identifier LED4.3.6 DSP LED4.3.7 Uman Network Status LEDP. 17 4.4 Main MenuP. 17 4.5 Input/Output4.5.1 Input Selection4.5.2 Output Mode4.6 Amp Gain and Input Sensitivity4.7 DSPP. 18 4.8 <strong>C10</strong> ApplicationsP. 19 4.8.1 Use with Sensor controlledSubwoofers4.8.2 Use without comparatorP. 20 4.9 Speaker and sensorcableconnectionP. 21 4.9.1 Switching Comparator ON/OFFP. 22 4.10 Power Amp Protection Systems4.10.1 Clip Limiter4.10.2 SOA Protection4.10.3 DC Protection4.10.4 DC Servo4.10.5 Overcurrent Protection4.10.6 Thermal Protection4.11 Main Protections4.11.1 Inrush Current Limitation4.11.2 Mains Over Voltage Detection4.11.3 Mains Failure DetectionP. 23 4.11.4 Fuse Protection4.12 Main SMPS Protections4.12.1 Overcurrent Protection4.12.2 Thermal Protection4.13 FansP. 24 4.14 Filter CleaningP. 25 5 SPECIFICATIONP. 27 6 TYPICAL PERFORMANCE DIAGRAMSP. 28 7 WARRANTY INFORMATION7.1 Summary of Warranty7.2 Items Excluded from This Warranty7.3 What CODA Will Do7.4 How to Obtain Warranty Service7.5 CODA’s Product ImprovementP. 29 8 SERVICE INFORMATIONP. 30 9 MAINTENANCE INFORMATION10 DECOMMISSIONINGP. 31 COMPANY INFORMATIONP. 32 NOTICES/CHANGES MADE TO THEAMPLIFIER6USER MANUAL v1.0CODA <strong>C10</strong>
1.1 Welcome To CODA AUDIO<strong>Coda</strong> <strong>Audio</strong> – designer and manufacturer of highest quality speaker systems<strong>Coda</strong> <strong>Audio</strong> is a leading designer and manufacturer of high quality proaudioloudspeaker systems.1 WELCOMECore to our products are a number of unique patented driver technologydesigns which provide outstanding dynamic results as well as improvedprecision and reliability over conventional components.To ensure the highest quality and control over our products we have ourown manufacturing facility in Europe which produces all of the driver andcabinet components. Further benefits to this approach include substantialreductions in cost and quicker times to market for new products.We have a wide product range offering high quality solutions to satisfy themost discerning and complex professional sound reinforcement applications,ranging from portable to installation to touring.<strong>Coda</strong> <strong>Audio</strong> is represented via a global network of experienced and technicallyqualified international distributors.We believe that the best way to get to know us better is by listening to ourloudspeakers because:HEARING IS BELIEVINGUSER MANUAL v1.0CODA <strong>C10</strong> 7
2 THE AMPLIFIER2.1 UnpackingPlease unpack and inspect your new amplifier for any damage that mayhave occurred during transit. If damage is found, notify the transportationcompany immediately. Only you as the consignee may initiate a claimfor shipping damage. CODA will be happy to cooperate fully as needed.Please save the shipping carton as evidence of damage for the shipper’sinspection.Even if the amplifier has arrived in perfect condition, save all packing materialsfor any future transport of the unit.When shipping the <strong>C10</strong> amplifier, always use the original shipping cartonand packing materials. For maximum protection, repack the unit as it wasoriginally packed at the factory.NOTE: NEVER SHIP THE AMPLIFIER WITHOUT THE ORIGINALPACKING MATERIALS.2.2 The AmplifierThe <strong>C10</strong> amplifiers offer a power output of:4400 W peak per channel @ 4 Ω (3800 W rms)4400 W peak per channel @ 2 Ω (4000 W rms)8800 W peak in Mono Bridge @ 4 Ω (7600 W rms)8800 W peak in Parallel Mono @ 2 Ω (8000 W rms)using a bipolar class H high efficiency power amplifier output stage.The <strong>C10</strong> power amplifier is fitted with Dual Voltage Switched Mode PowerSupply (SMPS) with automatic voltage selection for 120V / 230 V operation,which significantly reduces the weight and size (only 2U) of the amplifier.Using SMPS, the seamlessly regulated symmetrical supply voltagesof the power amplifier are more stable and efficient than the power suppliesused in conventional amplifiers.The <strong>C10</strong> also uses a microprocessor for controlling and monitoring thepower amp. This has four main advantages over more traditional poweramp systems:Reduced DistortionImproved Noise CharacteristicsIntegrated Remote ControlIndication of Protection or FailuresThe <strong>C10</strong> has been designed as an intelligent and powerful amplifier forperforming specialised tasks within a complex audio system. <strong>User</strong>s canadapt the power amp to meet their specific audio requirements beforeuse. The display mounted on the front of the <strong>C10</strong> amplifier allow the differentfunctions to be accessed. Since there are a lot of parameters available,it is important that users should familiarize themselves thoroughlywith the entire range of settings and programmable features before usingthe power amp.If you have any questions regarding features and/or functions of your <strong>C10</strong>amplifier, CODA will be pleased to provide you with further information.Alternatively, contact your dealer or distributor.8USER MANUAL v1.0CODA <strong>C10</strong>
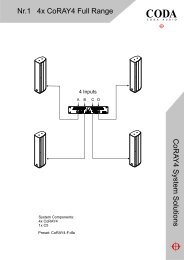
3-111 2122 THE AMPLIFIER2 22.3 <strong>C10</strong> - The Front1 Display 8 Clip LED Channel B2 Touch Controls 9 Signal LED Channel B3 Input Selection LED 10 DSP LED4 Output Mode LED 11 Uman Network Status LED5 Clip LED Channel A 12 Cooling Air Inlet Vents6 Signal LED Channel A 13 Removable Air Filter System7 Device Indicator LED132.4 <strong>C10</strong> - The Rear14 AC Power Connector 19 XLR - Line Inputs15 SPEAKON Connectors 20 Uman Network Connectors16 Cooling Air Outlet Vents 21 Uman Network Link LED17 Sense Connector 22 Ethernet Connector for18 XLR - Line Linksremote access22 2120 CAMCO PRODUKTIONS-UND VERTRIEBS-GMBHFISCHPICKE 5D-57482 WENDENGERMANY 14 1516 17 1819USER MANUAL v1.0CODA <strong>C10</strong> 9
2 THE AMPLIFIER / 3 INSTALLATION2.5 Factory settings<strong>C10</strong> amplifiers are delivered with the following factory settingsPower Status Amplifier is switched OffMuteBoth channels activeInput Selection AnalogLevel Attenuator 0 dB both channelsClip Limiter OnOutput Mode Dual ChannelAmpGain32 dBIP Settings 192.168.1.1IP Mask 255.255.255.0IP Gateway 192.168.1.1DSPOffDisplay Brightness 75%Lock Device UnlockedComparator Off3.1 MountingUse four screws and washers when mounting the amplifier to the front rackrails. For mobile use, the amplifier should also be secured using the 19”mounting elements on the rear panel.88,1 mm424,5 mm76,2 mm10,5 mm465,0 mm442,0 mm7,5 mm452,0 mm440,5 mm483,0 mm10USER MANUAL v1.0CODA <strong>C10</strong>
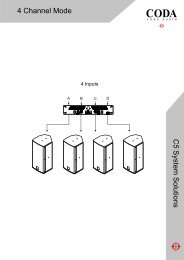
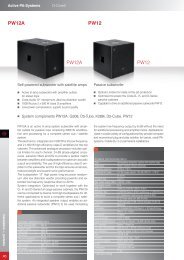
3.2 CoolingUnder normal operation of the power amp, overheating should never bea problem. The air is taken in from the front and out through the back. Itis of course essential that while the power amp is running, air is able tocirculate around it freely. The efficiency of the cooling will depend on boththe immediate environment (e.g. an enclosed rack, direct sunlight) andthat the front filter is clogged. If the amp is installed in a case, the openarea at the back of the case must be at least 140 cm². This area should bein line with the amp. If this cannot be achieved, a forced ventilation systemhas to be used.3.3.2 Dual Channel OperationTwo fully independent amplifier channels (normal operating mode).A (L)B (R)<strong>C10</strong>Z ≥ *Z min3 INSTALLATION3.3 Wiring3.3.1 Analog Input - XLR ConnectionXLR: Pin 1 = Ground (or lifted via 15 Ω resistor)Pin 2 = Hot (in-phase)Pin 3 = Cold (out of phase)Always use symmetrically (balanced) shielded cable to connect the amplifier.LINK BLINK AInputChannel BInputChannel AZ ≥ *Z min231231 132 1 23ToChannel BToChannel AUSER MANUAL v1.0CODA <strong>C10</strong> 11
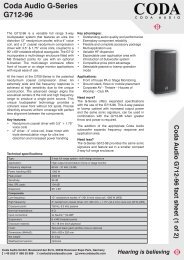
3 INSTALLATION3.3.3 SPEAKON ConnectionBoth SPEAKON connectors are connected to channel A and channel Boutputs. The pin configuration of the SPEAKON connectors is as follows:Upper SPEAKON: Pin 1+ Channel A signalPin 1- Channel A groundPin 2+ Channel B signalPin 2- Channel B groundBottom SPEAKON: Pin 1+ Channel B signalPin 1- Channel B groundPin 2+ Channel A signalPin 2- Channel A groundInputChannel AUpper SPEAKONInputChannel BBottom SPEAKON12USER MANUAL v1.0CODA <strong>C10</strong>
WARNING!SPEAKON connectors marked with the lightning flashes indicate highvoltages that are potentially life threatening.Wiring to these terminals requires installation by an instructed person orthe use of ready-made leads or cords.Custom wiring should only be carried out by qualified personnel.To prevent electric shock, do not operate the amplifier with any of theconductor portion of the speaker wire exposed.NOTE: For reasons of safety and performance do only use high-qualityfully insulated speaker cables of stranded copper wire. Use thelargest wire size that is economically and physically practical. Makesure that the cables are not longer than necessary.IMPORTANT: When connecting speaker cabinets in parallel, alwaysuse all the contacts in both SPEAKON connectors. If not, this maycause permanent damage to the connectors and considerably reduceperformance.3.4 Mains supplyWhen mounting or connecting the amp, always disconnect it from mains. Onlyconnect the <strong>C10</strong> amplifier to an appropriate AC circuit and outlet in accordancewith the requirements indicated in the second line on the rating plate.Exemplary rating plates for a mains supply of 120/230 V AC 50/60 Hz.Power Supply Data: CODA <strong>Audio</strong> <strong>C10</strong>120/230 V ~ 50/60 Hz 2100 W4400 W / 2 Ωxxxxx Voltage Mains Frequency Current Power Consumption<strong>C10</strong> 120/230 V 50/60 Hz 30/15 A 2100 WNOTE: Even under normal conditions the mains current can reach levelsup to 20 A (230 V), and 40 A (120 V), respectively; this could causelamps to flicker if connected to the same mains as the amp. The impedanceof the AC circuit should be less than 0,157 Ω to avoid flickeraccording to EN61000-3-11 “Electromagnetic compatibility – Part 3-11: Limits – Limitation of voltage changes, voltage fluctuations, and flickerin the public low-voltage supply systems – Equipment with rated current ≤75 A and subject to conditional connection”. If in any doubt, consult yourlocal power provider. Never attempt to measure this impedance level withyour Ohmmeter. This may damage your meter and expose you to the riskof electric shock!3 INSTALLATIONUSER MANUAL v1.0CODA <strong>C10</strong> 13
4 OPERATION4.1 Screen <strong>User</strong> InterfaceDue to the advanced approach with the absence of any control knobs orswitches, control of all parameters is done via the screen user interface.4.1.1 Screen <strong>User</strong> Interface ElementsThe screen user interface consists of four buttons and two selection bars.1 26 Vertical Selection Bar (VSB)- scrolls through menu items4.1.2 Handle the Selection Bars3465-Tip the VSB at the upper half to scroll upwards.-Tip the VSB at the lower half to scroll downwards.1 MENU button ( )- touch to leave the current sreen without changes- Hot key: touch and hold (≈2 s) to navigate to the Signal Monitor2 ENTER button ( )- navigate to the selected menu item, confirm changes3 A button ( )- select channel A4 B button ( )- select channel B5 Horizontal Selection Bar (HSB)- increase/decrease values14USER MANUAL v1.0CODA <strong>C10</strong>-Tip the HSB at the left half to decrease values.-Tip the HSB at the right half to increase values.
4.1.3 Hot key FunctionsThe Hot key Functions give you a quick access to important setting screens.The Power Hot key is accessible from all menu levels and screens.Power Off Hot key:Touch and hold MENU and ENTER simultaneously (≈3 s).Power Off screen will be displayed. Touching again MENU and ENTERsimultaneously will start Power Off-Sequence.Level Attenuator Hot key (from monitor screens 3.1-3.4):Touching the HSB opens the Level Attenuator Screen for a quick accessto level adjustments. After adjustment you can step back to the previousscreen by touching the MENU button.4.2 Power On-SequenceAs soon as the <strong>C10</strong> amplifer is connected to the mains power supply, itwill start the Power On-Sequence. The display will show the <strong>C10</strong> logo followedby the Power On-Screen.4 OPERATIONMute Hot key (from monitor screens 3.2-3.4):Touching button A or button B let you directly jump to the Signal Monitor.Here you can mute/unmute each channel directly by touching button A orbutton B again. After adjustment you can step back to the previous screenby touching the MENU button.Signal Monitor Hot keyTouch and hold MENU (≈3 s) let you directly jump to the Signal Monitor.You can step back to the previous screen by touching the MENU button.This is the screen used to switch the amplifier on/off. Please touch MENUand ENTER simultaneously to switch on the amplifier or touch any of thetouch-sensitive elements to activate the display backlight.NOTE: Turning the Amplifier off does NOT disconnect the amplifierfrom mains.The switch initiates start-up by activating the current limiting function. Assoon as the power amplifier is connected to the mains power supply, avoltage is supplied to both the line-filter and the fused input of the controllablerectifier. Disconnecting the amplifier from the main power supply canonly be achieved by physically separating the amplifier from the mains bypulling the mains plug. The mains plug therefore has to be freely accessible.Disconnect the mains plug from the mains during a lightning stormor when the amplifier remains unused or unsupervised for a prolonged periodof time. Alternatively, you can disconnect the amplifier from the mainsvia an external all-pole disconnection.If a power cut occurs while the amplifier is switched on, it will restart automaticallyonce the power supply has been restored. All settings prior to theloss of power will be maintained.USER MANUAL v1.0CODA <strong>C10</strong> 15
4.4 Main MenuTo switch the amplifier off use the Power menu.All settings important for operation of the amplifier are accessible in theSettings menu.Information about operating state of the amplifier like Temperature, OutputSignal, Configuration Overview, and Network Overview are accessible inthe Monitor menu.Adjustments for display brightness and contrast will be done in menu Display.A temporary lock of the touch-sensitive elements to prevent unintentionalchanges is accessible through the Lock Device menu.The serial number and current firmware version of your <strong>C10</strong> are displayedin the System Info.Please consult the <strong>C10</strong> Navigation Guide for details about the menu. Youcan always find the current <strong>C10</strong> Navigation Guide on our website codaaudio.net.4.5 Input/Output4.5.1 Input SelectionDue to the fact that the <strong>C10</strong> amplifier has a Uman Digital <strong>Audio</strong> NetworkInterface which is built-in and ready to use, there are three different Inputselections possible:AnalogIn this mode analog signals connected to the XLR Input connectors at theback of the amplifier will be used as input signal.DigitalWith the digital setting input signals are taken from the Uman Digital <strong>Audio</strong>Network Interface.Digital with Analog fallbackFor normal operation the input signals are taken from the Uman Digital<strong>Audio</strong> Network Interface. In case of a disconnection or failure of the Digital<strong>Audio</strong> Network the fallback mode automatically switches over to the analoginputs and gives you an extra portion of redundancy.4.5.2 Output ModeThere are three different Output Modes available:Dual Channel OperationMono Bridge OperationParallel Mono OperationFor more information about Output Modes please see section 3.3.4.6 Amp Gain and Input SensitivityThe <strong>C10</strong> amplifier has a 32 dB voltage gain sensitivity setting.The table shows input sensitivity per channel for a given gain and load.Model<strong>C10</strong> 4330 W @ 2 Ω*3885 W @ 4 Ω*2350 W @ 8 Ω*1250 W @ 16 Ω*4955 W Peak @ 4 Ω **32 dB2,35 V3,14 V3,46 V3,56 V3,58 V* All channels driven, 1 kHz, >1% THD @ 230 VAC** Peak Power at 4 Ohm, component tolerance dependent (+/-1,25%)Subject to technical alterations without prior notice4.7 DSPWith the optional DSP-Board installed you can route the DSP into the signalchain (DSP On) or bypass the complete DSP section (DSP Off).For more information regarding DSP functionality and Remote Control ofthe Amplifier please visit www.codaaudio.com.USER MANUAL v1.0CODA <strong>C10</strong> 174 OPERATION
4 OPERATION4.8 ApplicationsAIRLINE LA12 AIRLINE LA8 SC8 SC4 SCP18USER MANUAL v1.0CODA <strong>C10</strong>
4.8.1 Use with sensor controlled SubwoofersSC8 SC4 SCP4.8.2 Use without comparator. AIRLINE LA12, AIRLINE LA8, CUE-Series, etc.AIRLINE LA12 AIRLINE LA8 CUE-Series4 OPERATIONComparator ONThe Sensor LED is OrangeComparator OFFThe SensorLED is not glowingUSER MANUAL v1.0CODA <strong>C10</strong> 19
4 OPERATION4.9 Speaker and Sensorcable connection CAMCO PRODUKTIONS-UND VERTRIEBS-GMBHFISCHPICKE 5D-57482 WENDENGERMANY5-Pol XLR Sensor Cable connection4-Pol Speakon Cable connection20USER MANUAL v1.0CODA <strong>C10</strong>
5.9.1 Switching Comparator ON/OFF4 OPERATION1. Press the MENU ( ) and scroll downby using the Vertical Selection Bar (VSB)to the Menu point 2 Settings.Press the ENTER button ( )2. You are now in the Settings Menu. Usethe Vertical Selection Bar (VSB) to go tothe Menu point 2.14 Comparator.Press the ENTER button ( )3. You are now in the Comparator Menu.Press button A ( )- to switch the Comparator ON/OFF forChannel APress button B ( )- to switch the Comparator ON/OFF forChannel BThe green Sensor LED is illuminated whenthe voltage level at the output reaches approx.4 V; this corresponds to a power ofapprox. 4 W over a 4 Ω resistor.LED is off - Comparator not activeLED lit Orange - Comparator activeLED green (flashinng) - Sensor and Comparatorare oparatingLED Red - Sensor/Comparator fault.Check SensorcableUSER MANUAL v1.0CODA <strong>C10</strong> 21
4 OPERATION4.10 Power Amp Protection Systems4.10.1 Clip LimiterIf the power amp is overdriven, the clip detection circuit triggers the microprocessor.The processor reduces the input signal level by controlling theDCA. The strategy is implemented in software. For sinusoidal input signalsthe microprocessor limits the input signal in such a way that non-lineardistortions of the signal never exceed 1 %. The Clip Limiter can work oneach channel independently (except in the two mono-operation modes).To disable the Clip Limiter, use 2.5 Clip Limiter Screen.4.10.2 SOA ProtectionTo ensure that the power transistors are only used in the Safe OperationArea (SOA), the SOA-protection would mute the corresponding channel.If the power transistors are back in their SOA, the channel is automaticallyunmuted again.4.10.3 DC ProtectionEach output of the power amp is constantly monitored for persistent DCvoltage levels. If the 3 V threshold voltage is exceeded at any of the outputs,the corresponding channel will be automatically switched off. Themicroprocessor performs a sophisticated strategy to locate the cause ofthe malfunction. DC can be located in the output stage, driver stage, or atthe input of the amplifier.Output StageWhen a persistent DC voltage is located at an output stage, the mainSMPS remains switched off. This will be indicated in the amplifier‘sdisplay.Driver StageWhen a DC voltage is located at the driver stage, only the defectivechannel’s output stage and the DCA are muted. The other channelcontinues to work. This will be indicated in the amplifier‘s display.Amplifier InputWhen DC is located at the input stage, only the DCA of the affectedchannel is muted. The other channel continues to operate normally.If the DC signal at the input vanishes, the microprocessor will unmutethe affected channel and the amplifier will work as usual again.This will be shortly indicated in the amplifier‘s display.22USER MANUAL v1.0CODA <strong>C10</strong>4.10.4 DC ServoTo prevent DC Offset at the speaker output, the <strong>C10</strong> amplifiers are fittedwith two DC Servos (hence there are no capacitors in the signal path!).4.10.5 Overcurrent ProtectionThe output stage is permanently monitored for possible current surges.There are two limiting levels of overcurrent depending on output voltage.These limits will be set automatically. This improves reliability without degradingsound quality when driving complex loads.4.10.6 Thermal ProtectionThe microprocessor uses several sensors on the amplifier‘s heatsinks inorder to ascertain temperature data. If the microprocessor detects a temperatureof more than 85 °C at the amplifier‘s heat sinks, the input signal onthat channel is automatically reduced. If the temperature exceeds 95 °C,the corresponding channel is muted. If the temperature exceeds approx.110 °C, the main SMPS is switched off as an emergency protection. Thethermal protection status of the amplifiers are indicated in the display.4.11 Mains Protections4.11.1 Inrush Current LimitationWithin 2 seconds of the <strong>C10</strong> amplifiers being switched on, the inrush currentlimiter will increase mains current from nearly zero to nominal value.This value depends on programme material, output level, and speakerloads.4.11.2 Mains Over Voltage DetectionMains Over Voltage Detection is always operative. When the mains voltageexceeds approx. 265 V (230 V operation), or 134 V (120 V operation) , theamplifier will switch off. When the mains voltage returns to nominal value,a soft start occurs.4.11.3 Mains Failure DetectionMains Failure Detection is always operative. When the mains supply isinterrupted for about 2 mains cycles, the amplifier will switch off. When themains voltage returns to a normal value, a soft start occurs.
4.11.4 Fuse ProtectionThe average mains current can peak temporarily, depending on the loadimpedance and type of signal, at values several times higher than thenominal value allowed by the fuse protection. Continuous monitoring ofthe fuse protection status allows the conditions that would trigger the fuseprotection to be predicted. In order to avoid shut-down of the amplifier dueto current overload, the amplitude of the input signals will be limited. Thelimitation of the input signal allows the <strong>C10</strong> power amplifier to be operatedreliably from a mains power supply of 230 V/15 A (120 V/30 A).4 OPERATION4.12 Main SMPS Protections4.12.1 Overcurrent ProtectionMain SMPS (Switched Mode Power Supply) transformer current of your<strong>C10</strong> amplifier is continuously monitored. If over current occurs, the mainSMPS immediately stops working. Should there be an internal failure, thisfeature prevents other parts being damaged.4.12.2 Thermal ProtectionThe temperature of the main SMPS transformer of your <strong>C10</strong> amplifier ispermanently monitored. If the temperature exceeds 85 °C, the main SMPSis switched off. The amplifier‘s display will indicate a main SMPS error inthis case.4.13 FansThe fans mounted in your <strong>C10</strong> amplifier operate permanently, but aslong as the temperature remains below 40 °C, they run at their slowestspeed and can hardly be heard. The highest detected temperature fromeither channel controls the speed of the fans. Above 40 °C the speed isincreased until it reaches its maximum value.USER MANUAL v1.0CODA <strong>C10</strong> 23
4 OPERATION4.14 Filter CleaningThe air intake on the front of your <strong>C10</strong> amplifier is fitted with a removablefilter system. If the filter becomes clogged, the unit will not cool as efficientlyas it should and may result in reduced output levels.WARNING: Turn off the amplifier before removing the front frame!To clean or replace the filter just slightly unscrew the fixing screw with thehelp of a 2 mm allen key. The screw will be held back by a small plasticspacer on the back of the frame to avoid losing it. Then shift the frontframe slightly to the right. Then you should be able to remove the framefrom the amplifier completely (pull gently to avoid any bending of the frontframe)1<strong>C10</strong> Filter Assembly1 Foam Filter2 Front Frame3 Screw2324USER MANUAL v1.0CODA <strong>C10</strong>
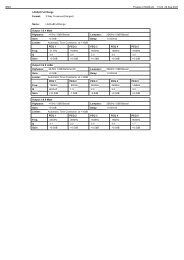
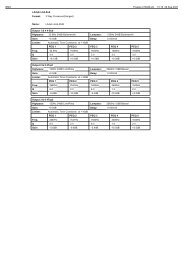
Output Power1 kHz, THD ≤ 1%, in dual channel operationDuration limited by fuse / thermal protection for RL107 dB (unweighted)>110 dB (A-weighted)tba.* All channels driven, 1 kHz, >1% THD @ 230 VAC** Peak Power at 4 Ohm, component tolerance dependent (+/-1,25%)Subject to technical alterations without prior notice.USER MANUAL v1.0CODA <strong>C10</strong> 25
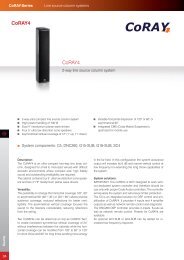
5 SPECIFICATIONFrequency Response8 Ω, 1 dB below rated powerInput ImpedanceInput GainProtection CircuitsLimiterFanLED IndicatorsInput ConnectorsOutput ConnectorsModes of OperationOptionsTHD+N (typical)20 Hz - 20 kHz, 8 Ω load,3 dB below rated powerSMPTE (typical)20 Hz - 20 kHz, 8 Ω load,3 dB below rated power20 Hz - 20 kHz ± 0,15 dB22 kΩ balanced32 dBinrush-current limitation, protection circuits against power on/off transients, temperaturemonitoring fo transformers and heatsinks, output DC protection, temperature dependentSOA protection, intelligent mains fuse protectionclip limitertwo temperature dependent speed-controlled axial fansLEDs for Input Selection, Output Mode, Clip, Signal, Device Identify, Sensor, and Uman3-pin XLR, male and female per channel, pin 2 = hot (inphase)Uman network connectors (In and out)Ethernet LinkOne 4-pole SPEAKON connector for each output channel (bi-amping possilbe)dual channel, mono bridge and parallel monoPlug-in DSP card available
6 Typical Performance Diagramstba.6 TYPICAL PERFORMANCE DIAGRAMSUSER MANUAL v1.0CODA <strong>C10</strong> 27
7 WARRANTY INFORMATION7.1 Summary of WarrantyCODA guarantees the <strong>C10</strong> Amplifier to be free from defective materialand/or workmanship for a period of six (6) years from the date of sale.When a defect occurs under normal installation and use, CODA will repairthe product under this warranty. In this event, please return the amplifier toyour dealer/distributor together with a copy of your sales receipt as proofof purchase.This warranty provides that examination of the returned product must indicatein our judgement a manufacturing defect.7.2 Items Excluded from This WarrantyCODA is not liable for any damage caused by shipping accidents, misuse,abuse, operation with incorrect AC voltage, operation with faulty peripheralequipment, modification or alteration without prior factory approval, serviceby an unauthorized service center and normal wear and tear. Amplifierson which the serial number has been removed or defaced are not eligiblefor warranty service.7.3 What CODA Will DoCODA (or its appointed agent) undertakes to rectify any defect regardlessof the reason for failure (unless excluded from this warrenty), by repair,replacement or refund as it sees fit.7.4 How to Obtain Warranty ServiceYou must notify your dealer/distributor of your need for warranty service.All components must be shipped in the original packaging.7.5 CODA’s Product ImprovementCODA reserves the right to improve the technical standard of its productswithout giving prior notice. If in any doubt, please consult your dealer/distributoror contact CODA directly for clarification.28USER MANUAL v1.0CODA <strong>C10</strong>
PLEASE ENCLOSE THIS COMPLETED FORM WITH THE AMPLIFIERDO NOT SEND SEPARATELYOwner’s InformationCompany Name: _ _ _ _ _ _ _ _ _ _ _ _ _ _ _ _ _ _ _ _ _ _ __ _ _ _ _ _ _ _ _ _ _ _ _ _ _ _ _ _ _ _ _ _ _ _ _ _ _ _ _ _ _Contact: _ _ _ _ _ _ _ _ _ _ _ _ _ _ _ _ _ _ _ _ _ _ _ _ _ _ _Address: _ _ _ _ _ _ _ _ _ _ _ _ _ _ _ _ _ _ _ _ _ _ _ _ _ _ __ _ _ _ _ _ _ _ _ _ _ _ _ _ _ _ _ _ _ _ _ _ _ _ _ _ _ _ _ _ __ _ _ _ _ _ _ _ _ _ _ _ _ _ _ _ _ _ _ _ _ _ _ _ _ _ _ _ _ _ __ _ _ _ _ _ _ _ _ _ _ _ _ _ _ _ _ _ _ _ _ _ _ _ _ _ _ _ _ _ _Telephone: _ _ _ _ _ _ _ _ _ _ _ _ _ _ _ _ _ _ _ _ _ _ _ _ _ _Facsimile: _ _ _ _ _ _ _ _ _ _ _ _ _ _ _ _ _ _ _ _ _ _ _ _ _ _eMail Address: _ _ _ _ _ _ _ _ _ _ _ _ _ _ _ _ _ _ _ _ _ _ _ _Model: _ _ _ _ _ _ _ _ _ _ _ _ _ _ _ _ _ _ _ _ _ _ _ _ _ _ _ _Serial Number: _ _ _ _ _ _ _ _ _ _ _ _ _ _ _ _ _ _ _ _ _ _ _ _Purchase Date: _ _ _ _ _ _ _ _ _ _ _ _ _ _ _ _ _ _ _ _ _ _ _ _Expired WarrantyIf the warranty has expired, payment will be:oooCash/ChequeVISAMasterCardNature of problem occurredPlease describe the conditions that existed when the problem occured andwhat attempts were made to correct it: _ _ _ _ _ _ _ _ _ _ _ _ _ __ _ _ _ _ _ _ _ _ _ _ _ _ _ _ _ _ _ _ _ _ _ _ _ _ _ _ _ _ _ __ _ _ _ _ _ _ _ _ _ _ _ _ _ _ _ _ _ _ _ _ _ _ _ _ _ _ _ _ _ __ _ _ _ _ _ _ _ _ _ _ _ _ _ _ _ _ _ _ _ _ _ _ _ _ _ _ _ _ _ __ _ _ _ _ _ _ _ _ _ _ _ _ _ _ _ _ _ _ _ _ _ _ _ _ _ _ _ _ _ __ _ _ _ _ _ _ _ _ _ _ _ _ _ _ _ _ _ _ _ _ _ _ _ _ _ _ _ _ _ __ _ _ _ _ _ _ _ _ _ _ _ _ _ _ _ _ _ _ _ _ _ _ _ _ _ _ _ _ _ __ _ _ _ _ _ _ _ _ _ _ _ _ _ _ _ _ _ _ _ _ _ _ _ _ _ _ _ _ _ __ _ _ _ _ _ _ _ _ _ _ _ _ _ _ _ _ _ _ _ _ _ _ _ _ _ _ _ _ _ __ _ _ _ _ _ _ _ _ _ _ _ _ _ _ _ _ _ _ _ _ _ _ _ _ _ _ _ _ _ __ _ _ _ _ _ _ _ _ _ _ _ _ _ _ _ _ _ _ _ _ _ _ _ _ _ _ _ _ _ __ _ _ _ _ _ _ _ _ _ _ _ _ _ _ _ _ _ _ _ _ _ _ _ _ _ _ _ _ _ __ _ _ _ _ _ _ _ _ _ _ _ _ _ _ _ _ _ _ _ _ _ _ _ _ _ _ _ _ _ __ _ _ _ _ _ _ _ _ _ _ _ _ _ _ _ _ _ _ _ _ _ _ _ _ _ _ _ _ _ _Other equipment in your system: _ _ _ _ _ _ _ _ _ _ _ _ _ _ _ _ __ _ _ _ _ _ _ _ _ _ _ _ _ _ _ _ _ _ _ _ _ _ _ _ _ _ _ _ _ _ __ _ _ _ _ _ _ _ _ _ _ _ _ _ _ _ _ _ _ _ _ _ _ _ _ _ _ _ _ _ __ _ _ _ _ _ _ _ _ _ _ _ _ _ _ _ _ _ _ _ _ _ _ _ _ _ _ _ _ _ __ _ _ _ _ _ _ _ _ _ _ _ _ _ _ _ _ _ _ _ _ _ _ _ _ _ _ _ _ _ __ _ _ _ _ _ _ _ _ _ _ _ _ _ _ _ _ _ _ _ _ _ _ _ _ _ _ _ _ _ _8 SERVICE INFORMATIONShipping AddressTo transport the amplifier, the original packing materials must be used.Please return the amplifier to the following address or your nearestCODA appointed distributor.Our web site: www.codaaudio.com provides a complete list of CODAdealers/distributors.USER MANUAL v1.0CODA <strong>C10</strong> 29
9 MAINTENANCE INFORMATION/10 DECOMISSIONING9 Maintenance InformationCleaning and servicing the inside of the amplifier must never be carried outby unqualified personnel. The amplifier must never be opened by unqualifiedpersonnel.Cleaning and servicing work on the inside of the amplifier must only becarried out by qualified personnel.Qualified personnel is defined as a person who has gained specialisedrelevant knowledge of electronic engineering through education, training,and experience, and who has sufficient knowledge of all relevant governmentalwork safety regulations to be in a position to judge the safefunctioning of power amplifiers based on technical rules according to IEC60065 (IEC 60065 (DIN EN 60065) “Safety Requirements for <strong>Audio</strong>, Videoor simlar Electronic Appliances”).In order to guarantee the safe functioning of the amplifier, it has to bechecked regularly, depending on its application but at least once a year,by a properly qualified person.Advice on how to carry out these checks can be found in DIN VDE 0702-1“Safety Checks for Electronic Appliances” .An amplifier that is considered to be unsafe must be labelled accordinglyand stored in a safe place to prevent this amplifier being used mistakenly.10 DecommissioningDuring the decommissioning process of the amplifier, all legally prescribedrules and procedures must be adhered to.30USER MANUAL v1.0CODA <strong>C10</strong>
Mailing Address:<strong>Coda</strong> <strong>Audio</strong> GmbHBoulevard der EU 6D-30539 HannoverGermanyTelephone:+49 (0) 511 866 558 88Facsimile:+49 (0) 511 866 558 87Internet:www.codaaudio.comEmail:contact@codaaudio.comCOMPANY INFORMATIONUSER MANUAL v1.0CODA <strong>C10</strong> 31
<strong>Coda</strong> <strong>Audio</strong> GmbHBoulevard der EU 630539 HannoverGermanywww.codaaudio.com
NOTICES/CHANGES MADE TO THE AMPLIFIERChanges Made To The AmplifierNOTE / IMPORTANT:Please consider that any changes made to the amplifier have to be documentatedin writing and passed on to the buyer in the event of resale!_ _ _ _ _ _ _ _ _ _ _ _ _ _ _ _ _ _ _ _ _ _ _ _ _ _ _ _ _ _ __ _ _ _ _ _ _ _ _ _ _ _ _ _ _ _ _ _ _ _ _ _ _ _ _ _ _ _ _ _ __ _ _ _ _ _ _ _ _ _ _ _ _ _ _ _ _ _ _ _ _ _ _ _ _ _ _ _ _ _ __ _ _ _ _ _ _ _ _ _ _ _ _ _ _ _ _ _ _ _ _ _ _ _ _ _ _ _ _ _ __ _ _ _ _ _ _ _ _ _ _ _ _ _ _ _ _ _ _ _ _ _ _ _ _ _ _ _ _ _ __ _ _ _ _ _ _ _ _ _ _ _ _ _ _ _ _ _ _ _ _ _ _ _ _ _ _ _ _ _ __ _ _ _ _ _ _ _ _ _ _ _ _ _ _ _ _ _ _ _ _ _ _ _ _ _ _ _ _ _ __ _ _ _ _ _ _ _ _ _ _ _ _ _ _ _ _ _ _ _ _ _ _ _ _ _ _ _ _ _ __ _ _ _ _ _ _ _ _ _ _ _ _ _ _ _ _ _ _ _ _ _ _ _ _ _ _ _ _ _ __ _ _ _ _ _ _ _ _ _ _ _ _ _ _ _ _ _ _ _ _ _ _ _ _ _ _ _ _ _ __ _ _ _ _ _ _ _ _ _ _ _ _ _ _ _ _ _ _ _ _ _ _ _ _ _ _ _ _ _ __ _ _ _ _ _ _ _ _ _ _ _ _ _ _ _ _ _ _ _ _ _ _ _ _ _ _ _ _ _ __ _ _ _ _ _ _ _ _ _ _ _ _ _ _ _ _ _ _ _ _ _ _ _ _ _ _ _ _ _ __ _ _ _ _ _ _ _ _ _ _ _ _ _ _ _ _ _ _ _ _ _ _ _ _ _ _ _ _ _ __ _ _ _ _ _ _ _ _ _ _ _ _ _ _ _ _ _ _ _ _ _ _ _ _ _ _ _ _ _ __ _ _ _ _ _ _ _ _ _ _ _ _ _ _ _ _ _ _ _ _ _ _ _ _ _ _ _ _ _ __ _ _ _ _ _ _ _ _ _ _ _ _ _ _ _ _ _ _ _ _ _ _ _ _ _ _ _ _ _ __ _ _ _ _ _ _ _ _ _ _ _ _ _ _ _ _ _ _ _ _ _ _ _ _ _ _ _ _ _ __ _ _ _ _ _ _ _ _ _ _ _ _ _ _ _ _ _ _ _ _ _ _ _ _ _ _ _ _ _ __ _ _ _ _ _ _ _ _ _ _ _ _ _ _ _ _ _ _ _ _ _ _ _ _ _ _ _ _ _ __ _ _ _ _ _ _ _ _ _ _ _ _ _ _ _ _ _ _ _ _ _ _ _ _ _ _ _ _ _ __ _ _ _ _ _ _ _ _ _ _ _ _ _ _ _ _ _ _ _ _ _ _ _ _ _ _ _ _ _ __ _ _ _ _ _ _ _ _ _ _ _ _ _ _ _ _ _ _ _ _ _ _ _ _ _ _ _ _ _ __ _ _ _ _ _ _ _ _ _ _ _ _ _ _ _ _ _ _ _ _ _ _ _ _ _ _ _ _ _ __ _ _ _ _ _ _ _ _ _ _ _ _ _ _ _ _ _ _ _ _ _ _ _ _ _ _ _ _ _ __ _ _ _ _ _ _ _ _ _ _ _ _ _ _ _ _ _ _ _ _ _ _ _ _ _ _ _ _ _ __ _ _ _ _ _ _ _ _ _ _ _ _ _ _ _ _ _ _ _ _ _ _ _ _ _ _ _ _ _ __ _ _ _ _ _ _ _ _ _ _ _ _ _ _ _ _ _ _ _ _ _ _ _ _ _ _ _ _ _ __ _ _ _ _ _ _ _ _ _ _ _ _ _ _ _ _ _ _ _ _ _ _ _ _ _ _ _ _ _ __ _ _ _ _ _ _ _ _ _ _ _ _ _ _ _ _ _ _ _ _ _ _ _ _ _ _ _ _ _ __ _ _ _ _ _ _ _ _ _ _ _ _ _ _ _ _ _ _ _ _ _ _ _ _ _ _ _ _ _ __ _ _ _ _ _ _ _ _ _ _ _ _ _ _ _ _ _ _ _ _ _ _ _ _ _ _ _ _ _ __ _ _ _ _ _ _ _ _ _ _ _ _ _ _ _ _ _ _ _ _ _ _ _ _ _ _ _ _ _ _32USER MANUAL v1.0CODA <strong>C10</strong>_ _ _ _ _ _ _ _ _ _ _ _ _ _ _ _ _ _ _ _ _ _ _ _ _ _ _ _ _ _ __ _ _ _ _ _ _ _ _ _ _ _ _ _ _ _ _ _ _ _ _ _ _ _ _ _ _ _ _ _ __ _ _ _ _ _ _ _ _ _ _ _ _ _ _ _ _ _ _ _ _ _ _ _ _ _ _ _ _ _ __ _ _ _ _ _ _ _ _ _ _ _ _ _ _ _ _ _ _ _ _ _ _ _ _ _ _ _ _ _ __ _ _ _ _ _ _ _ _ _ _ _ _ _ _ _ _ _ _ _ _ _ _ _ _ _ _ _ _ _ __ _ _ _ _ _ _ _ _ _ _ _ _ _ _ _ _ _ _ _ _ _ _ _ _ _ _ _ _ _ __ _ _ _ _ _ _ _ _ _ _ _ _ _ _ _ _ _ _ _ _ _ _ _ _ _ _ _ _ _ __ _ _ _ _ _ _ _ _ _ _ _ _ _ _ _ _ _ _ _ _ _ _ _ _ _ _ _ _ _ __ _ _ _ _ _ _ _ _ _ _ _ _ _ _ _ _ _ _ _ _ _ _ _ _ _ _ _ _ _ __ _ _ _ _ _ _ _ _ _ _ _ _ _ _ _ _ _ _ _ _ _ _ _ _ _ _ _ _ _ __ _ _ _ _ _ _ _ _ _ _ _ _ _ _ _ _ _ _ _ _ _ _ _ _ _ _ _ _ _ __ _ _ _ _ _ _ _ _ _ _ _ _ _ _ _ _ _ _ _ _ _ _ _ _ _ _ _ _ _ __ _ _ _ _ _ _ _ _ _ _ _ _ _ _ _ _ _ _ _ _ _ _ _ _ _ _ _ _ _ __ _ _ _ _ _ _ _ _ _ _ _ _ _ _ _ _ _ _ _ _ _ _ _ _ _ _ _ _ _ __ _ _ _ _ _ _ _ _ _ _ _ _ _ _ _ _ _ _ _ _ _ _ _ _ _ _ _ _ _ __ _ _ _ _ _ _ _ _ _ _ _ _ _ _ _ _ _ _ _ _ _ _ _ _ _ _ _ _ _ __ _ _ _ _ _ _ _ _ _ _ _ _ _ _ _ _ _ _ _ _ _ _ _ _ _ _ _ _ _ __ _ _ _ _ _ _ _ _ _ _ _ _ _ _ _ _ _ _ _ _ _ _ _ _ _ _ _ _ _ __ _ _ _ _ _ _ _ _ _ _ _ _ _ _ _ _ _ _ _ _ _ _ _ _ _ _ _ _ _ __ _ _ _ _ _ _ _ _ _ _ _ _ _ _ _ _ _ _ _ _ _ _ _ _ _ _ _ _ _ __ _ _ _ _ _ _ _ _ _ _ _ _ _ _ _ _ _ _ _ _ _ _ _ _ _ _ _ _ _ __ _ _ _ _ _ _ _ _ _ _ _ _ _ _ _ _ _ _ _ _ _ _ _ _ _ _ _ _ _ __ _ _ _ _ _ _ _ _ _ _ _ _ _ _ _ _ _ _ _ _ _ _ _ _ _ _ _ _ _ __ _ _ _ _ _ _ _ _ _ _ _ _ _ _ _ _ _ _ _ _ _ _ _ _ _ _ _ _ _ __ _ _ _ _ _ _ _ _ _ _ _ _ _ _ _ _ _ _ _ _ _ _ _ _ _ _ _ _ _ __ _ _ _ _ _ _ _ _ _ _ _ _ _ _ _ _ _ _ _ _ _ _ _ _ _ _ _ _ _ __ _ _ _ _ _ _ _ _ _ _ _ _ _ _ _ _ _ _ _ _ _ _ _ _ _ _ _ _ _ __ _ _ _ _ _ _ _ _ _ _ _ _ _ _ _ _ _ _ _ _ _ _ _ _ _ _ _ _ _ __ _ _ _ _ _ _ _ _ _ _ _ _ _ _ _ _ _ _ _ _ _ _ _ _ _ _ _ _ _ __ _ _ _ _ _ _ _ _ _ _ _ _ _ _ _ _ _ _ _ _ _ _ _ _ _ _ _ _ _ __ _ _ _ _ _ _ _ _ _ _ _ _ _ _ _ _ _ _ _ _ _ _ _ _ _ _ _ _ _ __ _ _ _ _ _ _ _ _ _ _ _ _ _ _ _ _ _ _ _ _ _ _ _ _ _ _ _ _ _ __ _ _ _ _ _ _ _ _ _ _ _ _ _ _ _ _ _ _ _ _ _ _ _ _ _ _ _ _ _ _