Create successful ePaper yourself
Turn your PDF publications into a flip-book with our unique Google optimized e-Paper software.
<strong>Altivar</strong> <strong>21</strong>Installation ManualRetain for future useVariable speed drives forasynchronous motors
ContentsImportant information __________________________________________________________________________________________ 4Before you begin______________________________________________________________________________________________ 5Steps for setting up the drive ____________________________________________________________________________________ 7Preliminary recommandations ___________________________________________________________________________________ 8Storing and shipping ____________________________________________________________________________________ 8Lifting and handling _____________________________________________________________________________________ 8Drive Ratings ________________________________________________________________________________________________ 9Dimensions and weights_______________________________________________________________________________________ 10Mounting and temperature conditions ____________________________________________________________________________ 12Removing the protective cover ___________________________________________________________________________ 12Mounting methods _____________________________________________________________________________________ 12Derating curves _______________________________________________________________________________________ 13Minimum air flow rates __________________________________________________________________________________ 16Position of the charging LED ___________________________________________________________________________________ 18Installing option card__________________________________________________________________________________________ 19Wiring _____________________________________________________________________________________________________ 20Wiring recommendations ________________________________________________________________________________ 20Branch circuit protection ________________________________________________________________________________ 20Output wiring _________________________________________________________________________________________ <strong>21</strong>Grounding ___________________________________________________________________________________________ <strong>21</strong>Terminals __________________________________________________________________________________________________ 22How to open the front cover up to 18.5 kW __________________________________________________________________ 22How to open the front cover from 22 kW ____________________________________________________________________ 22Power terminals _______________________________________________________________________________________ 23Control terminals ______________________________________________________________________________________ 26Connection diagram ____________________________________________________________________________________ 28Logic input switch _____________________________________________________________________________________ 29Use on an impedance grounded system __________________________________________________________________________ 30Motor thermal protection_______________________________________________________________________________________ 31Electromagnetic compatibility ___________________________________________________________________________________ 323
Important informationPLEASE NOTEPlease read these instructions carefully and examine the equipment in order to familiarize yourself with the device before installing,operating or carrying out any maintenance work on it.The following special messages that you will come across in this document or on the device are designed to warn you about potential risksor draw your attention to information that will clarify or simplify a procedure.The addition of this symbol to a “Danger” or “Warning” safety label indicates that there is an electrical risk that will resultin injury if the instructions are not followed.This is a safety warning symbol. It warns you of the potential risk of injury. You must comply with all safety messages thatfollow this symbol in order to avoid the risk of injury or death.DANGERDANGER indicates an imminently hazardous situation which, if not avoided, will result in death, serious injury or equipmentdamage.WARNINGWARNING indicates a potentially hazardous situation which, if not avoided, can result in death, serious injury or equipment damage.CAUTIONCAUTION indicates a potentially hazardous situation which, if not avoided, can result in injury or equipment damage.PLEASE NOTE:Only qualified personnel are authorized to carry out maintenance work on electrical equipment. <strong>Schneider</strong> <strong>Electric</strong> accepts no responsibilityfor the consequences of using this device. This document does not constitute an instruction manual for inexperienced personnel.© 2008 <strong>Schneider</strong> <strong>Electric</strong>. All rights reserved.4
Before you beginRead and follow these precautions before beginning any procedure with this drive.DANGERHAZARD OF ELECTRIC SHOCK, EXPLOSION, OR ARC FLASH• Read and understand this manual before installing or operating the <strong>Altivar</strong> <strong>21</strong> (ATV<strong>21</strong>) drive. Installation, adjustment, repair, andmaintenance must be performed by qualified personnel.• The user is responsible for compliance with all international and national electrical code requirements with respect to grounding ofall equipment.• Many parts of this drive, including the printed circuit boards, operate at the line voltage. DO NOT TOUCH. Use only electricallyinsulated tools.• DO NOT touch unshielded components or terminal strip screw connections with voltage present.• DO NOT short across terminals PA/+ and PC/– or across the DC bus capacitors.• Before servicing the drive:- Disconnect all power.- Place a “DO NOT TURN ON” label on all power disconnects.- Lock all power disconnects in the open position.- Disconnect all power, including external control power that may be present, before servicing the drive. WAIT 15 MINUTES to allowthe DC bus capacitors to discharge. Then follow the “Bus Voltage Measurement Procedure” on page 25 to verify that the DCvoltage is less than 45 V. The drive LED is not an indicator of the absence of DC bus voltage.• Install and close all covers before applying power or starting and stopping the drive.Failure to follow these instructions will result in death or serious injury.UNINTENDED EQUIPMENT OPERATIONDANGERBefore turning on the drive or upon exiting the configuration menus, ensure that the inputs assigned to the Run command are in a statethat will not cause the drive to run. Otherwise, the motor can start immediately.Failure to follow these instructions will result in death, serious injury, or equipment damage.LOSS OF CONTROLWARNING• The designer of any control scheme must consider the potential failure modes of control paths and, for certain critical controlfunctions, provide a means to achieve a safe state during and after a path failure. Examples of critical control functions are emergencystop and overtravel stop.• Separate or redundant control paths must be provided for critical control functions.• System control paths may include communication links. Consideration must be given to the implications of unanticipated transmissiondelays or failures of the link (1).• Each implementation of an <strong>Altivar</strong> <strong>21</strong> drive must be individually and thoroughly tested for proper operation before being placed intoservice.Failure to follow these instructions can result in death, serious injury, or equipment damage.(1)For additional information refer to NEMA ICS 1.1 (latest edition), “Safety Guidelines for the Application, Installation, and Maintenance ofSolid State Control” and to NEMA ICS 7.1 (latest edition), “Safety Standards for Construction and Guide for Selection, Installation andOperation of Adjustable-Speed Drive Systems.”5
Before you beginLOSS OF CONTROLWARNING• Set the communication error trip time to stop the drive in case the remote keypad display is deactivated by an unusual event such astripping, an operation error, or a power outage.• Ensure that the communication error trip time is properly set before deactivating the remote keypad display.Failure to follow these instructions can result in death, serious injury, or equipment damage.INCOMPATIBLE LINE VOLTAGECAUTIONBefore turning on and configuring the drive, ensure that the line voltage is compatible with the line voltage range specified on the drivenameplate. The drive can be damaged if the line voltage is not compatible.Failure to follow this instruction can result in injury or equipment damage.6
Steps for setting up the driveINSTALLATIONb 1 Receive and inspect the drivev Check that the catalog number printed on the label is the sameas that on the purchase orderv Remove the <strong>Altivar</strong> from its packaging and check that it has notbeen damaged in transitSteps 1 to 4 mustbe performed withthe power off.b 2 Check the line voltagev Check that the line voltage is compatible with thevoltage range of the drive (see pages 10 and 11)b 3 Mount the drivev Mount the drive in accordance with the instructionsin this documentv Install any internal and external optionsb 4 Wire the drivev Connect the motor, ensuring that itsconnections correspond to the voltagev Connect the line supply, after making surethat the power is offv Connect the controlv Connect the speed referencePROGRAMMINGv 5 Please refer to theProgramming Manual7
Preliminary recommandationsBefore installing the ATV<strong>21</strong> drive, read this manual and follow all precautions.WARNINGDAMAGED PACKAGINGIf the packaging appears damaged, it can be dangerous to open it or handle it. Handle with care.Failure to follow this instruction can result in death, serious injury, or equipment damage.WARNINGDAMAGED EQUIPMENTDo not operate or install any drive that appears damaged.Failure to follow this instruction can result in death, serious injury, or equipment damage.Before removing the drive from its packaging, verify that the carton was not damaged in shipping. Carton damage usually indicates improperhandling and the potential for device damage. If any damage is found, notify the carrier and your <strong>Schneider</strong> <strong>Electric</strong> representative.Storing and shippingIf the drive is not immediately installed, store it in a clean, dry area where the ambient temperature is between –25 and +70 °C (–13 to+158 °F). If the drive must be shipped to another location, use the original shipping material and carton to protect the drive.Lifting and handlingWARNINGHANDLING AND LIFTING HAZARDKeep the area below any equipment being lifted clear of all personnel and property. Use the lifting method illustrated in following figure.Failure to follow this instruction can result in death, serious injury, or equipment damage.RISK OF TOPPLINGWARNING• Keep the drive on the pallet until ready to install.• Never place the drive in an upright position without proper support, such as a hoist, braces, or other mounting supports.Failure to follow these instructions can result in death, serious injury, or equipment damage.Lifting method45°max.• <strong>Altivar</strong> <strong>21</strong> drives up to ATV<strong>21</strong>HD18N4 and ATV<strong>21</strong>W075N4 can be removed from theirpackaging and installed without a handling device.• A hoist must be used for higher ratings.• After removing the drive from its packaging, inspect it for damage. If any damage is found,notify the carrier and your sales representative.• Verify that the drive nameplate and label conform to the packing slip and correspondingpurchase order.8
Drive RatingsThree-phase supply voltage: 200 ... 240 V 50/60 HzMotor Line supply (input) Drive (output) <strong>Altivar</strong> <strong>21</strong>Power ratingsMax. line current (4)200 V 240 VMax.prospectiveline Isc (2)Nominalrated outputcurrent (1)Transientoutput current(1) (3)kW HP A A kA A A WTotaldissipatedpower at ratedload (1)Reference0.75 1 3.3 2.7 5 4.6 5.1 63 ATV<strong>21</strong>H075M3X1.5 2 6.1 5.1 5 7.5 8.3 101 ATV<strong>21</strong>HU15M3X2.2 3 8.7 7.3 5 10.6 11.7 120 ATV<strong>21</strong>HU22M3X3 — — 10 5 13.7 15.1 146 ATV<strong>21</strong>HU30M3X4 5 14.6 13 5 16.7 19.3 193 ATV<strong>21</strong>HU40M3X5.5 7.5 20.8 17.3 22 24.2 26.6 249 ATV<strong>21</strong>HU55M3X7.5 10 27.9 23.3 22 32.0 35.2 346 ATV<strong>21</strong>HU75M3X11 15 42.1 34.4 22 46.2 50.8 459 ATV<strong>21</strong>HD11M3X15 20 56.1 45.5 22 61.0 67.1 629 ATV<strong>21</strong>HD15M3X18.5 25 67.3 55.8 22 74.8 82.3 698 ATV<strong>21</strong>HD18M3X22 30 80.4 66.4 22 88.0 96.8 763 ATV<strong>21</strong>HD22M3X30 40 113.3 89.5 22 117 128.7 1085 ATV<strong>21</strong>HD30M3X(1)These power, amperage, and wattage ratings apply to:• Drives ATV<strong>21</strong>H075M3X to HD15M3X operating at a switching frequency of 12 kHz and operating in a 40 °C (104 °F) ambient.• Drives ATV<strong>21</strong>HD18M3X to HD30M3X operating at a switching frequency of 8 kHz, and operating in a 40 °C (104 °F) ambient.See pages 13–15 for derating curves as a function of switching frequency, ambient temperature, and mounting conditions.(2)Current on a line supply with the indicated short-circuit current rating.(3)For 60 seconds.(4)Typical value for the indicated motor power and for the maximum prospective line Isc.Three-phase supply voltage: 380 ... 480 V 50/60 HzMotor Line supply (input) Drive (output) <strong>Altivar</strong> <strong>21</strong>Power ratingsMax. line current (4)380 V 480 VMax.prospectiveline Isc (2)Nominalrated outputcurrent (1)Transientoutput current(1) (3)kW HP A A kA A A WTotaldissipatedpower at ratedload (1)Reference0.75 1 1.7 1.4 5 2.2 2.4 55 ATV<strong>21</strong>H075N41.5 2 3.2 2.5 5 3.7 4.0 78 ATV<strong>21</strong>HU15N42.2 3 4.6 3.6 5 5.1 5.6 103 ATV<strong>21</strong>HU22N43 — 6.2 4.9 5 7.2 7.9 137 ATV<strong>21</strong>HU30N44 5 8.1 6.4 5 8.2 10.0 176 ATV<strong>21</strong>HU40N45.5 7.5 10.9 8.6 22 12.0 13.2 <strong>21</strong>5 ATV<strong>21</strong>HU55N47.5 10 14.7 11.7 22 16.0 17.6 291 ATV<strong>21</strong>HU75N411 15 <strong>21</strong>.1 16.8 22 22.5 24.8 430 ATV<strong>21</strong>HD11N415 20 28.5 22.8 22 30.5 33.6 625 ATV<strong>21</strong>HD15N418.5 25 34.8 27.8 22 37.0 40.7 603 ATV<strong>21</strong>HD18N422 30 41.6 33.1 22 43.5 47.9 626 ATV<strong>21</strong>HD22N430 40 56.7 44.7 22 58.5 64.4 847 ATV<strong>21</strong>HD30N437 50 68.9 54.4 22 79 86.9 976 ATV<strong>21</strong>HD37N445 60 83.8 65.9 22 94 103.4 1253 ATV<strong>21</strong>HD45N455 75 102.7 89 22 116 127.6 1455 ATV<strong>21</strong>HD55N475 100 141.8 111.3 22 160 176 1945 ATV<strong>21</strong>HD75N4(1)These power, amperage, and wattage ratings apply to:• Drives ATV<strong>21</strong>H075N4 to HD15N4 operating at a switching frequency of 12 kHz and operating in a 40 °C (104 °F) ambient.• Drives ATV<strong>21</strong>HD18N4 to HD75N4 operating at a switching frequency of 8 kHz, and operating in a 40 °C (104 °F) ambient.See pages 13–15 for derating curves as a function of switching frequency, ambient temperature, and mounting conditions.(2)Current on a line supply with the indicated short-circuit current rating.(3)For 60 seconds.(4)Typical value for the indicated motor power and for the maximum prospective line Isc.9
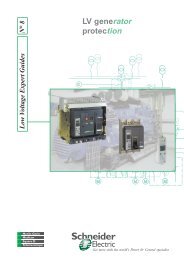
Dimensions and weightsThe figures below shows outline drawings of the ATV<strong>21</strong> drives and the tables gives the dimensions and weights of the various models.JØbK H2xM5c= G =ac1M5 tb14xM4ATV<strong>21</strong>H Dimensions mm (in.) Weight kga b b1 c c1 G H J Ø (lb)075M3X, U15M3X, U22M3X1.80107 143 49 150 67.3 93 1<strong>21</strong>.5 5 5 (3.978)075N4, U15N4, U22N4 (4.2) (5.6) (1.93) (5.9) (2.65) (3.6) (4.7) (0.20) (0.20) 2.00(4.42)U30M3x, U40M3X142 184 48 150 88.8 126 157 6.5 53.05(6.741)U30N4, U40N4, U55N4 (5.6) (7.2) (1.8) (5.9) (3.50) (4.9) (6.1) (0.26) (0.20) 3.35(7.404)b4xØH J2xM5c= G=ab1b1c14xM4M5 tATV<strong>21</strong>H Dimensions mm (in.) Weight kg(lb)a b b1 c c1 G H J ØU55M3X, U75M3X 180(7)U40M3X, D11M3X, D15M3X 245(9.6)232(9.1)329.5(13)75(2.9)75(2.9)170(6.7)190(7.5)134.8(5.31)147.6(5.8)160(6.3)225(8.8)<strong>21</strong>0(8.2)295(11.6)5(0.20)7(0.28)5(0.20)6(0.24)6.10(13.481)11.50(25.4)10
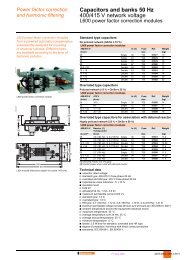
Mounting and temperature conditionsDerating curvesThe curves illustrate the drive nominal current derating percentage (I/In%) as a function of the temperature, switching frequency, and thetype of mounting.For example, 80% derating of a 20 hp, 460 V ATV<strong>21</strong> drive nominally rated for 30.5 amperes continuously: 30.5 x 0.8 = 24.4 (15 hp).For intermediate temperatures, interpolate between two curves.ATV<strong>21</strong>H075M3XI/In1009080706050406 8 10 12 14 1640 °C (104 °F) mounting types A, B and C50 °C (122 °F) mounting types A and C60 °C (140 °F) mounting types A and C50 °C (122 °F) mounting type B60 °C (140 °F) mounting type BSwitching frequency (kHz)ATV<strong>21</strong>HU15M3XI/In1009080706050406 8 10 12 14 1640 °C (104 °F) mounting types A, B and C50 °C (122 °F) mounting types A and C50 °C (122 °F) mounting type B60 °C (140 °F) mounting types A and C60 °C (140 °F) mounting type BSwitching frequency (kHz)AT<strong>21</strong>HU22M3XI/In100ATV<strong>21</strong>HU30M3X, ATV<strong>21</strong>HU40M3XI/In1009040 °C (104 °F) mounting types A, B and C9040 °C (104 °F) mounting types A, B and C80706050 °C (122 °F) mounting types A and C50 °C (122 °F) mounting type B60 °C (140 °F) mounting types A and C60 °C (140 °F) mounting type B80706050 °C (122 °F) mounting types A and C50 °C (122 °F) mounting type B60 °C (140 °F) mounting types A and C60 °C (140 °F) mounting type B5050406 8 10 12 14 16Switching frequency (kHz)406 8 10 12 14 16Switching frequency (kHz)ATV<strong>21</strong>HU55M3XI/InATV<strong>21</strong>HU75M3XI/In10090807040 °C (104 °F) mounting types A, B and C50 °C (122 °F) mounting types A and C60 °C (140 °F) mounting types A and C50 °C (122 °F) mounting type B60 °C (140 °F) mounting type B10090807040 °C (104 °F) mounting types A, B and C50 °C (122 °F) mounting types A and C50 °C (122 °F) mounting type B60 °C (140 °F) mounting types A and C60 °C (140 °F) mounting type B60605050406 8 10 12 14 16Switching frequency (kHz)406 8 10 12 14 16Switching frequency (kHz)ATV<strong>21</strong>HD11M3XI/InATV<strong>21</strong>HD15M3XI/In10090807040 °C (104 °F) mounting types A, B and C50 °C (122 °F) mounting types A and C60 °C (140 °F) mounting types A and C50 °C (122 °F) mounting type B60 °C (140 °F) mounting type B10090807040 °C (104 °F) mounting types A, B and C50 °C (122 °F) mounting types A and C50 °C (122 °F) mounting type B60 °C (140 °F) mounting types A and C60 °C (140 °F) mounting type B60605050406 8 10 12 14 16Switching frequency (kHz)406 8 10 12 14 16Switching frequency (kHz)13
Mounting and temperature conditionsATV<strong>21</strong>HD18M3XI/In1009080706050406 8 10 12 14 1640 °C (104 °F) mounting types A, B and C50 °C (122 °F) mounting types A and C50 °C (122 °F) mounting type B60 °C (140 °F) mounting types A and C60 °C (140 °F) mounting type BSwitching frequency (kHz)ATV<strong>21</strong>HD22M3XI/In1009080706050403020106 8 10 12 14 1640 °C (104 °F) mounting types A, B and C50 °C (122 °F) mounting types A and C50 °C (122 °F) mounting type B60 °C (140 °F) mounting types A and C60 °C (140 °F) mounting type BSwitching frequency (kHz)ATV<strong>21</strong>HD30M3XI/InATV<strong>21</strong>HU75N4I/In1009080706050403020106 8 10 12 14 16ATV<strong>21</strong>HU15N4I/In40 °C (104 °F) mounting types A, B and C50 °C (122 °F) mounting types A and C 6050 °C (122 °F) mounting type B5060 °C (140 °F) mounting types A and C60 °C (140 °F) mounting type B40Switching frequency (kHz)1009080706 8 10 12 14 16ATV<strong>21</strong>HU22N4I/In40 °C (104 °F) mounting types A, B and C50 °C (122 °F) mounting types A and C50 °C (122 °F) mounting type B60 °C (140 °F) mounting types A and C60 °C (140 °F) mounting type BSwitching frequency (kHz)100100909080706050406 8 10 12 14 1640 °C (104 °F) mounting types A, B and C50 °C (122 °F) mounting types A and C50 °C (122 °F) mounting type B60 °C (140 °F) mounting types A and C60 °C (140 °F) mounting type BSwitching frequency (kHz)80706050406 8 10 12 14 1640 °C (104 °F) mounting types A, B and C50 °C (122 °F) mounting types A and C50 °C (122 °F) mounting type B60 °C (140 °F) mounting types A and C60 °C (140 °F) mounting type BSwitching frequency (kHz)ATV<strong>21</strong>HU30N4, ATV<strong>21</strong>HU40N4I/In1009080706050406 8 10 12 14 1640 °C (104 °F) mounting types A, B and C50 °C (122 °F) mounting types A and C50 °C (122 °F) mounting type B60 °C (140 °F) mounting types A and C60 °C (140 °F) mounting type BSwitching frequency (kHz)ATV<strong>21</strong>HU55N4I/In1009080706050403020106 8 10 12 14 1640 °C (104 °F) mounting types A, B and C50 °C (122 °F) mounting types A and C50 °C (122 °F) mounting type B60 °C (140 °F) mounting types A and C60 °C (140 °F) mounting type BSwitching frequency (kHz)ATV<strong>21</strong>HU75N4I/InATV<strong>21</strong>HD11N4I/In1009080706040 °C (104 °F) mounting types A, B and C50 °C (122 °F) mounting types A and C60 °C (140 °F) mounting types A and C50 °C (122 °F) mounting type B60 °C (140 °F) mounting type B1009080706040 °C (104 °F) mounting types A, B and C50 °C (122 °F) mounting type B50 °C (122 °F) mounting types A and C60 °C (140 °F) mounting type B60 °C (140 °F) mounting types A and C5050406 8 10 12 14 16Switching frequency (kHz)406 8 10 12 14 16Switching frequency (kHz)14
Mounting and temperature conditionsATV<strong>21</strong>HD15N4I/In1009080706050406 8 10 12 14 1640 °C (104 °F) mounting types A, B and C50 °C (122 °F) mounting types A and C60 °C (140 °F) mounting types A and C50 °C (122 °F) mounting type B60 °C (140 °F) mounting type BSwitching frequency (kHz)ATV<strong>21</strong>HD18N4I/In1009080706050406 8 10 12 14 1640 °C (104 °F) mounting types A, B and C50 °C (122 °F) mounting types A and C50 °C (122 °F) mounting type B60 °C (140 °F) mounting types A and C60 °C (140 °F) mounting type BSwitching frequency (kHz)ATV<strong>21</strong>HD22N4I/InATV<strong>21</strong>HD30N4I/In1009080706050403020106 8 10 12 14 16ATV<strong>21</strong>HD37N4I/In1009080706050403020106 8 10 12 14 16ATV<strong>21</strong>HD55N4I/In1009080706050403020106 8 10 12 14 1640 °C (104 °F) mounting types A, B and C50 °C (122 °F) mounting types A and C50 °C (122 °F) mounting type B60 °C (140 °F) mounting types A and C60 °C (140 °F) mounting type BSwitching frequency (kHz)40 °C (104 °F) mounting types A, B and C50 °C (122 °F) mounting types A and C50 °C (122 °F) mounting type B60 °C (140 °F) mounting types A and C60 °C (140 °F) mounting type BSwitching frequency (kHz)40 °C (104 °F) mounting types A, B and C50 °C (122 °F) mounting types A and C50 °C (122 °F) mounting type B60 °C (140 °F) mounting types A and C60 °C (140 °F) mounting type BSwitching frequency (kHz)1009080706050403020106 8 10 12 14 16ATV<strong>21</strong>HD45N4I/In1009080706050403020106 8 10 12 14 16ATV<strong>21</strong>HD75N4I/In1009080706050403020106 8 10 12 14 1640 °C (104 °F) mounting types A, B and C50 °C (122 °F) mounting types A and C50 °C (122 °F) mounting type B60 °C (140 °F) mounting types A and C60 °C (140 °F) mounting type BSwitching frequency (kHz)40 °C (104 °F) mounting types A, B and C50 °C (122 °F) mounting types A and C50 °C (122 °F) mounting type B60 °C (140 °F) mounting types A and C60 °C (140 °F) mounting type BSwitching frequency (kHz)40 °C (104 °F) mounting types A, B and C50 °C (122 °F) mounting types A and C50 °C (122 °F) mounting type B60 °C (140 °F) mounting types A and C60 °C (140 °F) mounting type BSwitching frequency (kHz)15
Mounting and temperature conditionsMinimum air flow ratesIf you are installing the drive in a Type 1 enclosure, provide forced ventilation at a rate at least equal to the value listed below each drive.Minimum ventilation ratesFlow rateFor drivem 3 /hour ft 3 /minATV<strong>21</strong>H075M3X 22 13ATV<strong>21</strong>HU15M3X 35 <strong>21</strong>ATV<strong>21</strong>HU22M3X 41 25ATV<strong>21</strong>HU30M3X 50 30ATV<strong>21</strong>HU40M3X 66 39ATV<strong>21</strong>HU55M3X 85 50ATV<strong>21</strong>HU75M3X 118 70ATV<strong>21</strong>HD11M3X 157 93ATV<strong>21</strong>HD15M3X <strong>21</strong>5 127ATV<strong>21</strong>HD18M3X 239 141ATV<strong>21</strong>HD22M3X 261 154ATV<strong>21</strong>HD30M3X 371 <strong>21</strong>9ATV<strong>21</strong>H075N4 19 12ATV<strong>21</strong>HU15N4 27 16ATV<strong>21</strong>HU22N4 35 <strong>21</strong>ATV<strong>21</strong>HU30N4 47 28ATV<strong>21</strong>HU40N4 60 36ATV<strong>21</strong>HU55N4 74 44ATV<strong>21</strong>HU75N4 100 59ATV<strong>21</strong>HD11N4 147 87ATV<strong>21</strong>HD15N4 206 122ATV<strong>21</strong>HD18N4 <strong>21</strong>4 126ATV<strong>21</strong>HD22N4 <strong>21</strong>4 126ATV<strong>21</strong>HD30N4 290 171ATV<strong>21</strong>HD37N4 334 197ATV<strong>21</strong>HD45N4 429 252ATV<strong>21</strong>HD55N4 498 293ATV<strong>21</strong>HD75N4 666 39<strong>21</strong>6
Mounting and temperature conditionsVentilationWhen mounting the drive inside a Type 12 or IP54 enclosure, follow these ventilation precautions:• Observe the minimum clearance distances shown on page 12.• If necessary, install a stirring fan to circulate the air inside the enclosure, to prevent hot spots in the drive, and to distribute the heatuniformly to surfaces used for convection cooling.CAUTIONCONDENSATIONWhere condensation is possible, keep the drive powered up when the motor is not running, or install thermostatically controlled stripheaters.Failure to follow this instruction can result in injury or equipment damage.17
Position of the charging LEDBefore working on the drive, remove all power and wait 15 minutes to allow the DC bus to discharge. Then measure the DC bus voltagebetween the PA/+ and PC/– terminals.DANGERHAZARD OF ELECTRIC SHOCK, EXPLOSION, OR ARC FLASHRead and understand the precautions in “Before You Begin” starting on page 5 before performing this procedure.Failure to follow this instruction will result in death or serious injury.Capacitor charging LEDThe capacitor charging LED on thedrive is not an indicator of theabsence of DC bus voltage. It onlyindicates when the capacitor is atfull charge.RUNPRGMONLocRem%HzMODEENTRUNSTOPThe DC bus voltage can exceed 1,000 Vdc. Use a properly rated voltage-sensing device when performing this procedure. To measure theDC bus voltage:1 Disconnect all power.2 Wait 15 minutes to allow the DC bus to discharge.3 Measure the voltage of the DC bus between the PA/+ and PC/– terminals to ensure that the voltage is less than 45 Vdc.4 If the DC bus capacitors do not discharge completely, contact your local <strong>Schneider</strong> <strong>Electric</strong> representative. Do not repair or operate thedrive.18
Installing option cardThese should ideally be installed once the drive is mounted and before wiring it.Install the communication card in ATV<strong>21</strong> as follows.1 Turn off the input power of ATV<strong>21</strong> and wait for at least 15 minutes and then check that the CHARGE lamp on ATV<strong>21</strong> is no longer lit.2 Open the ATV<strong>21</strong> front cover, remove the terminal board fixing screw and take off the ATV<strong>21</strong> standard terminal board.See paragraph Howto open the front cover, page 22.Be careful not to lose the terminal board fixing screw when removed since it may be used again.3 Make the power and control the wiring connections to the drive before installing communication card.4 Please attach the insulating sheet in ATV<strong>21</strong>. (Fix to the terminal board fixing screw hole and ATV<strong>21</strong> catch pin.)5 Install the communication card over the insulating sheet and secure it with the board fixing screw (M3 tapping screw tightening torque:0.7 to 0.8Nm).6 Stick the cabling label for communication card on the standard cabling label stuck on the reverse side of the ATV<strong>21</strong> front cover. And stickthe communication card nameplate near the standard nameplate. Be careful not to cover slits on the ATV<strong>21</strong> enclosure.Note: To install or remove the terminal board, make it slide in or out in parallel with board.Cabling label positionTerminal board M3 fixing screw(tightening torque 0.7 to 0.8 Nm)Card fixing screw holeExampleStick the communication cardnameplateATV<strong>21</strong> nameplateATV<strong>21</strong> Standardterminal boardInsulating seat(attached)Communication card19
WiringWiring recommendationsGood wiring practice requires the separation of control circuit wiring from all power (line) wiring. In addition, power wiring to the motor musthave the maximum possible separation from all other power wiring, whether from the same drive or other drives.Do not run power and control wiring, or multiple power wiring, in the same conduit. This separation reduces the possibility of couplingelectrical transients from power circuits into control circuits or from motor power wiring into other power circuits.Follow the practices below when wiring ATV<strong>21</strong> drives:WARNINGIMPROPER WIRING PRACTICES• Follow the wiring practices described in this document in addition to those already required by the National <strong>Electric</strong>al Code and localelectrical codes.• Do not apply input line voltage to the output terminals (U/T1, V/T2, W/T3).• Check the power connections before energizing the drive.• If replacing another drive, verify that all wiring connections to the ATV<strong>21</strong> drive comply with all wiring instructions in this manual.Failure to follow these instructions can result in death, serious injury, or equipment damage.• Verify that the voltage and frequency of the input supply line and the voltage, frequency, and current of the motor match the rating on thedrive nameplate.• Use metallic conduit for all drive wiring. Do not run control and power wiring in the same conduit.• Separate the metallic conduits carrying power wiring from those carrying control wiring by at least 76 mm (3 in.).• Separate the non-metallic conduits or cable trays carrying power wiring from the metallic conduit carrying control wiring by at least305 mm (12 in.).• Whenever power and control wiring cross, the metallic conduits and non-metallic conduits or trays must cross at right angles.• Equip all inductive circuits near the drive (such as relays, contactors, and solenoid valves) with noise suppressors.Branch circuit protectionRefer to NEC Article 430 for sizing of branch circuit conductors. Ensure that all branch circuit components and equipment (such astransformers, feeder cables, disconnect devices, and protective devices) are rated for the input current of the ATV<strong>21</strong> drive, or for the ratedoutput current, whichever value is larger. The input current of the drives depends on the impedance of the power distribution system andthe available short-circuit current at the drive input terminals.Tables on page 9 provide input current information to optimally size branch circuit conductors. Do not exceed the short-circuit current ratingshown in the tables. The short-circuit current rating is the available short-circuit current capability on the line side of the fuses or circuitbreakers. A line reactor can be used to add impedance and reduce the available short-circuit current capability to the level allowed by thedrive.Note: Ensure that the branch circuit feeder protection rating is not less than the rated output current of the drive.When more than two drives are installed in parallel on a common power line voltage, regardless of voltage rating, an individual line reactorper drive is recommended. This provides filtering between drives and reduces harmonic distortion when the system is partially loaded.If starting the drive from line power, limit operations of the line contactor to less than once per minute to avoid premature failure of the filtercapacitors and precharge resistor. Use the logic inputs to command the drive.INADEQUATE OVERCURRENT PROTECTIONWARNING• Overcurrent protective devices must be properly coordinated.• The National <strong>Electric</strong>al Code and the Canadian <strong>Electric</strong>ity Code require branch circuit protection. Use the fuses recommended in thecatalogue to achieve published short-circuit current ratings.• Do not connect the drive to a power feeder whose short-circuit capacity exceeds the drive short-circuit current rating listed on thedrive nameplate or in Tables on page 9.Failure to follow these instructions can result in death, serious injury, or equipment damage.20
WiringOutput wiringThe drive is sensitive to the amount of capacitance (either phase-to-phase or phase-to-ground) present on the output power conductors.Excessive capacitance can cause an overcurrent trip. Follow these guidelines when selecting output cable:• Cable type: The cable selected must have a low capacitance phase-to-phase and phase-to-ground. Do not use mineral-impregnatedcable because it has a very high capacitance. Immersion of cables in water increases capacitance.• Cable length: The longer the cable, the greater the capacitance. Cable lengths greater than 30.5 m (100 ft.) can affect the drive and motorperformance.• When the output cable is in close proximity to other output cables, the drive may fault under some conditions because of high frequencyswitching and increased capacitance.• Do not use lightning arrestors and/or power factor correction capacitors on the output of the drive.For proper drive short circuit protection, certain values of inductance may be required in the output power wiring. Inductance can be suppliedby the power wiring or auxiliary inductors.INSUFFICIENT OUTPUT INDUCTANCECAUTIONProvide at least 500 mm (20 in.) of cable at the drive output (U/T1, V/T2, W/T3) to ensure a minimum inductance to protect the driveoutput from short circuits.Failure to follow this instruction can result in injury or equipment damage.GroundingGround the drive according to the National <strong>Electric</strong>al Code and all local codes to ensure safe, dependable operation.• Connect a copper wire from the equipment ground lug or terminal to the power system ground conductor. Size the wire according to thedrive rating and national and local codes.• Verify that resistance to ground is 1 W or less. Improper grounding causes intermittent and unreliable operation.DANGERHAZARD OF ELECTRIC SHOCK, EXPLOSION, OR ARC FLASHGround the equipment using the provided ground connecting point. The drive panel must be properly grounded before power is applied.Failure to follow this instruction will result in death or serious injury.Ground multiple drives below. Do not loop the ground cables or connect them in series.Grounding multiple driveYESNODriveDriveDriveDriveDriveDriveDriveDriveDrive<strong>21</strong>
TerminalsHow to open the front cover up to 18.5 kWTo access the terminals of ATV<strong>21</strong> drives:1. Turn the screw on the frontpanel 90° counterclockwiseto align the dot onthe screw with the unlockposition.2. Pull the front panel towardyou and swing it open tothe left.To avoid damaging thescrew, do not applyexcessive force or turn thescrew more than 90°.Screw3. Remove the terminal boardcover by pulling it up towardyou.Terminalboard cover4. Remove the wiring portcover by pulling it down.Pass the cables throughthe wiring port, andconnect them to theterminal board.Wiring portcoverHow to open the front cover from 22 kWTo access the terminals:1 Remove the screws.2 Lift off the cover.22
TerminalsPower terminalsArrangement of the power terminalsConnect the power terminals before connecting the control terminals.ABEach power terminal has the structure shown in the figure at left. Connect a cable to A if it has a ring terminalor to B if it does not have a terminal (bare wire).Parts A and B can accommodate different cable sizes.ATV<strong>21</strong>HMaximumwire sizeTighteningtorquemm 2AWGNm(lb.in)Ground screw075M3X, U15M3X,U22M3X, U30M3X, U40M3X075N4, U15N4, U22N4,U30N4, U40N46 101.3(11.5)R/L1 S/L2 T/L3P0 PA/+ PB PC/- U/T1 V/T2 W/T3ATV<strong>21</strong>HMaximumwire sizeTighteningtorquemm 2AWGNm(lb.in)R/L1 S/L2 T/L3 P0 PA/+ PB PC/- U/T1 V/T2 W/T3Ground screwU55N4U55M3X, U75M3XU75N4D11N46 1016 61.3(11.5)2.5(22.0)ATV<strong>21</strong>HMaximumwire sizeTighteningtorquemm 2AWGNm(lb.in)GroundscrewD11M3X, D15M3X, D18M3XD15N4, D18N425 34.5(40.0)R/L1 S/L2 T/L3 P0 PA/+ PB PC/- U/T1 V/T2 W/T323
TerminalsR/L1 S/L2 T/L3 U/T1 V/T2 W/T3ATV<strong>21</strong>HMaximumwire sizeTighteningtorquemm 2AWGNm(lb.in)t PA/+ PC/- tD22M3XD22N4, D30N450 1/024(<strong>21</strong>2.0)Ground screwR/L1 S/L2 T/L3U/T1V/T2W/T3ATV<strong>21</strong>HMaximumwire sizeTighteningtorquemm 2kcmilsNm(lb.in)tPA/+PC/-tD30M3X150 30041(363.0)Ground screwATV<strong>21</strong>HMaximumwire sizeTighteningtorqueR/L1S/L2T/L3U/T1V/T2W/T3mm 2AWGNm(lb.in)PEPOPA/+PBPC/-PED37N4, D45N450 1/024(<strong>21</strong>2.0)Ground screwATV<strong>21</strong>HMaximumwire sizeTighteningtorqueR/L1 S/L2 T/L3 U/T1 V/T2 W/T3mm 2kcmilsNm(lb.in)PEPA/+ PC/- PED55N4, D75N4150 30041(363.0)Ground screw24
TerminalsPower terminal functionsTerminalsFunctiont Ground terminal (1)R/L1S/L2T/L3U/T1V/T2W/T3PO (2)PA/+ (2) (3)PBPC/– (3)Power supplyOutputs to the motorDC bus (+) polarity (do not use)DC bus (+) polarityDC bus connection (do not use)DC bus (–) polarity(1)ATV<strong>21</strong> drives have two ground terminals, one on the power terminal strip and one on the heatsink.(2)Never remove the jumper between PO and PA/+.(3)The PA/+ and PC/– terminals can only be used to measure the DC bus voltage.25
TerminalsControl terminalsConnect the control terminals after connecting the power terminals.UNINTENDED EQUIPMENT OPERATIONDANGER• Prevent accidental grounding of logic inputs configured for sink logic. Accidental grounding can result in unintended activation of drivefunctions.• Protect the signal conductors against damage that could result in unintentional conductor grounding.• Follow NFPA 79 and EN 60204 guidelines for proper control circuit grounding practices.Failure to follow these instructions will result in death or serious injury.RISK OF IMPROPER OPERATIONWARNINGDo not change the setting of switch SW4 unless your system is wired for sink logic.this instruction can result in death or serious injury.Failure to follow this instruction can result in death or serious injury.Refer to “Logic Input Switch” on page 29 for recommended circuit diagrams for source and sink logic.Arrangement of the control terminalsPLC P24 CC FLA FLB FLC RY RCSOURCEPLCSINKSW4F R RES FMFM VIAVIVISW2 SW3PP VIA VIB CCSwitch:SW4(Selection of logic type)SW2(FM voltage/ current selection)SW3(VIA voltage/current selection)Control Terminal Wire Size and Torque:Maximum wire size: 2.5 mm² (AWG 14)Tightening torque: 0.6 Nm (5.3 lb.in)Factory Setting:SOURCE side (positive)V (Voltage)V (Voltage)Connector (RJ45)26
TerminalsControl terminal characteristicsTerminals FunctionPLCP24External power supply inputInternal supplyCharacteristics+24 Vdc input for external power supply for logic inputsMax. permissible voltage: 50 VdcCC Common 0 Vdc common (2 terminals)FLA,FLB,FLCRY, RCFRRESFMPPVIAVIBConfigurable relay outputsConfigurable logic inputsConfigurable analog outputInternal supply availableConfigurable analog/logicinputConfigurable analog inputShort-circuit and overload protection:24 Vdc supply (min. <strong>21</strong> Vdc, max. 27 Vdc), maximum current: 200 mADefaultfunction setting1 relay logic output, 1 N/C contact, and 1 N/O contact with common pointMinimum switching capacity: 3 mA for 24 VdcMaximum switching capacity:Fault relay• On resistive load (cos ϕ = 1): 5 A for 250 Vac or 30 Vdc• On inductive load (cos ϕ = 0.4 and L/R = 7 ms): 2 A for 250 Vac or 30 VdcMax. response time: 7 ms ± 0.5 ms1 relay logic output, 1 N/O contactMinimum switching capacity: 3 mA for 24 VdcMaximum switching capacity:Speed attained• On resistive load (cos ϕ = 1): 3 A for 250 Vac or 30 Vdc• On inductive load (cos ϕ = 0.4 and L/R = 7 ms): 2 A for 250 Vac or 30 VdcMax. response time: 7 ms ± 0.5 ms3 programmable logic inputs, 24 Vdc, compatible with level 1 PLC, IEC 65A-68 standardImpedance: 3.5 kΩF: Run forwardMaximum voltage: 30 Vdc(2-wire control)Max. sampling time: 2 ms ±0.5 msR: Preset speedMultiple assignment makes it possible to configure several functions on one input 1 command(15 Hz)Positive logic (Source): State 0 if y 5 Vdc or logic input not wired, state 1 if u 11 VdcRES: Fault resetNegative logic (Sink): State 0 if u 16 Vdc or logic input not wired,state 1 if y 10 Vdc1 switch-configurable voltage or current analog output:• Voltage analog output 0–10 Vdc, minimum load impedance 470 Ω• Current analog output X–Y mA by programming X and Y from 0 to 20 mA,maximum load impedance: 500 ΩOutput frequencyMax. sampling time: 2 ms ±0.5 msResolution: 10 bitsAccuracy: ±1 % for a temperature variation of 60 °CLinearity: ±0.2%Short-circuit and overload protection:One 10.5 Vdc ± 5% supply for the reference potentiometer (1 to 10 kΩ), —maximum current: 10 mASwitch-configurable voltage or current analog input:• Voltage analog input 0–10 Vdc, impedance 30 kΩ(max. safe voltage: 24 Vdc)• Analog current input X–Y mA by programming X and Y from 0 to 20 mA,with impedance 242 ΩMax. sampling time: 2 ms ±0.5 msResolution: 11 bitsAccuracy: ±0.6% for a temperature variation of 60 °CLinearity: ±0.15% of the maximum valueThis analog input is also configurable as a logic input.Consult the <strong>Altivar</strong> <strong>21</strong> Programming Manual for more information.Voltage analog input, configurable as an analog input or as a PTC probe input.Voltage analog input:• 0–10 Vdc, impedance 30 kΩ (max. safe voltage 24 Vdc)• Max. sampling time: 2 ms ±0.5 ms• Resolution: 11 bits• Accuracy: ±0.6% for a temperature variation of 60 °C• Linearity: ±0.15% of the maximum valuePTC probe input:• 6 probes max. mounted in series• Nominal value < 1.5 kΩ• Trip resistance 3 kW, reset value 1.8 kΩ• Short-circuit protection < 50 Ω—Primary speedreference,0–10 VSecondary speedreference,1–10 V27
TerminalsConnection diagramThree-phase connection diagram for the drive at the factory settings.L1 L2 L3U / T1V / T2W / T3P0PA / +PPVIACCV1BFMR / L1S / L2T / L3PLCFRRESP24FLAFLCFLBRYRC0–10 VM3 cNote: Connect the power terminals before connecting the control terminals. Install surge suppressors on all inductive circuits located nearthe drive or coupled to the same circuit.Refer to the drive nameplate or to the catalogue for recommended fuses. Fast acting or time delay Class J fuses can be used.28
TerminalsLogic input switchThe logic input switch SW4 assigns the logic input type to either 24 V (source logic) or 0 V (sink logic).Note: When the logic input is configured for sink logic, grounding the input signals can result in unintended activation of drive functions.UNINTENDED EQUIPMENT OPERATIONDANGER• Protect the signal conductors against damage that could result in unintentional conductor grounding.• Follow NFPA 79 and EN 60204 guidelines for proper control circuit grounding practices.Failure to follow these instructions can result in death, serious injury, or equipment damage.Recommended circuit diagrams for source and sink logicSource (Positive) LogicSource (Positive) LogicSW4SourceCommonP2424 VdcInputPLCSW424 VdcOutputFInputOutputFCommonPLCProgrammableControllerDriveProgrammableControllerDriveSink (Negative) LogicSink (Negative) LogicSW4OutputF24 VdcInputPLCSW424 VdcCommonOutputPLCFInputSinkCommonCCProgrammableControllerDriveProgrammableControllerDrive29
Use on an impedance grounded systemWhen using the ATV<strong>21</strong> drive on a system with an isolated or impedance grounded neutral, use a permanent insulation monitor compatiblewith non-linear loads.ATV<strong>21</strong> 480 V rated drives feature built-in radio frequency interference (RFI) filters with grounded capacitors. When using the drive on animpedance grounded system, we recommend that you isolate the RFI filters from ground to prevent reduction of their operating life.• ATV<strong>21</strong>H 075N4 to U55N4, ATV<strong>21</strong>H D22N4 to D30N4: Pull out the jumper to the left of the ground terminal as illustrated below to isolatethe RFI filters.Normal(filter connected)Impedancegrounded system(filterdisconnected)• ATV<strong>21</strong>H U75N4 to D18N4: Connect the cable to the top left of the power terminals as illustrated below to isolate the filters.Impedance grounded system(filter disconnected)Normal(filter connected,factory setting)30
Motor thermal protectionThermal protection is integrated into the drive by continuous calculation of I2t, taking motor speed into account. The motor power ratingmust be between 10% and 100% of the drive rating.CAUTIONLOSS OF MOTOR OVERLOAD PROTECTION• Setting the parameter OLn to 2, 3, 6, or 7 (not factory setting) disables the internal motor overload protection function. In this case,external motor overload protection must be provided. For more information, refer to the <strong>Altivar</strong>® <strong>21</strong> Programming Manual.• When using external overload relays connected to the drive output, the overload relay must be capable of operation across theexpected range of drive output frequencies (including direct current).• When using DC injection braking, the overload relay must be suitable for operation with direct current flowing in the motor. Do notuse overload relays equipped with current transformers for sensing the motor current.Failure to follow these instructions can result in injury or equipment damage.If parameter F632 is set to zero (factory setting), the motor thermal state memory is reset to zero when the drive is powered down. For moreinformation, refer to the <strong>Altivar</strong>® <strong>21</strong> Programming Manual.This drive does not provide direct thermal protection for the motor. Consult the motor manufacturer for the thermal capability of the motorwhen operated over the desired speed range.MOTOR OVERHEATINGCAUTION• If parameter F632 is set to zero (factory setting), the motor thermal state memory is reset to zero when the drive is powered down.For more information, refer to the <strong>Altivar</strong>® <strong>21</strong> Programming Manual.• Use a thermal sensor in the motor as required by the motor manufacturer for protection at all speeds and load conditions.Failure to follow these instruction can result in injury or equipment damage.31
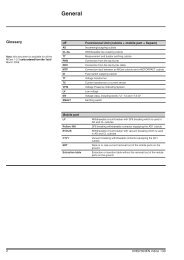
Electromagnetic compatibilityThe ATV<strong>21</strong> drive is considered to be a component. It is neither a machine nor a piece of equipment ready for use in accordance with theEuropean Community directives (machinery directive or electromagnetic compatibility directive). It is the user’s responsibility to ensure thatthe machine meets those standards.Installation recommendations for meeting EN 55011 class A• Ensure that the grounds of the drive, the motor, and the cable shields are at equal potential.• Use shielded cables with the shields connected to ground at both ends of the motor cable and control cables. Conduit can be used forpart of the shielding length, provided that there is no break in continuity.• Ensure maximum separation between the power supply cable (line supply) and the motor cable.ATV<strong>21</strong>H 075M3X to D18M3XATV<strong>21</strong>H 075N4 to D18N41 EMC plate supplied with the ATV<strong>21</strong> drive.2 ATV<strong>21</strong> drive.3 Non-shielded power supply wires or cables.4 Non-shielded wires for the output of the safety relay contacts.25 The shields for cables 6 and 7 must be securely attached to the EMC plate withstainless steel clamps (item 5). Strip cables 6 and 7 to expose the shields. Applyappropriately-sized clamps around the stripped portion of the cables and fasten themto the EMC plate.1356 Shielded cable for connection to the motor, with shield connected to ground at bothends. This shield must not be interrupted. If intermediate terminal blocks are used,they must be in EMC-shielded metal boxes.7 Shielded cable for connection to control/command devices. For applications whichrequire a large number of conductors, small cross-sections must be used (0.5 mm 2 ,20 AWG). This shield must not be interrupted. If intermediate terminal blocks areused, they must be in EMC-shielded metal boxes.86 748 Ground screw. Use this screw for the motor cables on the low power rated drives, asthe ground screw on the heatsink is inaccessible.AV<strong>21</strong>H D22M3X to D30M3XATV<strong>21</strong>H D22N4 to D75N42If using an additional input filter, connect it directly to the line supply with an unshieldedcable. Then make connection 3 on the drive using the filter output cable.Although there is a high frequency equipotential ground connection between the drive,motor, and cable shielding, you must still connect the PE protective conductors (greenyellow)to the appropriate terminals on each of the devices. You may also need todisconnect the shield at the motor end for very long cable runs to alleviate noisegeneration.81853 6 7 432
atv<strong>21</strong>_installation_manual_en_v12008-03