Supplement to the Canopy System Release 8 User Guide PMP 400
Supplement to the Canopy System Release 8 User Guide PMP 400
Supplement to the Canopy System Release 8 User Guide PMP 400

Create successful ePaper yourself
Turn your PDF publications into a flip-book with our unique Google optimized e-Paper software.
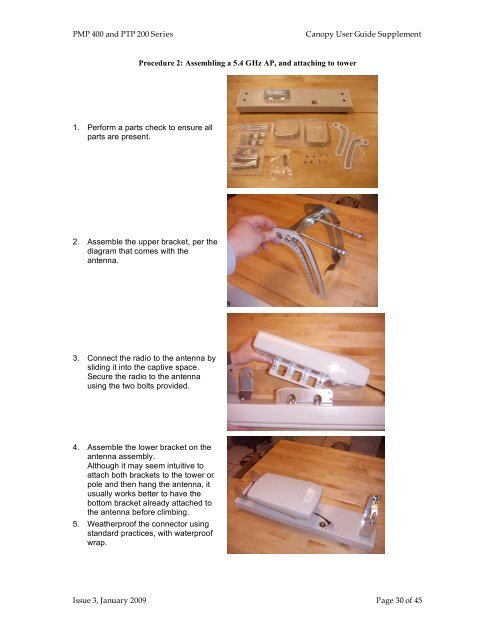
<strong>PMP</strong> <strong>400</strong> and PTP 200 Series<strong>Canopy</strong> <strong>User</strong> <strong>Guide</strong> <strong>Supplement</strong>Procedure 2: Assembling a 5.4 GHz AP, and attaching <strong>to</strong> <strong>to</strong>wer1. Perform a parts check <strong>to</strong> ensure allparts are present.2. Assemble <strong>the</strong> upper bracket, per <strong>the</strong>diagram that comes with <strong>the</strong>antenna.3. Connect <strong>the</strong> radio <strong>to</strong> <strong>the</strong> antenna bysliding it in<strong>to</strong> <strong>the</strong> captive space.Secure <strong>the</strong> radio <strong>to</strong> <strong>the</strong> antennausing <strong>the</strong> two bolts provided.4. Assemble <strong>the</strong> lower bracket on <strong>the</strong>antenna assembly.Although it may seem intuitive <strong>to</strong>attach both brackets <strong>to</strong> <strong>the</strong> <strong>to</strong>wer orpole and <strong>the</strong>n hang <strong>the</strong> antenna, itusually works better <strong>to</strong> have <strong>the</strong>bot<strong>to</strong>m bracket already attached <strong>to</strong><strong>the</strong> antenna before climbing.5. Wea<strong>the</strong>rproof <strong>the</strong> connec<strong>to</strong>r usingstandard practices, with waterproofwrap.Issue 3, January 2009 Page 30 of 45