Knot Knowledge
Knot Knowledge
Knot Knowledge

You also want an ePaper? Increase the reach of your titles
YUMPU automatically turns print PDFs into web optimized ePapers that Google loves.
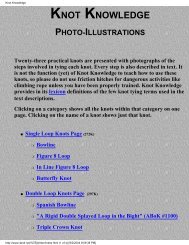
<strong>Knot</strong> <strong>Knowledge</strong>KNOT KNOWLEDGEPHOTO-ILLUSTRATIONSTwenty-three practical knots are presented with photographs of the stepsinvolved in tying each knot. Every step is also described in text. It is not thefunction (yet) of <strong>Knot</strong> <strong>Knowledge</strong> to teach how to use these knots, so pleasedo not use friction hitches for dangerous activities like climbing rope unlessyou have been properly trained. <strong>Knot</strong> <strong>Knowledge</strong> provides in its lexicondefinitions of the few knot tying terms used in the text descriptions.Clicking on a category shows all the knots within that category on one page.Clicking on the name of a knot shows just that knot.●Single Loop <strong>Knot</strong>s Page (272K)❍ Bowline❍ Figure 8 Loop❍ In Line Figure 8 Loop❍ Butterfly <strong>Knot</strong>●Double Loop <strong>Knot</strong>s Page (297K)❍ Spanish Bowline❍ "A Rigid Double Splayed Loop in the Bight" (ABoK #1100)❍ Triple Crown <strong>Knot</strong>❍ Bowline on a Bight●Hitches Page (324K)http://www.iland.net/%7Ejbritton/index.html (1 of 3) [7/1/2004 12:46:22 PM]
<strong>Knot</strong> <strong>Knowledge</strong>❍❍❍❍❍Clove HitchConstrictor HitchAnchor BendBunt Line HitchHighwayman's Hitch●Stopper <strong>Knot</strong>s Page (108K)❍ Figure 8❍ Heaving Line <strong>Knot</strong>❍ Double Overhand <strong>Knot</strong>●Bends Page (118K)❍ Sheet Bend❍ Full Carrick Bend●Friction Hitches Page (552K)❍ Blake's Hitch❍ Kreutzklem❍ Prusik❍ Kleimheist❍ Tautline Hitch (aka Rolling Hitch)❍ Sliding Sheet BendLinks:●If you didn't find the knot you wanted on <strong>Knot</strong> <strong>Knowledge</strong>, try PeterSuber's <strong>Knot</strong>s on the Web. It's the most complete index of knot-relatedweb sites on the web.http://www.iland.net/%7Ejbritton/index.html (2 of 3) [7/1/2004 12:46:22 PM]
<strong>Knot</strong> <strong>Knowledge</strong>●Roper's <strong>Knot</strong> Page is Ed Prins' knot-related website index, which alsohas an instruction section.●●●●Want to tie a rope halter for your horse? The Fiador (aka Theodore)knot can be found on Part II of Connie Nygard's Rope Halter website.The trucker's hitch is a frequent request. It can be found onNet<strong>Knot</strong>s.com's Outdoor <strong>Knot</strong>s page.For information on using the Blake's Hitch in recreational treeclimbing, check out Peter Jenkins' Tree Climbers International website.See the *NEW* knots on the contributions page.http://www.iland.net/%7Ejbritton/index.html (3 of 3) [7/1/2004 12:46:22 PM]
<strong>Knot</strong> <strong>Knowledge</strong> - LexiconKNOT KNOWLEDGELexicon[Return to Index]Here is a brief explanation of the few knot terms used in<strong>Knot</strong> <strong>Knowledge</strong>:bend - a knot used for joining two ends togetherbight - a semi-circle of rope where the rope does not cross itself; also thepart of the rope between the standing part and the end that can be used intying the knotdress - to remove slack in the knot by drawing up the knot neatly; to makesure the knot is tied correctly, that all parts are where they should beend - the end of the ropefriction hitch - a knot tied directly to the standing part, another rope, ora cylindrical object that is adjustable (can be slid) when the knot itself isgrabbed and moved, but otherwise stays put (from friction) when the load ishttp://www.iland.net/%7Ejbritton/<strong>Knot</strong>Photo%20Lexicon.html (1 of 2) [7/1/2004 12:46:23 PM]
<strong>Knot</strong> <strong>Knowledge</strong> - Lexiconon the standing parthitch - a knot that attaches a rope directly to an objectloop - a circle of rope in which the rope crosses itselfset - to fully tighten a knot by pulling on all partsslip - to use a bight of rope instead of the end when finishing tying a knot;used to make untying a knot easierstanding part - the part of the rope not used in the knot itselfstopper knot - a bulky knot that is used to prevent the rope from pullingthrough a hole or pulleyReturn to Indexhttp://www.iland.net/%7Ejbritton/<strong>Knot</strong>Photo%20Lexicon.html (2 of 2) [7/1/2004 12:46:23 PM]
<strong>Knot</strong> <strong>Knowledge</strong> - Single Loop <strong>Knot</strong>sKNOT KNOWLEDGESINGLE LOOP KNOTS[Bowline][Figure 8 Loop][In Line Figure 8 Loop][Butterfly <strong>Knot</strong>][Return to Index]BowlineThere are several variations on tying the bowline, two of which are presentedhere. I start with one method of tying that is simple to photograph and thendemonstrate the one handed twist method, which is an easy and reliable wayof forming the loop in the standing part.Step #1http://www.iland.net/%7Ejbritton/<strong>Knot</strong>Photo%20SingleLoop%20<strong>Knot</strong>s.html (1 of 20) [7/1/2004 12:46:26 PM]
<strong>Knot</strong> <strong>Knowledge</strong> - Single Loop <strong>Knot</strong>sArrange the rope as shown,with a small loop in thestanding part and the endgoing around the object theloop is to be tied around.Step #2Insert the end through theloop.http://www.iland.net/%7Ejbritton/<strong>Knot</strong>Photo%20SingleLoop%20<strong>Knot</strong>s.html (2 of 20) [7/1/2004 12:46:26 PM]
<strong>Knot</strong> <strong>Knowledge</strong> - Single Loop <strong>Knot</strong>sStep #3Pull the end around andbehind the standing part.Step #4Insert the end back throughthe loop.http://www.iland.net/%7Ejbritton/<strong>Knot</strong>Photo%20SingleLoop%20<strong>Knot</strong>s.html (3 of 20) [7/1/2004 12:46:26 PM]
<strong>Knot</strong> <strong>Knowledge</strong> - Single Loop <strong>Knot</strong>sFinished Bowline - Front ViewDress and set the knot.Finished Bowline - Rear ViewDress and set the knot.http://www.iland.net/%7Ejbritton/<strong>Knot</strong>Photo%20SingleLoop%20<strong>Knot</strong>s.html (4 of 20) [7/1/2004 12:46:26 PM]
<strong>Knot</strong> <strong>Knowledge</strong> - Single Loop <strong>Knot</strong>sBowline - One Handed Twist MethodThis is a fast and reliable method for making the loop in the standing part.This method can also be used to tie a sheet bend. To use this method for asheet bend, instead of twisting the end into a loop in its own standing part (asshown below), twist a loop very near the end of a second rope. Be sure thatthe end of the rope you have in your hand is pointing up and the end of thesecond rope (that you'll be twisting a loop into) is pointing down.Bowline - One Handed Twist Method - Step#1Grab the end of the ropeand place it across thestanding part. Place yourthumb under the standingpart.Bowline - One Handed Twist Method - Step#2http://www.iland.net/%7Ejbritton/<strong>Knot</strong>Photo%20SingleLoop%20<strong>Knot</strong>s.html (5 of 20) [7/1/2004 12:46:26 PM]
<strong>Knot</strong> <strong>Knowledge</strong> - Single Loop <strong>Knot</strong>sRotate your wristclockwise, hooking thestanding part with yourthumb and bringing itaround in a loop. Keep theend inside the big loop.Bowline - One Handed Twist Method - Step#3Continue rotating yourwrist until the loop isformed in the standing partwith the end threadedthrough it. Now you canjust weave the end behindthe standing part and backdown through the loop, asdescribed above (do this tocomplete the sheet bend,too).[Top of Page]http://www.iland.net/%7Ejbritton/<strong>Knot</strong>Photo%20SingleLoop%20<strong>Knot</strong>s.html (6 of 20) [7/1/2004 12:46:26 PM]
<strong>Knot</strong> <strong>Knowledge</strong> - Single Loop <strong>Knot</strong>sFigure 8 LoopThe Figure 8 Loop is just a Figure 8 <strong>Knot</strong> tied in the bight.Step #1Start with a bight of ropeand form a loop wherethe end is behind thestanding part.Step #2http://www.iland.net/%7Ejbritton/<strong>Knot</strong>Photo%20SingleLoop%20<strong>Knot</strong>s.html (7 of 20) [7/1/2004 12:46:26 PM]
<strong>Knot</strong> <strong>Knowledge</strong> - Single Loop <strong>Knot</strong>sBring the end around and infront of the standing part.Step #3Insert the end back throughthe loop.http://www.iland.net/%7Ejbritton/<strong>Knot</strong>Photo%20SingleLoop%20<strong>Knot</strong>s.html (8 of 20) [7/1/2004 12:46:26 PM]
<strong>Knot</strong> <strong>Knowledge</strong> - Single Loop <strong>Knot</strong>sFinished Figure 8 LoopDress and set the knot.[Top of Page]In Line Figure 8 Loophttp://www.iland.net/%7Ejbritton/<strong>Knot</strong>Photo%20SingleLoop%20<strong>Knot</strong>s.html (9 of 20) [7/1/2004 12:46:26 PM]
<strong>Knot</strong> <strong>Knowledge</strong> - Single Loop <strong>Knot</strong>sThe In Line Figure 8 Loop is used for a load that will be more or less parallelto the standing part. This loop knot can be pulled through a pulley easierthan other loop knots.Step #1Start with the standing part of therope.Step #2http://www.iland.net/%7Ejbritton/<strong>Knot</strong>Photo%20SingleLoop%20<strong>Knot</strong>s.html (10 of 20) [7/1/2004 12:46:26 PM]
<strong>Knot</strong> <strong>Knowledge</strong> - Single Loop <strong>Knot</strong>sTwist the standing part tocreate a loop, as shown.Step #3Bring the loop behindthe standing part.http://www.iland.net/%7Ejbritton/<strong>Knot</strong>Photo%20SingleLoop%20<strong>Knot</strong>s.html (11 of 20) [7/1/2004 12:46:26 PM]
<strong>Knot</strong> <strong>Knowledge</strong> - Single Loop <strong>Knot</strong>sStep #4Wrap the loop back aroundthe standing part.Step #5Insert the loop backthrough itself, to the side ofthe standing part that comesdown out of the knot.http://www.iland.net/%7Ejbritton/<strong>Knot</strong>Photo%20SingleLoop%20<strong>Knot</strong>s.html (12 of 20) [7/1/2004 12:46:26 PM]
<strong>Knot</strong> <strong>Knowledge</strong> - Single Loop <strong>Knot</strong>sFinished In Line Figure 8 Loop - FrontViewTo dress the knot, pull thestanding part coming out ofthe top of the knot. Thenpull on the loop to set theknot.http://www.iland.net/%7Ejbritton/<strong>Knot</strong>Photo%20SingleLoop%20<strong>Knot</strong>s.html (13 of 20) [7/1/2004 12:46:26 PM]
<strong>Knot</strong> <strong>Knowledge</strong> - Single Loop <strong>Knot</strong>sFinished In Line Figure 8 Loop - OppositeViewOpposite view.http://www.iland.net/%7Ejbritton/<strong>Knot</strong>Photo%20SingleLoop%20<strong>Knot</strong>s.html (14 of 20) [7/1/2004 12:46:26 PM]
<strong>Knot</strong> <strong>Knowledge</strong> - Single Loop <strong>Knot</strong>s[Top of Page]Butterfly <strong>Knot</strong>The Butterfly knot is good to use when you need an attachment loop in thebight of a loaded rope, because the ends lead out of the knot perpendicular tothe loop.http://www.iland.net/%7Ejbritton/<strong>Knot</strong>Photo%20SingleLoop%20<strong>Knot</strong>s.html (15 of 20) [7/1/2004 12:46:26 PM]
<strong>Knot</strong> <strong>Knowledge</strong> - Single Loop <strong>Knot</strong>sStep #1Start with a bight of rope.Step #2Twist the rope twice; thatis, one full turn.http://www.iland.net/%7Ejbritton/<strong>Knot</strong>Photo%20SingleLoop%20<strong>Knot</strong>s.html (16 of 20) [7/1/2004 12:46:26 PM]
<strong>Knot</strong> <strong>Knowledge</strong> - Single Loop <strong>Knot</strong>sStep #3Grasp the top of the bightand fold it down towardthe ends.http://www.iland.net/%7Ejbritton/<strong>Knot</strong>Photo%20SingleLoop%20<strong>Knot</strong>s.html (17 of 20) [7/1/2004 12:46:26 PM]
<strong>Knot</strong> <strong>Knowledge</strong> - Single Loop <strong>Knot</strong>sStep #4With your hand still onthe top of the bight, pull itunderneath and throughthe the "hole" that wasjust formed.http://www.iland.net/%7Ejbritton/<strong>Knot</strong>Photo%20SingleLoop%20<strong>Knot</strong>s.html (18 of 20) [7/1/2004 12:46:26 PM]
<strong>Knot</strong> <strong>Knowledge</strong> - Single Loop <strong>Knot</strong>sFinished Butterfly <strong>Knot</strong> - Front ViewDress and set theknot.Finished Butterfly <strong>Knot</strong> - Rear ViewDress and set theknot.http://www.iland.net/%7Ejbritton/<strong>Knot</strong>Photo%20SingleLoop%20<strong>Knot</strong>s.html (19 of 20) [7/1/2004 12:46:26 PM]
<strong>Knot</strong> <strong>Knowledge</strong> - Single Loop <strong>Knot</strong>s[Top of Page]Return to Indexhttp://www.iland.net/%7Ejbritton/<strong>Knot</strong>Photo%20SingleLoop%20<strong>Knot</strong>s.html (20 of 20) [7/1/2004 12:46:26 PM]
<strong>Knot</strong> <strong>Knowledge</strong> - BendsKNOT KNOWLEDGEBENDS[Sheet Bend][Full Carrick Bend][Return to Index]Sheet BendThe sheet bend is very similar to the square knot, granny knot, thief knot,and particularly the bowline. In fact, the sheet bend can be tied using theOne Handed Twist Method which is also used to tie the bowline. The sheetbend is very fast to tie and when slipped, is one of the easiest bends to workwith. It is also useful when joining two ropes of different diameters.Step #1http://www.iland.net/%7Ejbritton/<strong>Knot</strong>Photo%20Bends.html (1 of 8) [7/1/2004 12:46:30 PM]
<strong>Knot</strong> <strong>Knowledge</strong> - BendsForm a bight(with thelargerdiameterrope).Step #2Insert the second ropeunder and then over theend of the first rope.Step #3Take the end of the secondrope and bring it under thebight.Step #4http://www.iland.net/%7Ejbritton/<strong>Knot</strong>Photo%20Bends.html (2 of 8) [7/1/2004 12:46:30 PM]
<strong>Knot</strong> <strong>Knowledge</strong> - BendsBring the end over thebight, putting it under itsown standing part.Finished Sheet BendPull on both standing partsto set the knot.A double sheet bend is amore secure knot and canbe tied by adding anotherwrap around the bight (thatis, repeating steps 3 -4).Double Sheet BendSlipped Sheet Bendhttp://www.iland.net/%7Ejbritton/<strong>Knot</strong>Photo%20Bends.html (3 of 8) [7/1/2004 12:46:30 PM]
<strong>Knot</strong> <strong>Knowledge</strong> - BendsTo slip the sheet bend, sticka bight through instead ofthe end. Pull on the end tountie the knot.[Top of Page]Full Carrick BendThe Carrick Bend is a strong, secure knot that can be used to join two ropesof different construction.Step #1http://www.iland.net/%7Ejbritton/<strong>Knot</strong>Photo%20Bends.html (4 of 8) [7/1/2004 12:46:30 PM]
<strong>Knot</strong> <strong>Knowledge</strong> - BendsForm a loop with the firstrope, with the end behindthe standing part.Step #2Place the second rope underthe loop.Step #3Bring the end over thestanding part of the firstrope.Step #4http://www.iland.net/%7Ejbritton/<strong>Knot</strong>Photo%20Bends.html (5 of 8) [7/1/2004 12:46:30 PM]
<strong>Knot</strong> <strong>Knowledge</strong> - BendsPlace the end of the secondrope under the end of thefirst rope.Step #5Place the end over thestanding part of the firstrope.Step #6Weave the end of the secondrope under its own standingpart.http://www.iland.net/%7Ejbritton/<strong>Knot</strong>Photo%20Bends.html (6 of 8) [7/1/2004 12:46:30 PM]
<strong>Knot</strong> <strong>Knowledge</strong> - BendsStep #7Finally, pull the end overthe first rope. The knotshould be symmetric withthe ends on opposite sides.Finished Carrick Bend - Front ViewPull on both standing partsand then the ends to tightenthe knot.Finished Carrick Bend - Rear ViewRear view.[Top of Page]http://www.iland.net/%7Ejbritton/<strong>Knot</strong>Photo%20Bends.html (7 of 8) [7/1/2004 12:46:30 PM]
<strong>Knot</strong> <strong>Knowledge</strong> - BendsReturn to Indexhttp://www.iland.net/%7Ejbritton/<strong>Knot</strong>Photo%20Bends.html (8 of 8) [7/1/2004 12:46:30 PM]
<strong>Knot</strong> <strong>Knowledge</strong> - Stopper <strong>Knot</strong>sKNOT KNOWLEDGESTOPPER KNOTS[Figure 8][Heaving Line <strong>Knot</strong>][Double Overhand <strong>Knot</strong>][Return to Index]Figure 8The Figure 8 knot is made in the end of a rope. It is bulkier than anOverhand knot.Step #1http://www.iland.net/%7Ejbritton/<strong>Knot</strong>Photo%20Stopper%20<strong>Knot</strong>s.html (1 of 8) [7/1/2004 12:46:33 PM]
<strong>Knot</strong> <strong>Knowledge</strong> - Stopper <strong>Knot</strong>sMake a loop.Step #2Bring the end aroundbehind the standing part.Step #3http://www.iland.net/%7Ejbritton/<strong>Knot</strong>Photo%20Stopper%20<strong>Knot</strong>s.html (2 of 8) [7/1/2004 12:46:33 PM]
<strong>Knot</strong> <strong>Knowledge</strong> - Stopper <strong>Knot</strong>sPut the end through theloop.Finished Figure 8Dress and set the knot.[Top of Page]http://www.iland.net/%7Ejbritton/<strong>Knot</strong>Photo%20Stopper%20<strong>Knot</strong>s.html (3 of 8) [7/1/2004 12:46:33 PM]
<strong>Knot</strong> <strong>Knowledge</strong> - Stopper <strong>Knot</strong>sHeaving Line <strong>Knot</strong>The Heaving line knot can be used to add weight to the end of the rope togive mass to it when you want to throw it.Step #1Form a bight.Step #2http://www.iland.net/%7Ejbritton/<strong>Knot</strong>Photo%20Stopper%20<strong>Knot</strong>s.html (4 of 8) [7/1/2004 12:46:33 PM]
<strong>Knot</strong> <strong>Knowledge</strong> - Stopper <strong>Knot</strong>sStart making turns, takingthe end behind the standingpart and wrapping itaround the bight.Step #3Make several turns.Step #4http://www.iland.net/%7Ejbritton/<strong>Knot</strong>Photo%20Stopper%20<strong>Knot</strong>s.html (5 of 8) [7/1/2004 12:46:33 PM]
<strong>Knot</strong> <strong>Knowledge</strong> - Stopper <strong>Knot</strong>sInsert the end through theloop.Finished Heaving Line <strong>Knot</strong>Pull on the standing part totighten the knot.[Top of Page]http://www.iland.net/%7Ejbritton/<strong>Knot</strong>Photo%20Stopper%20<strong>Knot</strong>s.html (6 of 8) [7/1/2004 12:46:33 PM]
<strong>Knot</strong> <strong>Knowledge</strong> - Stopper <strong>Knot</strong>sDouble Overhand <strong>Knot</strong>The Double Overhand is bulkier than the Figure 8 knot and is more difficultto untie.Step #1Begin with anoverhand knot.Step #2Put the end backthrough the loop.Finished Double Overhand <strong>Knot</strong>http://www.iland.net/%7Ejbritton/<strong>Knot</strong>Photo%20Stopper%20<strong>Knot</strong>s.html (7 of 8) [7/1/2004 12:46:33 PM]
<strong>Knot</strong> <strong>Knowledge</strong> - Stopper <strong>Knot</strong>sYank firmly on bothends to snap this knottight.[Top of Page]Return to Indexhttp://www.iland.net/%7Ejbritton/<strong>Knot</strong>Photo%20Stopper%20<strong>Knot</strong>s.html (8 of 8) [7/1/2004 12:46:33 PM]
<strong>Knot</strong> <strong>Knowledge</strong> - BowlineKNOT KNOWLEDGESINGLE LOOP KNOTSBowlineThere are several variations on tying the bowline, two of which are presentedhere. I start with one method of tying that is simple to photograph and thendemonstrate the one handed twist method, which is an easy and reliable wayof forming the loop in the standing part.Step #1Arrange the rope as shown,with a small loop in thestanding part and the endgoing around the object theloop is to be tied around.http://www.iland.net/%7Ejbritton/bowline.htm (1 of 7) [7/1/2004 12:46:34 PM]
<strong>Knot</strong> <strong>Knowledge</strong> - BowlineStep #2Insert the end through theloop.http://www.iland.net/%7Ejbritton/bowline.htm (2 of 7) [7/1/2004 12:46:34 PM]
<strong>Knot</strong> <strong>Knowledge</strong> - BowlineStep #3Pull the end around andbehind the standing part.Step #4Insert the end back throughthe loop.http://www.iland.net/%7Ejbritton/bowline.htm (3 of 7) [7/1/2004 12:46:34 PM]
<strong>Knot</strong> <strong>Knowledge</strong> - BowlineFinished Bowline - Front ViewDress and set the knot.Finished Bowline - Rear ViewDress and set the knot.http://www.iland.net/%7Ejbritton/bowline.htm (4 of 7) [7/1/2004 12:46:34 PM]
<strong>Knot</strong> <strong>Knowledge</strong> - BowlineBowline - One Handed Twist MethodThis is a fast and reliable method for making the loop in the standing part.This method can also be used to tie a sheet bend. To use this method for asheet bend, instead of twisting the end into a loop in its own standing part (asshown below), twist a loop very near the end of a second rope. Be sure thatthe end of the rope you have in your hand is pointing up and the end of thesecond rope (that you'll be twisting a loop into) is pointing down.Bowline - One Handed Twist Method - Step#1Grab the end of the ropeand place it across thestanding part. Place yourthumb under the standingpart.Bowline - One Handed Twist Method - Step#2http://www.iland.net/%7Ejbritton/bowline.htm (5 of 7) [7/1/2004 12:46:34 PM]
<strong>Knot</strong> <strong>Knowledge</strong> - BowlineRotate your wristclockwise, hooking thestanding part with yourthumb and bringing itaround in a loop. Keep theend inside the big loop.Bowline - One Handed Twist Method - Step#3Continue rotating yourwrist until the loop isformed in the standing partwith the end threadedthrough it. Now you canjust weave the end behindthe standing part and backdown through the loop, asdescribed above (do this tocomplete the sheet bend,too).[Top of Page]http://www.iland.net/%7Ejbritton/bowline.htm (6 of 7) [7/1/2004 12:46:34 PM]
<strong>Knot</strong> <strong>Knowledge</strong> - BowlineReturn to Indexhttp://www.iland.net/%7Ejbritton/bowline.htm (7 of 7) [7/1/2004 12:46:34 PM]
<strong>Knot</strong> <strong>Knowledge</strong> - Sheet BendKNOT KNOWLEDGEBENDSSheet BendThe sheet bend is very similar to the square knot, granny knot, thief knot,and particularly the bowline. In fact, the sheet bend can be tied using theOne Handed Twist Method which is also used to tie the bowline. The sheetbend is very fast to tie and when slipped, is one of the easiest bends to workwith. It is also useful when joining two ropes of different diameters.Form a bight(with thelargerdiameterrope).Step #1Step #2http://www.iland.net/%7Ejbritton/sheetbend.htm (1 of 4) [7/1/2004 12:46:35 PM]
<strong>Knot</strong> <strong>Knowledge</strong> - Sheet BendInsert the second ropeunder and then over theend of the first rope.Step #3Take the end of the secondrope and bring it under thebight.Step #4Bring the end over thebight, putting it under itsown standing part.Finished Sheet Bendhttp://www.iland.net/%7Ejbritton/sheetbend.htm (2 of 4) [7/1/2004 12:46:35 PM]
<strong>Knot</strong> <strong>Knowledge</strong> - Sheet BendPull on both standing partsto set the knot.A double sheet bend is amore secure knot and canbe tied by adding anotherwrap around the bight (thatis, repeating steps 3 -4).Double Sheet BendTo slip the sheet bend, sticka bight through instead ofthe end. Pull on thestanding part to set theknot. Pull on the end tountie the knot.Slipped Sheet Bend[Top of Page]http://www.iland.net/%7Ejbritton/sheetbend.htm (3 of 4) [7/1/2004 12:46:35 PM]
<strong>Knot</strong> <strong>Knowledge</strong> - Sheet BendReturn to Indexhttp://www.iland.net/%7Ejbritton/sheetbend.htm (4 of 4) [7/1/2004 12:46:35 PM]
<strong>Knot</strong> <strong>Knowledge</strong> - Figure 8 LoopKNOT KNOWLEDGESINGLE LOOP KNOTSFigure 8 LoopThe Figure 8 Loop is just a Figure 8 <strong>Knot</strong> tied in the bight.Step #1Start with a bight of ropeand form a loop wherethe end is behind thestanding part.Step #2http://www.iland.net/%7Ejbritton/figure8loop.htm (1 of 3) [7/1/2004 12:46:35 PM]
<strong>Knot</strong> <strong>Knowledge</strong> - Figure 8 LoopBring the end around and infront of the standing part.Step #3Insert the end back throughthe loop.http://www.iland.net/%7Ejbritton/figure8loop.htm (2 of 3) [7/1/2004 12:46:35 PM]
<strong>Knot</strong> <strong>Knowledge</strong> - Figure 8 LoopFinished Figure 8 LoopDress and set the knot.[Top of Page]Return to Indexhttp://www.iland.net/%7Ejbritton/figure8loop.htm (3 of 3) [7/1/2004 12:46:35 PM]
<strong>Knot</strong> <strong>Knowledge</strong> - In Line Figure 8 LoopKNOT KNOWLEDGESINGLE LOOP KNOTSIn Line Figure 8 LoopThe In Line Figure 8 Loop is used for a load that will be more or less parallelto the standing part. This loop knot can be pulled through a pulley easierthan other loop knots.Step #1Start with the standing part of therope.http://www.iland.net/%7Ejbritton/inlinefigure8loop.htm (1 of 7) [7/1/2004 12:46:37 PM]
<strong>Knot</strong> <strong>Knowledge</strong> - In Line Figure 8 LoopStep #2Twist the standing part tocreate a loop, as shown.http://www.iland.net/%7Ejbritton/inlinefigure8loop.htm (2 of 7) [7/1/2004 12:46:37 PM]
<strong>Knot</strong> <strong>Knowledge</strong> - In Line Figure 8 LoopStep #3Bring the loop behindthe standing part.http://www.iland.net/%7Ejbritton/inlinefigure8loop.htm (3 of 7) [7/1/2004 12:46:37 PM]
<strong>Knot</strong> <strong>Knowledge</strong> - In Line Figure 8 LoopStep #4Wrap the loop back aroundthe standing part.Step #5Insert the loop backthrough itself, to the side ofthe standing part that comesdown out of the knot.http://www.iland.net/%7Ejbritton/inlinefigure8loop.htm (4 of 7) [7/1/2004 12:46:37 PM]
<strong>Knot</strong> <strong>Knowledge</strong> - In Line Figure 8 LoopFinished In Line Figure 8 Loop - FrontViewTo dress the knot, pull thestanding part coming out ofthe top of the knot. Thenpull on the loop to set theknot.http://www.iland.net/%7Ejbritton/inlinefigure8loop.htm (5 of 7) [7/1/2004 12:46:37 PM]
<strong>Knot</strong> <strong>Knowledge</strong> - In Line Figure 8 LoopFinished In Line Figure 8 Loop - OppositeViewOpposite view.http://www.iland.net/%7Ejbritton/inlinefigure8loop.htm (6 of 7) [7/1/2004 12:46:37 PM]
<strong>Knot</strong> <strong>Knowledge</strong> - In Line Figure 8 Loop[Top of Page]Return to Indexhttp://www.iland.net/%7Ejbritton/inlinefigure8loop.htm (7 of 7) [7/1/2004 12:46:37 PM]
<strong>Knot</strong> <strong>Knowledge</strong> - Butterfly <strong>Knot</strong>KNOT KNOWLEDGESINGLE LOOP KNOTSButterfly <strong>Knot</strong>The Butterfly knot is good to use when you need an attachment loop in thebight of a loaded rope, because the ends lead out of the knot perpendicular tothe loop.Step #1Start with a bight of rope.http://www.iland.net/%7Ejbritton/butterflyknot.htm (1 of 5) [7/1/2004 12:46:37 PM]
<strong>Knot</strong> <strong>Knowledge</strong> - Butterfly <strong>Knot</strong>Step #2Twist the rope twice; thatis, one full turn.Step #3Grasp the top of the bightand fold it down towardthe ends.http://www.iland.net/%7Ejbritton/butterflyknot.htm (2 of 5) [7/1/2004 12:46:37 PM]
<strong>Knot</strong> <strong>Knowledge</strong> - Butterfly <strong>Knot</strong>Step #4With your hand still onthe top of the bight, pull itunderneath and throughthe the "hole" that wasjust formed.http://www.iland.net/%7Ejbritton/butterflyknot.htm (3 of 5) [7/1/2004 12:46:37 PM]
<strong>Knot</strong> <strong>Knowledge</strong> - Butterfly <strong>Knot</strong>Finished Butterfly <strong>Knot</strong> - Front ViewDress and set theknot.Finished Butterfly <strong>Knot</strong> - Rear ViewDress and set theknot.http://www.iland.net/%7Ejbritton/butterflyknot.htm (4 of 5) [7/1/2004 12:46:37 PM]
<strong>Knot</strong> <strong>Knowledge</strong> - Butterfly <strong>Knot</strong>[Top of Page]Return to Indexhttp://www.iland.net/%7Ejbritton/butterflyknot.htm (5 of 5) [7/1/2004 12:46:37 PM]
<strong>Knot</strong> <strong>Knowledge</strong> - Double Loop <strong>Knot</strong>sKNOT KNOWLEDGEDOUBLE LOOP KNOTS[Spanish Bowline]["A Rigid Double Splayed Loop in the Bight"][Triple Crown <strong>Knot</strong>][Bowline on a Bight][Return to Index]Spanish BowlineThe Spanish Bowline is a double splayed loop knot that is easy to adjust (beforeputting on a load) due to the fact that the rope communicates between the twoloops. However, unless this knot is set very tightly, it is possible that the ropewill slip when you have put it to use, which could be disastrous. When tied andset properly, it is an excellent utility knot.Step #1http://www.iland.net/%7Ejbritton/<strong>Knot</strong>Photo%20DoubleLoop%20<strong>Knot</strong>s.html (1 of 14) [7/1/2004 12:46:42 PM]
<strong>Knot</strong> <strong>Knowledge</strong> - Double Loop <strong>Knot</strong>sMake two loops.Step #2Put a half twist in eachloop, turning the outsideof each loop to the middle.Step #3http://www.iland.net/%7Ejbritton/<strong>Knot</strong>Photo%20DoubleLoop%20<strong>Knot</strong>s.html (2 of 14) [7/1/2004 12:46:42 PM]
<strong>Knot</strong> <strong>Knowledge</strong> - Double Loop <strong>Knot</strong>sTake the left-twistedloop and insert itthrough the righttwistedloop.Step #4Take the material from thebottom of the twisted loopsand pull up bights throughthe top of the twisted loops.Finished Spanish Bowline - Front Viewhttp://www.iland.net/%7Ejbritton/<strong>Knot</strong>Photo%20DoubleLoop%20<strong>Knot</strong>s.html (3 of 14) [7/1/2004 12:46:42 PM]
<strong>Knot</strong> <strong>Knowledge</strong> - Double Loop <strong>Knot</strong>sPull on the standing lineto dress the knot. Pull onall parts to set the knot.Finished Spanish Bowline - Rear ViewPull on the standing line todress the knot. Pull on allparts to set the knot.[Top of Page]http://www.iland.net/%7Ejbritton/<strong>Knot</strong>Photo%20DoubleLoop%20<strong>Knot</strong>s.html (4 of 14) [7/1/2004 12:46:42 PM]
<strong>Knot</strong> <strong>Knowledge</strong> - Double Loop <strong>Knot</strong>s"A Rigid Double Splayed Loop in the Bight" (ABoK #1100)This knot is touted by Ashley as being "one of the firmest of the Double Loopssince the two loops do not directly communicate with each other" (ABoK, p.200). It seems to me that the loops still indirectly communicate, and I use thatfor initial adjustment. When the knot is properly set, it would be nearlyimpossible to get the rope to move between the loops.Step #1To start this knot,begin with a butterflyknot, but leave it looseas shown instead ofdrawing it up tight.Step #2http://www.iland.net/%7Ejbritton/<strong>Knot</strong>Photo%20DoubleLoop%20<strong>Knot</strong>s.html (5 of 14) [7/1/2004 12:46:42 PM]
<strong>Knot</strong> <strong>Knowledge</strong> - Double Loop <strong>Knot</strong>sTake the material from thelower two loops and pullbights through the upperloop.Step #3Grasp the the top ofthe loop you just pokedthe bights through andbring it toward youand down so that itrests across thestanding lines.http://www.iland.net/%7Ejbritton/<strong>Knot</strong>Photo%20DoubleLoop%20<strong>Knot</strong>s.html (6 of 14) [7/1/2004 12:46:42 PM]
<strong>Knot</strong> <strong>Knowledge</strong> - Double Loop <strong>Knot</strong>sFinished "Rigid Double Splayed Loop in aBight"Front ViewPull on thestanding part todress the knot.Pull on all partsto set the knot.Finished "Rigid Double Splayed Loop in aBight"Rear ViewPull on thestanding part todress the knot.Pull on all partsto set the knot.http://www.iland.net/%7Ejbritton/<strong>Knot</strong>Photo%20DoubleLoop%20<strong>Knot</strong>s.html (7 of 14) [7/1/2004 12:46:42 PM]
<strong>Knot</strong> <strong>Knowledge</strong> - Double Loop <strong>Knot</strong>s[Top of Page]Triple Crown <strong>Knot</strong>The Triple Crown <strong>Knot</strong> is my favorite double splayed loop knot because it iseasy to tie and the loops definitely don't communicate.Step #1http://www.iland.net/%7Ejbritton/<strong>Knot</strong>Photo%20DoubleLoop%20<strong>Knot</strong>s.html (8 of 14) [7/1/2004 12:46:42 PM]
<strong>Knot</strong> <strong>Knowledge</strong> - Double Loop <strong>Knot</strong>sForm two equal lengthbights in a bight.Step #2Grasp the standing partand bring it up over andbetween the two bights,forming a small loop atthe bottomhttp://www.iland.net/%7Ejbritton/<strong>Knot</strong>Photo%20DoubleLoop%20<strong>Knot</strong>s.html (9 of 14) [7/1/2004 12:46:42 PM]
<strong>Knot</strong> <strong>Knowledge</strong> - Double Loop <strong>Knot</strong>sStep #3Grasp the right hand bightand cross it over thestanding part and the lefthand bight.Step #4Grasp the left handbight and cross it overthe right hand bight,inserting it throughthe small loop.Finished Triple Crown <strong>Knot</strong> - Front Viewhttp://www.iland.net/%7Ejbritton/<strong>Knot</strong>Photo%20DoubleLoop%20<strong>Knot</strong>s.html (10 of 14) [7/1/2004 12:46:42 PM]
<strong>Knot</strong> <strong>Knowledge</strong> - Double Loop <strong>Knot</strong>sPull on thestanding part todress the knot.Pull on all partsto set the knot.Finished Triple Crown <strong>Knot</strong> - Rear ViewPull on thestanding partto dress theknot. Pull onall parts to setthe knot.[Top of Page]Bowline on a BightThe Bowline on a Bight is good parallel loop knot to use when you need handhttp://www.iland.net/%7Ejbritton/<strong>Knot</strong>Photo%20DoubleLoop%20<strong>Knot</strong>s.html (11 of 14) [7/1/2004 12:46:42 PM]
<strong>Knot</strong> <strong>Knowledge</strong> - Double Loop <strong>Knot</strong>sloops to tug on the rope to get it unstuck from a vine-choked branch. It is easyto tie and does not readily jam, so it is usually easy to untie after applying aload.Step #1Start with a bight ofrope.Step #2Form a loop bybringing the endover the standingpart.Step #3http://www.iland.net/%7Ejbritton/<strong>Knot</strong>Photo%20DoubleLoop%20<strong>Knot</strong>s.html (12 of 14) [7/1/2004 12:46:42 PM]
<strong>Knot</strong> <strong>Knowledge</strong> - Double Loop <strong>Knot</strong>sInsert the end of the bightthrough the loop.Step #4Grasp the end of thebight and bring ittoward you and downacross the bottom of theloop.With your hand still on theend of the bight, drag itbeneath all the material thatmakes up the loop so that itends up behind the standingpart.Step #5http://www.iland.net/%7Ejbritton/<strong>Knot</strong>Photo%20DoubleLoop%20<strong>Knot</strong>s.html (13 of 14) [7/1/2004 12:46:42 PM]
<strong>Knot</strong> <strong>Knowledge</strong> - Double Loop <strong>Knot</strong>sFinished Bowline on a Bight - Front ViewPull on the lowerloop to pull the endof the bight snugagainst the originalloop. Pull on thestanding part to setthe knotFinished Bowline on a Bight - Rear ViewPull on the lower loopto pull the end of thebight snug against theoriginal loop. Pull onthe standing part toset the knot[Top of Page]Return to Indexhttp://www.iland.net/%7Ejbritton/<strong>Knot</strong>Photo%20DoubleLoop%20<strong>Knot</strong>s.html (14 of 14) [7/1/2004 12:46:42 PM]
<strong>Knot</strong> <strong>Knowledge</strong> - Spanish BowlineKNOT KNOWLEDGEDOUBLE LOOP KNOTSSpanish BowlineThe Spanish Bowline is a double splayed loop knot that is easy to adjust(before putting on a load) due to the fact that the rope communicatesbetween the two loops. However, unless this knot is set very tightly, it ispossible that the rope will slip when you have put it to use, which could bedisastrous. When tied and set properly, it is an excellent utility knot.Step #1Make two loops.http://www.iland.net/%7Ejbritton/spanishbowline.htm (1 of 4) [7/1/2004 12:46:43 PM]
<strong>Knot</strong> <strong>Knowledge</strong> - Spanish BowlineStep #2Put a half twist in eachloop, turning the outsideof each loop to the middle.Step #3Take the left-twistedloop and insert itthrough the righttwistedloop.http://www.iland.net/%7Ejbritton/spanishbowline.htm (2 of 4) [7/1/2004 12:46:43 PM]
<strong>Knot</strong> <strong>Knowledge</strong> - Spanish BowlineStep #4Take the material from thebottom of the twisted loopsand pull up bights throughthe top of the twisted loops.Finished Spanish Bowline - Front ViewPull on the standing lineto dress the knot. Pull onall parts to set the knot.http://www.iland.net/%7Ejbritton/spanishbowline.htm (3 of 4) [7/1/2004 12:46:43 PM]
<strong>Knot</strong> <strong>Knowledge</strong> - Spanish BowlineFinished Spanish Bowline - Rear ViewPull on the standing line todress the knot. Pull on allparts to set the knot.[Top of Page]Return to Indexhttp://www.iland.net/%7Ejbritton/spanishbowline.htm (4 of 4) [7/1/2004 12:46:43 PM]
<strong>Knot</strong> <strong>Knowledge</strong> - Rigid Double Splayed LoopKNOT KNOWLEDGEDOUBLE LOOP KNOTS"A Rigid Double Splayed Loop in the Bight" (ABoK#1100)This knot is touted by Ashley as being "one of the firmest of the DoubleLoops since the two loops do not directly communicate with each other"(ABoK, p. 200). It seems to me that the loops still indirectly communicate,and I use that for initial adjustment. When the knot is properly set, it wouldbe nearly impossible to get the rope to move between the loops.Step #1To start this knot,begin with a butterflyknot, but leave it looseas shown instead ofdrawing it up tight.http://www.iland.net/%7Ejbritton/rigiddoubleloop.htm (1 of 4) [7/1/2004 12:46:44 PM]
<strong>Knot</strong> <strong>Knowledge</strong> - Rigid Double Splayed LoopStep #2Take the material from thelower two loops and pullbights through the upperloop.Step #3Grasp the the top ofthe loop you just pokedthe bights through andbring it toward youand down so that itrests across thestanding lines.http://www.iland.net/%7Ejbritton/rigiddoubleloop.htm (2 of 4) [7/1/2004 12:46:44 PM]
<strong>Knot</strong> <strong>Knowledge</strong> - Rigid Double Splayed LoopFinished "Rigid Double Splayed Loop in aBight"Front ViewPull on thestanding part todress the knot.Pull on all partsto set the knot.http://www.iland.net/%7Ejbritton/rigiddoubleloop.htm (3 of 4) [7/1/2004 12:46:44 PM]
<strong>Knot</strong> <strong>Knowledge</strong> - Rigid Double Splayed LoopFinished "Rigid Double Splayed Loop in aBight"Rear ViewPull on thestanding part todress the knot.Pull on all partsto set the knot.[Top of Page]Return to Indexhttp://www.iland.net/%7Ejbritton/rigiddoubleloop.htm (4 of 4) [7/1/2004 12:46:44 PM]
<strong>Knot</strong> <strong>Knowledge</strong> - Triple Crown <strong>Knot</strong>KNOT KNOWLEDGEDOUBLE LOOP KNOTSTriple Crown <strong>Knot</strong>The Triple Crown <strong>Knot</strong> is my favorite double splayed loop knot because it iseasy to tie and the loops definitely don't communicate.Step #1Form two equal lengthbights in a bight.Step #2http://www.iland.net/%7Ejbritton/triplecrownknot.htm (1 of 4) [7/1/2004 12:46:44 PM]
<strong>Knot</strong> <strong>Knowledge</strong> - Triple Crown <strong>Knot</strong>Grasp the standing partand bring it up over andbetween the two bights,forming a small loop atthe bottomStep #3Grasp the right hand bightand cross it over thestanding part and the lefthand bight.http://www.iland.net/%7Ejbritton/triplecrownknot.htm (2 of 4) [7/1/2004 12:46:44 PM]
<strong>Knot</strong> <strong>Knowledge</strong> - Triple Crown <strong>Knot</strong>Step #4Grasp the left handbight and cross it overthe right hand bight,inserting it throughthe small loop.Finished Triple Crown <strong>Knot</strong> - Front ViewPull on thestanding part todress the knot.Pull on all partsto set the knot.Finished Triple Crown <strong>Knot</strong> - Rear Viewhttp://www.iland.net/%7Ejbritton/triplecrownknot.htm (3 of 4) [7/1/2004 12:46:44 PM]
<strong>Knot</strong> <strong>Knowledge</strong> - Triple Crown <strong>Knot</strong>Pull on thestanding partto dress theknot. Pull onall parts to setthe knot.[Top of Page]Return to Indexhttp://www.iland.net/%7Ejbritton/triplecrownknot.htm (4 of 4) [7/1/2004 12:46:44 PM]
<strong>Knot</strong> <strong>Knowledge</strong> - Bowline on a BightKNOT KNOWLEDGEDOUBLE LOOP KNOTSBowline on a BightThe Bowline on a Bight is good parallel loop knot to use when you need handloops to tug on the rope to get it unstuck from a vine-choked branch. It is easyto tie and does not readily jam, so it is usually easy to untie after applying aload.Step #1Start with a bight ofrope.Step #2http://www.iland.net/%7Ejbritton/bowlineonabight.htm (1 of 4) [7/1/2004 12:46:45 PM]
<strong>Knot</strong> <strong>Knowledge</strong> - Bowline on a BightForm a loop bybringing the endover the standingpart.Step #3Insert the end of the bightthrough the loop.Step #4Grasp the end of thebight and bring ittoward you and downacross the bottom of theloop.http://www.iland.net/%7Ejbritton/bowlineonabight.htm (2 of 4) [7/1/2004 12:46:45 PM]
<strong>Knot</strong> <strong>Knowledge</strong> - Bowline on a BightStep #5With your hand still on theend of the bight, drag itbeneath all the material thatmakes up the loop so that itends up behind the standingpart.Finished Bowline on a Bight - Front ViewPull on the lowerloop to pull the endof the bight snugagainst the originalloop. Pull on thestanding part to setthe knotFinished Bowline on a Bight - Rear ViewPull on the lower loopto pull the end of thebight snug against theoriginal loop. Pull onthe standing part toset the knot[Top of Page]http://www.iland.net/%7Ejbritton/bowlineonabight.htm (3 of 4) [7/1/2004 12:46:45 PM]
<strong>Knot</strong> <strong>Knowledge</strong> - Bowline on a BightReturn to Indexhttp://www.iland.net/%7Ejbritton/bowlineonabight.htm (4 of 4) [7/1/2004 12:46:45 PM]
<strong>Knot</strong> <strong>Knowledge</strong> - HitchesKNOT KNOWLEDGEHITCHES[Clove Hitch][Constrictor Hitch][Anchor Bend][Bunt Line Hitch][Highwayman's Hitch][Return to Index]Clove HitchThe clove hitch is a quick and easy knot to tie especially when you can pop itover the end of what you're tying on to. It's easy to untie even after a loadhas been applied.http://www.iland.net/%7Ejbritton/<strong>Knot</strong>Photo%20Hitches.html (1 of 21) [7/1/2004 12:46:50 PM]
<strong>Knot</strong> <strong>Knowledge</strong> - HitchesStep #1Make two loops,twisted in oppositedirections.Step #2Place the left loop underthe left part of the rightloop, to form a hole.Step #3http://www.iland.net/%7Ejbritton/<strong>Knot</strong>Photo%20Hitches.html (2 of 21) [7/1/2004 12:46:50 PM]
<strong>Knot</strong> <strong>Knowledge</strong> - HitchesPop the hole over the endof the object you're tyingon to (in this case a barelyvisibledowel rod).Finished Clove Hitch - Front ViewDress and set the knot.Finished Clove Hitch - Rear Viewhttp://www.iland.net/%7Ejbritton/<strong>Knot</strong>Photo%20Hitches.html (3 of 21) [7/1/2004 12:46:50 PM]
<strong>Knot</strong> <strong>Knowledge</strong> - HitchesDress and set the knot[Top of Page]Constrictor HitchUse the Constrictor Hitch when you need to clamp a rope tightly around anobject. It has a vice-like grip and is very hard to untie unless you slip theknot.Step #1http://www.iland.net/%7Ejbritton/<strong>Knot</strong>Photo%20Hitches.html (4 of 21) [7/1/2004 12:46:50 PM]
<strong>Knot</strong> <strong>Knowledge</strong> - HitchesPlace the end around andbehind the item you'retying the rope to.Step #2Wrap the end around tothe other side of theobject, crossing thestanding part.Step #3http://www.iland.net/%7Ejbritton/<strong>Knot</strong>Photo%20Hitches.html (5 of 21) [7/1/2004 12:46:50 PM]
<strong>Knot</strong> <strong>Knowledge</strong> - HitchesContinue wrapping theend around the dowel sothe end is parallel withthe standing part.Step #4Bring the end over thestanding part and tuckit under and betweenthe two loops.Finished Constrictor Hitchhttp://www.iland.net/%7Ejbritton/<strong>Knot</strong>Photo%20Hitches.html (6 of 21) [7/1/2004 12:46:50 PM]
<strong>Knot</strong> <strong>Knowledge</strong> - HitchesDress and set the knot.Slipped Constrictor HitchSince this knot cinchesup so tightly, if youplan to untie it, stick abight of rope throughinstead of the end.Yank on the end todisengage the knot fromthe object.http://www.iland.net/%7Ejbritton/<strong>Knot</strong>Photo%20Hitches.html (7 of 21) [7/1/2004 12:46:50 PM]
<strong>Knot</strong> <strong>Knowledge</strong> - Hitches[Top of Page]Anchor BendThe Anchor Bend can be used to attach a rope to a carabiner or ring. Thefollowing shows two turns, and three or more can be used.Step #1http://www.iland.net/%7Ejbritton/<strong>Knot</strong>Photo%20Hitches.html (8 of 21) [7/1/2004 12:46:50 PM]
<strong>Knot</strong> <strong>Knowledge</strong> - HitchesBring the end behind andthen through the carabiner.Step #2Loop the rope once aroundthe carabiner.http://www.iland.net/%7Ejbritton/<strong>Knot</strong>Photo%20Hitches.html (9 of 21) [7/1/2004 12:46:50 PM]
<strong>Knot</strong> <strong>Knowledge</strong> - HitchesStep #3Bring the end behind thestanding part.Step #4http://www.iland.net/%7Ejbritton/<strong>Knot</strong>Photo%20Hitches.html (10 of 21) [7/1/2004 12:46:50 PM]
<strong>Knot</strong> <strong>Knowledge</strong> - HitchesBring the end throughthe two loops.Finished Anchor BendDress and set the knot.[Top of Page]Bunt Line Hitchhttp://www.iland.net/%7Ejbritton/<strong>Knot</strong>Photo%20Hitches.html (11 of 21) [7/1/2004 12:46:50 PM]
<strong>Knot</strong> <strong>Knowledge</strong> - HitchesThe Bunt Line Hitch is also a good attachment knot for a carabiner or aring.Step #1Bring the end in front andthen through the carabiner.Step #2http://www.iland.net/%7Ejbritton/<strong>Knot</strong>Photo%20Hitches.html (12 of 21) [7/1/2004 12:46:50 PM]
<strong>Knot</strong> <strong>Knowledge</strong> - HitchesPull the end over andacross the standing part.Step #3Bring the end behindthe loop.Step #4http://www.iland.net/%7Ejbritton/<strong>Knot</strong>Photo%20Hitches.html (13 of 21) [7/1/2004 12:46:50 PM]
<strong>Knot</strong> <strong>Knowledge</strong> - HitchesPull the end around thefront of the loop, orbelow it, as pictured.Step #5Insert the end through theloop.http://www.iland.net/%7Ejbritton/<strong>Knot</strong>Photo%20Hitches.html (14 of 21) [7/1/2004 12:46:50 PM]
<strong>Knot</strong> <strong>Knowledge</strong> - HitchesFinished Buntline Hitch - Front ViewDress and set the knot,bringing the standingpart snug against thecarabiner.Finished Buntline Hitch - Rear ViewDress and set the knot,bringing the standingpart snug against thecarabiner.[Top of Page]Highwayman's Hitchhttp://www.iland.net/%7Ejbritton/<strong>Knot</strong>Photo%20Hitches.html (15 of 21) [7/1/2004 12:46:50 PM]
<strong>Knot</strong> <strong>Knowledge</strong> - HitchesThe Highwayman's Hitch is ideal for tying a rope to an object when youneed a quick release. Just yank on the end that is not supporting the load tountie and completely remove the rope from the object it was made fast to.Step #1Pull a bight under the object youare tying on to. The left side is thestanding part and the right side isthe end. The standing part isconnected to the load.Step #2http://www.iland.net/%7Ejbritton/<strong>Knot</strong>Photo%20Hitches.html (16 of 21) [7/1/2004 12:46:50 PM]
<strong>Knot</strong> <strong>Knowledge</strong> - HitchesForm a bight in thestanding part.Step #3Pull the bight over the objectand through the originalbight.http://www.iland.net/%7Ejbritton/<strong>Knot</strong>Photo%20Hitches.html (17 of 21) [7/1/2004 12:46:50 PM]
<strong>Knot</strong> <strong>Knowledge</strong> - HitchesStep #4Make a bight in the end.http://www.iland.net/%7Ejbritton/<strong>Knot</strong>Photo%20Hitches.html (18 of 21) [7/1/2004 12:46:50 PM]
<strong>Knot</strong> <strong>Knowledge</strong> - HitchesStep #5Insert it through theprevious bight.http://www.iland.net/%7Ejbritton/<strong>Knot</strong>Photo%20Hitches.html (19 of 21) [7/1/2004 12:46:50 PM]
<strong>Knot</strong> <strong>Knowledge</strong> - HitchesStep #6Pull the standing part todress the knot. Then set theknot by pulling on all parts.The end is yanked abruptlyhttp://www.iland.net/%7Ejbritton/<strong>Knot</strong>Photo%20Hitches.html (20 of 21) [7/1/2004 12:46:50 PM]
<strong>Knot</strong> <strong>Knowledge</strong> - Hitchesto disengage the knot.[Top of Page]Return to Indexhttp://www.iland.net/%7Ejbritton/<strong>Knot</strong>Photo%20Hitches.html (21 of 21) [7/1/2004 12:46:50 PM]
<strong>Knot</strong> <strong>Knowledge</strong> - Clove HitchKNOT KNOWLEDGEHITCHESClove HitchThe clove hitch is a quick and easy knot to tie especially when you can pop itover the end of what you're tying on to. It's easy to untie even after a loadhas been applied.Step #1Make two loops,twisted in oppositedirections.Step #2http://www.iland.net/%7Ejbritton/clovehitch.htm (1 of 3) [7/1/2004 12:46:51 PM]
<strong>Knot</strong> <strong>Knowledge</strong> - Clove HitchPlace the left loop underthe left part of the rightloop, to form a hole.Step #3Pop the hole over the endof the object you're tyingon to (in this case a barelyvisibledowel rod).Finished Clove Hitch - Front Viewhttp://www.iland.net/%7Ejbritton/clovehitch.htm (2 of 3) [7/1/2004 12:46:51 PM]
<strong>Knot</strong> <strong>Knowledge</strong> - Clove HitchDress and set the knot.Finished Clove Hitch - Rear ViewDress and set the knot[Top of Page]Return to Indexhttp://www.iland.net/%7Ejbritton/clovehitch.htm (3 of 3) [7/1/2004 12:46:51 PM]
<strong>Knot</strong> <strong>Knowledge</strong> - Constrictor HitchKNOT KNOWLEDGEHITCHESConstrictor HitchUse the Constrictor Hitch when you need to clamp a rope tightly around anobject. It has a vice-like grip and is very hard to untie unless you slip theknot.Step #1Place the end around andbehind the item you'retying the rope to.http://www.iland.net/%7Ejbritton/constrictorhitch.htm (1 of 4) [7/1/2004 12:46:52 PM]
<strong>Knot</strong> <strong>Knowledge</strong> - Constrictor HitchStep #2Wrap the end around tothe other side of theobject, crossing thestanding part.Step #3Continue wrapping theend around the dowel sothe end is parallel withthe standing part.Step #4http://www.iland.net/%7Ejbritton/constrictorhitch.htm (2 of 4) [7/1/2004 12:46:52 PM]
<strong>Knot</strong> <strong>Knowledge</strong> - Constrictor HitchBring the end over thestanding part and tuckit under and betweenthe two loops.Finished Constrictor HitchDress and set the knot.Slipped Constrictor Hitchhttp://www.iland.net/%7Ejbritton/constrictorhitch.htm (3 of 4) [7/1/2004 12:46:52 PM]
<strong>Knot</strong> <strong>Knowledge</strong> - Constrictor HitchSince this knot cinchesup so tightly, if youplan to untie it, stick abight of rope throughinstead of the end.Yank on the end todisengage the knot fromthe object.[Top of Page]Return to Indexhttp://www.iland.net/%7Ejbritton/constrictorhitch.htm (4 of 4) [7/1/2004 12:46:52 PM]
http://www.iland.net/%7Ejbritton/anchorhitch.htmKNOT KNOWLEDGEHITCHESAnchor BendThe Anchor Bend can be used to attach a rope to a carabiner or ring. Thefollowing shows two turns, and three or more can be used.Step #1Bring the end behind andthen through the carabiner.http://www.iland.net/%7Ejbritton/anchorhitch.htm (1 of 4) [7/1/2004 12:46:52 PM]
http://www.iland.net/%7Ejbritton/anchorhitch.htmStep #2Loop the rope once aroundthe carabiner.Step #3Bring the end behind thestanding part.http://www.iland.net/%7Ejbritton/anchorhitch.htm (2 of 4) [7/1/2004 12:46:52 PM]
http://www.iland.net/%7Ejbritton/anchorhitch.htmStep #4Bring the end throughthe two loops.Finished Anchor BendDress and set the knot.[Top of Page]http://www.iland.net/%7Ejbritton/anchorhitch.htm (3 of 4) [7/1/2004 12:46:52 PM]
http://www.iland.net/%7Ejbritton/anchorhitch.htmReturn to Indexhttp://www.iland.net/%7Ejbritton/anchorhitch.htm (4 of 4) [7/1/2004 12:46:52 PM]
http://www.iland.net/%7Ejbritton/buntlinehitch.htmKNOT KNOWLEDGEHITCHESBunt Line HitchThe Bunt Line Hitch is also a good attachment knot for a carabiner or aring.Step #1Bring the end in front andthen through the carabiner.http://www.iland.net/%7Ejbritton/buntlinehitch.htm (1 of 4) [7/1/2004 12:46:53 PM]
http://www.iland.net/%7Ejbritton/buntlinehitch.htmStep #2Pull the end over andacross the standing part.Step #3Bring the end behindthe loop.Step #4http://www.iland.net/%7Ejbritton/buntlinehitch.htm (2 of 4) [7/1/2004 12:46:53 PM]
http://www.iland.net/%7Ejbritton/buntlinehitch.htmPull the end around thefront of the loop, orbelow it, as pictured.Step #5Insert the end through theloop.http://www.iland.net/%7Ejbritton/buntlinehitch.htm (3 of 4) [7/1/2004 12:46:53 PM]
http://www.iland.net/%7Ejbritton/buntlinehitch.htmFinished Buntline Hitch - Front ViewDress and set the knot,bringing the standingpart snug against thecarabiner.Finished Buntline Hitch - Rear ViewDress and set the knot,bringing the standingpart snug against thecarabiner.[Top of Page]Return to Indexhttp://www.iland.net/%7Ejbritton/buntlinehitch.htm (4 of 4) [7/1/2004 12:46:53 PM]
<strong>Knot</strong> <strong>Knowledge</strong> - Highwayman's HitchKNOT KNOWLEDGEHITCHESHighwayman's HitchThe Highwayman's Hitch is ideal for tying a rope to an object when youneed a quick release. Just yank on the end that is not supporting the load tountie and completely remove the rope from the object it was made fast to.Step #1Pull a bight under the object youare tying on to. The left side is thestanding part and the right side isthe end. The standing part isconnected to the load.http://www.iland.net/%7Ejbritton/highwaymanshitch.htm (1 of 7) [7/1/2004 12:46:53 PM]
<strong>Knot</strong> <strong>Knowledge</strong> - Highwayman's HitchStep #2Form a bight in thestanding part.http://www.iland.net/%7Ejbritton/highwaymanshitch.htm (2 of 7) [7/1/2004 12:46:53 PM]
<strong>Knot</strong> <strong>Knowledge</strong> - Highwayman's HitchStep #3Pull the bight over the objectand through the originalbight.http://www.iland.net/%7Ejbritton/highwaymanshitch.htm (3 of 7) [7/1/2004 12:46:53 PM]
<strong>Knot</strong> <strong>Knowledge</strong> - Highwayman's HitchStep #4Make a bight in the end.http://www.iland.net/%7Ejbritton/highwaymanshitch.htm (4 of 7) [7/1/2004 12:46:53 PM]
<strong>Knot</strong> <strong>Knowledge</strong> - Highwayman's HitchStep #5Insert it through theprevious bight.http://www.iland.net/%7Ejbritton/highwaymanshitch.htm (5 of 7) [7/1/2004 12:46:53 PM]
<strong>Knot</strong> <strong>Knowledge</strong> - Highwayman's HitchStep #6Pull the standing part todress the knot. Then set theknot by pulling on all parts.The end is yanked abruptlyhttp://www.iland.net/%7Ejbritton/highwaymanshitch.htm (6 of 7) [7/1/2004 12:46:53 PM]
<strong>Knot</strong> <strong>Knowledge</strong> - Highwayman's Hitchto disengage the knot.[Top of Page]Return to Indexhttp://www.iland.net/%7Ejbritton/highwaymanshitch.htm (7 of 7) [7/1/2004 12:46:53 PM]
<strong>Knot</strong> <strong>Knowledge</strong> - Figure 8KNOT KNOWLEDGESTOPPER KNOTSFigure 8The Figure 8 knot is made in the end of a rope. It is bulkier than anOverhand knot.Step #1Make a loop.Step #2http://www.iland.net/%7Ejbritton/figure8.htm (1 of 3) [7/1/2004 12:46:54 PM]
<strong>Knot</strong> <strong>Knowledge</strong> - Figure 8Bring the end aroundbehind the standing part.Step #3Put the end through theloop.http://www.iland.net/%7Ejbritton/figure8.htm (2 of 3) [7/1/2004 12:46:54 PM]
<strong>Knot</strong> <strong>Knowledge</strong> - Figure 8Finished Figure 8Dress and set the knot.[Top of Page]Return to Indexhttp://www.iland.net/%7Ejbritton/figure8.htm (3 of 3) [7/1/2004 12:46:54 PM]
<strong>Knot</strong> <strong>Knowledge</strong> - Heaving Line <strong>Knot</strong>KNOT KNOWLEDGESTOPPER KNOTSHeaving Line <strong>Knot</strong>The Heaving line knot can be used to add weight to the end of the rope togive mass to it when you want to throw it.Step #1Form a bight.http://www.iland.net/%7Ejbritton/heavinglineknot.htm (1 of 4) [7/1/2004 12:46:54 PM]
<strong>Knot</strong> <strong>Knowledge</strong> - Heaving Line <strong>Knot</strong>Step #2Start making turns, takingthe end behind the standingpart and wrapping itaround the bight.Step #3Make several turns.Step #4http://www.iland.net/%7Ejbritton/heavinglineknot.htm (2 of 4) [7/1/2004 12:46:54 PM]
<strong>Knot</strong> <strong>Knowledge</strong> - Heaving Line <strong>Knot</strong>Insert the end through theloop.Finished Heaving Line <strong>Knot</strong>Pull on the standing part totighten the knot.[Top of Page]Return to Indexhttp://www.iland.net/%7Ejbritton/heavinglineknot.htm (3 of 4) [7/1/2004 12:46:54 PM]
<strong>Knot</strong> <strong>Knowledge</strong> - Heaving Line <strong>Knot</strong>http://www.iland.net/%7Ejbritton/heavinglineknot.htm (4 of 4) [7/1/2004 12:46:54 PM]
<strong>Knot</strong> <strong>Knowledge</strong> - Double Overhand <strong>Knot</strong>KNOT KNOWLEDGESTOPPER KNOTSDouble Overhand <strong>Knot</strong>The Double Overhand is bulkier than the Figure 8 knot and is more difficultto untie.Step #1Begin with anoverhand knot.Step #2http://www.iland.net/%7Ejbritton/doubleoverhandknot.htm (1 of 2) [7/1/2004 12:46:55 PM]
<strong>Knot</strong> <strong>Knowledge</strong> - Double Overhand <strong>Knot</strong>Put the end backthrough the loop.Finished Double Overhand <strong>Knot</strong>Yank firmly on bothends to snap this knottight.[Top of Page]Return to Indexhttp://www.iland.net/%7Ejbritton/doubleoverhandknot.htm (2 of 2) [7/1/2004 12:46:55 PM]
<strong>Knot</strong> <strong>Knowledge</strong> - Full Carrick BendKNOT KNOWLEDGEBENDSFull Carrick BendThe Carrick Bend is a strong, secure knot that can be used to join two ropesof different construction.Step #1Form a loop with the firstrope, with the end behindthe standing part.Step #2http://www.iland.net/%7Ejbritton/fullcarrickbend.htm (1 of 4) [7/1/2004 12:46:56 PM]
<strong>Knot</strong> <strong>Knowledge</strong> - Full Carrick BendPlace the second rope underthe loop.Step #3Bring the end over thestanding part of the firstrope.Step #4Place the end of the secondrope under the end of thefirst rope.Step #5http://www.iland.net/%7Ejbritton/fullcarrickbend.htm (2 of 4) [7/1/2004 12:46:56 PM]
<strong>Knot</strong> <strong>Knowledge</strong> - Full Carrick BendPlace the end over thestanding part of the firstrope.Step #6Weave the end of the secondrope under its own standingpart.Step #7Finally, pull the end overthe first rope. The knotshould be symmetric withthe ends on opposite sides.http://www.iland.net/%7Ejbritton/fullcarrickbend.htm (3 of 4) [7/1/2004 12:46:56 PM]
<strong>Knot</strong> <strong>Knowledge</strong> - Full Carrick BendFinished Carrick Bend - Front ViewPull on both standing partsand then the ends to tightenthe knot.Finished Carrick Bend - Rear ViewRear view.[Top of Page]Return to Indexhttp://www.iland.net/%7Ejbritton/fullcarrickbend.htm (4 of 4) [7/1/2004 12:46:56 PM]
Friction HitchesKNOT KNOWLEDGEFRICTION HITCHES[Blake's Hitch][Kreutzklem (Hedden)][Prusik][Kleimheist][Tautline Hitch/Rolling Hitch)][Sliding Sheet Bend][Return to Index]Blake's HitchThe Blake's Hitch is an ascending knot commonly used by arborists and treeclimbers in general. It should only be used on arborist rope. Used forascending, it is also used for descending as well.http://www.iland.net/%7Ejbritton/Friction%20Hitches.html (1 of 26) [7/1/2004 12:47:05 PM]
Friction HitchesIn this picture, the blackrope is what you tie theBlake's Hitch to (thestanding part), and thewhite rope (the end) is whatwill be used to tie theBlake's Hitch. Place theend in front of the standingpart.Step #1Step #2Bring the end aroundbehind the standing part.Step #3http://www.iland.net/%7Ejbritton/Friction%20Hitches.html (2 of 26) [7/1/2004 12:47:05 PM]
Friction HitchesKeep wrapping the endaround the standing part.Step #4Make more turns.http://www.iland.net/%7Ejbritton/Friction%20Hitches.html (3 of 26) [7/1/2004 12:47:05 PM]
Friction HitchesStep #5Three turns arerequired.Step #6Bring the end down overitself...http://www.iland.net/%7Ejbritton/Friction%20Hitches.html (4 of 26) [7/1/2004 12:47:05 PM]
Friction HitchesStep #7...and behind the standingpart.Step #8Insert the end through thebottom two turns. Whentying the knot it is helpful towrap the bottom two turnsaround your thumb, sowhen you arrive at this step,you can remove your thumband poke the end throughthe hole where your thumbhttp://www.iland.net/%7Ejbritton/Friction%20Hitches.html (5 of 26) [7/1/2004 12:47:05 PM]
Friction Hitcheswas.Finished Blake's Hitch - Front ViewDress and set the knot,adding a Figure 8stopper knot in the tailfor safety.Finished Blake's Hitch - Rear Viewhttp://www.iland.net/%7Ejbritton/Friction%20Hitches.html (6 of 26) [7/1/2004 12:47:05 PM]
Friction HitchesRear view.[Top of Page]Kreutzklem (Hedden)The Kreutzklem (or Hedden) is quick and simple to tie and untie. It is alsoeasy to loosen the knot after applying a load, to advance it up the rope.Step #1http://www.iland.net/%7Ejbritton/Friction%20Hitches.html (7 of 26) [7/1/2004 12:47:05 PM]
Friction HitchesForm a bight from the loopand place it behind theclimbing rope.Step #2Wrap the loop across theclimbing rope.Step #3http://www.iland.net/%7Ejbritton/Friction%20Hitches.html (8 of 26) [7/1/2004 12:47:05 PM]
Friction HitchesContinue wrapping theloop around the climbingrope.Step #4Insert the loopthrough the bight.Finished Kreutzklemhttp://www.iland.net/%7Ejbritton/Friction%20Hitches.html (9 of 26) [7/1/2004 12:47:05 PM]
Friction HitchesDress and set theknot.[Top of Page]PrusikThe prusik is widely used as an ascending knot. The friction can be increasedby adding a third turn. The prusik can cinch up tightly and the friction canbe somewhat difficult to break after a load has been applied.Step #1http://www.iland.net/%7Ejbritton/Friction%20Hitches.html (10 of 26) [7/1/2004 12:47:05 PM]
Friction HitchesPlace a bight of the loopacross the climbing rope.Step #2Wrap the loop behind theclimbing rope and throughthe bight.Step #3http://www.iland.net/%7Ejbritton/Friction%20Hitches.html (11 of 26) [7/1/2004 12:47:05 PM]
Friction HitchesContinue wrappingthe loop around theclimbing rope.Step #4Wrap it behindthe climbingrope again andthrough thebight.Finished Prusikhttp://www.iland.net/%7Ejbritton/Friction%20Hitches.html (12 of 26) [7/1/2004 12:47:05 PM]
Friction HitchesDress and set the knot. Itis important to keep thisknot neat whiletightening.Finished Prusik - Opposite ViewOpposite view.[Top of Page]http://www.iland.net/%7Ejbritton/Friction%20Hitches.html (13 of 26) [7/1/2004 12:47:05 PM]
Friction HitchesKleimheistThe Kleimheist is easier to tie and untie than the prusik. It does not tend tocinch up as tightly as a prusik, so it is easier to break friction after releasingthe load. You can add more turns to increase friction, as well.Step #1Place a bight of the loopbehind the climbing rope.Step #2http://www.iland.net/%7Ejbritton/Friction%20Hitches.html (14 of 26) [7/1/2004 12:47:05 PM]
Friction HitchesWrap the loop across theclimbing rope.Step #3Wrap the loop behind theclimbing rope.http://www.iland.net/%7Ejbritton/Friction%20Hitches.html (15 of 26) [7/1/2004 12:47:05 PM]
Friction HitchesStep #4Repeat steps 2 -3 two moretimes.Step #5Insert the loop throughthe original bightFinished Kleimheisthttp://www.iland.net/%7Ejbritton/Friction%20Hitches.html (16 of 26) [7/1/2004 12:47:05 PM]
Friction HitchesPull the loop back down,bringing the bight downacross the wraps. Tightenthe knot.[Top of Page]Tautline Hitch (aka Rolling Hitch)The Tautline Hitch is an adjustable knot that is commonly used fortensioning guy lines, such as on a tent. The knot can slide along the standingpart. When the knot is released, the tension on the standing part tightens thecoils in the knot, increasing the friction which keeps the knot in place undertension. Since the Tautline Hitch is tied to its own standing part, the ropemust be able to slide around the object it is secured to for it to be adjustable.This knot is known as the Rolling Hitch when, instead of being tied aroundits standing part, it is tied around another rope, spar, or cylindrical object.http://www.iland.net/%7Ejbritton/Friction%20Hitches.html (17 of 26) [7/1/2004 12:47:05 PM]
Friction HitchesStep 1Pull the end around asecure object (Thepicture shows an emptythread spool.)Step 2Bring the end under thestanding part.Step 3Wrap the end around thestanding part.http://www.iland.net/%7Ejbritton/Friction%20Hitches.html (18 of 26) [7/1/2004 12:47:05 PM]
Friction HitchesStep 4Wrap the end around thestanding part a secondtime.Step 5Now you add a half hitchabove the turns. Bringthe end over the standingpart.Step 6Make a half hitch.http://www.iland.net/%7Ejbritton/Friction%20Hitches.html (19 of 26) [7/1/2004 12:47:05 PM]
Friction HitchesTighten the loops. Becareful to keep the knotneat while doing this,and tighten it enough sothat it will grip thestanding part reliably,but not so tight that itcan't easily slide.Finished Tautline HitchFinished Tautline Hitch - Opposite ViewOpposite view.Finished Tautline Hitchhttp://www.iland.net/%7Ejbritton/Friction%20Hitches.html (20 of 26) [7/1/2004 12:47:05 PM]
Friction HitchesThis picture showsthe knot havingbeen slid furtherup the standingpart. Note that therope had to movearound the spoolin order for this tooccur.[Top of Page]Sliding Sheet BendThe Sliding Sheet Bend is used for the same purpose as the Tautline Hitch,but with a quick yank of the end, it is completely untied. This is a boon forthose wearing gloves or who have cold, numb fingers. Moreover, unlike theTautline Hitch, the Sliding Sheet Bend can be "locked" in place to prevent itsliding. It can also be unlocked to make it adjustable again. This is one of themost useful knots I know, and I gladly give credit and much appreciation toPeter Suber, who came up with this knot and shared it with the world. VisitDr. Suber's website for more knots like this.http://www.iland.net/%7Ejbritton/Friction%20Hitches.html (21 of 26) [7/1/2004 12:47:05 PM]
Friction HitchesStep 1Wrap the end aroundthe object it is to besecured to (a spool inthis picture).Step 2Form a bight in thestanding part, pointingaway from the spool.Step 3Pull the end under thebight.http://www.iland.net/%7Ejbritton/Friction%20Hitches.html (22 of 26) [7/1/2004 12:47:05 PM]
Friction HitchesStep 4Bring the end over thebight...Step 5...and form a loop.Step 6http://www.iland.net/%7Ejbritton/Friction%20Hitches.html (23 of 26) [7/1/2004 12:47:05 PM]
Friction HitchesNow, form a bight in theend and stick it throughthe bight in the standingpart.If you are tying this knotflat as pictured, it helpsat this point to slide thebight in the end so that itis over the loop formedearlier.Step 7Pull on both ends of thebight in the standingpart, removing the bight,so the standing part isstraight as pictured.Keep the knot neat whiledoing this!Step 8http://www.iland.net/%7Ejbritton/Friction%20Hitches.html (24 of 26) [7/1/2004 12:47:05 PM]
Friction HitchesFinished Sliding Sheet BendTighten the knot, so thatthe standing part formsa "hump" as it passesover the bight in the end.This is what creates thefriction, and the frictioncan be adjusted byincreasing or decreasingthe hump (by tighteningand loosening the knot).This picture shows theknot having been slidfurther up thestanding part. Notethat the rope had tomove around the spoolin order for this tooccur (like theTautline Hitch).Finished Sliding Sheet BendLocked Sliding Sheet Bendhttp://www.iland.net/%7Ejbritton/Friction%20Hitches.html (25 of 26) [7/1/2004 12:47:05 PM]
Friction HitchesOnce you have adjusted theknot to your satisfaction, itcan be locked by tighteningthe knot by pulling on thenon-sliding parts of theknot. To unlock, loosen andflatten the knot, to reducethe hump. To untie, simplyyank on the end.[Top of Page]Return to Indexhttp://www.iland.net/%7Ejbritton/Friction%20Hitches.html (26 of 26) [7/1/2004 12:47:05 PM]
<strong>Knot</strong> <strong>Knowledge</strong> - Blake's HitchKNOT KNOWLEDGEFRICTION HITCHESBlake's HitchThe Blake's Hitch is an ascending knot commonly used by arborists and treeclimbers in general. It should only be used on arborist rope. Used forascending, it is also used for descending as well.In this picture, the blackrope is what you tie theBlake's Hitch to (thestanding part), and thewhite rope (the end) is whatwill be used to tie theBlake's Hitch. Place theend in front of the standingpart.Step #1Step #2http://www.iland.net/%7Ejbritton/blakeshitch.htm (1 of 7) [7/1/2004 12:47:06 PM]
<strong>Knot</strong> <strong>Knowledge</strong> - Blake's HitchBring the end aroundbehind the standing part.Step #3Keep wrapping the endaround the standing part.Step #4http://www.iland.net/%7Ejbritton/blakeshitch.htm (2 of 7) [7/1/2004 12:47:06 PM]
<strong>Knot</strong> <strong>Knowledge</strong> - Blake's HitchMake more turns.Step #5Three turns arerequired.http://www.iland.net/%7Ejbritton/blakeshitch.htm (3 of 7) [7/1/2004 12:47:06 PM]
<strong>Knot</strong> <strong>Knowledge</strong> - Blake's HitchStep #6Bring the end down overitself...http://www.iland.net/%7Ejbritton/blakeshitch.htm (4 of 7) [7/1/2004 12:47:06 PM]
<strong>Knot</strong> <strong>Knowledge</strong> - Blake's HitchStep #7...and behind the standingpart.Step #8Insert the end through thebottom two turns. Whentying the knot it is helpful towrap the bottom two turnsaround your thumb, sowhen you arrive at this step,you can remove your thumband poke the end throughthe hole where your thumbwas.http://www.iland.net/%7Ejbritton/blakeshitch.htm (5 of 7) [7/1/2004 12:47:06 PM]
<strong>Knot</strong> <strong>Knowledge</strong> - Blake's HitchFinished Blake's Hitch - Front ViewDress and set the knot,adding a Figure 8stopper knot in the tailfor safety.Finished Blake's Hitch - Rear ViewRear view.[Top of Page]http://www.iland.net/%7Ejbritton/blakeshitch.htm (6 of 7) [7/1/2004 12:47:06 PM]
<strong>Knot</strong> <strong>Knowledge</strong> - Blake's HitchReturn to Indexhttp://www.iland.net/%7Ejbritton/blakeshitch.htm (7 of 7) [7/1/2004 12:47:06 PM]
<strong>Knot</strong> <strong>Knowledge</strong> - Kreutzklem (Hedden)KNOT KNOWLEDGEFRICTION HITCHESKreutzklem (Hedden)The Kreutzklem (or Hedden) is quick and simple to tie and untie. It is alsoeasy to loosen the knot after applying a load, to advance it up the rope.Step #1Form a bight from the loopand place it behind theclimbing rope.http://www.iland.net/%7Ejbritton/kreutzklem.htm (1 of 4) [7/1/2004 12:47:07 PM]
<strong>Knot</strong> <strong>Knowledge</strong> - Kreutzklem (Hedden)Step #2Wrap the loop across theclimbing rope.Step #3Continue wrapping theloop around the climbingrope.Step #4http://www.iland.net/%7Ejbritton/kreutzklem.htm (2 of 4) [7/1/2004 12:47:07 PM]
<strong>Knot</strong> <strong>Knowledge</strong> - Kreutzklem (Hedden)Insert the loopthrough the bight.Finished KreutzklemDress and set theknot.[Top of Page]http://www.iland.net/%7Ejbritton/kreutzklem.htm (3 of 4) [7/1/2004 12:47:07 PM]
<strong>Knot</strong> <strong>Knowledge</strong> - Kreutzklem (Hedden)Return to Indexhttp://www.iland.net/%7Ejbritton/kreutzklem.htm (4 of 4) [7/1/2004 12:47:07 PM]
<strong>Knot</strong> <strong>Knowledge</strong> - PrusikKNOT KNOWLEDGEFRICTION HITCHESPrusikThe prusik is widely used as an ascending knot. The friction can be increasedby adding a third turn. The prusik can cinch up tightly and the friction canbe somewhat difficult to break after a load has been applied.Step #1Place a bight of the loopacross the climbing rope.http://www.iland.net/%7Ejbritton/prusik.htm (1 of 4) [7/1/2004 12:47:08 PM]
<strong>Knot</strong> <strong>Knowledge</strong> - PrusikStep #2Wrap the loop behind theclimbing rope and throughthe bight.Step #3Continue wrappingthe loop around theclimbing rope.Step #4http://www.iland.net/%7Ejbritton/prusik.htm (2 of 4) [7/1/2004 12:47:08 PM]
<strong>Knot</strong> <strong>Knowledge</strong> - PrusikWrap it behindthe climbingrope again andthrough thebight.Finished PrusikDress and set the knot. Itis important to keep thisknot neat whiletightening.Finished Prusik - Opposite Viewhttp://www.iland.net/%7Ejbritton/prusik.htm (3 of 4) [7/1/2004 12:47:08 PM]
<strong>Knot</strong> <strong>Knowledge</strong> - PrusikOpposite view.[Top of Page]Return to Indexhttp://www.iland.net/%7Ejbritton/prusik.htm (4 of 4) [7/1/2004 12:47:08 PM]
<strong>Knot</strong> <strong>Knowledge</strong> - KleimheistKNOT KNOWLEDGEFRICTION HITCHESKleimheistThe Kleimheist is easier to tie and untie than the prusik. It does not tend tocinch up as tightly as a prusik, so it is easier to break friction after releasingthe load. You can add more turns to increase friction, as well.Step #1Place a bight of the loopbehind the climbing rope.http://www.iland.net/%7Ejbritton/kleimheist.htm (1 of 4) [7/1/2004 12:47:09 PM]
<strong>Knot</strong> <strong>Knowledge</strong> - KleimheistStep #2Wrap the loop across theclimbing rope.Step #3Wrap the loop behind theclimbing rope.http://www.iland.net/%7Ejbritton/kleimheist.htm (2 of 4) [7/1/2004 12:47:09 PM]
<strong>Knot</strong> <strong>Knowledge</strong> - KleimheistStep #4Repeat steps 2 -3 two moretimes.Step #5Insert the loop throughthe original bighthttp://www.iland.net/%7Ejbritton/kleimheist.htm (3 of 4) [7/1/2004 12:47:09 PM]
<strong>Knot</strong> <strong>Knowledge</strong> - KleimheistFinished KleimheistPull the loop back down,bringing the bight downacross the wraps. Tightenthe knot.[Top of Page]Return to Indexhttp://www.iland.net/%7Ejbritton/kleimheist.htm (4 of 4) [7/1/2004 12:47:09 PM]
<strong>Knot</strong> <strong>Knowledge</strong> - Tautline HitchKNOT KNOWLEDGEFRICTION HITCHESTautline Hitch (aka Rolling Hitch)The Tautline Hitch is an adjustable knot that is commonly used fortensioning guy lines, such as on a tent. The knot can slide along the standingpart. When the knot is released, the tension on the standing part tightens thecoils in the knot, increasing the friction which keeps the knot in place undertension. Since the Tautline Hitch is tied to its own standing part, the ropemust be able to slide around the object it is secured to for it to be adjustable.This knot is known as the Rolling Hitch when, instead of being tied aroundits standing part, it is tied around another rope, spar, or cylindrical object.Pull the end around asecure object (Thepicture shows an emptythread spool.)Step 1http://www.iland.net/%7Ejbritton/tautlinehitch.htm (1 of 5) [7/1/2004 12:47:10 PM]
<strong>Knot</strong> <strong>Knowledge</strong> - Tautline HitchStep 2Bring the end under thestanding part.Step 3Wrap the end around thestanding part.Step 4http://www.iland.net/%7Ejbritton/tautlinehitch.htm (2 of 5) [7/1/2004 12:47:10 PM]
<strong>Knot</strong> <strong>Knowledge</strong> - Tautline HitchWrap the end around thestanding part a secondtime.Step 5Now you add a half hitchabove the turns. Bringthe end over the standingpart.Step 6Make a half hitch.Finished Tautline Hitchhttp://www.iland.net/%7Ejbritton/tautlinehitch.htm (3 of 5) [7/1/2004 12:47:10 PM]
<strong>Knot</strong> <strong>Knowledge</strong> - Tautline HitchTighten the loops. Becareful to keep the knotneat while doing this,and tighten it enough sothat it will grip thestanding part reliably,but not so tight that itcan't easily slide.Finished Tautline Hitch - Opposite ViewOpposite view.This picture showsthe knot havingbeen slid furtherup the standingpart. Note that therope had to movearound the spoolin order for this tooccur.Finished Tautline Hitchhttp://www.iland.net/%7Ejbritton/tautlinehitch.htm (4 of 5) [7/1/2004 12:47:10 PM]
<strong>Knot</strong> <strong>Knowledge</strong> - Tautline Hitch[Top of Page]Return to Indexhttp://www.iland.net/%7Ejbritton/tautlinehitch.htm (5 of 5) [7/1/2004 12:47:10 PM]
<strong>Knot</strong> <strong>Knowledge</strong> - Sliding Sheet BendKNOT KNOWLEDGEFRICTION HITCHESSliding Sheet BendThe Sliding Sheet Bend is used for the same purpose as the Tautline Hitch,but with a quick yank of the end, it is completely untied. This is a boon forthose wearing gloves or who have cold, numb fingers. Moreover, unlike theTautline Hitch, the Sliding Sheet Bend can be "locked" in place to prevent itsliding. It can also be unlocked to make it adjustable again. For this cleverknot, I gladly give credit and much appreciation to Dr. Peter Suber, whocame up with this knot and posted it to the Web. I learned to tie this knotusing his instructions, and you can visit his website for more knots like this.Wrap the end aroundthe object it is to besecured to (a spool inthis picture).Step 1http://www.iland.net/%7Ejbritton/slidingsheetbend.htm (1 of 6) [7/1/2004 12:47:11 PM]
<strong>Knot</strong> <strong>Knowledge</strong> - Sliding Sheet BendStep 2Form a bight in thestanding part, pointingaway from the spool.Step 3Pull the end under thebight.Step 4Bring the end over thebight...http://www.iland.net/%7Ejbritton/slidingsheetbend.htm (2 of 6) [7/1/2004 12:47:11 PM]
<strong>Knot</strong> <strong>Knowledge</strong> - Sliding Sheet BendStep 5...and form a loop.Step 6Now, form a bight in theend and stick it throughthe bight in the standingpart.Step 7http://www.iland.net/%7Ejbritton/slidingsheetbend.htm (3 of 6) [7/1/2004 12:47:11 PM]
<strong>Knot</strong> <strong>Knowledge</strong> - Sliding Sheet BendIf you are tying this knotflat as pictured, it helpsat this point to slide thebight in the end so that itis over the loop formedearlier.Pull on both ends of thebight in the standingpart, removing the bight,so the standing part isstraight as pictured.Keep the knot neat whiledoing this!Step 8Finished Sliding Sheet BendTighten the knot, so thatthe standing part formsa "hump" as it passesover the bight in the end.This is what creates thefriction, and the frictioncan be adjusted byincreasing or decreasingthe hump (by tighteninghttp://www.iland.net/%7Ejbritton/slidingsheetbend.htm (4 of 6) [7/1/2004 12:47:11 PM]
<strong>Knot</strong> <strong>Knowledge</strong> - Sliding Sheet Bendand loosening the knot).This picture shows theknot having been slidfurther up thestanding part. Notethat the rope had tomove around the spoolin order for this tooccur (like theTautline Hitch).Finished Sliding Sheet BendLocked Sliding Sheet Bendhttp://www.iland.net/%7Ejbritton/slidingsheetbend.htm (5 of 6) [7/1/2004 12:47:11 PM]
<strong>Knot</strong> <strong>Knowledge</strong> - Sliding Sheet BendOnce you have adjusted theknot to your satisfaction, itcan be locked by tighteningthe knot by pulling on thenon-sliding parts of theknot. To unlock, loosen andflatten the knot, to reducethe hump. To untie, simplyyank on the end.[Top of Page]Return to Indexhttp://www.iland.net/%7Ejbritton/slidingsheetbend.htm (6 of 6) [7/1/2004 12:47:11 PM]
ContributionsKNOT KNOWLEDGEContributionsLehman8This knot is Dan Lehman's creation. The sketch is his own handiwork. Hisdesign goal was to combine a "Figure 8 Loop's strong form and aBowlinesque ease of untying". Notice the sketch labels the segments of theknots, and the scan of the knot is in the same orientation as the sketchedknot.Dan's comments:Lehman8"The end (M-N) can be tucked outwith the looParts (F-G), which Ithink 'softens' the SPart's initialdeflection (under the 'collar') andadds into the SPart's u-turn (A-B-C)."NB: the end can here exit overhttp://www.iland.net/%7Ejbritton/<strong>Knot</strong>PhotoContributions.html(1 of 8) [7/1/2004 12:47:13 PM]
Contributionsover-under-under-under (under E-F) (It's drawn over-over-underunder-over);and that version alsoallows a further tucking. But Ithink that then the end (M-N)provides less or no 'softening' atthe point immediately after the'collar'. That is, 'B' is hardlytouching 'M-N', deflecting over 'D-E'."Locktight Loop IDan Lehman shows how to tie version one of his Locktight Loop:Locktight Loop Ihttp://www.iland.net/%7Ejbritton/<strong>Knot</strong>PhotoContributions.html (2 of 8) [7/1/2004 12:47:13 PM]
ContributionsSketch by Dan Lehman, 1/1/2000.Locktight Loop IIDan Lehman shows how to tie version two of his Locktight Loop:Locktight Loop IIhttp://www.iland.net/%7Ejbritton/<strong>Knot</strong>PhotoContributions.html (3 of 8) [7/1/2004 12:47:13 PM]
ContributionsSketch by Dan Lehman, 1/11/2000.Single Bowline on the BightThis is Dan Lehman's sketch of his Single Bowline in the Bight:http://www.iland.net/%7Ejbritton/<strong>Knot</strong>PhotoContributions.html (4 of 8) [7/1/2004 12:47:13 PM]
ContributionsSingle Bowline on the BightSketchby DanLehmanFigure 8 Loop, Strong FormDan Lehman shows the correct way to tie the Figure 8 Loop <strong>Knot</strong>:http://www.iland.net/%7Ejbritton/<strong>Knot</strong>PhotoContributions.html (5 of 8) [7/1/2004 12:47:13 PM]
ContributionsFigure 8 Loop, Strong FormDan Lehman's comments:"I've labelled the segments so as tomatch - as closely as they do - thelabels on the Lehman8 (hence,there is a 'collar' here labelled 'E-F', corresponding to that on theLehman8-part of the Figure 8component)."One can see how 'padding' (ofthe SPart) section 'P-Q-R' of theFigure 8 above was modelled by 'J-K' in the Lehman 8."Sailor's HitchesThese knots were sent to me by Kevin. They are his drawings, and thedescriptive text is also his words. Thanks, Kevin, for contributing.http://www.iland.net/%7Ejbritton/<strong>Knot</strong>PhotoContributions.html (6 of 8) [7/1/2004 12:47:13 PM]
ContributionsDraws up withoutworking to form astrong, secure hitchthat will not jam. Itmay be used as away to tie a smallerrope to a very largerope. (The smallerrope should pull leftwhen tied as shownhere.) Push a bightthrough the finaltuck to form aSlipped Sailor'sHitch.Sailor's HitchThis hitch is amodification of theSailor's Hitch thatallows a lengthwisepull on smooth spar,even if tapered. Thishitch evenoutperforms theIcicle Hitch in thisregard. Ensure thatGripping Sailor's Hitchhttp://www.iland.net/%7Ejbritton/<strong>Knot</strong>PhotoContributions.html (7 of 8) [7/1/2004 12:47:13 PM]
Contributionsthe hitch is tightbefore applying thelengthise pull. (Thepull should besteady.)[Top of Page]Return to Indexhttp://www.iland.net/%7Ejbritton/<strong>Knot</strong>PhotoContributions.html (8 of 8) [7/1/2004 12:47:13 PM]