VigorAP 800 User's Guide i - FTP - Draytek
VigorAP 800 User's Guide i - FTP - Draytek
VigorAP 800 User's Guide i - FTP - Draytek

You also want an ePaper? Increase the reach of your titles
YUMPU automatically turns print PDFs into web optimized ePapers that Google loves.
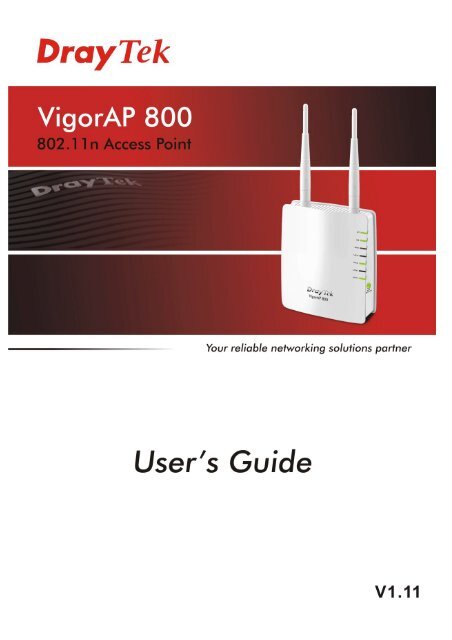
i<strong>VigorAP</strong> <strong>800</strong> User’s <strong>Guide</strong>
<strong>VigorAP</strong> <strong>800</strong> User’s <strong>Guide</strong>ii
<strong>VigorAP</strong> <strong>800</strong>Wireless Access PointUser’s <strong>Guide</strong>Version: 1.11Firmware Version: V1.0.2Date: 30/11/2011iii<strong>VigorAP</strong> <strong>800</strong> User’s <strong>Guide</strong>
Copyright InformationCopyrightDeclarationsTrademarksSafety Instructions and ApprovalSafetyInstructionsWarrantyBe a RegisteredOwnerFirmware & ToolsUpdatesCopyright 2011 All rights reserved. This publication contains information that isprotected by copyright. No part may be reproduced, transmitted, transcribed, stored in aretrieval system, or translated into any language without written permission from thecopyright holders.The following trademarks are used in this document:• Microsoft is a registered trademark of Microsoft Corp.• Windows, Windows 95, 98, Me, NT, 2000, XP, Vista and Explorer aretrademarks of Microsoft Corp.• Apple and Mac OS are registered trademarks of Apple Inc.• Other products may be trademarks or registered trademarks of their respectivemanufacturers.• Read the installation guide thoroughly before you set up the modem.• The modem is a complicated electronic unit that may be repaired only beauthorized and qualified personnel. Do not try to open or repair the modemyourself.• Do not place the modem in a damp or humid place, e.g. a bathroom.• The modem should be used in a sheltered area, within a temperature range of +5to +40 Celsius.• Do not expose the modem to direct sunlight or other heat sources. The housingand electronic components may be damaged by direct sunlight or heat sources.• Do not deploy the cable for LAN connection outdoor to prevent electronic shockhazards.• Keep the package out of reach of children.• When you want to dispose of the modem, please follow local regulations onconservation of the environment.We warrant to the original end user (purchaser) that the modem will be free from anydefects in workmanship or materials for a period of one (1) year from the date ofpurchase from the dealer. Please keep your purchase receipt in a safe place as it servesas proof of date of purchase. During the warranty period, and upon proof of purchase,should the product have indications of failure due to faulty workmanship and/ormaterials, we will, at our discretion, repair or replace the defective products orcomponents, without charge for either parts or labor, to whatever extent we deemnecessary tore-store the product to proper operating condition. Any replacement willconsist of a new or re-manufactured functionally equivalent product of equal value, andwill be offered solely at our discretion. This warranty will not apply if the product ismodified, misused, tampered with, damaged by an act of God, or subjected to abnormalworking conditions. The warranty does not cover the bundled or licensed software ofother vendors. Defects which do not significantly affect the usability of the product willnot be covered by the warranty. We reserve the right to revise the manual and onlinedocumentation and to make changes from time to time in the contents hereof withoutobligation to notify any person of such revision or changes.Web registration is preferred. You can register your Vigor modem viahttp://www.draytek.com.Due to the continuous evolution of DrayTek technology, all modems will be regularlyupgraded. Please consult the DrayTek web site for more information on newestfirmware, tools and documents.http://www.draytek.com<strong>VigorAP</strong> <strong>800</strong> User’s <strong>Guide</strong>iv
European Community DeclarationsManufacturer: DrayTek Corp.Address: No. 26, Fu Shing Road, Hukou Township, Hsinchu Industrial Park, Hsinchu County, Taiwan 303Product: <strong>VigorAP</strong> <strong>800</strong>DrayTek Corp. declares that <strong>VigorAP</strong> <strong>800</strong> is in compliance with the following essential requirements and otherrelevant provisions of R&TTE Directive 1999/5/EEC.The product conforms to the requirements of Electro-Magnetic Compatibility (EMC) Directive 2004/108/EC bycomplying with the requirements set forth in EN55022/Class B and EN55024/Class B.The product conforms to the requirements of Low Voltage (LVD) Directive 2006/95/EC by complying with therequirements set forth in EN60950-1.Federal Communication Commission Interference StatementThis equipment has been tested and found to comply with the limits for a Class B digital device, pursuant to Part15 of the FCC Rules. These limits are designed to provide reasonable protection against harmful interference in aresidential installation. This equipment generates, uses and can radiate radio frequency energy and, if not installedand used in accordance with the instructions, may cause harmful interference to radio communications. However,there is no guarantee that interference will not occur in a particular installation. If this equipment does causeharmful interference to radio or television reception, which can be determined by turning the equipment off andon, the user is encouraged to try to correct the interference by one of the following measures:• Reorient or relocate the receiving antenna.• Increase the separation between the equipment and receiver.• Connect the equipment into an outlet on a circuit different from that to which the receiver is connected.• Consult the dealer or an experienced radio/TV technician for help.This device complies with Part 15 of the FCC Rules. Operation is subject to the following two conditions:(1) This device may not cause harmful interference, and(2) This device may accept any interference received, including interference that may cause undesired operation.This product is designed for 2.4GHz WLAN network throughout the EC region and Switzerland with restrictionsin France.You are cautioned that changes or modifications not expressly approved by the party responsible for compliancecould void your authority to operate the equipment.FCC RF Radiation Exposure Statement1. This Transmitter must not be co-located or operating in conjunction with any other antenna or transmitter.2. This equipment complies with FCC RF radiation exposure limits set forth for an uncontrolled environment.This equipment should be installed and operated with a minimum distance of 20 centimeters between theradiator and your body.v<strong>VigorAP</strong> <strong>800</strong> User’s <strong>Guide</strong>
<strong>VigorAP</strong> <strong>800</strong> User’s <strong>Guide</strong>vi
Table of ContentsPreface .........................................................................................................11.1 Introduction ............................................................................................................................. 11.2 LED Indicators and Connectors .............................................................................................. 21.3 Hardware Installation .............................................................................................................. 41.3.1 Wired Connection for PC in LAN ...................................................................................... 41.3.2 Wired Connection for Notebook in WLAN ........................................................................ 51.3.2 Wireless Connection......................................................................................................... 61.3.3 POE Connection ............................................................................................................... 7Network Configuration................................................................................92.1 Windows 95/98/Me IP Address Setup..................................................................................... 92.2 Windows 2000 IP Address Setup...........................................................................................112.3 Windows XP IP Address Setup ............................................................................................. 122.4 Windows Vista IP Address Setup.......................................................................................... 132.5 Accessing to Web User Interface.......................................................................................... 142.6 Changing Password.............................................................................................................. 152.7 Quick Start Wizard ................................................................................................................ 162.7.1 Configuring 2.4G Wireless Settings – General............................................................... 162.7.2 Configuring 2.4G Wireless Settings based on the Operation Mode............................... 172.7.3 Configuring 5G Wireless Settings................................................................................... 202.7.4 Finishing the Wireless Settings Wizard .......................................................................... 212.8 Online Status......................................................................................................................... 22Web Configuration .........................................................................................233.1 Operation Mode .................................................................................................................... 243.2 LAN ....................................................................................................................................... 253.3 General Concepts for Wireless LAN ..................................................................................... 263.4 Wireless LAN Settings for AP Mode ..................................................................................... 293.4.1 General Setup................................................................................................................. 293.4.2 Security........................................................................................................................... 323.4.3 Access Control................................................................................................................ 353.4.4 WPS................................................................................................................................ 373.4.5 AP Discovery .................................................................................................................. 383.4.6 Station List ...................................................................................................................... 393.5 Wireless LAN Settings for Station-Infrastructure Mode ........................................................ 40vii<strong>VigorAP</strong> <strong>800</strong> User’s <strong>Guide</strong>
3.5.1 General Setup................................................................................................................. 403.5.2 Site Survey ..................................................................................................................... 453.5.3 Statistics.......................................................................................................................... 453.5.4 WPS (Wi-Fi Protected Setup)......................................................................................... 463.6 Wireless LAN Settings for AP Bridge-Point to Point/AP Bridge-Point to Multi-Point Mode .. 483.6.1 General Setup................................................................................................................. 483.6.2 AP Discovery .................................................................................................................. 513.6.3 WDS AP Status .............................................................................................................. 523.7 Wireless LAN Settings for AP Bridge-WDS Mode ................................................................ 533.7.1 General Setup................................................................................................................. 533.7.2 Security........................................................................................................................... 583.7.3 Access Control................................................................................................................ 603.7.4 WPS................................................................................................................................ 623.7.5 AP Discovery .................................................................................................................. 623.7.6 WDS AP Status .............................................................................................................. 643.7.7 Station List ...................................................................................................................... 643.8 Wireless LAN Settings for Universal Repeater Mode ........................................................... 653.8.1 General Setup................................................................................................................. 653.8.2 Security........................................................................................................................... 693.8.3 Access Control................................................................................................................ 733.8.4 WPS................................................................................................................................ 743.8.5 AP Discovery .................................................................................................................. 753.8.6 Universal Repeater......................................................................................................... 763.8.7 Station List ...................................................................................................................... 783.9 Wireless LAN (5G) Settings for AP Mode ............................................................................. 793.9.1 General Setup................................................................................................................. 793.9.2 Security........................................................................................................................... 803.9.3 Access Control................................................................................................................ 833.9.4 AP Discovery .................................................................................................................. 843.9.5 Station List ...................................................................................................................... 853.10 RADIUS Server ................................................................................................................... 873.11 System Maintenance........................................................................................................... 883.11.1 System Status............................................................................................................... 883.11.2 TR-069.......................................................................................................................... 893.11.3 Administrator Password................................................................................................ 903.11.4 Configuration Backup ................................................................................................... 913.11.5 Reboot System ............................................................................................................. 923.11.6 Firmware Upgrade ........................................................................................................ 933.12 Diagnostics.......................................................................................................................... 933.13 Support Area ....................................................................................................................... 94Application and Examples........................................................................974.1 Upgrade Firmware for Your Modem...................................................................................... 974.2 How to set different segments for different SSIDs in <strong>VigorAP</strong> <strong>800</strong> ..................................... 100<strong>VigorAP</strong> <strong>800</strong> User’s <strong>Guide</strong>viii
Trouble Shooting.....................................................................................1035.1 Checking If the Hardware Status Is OK or Not.................................................................... 1035.2 Checking If the Network Connection Settings on Your Computer Is OK or Not ................. 1045.3 Pinging the Modem from Your Computer............................................................................ 1065.4 Backing to Factory Default Setting If Necessary ................................................................ 1075.5 Contacting Your Dealer ....................................................................................................... 108ix<strong>VigorAP</strong> <strong>800</strong> User’s <strong>Guide</strong>
Preface1.1 IntroductionThank you for purchasing this <strong>VigorAP</strong> <strong>800</strong>! With this high cost-efficiency <strong>VigorAP</strong> <strong>800</strong>,computers and wireless devices which are compatible with 802.11n can connect to existingwired Ethernet network via this <strong>VigorAP</strong> <strong>800</strong>, at the speed of 300Mbps.Easy install procedures allows any computer users to setup a network environment in veryshort time - within minutes, even inexperienced users. Just follow the instructions given inthis user manual, you can complete the setup procedure and release the power of this accesspoint all by yourself!1<strong>VigorAP</strong> <strong>800</strong> User’s <strong>Guide</strong>
1.2 LED Indicators and ConnectorsBefore you use the Vigor modem, please get acquainted with the LED indicators andconnectors first.LED Status ExplanationACTOff The system is not ready or is failed.Blinking The system is ready and can work normally.USBOnA USB device is connected and active.Blinking The data is transmitting.LAN BOnA normal connection is through its correspondingport.Off LAN is disconnected.Blinking Data is transmitting (sending/receiving).LAN A1 - A4 OnA normal connection is through its correspondingport.Off LAN is disconnected.WLANOnWireless function is ready.(Green LED) on Off Wireless function is not ready.WLAN button Blinking Data is transmitting (sending/receiving).WPSOff The WPS is off.(Orange LED) onWLAN buttonBlinking(Orange)Blink with 1 second cycle for 2 minutes - - WPS isenabled and waiting for wireless client to connectwith it.Blinking Data is transmitting (sending/receiving).(Orange)WPS Button Press this button for 2 seconds to wait for client device makingnetwork connection through WPS. When the orange LED lights up,the WPS will be on.<strong>VigorAP</strong> <strong>800</strong> User’s <strong>Guide</strong> 2
InterfaceLAN BLAN A1 (PoE) -A4USBDescriptionConnecter for xDSL / Cable modem or router.Connecter for xDSL / Cable modem or router.Connector for future use.Restore the default settings. Usage: Turn on <strong>VigorAP</strong><strong>800</strong>. Press the button and keep for more than 10seconds. Then <strong>VigorAP</strong> <strong>800</strong> will restart with thefactory default configuration.ON/OFF: Power switch.PWR: Connecter for a power adapter.3<strong>VigorAP</strong> <strong>800</strong> User’s <strong>Guide</strong>
1.3 Hardware InstallationThis section will guide you to install the modem through hardware connection and configurethe modem’s settings through web browser.Before starting to configure the modem, you have to connect your devices correctly.1.3.1 Wired Connection for PC in LAN1. Connect <strong>VigorAP</strong> <strong>800</strong> to ADSL modem, router, or switch/hub in your network throughthe LAN A port of the access point by Ethernet cable.2. Connect a computer to other available LAN A port. Make sure the subnet IP address ofthe PC is the same as <strong>VigorAP</strong> <strong>800</strong> management IP, e.g., 192.168.1.X.3. Connect the A/C power adapter to the wall socket, and then connect it to the PWRconnector of the access point.4. Power on <strong>VigorAP</strong> <strong>800</strong>.5. Check all LEDs on the front panel. ACT LED should be steadily on, LAN LEDsshould be on if the access point is correctly connected to the ADSL modem or router.(For the detailed information of LED status, please refer to section 1.2.)<strong>VigorAP</strong> <strong>800</strong> User’s <strong>Guide</strong> 4
1.3.2 Wired Connection for Notebook in WLAN1. Connect <strong>VigorAP</strong> <strong>800</strong> to ADSL modem or router in your network through the LAN Aport of the access point by Ethernet cable.2. Connect the A/C power adapter to the wall socket, and then connect it to the PWRconnector of the access point.3. Power on <strong>VigorAP</strong> <strong>800</strong>.4. Check all LEDs on the front panel. ACT LED should be steadily on, LAN LEDsshould be on if the access point is correctly connected to the ADSL modem or router.(For the detailed information of LED status, please refer to section 1.2.)5<strong>VigorAP</strong> <strong>800</strong> User’s <strong>Guide</strong>
1.3.2 Wireless Connection<strong>VigorAP</strong> <strong>800</strong> can access Internet via an ADSL modem, router, or switch/hub in yournetwork through wireless connection.1. Connect <strong>VigorAP</strong> <strong>800</strong> to ADSL modem or router via wireless network.2. Connect the A/C power adapter to the wall socket, and then connect it to the PWRconnector of the access point.3. Power on <strong>VigorAP</strong> <strong>800</strong>.4. Check all LEDs on the front panel. ACT LED should be steadily on, LAN LEDsshould be on if <strong>VigorAP</strong> <strong>800</strong> is correctly connected to the ADSL modem, router orswitch/hub.(For the detailed information of LED status, please refer to section 1.2.)<strong>VigorAP</strong> <strong>800</strong> User’s <strong>Guide</strong> 6
1.3.3 POE Connection<strong>VigorAP</strong> <strong>800</strong> can gain the power from the connected switch, e.g., VigorSwitch P2260. PoE(Power over Ethernet) can break the install limitation caused by the fixed power supply.1. Connect <strong>VigorAP</strong> <strong>800</strong> to a switch in your network through the LAN A1 port of theaccess point by Ethernet cable.2. Connect a computer to LAN A2 – A4. Make sure the subnet IP address of the PC is thesame as <strong>VigorAP</strong> <strong>800</strong> management IP, e.g., 192.168.1.X.3. Power on <strong>VigorAP</strong> <strong>800</strong>.4. Check all LEDs on the front panel. ACT LED should be steadily on, LAN LEDsshould be on if the access point is correctly connected to the ADSL modem, router orswitch/hub.7<strong>VigorAP</strong> <strong>800</strong> User’s <strong>Guide</strong>
This page is left blank.<strong>VigorAP</strong> <strong>800</strong> User’s <strong>Guide</strong> 8
Network ConfigurationAfter the network connection is built, the next step you should do is setup <strong>VigorAP</strong> <strong>800</strong> withproper network parameters, so it can work properly in your network environment.Before you can connect to the access point and start configuration procedures, yourcomputer must be able to get an IP address automatically (use dynamic IP address). If it’s setto use static IP address, or you’re unsure, please follow the following instructions toconfigure your computer to use dynamic IP address:For the default IP address of this AP is set “192.168.1.2”, we recommend you to use“192.168.1.X (except 2)” in the field of IP address on this section for your computer.If the operating system of your computer is…Windows 95/98/Me - please go to section 2.1Windows 2000 - please go to section 2.2Windows XP - please go to section 2.3Windows Vista - please go to section 2.42.1 Windows 95/98/Me IP Address SetupClick Start button (it should be located at lower-left corner of your computer), then clickcontrol panel. Double-click Network icon, and the Network window will appear. SelectTCP/IP, then click ‘Properties’.9<strong>VigorAP</strong> <strong>800</strong> User’s <strong>Guide</strong>
Select Specify an IP address, then input the following settings in respective field and clickOK when finish.IP address: 192.168.1.9Subnet Mask: 255.255.255.0<strong>VigorAP</strong> <strong>800</strong> User’s <strong>Guide</strong> 10
2.2 Windows 2000 IP Address SetupClick Start button (it should be located at lower-left corner of your computer), then clickcontrol panel. Double-click Network and Dial-up Connections icon, double click LocalArea Connection, and Local Area Connection Properties window will appear. SelectInternet Protocol (TCP/IP), then click Properties.Select Use the following IP address, then input the following settings in respective field andclick OK when finish.IP address: 192.168.1.9Subnet Mask: 255.255.255.011<strong>VigorAP</strong> <strong>800</strong> User’s <strong>Guide</strong>
2.3 Windows XP IP Address SetupClick Start button (it should be located at lower-left corner of your computer), then clickcontrol panel. Double-click Network and Internet Connections icon, click NetworkConnections, and then double-click Local Area Connection, Local Area ConnectionStatus window will appear, and then click Properties.Select Use the following IP address, then input the following settings in respective field andclick OK when finish:IP address: 192.168.1.9Subnet Mask: 255.255.255.0.<strong>VigorAP</strong> <strong>800</strong> User’s <strong>Guide</strong> 12
2.4 Windows Vista IP Address SetupClick Start button (it should be located at lower-left corner of your computer), then clickcontrol panel. Click View Network Status and Tasks, then click Manage NetworkConnections. Right-click Local Area Netwrok, then select ‘Properties’. Local AreaConnection Properties window will appear, select Internet Protocol Version 4 (TCP /IPv4), and then click Properties.Select Use the following IP address, then input the following settings in respective field andclick OK when finish:IP address: 192.168.1.9Subnet Mask: 255.255.255.0.13<strong>VigorAP</strong> <strong>800</strong> User’s <strong>Guide</strong>
2.5 Accessing to Web User InterfaceAll functions and settings of this access point must be configured via web user interface.Please start your web browser (e.g., IE).1. Make sure your PC connects to the <strong>VigorAP</strong> <strong>800</strong> correctly.Notice: You may either simply set up your computer to get IP dynamicallyfrom the modem or set up the IP address of the computer to be the same subnetas the default IP address of <strong>VigorAP</strong> <strong>800</strong> 192.168.1.2. For the detailedinformation, please refer to the later section - Trouble Shooting of the guide.2. Open a web browser on your PC and type http://192.168.1.2. A pop-up window willopen to ask for username and password. Pease type “admin/admin” onUsername/Password and click OK.3. The Main Screen will pop up.Note: If you fail to access to the web configuration, please go to “TroubleShooting” for detecting and solving your problem. For using the device properly, itis necessary for you to change the password of web configuration for security andadjust primary basic settings.<strong>VigorAP</strong> <strong>800</strong> User’s <strong>Guide</strong> 14
2.6 Changing Password1. Please change the password for the original security of the modem.2. Go to System Maintenance page and choose Administrator Password.3. Enter the new login password on the field of Password. Then click OK to continue.4. Now, the password has been changed. Next time, use the new password to access theWeb Configurator for this modem.15<strong>VigorAP</strong> <strong>800</strong> User’s <strong>Guide</strong>
2.7 Quick Start WizardQuick Start Wizard will guide you to configure 2.4G wireless setting, 5G wireless settingand other corresponding settings for Vigor Access Point step by step.2.7.1 Configuring 2.4G Wireless Settings – GeneralThis page displays general settings for the operation mode selected.Operation ModeThere are six operation modes for wireless connection. Settingsfor each mode are different.Wireless ModeAt present, <strong>VigorAP</strong> <strong>800</strong> can connect to 11b only, 11g only, 11nonly, Mixed (11b+11g) and Mixed (11b+11g+11n) stationssimultaneously. Simply choose Mixed (11b+11g+11n) mode.Main SSIDSet a name for <strong>VigorAP</strong> <strong>800</strong> to be identified.Enable 2 Subnet (Simulate 2 APs) - Check the box to enable thefunction for two independent subnets. Once you enable thisfunction, LAN-A and LAN-B would be independent. Next, youcan connect one router in LAN-A, and another router in LAN-B.Such mechanism can make you feeling that you have twoindependent AP/subnet functions in one <strong>VigorAP</strong> <strong>800</strong>.If you disable this function, LAN-A and LAN-B ports are in thesame domain. You could only connect one router (no matter<strong>VigorAP</strong> <strong>800</strong> User’s <strong>Guide</strong> 16
Channelconnecting to LAN-A or LAN-B) in this environment.Multiple SSID - When Enable 2 Subnet is enabled, you canspecify subnet interface (LAN-A or LAN-B) for each SSID byusing the drop down menu.Means the channel frequency of the wireless LAN. The defaultchannel is 6. You may switch channel if the selected channel isunder serious interference. If you have no idea of choosing thefrequency, please select AutoSelect to let system determine foryou.Extension ChannelStation ListWith 802.11n, there is one option to double the bandwidth perchannel. The available extension channel options will be variedaccording to the Channel selected above.Click this button to open the Station List dialog. It provides theknowledge of connecting wireless clients now along with itsstatus code.AP Discovery Click this button to open the AP Discovery dialog. <strong>VigorAP</strong> <strong>800</strong>can scan all regulatory channels and find working APs in theneighborhood.After finishing this web page configuration, please click Next to continue.2.7.2 Configuring 2.4G Wireless Settings based on the Operation ModeIn this page, the advanced settings will vary according to the operation mode chosen on2.7.1.17<strong>VigorAP</strong> <strong>800</strong> User’s <strong>Guide</strong>
Advanced Settings for Station-InfrastructureWhen you choose Station-Infrastructure, you will need to configure the following page toconnect to one AP.Advanced Settings for AP Bridge-Point to PointWhen you choose AP Bridge-Point to Point, you will need to configure the following page.<strong>VigorAP</strong> <strong>800</strong> User’s <strong>Guide</strong> 18
Advanced Settings for AP Bridge-Point to Multi-PointWhen you choose AP Bridge-Point to Multi-Point, you will need to configure the followingpage.Advanced Settings for AP Bridge-WDSWhen you choose AP Bridge-WDS, you will need to configure the following page.19<strong>VigorAP</strong> <strong>800</strong> User’s <strong>Guide</strong>
Advanced Settings for AP Bridge-Universal RepeaterWhen you choose AP Bridge-Universal Repeater you will need to configure the followingpage.After finishing this web page configuration, please click Next to continue.2.7.3 Configuring 5G Wireless Settings<strong>VigorAP</strong> <strong>800</strong> offers 5G wireless connection capability. You can setup 5G features in QuickStart Wizard first. Once the USB 5G wireless dongle connects to <strong>VigorAP</strong> <strong>800</strong>, it can workimmediately.Wireless ModeAt present, <strong>VigorAP</strong> <strong>800</strong> can connect to 11a only, 11n only (5G),Mixed (11a+11n) stations simultaneously. Simply choose Mixed(11a+11n) mode.Main SSIDChannelSet a name for <strong>VigorAP</strong> <strong>800</strong> to be identified.Multiple SSID – Set the SSIDs and specify subnet interface(LAN-A or LAN-B) for each SSID by click Multiple SSID.Means the channel of frequency of the wireless LAN. The defaultchannel is 48. You may switch channel if the selected channel isunder serious interference. If you have no idea of choosing thefrequency, please select AutoSelect to let system determine foryou.<strong>VigorAP</strong> <strong>800</strong> User’s <strong>Guide</strong> 20
Extension ChannelStation ListWith 802.11n, there is one option to double the bandwidth perchannel. The available extension channel options will be variedaccording to the Channel selected above.Click this button to open the Station List dialog. It provides theknowledge of connecting wireless clients now along with itsstatus code.After finishing this web page configuration, please click Next to continue.2.7.4 Finishing the Wireless Settings WizardWhen you see this page, it means the wireless setting wizard is almost finished. Just clickFinish to save the settings and complete the setting procedure.21<strong>VigorAP</strong> <strong>800</strong> User’s <strong>Guide</strong>
2.8 Online StatusThe online status shows the LAN status, Station Link Status for such device.Detailed explanation is shown below:LAN-A/LAN-B StatusIP AddressDisplays the IP address of the LAN interface.TX PacketsDisplays the total transmitted packets at the LAN interface.RX PacketsDisplays the total number of received packets at the LAN interface.TX BytesDisplays the total transmitted size at the LAN interface.RX BytesDisplays the total number of received size at the LAN interface.<strong>VigorAP</strong> <strong>800</strong> User’s <strong>Guide</strong> 22
Web ConfigurationThis chapter will guide users to execute advanced (full) configuration. As for other examplesof application, please refer to chapter 5.1. Open a web browser on your PC and type http://192.168.1.2. The window will ask fortyping username and password.2. Please type “admin/admin” on Username/Password for administration operation.Now, the Main Screen will appear. Be aware that “Admin mode” will be displayed on thebottom left side.23<strong>VigorAP</strong> <strong>800</strong> User’s <strong>Guide</strong>
3.1 Operation ModeThis page provides several available modes for you to choose for different conditions. Clickany one of them and click OK. The system will configure the required settingsautomatically.APThis mode allows wireless clients to connect to access point andexchange data with the devices connected to the wired network.Station-Infrastructure Enable the Ethernet device such as TV and Game playerconnected to the <strong>VigorAP</strong> <strong>800</strong> to an access point.AP Bridge-Point toPointAP Bridge-Point toMulti-PointAP Bridge-WDSUniversal RepeaterThis mode can establish wireless connection with another<strong>VigorAP</strong> <strong>800</strong> using the same mode, and link the wired networkwhich these two <strong>VigorAP</strong> <strong>800</strong>s connected together. Only oneaccess point can be connected in this mode.This mode can establish wireless connection with other <strong>VigorAP</strong><strong>800</strong>s using the same mode, and link the wired network whichthese <strong>VigorAP</strong> <strong>800</strong>s connected together. Up to 4 access pointscan be connected in this mode.This mode is similar to AP Bridge to Multi-Point, but accesspoint is not work in bridge-dedicated mode, and will be able toaccept wireless clients while the access point is working as awireless bridge.This product can act as a wireless range extender that will helpyou to extend the networking wirelessly. The access point can actas Station and AP at the same time. It can use Station function toconnect to a Root AP and use AP function to service all wirelessclients within its coverage.<strong>VigorAP</strong> <strong>800</strong> User’s <strong>Guide</strong> 24
3.2 LANNote: The Wireless LAN settings will be changed according to the Operation Modeselected here. For the detailed information, please refer to the section of Wireless LAN.Local Area Network (LAN) is a group of subnets regulated and ruled by modem.Click LAN to open the LAN settings page and choose General Setup.Note: Such page will be changed according to the Operation Mode selected. Thefollowing screen is obtained by choosing AP as the operation mode.IP AddressSubnet MaskDHCP ServerConfigurationEnable Server /Disable ServerType in private IP address for connecting to a local privatenetwork (Default: 192.168.1.2).Type in an address code that determines the size of the network.(Default: 255.255.255.0/ 24)DHCP stands for Dynamic Host Configuration Protocol. DHCPserver can automatically dispatch related IP settings to any localuser configured as a DHCP client.Enable Server lets the modem assign IP address to every host inthe LAN.Disable Server lets you manually or use other DHCP server toassign IP address to every host in the LAN.25<strong>VigorAP</strong> <strong>800</strong> User’s <strong>Guide</strong>
Start IP Address -End IP AddressSubnet MaskDefault GatewayLease TimePrimary IP AddressEnter a value of the IP address pool for the DHCP server to startwith when issuing IP addresses. If the 1st IP address of yourmodem is 192.168.1.2, the starting IP address must be192.168.1.3 or greater, but smaller than 192.168.1.254.Enter a value of the IP address pool for the DHCP server to endwith when issuing IP addresses.Type in an address code that determines the size of the network.(Default: 255.255.255.0/ 24)Enter a value of the gateway IP address for the DHCP server.It allows you to set the leased time for the specified PC.You must specify a DNS server IP address here because your ISPshould provide you with usually more than one DNS Server. Ifyour ISP does not provide it, the modem will automatically applydefault DNS Server IP address: 194.109.6.66 to this field.Secondary IP Address You can specify secondary DNS server IP address here becauseyour ISP often provides you more than one DNS Server. If yourISP does not provide it, the modem will automatically applydefault secondary DNS Server IP address: 194.98.0.1 to this field.3.3 General Concepts for Wireless LANThe <strong>VigorAP</strong> <strong>800</strong> is equipped with a wireless LAN interface compliant with the standardIEEE 802.11n draft 2 protocol. To boost its performance further, the <strong>VigorAP</strong> <strong>800</strong> is alsoloaded with advanced wireless technology to lift up data rate up to 300 Mbps*. Hence, youcan finally smoothly enjoy stream music and video.Note: * The actual data throughput will vary according to the network conditions andenvironmental factors, including volume of network traffic, network overhead andbuilding materials.In an Infrastructure Mode of wireless network, <strong>VigorAP</strong> <strong>800</strong> plays a role as an Access Point(AP) connecting to lots of wireless clients or Stations (STA). All the STAs will share thesame Internet connection via <strong>VigorAP</strong> <strong>800</strong>. The General Setup will set up the informationof this wireless network, including its SSID as identification, located channel etc.Security OverviewWEP (Wired Equivalent Privacy) is a legacy method to encrypt each frame transmitted viaradio using either a 64-bit or 128-bit key. Usually access point will preset a set of four keysand it will communicate with each station using only one out of the four keys.WPA (Wi-Fi Protected Access), the most dominating security mechanism in industry, isseparated into two categories: WPA-personal or called WPA Pre-Share Key (WPA/PSK),and WPA-Enterprise or called WPA/802.1x.In WPA-Personal, a pre-defined key is used for encryption during data transmission. WPAapplies Temporal Key Integrity Protocol (TKIP) for data encryption while WPA2 appliesAES. The WPA-Enterprise combines not only encryption but also authentication.Since WEP has been proved vulnerable, you may consider using WPA for the most secureconnection. You should select the appropriate security mechanism according to your needs.No matter which security suite you select, they all will enhance the over-the-air dataprotection and /or privacy on your wireless network. The <strong>VigorAP</strong> <strong>800</strong> is very flexible andcan support multiple secure connections with both WEP and WPA at the same time.<strong>VigorAP</strong> <strong>800</strong> User’s <strong>Guide</strong> 26
WPS IntroductionWPS (Wi-Fi Protected Setup) provides easy procedure to make network connectionbetween wireless station and wireless access point (<strong>VigorAP</strong> <strong>800</strong>) with the encryption ofWPA and WPA2.It is the simplest way to build connection between wireless network clients and <strong>VigorAP</strong> <strong>800</strong>.Users do not need to select any encryption mode and type any long encryption passphrase tosetup a wireless client every time. He/she only needs to press a button on wireless client, andWPS will connect for client and <strong>VigorAP</strong> <strong>800</strong> automatically.Note: Such function is available for the wireless station with WPS supported.There are two methods to do network connection through WPS between AP and Stations:pressing the Start PBC button or using PIN Code.On the side of <strong>VigorAP</strong> <strong>800</strong> series which served as an AP, press WPS button once on thefront panel of <strong>VigorAP</strong> <strong>800</strong> or click Start PBC on web configuration interface. On the sideof a station with network card installed, press Start PBC button of network card.If you want to use PIN code, you have to know the PIN code specified in wireless client.Then provide the PIN code of the wireless client you wish to connect to the <strong>VigorAP</strong> <strong>800</strong>.27<strong>VigorAP</strong> <strong>800</strong> User’s <strong>Guide</strong>
<strong>VigorAP</strong> <strong>800</strong> User’s <strong>Guide</strong> 28
3.4 Wireless LAN Settings for AP ModeWhen you choose AP as the operation mode, the Wireless LAN menu items will includeGeneral Setup, Security, Access Control, WPS, AP Discovery and Station List.Note: The Wireless LAN settings will be changed according to the OperationMode selected in section 3.1.3.4.1 General SetupBy clicking the General Setup, a new web page will appear so that you could configure theSSID and the wireless channel.Please refer to the following figure for more information.29<strong>VigorAP</strong> <strong>800</strong> User’s <strong>Guide</strong>
Enable Wireless LANModeCheck the box to enable wireless function.At present, <strong>VigorAP</strong> <strong>800</strong> can connect to 11b only, 11g only, 11nonly, Mixed (11b+11g) and Mixed (11b+11g+11n) stationssimultaneously. Simply choose Mixed (11b+11g+11n) mode.Enable 2 Subnet(Simulate 2 APs)Hide SSIDSSIDSubnetIsolate LANIsolate MemberVLAN IDMac CloneCheck the box to enable the function for two independent subnets.Once you enable this function, LAN-A and LAN-B would beindependent. Next, you can connect one router in LAN-A, andanother router in LAN-B. Such mechanism can make you feelingthat you have two independent AP/subnet functions in one<strong>VigorAP</strong> <strong>800</strong>.If you disable this function, LAN-A and LAN-B ports are in thesame domain. You could only connect one router (no matterconnecting to LAN-A or LAN-B) in this environment.Check it to prevent from wireless sniffing and make it harder forunauthorized clients or STAs to join your wireless LAN.Depending on the wireless utility, the user may only see theinformation except SSID or just cannot see any thing about<strong>VigorAP</strong> <strong>800</strong> while site surveying. The system allows you to setthree sets of SSID for different usage.Set a name for <strong>VigorAP</strong> <strong>800</strong> to be identified. Default settings areDrayTek-LAN-A and DrayTek-LAN-B. When Enable 2 Subnetis enabled, you can specify subnet interface (LAN-A or LAN-B)for each SSID by using the drop down menu.Choose LAN-A or LAN-B for each SSID. If you choose LAN-A,the wireless clients connecting to this SSID could onlycommunicate with LAN-A.Check this box to make the wireless clients (stations) with thesame SSID not accessing for wired PC in LAN.Note: If Isolate LAN is checked, do not type any value forVLAN ID.Check this box to make the wireless clients (stations) with thesame SSID not accessing for each other.Type the value for such SSID. Packets transferred from suchSSID to LAN will be tagged with the number.If your network uses VLANs, you can assign the SSID to aVLAN on your network. Client devices that associate using theSSID are grouped into this VLAN. The VLAN ID range is from 3to 4095. The VLAN ID is 0 by default, it means disabling theVLAN function for the SSID.Check this box and manually enter the MAC address of the<strong>VigorAP</strong> <strong>800</strong> User’s <strong>Guide</strong> 30
Channeldevice with SSID 1. The MAC address of other SSIDs willchange based on this MAC address.Means the channel of frequency of the wireless LAN. The defaultchannel is 6. You may switch channel if the selected channel isunder serious interference. If you have no idea of choosing thefrequency, please select AutoSelect to let system determine foryou.Extension ChannelRateWith 802.11n, there is one option to double the bandwidth perchannel. The available extension channel options will be variedaccording to the Channel selected above. Configure the extensionchannel you want.If you choose 11g Only, 11b Only or 11n Only, such feature willbe available for you to set data transmission rate.Packet-OVERDRIVE This feature can enhance the performance in data transmissionabout 40%* more (by checking Tx Burst). It is active only whenboth sides of Access Point and Station (in wireless client) invokethis function at the same time. That is, the wireless client mustsupport this feature and invoke the function, too.Note: Vigor N61 wireless adapter supports this function.Therefore, you can use and install it into your PC for matchingwith Packet-OVERDRIVE (refer to the following picture ofVigor N61 wireless utility window, choose Enable forTxBURST on the tab of Option).31<strong>VigorAP</strong> <strong>800</strong> User’s <strong>Guide</strong>
WMM CapableAntennaTo apply WMM parameters for wireless data transmission, pleaseclick the Enable radio button.<strong>VigorAP</strong> <strong>800</strong> can be attached with two antennas to have gooddata transmission via wireless connection. However, if you haveonly one antenna attached, please choose 1T1R.Tx PowerThe default setting is the maximum (100%). Lower down thevalue may degrade range and throughput of wireless.3.4.2 SecurityThis page allows you to set security with different modes for SSID 1, 2, 3 and 4 respectively.After configuring the correct settings, please click OK to save and invoke it.By clicking the Security Settings, a new web page will appear so that you could configurethe settings.<strong>VigorAP</strong> <strong>800</strong> User’s <strong>Guide</strong> 32
ModeThere are several modes provided for you to choose.Disable - The encryption mechanism is turned off.WEP - Accepts only WEP clients and the encryption keyshould be entered in WEP Key.WPA/PSK or WPA2/PSK or Mixed (WPA+WPA2)/PSK -Accepts only WPA clients and the encryption key should beentered in PSK. The WPA encrypts each frame transmittedfrom the radio using the key, which either PSK (Pre-SharedKey) entered manually in this field below or automaticallynegotiated via 802.1x authentication.WEP/802.1x - The built-in RADIUS client feature enables<strong>VigorAP</strong> <strong>800</strong> to assist the remote dial-in user or a wirelessstation and the RADIUS server in performing mutualauthentication. It enables centralized remote accessauthentication for network management.The WPA encrypts each frame transmitted from the radiousing the key, which either PSK (Pre-Shared Key) enteredmanually in this field below or automatically negotiated via802.1x authentication. Select WPA, WPA2 or Auto as WPAmode.33<strong>VigorAP</strong> <strong>800</strong> User’s <strong>Guide</strong>
WPA AlgorithmsWPA/802.1x - The WPA encrypts each frame transmittedfrom the radio using the key, which either PSK (Pre-SharedKey) entered manually in this field below or automaticallynegotiated via 802.1x authentication.WPA2/802.1x - The WPA encrypts each frame transmittedfrom the radio using the key, which either PSK (Pre-SharedKey) entered manually in this field below or automaticallynegotiated via 802.1x authentication.Select TKIP, AES or TKIP/AES as the algorithm for WPA.Such feature is available for WPA2/802.1x, WPA/802.1x,WPA/PSK or WPA2/PSK or Mixed (WPA+WPA2)/PSKmode.Pass Phrase Either 8~63 ASCII characters, such as 012345678..(or 64Hexadecimal digits leading by 0x, such as"0x321253abcde..."). Such feature is available for WPA/PSKor WPA2/PSK or Mixed (WPA+WPA2)/PSK mode.Key Renewal IntervalPMK Cache PeriodPre-AuthenticationKey 1 – Key 4WPA uses shared key for authentication to the network.However, normal network operations use a differentencryption key that is randomly generated. This randomlygenerated key that is periodically replaced. Enter the renewalsecurity time (seconds) in the column. Smaller interval leadsto greater security but lower performance. Default is 3600seconds. Set 0 to disable re-key. Such feature is available forWPA2/802.1,WPA/802.1x, WPA/PSK or WPA2/PSK orMixed (WPA+WPA2)/PSK mode.Set the expire time of WPA2 PMK (Pairwise master key)cache. PMK Cache manages the list from the BSSIDs in theassociated SSID with which it has pre-authenticated. Suchfeature is available for WPA2/802.1 mode.Enables a station to authenticate to multiple APs for roamingsecurer and faster. With the pre-authentication proceduredefined in IEEE 802.11i specification, thepre-four-way-handshake can reduce handoff delay perceivableby a mobile node. It makes roaming faster and more secure.(Only valid in WPA2)Enable - Enable IEEE 802.1X Pre-Authentication.Disable - Disable IEEE 802.1X Pre-Authentication.Four keys can be entered here, but only one key can beselected at a time. The format of WEP Key is restricted to 5ASCII characters or 10 hexadecimal values in 64-bitencryption level, or restricted to 13 ASCII characters or 26hexadecimal values in 128-bit encryption level. The allowedcontent is the ASCII characters from 33(!) to 126(~) except '#'and ','. Such feature is available for WEP mode.802.1x WEP Disable - Disable the WEP Encryption. Data sent to the APwill not be encrypted.<strong>VigorAP</strong> <strong>800</strong> User’s <strong>Guide</strong> 34
Enable - Enable the WEP Encryption.Such feature is available for WEP/802.1x mode.Click the link of RADIUS Server to access into the following page for more settings.Use internal RADIUSServerIP AddressPortShared SecretSession TimeoutThere is a RADIUS server built in <strong>VigorAP</strong> <strong>800</strong> which is usedto authenticate the wireless client connecting to the accesspoint. Check this box to use the internal RADIUS server forwireless security.Besides, if you want to use the external RADIUS server forauthentication, do not check this box.Please refer to the section, 3.10 RADIUS Server to configuresettings for internal server of <strong>VigorAP</strong> <strong>800</strong>.Enter the IP address of external RADIUS server.The UDP port number that the external RADIUS server isusing. The default value is 1812, based on RFC 2138.The external RADIUS server and client share a secret that isused to authenticate the messages sent between them. Bothsides must be configured to use the same shared secret.Set the maximum time of service provided beforere-authentication. Set to zero to perform another authenticationimmediately after the first authentication has successfullycompleted. (The unit is second.)3.4.3 Access ControlFor additional security of wireless access, the Access Control facility allows you to restrictthe network access right by controlling the wireless LAN MAC address of client. Only thevalid MAC address that has been configured can access the wireless LAN interface. Byclicking the Access Control, a new web page will appear, as depicted below, so that youcould edit the clients' MAC addresses to control their access rights (deny or allow).35<strong>VigorAP</strong> <strong>800</strong> User’s <strong>Guide</strong>
PolicySelect to enable any one of the following policy or disable thepolicy. Choose Activate MAC address filter to type in theMAC addresses for other clients in the network manually.Choose Blocked WLAN from LAN will separate all theWLAN stations from LAN based on the MAC Address list.MAC Address FilterClient’s MAC AddressAddDeleteEditCancelOKCancelDisplay all MAC addresses that are edited before.Manually enter the MAC address of wireless client.Add a new MAC address into the list.Delete the selected MAC address in the list.Edit the selected MAC address in the list.Give up the access control set up.Click it to save the access control list.Clean all entries in the MAC address list.<strong>VigorAP</strong> <strong>800</strong> User’s <strong>Guide</strong> 36
3.4.4 WPSOpen Wireless LAN>>WPS to configure the corresponding settings.Enable WPSWPS ConfiguredWPS SSIDCheck this box to enable WPS setting.Display related system information for WPS. If the wirelesssecurity (encryption) function of <strong>VigorAP</strong> <strong>800</strong> is properlyconfigured, you can see ‘Yes’ message here.Display current selected SSID.WPS Auth Mode Display current authentication mode of the <strong>VigorAP</strong> <strong>800</strong>r.Only WPA2/PSK and WPA/PSK support WPS.WPS Encryp TypeAP PINConfigure via PushButtonConfigure via ClientPinCodeDisplay encryption mode (None, WEP, TKIP, AES, etc.) of<strong>VigorAP</strong> <strong>800</strong>.The number displayed here is used for remote client enteringthe registrar’s PIN code in remote station to make a networkconnection.Click Start PBC to invoke Push-Button style WPS setupprocedure. <strong>VigorAP</strong> <strong>800</strong> will wait for WPS requests fromwireless clients about two minutes. The WPS LED on<strong>VigorAP</strong> <strong>800</strong> will blink fast when WPS is in progress. It willreturn to normal condition after two minutes. (You need tosetup WPS within two minutes)Type the PIN code specified in wireless client you wish toconnect, and click Start PIN button. The WLAN LED on<strong>VigorAP</strong> <strong>800</strong> will blink fast when WPS is in progress. It willreturn to normal condition after two minutes. (You need tosetup WPS within two minutes).37<strong>VigorAP</strong> <strong>800</strong> User’s <strong>Guide</strong>
3.4.5 AP Discovery<strong>VigorAP</strong> <strong>800</strong> can scan all regulatory channels and find working APs in the neighborhood.Based on the scanning result, users will know which channel is clean for usage. Also, it canbe used to facilitate finding an AP for a WDS link. Notice that during the scanning process(about 5 seconds), no client is allowed to connect to Vigor.This page is used to scan the existence of the APs on the wireless LAN. Please click Scan todiscover all the connected APs.SSID Display the SSID of the AP scanned by <strong>VigorAP</strong> <strong>800</strong>.BSSID Display the MAC address of the AP scanned by <strong>VigorAP</strong> <strong>800</strong>.RSSIDisplay the signal strength of the access point. RSSI is theabbreviation of Receive Signal Strength Indication.ChannelEncryptionAuthenticationScanChannel StatisticsDisplay the wireless channel used for the AP that is scanned by<strong>VigorAP</strong> <strong>800</strong>.Display the encryption mode for the scanned AP.Display the authentication type that the scanned AP applied.It is used to discover all the connected AP. The results will beshown on the box above this buttonIt displays the statistics for the channels used by APs.<strong>VigorAP</strong> <strong>800</strong> User’s <strong>Guide</strong> 38
3.4.6 Station ListStation List provides the knowledge of connecting wireless clients now along with its statuscode.MAC AddressSSIDAuthEncryptRefreshAdd to Access ControlAddDisplay the MAC Address for the connecting client.Display the SSID that the wireless client connects to.Display the authentication that the wireless client uses forconnection with such AP.Display the encryption mode used by the wireless client.Click this button to refresh the status of station list.Client’s MAC Address - For additional security of wirelessaccess, the Access Control facility allows you to restrict thenetwork access right by controlling the wireless LAN MACaddress of client. Only the valid MAC address that has beenconfigured can access the wireless LAN interface.Click this button to add current typed MAC address into AccessControl.39<strong>VigorAP</strong> <strong>800</strong> User’s <strong>Guide</strong>
3.5 Wireless LAN Settings for Station-Infrastructure ModeWhen you choose Station-Infrastructure as the operation mode, the Wireless LAN menuitems will include General Setup, Site Survey, Statistics and WPS.3.5.1 General SetupBy clicking the General Setup, a new web page will appear so that you could configure thewireless profile and choose proper mode. Please refer to the following figure for moreinformation.Enable Wireless LANCheck the box to enable wireless function.Mode At present, <strong>VigorAP</strong> <strong>800</strong> can connect to 11 b only, 11 g only, 11n only, Mixed (11b+11g), Mixed (11b+11g+11n) and Mixed(11g+11n) stations simultaneously. Simply choose Mixed(11b+11g+11n) mode.AddClick this button to add new wireless profiles.<strong>VigorAP</strong> <strong>800</strong> User’s <strong>Guide</strong> 40
DeleteEditConnectPacket-OVERDRIVEClick this button to delete the selected wireless profile.Click this button to modify the existing wireless profile.Click this button to connect the wireless station to AP with theselected profile.This feature can enhance the performance in data transmissionabout 40%* more (by checking Tx Burst). It is active only whenboth sides of Access Point and Station (in wireless client) invokethis function at the same time. That is, the wireless client mustsupport this feature and invoke the function, too.Note: Vigor N61 wireless adapter supports this function.Therefore, you can use and install it into your PC for matchingwith Packet-OVERDRIVE (refer to the following picture ofVigor N61 wireless utility window, choose Enable forTxBURST on the tab of Option).Mac CloneCheck this box and manually enter the MAC address for Stationmode driver.Add a New Wireless ProfileTo add a new wireless profile for the stations, click Add. The following dialog box willappear.41<strong>VigorAP</strong> <strong>800</strong> User’s <strong>Guide</strong>
Profile NameSSIDNetwork TypeType a name for the new profile.Type the name for such access point that can be used forconnection by the stations.Infrastructure - In this mode, you can connect the access pointto Ethernet device such as TV and Game player to enable theEthernet device as a wireless station and join to a wirelessnetwork through an access point or AP router.802.11 Ad Hoc – An ad-hoc network is a network wherewireless stations can communicate with peer to peer (P2P).Power Saving ModeRTS ThresholdFragment ThresholdChoose the power saving mode for such device.CAM – Choose this item if it is not necessary to perform powersaving job.Power Saving Mode – Choose this item to get into the powersaving status when there is no data passing through the accesspoint.Set the RTS threshold of wireless radio. Do not modify defaultvalue if you don’t know what it is, default value is 2347.Set the Fragment threshold of wireless radio. Do not modify<strong>VigorAP</strong> <strong>800</strong> User’s <strong>Guide</strong> 42
Security Modedefault value if you don’t know what it is, default value is 2346.802.11 standard defines two mechanisms for authentication ofwireless LAN clients: Open Authentication and Shared KeyAuthentication.Choose one of the security modes from the drop down list. Ifyou choose OPEN or SHARED, you have to type WEPinformation.OPEN – Open authentication is basically null authenticationalgorithm, which means that there is no verification of the user.SHARED – It works similar to Open authentication with onlyone major difference. If you choose OPEN with WEPencryption key, the WEP keys is used to encrypt and decrypt thedata but not for authentication. In Shared key authentication,WEP encryption will be used for authentication.If you choose WPA-Personal or WPA2-Personal, thecorresponding WPA settings will be listed as follows. You haveto choose the WPA algorithms and type the pass phrase for suchsecurity mode.WEP Key LengthWPA Algorithms – Choose Temporal Key Integrity Protocol(TKIP) or AES for data encryption.Pass Phrase – Please type 8 to 63 alphanumerical charactershere.WEP (Wired Equivalent Privacy) is a common encryptionmode. It is safe enough for home and personal use. However, ifyou need higher level of security, please consider using WPAencryption (see next section).Some wireless clients do not support WPA, but support WEP.Therefore WEP is still a good choice for you if you have suchkind of client in your network environment.There are two types of WEP key length: 64-bit and 128-bit.Using 128-bit is safer than 64-bit, but it will reduce some data43<strong>VigorAP</strong> <strong>800</strong> User’s <strong>Guide</strong>
WEP Key EntryMethodtransfer performance.There are two types of key method: ASCII and Hex. When youselect a key format, the number of characters of key will bedisplayed. For example, if you select 64-bit as key length, andHex as key format, you’ll see the message at the right of KeyFormat is ‘Hex (10 characters) which means the length of WEPkey is 10 characters.WEP Keys (Key 1 – Key4)Default KeyInput WEP key characters here, the number of characters mustbe the same as the number displayed at Key Format field. Youcan use any alphanumerical characters (0-9, a-z, and A-Z) if youselect ASCII key format, and if you select Hex as key format,you can use characters 0-9, a-f, and A-F. You must enter at leastone encryption key here. If you entered multiple WEP keys,they should not be the same with each other.You can set up to four sets of WEP key, and you can decidewhich key is being used as default here. If you don’t knowwhich one you should use, select ‘Key 1’.Below shows an example for a wireless profile created.<strong>VigorAP</strong> <strong>800</strong> User’s <strong>Guide</strong> 44
3.5.2 Site SurveyThe page will list the access points nearby as <strong>VigorAP</strong><strong>800</strong> is set to Station mode. You canselect one of the access points to associate.SSIDBSSIDRSSIChannelEncryptionAuthenticationConnectScanAdd ProfileDisplay the SSID name of the access point.Display the BSSID (MAC Address) of the access point.Display the signal strength of the access point. RSSI is theabbreviation of Receive Signal Strength Indication.Display the channel number of the access point.Display the encryption setting of the access points. If you haveselected the access point with security setting, you have to go to2-7 Wireless Security to set the same security with the accesspoint you want to associate.Display the authentication type of the access point.Connect to the wireless AP that you choose.Search the stations connected to such access point.The system will add a profile automatically for you to connectwith the wireless AP that you choose.3.5.3 StatisticsThis page displays the statistics for data transmission and receiving between the access pointand the stations.45<strong>VigorAP</strong> <strong>800</strong> User’s <strong>Guide</strong>
Click Rest Counters if required.3.5.4 WPS (Wi-Fi Protected Setup)Wi-Fi Protected Setup (WPS) is the simplest way to build connection between wirelessnetwork clients and the access point. You don’t have to select encryption mode and input along encryption passphrase every time when you need to setup a wireless client. You onlyhave to press a button on wireless client and the access point, and the WPS will do the setupfor you.<strong>VigorAP</strong><strong>800</strong> supports two types of WPS: Push-Button Configuration (PBC), and PIN code.If you want to use PBC, you have to switch <strong>VigorAP</strong><strong>800</strong> to WPS mode and push a specificbutton on the wireless client to start WPS mode. You can push Reset/WPS button of this<strong>VigorAP</strong><strong>800</strong>, or click PBC Start button in the web configuration interface to do this; if youwant to use PIN code, you have to provide the PIN code of the wireless client you wish toconnect to this access point and then switch the wireless client to WPS mode.Note: WPS function of <strong>VigorAP</strong><strong>800</strong> will not work for those wireless AP/clients do notsupport WPS.To use WPS function to set encrypted connection between <strong>VigorAP</strong><strong>800</strong> and WPS-enabledwireless AP, please open Wireless LAN >>WPS. The following information will bedisplayed:SSIDBSSIDRSSICh. (Channel)Auth. (Authentication)Encrypt (Encryption)Ver. (Version)Display the SSID name of the access point.Display the BSSID (MAC Address) of the access point.Display the signal strength of the access point. RSSI is theabbreviation of Receive Signal Strength Indication.Display the channel number of the access point.Display the authentication type of the access point.Display the encryption setting of the access points. If you haveselected the access point with security setting, you have to go to2-7 Wireless Security to set the same security with the accesspoint you want to associate.Display the version of WPS.<strong>VigorAP</strong> <strong>800</strong> User’s <strong>Guide</strong> 46
StatusRefreshStart PBCPIN StartRenew PINDisplay the status of WPS access point.Click this button to refresh the AP site survey.Click Start PBC to make a WPS connection within 2 minutes.When using PinCode method, it is required to enter PIN Code(Personal Identification Number Code, 8-digit numbers) intoRegistrar. When the wireless station is Enrollee, the users canuse Renew PIN to re-generate a new PIN code.Click this button to re-generate a new PIN code.Note: When you’re using PBC type WPS setup, you must press PBC button (hardware orsoftware) of wireless client within 2 minutes. If you didn’t press PBC button of wirelessclient within this time period, please press PBC button (hardware or software) of thisaccess point again.47<strong>VigorAP</strong> <strong>800</strong> User’s <strong>Guide</strong>
3.6 Wireless LAN Settings for AP Bridge-Point to Point/APBridge-Point to Multi-Point ModeWhen you choose AP Bridge-Point to Point or Point-to Multi-Point Mode as the operationmode, the Wireless LAN menu items will include General Setup, AP Discovery and WDSAP Status.AP Bridge-Point to Point allows <strong>VigorAP</strong> <strong>800</strong> to connect to another <strong>VigorAP</strong> <strong>800</strong> whichuses the same mode. All wired Ethernet clients of both <strong>VigorAP</strong> <strong>800</strong>s will be connectedtogether.Point-to Multi-Point Mode allows AP <strong>800</strong> to connect up to four AP <strong>800</strong>s which uses thesame mode. All wired Ethernet clients of every <strong>VigorAP</strong> <strong>800</strong> will be connected together.3.6.1 General SetupBy clicking the General Setup, a new web page will appear so that you could configure thePhy mode, security, Tx Burst and choose proper mode. Please refer to the following figurefor more information.<strong>VigorAP</strong> <strong>800</strong> User’s <strong>Guide</strong> 48
Enable Wireless LANModeCheck the box to enable wireless function.At present, <strong>VigorAP</strong> <strong>800</strong> can connect to 11b only, 11g only, 11nonly, Mixed (11b+11g) and Mixed (11b+11g+11n) stationssimultaneously. Simply choose Mixed (11b+11g+11n) mode.ChannelMeans the channel of frequency of the wireless LAN. Thedefault channel is 11. You may switch channel if the selectedchannel is under serious interference. If you have no idea ofchoosing the frequency, please select AutoSelect to let systemdetermine for you.Extension ChannelRateWith 802.11n, there is one option to double the bandwidth perchannel. The available extension channel options will be variedaccording to the Channel selected above.If you choose 11g Only, 11b Only or 11n Only, such feature willbe available for you to set data transmission rate.Phy ModeSelect CCK (11b mode), OFDM (11g mode), or HTMIX(11b/g/n mixed mode) from the drop down menu for the accesspoint that <strong>VigorAP</strong> <strong>800</strong> wants to connect. Each access point49<strong>VigorAP</strong> <strong>800</strong> User’s <strong>Guide</strong>
should be setup to the same Phy mode for connecting with eachother.SecurityPeer Mac AddressPacket-OVERDRIVESelect WEP, TKIP or AES as the encryption algorithm. Type thekey number if required.Type the peer MAC address for the access point that <strong>VigorAP</strong><strong>800</strong> connects to.This feature can enhance the performance in data transmissionabout 40%* more (by checking Tx Burst). It is active only whenboth sides of Access Point and Station (in wireless client) invokethis function at the same time. That is, the wireless client mustsupport this feature and invoke the function, too.Note: Vigor N61 wireless adapter supports this function.Therefore, you can use and install it into your PC for matchingwith Packet-OVERDRIVE (refer to the following picture ofVigor N61 wireless utility window, choose Enable forTxBURST on the tab of Option).WMM CapableAntennaTo apply WMM parameters for wireless data transmission,please click the Enable radio button.<strong>VigorAP</strong> <strong>800</strong> can be attached with two antennas to have gooddata transmission via wireless connection. However, if you haveonly one antenna attached, please choose 1T1R.Tx PowerThe default setting is the maximum (100%). Lower down thevalue may degrade range and throughput of wireless.<strong>VigorAP</strong> <strong>800</strong> User’s <strong>Guide</strong> 50
3.6.2 AP Discovery<strong>VigorAP</strong> <strong>800</strong> can scan all regulatory channels and find working APs in the neighborhood.Based on the scanning result, users will know which channel is clean for usage. Also, it canbe used to facilitate finding an AP for a WDS link. Notice that during the scanning process(about 5 seconds), no client is allowed to connect to <strong>VigorAP</strong> <strong>800</strong>.This page is used to scan the existence of the APs on the wireless LAN. Yet, only the APwhich is in the same channel of <strong>VigorAP</strong> <strong>800</strong> can be found. Please click Scan to discover allthe connected APs.SSID Display the SSID of the AP scanned by <strong>VigorAP</strong> <strong>800</strong>r.BSSID Display the MAC address of the AP scanned by <strong>VigorAP</strong> <strong>800</strong>.RSSIChannelEncryptionAuthenticationScanStatisticsAP’s MAC AddressAP’s SSIDAddDisplay the signal strength of the access point. RSSI is theabbreviation of Receive Signal Strength Indication.Display the wireless channel used for the AP that is scanned by<strong>VigorAP</strong> <strong>800</strong>.Display the encryption mode for the scanned AP.Display the authentication type that the scanned AP applied.It is used to discover all the connected AP. The results will beshown on the box above this buttonIt displays the statistics for the channels used by APs.If you want the found AP applying the WDS settings, pleasetype in the AP’s MAC address.To specify an AP to be applied with WDS settings, you canspecify MAC address or SSID for the AP. Here is the place thatyou can type the SSID of the AP.Click Bridge for the specified AP. Next, click Add. Later, theMAC address of the AP will be added and be shown on WDS51<strong>VigorAP</strong> <strong>800</strong> User’s <strong>Guide</strong>
3.6.3 WDS AP Statussettings page.<strong>VigorAP</strong> <strong>800</strong> can display the status such as MAC address, physical mode, power save andbandwidth for the working AP connected with WDS. Click Refresh to get the newestinformation.<strong>VigorAP</strong> <strong>800</strong> User’s <strong>Guide</strong> 52
3.7 Wireless LAN Settings for AP Bridge-WDS ModeWhen you choose AP Bridge-WDS as the operation mode, the Wireless LAN menu itemswill include General Setup, Security, Access Control, WPS, AP Discovery and Station List.3.7.1 General SetupBy clicking the General Setup, a new web page will appear so that you could configure thePhy mode, security, Tx Burst and choose proper mode. Please refer to the following figurefor more information.53<strong>VigorAP</strong> <strong>800</strong> User’s <strong>Guide</strong>
Enable Wireless LANModeCheck the box to enable wireless function.At present, <strong>VigorAP</strong> <strong>800</strong> can connect to 11b only, 11g only, 11nonly, Mixed (11b+11g) and Mixed (11b+11g+11n) stationssimultaneously. Simply choose Mixed (11b+11g+11n) mode.<strong>VigorAP</strong> <strong>800</strong> User’s <strong>Guide</strong> 54
Enable 2 Subnet(Simulate 2 APs)Hide SSIDSSIDSubnetIsolate LANIsolate MemberVLAN IDMac CloneChannelCheck the box to enable the function for two independentsubnets. Once you enable this function, LAN-A and LAN-Bwould be independent. Next, you can connect one router inLAN-A, and another router in LAN-B. Such mechanism canmake you feeling that you have two independent AP/subnetfunctions in one <strong>VigorAP</strong> <strong>800</strong>.If you disable this function, LAN-A and LAN-B ports are in thesame domain. You could only connect one router (no matterconnecting to LAN-A or LAN-B) in this environment.Check it to prevent from wireless sniffing and make it harder forunauthorized clients or STAs to join your wireless LAN.Depending on the wireless utility, the user may only see theinformation except SSID or just cannot see any thing about<strong>VigorAP</strong> <strong>800</strong> while site surveying. The system allows you to setthree sets of SSID for different usage.Set a name for <strong>VigorAP</strong> <strong>800</strong> to be identified. Default settingsare DrayTek-LAN-A and DrayTek-LAN-B. When Enable 2Subnet is enabled, you can specify subnet interface (LAN-A orLAN-B) for each SSID by using the drop down menu.Choose LAN-A or LAN-B for each SSID.Check this box to make the wireless clients (stations) with thesame SSID not accessing for wired PC in LAN.Check this box to make the wireless clients (stations) with thesame SSID not accessing for each other.Type the value for such SSID. Packets transferred from suchSSID to LAN will be tagged with the number.If your network uses VLANs, you can assign the SSID to aVLAN on your network. Client devices that associate using theSSID are grouped into this VLAN. The VLAN ID range is from3 to 4095. The VLAN ID is 0 by default, it means disabling theVLAN function for the SSID.Check this box and manually enter the MAC address of thedevice with SSID 1. The MAC address of other SSIDs willchange based on this MAC address.Means the channel of frequency of the wireless LAN. Thedefault channel is 6. You may switch channel if the selectedchannel is under serious interference. If you have no idea ofchoosing the frequency, please select AutoSelect to let systemdetermine for you.55<strong>VigorAP</strong> <strong>800</strong> User’s <strong>Guide</strong>
Extension ChannelRateWith 802.11n, there is one option to double the bandwidth perchannel. The available extension channel options will be variedaccording to the Channel selected above.If you choose 11g Only, 11b Only or 11n Only, such featurewill be available for you to set data transmission rate.Phy ModeThere are three types of transmission rates developed bydifferent techniques for Phy Mode. Data will be transmitted viacommunication channel.SubnetSecurityPeer Mac AddressPacket-OVERDRIVEChoose LAN-A or LAN-B for each SSID.Select WEP, TKIP or AES as the encryption algorithm.Four peer MAC addresses are allowed to be entered in this pageat one time.This feature can enhance the performance in data transmissionabout 40%* more (by checking Tx Burst). It is active onlywhen both sides of Access Point and Station (in wireless client)invoke this function at the same time. That is, the wireless clientmust support this feature and invoke the function, too.Note: Vigor N61 wireless adapter supports this function.Therefore, you can use and install it into your PC for matchingwith Packet-OVERDRIVE (refer to the following picture ofVigor N61 wireless utility window, choose Enable forTxBURST on the tab of Option).<strong>VigorAP</strong> <strong>800</strong> User’s <strong>Guide</strong> 56
WMM CapableAntennaTo apply WMM parameters for wireless data transmission,please click the Enable radio button.<strong>VigorAP</strong> <strong>800</strong> can be attached with two antennas to have gooddata transmission via wireless connection. However, if you haveonly one antenna attached, please choose 1T1R.Tx PowerThe default setting is the maximum (100%). Lower down thevalue may degrade range and throughput of wireless.57<strong>VigorAP</strong> <strong>800</strong> User’s <strong>Guide</strong>
3.7.2 SecurityThis page allows you to set security with different modes for SSID 1, 2, 3 and 4 respectively.After configuring the correct settings, please click OK to save and invoke it.By clicking the Security Settings, a new web page will appear so that you could configurethe settings.ModeThere are several modes provided for you to choose.Disable - The encryption mechanism is turned off.WEP - Accepts only WEP clients and the encryption key shouldbe entered in WEP Key.WPA/PSK or WPA2/PSK or Mixed (WPA+WPA2)/PSK -Accepts only WPA clients and the encryption key should beentered in PSK. The WPA encrypts each frame transmitted fromthe radio using the key, which either PSK (Pre-Shared Key)entered manually in this field below or automatically negotiatedvia 802.1x authentication.WEP/802.1x - The built-in RADIUS client feature enables<strong>VigorAP</strong> <strong>800</strong> to assist the remote dial-in user or a wirelessstation and the RADIUS server in performing mutual<strong>VigorAP</strong> <strong>800</strong> User’s <strong>Guide</strong> 58
WPA Algorithmsauthentication. It enables centralized remote accessauthentication for network management.The WPA encrypts each frame transmitted from the radio usingthe key, which either PSK (Pre-Shared Key) entered manuallyin this field below or automatically negotiated via 802.1xauthentication. Select WPA, WPA2 or Auto as WPA mode.WPA/802.1x - The WPA encrypts each frame transmitted fromthe radio using the key, which either PSK (Pre-Shared Key)entered manually in this field below or automatically negotiatedvia 802.1x authentication.WPA2/802.1x - The WPA encrypts each frame transmittedfrom the radio using the key, which either PSK (Pre-SharedKey) entered manually in this field below or automaticallynegotiated via 802.1x authentication.Select TKIP, AES or TKIP/AES as the algorithm for WPA. Suchfeature is available for WPA2/802.1x, WPA/802.1x,WPA/PSK or WPA2/PSK or Mixed (WPA+WPA2)/PSKmode.Pass Phrase Either 8~63 ASCII characters, such as 012345678..(or 64Hexadecimal digits leading by 0x, such as "0x321253abcde...").Such feature is available for WPA/PSK or WPA2/PSK orMixed (WPA+WPA2)/PSK mode.Key Renewal IntervalPMK Cache PeriodPre-AuthenticationKey 1 – Key 4WPA uses shared key for authentication to the network.However, normal network operations use a different encryptionkey that is randomly generated. This randomly generated keythat is periodically replaced. Enter the renewal security time(seconds) in the column. Smaller interval leads to greatersecurity but lower performance. Default is 3600 seconds. Set 0to disable re-key. Such feature is available forWPA2/802.1,WPA/802.1x, WPA/PSK or WPA2/PSK orMixed (WPA+WPA2)/PSK mode.Set the expire time of WPA2 PMK (Pairwise master key) cache.PMK Cache manages the list from the BSSIDs in the associatedSSID with which it has pre-authenticated. Such feature isavailable for WPA2/802.1 mode.Enables a station to authenticate to multiple APs for roamingsecurer and faster. With the pre-authentication proceduredefined in IEEE 802.11i specification, thepre-four-way-handshake can reduce handoff delay perceivableby a mobile node. It makes roaming faster and more secure.(Only valid in WPA2)Enable - Enable IEEE 802.1X Pre-Authentication.Disable - Disable IEEE 802.1X Pre-Authentication.Four keys can be entered here, but only one key can be selectedat a time. The format of WEP Key is restricted to 5 ASCIIcharacters or 10 hexadecimal values in 64-bit encryption level,or restricted to 13 ASCII characters or 26 hexadecimal values in128-bit encryption level. The allowed content is the ASCIIcharacters from 33(!) to 126(~) except '#' and ','. Such feature is59<strong>VigorAP</strong> <strong>800</strong> User’s <strong>Guide</strong>
available for WEP mode.802.1x WEP Disable - Disable the WEP Encryption. Data sent to the AP willnot be encrypted.Enable - Enable the WEP Encryption.Such feature is available for WEP/802.1x mode.Click the link of RADIUS Server to access into the following page for more settings.Use internal RADIUSServerIP AddressPortShared SecretSession TimeoutThere is a RADIUS server built in <strong>VigorAP</strong> <strong>800</strong> which is usedto authenticate the wireless client connecting to the accesspoint. Check this box to use the internal RADIUS server forwireless security.Besides, if you want to use the external RADIUS server forauthentication, do not check this box.Please refer to the section, 3.10 RADIUS Server to configuresettings for internal server of <strong>VigorAP</strong> <strong>800</strong>.Enter the IP address of external RADIUS server.The UDP port number that the external RADIUS server isusing. The default value is 1812, based on RFC 2138.The external RADIUS server and client share a secret that isused to authenticate the messages sent between them. Bothsides must be configured to use the same shared secret.Set the maximum time of service provided beforere-authentication. Set to zero to perform another authenticationimmediately after the first authentication has successfullycompleted. (The unit is second.)3.7.3 Access ControlFor additional security of wireless access, the Access Control facility allows you to restrictthe network access right by controlling the wireless LAN MAC address of client. Only thevalid MAC address that has been configured can access the wireless LAN interface. Byclicking the Access Control, a new web page will appear, as depicted below, so that youcould edit the clients' MAC addresses to control their access rights (deny or allow).<strong>VigorAP</strong> <strong>800</strong> User’s <strong>Guide</strong> 60
PolicySelect to enable any one of the following policy or disable thepolicy. Choose Activate MAC address filter to type in theMAC addresses for other clients in the network manually.Choose Blocked WLAN from LAN will separate all theWLAN stations from LAN based on the MAC Address list.MAC Address FilterClient’s MAC AddressAddDeleteEditCancelOKCancelDisplay all MAC addresses that are edited before.Manually enter the MAC address of wireless client.Add a new MAC address into the list.Delete the selected MAC address in the list.Edit the selected MAC address in the list.Give up the access control set up.Click it to save the access control list.Clean all entries in the MAC address list.61<strong>VigorAP</strong> <strong>800</strong> User’s <strong>Guide</strong>
3.7.4 WPSOpen Wireless LAN>>WPS to configure the corresponding settings.Enable WPSWPS ConfiguredWPS SSIDWPS Auth ModeWPS Encryp TypeAP PINConfigure via PushButtonConfigure via ClientPinCodeCheck this box to enable WPS setting.Display related system information for WPS. If the wirelesssecurity (encryption) function of <strong>VigorAP</strong> <strong>800</strong> is properlyconfigured, you can see ‘Yes’ message here.Display current selected SSID.Display current authentication mode of <strong>VigorAP</strong> <strong>800</strong>. OnlyWPA2/PSK and WPA/PSK support WPS.Display encryption mode (None, WEP, TKIP, AES, etc.) of<strong>VigorAP</strong> <strong>800</strong>.The number displayed here is used for remote client entering theregistrar’s PIN code in remote station to make a networkconnection.Click Start PBC to make a WPS connection within 2 minutes.When using PinCode method, it is required to enter PIN Code(Personal Identification Number Code, 8-digit numbers) intoRegistrar.3.7.5 AP Discovery<strong>VigorAP</strong> <strong>800</strong> can scan all regulatory channels and find working APs in the neighborhood.Based on the scanning result, users will know which channel is clean for usage. Also, it canbe used to facilitate finding an AP for a WDS link. Notice that during the scanning process(about 5 seconds), no client is allowed to connect to Vigor.This page is used to scan the existence of the APs on the wireless LAN. Yet, only the APwhich is in the same channel of <strong>VigorAP</strong> <strong>800</strong> can be found. Please click Scan to discover allthe connected APs.<strong>VigorAP</strong> <strong>800</strong> User’s <strong>Guide</strong> 62
SSID Display the SSID of the AP scanned by <strong>VigorAP</strong> <strong>800</strong>.BSSID Display the MAC address of the AP scanned by <strong>VigorAP</strong> <strong>800</strong>.RSSIChannelEncryptionAuthenticationScanStatisticsAP’s MAC AddressAP’s SSIDAddDisplay the signal strength of the access point. RSSI is theabbreviation of Receive Signal Strength Indication.Display the wireless channel used for the AP that is scanned by<strong>VigorAP</strong> <strong>800</strong>.Display the encryption mode for the scanned AP.Display the authentication type that the scanned AP applied.It is used to discover all the connected AP. The results will beshown on the box above this buttonIt displays the statistics for the channels used by APs.If you want the found AP applying the WDS settings, pleasetype in the AP’s MAC address.To specify an AP to be applied with WDS settings, you canspecify MAC address or SSID for the AP. Here is the place thatyou can type the SSID of the AP.Click Repeater for the specified AP. Next, click Add. Later, theMAC address of the AP will be added and be shown on WDSsettings page.63<strong>VigorAP</strong> <strong>800</strong> User’s <strong>Guide</strong>
3.7.6 WDS AP Status<strong>VigorAP</strong> <strong>800</strong> can display the status such as MAC address, physical mode, power save andbandwidth for the working AP connected with WDS. Click Refresh to get the newestinformation.3.7.7 Station ListStation List provides the knowledge of connecting wireless clients now along with its statuscode.MAC AddressSSIDAuthEncryptRefreshAdd to Access ControlAddDisplay the MAC Address for the connecting client.Display the SSID that the wireless client connects to.Display the authentication that the wireless client uses forconnection with such AP.Display the encryption mode used by the wireless client.Click this button to refresh the status of station list.Client’s MAC Address - For additional security of wirelessaccess, the Access Control facility allows you to restrict thenetwork access right by controlling the wireless LAN MACaddress of client. Only the valid MAC address that has beenconfigured can access the wireless LAN interface.Click this button to add current typed MAC address into AccessControl.<strong>VigorAP</strong> <strong>800</strong> User’s <strong>Guide</strong> 64
3.8 Wireless LAN Settings for Universal Repeater ModeWhen you choose Universal Repeater as the operation mode, the Wireless LAN menu itemswill include General Setup, Security, WPS, AP Discovery, Universal Repeater and StationList.3.8.1 General SetupBy clicking the General Setup, a new web page will appear so that you could configure theSSID and the wireless channel.Please refer to the following figure for more information.65<strong>VigorAP</strong> <strong>800</strong> User’s <strong>Guide</strong>
Enable Wireless LANModeCheck the box to enable wireless function.At present, <strong>VigorAP</strong> <strong>800</strong> can connect to 11b only, 11g only, 11nonly, Mixed (11b+11g) and Mixed (11b+11g+11n) stationssimultaneously. Simply choose Mixed (11b+11g+11n) mode.Enable 2 Subnet(Simulate 2 APs)Check the box to enable the function for two independentsubnets. Once you enable this function, LAN-A and LAN-Bwould be independent. Next, you can connect one router inLAN-A, and another router in LAN-B. Such mechanism canmake you feeling that you have two independent AP/subnet<strong>VigorAP</strong> <strong>800</strong> User’s <strong>Guide</strong> 66
Hide SSIDSSIDSubnetIsolate LANIsolate MemberVLAN IDMac CloneChannelfunctions in one <strong>VigorAP</strong> <strong>800</strong>.If you disable this function, LAN-A and LAN-B ports are in thesame domain. You could only connect one router (no matterconnecting to LAN-A or LAN-B) in this environment.Check it to prevent from wireless sniffing and make it harder forunauthorized clients or STAs to join your wireless LAN.Depending on the wireless utility, the user may only see theinformation except SSID or just cannot see any thing about<strong>VigorAP</strong> <strong>800</strong> while site surveying. The system allows you to setthree sets of SSID for different usage.Set a name for <strong>VigorAP</strong> <strong>800</strong> to be identified. Default settingsare DrayTek-LAN-A and DrayTek-LAN-B. When Enable 2Subnet is enabled, you can specify subnet interface (LAN-A orLAN-B) for each SSID by using the drop down menu.Choose LAN-A or LAN-B for each SSID. If you chooseLAN-A, the wireless clients connecting to this SSID could onlycommunicate with LAN-A.Check this box to make the wireless clients (stations) with thesame SSID not accessing for wired PC in LAN.Note: If Isolate LAN is checked, do not type any value forVLAN ID.Check this box to make the wireless clients (stations) with thesame SSID not accessing for each other.Type the value for such SSID. Packets transferred from suchSSID to LAN will be tagged with the number.If your network uses VLANs, you can assign the SSID to aVLAN on your network. Client devices that associate using theSSID are grouped into this VLAN. The VLAN ID range is from3 to 4095. The VLAN ID is 0 by default, it means disabling theVLAN function for the SSID.Check this box and manually enter the MAC address of thedevice with SSID 1. The MAC address of other SSIDs willchange based on this MAC address.Means the channel of frequency of the wireless LAN. Thedefault channel is 6. You may switch channel if the selectedchannel is under serious interference. If you have no idea ofchoosing the frequency, please select AutoSelect to let systemdetermine for you.67<strong>VigorAP</strong> <strong>800</strong> User’s <strong>Guide</strong>
Extension ChannelRateWith 802.11n, there is one option to double the bandwidth perchannel. The available extension channel options will be variedaccording to the Channel selected above.If you choose 11g Only, 11b Only or 11n Only, such featurewill be available for you to set data transmission rate.Packet-OVERDRIVEThis feature can enhance the performance in data transmissionabout 40%* more (by checking Tx Burst). It is active onlywhen both sides of Access Point and Station (in wireless client)invoke this function at the same time. That is, the wireless clientmust support this feature and invoke the function, too.Note: Vigor N61 wireless adapter supports this function.Therefore, you can use and install it into your PC for matchingwith Packet-OVERDRIVE (refer to the following picture ofVigor N61 wireless utility window, choose Enable forTxBURST on the tab of Option).<strong>VigorAP</strong> <strong>800</strong> User’s <strong>Guide</strong> 68
WMM CapableAntennaTo apply WMM parameters for wireless data transmission,please click the Enable radio button.<strong>VigorAP</strong> <strong>800</strong> can be attached with two antennas to have gooddata transmission via wireless connection. However, if you haveonly one antenna attached, please choose 1T1R.Tx PowerThe default setting is the maximum (100%). Lower down thevalue may degrade range and throughput of wireless.3.8.2 SecurityThis page allows you to set security with different modes for SSID 1, 2, 3 and 4 respectively.After configuring the correct settings, please click OK to save and invoke it.By clicking the Security Settings, a new web page will appear so that you could configurethe settings.ModeThere are several modes provided for you to choose.69<strong>VigorAP</strong> <strong>800</strong> User’s <strong>Guide</strong>
WPA AlgorithmsDisable - The encryption mechanism is turned off.WEP - Accepts only WEP clients and the encryption key shouldbe entered in WEP Key.WPA/PSK or WPA2/PSK or Mixed (WPA+WPA2)/PSK -Accepts only WPA clients and the encryption key should beentered in PSK. The WPA encrypts each frame transmitted fromthe radio using the key, which either PSK (Pre-Shared Key)entered manually in this field below or automatically negotiatedvia 802.1x authentication.WEP/802.1x - The built-in RADIUS client feature enables<strong>VigorAP</strong> <strong>800</strong> to assist the remote dial-in user or a wirelessstation and the RADIUS server in performing mutualauthentication. It enables centralized remote accessauthentication for network management.The WPA encrypts each frame transmitted from the radio usingthe key, which either PSK (Pre-Shared Key) entered manuallyin this field below or automatically negotiated via 802.1xauthentication. Select WPA, WPA2 or Auto as WPA mode.WPA/802.1x - The WPA encrypts each frame transmitted fromthe radio using the key, which either PSK (Pre-Shared Key)entered manually in this field below or automatically negotiatedvia 802.1x authentication.WPA2/802.1x - The WPA encrypts each frame transmittedfrom the radio using the key, which either PSK (Pre-SharedKey) entered manually in this field below or automaticallynegotiated via 802.1x authentication.Select TKIP, AES or TKIP/AES as the algorithm for WPA. Suchfeature is available for WPA2/802.1x, WPA/802.1x,WPA/PSK or WPA2/PSK or Mixed (WPA+WPA2)/PSKmode.Pass Phrase Either 8~63 ASCII characters, such as 012345678..(or 64Hexadecimal digits leading by 0x, such as "0x321253abcde...").Such feature is available for WPA/PSK or WPA2/PSK orMixed (WPA+WPA2)/PSK mode.Key Renewal IntervalWPA uses shared key for authentication to the network.However, normal network operations use a different encryptionkey that is randomly generated. This randomly generated keythat is periodically replaced. Enter the renewal security time(seconds) in the column. Smaller interval leads to greatersecurity but lower performance. Default is 3600 seconds. Set 0to disable re-key. Such feature is available for<strong>VigorAP</strong> <strong>800</strong> User’s <strong>Guide</strong> 70
PMK Cache PeriodPre-AuthenticationKey 1 – Key 4WPA2/802.1,WPA/802.1x, WPA/PSK or WPA2/PSK orMixed (WPA+WPA2)/PSK mode.Set the expire time of WPA2 PMK (Pairwise master key) cache.PMK Cache manages the list from the BSSIDs in the associatedSSID with which it has pre-authenticated. Such feature isavailable for WPA2/802.1 mode.Enables a station to authenticate to multiple APs for roamingsecurer and faster. With the pre-authentication proceduredefined in IEEE 802.11i specification, thepre-four-way-handshake can reduce handoff delay perceivableby a mobile node. It makes roaming faster and more secure.(Only valid in WPA2)Enable - Enable IEEE 802.1X Pre-Authentication.Disable - Disable IEEE 802.1X Pre-Authentication.Four keys can be entered here, but only one key can be selectedat a time. The format of WEP Key is restricted to 5 ASCIIcharacters or 10 hexadecimal values in 64-bit encryption level,or restricted to 13 ASCII characters or 26 hexadecimal values in128-bit encryption level. The allowed content is the ASCIIcharacters from 33(!) to 126(~) except '#' and ','. Such feature isavailable for WEP mode.802.1x WEP Disable - Disable the WEP Encryption. Data sent to the AP willnot be encrypted.Enable - Enable the WEP Encryption.Such feature is available for WEP/802.1x mode.Click the link of RADIUS Server to access into the following page for more settings.Use internal RADIUSServerThere is a RADIUS server built in <strong>VigorAP</strong> <strong>800</strong> which is usedto authenticate the wireless client connecting to the accesspoint. Check this box to use the internal RADIUS server forwireless security.Besides, if you want to use the external RADIUS server forauthentication, do not check this box.Please refer to the section, 3.10 RADIUS Server to configuresettings for internal server of <strong>VigorAP</strong> <strong>800</strong>.71<strong>VigorAP</strong> <strong>800</strong> User’s <strong>Guide</strong>
IP AddressPortShared SecretSession TimeoutEnter the IP address of external RADIUS server.The UDP port number that the external RADIUS server isusing. The default value is 1812, based on RFC 2138.The external RADIUS server and client share a secret that isused to authenticate the messages sent between them. Bothsides must be configured to use the same shared secret.Set the maximum time of service provided beforere-authentication. Set to zero to perform another authenticationimmediately after the first authentication has successfullycompleted. (The unit is second.)<strong>VigorAP</strong> <strong>800</strong> User’s <strong>Guide</strong> 72
3.8.3 Access ControlFor additional security of wireless access, the Access Control facility allows you to restrictthe network access right by controlling the wireless LAN MAC address of client. Only thevalid MAC address that has been configured can access the wireless LAN interface. Byclicking the Access Control, a new web page will appear, as depicted below, so that youcould edit the clients' MAC addresses to control their access rights (deny or allow).PolicySelect to enable any one of the following policy or disable thepolicy. Choose Activate MAC address filter to type in theMAC addresses for other clients in the network manually.Choose Blocked WLAN from LAN will separate all theWLAN stations from LAN based on the MAC Address list.MAC Address FilterClient’s MAC AddressAddDeleteEditCancelOKCancelDisplay all MAC addresses that are edited before.Manually enter the MAC address of wireless client.Add a new MAC address into the list.Delete the selected MAC address in the list.Edit the selected MAC address in the list.Give up the access control set up.Click it to save the access control list.Clean all entries in the MAC address list.73<strong>VigorAP</strong> <strong>800</strong> User’s <strong>Guide</strong>
3.8.4 WPSOpen Wireless LAN>>WPS to configure the corresponding settings.Enable WPSWPS ConfiguredWPS SSIDWPS Auth ModeWPS Encryp TypeAP PINConfigure via PushButtonConfigure via ClientPinCodeCheck this box to enable WPS setting.Display related system information for WPS. If the wirelesssecurity (encryption) function of <strong>VigorAP</strong> <strong>800</strong> is properlyconfigured, you can see ‘Yes’ message here.Display current selected SSID.Display current authentication mode of <strong>VigorAP</strong> <strong>800</strong>. OnlyWPA2/PSK and WPA/PSK support WPS.Display encryption mode (None, WEP, TKIP, AES, etc.) of<strong>VigorAP</strong> <strong>800</strong>.The number displayed here is used for remote client entering theregistrar’s PIN code in remote station to make a networkconnection.Click Start PBC to invoke Push-Button style WPS setupprocedure. <strong>VigorAP</strong> <strong>800</strong> will wait for WPS requests fromwireless clients about two minutes. The WPS LED on t<strong>VigorAP</strong> <strong>800</strong> will blink fast when WPS is in progress. It willreturn to normal condition after two minutes. (You need to setupWPS within two minutes)Type the PIN code specified in wireless client you wish toconnect, and click Start PIN button. The WLAN LED on<strong>VigorAP</strong> <strong>800</strong> will blink fast when WPS is in progress. It willreturn to normal condition after two minutes. (You need to setupWPS within two minutes).<strong>VigorAP</strong> <strong>800</strong> User’s <strong>Guide</strong> 74
3.8.5 AP Discovery<strong>VigorAP</strong> <strong>800</strong> can scan all regulatory channels and find working APs in the neighborhood.Based on the scanning result, users will know which channel is clean for usage. Also, it canbe used to facilitate finding an AP for a WDS link. Notice that during the scanning process(about 5 seconds), no client is allowed to connect to Vigor.This page is used to scan the existence of the APs on the wireless LAN. Yet, only the APwhich is in the same channel of <strong>VigorAP</strong> <strong>800</strong> can be found. Please click Scan to discover allthe connected APs.SSID Display the SSID of the AP scanned by <strong>VigorAP</strong> <strong>800</strong>.BSSID Display the MAC address of the AP scanned by <strong>VigorAP</strong> <strong>800</strong>.RSSIDisplay the signal strength of the access point. RSSI is theabbreviation of Receive Signal Strength Indication.ChannelEncryptionAuthenticationScanStatisticsAP’s MAC AddressAP’s SSIDSelect as UniversalRepeaterDisplay the wireless channel used for the AP that is scanned by<strong>VigorAP</strong> <strong>800</strong>.Display the encryption mode for the scanned AP.Display the authentication type that the scanned AP applied.It is used to discover all the connected AP. The results will beshown on the box above this button.It displays the statistics for the channels used by APs.It displays the MAC address of the AP you selected.It displays the SSID of the AP you selected.In Universal Repeater mode, WAN would work as stationmode and the wireless AP can be selected as a universalrepeater. Choose one of the wireless APs from the Scan list.75<strong>VigorAP</strong> <strong>800</strong> User’s <strong>Guide</strong>
3.8.6 Universal RepeaterThe access point can act as a wireless repeater; it can be Station and AP at the same time. Itcan use Station function to connect to a Root AP and use AP function to serve all wirelessstations within its coverage.Note: While using Universal Repeater mode, the access point will demodulate thereceived signal. Please check if this signal is noise for the operating network, then havethe signal modulated and amplified again. The output power of this mode is the same asthat of WDS and normal AP mode.SSIDMAC Address(Optional)ChannelSecurity ModeSet the name of access point that <strong>VigorAP</strong><strong>800</strong> wants to connectto.Type the MAC address of access point that <strong>VigorAP</strong><strong>800</strong> wantsto connect to.Means the channel of frequency of the wireless LAN. Thedefault channel is 6. You may switch channel if the selectedchannel is under serious interference. If you have no idea ofchoosing the frequency, please select AutoSelect to let systemdetermine for you.There are several modes provided for you to choose. Each modewill bring up different parameters (e.g., WEP keys, Pass Phrase)for you to configure.<strong>VigorAP</strong> <strong>800</strong> User’s <strong>Guide</strong> 76
Open / Shared ModeEncryption TypeWEP KeysChoose None to disable the WEP Encryption. Data sent to theAP will not be encrypted. To enable WEP encryption for datatransmission, please choose WEP.Four keys can be entered here, but only one key can be selectedat a time. The format of WEP Key is restricted to 5 ASCIIcharacters or 10 hexadecimal values in 64-bit encryption level,or restricted to 13 ASCII characters or 26 hexadecimal values in128-bit encryption level. The allowed content is the ASCIIcharacters from 33(!) to 126(~) except '#' and ','.WPA/PSK Mode and WPA2/PSK ModeEncryption TypeSelect TKIP or AES as the algorithm for WPA.Pass Phrase Either 8~63 ASCII characters, such as 012345678 (or 64Hexadecimal digits leading by 0x, such as "0x321253abcde...").77<strong>VigorAP</strong> <strong>800</strong> User’s <strong>Guide</strong>
3.8.7 Station ListStation List provides the knowledge of connecting wireless clients now along with its statuscode.MAC AddressSSIDAuthEncryptRefreshAdd to Access ControlAddDisplay the MAC Address for the connecting client.Display the SSID that the wireless client connects to.Display the authentication that the wireless client uses forconnection with such AP.Display the encryption mode used by the wireless client.Click this button to refresh the status of station list.Client’s MAC Address - For additional security of wirelessaccess, the Access Control facility allows you to restrict thenetwork access right by controlling the wireless LAN MACaddress of client. Only the valid MAC address that has beenconfigured can access the wireless LAN interface.Click this button to add current typed MAC address intoAccess Control.<strong>VigorAP</strong> <strong>800</strong> User’s <strong>Guide</strong> 78
3.9 Wireless LAN (5G) Settings for AP ModeWhen a 5G Dongle connects to <strong>VigorAP</strong> <strong>800</strong>, only AP mode (the operation mode) isavailable for configuration. The AP mode allows wireless clients to connect to access pointand exchange data with the devices connected to the wired network.If no 5G dongle connected to <strong>VigorAP</strong> <strong>800</strong>, an error message will be displayed and nofunction in this menu can be activated.3.9.1 General SetupBy clicking the General Setup, a new web page will appear so that you could configure thegeneral settings for wireless connection such as specifying SSID, selecting the wirelesschannel, isolate LAN connection and so on.Enable Wireless LANModeCheck the box to enable wireless function.At present, <strong>VigorAP</strong> <strong>800</strong> can be connected by 11a only, 11n only(5G), Mixed (11a+11n) stations simultaneously. Simply chooseMixed (11a+11n) mode.Enable 2 Subnet(Simulate 2 APs)Check the box to enable the function for two independent subnets.Once you enable this function, LAN-A and LAN-B would beindependent. Next, you can connect one router in LAN-A, andanother router in LAN-B. Such mechanism can make you feeling79<strong>VigorAP</strong> <strong>800</strong> User’s <strong>Guide</strong>
Hide SSIDSSIDIsolate LANIsolate MemberVLAN IDChannelExtension Channelthat you have two independent AP/subnet functions in one<strong>VigorAP</strong> <strong>800</strong>.If you disable this function, LAN-A and LAN-B ports are in thesame domain. You could only connect one router (no matterconnecting to LAN-A or LAN-B) in this environment.Check it to prevent from wireless sniffing and make it harder forunauthorized clients or STAs to join your wireless LAN.Depending on the wireless utility, the user may only see theinformation except SSID or just cannot see any thing about<strong>VigorAP</strong> <strong>800</strong> while site surveying. The system allows you to setthree sets of SSID for different usage.Set a name for <strong>VigorAP</strong> <strong>800</strong> to be identified. Default settings areDrayTek-LAN-A and DrayTek-LAN-B. When Enable 2 Subnetis enabled, you can specify subnet interface (LAN-A or LAN-B)for each SSID by using the drop down menu.Check this box to make the wireless clients (stations) with thesame SSID not accessing for wired PC in LAN.Note: If Isolate LAN is checked, do not type any value forVLAN ID.Check this box to make the wireless clients (stations) with thesame SSID not accessing for each other.Type the value for such SSID. Packets transferred from suchSSID to LAN will be tagged with the number.If your network uses VLANs, you can assign the SSID to aVLAN on your network. Client devices that associate using theSSID are grouped into this VLAN. The VLAN ID range is from 3to 4095. The VLAN ID is 0 by default, it means disabling theVLAN function for the SSID.Means the channel of frequency of the wireless LAN. The defaultchannel is 36. You may switch channel if the selected channel isunder serious interference. If you have no idea of choosing thefrequency, please select AutoSelect to let system determine foryou.With 802.11n, there is one option to double the bandwidth perchannel. The available extension channel options will be variedaccording to the Channel selected above.3.9.2 SecurityThis page allows you to set security with different modes for SSID 1, 2, and 3 respectively.After configuring the correct settings, please click OK to save and invoke it.By clicking the Security Settings, a new web page will appear so that you could configurethe settings.<strong>VigorAP</strong> <strong>800</strong> User’s <strong>Guide</strong> 80
ModeThere are several modes provided for you to choose.Disable - The encryption mechanism is turned off.WEP - Accepts only WEP clients and the encryption keyshould be entered in WEP Key.WPA/PSK or WPA2/PSK or Mixed (WPA+WPA2)/PSK -Accepts only WPA clients and the encryption key should beentered in PSK. The WPA encrypts each frame transmitted fromthe radio using the key, which either PSK (Pre-Shared Key)entered manually in this field below or automatically negotiatedvia 802.1x authentication.WEP/802.1x - The built-in RADIUS client feature enables<strong>VigorAP</strong> <strong>800</strong> to assist the remote dial-in user or a wirelessstation and the RADIUS server in performing mutualauthentication. It enables centralized remote accessauthentication for network management.The WPA encrypts each frame transmitted from the radio usingthe key, which either PSK (Pre-Shared Key) entered manuallyin this field below or automatically negotiated via 802.1xauthentication. Select WPA, WPA2 or Auto as WPA mode.81<strong>VigorAP</strong> <strong>800</strong> User’s <strong>Guide</strong>
WPA AlgorithmsWPA/802.1x - The WPA encrypts each frame transmitted fromthe radio using the key, which either PSK (Pre-Shared Key)entered manually in this field below or automatically negotiatedvia 802.1x authentication.WPA2/802.1x - The WPA encrypts each frame transmittedfrom the radio using the key, which either PSK (Pre-SharedKey) entered manually in this field below or automaticallynegotiated via 802.1x authentication.Select TKIP, AES or TKIP/AES as the algorithm for WPA. Suchfeature is available for WPA2/802.1x, WPA/802.1x,WPA/PSK or WPA2/PSK or Mixed (WPA+WPA2)/PSKmode.Pass Phrase Either 8~63 ASCII characters, such as 012345678..(or 64Hexadecimal digits leading by 0x, such as "0x321253abcde...").Such feature is available for WPA/PSK or WPA2/PSK orMixed (WPA+WPA2)/PSK mode.Key Renewal IntervalPMK Cache PeriodPre-AuthenticationKey 1 – Key 4WPA uses shared key for authentication to the network.However, normal network operations use a different encryptionkey that is randomly generated. This randomly generated keythat is periodically replaced. Enter the renewal security time(seconds) in the column. Smaller interval leads to greatersecurity but lower performance. Default is 3600 seconds. Set 0to disable re-key. Such feature is available forWPA2/802.1,WPA/802.1x, WPA/PSK or WPA2/PSK orMixed (WPA+WPA2)/PSK mode.Set the expire time of WPA2 PMK (Pairwise master key) cache.PMK Cache manages the list from the BSSIDs in the associatedSSID with which it has pre-authenticated. Such feature isavailable for WPA2/802.1 mode.Enables a station to authenticate to multiple APs for roamingsecurer and faster. With the pre-authentication proceduredefined in IEEE 802.11i specification, thepre-four-way-handshake can reduce handoff delay perceivableby a mobile node. It makes roaming faster and more secure.(Only valid in WPA2)Enable - Enable IEEE 802.1X Pre-Authentication.Disable - Disable IEEE 802.1X Pre-Authentication.Four keys can be entered here, but only one key can be selectedat a time. The format of WEP Key is restricted to 5 ASCIIcharacters or 10 hexadecimal values in 64-bit encryption level,or restricted to 13 ASCII characters or 26 hexadecimal values in128-bit encryption level. The allowed content is the ASCIIcharacters from 33(!) to 126(~) except '#' and ','. Such feature isavailable for WEP mode.802.1x WEP Disable - Disable the WEP Encryption. Data sent to the AP willnot be encrypted.<strong>VigorAP</strong> <strong>800</strong> User’s <strong>Guide</strong> 82
Enable - Enable the WEP Encryption.Such feature is available for WEP/802.1x mode.Click the link of RADIUS Server to access into the following page for more settings.Use internal RADIUSServerIP AddressPortShared SecretSession TimeoutThere is a RADIUS server built in <strong>VigorAP</strong> <strong>800</strong> which is usedto authenticate the wireless client connecting to the accesspoint. Check this box to use the internal RADIUS server forwireless security.Besides, if you want to use the external RADIUS server forauthentication, do not check this box.Please refer to the section, 3.10 RADIUS Server to configuresettings for internal server of <strong>VigorAP</strong> <strong>800</strong>.Enter the IP address of external RADIUS server.The UDP port number that the external RADIUS server isusing. The default value is 1812, based on RFC 2138.The external RADIUS server and client share a secret that isused to authenticate the messages sent between them. Bothsides must be configured to use the same shared secret.Set the maximum time of service provided beforere-authentication. Set to zero to perform another authenticationimmediately after the first authentication has successfullycompleted. (The unit is second.)3.9.3 Access ControlFor additional security of wireless access, the Access Control facility allows you to restrictthe network access right by controlling the wireless LAN MAC address of client. Only thevalid MAC address that has been configured can access the wireless LAN interface. Byclicking the Access Control, a new web page will appear, as depicted below, so that youcould edit the clients' MAC addresses to control their access rights (deny or allow).83<strong>VigorAP</strong> <strong>800</strong> User’s <strong>Guide</strong>
PolicySelect to enable any one of the following policy or disable thepolicy. Choose Activate MAC address filter to type in theMAC addresses for other clients in the network manually.Choose Blocked WLAN from LAN will separate all theWLAN stations from LAN based on the MAC Address list.MAC Address FilterClient’s MAC AddressAddDeleteEditCancelOKCancelDisplay all MAC addresses that are edited before.Manually enter the MAC address of wireless client.Add a new MAC address into the list.Delete the selected MAC address in the list.Edit the selected MAC address in the list.Give up the access control set up.Click it to save the access control list.Clean all entries in the MAC address list.3.9.4 AP Discovery<strong>VigorAP</strong> <strong>800</strong> can scan all regulatory channels and find working APs in the neighborhood.Based on the scanning result, users will know which channel is clean for usage. Also, it canbe used to facilitate finding an AP for a WDS link. Notice that during the scanning process(about 5 seconds), no client is allowed to connect to Vigor.This page is used to scan the existence of the APs on the wireless LAN. Yet, only the APwhich is in the same channel of <strong>VigorAP</strong> <strong>800</strong> can be found. Please click Scan to discover allthe connected APs.<strong>VigorAP</strong> <strong>800</strong> User’s <strong>Guide</strong> 84
SSID Display the SSID of the AP scanned by <strong>VigorAP</strong> <strong>800</strong>.BSSID Display the MAC address of the AP scanned by <strong>VigorAP</strong> <strong>800</strong>.RSSIChannelEncryptionAuthenticationScanDisplay the signal strength of the access point. RSSI is theabbreviation of Receive Signal Strength Indication.Display the wireless channel used for the AP that is scanned by<strong>VigorAP</strong> <strong>800</strong>.Display the encryption mode for the scanned AP.Display the authentication type that the scanned AP applied.It is used to discover all the connected AP. The results will beshown on the box above this button3.9.5 Station ListStation List provides the knowledge of connecting wireless clients now along with its statuscode.MAC AddressSSIDAuthEncryptRefreshDisplay the MAC Address for the connecting client.Display the SSID that the wireless client connects to.Display the authentication that the wireless client uses forconnection with such AP.Display the encryption mode used by the wireless client.Click this button to refresh the status of station list.85<strong>VigorAP</strong> <strong>800</strong> User’s <strong>Guide</strong>
Add to Access ControlAddClient’s MAC Address - For additional security of wirelessaccess, the Access Control facility allows you to restrict thenetwork access right by controlling the wireless LAN MACaddress of client. Only the valid MAC address that has beenconfigured can access the wireless LAN interface.Click this button to add current typed MAC address into AccessControl.<strong>VigorAP</strong> <strong>800</strong> User’s <strong>Guide</strong> 86
3.10 RADIUS Server<strong>VigorAP</strong> <strong>800</strong> offers a built-in RADIUS server to authenticate the wireless client that tries toconnect to <strong>VigorAP</strong> <strong>800</strong>. The AP can accept the wireless connection authenticationrequested by wireless clients.Enable RADIUS ServerUsers ProfileAuthentication ClientCheck it to enable the internal RADIUS server.Username – Type a new name for the user profile.Password – Type a new password for such new user profile.Confirm Password – Retype the password to confirm it.Add – Make a new user profile with the name and passwordspecified on the left boxes.Cancel – Clear current settings for user profile.Delete Selected – Delete the selected user profile (s).Delete All – Delete all of the user profiles.This internal RADIUS server of <strong>VigorAP</strong> <strong>800</strong> can be treatedas the external RADIUS server for other users. Specify theclient IP and secret key to make the wireless client choosing<strong>VigorAP</strong> <strong>800</strong> as its external RADUIS server.Client IP – Type the IP address for the user to beauthenticated by <strong>VigorAP</strong> <strong>800</strong> when the user tries to use<strong>VigorAP</strong> <strong>800</strong> as the external RADIUS server.Secret Key – Type the password for the user to beauthenticated by <strong>VigorAP</strong> <strong>800</strong> while the user tries to use<strong>VigorAP</strong> <strong>800</strong> as the external RADIUS server.Confirm Secrete Key – Type the password again forconfirmation.Add – Make a new client with IP and secrete key specifiedon the left boxes.87<strong>VigorAP</strong> <strong>800</strong> User’s <strong>Guide</strong>
Cancel – Clear current settings for the client.Delete Selected – Delete the selected client(s).Delete All – Delete all of the clients.3.11 System MaintenanceFor the system setup, there are several items that you have to know the way of configuration:Status, TR-069, Administrator Password, Configuration Backup, Syslog, Time setup, RebootSystem, Firmware Upgrade.Below shows the menu items for System Maintenance.3.11.1 System StatusThe System Status provides basic network settings of Vigor modem. It includes LAN andWAN interface information. Also, you could get the current running firmware version orfirmware related information from this presentation.Model NameFirmware VersionBuild Date/TimeSystem UptimeOperation ModeSystem -------Memory totalMemory leftLAN-------Display the model name of the modem.Display the firmware version of the modem.Display the date and time of the current firmware build.Display the period that such device connects to Internet.Display the operation mode that the device used.Display the total memory of your system.Display the remaining memory of your system.<strong>VigorAP</strong> <strong>800</strong> User’s <strong>Guide</strong> 88
MAC AddressIP AddressIP MaskWireless-------MAC AddressSSIDChannelDisplay the MAC address of the LAN Interface.Display the IP address of the LAN interface.Display the subnet mask address of the LAN interface.Display the MAC address of the WAN Interface.Display the SSID of the device.Display the channel that the station used for connecting withsuch device.3.11.2 TR-069This device supports TR-069 standard. It is very convenient for an administrator to manage aTR-069 device through an Auto Configuration Server, e.g., VigorACS SI.ACS ServerCPE SettingsURL/Username/Password – Such data must be typed accordingto the ACS (Auto Configuration Server) you want to link. Pleaserefer to Auto Configuration Server user’s manual for detailedinformation.Such information is useful for Auto Configuration Server (ACS).Enable– Check the box to allow the CPE Client to connect withAuto Configuration Server.89<strong>VigorAP</strong> <strong>800</strong> User’s <strong>Guide</strong>
Periodic InformSettingsSTUN SettingsOn – Choose the interface (LAN-A or LAN-B) for <strong>VigorAP</strong> <strong>800</strong>connecting to ACS server.Port – Sometimes, port conflict might be occurred. To solve suchproblem, you might change port number for CPE.The default setting is Enable. Please set interval time or scheduletime for the AP to send notification to CPE. Or click Disable toclose the mechanism of notification.Interval Time – Type the value for the interval time setting. Theunit is “second”.The default is Disable. If you click Enable, please type therelational settings listed below:Server Address – Type the IP address of the STUN server.Server Port – Type the port number of the STUN server.Minimum Keep Alive Period – If STUN is enabled, the CPEmust send binding request to the server for the purpose ofmaintaining the binding in the Gateway. Please type a number asthe minimum period. The default setting is “60 seconds”.Maximum Keep Alive Period – If STUN is enabled, the CPEmust send binding request to the server for the purpose ofmaintaining the binding in the Gateway. Please type a number asthe maximum period. A value of “-1” indicates that no maximumperiod is specified.3.11.3 Administrator PasswordThis page allows you to set new password.AccountPasswordType the name for accessing into Web User Interface.Type in new password in this filed.When you click OK, the login window will appear. Please use the new password to accessinto the web user interface again.<strong>VigorAP</strong> <strong>800</strong> User’s <strong>Guide</strong> 90
3.11.4 Configuration BackupBackup the ConfigurationFollow the steps below to backup your configuration.1. Go to System Maintenance >> Configuration Backup. The following windows willbe popped-up, as shown below.2. Click Backup button to get into the following dialog. Click Save button to openanother dialog for saving configuration as a file.3. In Save As dialog, the default filename is config.cfg. You could give it another nameby yourself.91<strong>VigorAP</strong> <strong>800</strong> User’s <strong>Guide</strong>
4. Click Save button, the configuration will download automatically to your computer as afile named config.cfg.The above example is using Windows platform for demonstrating examples. The Mac orLinux platform will appear different windows, but the backup function is still available.Note: Backup for Certification must be done independently. The Configuration Backupdoes not include information of Certificate.Restore Configuration1. Go to System Maintenance >> Configuration Backup. The following windows willbe popped-up, as shown below.2. Click Browse button to choose the correct configuration file for uploading to themodem.3. Click Restore button and wait for few seconds, the following picture will tell you thatthe restoration procedure is successful.3.11.5 Reboot SystemThe Web Configurator may be used to restart your modem. Click Reboot System fromSystem Maintenance to open the following page.If you want to reboot the modem using the current configuration, check Using currentconfiguration and click OK. To reset the modem settings to default values, check Usingfactory default configuration and click OK. The modem will take 5 seconds to reboot thesystem.Note: When the system pops up Reboot System web page after you configure web settings,please click OK to reboot your modem for ensuring normal operation and preventingunexpected errors of the modem in the future.<strong>VigorAP</strong> <strong>800</strong> User’s <strong>Guide</strong> 92
3.11.6 Firmware UpgradeBefore upgrading your modem firmware, you need to install the Modem Tools. TheFirmware Upgrade Utility is included in the tools. The following web page will guide youto upgrade firmware by using an example. Note that this example is running over WindowsOS (Operating System).Download the newest firmware from DrayTek's web site or <strong>FTP</strong> site. The DrayTek web siteis www.draytek.com (or local DrayTek's web site) and <strong>FTP</strong> site is ftp.draytek.com.Click System Maintenance>> Firmware Upgrade to launch the Firmware Upgrade Utility.3.12 DiagnosticsClick Browse to locate the newest firmware from your hard disk and click Upgrade.Diagnostic Tools provide a useful way to view or diagnose the status of your <strong>VigorAP</strong> <strong>800</strong>.At present, only System Log is offered.93<strong>VigorAP</strong> <strong>800</strong> User’s <strong>Guide</strong>
3.13 Support AreaWhen you click the menu item under Support Area, you will be guided to visitwww.draytek.com and open the corresponding pages directly.Click Support Area>>Application Note, the following web page will be displayed.Click Support Area>>FAQ, the following web page will be displayed.<strong>VigorAP</strong> <strong>800</strong> User’s <strong>Guide</strong> 94
Click Support Area>>Product Registration, the following web page will be displayed.95<strong>VigorAP</strong> <strong>800</strong> User’s <strong>Guide</strong>
This page is left blank.<strong>VigorAP</strong> <strong>800</strong> User’s <strong>Guide</strong> 96
Application andExamples4.1 Upgrade Firmware for Your ModemBefore upgrading your device firmware, you need to install the Router Tools. The fileRTSxxx.exe will be asked to copy onto your computer. Remember the place of storing theexecution file.1. Go to www.draytek.com.2. Access into Support >> Downloads. Please find out Firmware menu and click it.Search the model you have and click on it to download the newly update firmware foryour router.3. Access into Support >> Downloads. Please find out Utility menu and click it.4. Click on the link of Router Tools to download the file. After downloading the files,please decompressed the file onto your host.97<strong>VigorAP</strong> <strong>800</strong> User’s <strong>Guide</strong>
5. Double click on the icon of modem tool. The setup wizard will appear.6. Follow the onscreen instructions to install the tool. Finally, click Finish to end theinstallation.7. From the Start menu, open Programs and choose Modem Tools XXX >> FirmwareUpgrade Utility.8. Type in your modem IP, usually 192.168.1.2.9. Click the button to the right side of Firmware file typing box. Locate the files that youdownload from the company web sites. You will find out two files with differentextension names, xxxx.all (keep the old custom settings) and xxxx.rst (reset all thecustom settings to default settings). Choose any one of them that you need.<strong>VigorAP</strong> <strong>800</strong> User’s <strong>Guide</strong> 98
10. Click Send.11. Now the firmware update is finished.99<strong>VigorAP</strong> <strong>800</strong> User’s <strong>Guide</strong>
4.2 How to set different segments for different SSIDs in<strong>VigorAP</strong> <strong>800</strong><strong>VigorAP</strong> <strong>800</strong> supports two network segments, LAN-A and LAN-B for different SSIDs. Withsuch feature, the user can dispatch SSIDs with different network segments for reaching thetarget of managing wireless network. See the following figure.In the above figure, <strong>VigorAP</strong> <strong>800</strong> is used to control the wireless network connection. It canseparate the wireless traffic between accessing internal server and the usage of video.Wireless station connecting to <strong>VigorAP</strong> <strong>800</strong> with SSID 1 can get the IP address with thenetwork segment of 192.168.1.0/24 (LAN-A); wireless station connecting to <strong>VigorAP</strong><strong>800</strong>with SSID 2 can get the IP address with the same network segment of 192.168.2.0/24(LAN-B).LAN-B : 192.168.2.0/24 for internal serverLAN-A : 192.168.1.0/24 for video trafficBelow shows you how to configure the web page for <strong>VigorAP</strong> <strong>800</strong>:1. In the page of Operation Mode, click AP mode.<strong>VigorAP</strong> <strong>800</strong> User’s <strong>Guide</strong> 100
2. Open Wireless LAN >> General Setup. Choose the subnet LAN-A for SSID 1 andchoose LAN-B for SSID 2. Specify the wireless channel. Then, click OK to save theconfiguration.3. Open Wireless LAN >> Security Settings. Set the encryption method and set thepassword for SSID 1 and SSID 2 respectively.101<strong>VigorAP</strong> <strong>800</strong> User’s <strong>Guide</strong>
4. Open LAN>General Setup to configure the settings for enabling DHCP server onLAN-A/LAN-B. If there is a DHCP server configured in the same network segment,skip this step.5. After finishing the above settings, the wireless equipment connecting to <strong>VigorAP</strong> <strong>800</strong>with SSID 1 can get the IP address assigned by LAN-A 192.168.1.0/24 for accessingthe internal server. The wireless equipment connecting to <strong>VigorAP</strong> <strong>800</strong> with SSID 2can get the IP address assigned by LAN-B 192.168.2.0/24 for using the video/audiouploading and downloading services.<strong>VigorAP</strong> <strong>800</strong> User’s <strong>Guide</strong> 102
Trouble ShootingThis section will guide you to solve abnormal situations if you cannot access into the Internetafter installing the modem and finishing the web configuration. Please follow sections belowto check your basic installation status stage by stage.• Checking if the hardware status is OK or not.• Checking if the network connection settings on your computer are OK or not.• Pinging the modem from your computer.• Checking if the ISP settings are OK or not.• Backing to factory default setting if necessary.If all above stages are done and the modem still cannot run normally, it is the time for you tocontact your dealer for advanced help.5.1 Checking If the Hardware Status Is OK or NotFollow the steps below to verify the hardware status.1. Check the power line and cable connections.Refer to “1.3 Hardware Installation” for details.2. Power on the modem. Make sure the POWER LED, ACT LED and LAN LED arebright.3. If not, it means that there is something wrong with the hardware status. Simply back to“1.3 Hardware Installation” to execute the hardware installation again. And then, tryagain.103<strong>VigorAP</strong> <strong>800</strong> User’s <strong>Guide</strong>
5.2 Checking If the Network Connection Settings on YourComputer Is OK or NotSometimes the link failure occurs due to the wrong network connection settings. After tryingthe above section, if the link is stilled failed, please do the steps listed below to make surethe network connection settings is OK.For WindowsThe example is based on Windows XP. As to the examples for other operationsystems, please refer to the similar steps or find support notes inwww.draytek.com.1. Go to Control Panel and then double-click on Network Connections.2. Right-click on Local Area Connection and click on Properties.3. Select Internet Protocol (TCP/IP) and then click Properties.<strong>VigorAP</strong> <strong>800</strong> User’s <strong>Guide</strong> 104
4. Select Obtain an IP address automatically and Obtain DNS server addressautomatically.For Mac Os1. Double click on the current used Mac Os on the desktop.2. Open the Application folder and get into Network.3. On the Network screen, select Using DHCP from the drop down list of ConfigureIPv4.105<strong>VigorAP</strong> <strong>800</strong> User’s <strong>Guide</strong>
5.3 Pinging the Modem from Your ComputerThe default gateway IP address of the modem is 192.168.1.2. For some reason, you mightneed to use “ping” command to check the link status of the modem. The most importantthing is that the computer will receive a reply from 192.168.1.2. If not, please check theIP address of your computer. We suggest you setting the network connection as get IPautomatically. (Please refer to the section 5.2)Please follow the steps below to ping the modem correctly.For Windows1. Open the Command Prompt window (from Start menu> Run).2. Type command (for Windows 95/98/ME) or cmd (for Windows NT/ 2000/XP/Vista).The DOS command dialog will appear.3. Type ping 192.168.1.2 and press [Enter]. If the link is OK, the line of “Reply from192.168.1.2:bytes=32 time
5.4 Backing to Factory Default Setting If NecessarySometimes, a wrong connection can be improved by returning to the default settings. Try toreset the modem by software or hardware.Warning: After pressing factory default setting, you will loose all settings you didbefore. Make sure you have recorded all useful settings before you pressing. Thepassword of factory default is null.Software ResetYou can reset the modem to factory default via Web page.Go to System Maintenance and choose Reboot System on the web page. The followingscreen will appear. Choose Using factory default configuration and click OK. After fewseconds, the modem will return all the settings to the factory settings.Hardware ResetWhile the modem is running, press the Factory Reset button and hold for more than 5seconds. When you see the ACT LED blinks rapidly, please release the button. Then, themodem will restart with the default configuration.107<strong>VigorAP</strong> <strong>800</strong> User’s <strong>Guide</strong>
After restore the factory default setting, you can configure the settings for the modem againto fit your personal request.5.5 Contacting Your DealerIf the modem still cannot work correctly after trying many efforts, please contact your dealerfor further help right away. For any questions, please feel free to send e-mail tosupport@draytek.com.<strong>VigorAP</strong> <strong>800</strong> User’s <strong>Guide</strong> 108