You also want an ePaper? Increase the reach of your titles
YUMPU automatically turns print PDFs into web optimized ePapers that Google loves.
<strong>Scenario</strong> <strong>Dreams</strong>, <strong>LLC</strong>http://www.scenariodreams.com/manuals/universal_manual.htmWorlds Largest Paintball CommunityPDF Created with deskPDF PDF Writer - Trial :: http://www.docudesk.com1 of 4 1/22/2011 1:59 PM
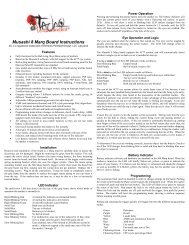
<strong>Scenario</strong> <strong>Dreams</strong>, <strong>LLC</strong>http://www.scenariodreams.com/manuals/universal_manual.htmSend Items to:<strong>Scenario</strong> <strong>Dreams</strong>PO Box 1379Seguin, TX 78156Current ProductsUniversalUniversal T-BoardKingmanESP T-BoardPrimal T-BoardRamping ChipT-Chip Multi-ModeDragun EmpireTES T-BoardThe One T-BoardRamping ChipT-Chip Multi-ModeDye MatrixDMT-Chip Muilti-ModeDiabloMongoose T-BoardWrath T-BoardRamping ChipT-Chip Multi-ModeSmart PartsION/Epiphany T-BoardOther ProductsKingman Rock'n GripT-Switch Micro-SwitchBreak-Beam EyesBounce-Beam EyesUniversal T-Board (Open bolt version)Installation of the Universal T-Board (Two Button, Open Bolt Version)FunctionalitySee install ManualThe Universal T_Board function much like a stock board, however, the setting and LED functions are different. Toturn on the marker, (Instant On - off) tap and release the power button on the membrane pad, (Instant On - on) themarker will turn on as soon as power is applied. The marker is now ON and in fire mode. The color of the LED willdenote the firing mode that the marker is in (see below). To put the marker in Safety, tap the power button while Live.The LED will flicker green quickly. To return to firing mode, tap the power button again. When the marker is turned"on", the saved settings are used. To turn off the marker, (Instant On - off) depress and hold the power button for 2sec, (Instant On - on) switch off.Note1: When you first connect power to your T-board, it will power up immediately and Disco the LED to load thedefault settings.. Use the Membrane pad to turn off. Everytime after that the T-board will function as you set it up to.Note2: DIP switch 1 is the Tournament lock. Turn ON for tournament settings.Shot Qing - If enabled, when the trigger is pulled and no ball is in the breech, the marker will wait up to .25 sec for aball to enter the breech and will AUTOMATICALLY fire. This feature prevents "lost" shots because your fingers arefaster than your hopper, and is still legal on most fields since it does not add shots.ABS (Anti-Bolt Stick) - If enabled, the first shot will have the ABS dwell (dwell + ABS setting). All other shots will havethe standard dwell. If the marker is not fired for 10 sec, the first shot will have the ABS setting again.Force Semi Mode - If the trigger is pulled and held long enough (Force Semi Time), the marker is automatically set tosemi mode, the eyes disabled, and ROF set to 13bps. This is to guarantee the marker will function, regardless of theeye or mode.Note: This feature is disabled on any mode that requires you to hold the trigger. (NXL, Nitro, Auto)To disable/enable the eyes - push the eye button (membrane pad) or setup button on the board until the LED turnsRED (disabled, ROF capped), BLUE (disabled, ROF uncapped) or GREEN (enabled). When the eyes are disabled, themarker is capped at 13bps, regardless of MROF setting.Changing Modes of Fire1. Turn OFF marker. Hold down trigger and turn marker ON. The LED will cycle through its colors very quickly (Disco),let go of the trigger after the LED cycle. You are now in the Modes Menu.2. Simply press the trigger to cycle through the modes. The color of the LED indicated which mode you are in...-Red - NPPL Semi-Green - Reactive Trigger-Blue - 3 Round Burst-White - Full Auto-Red - CFOA (capped semi)-Purple - Nitro-Yellow - PSP Ramping-Teal - NXL Auto3. Once you have selected the mode you want, tap the ON button on the membrane pad (or pull and hold the trigger ifnot using the membrane pad), the LEDs will cycle again to indicate that your setting has been saved.4. The marker has returned to Live Mode with your desired mode of fire.Adjusting SettingWith your ION T-Board, you have full control over how your marker shoots. Below are the instructions for changingyour settings. This may sound confusing at first, please read the sample below the chart.1. Turn Off marker2.Press and HOLD the EYE button (Setup button if you don't have a membrane pad).3. While holding the EYE button, tap the POWER button4. Continue to hold the EYE button, the LED will flash red once, pause, then flash once again. At this time you can letgo of the EYE button and you are now in Setup1 (Reference Chart Below). IF you continue to hold the EYE buttonafter the first LED blink, and the second LED blink, it will then blink twice together. If you let go, this will bypassSetup1 and bring you straight to Setup 2. If you hold the EYE button until the LED blinks 3 times together and releasethe EYE button, this will restore the default settings.5. Once you are in your desired Setup Menu, the LED color will indicate which setting you are currently in. Pull thetrigger X amount of times to set your setting. The first pull of the trigger sets the value at its minimum, each pull afterthat increments the value based on the chart below.6. Tap the EYE button to move on to the next setting. You can also ignore a setting and bypass to the next setting bynot pulling the trigger, and just tap the EYE button till the LED indicates the setting you desire.7. When finished with your settings, you can tap the POWER button to enter Live mode, from any setting or SetupMenu. If you cycle through all the settings, the marker will automatically exit the menu, and enter live mode.8. The LEDs will cycle quickly to indicate your settings were saved.PDF Created with deskPDF PDF Writer - Trial :: http://www.docudesk.com2 of 4 1/22/2011 1:59 PM
<strong>Scenario</strong> <strong>Dreams</strong>, <strong>LLC</strong>http://www.scenariodreams.com/manuals/universal_manual.htmSetup1Default Min(ON) Max(OFF) Incrmnts ColorROF* 15 9501 bps RedDwell 7ms 2 256 1ms GreenDebounce 5ms 0 256 1ms BlueEye Delay 15ms 1 256 1ms PurpleEye Type Break Break Bounce toggle TealForce Semi 2 sec 0.5 none .5 sec WhiteSetup2Shot Qing ON ON OFF toggle TealABS 0ms 0ms 256 1ms YellowAfter Nitro Semi n/a n/acyclePurpleTrigger speed 5bps 5bps None 1bps RedTrig pulls toramp4 pulls 2 pulls 256 1 pull BlueTraining OFF ON OFF toggle TealTraining Dwell 10ms 1 256 1ms GreenAuto-Off OFF ON OFF Toggle WhiteInstant On OFF ON OFF toggle PurpleSetup3RestoreDefaultn/a n/a n/a n/a n/aSetup4Eye Alignment n/a n/a n/a n/a Red*ROF NOTE: The Eye Delay and Dwell directly affect your MaxROF. If your dwell is very high (stock ION - 34ms) you will not beable to increase your ROF over 20bps without the boardactivating its protection mode. This protection mode will loweryour ROF to 7-9bps to prevent damage to your board. you mustlower your dwell and eye delay to get higher ROF rates.Setup1ROF - Firing speed of the marker - Min. 9bps -Dwell - Time Solenoid is on - Min. 2ms - Increments 1msDebounce - Debounce of trigger - Min. 0ms - Increments 1msEye Delay - Delay after eyes check to ensure ball is completely in chamber.Eye Type - Breakbeam or bouncebeam.Force Semi - Time needed to force marker into semi mode - Min. 0.5 sec - Increments 0.5 sec.Setup2Shot Qing - If the trigger is pulled and no ball is in the breach, the marker will wait for up to sec for a ball to enterthe breach and then will AUTOMATICALLY fire.ABS - On first trigger pull, ABS is disabled, after that, each trigger pull will increment the ABS 1msAfter Nitro - The LED will blink Purple followed by the color of the switched mode. Pull the trigger to cycle the modes.PDF Created with deskPDF PDF Writer - Trial :: http://www.docudesk.com3 of 4 1/22/2011 1:59 PM
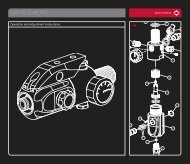
<strong>Scenario</strong> <strong>Dreams</strong>, <strong>LLC</strong>http://www.scenariodreams.com/manuals/universal_manual.htmTrigger Speed - Minumum Trigger pull speed to activate ramping. I.E. 5bpsTrig pulls to ramp - number of trigger pulls needed to start ramping.Training - Allows the marker to be aired up and fired without actually firing a ball (Provided the Training Dwell isproperly set and supported by marker design, ION, EGO, ect).Training Dwell - Dwell used for Training. It should only be enough to hear the marker partially cycle. Should not beable to actually fire a ball.Auto-Off - Marker will automatically turn off if not fired or in safe mode after 10 minutes.Instant On - When Off, marker must be turned on using the membrane pad (ION), if On, marker will turn on as soon aspower is supplied (Spyder).Setup3 - restores default factory settingsEye Alignment ToolWhen in the Eye Alignment Tool, the LED will light up when the eye is properly aligned. If the eye is blocked ormisaligned, the LED will NOT light. this tool is used to verify that your eyes are clean and functioning.TROUBLESHOOTING:Copyright <strong>Scenario</strong> <strong>Dreams</strong> <strong>LLC</strong>.All Rights Reserved 2005PDF Created with deskPDF PDF Writer - Trial :: http://www.docudesk.com4 of 4 1/22/2011 1:59 PM