Door Visors Installation Instructions - Bernardi Acura Parts ...
Door Visors Installation Instructions - Bernardi Acura Parts ...
Door Visors Installation Instructions - Bernardi Acura Parts ...

Create successful ePaper yourself
Turn your PDF publications into a flip-book with our unique Google optimized e-Paper software.
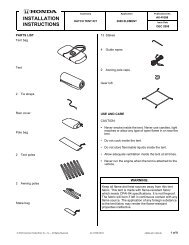
INSTALLATIONINSTRUCTIONSAccessory Application Publications No.BII 44686DOOR VISOR2011 RLP/N 08R04-SJA-201Issue DateDEC 2010PARTS LISTINSTALLATIONNOTE:<strong>Door</strong> visor (front left)• These instructions show the left door visors beinginstalled. The same procedure applies to installingthe right door visors.• Be careful not to damage the paint finish and theglass run channels when installing the door visors.• Handle the door visors with care. They are notdesigned to absorb shock or impact.<strong>Door</strong> visor (front right)• Do not use organic solvents such as thinner,benzene, and alcohol to clean the door visors asthey may damage the plastic surfaces.• This door visor kit should be installed only if theambient air temperature is 60°F (15°C) or above.• To allow the adhesive to cure, do not wash thevehicle for 24 hours.• Read the label on the primer before using it.<strong>Door</strong> visor (rear left)<strong>Door</strong> visor (rear right)Installing the Front <strong>Door</strong> Visor1. Lower the front door glass completely. Removethe door glass run channel from the door sash inthe area shown. Do not remove the glass runchannel from the door mirror base and the rear ofthe door.PrimerDOOR MIRRORBASE(Do not remove thedoor glass runchannel here.)4 EPT sealersSUPPLIES REQUIREDIsopropyl alcoholShop towelMasking tapeScaleGloveDOOR GLASSRUN CHANNEL4319160K© 2010 American Honda Motor Co., Inc. - All Rights Reserved. BII 44686 (1012) 08R04-SJA-2000-91 1 of 7
2. Push the two brackets on the door visor onto thedoor sash. Insert the front tab under the doormirror base.4. Apply masking tape to the door sash along theupper, front, and rear edges of the door visor asshown. Remove the door visor.SECTIONAL VIEWDOORVISOR5 mm(0.2 in.)DOORSASH5mm(0.2 in.)MASKING TAPEDOORSASHBRACKETDOOR VISOR4319180K5. Using isopropyl alcohol, thoroughly clean the doorsash in the area surrounded by the masking tape.Allow it to dry.DOORMIRRORBASETABAlign the frontend of the doorvisor with thedoor mirrorbase withoutclearance.3. Align the front end of the door visor with the doormirror base so there is no clearance. Adjust thedoor visor so that the distance between the rearedge of the door visor and door sash is 5 mm(0.2 in.).6. While wearing gloves, apply the primer to thedoor sash within the masked off area. Wipe up anyexcess primer at once. Allow the primer to dry forat least 3 minutes, then remove the masking tape.SHADED SURFACE OFDOOR SASH(Thoroughly clean withisopropyl alcohol beforeapplying the primer.)4319190K2 of 7 BII 44686 (1012) © 2010 American Honda Motor Co., Inc. - All Rights Reserved.
7. Remove the adhesive backing from the EPT sealer.Attach the EPT sealer to the door sash, and applypressure. Apply the EPT sealer as shown, with theupper edge in contact with the door sash.VIEW FROM THE SIDEDOOR SASH9. Position the door visor as shown in steps 2and 3.SECTIONAL VIEWDOORVISORDOORSASH5mm(0.2 in.)EPT SEALERIn contactEPT SEALERDOORSASHBRACKET7 mm(0.3 in.)4805030K8. Peel back the adhesive backings, fold them over,and attach them to the front of the door visor withmasking tape.DOORMIRRORBASETABAlign the frontend of the doorvisor with thedoor mirrorbase withoutclearance.DOOR VISOR 4319210K10. While holding light pressure on the door visor,carefully remove the adhesive backing. Using thepalm of your hand, hold the door visor firmlyagainst the door for 30 seconds.2 ADHESIVE BACKINGS(Attach them to thefront of the door visorwith masking tape.)DOOR VISOR4319201KADHESIVE BACKING4319221K© 2010 American Honda Motor Co., Inc. - All Rights Reserved. BII 44686 (1012) 3 of 7
11. Reinstall the door glass run channel. Seat the doorglass run channel properly.SECTIONAL VIEWInstalling the Rear <strong>Door</strong> Visor13. Lower the rear door glass completely. Remove thedoor glass run channel from the door sash in thearea shown.DOORVISORDOORGLASSRUNCHANNELDOORVISORDOOR GLASSRUN CHANNEL4319240KDOOR GLASS RUNCHANNEL4319230K14. Push the two brackets on the door visor onto thedoor sash.12. Check that the run channel is securely installed.5 mm (0.2 in.)SECTIONAL VIEWDOORSASHDOORVISORDOORSASHBRACKET4319250K15. Adjust the door visor so that the distance betweenthe front edges of the door visor and door sash is5 mm (0.2 in.).4 of 7 BII 44686 (1012) © 2010 American Honda Motor Co., Inc. - All Rights Reserved.
16. Apply masking tape to the door sash along theupper, front and rear edges of the door visor asshown. Remove the door visor.19. Remove the adhesive backing from the EPT sealer.Attach the EPT sealer to the door sash, and applypressure. Apply the EPT sealer as shown, with theupper edge in contact with the door sash.MASKING TAPEEPT SEALERDOOR VISOR4319260KDOOR SASH7 mm(0.3 in.) In contactEPTSEALER17. Using isopropyl alcohol, thoroughly clean the doorsash in the area surrounded by the masking tape.Allow it to dry.18. While wearing gloves, apply the primer to the doorsash within the masked off area. Wipe up anyexcess primer at once. Allow the primer to dry forat least 3 minutes, then remove the masking tape.20. Peel back the adhesive backings, fold them over,and attach them to the front of the door visor withmasking tape.DOOR VISORSIDE VIEW4805040KSHADED SURFACE OF DOOR SASH(Thoroughly clean with isopropylalcohol before applying the primer.)2 ADHESIVE BACKINGS(Attach them to the front of thedoor visor with masking tape.)4319280K4319270K© 2010 American Honda Motor Co., Inc. - All Rights Reserved. BII 44686 (1012) 5 of 7
21. Position the door visor as shown in steps 14and 15.23. Reinstall the door glass run channel. Seat theglass run channel properly.5 mm (0.2 in.)5mmSECTIONAL VIEWSECTIONAL VIEWDOORVISORDOORSASHDOORVISORDOORSASHBRACKETDOORGLASSRUNCHANNELDOORVISORDOOR GLASS RUNCHANNEL4319310K22. While holding light pressure on the door visor,carefully remove the adhesive backing. Using thepalm of your hand, hold the door visor firmlyagainst the door for 30 seconds.DOOR VISOR24. Check that the run channel is securely installed.25. Repeat steps 1 through 24 to install the doorvisors on the right side of the vehicle.26. Raise and lower all the windows several times toseat the glass run channels.NOTE: Whenever the battery is disconnected, thedriver’s window AUTO function is disabled.27. Start the engine. Push down on the driver’swindow switch until the window is fully open.ADHESIVE BACKING4319300K6 of 7 BII 44686 (1012) © 2010 American Honda Motor Co., Inc. - All Rights Reserved.
28. Pull up on the driver’s window switch to close thewindow completely, then hold the switch for2 seconds or more.29. Lower and raise the driver’s window to check theoperation of the driver’s window AUTO function.USE AND CARE• To clean the door visor, wipe it with a soft clothdampened with clean water.• To remove dust and dirt, clean with a solution ofliquid dishwashing soap and water using a softcloth or chamois. Never use organic solvents suchas thinner, benzine, alcohol, etc., or cleanerscontaining compounds.© 2010 American Honda Motor Co., Inc. - All Rights Reserved. BII 44686 (1012)7 of 7