Force.com Cookbook - Villanova University
Force.com Cookbook - Villanova University
Force.com Cookbook - Villanova University

Create successful ePaper yourself
Turn your PDF publications into a flip-book with our unique Google optimized e-Paper software.
<strong>Force</strong>.<strong>com</strong> <strong>Cookbook</strong>Code Samples and Best PracticesEdited by Carol FrangerWith contributions byadditional members of the salesforce.<strong>com</strong>Technology and Services organizations
<strong>Force</strong>.<strong>com</strong> <strong>Cookbook</strong>© Copyright 2000-2010 salesforce.<strong>com</strong>, inc. All rights reserved. Salesforce.<strong>com</strong> is a registered trademarkof salesforce.<strong>com</strong>, inc., as are other names and marks. Other marks appearing herein may betrademarks of their respective owners.No part of this publication may be reproduced, stored in a retrieval system, or transmitted, in anyform, or by any means, electronic, mechanical, photocopying, recording, or otherwise, without theprior consent of the publisher.ISBN: 978-0-9789639-2-7Recipe authors: Stefanie Anderson, Steven Anderson, Mysti Berry, Michelle Chapman-Thurber, PhilChoi, Leah Cutter, Carol Franger, Mark Leonard, Chris McGuire, Teresa Talbot, Garen Torikian, andJoanne Ward. Additional contributors Pierpaolo Bergamo, Dave Carroll, Simon Fell, Steve Fisher,Chris Fry, Richard Greenwald, Larry Jovanovic, Andrea Leszek, Markus Spohn, Nick Tran, Jason Wei,and Craig Weissman. Additional thanks to Andrew Albert, Grant Anderson, Gavin Austin, Eric Bezar,Manoj Cheenath, Bulent Cinarkaya, Bill Eidson, Matthew Friend, Adam Gross, Michelle Jowitt, PaulKopacki, Sarah Marovich, Reena Mathew, Taggart Matthiesen, Yudi Nagata, Kavindra Patel, IgorPesenson, Vahn Phan, Varadarajan Rajaram, Geri Rebstock, Bhavana Rehani, EJ Rice, Jim Rivera,Emad Salman, Mary Scotton, Jerry Sherman, Sagar Wanaselja, Jill Wetzler, and Sarah Whitlock fortheir advice and support. Special thanks to the editor and lead writer of the First Edition, CarolineRoth, and editor of the Second Edition, Mysti Berry.
Table of ContentsTable of ContentsWel<strong>com</strong>e...................................................................................................1About This Book..............................................................................................................1Intended Audience................................................................................................2Conventions..........................................................................................................2The Sample Recruiting App.................................................................................3Additional Resources............................................................................................4Sending Feedback.................................................................................................7Understanding the <strong>Force</strong>.<strong>com</strong> Platform............................................................................7Using <strong>Force</strong>.<strong>com</strong> Tools and Technologies.........................................................................9Point-and-Click Setup Tools................................................................................9Visualforce..........................................................................................................12Apex....................................................................................................................12<strong>Force</strong>.<strong>com</strong> Sites...................................................................................................13Salesforce Mobile................................................................................................13The Web Services API.......................................................................................13The Bulk API.....................................................................................................14The <strong>Force</strong>.<strong>com</strong> Migration Tool...........................................................................14<strong>Force</strong>.<strong>com</strong> IDE...................................................................................................14The Metadata API..............................................................................................14Chapter 1: Searching and Querying Data.................................................16Using the Enterprise WSDL and the AJAX Toolkit to Examine Your DataModel........................................................................................................................18Using SoqlXplorer to Examine Your Data Model..........................................................24Choosing Between SOQL and SOSL............................................................................26Querying Multiple Related Objects Using Relationship Queries...................................27Finding a Contact, Lead, or Person Account..................................................................29Retrieving Data Based on a Relative Date......................................................................31Finding Search Data Based on Division.........................................................................32Previewing Query Results...............................................................................................33Sorting Query Results....................................................................................................34i
Table of ContentsViewing Tags..................................................................................................................37Viewing Records with Tags............................................................................................38Writing Shorter Queries Using Outer Joins...................................................................39Making Apex Work in any Organization.......................................................................40Chapter 2: Managing Workflow and Approvals.........................................44Managing Large Opportunities Using Time-Based Workflow......................................45Managing Lost Opportunities Using Workflow.............................................................47Using Workflow to Notify Case Contact for Priority Cases...........................................48Using Workflow to Add Account Names to Opportunity Names..................................49Requiring Parallel Approvals for Large Campaigns........................................................50Using a Matrix-Based Dynamic Approval Process.........................................................54Sending Outbound Messages with Workflow................................................................56Tracking Outbound Messages from Workflow...............................................................59Updating a Field on a Parent Record..............................................................................60Chapter 3: Customizing the User Interface...............................................62Overriding a Standard Button........................................................................................64Creating a Button with Apex..........................................................................................66Creating a Consistent Look and Feel with Static Resources..........................................67Formatting a Currency....................................................................................................68Building a Table of Data in a Visualforce Page...............................................................69Building a Form in a Visualforce Page............................................................................71Creating a Wizard with Visualforce Pages.....................................................................72Creating Custom Help...................................................................................................81Creating a Custom Visualforce Component...................................................................82Overriding a Standard Page............................................................................................85Redirecting to a Standard Object List Page....................................................................87Dynamically Updating a Page........................................................................................88Overriding a Page for Some, but not All, Users..............................................................93Referencing an Existing Page.........................................................................................96Defining Skeleton Visualforce Templates.......................................................................98Creating Tabbed Accounts............................................................................................102Adding CSS to Visualforce Pages.................................................................................104Editing Multiple Records Using a Visualforce List Controller....................................107Selecting Records with a Visualforce Custom List Controller.....................................110ii
Table of ContentsChapter 4: Displaying Data and Modifying Data Actions........................112Creating a Many-to-Many Relationship......................................................................114Storing and Displaying Confidential Information........................................................118Averaging Aggregated Data..........................................................................................121Displaying Fields from a Related Record on a Detail Page..........................................123Blocking Record Creation with Cross-Object Validation Rules...................................126Validating Data Based on Fields in Other Records......................................................129Using Query String Parameters in a Visualforce Page..................................................132Using AJAX in a Visualforce Page................................................................................134Using Properties in Apex..............................................................................................136Mass Updating Contacts When an Account Changes.................................................140Bulk Processing Records in a Trigger............................................................................142Using Batch Apex to Reassign Account Owners..........................................................143Controlling Recursive Triggers.....................................................................................149Comparing Queries Against Trigger.old and Trigger.new............................................152Preventing Duplicate Records from Saving..................................................................153Creating a Child Record When a Parent Record is Created........................................159Using Custom Settings to Display Data.......................................................................160Using System.runAs in Test Methods..........................................................................170Integrating Visualforce and Google Charts..................................................................172Using Special Characters in Custom Links..................................................................177Chapter 5: Creating Public Websites......................................................179Registering a Custom Domain for Your <strong>Force</strong>.<strong>com</strong> Site...............................................180Using <strong>Force</strong>.<strong>com</strong> Site-Specific Merge Fields................................................................182Customizing the Look and Feel of Your <strong>Force</strong>.<strong>com</strong> Site..............................................184Adding a Feed to Your <strong>Force</strong>.<strong>com</strong> Site.........................................................................186Creating a Sitemap File................................................................................................188Creating a Web-to-Lead Form for Your <strong>Force</strong>.<strong>com</strong> Site..............................................190Chapter 6: Integrating with Other Applications......................................193Retrieving Information from In<strong>com</strong>ing Email Messages.............................................194Creating Records from Information in In<strong>com</strong>ing Email Messages..............................196Retrieving Email Attachments and Associating Them with Records...........................197Creating Email Templates and Automatically Sending Emails....................................198Email Recipes—Complete Code Example...................................................................202iii
Table of ContentsUpdating Salesforce.<strong>com</strong> Data in the Mobile Application...........................................204Retrieving a User's Location from a GPS-enabled Phone............................................211Enabling Single Sign-On with the <strong>Force</strong>.<strong>com</strong> Platform..............................................216Implementing Single Sign-On for Clients...................................................................222Chapter 7: Integrating Applications with the API and Apex.....................227Setting Up Your Salesforce.<strong>com</strong> Web Services API Applications................................228Select a Development Language.......................................................................228Create an Integration User................................................................................228Select a WSDL.................................................................................................229Generate a WSDL Document..........................................................................230If You Use the Partner WSDL..........................................................................231Log In to and Out of the API..........................................................................233Manage Sessions...............................................................................................236Change the Session Timeout Value..................................................................237Implementing the query()/queryMore() Pattern...........................................................238Batching Records for API Calls...................................................................................239Using a Wrapper Class for Common API Functions...................................................242Building a Web Portal with Salesforce.<strong>com</strong> Data.........................................................255Add and Remove Tags on a Single Record...................................................................261Add and Remove Tags on Multiple Records................................................................263Updating Tag Definitions.............................................................................................265<strong>Force</strong>.<strong>com</strong> Platform Glossary.................................................................267Index.....................................................................................................306iv
Wel<strong>com</strong>eCongratulations! You're part of a growing movement of innovative application developers whoare curious about the future of <strong>com</strong>puting, and who no longer want to accept the status quo.Maybe your organization just purchased Salesforce.<strong>com</strong> licenses, or maybe you've been usingSalesforce.<strong>com</strong> for a while and want to extend its capabilities. Maybe you've got a brilliantbusiness idea and are looking for the best and fastest way to start making money, or maybe you'rejust curious about this thing called Apex and want to keep your skill set up to date with the latesttechnology.No matter what angle you're <strong>com</strong>ing from, this book helps application developers leverage thepower of the <strong>Force</strong>.<strong>com</strong> cloud platform to build fully functional, integrated Web applicationsthat free you and your organization from the drudgery of maintaining your own software andhardware stacks. Instead, you can spend your time and money on the ideas and innovations thatmake your business applications special, whether you're a lone developer looking for your firstround of venture funding or part of a multi-billion-dollar <strong>com</strong>pany with hundreds of thousandsof employees.About This BookThis book provides many recipes for using the Web Services API, developing Apex scripts,and creating Visualforce pages. Written by developers, the <strong>Force</strong>.<strong>com</strong> <strong>Cookbook</strong>: Code Samplesand Best Practices helps developers be<strong>com</strong>e familiar with <strong>com</strong>mon <strong>Force</strong>.<strong>com</strong> programmingtechniques and best practices.To get the most out of the recipes in this book, make sure you understand the experience youshould have, and the tools to supplement these recipes:• Intended Audience on page 2• Conventions on page 21
Wel<strong>com</strong>e• The Sample Recruiting App on page 3• Additional Resources on page 4• Sending Feedback on page 7Note: This book indicates the recipes for which salesforce.<strong>com</strong> Training &Certification has provided example code or other information. To enroll in coursesthat provide even more information and practical experience, seewww.salesforce.<strong>com</strong>/training.Intended AudienceDevelopers who are already familiar with the point-and-click capabilities of the <strong>Force</strong>.<strong>com</strong>platform can most easily implement the recipes in this book. Before working with the recipesyou find here, you should be familiar with the concepts, techniques, and best practices describedin <strong>Force</strong>.<strong>com</strong> Fundamentals: An Introduction to Custom Application Development in the Cloud,available on the Developer <strong>Force</strong> website at developer.force.<strong>com</strong>/books/fundamentals.To get the most out of this book, you should also have experience with at least one of thefollowing:• HTML and JavaScript• Java• C#.NET• VB.NET• PHP• Python• Ruby• Perl• Any other Web-services-enabled programming languageConventionsThis book uses the following typographical conventions:ConventionDescription2SELECT Name FROM Account In an example, Courier font indicates items that you shouldtype as shown. In a syntax statement, Courier font alsoindicates items that you should type as shown, except forquestion marks and square brackets.
Wel<strong>com</strong>eConventionSELECT fieldname FROMobjectname?WHERE[conditionexpression]DescriptionIn an example or syntax statement, italics representvariables. You supply the actual value.In a syntax statement, the question mark indicates theelement preceding it is optional. You may omit the elementor include one.In a syntax statement, square brackets surround an elementthat may be repeated up to the limits for that element. Youmay omit the element, or include one or more of them.The Sample Recruiting AppSome of the recipes in this book require a custom app for illustration. In these cases, this bookuses the custom Recruiting app that was developed as part of <strong>Force</strong>.<strong>com</strong> Fundamentals: AnIntroduction to Custom Application Development in the Cloud. The schema for this Recruitingapp is pictured in the following entity-relationship diagram and can be downloaded fromdeveloper.force.<strong>com</strong>/books/cookbook.3
Wel<strong>com</strong>eFigure 1: Schema for the Sample Recruiting AppAdditional ResourcesA variety of resources are available to supplement this book.DocumentationDeveloper <strong>Force</strong> Technical Library4
Wel<strong>com</strong>eThe Developer <strong>Force</strong> Technical Library, atwiki.developerforce.<strong>com</strong>/index.php/Documentation, is your resource forinformation about developing on the <strong>Force</strong>.<strong>com</strong> platform. Here you can learn <strong>Force</strong>.<strong>com</strong>fundamentals and advanced programming techniques, get started with Visualforce or Apex,learn how to write SOQL and SOSL queries, dig into the Web services and metadata API,and more.<strong>Force</strong>.<strong>com</strong> Point-and-Click Functionality• Access the Help & Training window by clicking Help or Help & Training in theupper-right corner of any Salesforce.<strong>com</strong> page. Alternatively, access a context-sensitiveview of the Help & Training window by clicking Help for this Page on the right side ofany page title bar, or the help link on the right side of any related list.• Review white papers, multimedia presentations, and other documentation in the ApplicationFramework section of the Developer <strong>Force</strong> website atwiki.developerforce.<strong>com</strong>/index.php/Application_Framework.• Review tips and best practices at www.salesforce.<strong>com</strong>/<strong>com</strong>munity.Visualforce• Read the Visualforce Developer's Guide, available atwww.salesforce.<strong>com</strong>/us/developer/docs/pages/index.htm.• Review white papers, multimedia presentations, and other documentation in the Visualforcesection of the Developer <strong>Force</strong> website atwiki.apexdevnet.<strong>com</strong>/index.php/Visualforce.Apex• Read the <strong>Force</strong>.<strong>com</strong> Apex Developer's Guide, available atwww.salesforce.<strong>com</strong>/us/developer/docs/apexcode/index.htm.• Review white papers, multimedia presentations, and other documentation in the Apexsection of the Developer <strong>Force</strong> website atwiki.developerforce.<strong>com</strong>/index.php/Apex.Web Services API• Read the <strong>Force</strong>.<strong>com</strong> Web Services API Developer's Guide, available atwww.salesforce.<strong>com</strong>/apidoc.• Review whitepapers, multimedia presentations, and other documentation in the API sectionof the Developer <strong>Force</strong> website atwiki.apexdevnet.<strong>com</strong>/index.php/Web_Services_API.Metadata APIRead the <strong>Force</strong>.<strong>com</strong> Metadata API Developer's Guide, available atwww.salesforce.<strong>com</strong>/us/developer/docs/api_meta/index.htm.5
Wel<strong>com</strong>eBulk APIRead the <strong>Force</strong>.<strong>com</strong> Bulk API Developer's Guide, available atwww.salesforce.<strong>com</strong>/us/developer/docs/api_asynch/index.htm.Training CoursesTraining classes are also available from salesforce.<strong>com</strong> Training & Certification. You can finda <strong>com</strong>plete list of courses at www.salesforce.<strong>com</strong>/training.Free Developer Edition AccountIf you have not already done so, visit the Developer <strong>Force</strong> website at developer.force.<strong>com</strong>and click Join Now to sign up for a free, two-user Developer Edition organization.Integrated Development ToolsThe <strong>Force</strong>.<strong>com</strong> platform provides developer tools that are tightly integrated with the platform.You may wish to select a tool and be<strong>com</strong>e familiar with it before working with the recipes inthis book.• The <strong>Force</strong>.<strong>com</strong> Migration Tool is generally available. To access it, log in to yourSalesforce.<strong>com</strong> organization and select Setup ➤ Develop ➤ Tools and click <strong>Force</strong>.<strong>com</strong>Migration Tool.• The <strong>Force</strong>.<strong>com</strong> IDE is the world's first integrated development environment for cloud<strong>com</strong>puting. Based on Eclipse technology, the <strong>Force</strong>.<strong>com</strong> IDE provides professionaldevelopers and development teams the tools to code, test, deploy, and version <strong>Force</strong>.<strong>com</strong><strong>com</strong>ponents, including Apex, Visualforce, custom objects, layouts, and more. Forinformation about this tool, see wiki.apexdevnet.<strong>com</strong>/index.php/<strong>Force</strong>.<strong>com</strong>_IDE.• The latest version of AJAX Tools, an AppExchange package alternative to the <strong>Force</strong>.<strong>com</strong>IDE, includes syntax-highlighting, a tool for exploring the data model of your organization,and code samples. To download the latest version, go tosites.force.<strong>com</strong>/appexchange/listingDetail?listingId=a0330000002foeKAAQ.• For Mac users, SoqlXplorer provides metadata exploration, a SOQL query tester, and agraphical schema view for examining object relationships (a piece of functionality that'sonly available on the Mac OS X platform!). Download SoqlXplorer from Simon Fell'sPocketSOAP website at www.pocketsoap.<strong>com</strong>/osx/soqlx. After the downloadautomatically extracts itself, drag the SoqlXplorer icon to your Applications folder to<strong>com</strong>plete the installation.For other great Salesforce.<strong>com</strong> tools and utilities built exclusively for Mac OS X, seewww.pocketsoap.<strong>com</strong>/osx.6
Wel<strong>com</strong>eTip: Visit IdeaExchange at ideas.salesforce.<strong>com</strong> and see what users are askingfor. IdeaExchange is a forum where salesforce.<strong>com</strong> customers can suggest new productconcepts, promote favorite enhancements, interact with product managers and othercustomers, and preview what salesforce.<strong>com</strong> is planning to deliver in future releases.You can use IdeaExchange both to find ideas for new applications, and to post yourpet peeves about how the platform works for you.Sending FeedbackThe authors made every effort to ensure the accuracy of the information contained within thisbook, but neither they nor salesforce.<strong>com</strong> assumes any responsibility or liability for any errorsor inaccuracies that may appear. If you do find any errors, please send feedback todocfeedback@salesforce.<strong>com</strong>, or visit the Developer <strong>Force</strong> discussion boards atwww.salesforce.<strong>com</strong>/developer/<strong>com</strong>munity/index.jsp.Understanding the <strong>Force</strong>.<strong>com</strong> PlatformThe <strong>Force</strong>.<strong>com</strong> platform makes it easy to build applications for cloud <strong>com</strong>puting. It's theworld's first platform for building, sharing, and running business applications in the cloud.The <strong>Force</strong>.<strong>com</strong> platform is unique among development platforms for several reasons.DeliveryThe <strong>Force</strong>.<strong>com</strong> platform runs in a hosted, multitenant environment.Thatmeans you can access any app you build on the platform from anywherein the world with just an Internet connection and a Web browser. Noservers or databases need to be maintained, and no software needs to beinstalled or upgraded. Instead, salesforce.<strong>com</strong> provides a hostedenvironment in which the latest features and functionality are seamlesslyavailable to all users with every new release. And you'll have the peace ofmind of knowing that any app you were using or building before the newrelease will work just as well after the release too, regardless of whether itwas a standard CRM app from salesforce.<strong>com</strong> or a custom app youdeveloped on your own.As a developer, the platform's multitenant architecture also means thatyou never have to worry about scaling your apps from one to one thousandor even to one million users—all of the infrastructure to handle suchgrowth is provided free of charge, automatically behind the scenes. Thatleaves you more time to focus on your business problems and solutions,7
Wel<strong>com</strong>e8DistributionDevelopmentrather than anticipating the pressures that increased usage might exert onyour apps.Any app written on the platform has access to a built-in <strong>com</strong>munity ofpotential customers on the AppExchange athttp://sites.force.<strong>com</strong>/appexchange. Unlike traditional software,where you have to create an install wizard and find a way to distribute theproduct, you can easily share and distribute your app on the AppExchangewith only a few clicks of the mouse. You can share your apps privatelywith just the people you want, or you can publish your apps for anyone todownload.If you do publish an app publicly, the <strong>com</strong>munity of users on theAppExchange can take your app for a test drive and review <strong>com</strong>mentsfrom other users about how well it worked. Additionally, informationabout the users who download your app is sent directly to you in the formof a new lead in any Salesforce.<strong>com</strong> organization that you specify.When you're ready to release new versions of your app, the AppExchangealso helps you <strong>com</strong>municate and manage the upgrade process for all ofyour users. You can track which of your customers are on which versionof your app, and you never have to worry that your users have broken ordeleted any <strong>com</strong>ponent your app relies on.The <strong>Force</strong>.<strong>com</strong> platform <strong>com</strong>es with a wide variety of built-in,point-and-click functionality that help you build your apps faster. Needa way to store data in your app? Define new database objects, fields, andrelationships declaratively with the mouse, rather than by <strong>com</strong>posing SQLCREATE statements. Need to control which users have access to differentkinds of data? Again, no coding necessary—just use the security andsharing framework to define permissions at different levels of granularity,from individual fields to entire objects and applications. The <strong>Force</strong>.<strong>com</strong>platform includes point-and-click tools for everything from stringlocalization to workflow rules and approval processes, from custom reportsand dashboards to page layouts and data import wizards—which meansyou can spend less time recreating the “plumbing” that makes yourapplications run and more time on the unique functionality that sets yourapps apart from your <strong>com</strong>petitor's.And what happens when you want to go beyond the capabilities of thepoint-and-click tools the platform provides? The Web Services API, Apex,and Visualforce give you the flexibility you need to build the applicationsyou want. Integrate third-party Web services with embedded mashups,change the logic behind every function with Apex classes and triggers,
Wel<strong>com</strong>eand redesign the user interface the way you want with Visualforce. You'relimited only by your imagination!The <strong>Force</strong>.<strong>com</strong> platform includes a number of tools that can help you develop apps. Thesetools allow you to define the data, business logic, and user interface for an application. Therecipes in this book focus on these tools.Using <strong>Force</strong>.<strong>com</strong> Tools and TechnologiesThe <strong>Force</strong>.<strong>com</strong> platform includes a number of tools that can help you build apps. These toolsallow you to define the data, business logic, and user interface for an application.Point-and-Click Setup ToolsThe <strong>Force</strong>.<strong>com</strong> platform includes declarative, point-and-click setup tools that allowadministrators and developers to quickly build <strong>com</strong>mon application <strong>com</strong>ponents withoutwriting any code. These setup tools allow you to effortlessly build:Data ComponentsData <strong>com</strong>ponents are equivalent to the “model” in the MVC applicationdevelopment paradigm. They include:• Custom objectsSimilar to a database table, a Salesforce.<strong>com</strong> object is a structure forstoring data about a certain type of entity, such as a person, account,or job application. Salesforce.<strong>com</strong> includes over a dozen standardobjects that support default apps like Sales and Service & Support, butit also allows you to build custom objects for your own applicationneeds. In Salesforce.<strong>com</strong>, each object automatically includes built-infeatures like a user interface, a security and sharing model, workflowprocesses, search, and much more.• Custom fieldsSimilar to a column in a database table, a Salesforce.<strong>com</strong> field is aproperty of an object, such as the first name of a contact or the statusof an opportunity. Salesforce.<strong>com</strong> fields support over a dozen differentfield types, such as auto-number, checkbox, date/time, and multi-selectpicklists.• Custom relationships9
Wel<strong>com</strong>eSimilar to the way primary and foreign keys work in a relationaldatabase, a Salesforce.<strong>com</strong> relationship defines a connection betweentwo objects in which matching values in a specified field in both objectsare used to link related data.• Field historySalesforce.<strong>com</strong> field history allows you to track changes to fields on aparticular object just by selecting a checkbox on a custom object andfield definition. Users can then review audit logs for changes to sensitiverecords without any additional development work.Business Logic ComponentsBusiness logic <strong>com</strong>ponents are equivalent to the “controller” in theModel-View-Controller (MVC) application development paradigm.Theyinclude:• Security and permission settingsSalesforce.<strong>com</strong> security and permissions tools, such as user profiles,organization-wide defaults, the role hierarchy, sharing rules, andmanual sharing, allow you to control the data that users can view andedit, with either broad generalizations or a fine level of detail.• Formula fields and validation rulesFormula fields, default field values, and validation rules allow you touse Excel-like syntax to calculate certain data automatically, maintaindata quality, and add custom error messages to your apps.• Workflow rulesWorkflow rules are processes triggered by user activity or accordingto a schedule. These processes can automatically assign tasks to users,send email alerts to multiple recipients, update field values in records,and even generate SOAP messages to external Web services.• Approval processesApprovals allow you to set up a chain of users who can approve thecreation of sensitive types of records, such as new contracts or vacationrequests.• Email10
Wel<strong>com</strong>eEmail functionality in Salesforce.<strong>com</strong> allows you to email contacts,leads, person accounts, and users in your organization directly fromaccount, contact, lead, opportunity, case, campaign, or custom objectpages.User Interface ComponentsUser interface <strong>com</strong>ponents are equivalent to the “view” in the MVCapplication development paradigm. They include:• TabsTabs give users a starting point for viewing, editing, and enteringinformation for a particular object. When a user clicks a tab at the topof the page, the corresponding tab home page for that object appears.• Page layoutsRegardless of whether a particular object has a tab, all objects can beviewed or edited. Page layouts allow you to organize the fields, customlinks, related lists, and other <strong>com</strong>ponents that appear on those pages.• Custom viewsCustom views allow users to filter the records they see for a particularobject, based on criteria they specify.• Reports and DashboardsSalesforce.<strong>com</strong> includes a full-featured report building tool, includingcustom report types that allow you to view data for any <strong>com</strong>binationof objects, and dynamic dashboards that give users a bird's eye view oftheir application data.• ConsoleSalesforce.<strong>com</strong> Console allows you to set up a page that displaysmultiple objects at a time, streamlining the user experience. It includesa list view of several different objects at the top of the page, a detailview in the main window, customizable sidebar <strong>com</strong>ponents, andmini-detail views of related information in a dynamic AJAX-basedinterface.With this functionality, app developers can build extensive, full-featured applications thathandle many business needs. For a more thorough introduction to the functionality provided11
Wel<strong>com</strong>eby the platform, read <strong>Force</strong>.<strong>com</strong> Fundamentals: An Introduction to Custom Application Developmentin the Cloud, available on the Developer <strong>Force</strong> website atdeveloper.force.<strong>com</strong>/books/fundamentals.VisualforceVisualforce is a tag-based markup language that allows developers to develop their own custominterfaces using standard Salesforce.<strong>com</strong> <strong>com</strong>ponents. Visualforce pages deliver the ability tocreate custom pages for your <strong>Force</strong>.<strong>com</strong> applications. Visualforce pages includes a set of tagsto describe a variety of rich <strong>com</strong>ponents into your page design. These <strong>com</strong>ponents bring thefull power of the metadata-driven <strong>Force</strong>.<strong>com</strong> platform to your pages, while giving you <strong>com</strong>pletefreedom to design pages to suit your specific user interface requirements. The <strong>com</strong>ponents caneither be controlled by the same logic that's used in standard Salesforce.<strong>com</strong> pages, or developerscan associate their own logic with a controller written in Apex. With this architecture, designersand developers can easily split up the work that goes with building a new application—designerscan focus on the user interface, while developers can work on the business logic that drives theapp.ApexApex is a strongly-typed, object-oriented programming language for executing flow andtransaction control statements on the <strong>Force</strong>.<strong>com</strong> server in conjunction with database queries,inserts, updates, and deletes. Using syntax that looks like Java and acts like database storedprocedures, Apex allows you to add business logic to your applications in a more efficient,integrated way than is possible with the Web Services API.You can manage and invoke Apex scripts using the following constructs:• ClassesA class is a template or blueprint from which Apex objects are created. Classes consist ofother classes, user-defined methods, variables, exception types, and static initializationcode.Once successfully saved, class methods or variables can be invoked by other Apex scripts,or through the <strong>Force</strong>.<strong>com</strong> Web Services API (or AJAX Toolkit) for methods that havebeen designated with the webService keyword.In most cases, Apex classes are modeled on their counterparts in Java and can be quicklyunderstood by those who are familiar with them.12• Triggers
Wel<strong>com</strong>eA trigger is an Apex script that executes before or after specific data manipulation language(DML) events occur, such as before object records are inserted into the database, or afterrecords have been deleted. Other than Apex Web service methods, triggers provide theprimary means for instantiating Apex.• Anonymous blocksAn anonymous block is an Apex script that does not get stored in the metadata, but that canbe <strong>com</strong>piled and executed through the use of the executeanonymous() API call or theequivalent in the AJAX toolkit.<strong>Force</strong>.<strong>com</strong> Sites<strong>Force</strong>.<strong>com</strong> sites enables you to create public websites and applications that are directly integratedwith your Salesforce.<strong>com</strong> organization—without requiring users to log in with a username andpassword. Sites are hosted on Salesforce.<strong>com</strong> servers, and are built on Visualforce pages.Salesforce MobileSalesforce Mobile is a Salesforce.<strong>com</strong> feature that enables users to access their Salesforce.<strong>com</strong>data from mobile devices running the mobile client application. The Salesforce Mobile clientapplication exchanges data with Salesforce.<strong>com</strong> over wireless carrier networks, and stores alocal copy of the user’s data in its own database on the mobile device. Users can edit local copiesof their Salesforce.<strong>com</strong> records when a wireless connection is unavailable, and transmit thosechanges when a wireless connection be<strong>com</strong>es available.Salesforce Mobile works with Apex and Visualforce to extend functionality.The Web Services APISalesforce.<strong>com</strong> provides programmatic access to your organization’s information using a simple,powerful, and secure application programming interface, the <strong>Force</strong>.<strong>com</strong> Web Services API(the API). You can use the SOAP-based API to create, retrieve, update or delete records, suchas accounts, leads, and custom objects. With more than 20 different calls, the API also allowsyou to maintain passwords, perform searches, and much more. Use the API in any languagethat supports Web services.13
Wel<strong>com</strong>eThe Bulk APIThe REST-based Bulk API is optimized for loading or deleting large sets of data. It allowsyou to insert, update, upsert, or delete a large number of records asynchronously by submittinga number of batches which are processed in the background by Salesforce.<strong>com</strong>.The SOAP-based API, in contrast, is optimized for real-time client applications that updatesmall numbers of records at a time. Although the SOAP-based API can also be used forprocessing large numbers of records, when the data sets contain hundreds of thousands ofrecords it be<strong>com</strong>es less practical. The Bulk API is designed to make it simple to process datafrom a few thousand to millions of records.The <strong>Force</strong>.<strong>com</strong> Migration ToolThe <strong>Force</strong>.<strong>com</strong> Migration Tool is a Java/Ant-based <strong>com</strong>mand-line utility for moving metadatabetween a local directory and a Salesforce.<strong>com</strong> organization. You can use the <strong>Force</strong>.<strong>com</strong>Migration Tool to retrieve <strong>com</strong>ponents, create scripted deployment, and repeat deploymentpatterns.<strong>Force</strong>.<strong>com</strong> IDEThe <strong>Force</strong>.<strong>com</strong> IDE is a plug-in for the Eclipse IDE that provides special help for developingand deploying Apex classes, Apex triggers, Visualforce pages, and metadata <strong>com</strong>ponents.The Metadata APIUse the Metadata API to retrieve, deploy, create, update or delete customization information,such as custom object definitions and page layouts, for your organization. The most <strong>com</strong>monusage is to migrate changes from a sandbox or testing organization to your productionorganization. The Metadata API is intended for managing customizations and for buildingtools that can manage the metadata model, not the data itself. To create, retrieve, update ordelete records, such as accounts or leads, use the API to manage your data.You can modify metadata in test organizations on Developer Edition or Sandbox, and thendeploy tested changes to production organizations on Enterprise Edition or Unlimited Editions.You can also create scripts to populate a new organization with your custom objects, customfields, and other <strong>com</strong>ponents.14
Wel<strong>com</strong>eThe easiest way to access the functionality in the Metadata API is to use the <strong>Force</strong>.<strong>com</strong> IDEor <strong>Force</strong>.<strong>com</strong> Migration Tool. These tools are built on top of the Metadata API and use thestandard Eclipse and Ant tools respectively to simplify the task of working with the MetadataAPI. Built on the Eclipse platform, the <strong>Force</strong>.<strong>com</strong> IDE provides a <strong>com</strong>fortable environmentfor programmers familiar with integrated development environments, allowing you to code,<strong>com</strong>pile, test, and deploy all from within the IDE itself. The <strong>Force</strong>.<strong>com</strong> Migration Tool isideal if you want to use a script or a <strong>com</strong>mand-line utility for moving metadata between a localdirectory and a Salesforce.<strong>com</strong> organization.15
Chapter 1: Searching and Querying DataChapter 1Searching and Querying DataIn this chapter ...• Using the EnterpriseWSDL and the AJAXToolkit to Examine YourData Model• Using SoqlXplorer toExamine Your DataModel• Choosing Between SOQLand SOSL• Querying Multiple RelatedObjects UsingRelationship Queries• Finding a Contact, Lead,or Person Account• Retrieving Data Based ona Relative Date• Finding Search DataBased on Division• Previewing Query Results• Sorting Query Results• Viewing Tags• Viewing Records withTags• Writing Shorter QueriesUsing Outer JoinsTruly useful, cloud <strong>com</strong>puting business apps include businesslogic and processes that help <strong>com</strong>panies run their businessesefficiently. As we've mentioned, the <strong>Force</strong>.<strong>com</strong> platformgives you the power to write code and develop <strong>com</strong>ponentsto incorporate business logic, such as data validation, intoyour app. Pretty much any business process you write foryour app will require your code to search, query, and examinesets of records upon which the business process will operate.So what's the best way to do that?In this chapter, you'll learn how to examine your app'sobjects, relationships, and fields in a graphical way. You'llalso learn the difference between SOQL and SOSL andhow to use them to construct queries that examine sets ofrecords in your app. Then you'll see how to use SOQL toquery related objects using their relationship associationsand how to filter your queries by a relative date or thedivision of a record. Finally, you'll use the AJAX toolkit toquery your data in a <strong>com</strong>mand-line environment. Theseexamples and best practices are a great way to get starteddeveloping your own queries to manipulate the data in waysthat are unique to your app.You can use the recipes in this chapter without setting upthe API, because the tools you'll use are already set up foryou. But all the query techniques you learn here can be usedif you do work with the API. For more information, seeIntegrating Applications with the API and Apex on page227.16
Searching and Querying Data• Making Apex Work in anyOrganization17
Chapter 1: Searching and Querying DataUsing the Enterprise WSDL and the AJAX Toolkit toExamine Your Data ModelProblemYou want to browse through the fields, attributes, and relationships of every object in yourSalesforce.<strong>com</strong> organization, and you're not on a Mac OS X platform.SolutionUse the enterprise WSDL and the AJAX Toolkit. No installation is necessary, these tools areavailable to any organization with API access.Tip: The permissions associated with your login affect the visibility of objects andfields in the enterprise WSDL and the AJAX Toolkit. Be sure that your login hasaccess to the data you need to explore—a user created specifically for API access, withthe “Modify All Data” permission but not other administration permissions, typicallyworks best.First, you can inspect objects and their fields, calls, SOAP headers and status codes (errorcodes) just by reviewing the WSDL:1. Navigate to https://www.salesforce.<strong>com</strong>, click the Customer Login tab andlog in to your Salesforce.<strong>com</strong> organization.2. Click Setup ➤ Develop ➤ API.3. Generate the enterprise WSDL.• If you have managed packages installed in your organization, click GenerateEnterprise WSDL. Salesforce.<strong>com</strong> prompts you to select the version of eachinstalled package to include in the generated WSDL.• Otherwise, right-click Generate Enterprise WSDL to save the WSDL to alocal directory. In the right-click menu, Internet Explorer users can choose SaveTarget As, while Mozilla Firefox users can choose Save Link As.4. Open the WSDL file you just saved in your favorite XML editor.5. Scroll through the file. There is an entry for each standard and custom object visibleto the logged in user, as well as entries for calls, SOAP headers, and status codes.Notice that each standard object is a <strong>com</strong>plex type that extends sObject.You can find some relationships by inspecting the WSDL. For example, there is a field in theContact object that contains account IDs:18
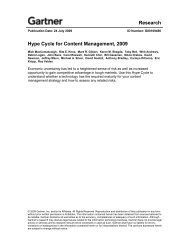
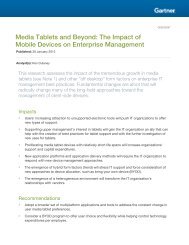
Searching and Querying DataThus, it's clear that Contact has a relationship with Account, though you must use the AJAXToolkit to be sure of the type of relationship.Next, you can inspect objects and their fields using the AJAX Toolkit:1. Navigate to the AJAX Toolkit debug shell, using the correct URL for the APIversion. For example, the following URL is for an organization querying version15.0:https://na1.salesforce.<strong>com</strong>/soap/ajax/15.0/debugshell.htmlYou may need to log directly into your organization and cut and paste the filepath.2. If requested, log in. Otherwise, issue this <strong>com</strong>mand in the debug shell to log in:sforce.connection.login("MyName@myISP.<strong>com</strong>", "myPassword")You'll see a table of information, including the user information. Notice that everyrequest (call) made in the AJAX Toolkit is preceded by sforce.connection..That's the JavaScript library that contains the toolkit.3. Issue a describeSObject call to inspect the object you are curious about:sforce.connection.describeSObject("Contact")19
Chapter 1: Searching and Querying DataFigure 2: Output from describeSObjectYou can find important information about this object:20
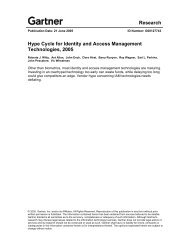
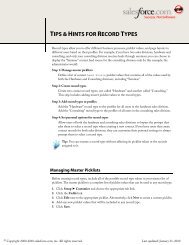
Searching and Querying DataKey PrefixThe first three characters of the Salesforce.<strong>com</strong> ID for records ofthis object type. For example, the ID of any account record alwaysstarts with 001. In this example you can see that contact recordsalways start with 003.Label and LabelPluralThe labels that are used to display this object in both singular andplural form.URL DetailThe URLs that can be used to reach detail, edit, and list pages forthe object in a Web browser.AttributesA list of actions that you can perform on the object. Seewww.salesforce.<strong>com</strong>/us/developer/docs/api/index_CSH.htm#sforce_api_calls_describesobjects_describesobjectresult.htm .4. To see which objects are children of this object, click the arrows icon next tochildRelationships:21
Chapter 1: Searching and Querying DataFigure 3: Child ObjectsIn this example, notice that some fields are named WhoId or ParentId instead ofthe expected ContactId.These names are used when the parent could be the objectyour are inspecting, in this case Contact, or another object.22
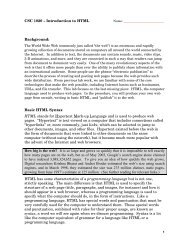
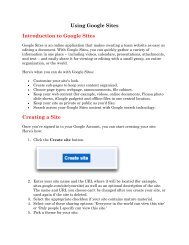
Searching and Querying DataThe relationships that have been defined on other objects that reference this objectas the “one” side of a one-to-many relationship. For example, if you expand theChild Relationships node under the Account object, contacts, opportunities, andtasks are included in this list.Note: Relationships that are defined on this object so that it represents the“many” side of a one-to-many relationship (for example, the Parent Accountrelationship on the Account object) are included in the list of fields.5. To see the fields that this object contains, click the arrows icon next to fields:Figure 4: Output from describeSObject fieldsYou can find important information about the fields on this object, including theAPI name for the field and the corresponding Salesforce.<strong>com</strong> user interface name.You can also see which attributes are set to true for this field. For example, ifcreatable is true, than this field can be created on a record using the API.Note: Standard objects are listed by their standard names, even if you've renamedthem.DiscussionTo have the AJAX Toolkit use a different version of the API, change the version number inthe URL. For example, the following URL accesses an organization on instance na1 via version15.0 of the API:https://na1.salesforce.<strong>com</strong>/soap/ajax/15.0/debugshell.html23
Chapter 1: Searching and Querying DataIf you change 15 to 14, you'll access the same organization on the same instance with version14.0 of the API. This may be useful for testing.See AlsoUsing SoqlXplorer to Examine Your Data Model on page 24Using SoqlXplorer to Examine Your Data ModelProblemYou want to browse through the fields, attributes, and relationships of every object in yourSalesforce.<strong>com</strong> organization, and you're on the Mac OS X platform.SolutionFor Mac users, SoqlXplorer provides metadata exploration, a SOQL query tester, and a graphicalschema view for examining object relationships (a piece of functionality that's only availableon the Mac OS X platform!). Download SoqlXplorer from Simon Fell's PocketSOAP websiteat www.pocketsoap.<strong>com</strong>/osx/soqlx. After the download automatically extracts itself,drag the SoqlXplorer icon to your Applications folder to <strong>com</strong>plete the installation.After installing SoqlXplorer, open the application and log in by entering your standardSalesforce.<strong>com</strong> username and password and specifying the server to which you want to connect.Choose www.salesforce.<strong>com</strong> to connect to the normal production servers, or test.salesforce.<strong>com</strong>to connect to a sandbox organization.After you click Login, SoqlXplorer issues a describeGlobal() call to the API to populatethe interactive list of objects in the right sidebar.You can expand any object to explore its fields and relationships. To view attributes for anobject, toggle the Details button to On in the bottom right corner of the window. If you selectan object field, the Details popup shows properties for the field instead.24
Searching and Querying DataFigure 5: Viewing Object Attributes in SoqlXplorerTwo views are available in the main window: SOQL and Schema.• Use SOQL view to open a SOQL query editor where you can construct and execute SOQLqueries. The queries you write use syntax-highlighting to improve legibility, and you candouble-click an object's name to automatically build a query that selects all available fields.You can also double-click any result data to copy and paste it elsewhere.• Use Schema view to open an interactive entity relationship diagram (ERD) of the objectsin your organization. Select any object in the right sidebar to view that object's parentrelationships (in blue) and child relationships (in orange). You can expand the fields of anyobject by clicking the + toggle button in the upper right corner of any object, and you candouble-click an object to move it to the center of the view.25
Chapter 1: Searching and Querying DataFigure 6: Schema View in SoqlXplorerTip: Simon Fell frequently adds new functionality to SoqlXplorer. To automaticallycheck for updates, click SoqlXplorer ➤ Preferences and select Check for updatesat startup.See AlsoUsing the Enterprise WSDL and the AJAX Toolkit to Examine Your Data Model on page1826Choosing Between SOQL and SOSLProblemYou know that the platform supports Salesforce.<strong>com</strong> Object Query Language (SOQL) andSalesforce.<strong>com</strong> Object Search Language (SOSL), but you don't know what the difference isbetween the two, or when to use one over the other.
Searching and Querying DataSolutionA SOQL query is the equivalent of a SELECT clause in a SQL statement. Use SOQL witha query() call when:• You know in which objects or fields the data resides• You want to retrieve data from a single object or from multiple objects that are related toone another• You want to count the number of records that meet particular criteria• You want to sort your results as part of the query• You want to retrieve data from number, date, or checkbox fieldsA SOSL query is a programmatic way of performing a text-based search. Use SOSL with asearch() call when:• You don't know in which object or field the data resides and you want to find it in the mostefficient way possible• You want to retrieve multiple objects and fields efficiently, and the objects may or may notbe related to one another• You want to retrieve data for a particular division in an organization with Divisions, andyou want to find it in the most efficient way possibleTip: Although SOQL was previously the only one of the two query languages thatallowed condition-based filtering with WHERE clauses, as of the Summer '07 releaseSOSL supports this functionality as well.See Also• Finding Search Data Based on Division on page 32• “Salesforce.<strong>com</strong> Object Query Language (SOQL)” atwww.salesforce.<strong>com</strong>/us/developer/docs/api/index_CSH.htm#sforce_api_calls_soql.htm• “Salesforce.<strong>com</strong> Object Search Language (SOSL)” atwww.salesforce.<strong>com</strong>/us/developer/docs/api/index_CSH.htm#sforce_api_calls_sosl.htmQuerying Multiple Related Objects Using RelationshipQueriesProblemYou want to use as few SOQL queries as possible to access data from multiple related objects.27
Chapter 1: Searching and Querying DataSolutionUse SOQL relationship syntax to pull data from related records in a single query.For each of the following examples, the child object is the object on which the relationshipfield (the foreign key) is defined, and the parent is the object that the child references:Basic Child-to-Parent (Foreign Key) TraversalTo traverse a relationship from a child to a parent, use standard dotnotation off the name of the relationship. For example, this SOQL queryretrieves information about contacts from the Contact object, along withthe name of each contact's related account (the parent object):SELECT Id, LastName, FirstName, Account.NameFROM ContactAccount is the name of the relationship that's defined by the AccountIdlookup field on the Contact object. Using dot notation, this SOQL queryretrieves the Name field on the account that is related through the Accountrelationship.Expanded Child-to-Parent (Foreign Key) TraversalChild-to-parent traversals can extend up to five levels from the originalroot object. For example, the last selected field in this SOQL statementextends two levels from the root contact record by retrieving the name ofthe parent account on the account associated with the contact:SELECT Id, LastName, FirstName, Account.Name,Account.Parent.NameFROM ContactBasic Parent-to-Child (Aggregate) TraversalTo traverse a relationship from a parent to a set of children, use a nestedquery. For example, this SOQL query retrieves opportunities and theopportunity products associated with each opportunity:SELECT Id, Name, Amount,(SELECT Quantity, UnitPrice, TotalPriceFROM OpportunityLineItems)FROM OpportunityUsing the nested query, we're specifying that for each opportunity we wantthe respective set of OpportunityLineItem records that are related throughthe OpportunityLineItems child relationship.Combined Child-to-Parent and Parent-to-Child TraversalForeign key and aggregate traversals can also be <strong>com</strong>bined in a singlequery. For example:28SELECT Id, Name, Account.Name,(SELECT Quantity, UnitPrice, TotalPrice,
Searching and Querying DataPricebookEntry.Name,PricebookEntry.Product2.FamilyFROM OpportunityLineItems)FROM OpportunitySee Also• “Relationship Queries” at www.salesforce.<strong>com</strong>/us/developer/docs/api/index_CSH.htm#sforce_api_calls_soql_relationships.htm• “Salesforce.<strong>com</strong> Object Query Language (SOQL)” atwww.salesforce.<strong>com</strong>/us/developer/docs/api/index_CSH.htm#sforce_api_calls_soql.htmFinding a Contact, Lead, or Person AccountProblemYou want to write a query to find a person, but you don't know whether this person is storedas a lead, as a contact, or as a person account.SolutionPerform the search with one SOSL query, rather than multiple SOQL queries. For example:• To look for Joe in all searchable text fields in the system, and return the IDs of the recordswhere Joe is found in a case-insensitive search:FIND {Joe}• To look for all email fields that start with jo or end in acme.<strong>com</strong>, and return the IDs of therecords where those fields are found:FIND {"jo*" OR "*acme.<strong>com</strong>"}IN EMAIL FIELDSTip: If you know you're looking for a name, an email address, or a phone number,it's more efficient to narrow your search scope to only name fields, email fields, orphone fields, respectively, rather than searching every field.• To look for the name Joe Smith or Joe Smythe in the name field on a lead or contact only,and return the name and phone number of any matching record that was also created inthe current fiscal quarter:FIND {"Joe Smith" OR "Joe Smythe"}IN NAME FIELDSRETURNING29
Chapter 1: Searching and Querying Datalead(name, phone WHERE createddate = THIS_FISCAL_QUARTER),contact(name, phone WHERE createddate = THIS_FISCAL_QUARTER)If you want to search for records based on a query string that was entered by a user, first escapeany special characters that were entered by the user, and then construct the appropriate SOSLstring. For example, the following JavaScript searches leads, contacts, and accounts for anyinstance of a record named “Phil Degauss”:function init() {var who = "phil degauss";// These special characters must be preceded by a backslash// before they can be used in a SOSL query.who = who.replace(/([\&\|\!\(\)\{\}\[\]\^~\:\\\+\-])/g, "\\$1");var sstr = "find {" + who + "} in NAME FIELDS RETURNING " +"Lead (id, firstname, lastname), " +"Contact(id, firstname, lastname), " +"Account(id, name)";// Issue the SOSL query using the AJAX Toolkit.var sr = sforce.connection.search(sstr);var m = document.getElementById('main');// Write out the results.if (sr) {var list = sr.getArray('searchRecords');for (var i = 0; i < list.length; i++ ) {m.innerHTML += "Search results : " +list[i].toString();}} else {m.innerHTML += "No search results";}}30DiscussionYou can make this solution even more robust by making use of the * wildcard character. Forexample, the solution here only searches for exact matches of the name “Phil Degausse.” If you
Searching and Querying Datawanted this solution to also return a record named “Philip Degausse,” or “Phil Degaussey,”modify the user's search string by appending * after each token in the string:var who = "phil* degauss*";Note that it's still important to maintain the space between the two names, so that each tokenphil* and degauss* will match individual name fields in the objects that are queried.See Also• Choosing Between SOQL and SOSL on page 26• “Salesforce.<strong>com</strong> Object Search Language (SOSL)” atwww.salesforce.<strong>com</strong>/us/developer/docs/api/index_CSH.htm#sforce_api_calls_sosl.htmRetrieving Data Based on a Relative DateProblemYou want to retrieve records based on a relative date, such as “before last year” or “during thenext fiscal quarter.”SolutionUse a date literal in the WHERE clause of your SOQL or SOSL statement. For example:• This SOQL statement returns all opportunities that closed yesterday:SELECT Id FROM Opportunity WHERE CloseDate = YESTERDAY• This SOQL statement returns all opportunities that closed prior to the beginning of thelast fiscal quarter:SELECT Id FROM Opportunity WHERE CloseDate < LAST_FISCAL_QUARTER• This SOQL statement returns all opportunities with a close date that is more than 15 daysaway:SELECT Id FROM Opportunity WHERE CloseDate > NEXT_N_DAYS:15DiscussionWhen you specify a date in a SOQL or SOSL query, it can be a specific date or dateTimefield, or it can be an expression that uses a date literal—a keyword that represents a relativerange of time such as last month or next year. To construct an expression that returns date or31
Chapter 1: Searching and Querying DatadateTime values within the range, use =. To construct an expression that returns date ordateTime values that fall on either side of the range, use > or
Searching and Querying DataSee Also• “Salesforce.<strong>com</strong> Object Query Language (SOQL)” atwww.salesforce.<strong>com</strong>/us/developer/docs/api/index_CSH.htm#sforce_api_calls_soql.htm• “Salesforce.<strong>com</strong> Object Search Language (SOSL)” atwww.salesforce.<strong>com</strong>/us/developer/docs/api/index_CSH.htm#sforce_api_calls_sosl.htmPreviewing Query ResultsProblemYour solution gives users a chance to build a query or set up a filter for a query that you'vealready written. You want to offer users a preview of what data is returned from their query,including the total number of records that are returned.SolutionRun two SOQL queries: one that uses COUNT() to return the total number of records thatwill be returned, and one that uses LIMIT to quickly return 25 random records that match thequery.DiscussionIf your solution allows a user to build a query or set up a filter for an existing query, there's achance that the user might execute a long-running query that uses query() or queryMore()in a loop. This query could easily take a lot longer than the user expects.To avoid this issue, it's a good idea to give users a preview of their query results if the resultset is going to be greater than 1,000 records, including the total number of records that willbe returned and a sample of what the resulting data will look like. You can then prompt themwith a question such as, “Are you sure?” before proceeding with the full query.Although running the normal query() call returns the total result size, it also returns a batchof up to 2,000 records, depending on your configured batch size. If you want your applicationto be faster, it's a good idea to run a COUNT() query and a LIMIT query instead.For example, the following SOQL query returns the total number of accounts in theorganization, without any filters. You can use this value in a prompt to the user to ask if they'resure they want to proceed with the query:SELECT COUNT() FROM Account33
Chapter 1: Searching and Querying DataThen you can use the following SOQL query to return a random subset of the total data tothe user. The user might decide that he or she requires additional fields before the full queryshould run:SELECT Name, BillingCity FROM Account LIMIT 25See Also• Implementing the query()/queryMore() Pattern on page 238• “Salesforce.<strong>com</strong> Object Query Language (SOQL)” atwww.salesforce.<strong>com</strong>/us/developer/docs/api/index_CSH.htm#sforce_api_calls_soql.htmSorting Query ResultsProblemYou've issued a SOQL or SOSL query and want the results sorted by the value of one or morefields.SolutionUse the ORDER BY clause in your SOQL or SOSL statement to efficiently receive results inthe order that you prefer.Note: You can't use the ORDER BY clause in any Apex query if it also uses locking.Those query results, however, are always ordered by ID.For example, this SOQL query:SELECT Name FROM Contact ORDER BY FirstNameReturns a list of contacts sorted alphabetically by first name:• Andy Young• Ashley James• Jack Bond• Jill Jazzy• Stella Pavlov• Zebidiah Jazzy34
Searching and Querying DataThis SOQL query:SELECT Name FROM Contact ORDER BY LastName DESC,FirstName DESCReturns a list of contacts sorted in reverse-alphabetical order by last name and then inreverse-alphabetical order by first name:• Andy Young• Stella Pavlov• Zebidiah Jazzy• Jill Jazzy• Ashley James• Jack BondThis SOSL query:FIND {Ja*} RETURNING Contact (Name ORDER BY LastName)Returns a list of contacts that include “Ja” in the name, sorted alphabetically by last name:• Jack Bond• Ashley James• Jill Jazzy• Zebidiah JazzyThis SOSL query:FIND {Ja*} RETURNING Contact (Name ORDER BY LastName,FirstName DESC),Lead (Name ORDER BY FirstName)Returns a list of contacts and leads that include “Ja” in the name, where contacts are sortedalphabetically by last name and then reverse-alphabetically by first name, and where leads aresorted alphabetically by first name:• (Contact) Jack Bond• (Contact) Ashley James• (Contact) Zebidiah Jazzy• (Contact) Jill Jazzy• (Lead) Jack Rodgers• (Lead) Tom Jamison35
Chapter 1: Searching and Querying DataDiscussionORDER BY is the best solution for sorting because the <strong>Force</strong>.<strong>com</strong> server does the work andyour code doesn't need to do anything else after receiving the data.You can sort your query results by any of the specified object's fields that is not a long text areaor multi-select picklist field, even if the field is not one of the query fields that you wantreturned.Note: If you attempt to sort by a long text area or multi-select picklist field, you'llreceive a “malformed query” error message.The ORDER BY clause for SOQL and SOSL includes a number of features:• Sort by Multiple FieldsYou can sort your query by multiple fields, so that records that have the same value for thefirst field are then ordered by the value of a second field. For example, the following queryreturns contacts sorted first by LastName and then by FirstName:SELECT Name FROM Contact ORDER BY LastName,FirstName• Sort in Ascending and Descending OrderYou can specify whether values should be sorted in ascending or descending order by addingthe modifiers ASC or DESC to any sort field. For example, the following query returnscontacts in reverse-alphabetical order:SELECT Name FROM Contact ORDER BY LastName DESC,FirstName DESCWhen this value is not specified, results are sorted in ascending order by default.• Sort Null ValuesYou can also specify whether null values should be sorted at the beginning (FIRST) or end(LAST) of the list of results. For example, the following query places null values at the endof a list of contact mailing cities and states that's organized by state in reverse-alphabeticalorder:SELECT MailingCity, MailingState FROM ContactORDER BY MailingState DESC NULLS LAST36
Searching and Querying DataORDER BY always follows the WHERE clause in a SOQL or SOSL statement. For example:SELECT Name FROM Contact WHERE Name like 'Ja%'ORDER BY LastName, FirstNameNote: SOQL query sorting is case insensitive. If you require case sensitive sorting,you'll need to implement this in your own code.See Also• Choosing Between SOQL and SOSL on page 26• “Salesforce.<strong>com</strong> Object Query Language (SOQL)” atwww.salesforce.<strong>com</strong>/us/developer/docs/api/index_CSH.htm#sforce_api_calls_soql.htm• “Salesforce.<strong>com</strong> Object Search Language (SOSL)” atwww.salesforce.<strong>com</strong>/us/developer/docs/api/index_CSH.htm#sforce_api_calls_sosl.htmViewing TagsProblemYou want to see all the tags that are available in an organization.SolutionUsing the API, perform the search on the TagDefiniton object to retrieve multiple tags.The following call will return a list of the public tags in alphabetic order:sforce.connection.query("SELECT Name FROM TagDefinition " +"WHERE Type = 'Public' ORDER BY Name");An example response might be:• Great Lakes• Manager• Midwest• Northeast• Northwest• Senior Manager• Southeast• Southwest37
Chapter 1: Searching and Querying Data• Staff• Team LeadDiscussionQuerying TagDefinition does not indicate how many times a tag is being used, nor on whattype of record. To find this information, see Viewing Records with Tags on page 38.See Also• Add and Remove Tags on a Single Record on page 261• Add and Remove Tags on Multiple Records on page 263• Updating Tag Definitions on page 265• “TagDefinition” in the <strong>Force</strong>.<strong>com</strong> Web Services API Developer's Guide atwww.salesforce.<strong>com</strong>/us/developer/docs/api/Content/sforce_api_objects_tagdefinition.htmViewing Records with TagsProblemYou want to generate a list of records that use the same public tag.SolutionYou can retrieve a list of records with a particular tag by calling queries on specific tag objects.For instance, to retrieve a list of all contacts tagged as Staff and all contacts tagged as GreatLakes, execute the following in the AJAX Toolkit or your own client application:var staffContactResults = sforce.connection.query("SELECT ItemId " +"FROM ContactTag WHERE Name = 'Staff'");var greatLakesContactResults =sforce.connection.query("SELECT ItemId " +"FROM ContactTag WHERE Name = 'Great Lakes'");Another example: to find all contacts tagged as both Staff and Great Lakes, use the followingquery to form a result array with any null rows dropped:38var ReturnedContacts = sforce.connection.query("SELECT Name, Id, " +"(SELECT ItemId, Name, Id FROM Tags " +"WHERE Name = 'Staff' OR Name = 'Great Lakes') FROM Contact");var TagArray = new Array();var arraySize = 0;for (var i = 0; i < ReturnedContacts.size; i++){if (ReturnedContacts.records[i].Tags != null){
Searching and Querying Data}}TagArray[arraySize] = ReturnedContacts.records[i].Tags;arraySize++;See Also• Add and Remove Tags on a Single Record on page 261• Add and Remove Tags on Multiple Records on page 263• Updating Tag Definitions on page 265• “TagDefinition” in the <strong>Force</strong>.<strong>com</strong> Web Services API Developer's Guide atwww.salesforce.<strong>com</strong>/us/developer/docs/api/index_CSH.htm#sforce_api_objects_tagdefinition.htm• The AJAX Toolkit Developer's Guide atwww.salesforce.<strong>com</strong>/us/developer/docs/ajax/index.htmWriting Shorter Queries Using Outer JoinsProblemYou'd like to write short, simple queries similar to an outer join in SQL. For example, “retrieveall the IDs for accounts whose opportunities are all closed.”SolutionUse IN or NOT IN to write simple queries that exploit Salesforce.<strong>com</strong> support of semi-joinsand anti-joins in SOQL.For example, to find the account IDs for all accounts where there is a lost opportunity associatedto the account, use a semi-join:SELECT Id, NameFROM AccountWHERE Id IN(SELECT AccountId FROM Opportunity WHERE StageName = 'Closed Lost')To find the account IDs for all accounts that have no open opportunities, use an anti-joinquery:SELECT IdFROM AccountWHERE Id NOT IN (SELECT AcountId FROM OpportunityWHERE IsClosed = false)39
Chapter 1: Searching and Querying DataYou can write nested queries using relationships. For example, to find opportunity IDs andtheir related line items if the line item value is greater than $10,000, issue a query similar tothe following:SELECT Id, (SELECT Id from OpportunityLineItem)FROM OpportunityWHERE Id IN (SELECT OpportunityId FROM OpportunityLineItemWHERE totalPrice > 10000)DiscussionBecause semi-joins and anti-joins can potentially use a lot of resources during calculation,salesforce.<strong>com</strong> enforces some limits on these types of queries. For more information, see“Semi-Joins with IN and Anti-Joins with NOT IN” in the <strong>Force</strong>.<strong>com</strong> Web Services API Developer'sGuide.See Also• Using the Enterprise WSDL and the AJAX Toolkit to Examine Your Data Model onpage 18• Sorting Query Results on page 34Making Apex Work in any OrganizationProblemYou want to write Apex scripts that use standard sObjects, then you want to package your codeso other organizations can download it from AppExchange. In addition, you want your codeto work regardless of the standard objects available on the organization that downloads yourpackage.SolutionDynamic Apex enables developers to create more flexible applications by providing them withthe ability to do the following:• Access information about sObjects in general and the fields of an sObject.Describe information for an sObject includes whether that type of sObject supports operationslike create or undelete, the sObject's name and label, the sObject's fields and child objects,and so on. The describe information for a field includes whether the field has a defaultvalue, whether it is a calculated field, the type of the field, and so on.40
Searching and Querying DataNote: Describe information provides information only about objects in anorganization, not individual records.• Write SOQL queries, SOSL queries, and DML that are dynamic; that is, you don't haveto know all the names, objects, or parameters when you first write the code.Dynamic SOQL and SOSL queries provide the ability to execute SOQL or SOSL as a stringat runtime, while dynamic DML provides the ability to create a record dynamically andthen insert it into the database using DML. Using dynamic SOQL, SOSL, and DML, anapplication can be tailored precisely to the organization, as well as the user's permissions.This can be useful for applications that are installed from AppExchange.Note: Because this recipe uses the development mode of Visualforce, be sure you haveenabled it. To enable Visualforce development mode, click Setup ➤ My personalInformation ➤ Personal Information, and click Edit. Select the DevelopmentMode checkbox, and then click Save.This recipe demonstrates using describe information for an organization. It uses a Visualforcepage for displaying the information.1. Create the Apex class that the Visualforce page uses to populate a dropdown with alist of all the sObjects available in the organization. Click Setup ➤ Develop ➤ ApexClasses, then click New.2. Copy and paste the following into the Body text field for the class:public class Describer {private Map schemaMap =Schema.getGlobalDescribe();public List fields {get; set;}public List objectNames{public get; private set;}public String selectedObject {get; set;}// Intialize objectNames and fieldspublic Describer() {objectNames = initObjNames();fields = new List();}// Populate SelectOption list -// find all sObjects available in the organizationprivate List initObjNames() {List objNames =new List();List entities =new List(schemaMap.keySet());entities.sort();for(String name : entities)objNames.add(new SelectOption(name,name));41
Chapter 1: Searching and Querying Data}return objNames;// Find the fields for the selected objectpublic void showFields() {fields.clear();Map fieldMap =schemaMap.get(selectedObject).getDescribe().fields.getMap();}for(Schema.SObjectField sfield : fieldMap.Values()){schema.describefieldresult dfield =sfield.getDescribe();Pair field = new Pair();field.key = dfield.getname();fields.add(field);}}public class Pair {public String key {get; set;}public String val {get; set;}}3. To create the Visualforce page, enter the following URL in your browser's addressbar:http://MySalesforceInstance/apex/DescribePageWhere MySalesforceInstance is the URL for your Salesforce.<strong>com</strong> organization.For example, if your organization uses na3.salesforce.<strong>com</strong>, enterhttp://na3.salesforce.<strong>com</strong>/apex/DescribePage.4. Click Create page DescribePage to create the page.5. At the bottom of the page, click Page Editor.6. Select all the text automatically generated for the page, and replace it with thefollowing:42
Searching and Querying DataDiscussionThe controller first populates the dropdown with the list of sObjects. When a user clicks theGet Describe Object Fields button on the Visualforce page, the controller populates the on the Visualforce page with the names of all the fields associated withthat sObject.See AlsoUsing Properties in Apex on page 13643
Chapter 2: Managing Workflow and ApprovalsChapter 2Managing Workflow and ApprovalsIn this chapter ...• Managing LargeOpportunities UsingTime-Based Workflow• Managing LostOpportunities UsingWorkflow• Using Workflow to NotifyCase Contact for PriorityCases• Using Workflow to AddAccount Names toOpportunity Names• Requiring ParallelApprovals for LargeCampaigns• Using a Matrix-BasedDynamic Approval Process• Sending OutboundMessages with Workflow• Tracking OutboundMessages from Workflow• Updating a Field on aParent RecordYour organization operates more efficiently withstandardized internal procedures and automated businessprocesses. Use workflow rules and approval processes toautomate them. Not only do you save time, but you enforceconsistency across your business practices.Build workflow rules to trigger actions, such as email alerts,tasks, field updates, and outbound messages based on timetriggers, criteria, or formulas. Use approval processes toautomate all of your organization's approvals, from simpleto <strong>com</strong>plex.44
Managing Workflow and ApprovalsManaging Large Opportunities Using Time-BasedWorkflowProblemYou want to create a workflow rule to send an email alert when an opportunity with an amountgreater than $1,000,000 is created, as well as 30 days before, 15 days before, and 5 days afterthe opportunity close date. After the close date, you want to assign a task to the opportunityowner to update the deal.SolutionCreate a workflow rule with multiple time triggers to send email alerts based on the criteriayou specify. In this example, the rule criteria are that the opportunity must have a value greaterthan $1,000,000 and must not be closed. First we'll create the workflow rule, then define theimmediate and time-dependent workflow actions.1. Create a new workflow rule.a. Click Setup ➤ Create ➤ Workflow & Approvals ➤ Workflow Rules.b. Click New Rule.c. Select Opportunity.d. Enter the name and description, then select When a record iscreated, or when a record is edited and did notpreviously meet the rule criteria.e. Under Rule Criteria, select Run this rule if the following andchoose criteria are met.f. Define the rule to fire when Opportunity: Amount greater than1,000,000 and Opportunity: Closed equals FALSE.g. Click Save & Next.2. Add an immediate workflow action to send an email alert when an opportunity meetsthe above criteria.a. Click Add Workflow Action and select New Email.b. Define the workflow alert by providing the description, selecting the emailtemplate, and adding the recipients. In this example, the recipient mightbe the VP of Sales role. To find the right VP, select Role in the Searchmenu and click Find.c. Click Save.3. Create time triggers for large opportunities nearing their close dates, as well as onefor missed opportunities.45
Chapter 2: Managing Workflow and Approvalsa. Click Add Time Trigger in the Time-Dependent Workflow Actionssection of the Edit Workflow Rule page.b. Set a time trigger for 30 days before Opportunity: Close Date andclick Save.c. Set a time trigger for 15 days before Opportunity: Close Date andclick Save.d. Set a time trigger for 5 days after Opportunity: Close Date and clickSave.4. Add actions to each time trigger.a. Under Time-Dependent Workflow Actions, click Add Workflow Actionand select New Email for each of the three time triggers. Define the alertsby providing descriptions, selecting appropriate email templates, and addingrecipients.• For the 30 days before time trigger, the recipient might be the VP ofSales role.• For the 15 days before time trigger, the recipient might be the recordowner.• For the 5 days after time trigger, the recipient might be the ExecutiveSponsor for the Sales team.b. Click Save for each workflow action.c. Click Add Workflow Action and select New Task for the 5 days aftertime trigger.i. Assign the task of updating the deal to the opportunity owner.ii. Set the due date to Rule Trigger Date plus 1 day.iii. Select the Notify Assignee option.iv. Set Status and Priority, and add any <strong>com</strong>ments.d. Click Save.5. Return to the Workflow Rule detail page and click Activate to activate the rule.DiscussionYou want to be able to track large opportunities closely. Proactively manage your opportunitiesusing workflow rules with multiple time triggers. As the close date approaches for a large deal,automatic workflow actions, like email alerts, increase the visibility to executives who can thentake the necessary actions to close the deal.Time-dependent actions can also be used to remindmanagement to review lost deals after the close date to determine the causes of failure, and tolearn what to do next time to ensure success.46
Managing Workflow and ApprovalsSee AlsoManaging Lost Opportunities Using Workflow on page 47Managing Lost Opportunities Using WorkflowProblemYou want to create a workflow rule to send an email alert when an opportunity with an amountgreater than $1,000,000 is closed and lost.SolutionCreate a workflow rule to send email alerts based on the formula you specify. In this example,the rule criteria are that the opportunity must have a value greater than $1,000,000 and Stagechanges from Proposal/Price Quote to Closed Lost. First we'll create the workflow rule, thendefine the immediate workflow actions.1. Create a new workflow rule.a. Click Setup ➤ Create ➤ Workflow & Approvals ➤ Workflow Rules.b. Click New Rule.c. Select Opportunity.d. Enter the name and description, then select Every time a recordis created or edited.e. Under Rule Criteria, select Run this rule if the following andchoose formula evaluates to true.f. Add the following formula to the formula field:AND(ISPICKVAL(StageName,"Closed Lost"),ISPICKVAL(PRIORVALUE(StageName),"Proposal/Price Quote"),Amount > 1000000)g. Click Check Syntax to ensure there were no mistakes, then click Save &Next.2. Add an immediate workflow action to send an email alert when an opportunity meetsthe above criteria.a. Click Add Workflow Action and select New Email.b. Define the workflow alert by providing the description, selecting the emailtemplate, and adding the recipients. In this example, the recipient might47
Chapter 2: Managing Workflow and Approvalsbe the VP of Sales role. To find the right VP, select Role in the Searchmenu and click Find.c. Click Save.3. Return to the Workflow Rule detail page and click Activate to activate the rule.DiscussionIf you lose a large opportunity, you want to know why. Using a workflow rule with a formulafor the rule criteria, you can track specific field value changes using sophisticated formulafunctions, such as ISPICKVAL and PRIORVALUE. When a large opportunity is lost, automaticworkflow actions, like email alerts, notify key people in your organization so that they caninvestigate what went wrong, and learn what to do next time to ensure success.See AlsoManaging Large Opportunities Using Time-Based Workflow on page 4548Using Workflow to Notify Case Contact for PriorityCasesProblemYou want to create a workflow rule to send an email alert to the case contact when you receivea high priority case for accounts that have a Platinum service-level agreement (SLA).SolutionCreate a workflow rule to send email alerts based on the criteria you specify. In this example,the rule criteria are that the case priority is high and the account SLA is platinum. First we'llcreate the workflow rule, then define the immediate workflow actions.1. Create a new workflow rule.a. Click Setup ➤ Create ➤ Workflow & Approvals ➤ Workflow Rules.b. Click New Rule.c. Select Case.d. Enter the name and description, then select Only when a record iscreated.e. Under Rule Criteria, select Run this rule if the following andchoose criteria are met.f. Define the rule to fire when Case: Priority equals HIGH andAccount: SLA equals PLATINUM.
Managing Workflow and Approvals2. Add an immediate workflow action to send an email alert to the case contact whena case meets the above criteria.a. Click Add Workflow Action and select New Email.b. Define the workflow alert by providing the description, selecting the emailtemplate, and adding the recipients. In this example, the recipient is thecase contact.c. Click Save.3. Return to the Workflow Rule detail page and click Activate to activate the rule.DiscussionWhen a high priority account files a case, you want to know right away. Use a workflow rulewith an automatic email alert to notify the right people so that they can take care of your highestpriority customers. Workflow email alerts can be used to notify anyone inside or outside ofyour organization—they don't have to be Salesforce.<strong>com</strong> users.Using Workflow to Add Account Names to OpportunityNamesProblemYou want to create a workflow rule to enforce a consistent naming standard for opportunities.The opportunity name for any opportunity that does not include the associated account namechanges to Account Name: Opportunity Name.SolutionCreate a workflow rule to evaluate all opportunity names based on the formula you specify. Ifthe name does not include the associated account name, it will be added. First we'll create theworkflow rule, then define the immediate actions.1. Create a new workflow rule.a. Click Setup ➤ Create ➤ Workflow & Approvals ➤ Workflow Rules.b. Click New Rule.c. Select the Opportunity object.d. Enter the name and description, then select When a record iscreated, or when a record is edited and did notpreviously meet the rule criteria.e. Under Rule Criteria, select Run this rule if the following andchoose formula evaluates to true.49
Chapter 2: Managing Workflow and Approvalsf. Add the following formula to the formula field:NOT(CONTAINS(Name, Account.Name))g. Click Check Syntax to ensure there were no mistakes, then click Save &Next.2. Add an immediate workflow action to update the Opportunity Name field whenan opportunity meets the above criteria.a. Click Add Workflow Action and select New Field Update.b. Define the workflow field update by providing the name and descriptionand selecting the Field to Update. In this example, selectOpportunity Name.c. Under Text Options, select Use a formula to set the new valueand specify the following formula:Account.Name & ": " & Named. Click Save.3. Return to the Workflow Rule detail page and click Activate to activate the rule.DiscussionYou want to be able to enforce consistency across your business practices. Using a workflowrule with a formula for the rule criteria, you can set standard naming conventions foropportunities or other objects. Formulas can span multiple objects and, when used with fieldupdates within a workflow rule, can be a powerful tool for enforcing <strong>com</strong>pany standards.Requiring Parallel Approvals for Large CampaignsProblemYou want to create an approval process to route all approval requests to the Director ofMarketing, route all approved requests $25,000 or greater to two designated Vice Presidents(VPs) for unanimous approval, and finally, send all requests, regardless of size, to the Directorof Finance for final approval. Requests under $25,000 that are approved by the Director ofMarketing should skip the two VPs and go directly to the Director of Finance.SolutionCreate a three-step approval process based on the criteria you specify. In this example, allrequests are sent to the Director of Marketing, approved requests under $25,000 skip the VPs50
Managing Workflow and Approvalsapproval step and go directly to the Director of Finance; and approved requests $25,000 orgreater are sent to the VPs for parallel approval. Both must approve the request.First we'll create the approval process, then define the approval steps and final approval/rejectionactions.1. Create a new approval process.a. Click Setup ➤ Create ➤ Workflow & Approvals ➤ Approval Processes.b. From the Manage Approval Processes For drop-down list, selectthe object type for this approval process. For this example, select Campaign.c. Click Create New Approval Process and select Use Standard SetupWizard.d. Enter the Process Name and Description for your new approvalprocess, then click Next.e. From the Use this approval process if the followingdrop-down list, select criteria are met.f. Define the rule to fire when Status not equal to Completed,Aborted and Budgeted Cost not equal to 0.g. Click Next.h. Leave the default selections for Step 3, then click Next.i. For the Approval Assignment Email Template, find and select theappropriate template, then click Next.j. Leave the default selections for Step 5, but select the Display approvalhistory information... option, then click Next.k. By default, only the record owner—Campaign Owner, in this example—islisted under Allowed Submitters. Add any other users, groups, or rolesthat are allowed to submit requests for approval. Select the Allowsubmitters to recall approval requests option to enable therecall feature for the submitter.Note: Admin users can recall approval requests, regardless of thissetting. This option only enables recall for the user submitting theapproval request.l. Click Save.m. Select Yes, I'd like to create an approval step now, thenclick Go.2. Create the first approval step.a. If you're not already on the New Approval Step page, click New ApprovalStep in the Approval Steps section of the Approval Process detail page.b. Enter the name and description. Let's call this step “Marketing Approval.”Click Next.51
Chapter 2: Managing Workflow and Approvalsc. For the step criteria, select All records should enter this step.Click Next.d. Select Automatically assign to approver(s), choose User, andfind and select the user you want. In this example, the first approver is aDirector of Marketing. Since there is only one approver for this step, leavethe default for the When multiple approvers are selected:setting. You can also allow the approver's delegate to approve the request.e. Click Save.f. Select the No, I'll do this later... option and click Go.3. Create the second approval step.a. Click New Approval Step in the Approval Steps section of the ApprovalProcess detail page.b. Enter the name and description. Let's call this step “Large BudgetApproval.” Click Next.c. For the step criteria, select Enter this step if the followingand choose criteria are met.d. Set the criteria as Budgeted Cost greater or equal 25000.e. Select Automatically assign to approver(s), choose User, andfind and select the user you want. In this example, the first approver is thefirst VP.f. Click Add Rowg. Choose User, and find and select the user you want. In this example, thefirst approver is the second VP.h. Select the Require UNANIMOUS approval from all selectedapprovers option.i. Under Reject Behavior, select the Perform ONLY the rejectionactions for this step and send the approval requestback to the most recent approver. (Go Back 1 Step)option. If either of the VPs rejects the request, it gets sent back to theMarketing Approval step.j. Click Save.k. Select the No, I'll do this later... option and click Go.4. Create the third approval step.a. Click New Approval Step in the Approval Steps section of the ApprovalProcess detail page.b. Enter the name and description. Let's call this step “Finance Approval.”Click Next.c. For the step criteria, select All records should enter this step.52
Managing Workflow and Approvalsd. Select Automatically assign to approver(s), choose User, andfind and select the user you want. In this example, the approver is theDirector of Finance.e. Under Reject Behavior, select the Perform all rejection actionsfor this step AND all final rejection actions. (FinalRejection) option.f. Click Save.g. Select the No, I'll do this later... option and click Go.5. Go back and edit Step 2.a. Click Edit next to Step 2.b. Click Next to go to the Specify Step Criteria page of the wizard.c. For the else option, select go to next step. Approved requests less than$25,000 are sent directly to the Finance Approval step, skipping the LargeBudget Approval step.d. Click Save.Note: You have to create Step 3 before you can set the elseoption. This option isn't enabled for the last step of an approvalprocess.6. Add final approval actions for the approval process.a. Click Add New, then select Email in the Final Approval Actions sectionof the Approval Process detail page.b. Add a description.c. For the Email Template, find and select a template to use for theapproval message.d. For the Search field, select Owner.e. Select Campaign Owner and click Add. On approval, the campaign ownerreceives email notification.f. Click Save.7. Add final rejection actions for the approval process.a. Click Add New, then select Email in the Final Rejection Actions sectionof the Approval Process detail page.b. Add a description.c. For the Email Template, find and select a template to use for therejection message.d. For the Search field, select Owner.e. Select Campaign Owner and click Add. On rejection, the campaign ownerreceives email notification.53
Chapter 2: Managing Workflow and Approvalsf. Click Save.8. Return to the Approval Process detail page and click Activate to activate the approvalprocess.DiscussionAutomating your <strong>com</strong>pany's campaign budget approval process enforces your best businesspractices. Use a single approval process to manage multiple conditions and approvalrequirements. Requiring multiple, unanimous approvals enforces stricter standards for largebudget approvals, while the option to skip certain approval steps streamlines the process. Usingparallel approvals and the “else” option, you can create sophisticated processes to match your<strong>com</strong>plex business needs.Using a Matrix-Based Dynamic Approval ProcessProblemYou want to be able to create a single criteria-based approval process to route opportunitydiscount approval requests to designated approvers, based on the requester's region and theopportunity's account type.SolutionThe Dynamic Approval Routing application, available for free on AppExchange, provides asample solution that automates an opportunity discount approval process based on region andaccount type, and routes opportunities through three required levels of approval.The DynamicApproval Routing application <strong>com</strong>es packaged with the necessary custom object, validationrule, Apex class, and Apex triggers and tests. The package also <strong>com</strong>es with documentation onhow to customize the application to fit your needs.To take advantage of dynamic approvals, do the following:1. Go to AppExchange and install the Dynamic Approval Routing application.Note: For Developer Edition organizations, or any organizations with fewerthan three users, select the Ignore Apex test failures checkbox beforeinstalling the package. Otherwise, the Apex test fails and the installationdoes not succeed.2. Once installation is <strong>com</strong>plete, click All Tabs, then click Customize My Tabs. Addthe Approval Routing Rules tab to the Selected Tabs list.3. Customize the following fields' picklist values to match your organization.54
Managing Workflow and Approvals• Owner Region—Custom picklist field on the User object to model theopportunity owner’s region. Set the region for all opportunity owners.• Account Type—Custom picklist field on the Opportunity object to model theaccount type associated with the opportunity. Set the account type for allopportunities.Note: You may have to enable the Owner Region and Account Typefields in the Page Layouts for Users and Opportunities, respectively.4. Create an Approval Routing Rule for each <strong>com</strong>bination of region and account type.a. Select the Account Type and Owner Region for the rule.The RoutingKey, a <strong>com</strong>posite key based on the Account Type and Owner Regionfields, is created automatically.b. For each rule, select approvers for Level1, Level2, and Level3, thecustom user lookup fields used to model the levels of authorization.Approvers for all opportunities are assigned according to the submitter'sregion and the opportunity's type.5. Create the approval process for opportunity discounts.a. Click Setup ➤ Create ➤ Workflow & Approvals ➤ Approval Processes.b. From the Manage Approval Processes For drop-down list, selectthe object type for this approval process. For this example, selectOpportunity.c. Click Create New Approval Process and select Use Standard SetupWizard.d. Enter the Process Name (Opportunity Discount Approval) andDescription for your new approval process, then click Next.e. From the Use this approval process if the followingdrop-down list, select criteria are met.f. Define the rule to fire when Closed equals False.g. Click Next.h. Leave the Next Automated Approver Determined By set at None,but select the Administrators OR the currently assignedapprover can edit records during the approval processoption, then click Next.i. Leave the Approval Assignment Email Template blank, then clickNext.j. Select the fields you want to display on the approval page, click theDisplay approval history information... option, then clickNext.k. By default, only the record owner—Opportunity Owner, in this example—islisted under Allowed Submitters. Leave this setting.55
Chapter 2: Managing Workflow and Approvalsl. Click Save.Note: The approval process described here is a generic one. Youcan create any approval process you want to use the ApprovalRouting Rules you defined in the Dynamic Approval Routingcustom object.6. Create the three approval steps to correspond to the Level1, Level2, and Level3approver fields defined in the Approval Routing Rule.a. From the Approval Process Detail page, click New Approval Step.b. Name the steps Level 1 Approval, Level 2 Approval, Level3 Approval.c. For the step criteria, select All records should enter this step.d. Select Automatically assign to approver(s) and choose RelatedUser.e. Find and select Level1, Level2, and Level3 for your three steps, respectively.f. Click Save.Once you be<strong>com</strong>e more familiar with how these routing rules work, you can design data-drivenapproval routing for all approval processes involving multiple routing criteria.DiscussionIn previous Salesforce.<strong>com</strong> releases, implementing a solution for an organization with multipleaccount types and regions would require multiple approval processes: one for each <strong>com</strong>binationof region and account type. As the numbers of account types and regions grow, the numberof approval processes required jump significantly. For example, if you had two account typesand three regions, you would need six approval processes; if you had 10 account types and fiveregions, you would need to create and maintain 50 approval processes.By leveraging the Dynamic Approval Routing application, which uses a custom object, validationrules, and Apex code, you can create a single data-driven approval process to handle your most<strong>com</strong>plex approval processes.56Sending Outbound Messages with WorkflowProblemYou want to send an outbound message to an external Web service when records are createdor updated in Salesforce.<strong>com</strong>.
Managing Workflow and ApprovalsSolutionSet up a workflow rule to send the outbound message, generate the WSDL document for themessage, and then set up a listener in your language of choice.For the following example, we'll revisit our sample Recruiting application. We'll set up amessage to a legal services provider if a visa is required before a candidate can start his or hernew job:1. Click Setup ➤ Create ➤ Workflow & Approvals ➤ Workflow Rules and createa new workflow rule that fires when a candidate is created, or when a candidate isedited and did not previously meet the rule's criteria. Set the criteria for the rule tobe “Visa Required equals True.”2. Add an outbound message workflow action:a. In the Immediate Workflow Actions area, click Add Workflow Action➤ New Outbound Message.b. Enter a name and description for the outbound message.c. Specify the Endpoint URL for the recipient of the message. Salesforce.<strong>com</strong>sends a SOAP message to this endpoint, which is the Web service listenerthat will consume the outbound message.d. Select a Salesforce.<strong>com</strong> user whose security settings will control the datathat's visible for the message.e. Select Include Session ID if you want the Salesforce.<strong>com</strong> sessionIdincluded in the message. You should include it if you intend to make APIcalls and you don't want to include a username and password in the bodyof your message (which is far less secure than sending the sessionId).f. Select the field values that you want included in the outbound message.g. Click Save.3. Activate the workflow rule by returning to the Workflow Rule detail page and clickingActivate.4. Generate the WSDL document for your outbound message: Return to the OutboundMessage detail page by clicking Setup ➤ Create ➤ Workflow & Approvals ➤Outbound Messages and selecting the name of the outbound message. Then clickClick for WSDL. This file is bound to the outbound message and contains theinstructions about how to reach the endpoint service and what data is sent to it. Savethe file to your local machine.5. Build a listener for the outbound message.This Web service endpoint has to conformto the definition of the WSDL file. For example, to build a listener using .NET:a. Run wsdl.exe/serverInterfaceleads.wsdl with .NET 2.0. Thisgenerates NotificationServiceInterfaces.cs, which defines thenotification interface.b. Create a class that implements NotificationServiceInterfaces.cs.57
Chapter 2: Managing Workflow and ApprovalsWhile there are a number of ways to do this, one simple way is to <strong>com</strong>pilethe interface to a .dll first (.dlls must be in the bin directory in ASP.NET):mkdir bin csc /t:library /out:bin\nsi.dllNotificationServiceInterfaces.csThen write an ASMX-based Web service that implements this interface.For example, a very simple implementation inMyNotificationListener.asmx might be:class MyNotificationListener : INotificationBinding{public notificationsResponsenotifications(notifications n){notificationsResponse r =new notificationsResponse();r.Ack = true;return r;}}c. Deploy the service by creating a new virtual directory in IIS for the directorythat contains MyNotificationListener.asmx.You can test that the service is deployed by viewing the service page witha browser. For example, if you create a virtual directory namedsalesforce, navigate tohttp://localhost/salesforce/MyNotificationListener.asmx.DiscussionAlthough this recipe only outlines the procedure for a .NET-based solution using IIS, theprocess for other Web services-enabled languages and tools is similar. Note that your listenermust meet the following requirements:• It must be reachable from the public Internet.• If it uses SSL, it must use one of the following ports:- 80: this port only accepts HTTP connections- 443: this port only accepts HTTPS connections- 7000-10000: these ports accept HTTP or HTTPS connections• If it requires client certificates, you must have the current Salesforce.<strong>com</strong> client certificateavailable at Setup ➤ Develop ➤ API.58
Managing Workflow and Approvals• The <strong>com</strong>mon name (CN) of the listener's certificate must match the domain name for yourendpoint's server, and the certificate must be issued by a Certificate Authority trusted bythe Java 2 Platform, Standard Edition 5.0 ( JDK 1.5).See Also• Tracking Outbound Messages from Workflow on page 59• “Outbound Messaging” in the <strong>Force</strong>.<strong>com</strong> Web Services API Developer's Guide atwww.salesforce.<strong>com</strong>/us/developer/docs/api/index_CSH.htm#sforce_api_om_outboundmessaging.htm• The “Creating an Outbound Messaging Notification Service with CSharp and .NetFramework 2.0” whitepaper at wiki.apexdevnet.<strong>com</strong>/index.php/Creating_an_Outbound_Messaging_Notification_Service_with_CSharp_and_.Net_Framework_2.0Tracking Outbound Messages from WorkflowProblemYou want to track the status of the outbound messages that have been sent to external serversas a result of a workflow rule.SolutionClick Setup ➤ Monitoring ➤ Outbound Messages.Alternatively, click Setup ➤ Create ➤ Workflow & Approvals ➤ Outbound Messages, andthen click View Message Delivery Status. From this page you can:• View the status of your outbound messages, including the total number of attempteddeliveries• View the action that triggered the outbound message by clicking any workflow or approvalprocess action ID• Click Retry next to a message to immediately re-deliver the message• Click Del next to a message to permanently remove the outbound message from the queueSee Also• Sending Outbound Messages with Workflow on page 56• “Outbound Messaging” in the <strong>Force</strong>.<strong>com</strong> Web Services API Developer's Guide atwww.salesforce.<strong>com</strong>/us/developer/docs/api/index_CSH.htm#sforce_api_om_outboundmessaging.htm59
Chapter 2: Managing Workflow and Approvals• The “Creating an Outbound Messaging Notification Service with CSharp and .NetFramework 2.0” whitepaper at wiki.apexdevnet.<strong>com</strong>/index.php/Creating_an_Outbound_Messaging_Notification_Service_with_CSharp_and_.Net_Framework_2.0Updating a Field on a Parent RecordProblemYou want to create a workflow rule to close an application when a candidate accepts a job offer.Applications and Candidates, both custom objects, have a master-detail relationship in theRecruiting application.SolutionCreate a workflow rule that performs a field update on the parent record, based on the criteriayou specify. In this example, when the Candidate Status field changes to “Accepted,” theApplication Status field is set to “Closed.” First we'll create the workflow rule, then define theimmediate workflow actions.Note: For this example, the Workflow and Roll-Up Summary Field Evaluationscritical update must be activated. To do this, click Setup ➤ Critical Updates. In theUpdates list, find “Workflow and Roll-Up Summary Field Evaluations.” Be sure toread the Possible Impact message, then click Activate.1. Create a new workflow rule:a. Click Setup ➤ Create ➤ Workflow & Approvals ➤ Workflow Rules.b. Click New Rule.c. Select the object to which this rule applies. In this example, though thefield update occurs on the Application record, select the Candidate record,as that is the object that controls whether or not the rule runs. Click Next.d. Enter a rule name and optionally, a description.e. For the evaluation criteria, choose When a record is created, orwhen a record is edited and did not previously meetthe rule criteria.f. Under Rule Criteria, choose criteria are met, then specify the filter“Candidate: Status equals Accepted”.2. Add an immediate workflow action to perform a field update when a candidate meetsthe criteria you specified:60a. Click Edit in the Workflow Actions section of the Workflow Rule detailpage.b. Click Add Workflow Action and select New Field Update.
Managing Workflow and Approvalsc. Define the field update by providing the name, description, and field toupdate. Since the field update occurs on the master record, select theApplication object, then specify the Application: Status field.d. Click Save.3. Return to the Workflow Rule detail page and click Activate to activate the rule.DiscussionYou want to be able to perform field updates on parent records. For standard objects, workflowrules can only perform field updates on the object related to the rule. The exceptions are thatboth Case Comments and Email Messages can perform cross-object field updates on Cases.For all custom objects, however, you can create workflow actions where a change to a detailrecord updates a field on the related master record. Cross-object field updates only work forcustom-to-custom master-detail relationships.See Also• The Sample Recruiting App on page 3• “Creating Workflow Rules” in the Salesforce.<strong>com</strong> online help• “Field Update Considerations” in the Salesforce.<strong>com</strong> online help61
Chapter 3: Customizing the User InterfaceChapter 3Customizing the User InterfaceIn this chapter ...This chapter contains recipes that help you make basic• Overriding a StandardButtonmodifications to the Salesforce.<strong>com</strong> application using Apexand Visualforce.• Creating a Button with Apex enables a new class of applications and features to beApexdeveloped and deployed on the platform by providing theability to capture business logic and rules.The language uses• Creating a Consistenta <strong>com</strong>bination of Java-like syntax with API functions andLook and Feel with StaticSOQL to let you define triggers, classes, and otherResourcesrepresentations of business logic that can interact with the• Formatting a Currency platform at a low level. Conceptually similar to a stored••Building a Table of Datain a Visualforce PageBuilding a Form in aprocedure system, Apex allows almost any kind oftransactional, <strong>com</strong>plex logic to be developed and run entirelyin the cloud.Visualforce PageSimilar to the way Apex dramatically increases the power• Creating a Wizard withof developers to customize business logic, VisualforceVisualforce Pagesdramatically increases the power of developers to customize• Creating Custom Help the user interface. With this markup language, each tag••Creating a CustomVisualforce ComponentOverriding a Standardcorresponds to a coarse or fine-grained <strong>com</strong>ponent, such asa section of a page, a related list, or a field. The <strong>com</strong>ponentscan either be controlled by the same logic that's used inPagestandard pages, or developers can associate their own logic• Redirecting to a Standardwith a controller written in Apex. With this architecture,Object List Pagedesigners and developers can easily split up the work thatgoes with building a new application—designers can focus• Dynamically Updating aon the user interface, while developers can work on thePagebusiness logic that drives the app.• Overriding a Page forSome, but not All, Users62
Customizing the User Interface• Referencing an ExistingPage• Defining SkeletonVisualforce Templates• Creating Tabbed Accounts• Adding CSS toVisualforce Pages• Editing Multiple RecordsUsing a Visualforce ListController• Selecting Records with aVisualforce Custom ListController63
Chapter 3: Customizing the User InterfaceOverriding a Standard ButtonProblemYou want to override what happens when a user clicks a standard button, such as New or Edit.SolutionTo override a button on a standard object:1. Click Setup ➤ Customize, select the name of the object, and then click Buttonsand Links.2. In the Standard Buttons and Links related list, click Override next to the name ofthe button you want to change.3. Select Visualforce Page as the content type.4. Select a Visualforce page from the content name drop-down list.Only Visualforce pages that use the standard controller for the object on which thebutton appears can be selected. For example, if you want to use a page to overridethe Edit button on accounts, the page markup must include thestandardController="Account" attribute on the tag:... page content here ...5. Click Save.To override a button on a custom object:1. Click Setup ➤ Create ➤ Objects and select the name of the object.2. Scroll down to the Standard Buttons and Links related list and click Override nextto the name of the button you want to override.3. Select Visualforce Page as the content type.4. Select a Visualforce page from the content name drop-down list.Only Visualforce pages that use the standard controller for the object on which thebutton appears can be selected. For example, if you want to use a page to overridethe Edit button on accounts, the page markup must include thestandardController="Account" attribute on the tag:... page content here ...64
Customizing the User Interface5. Click Save.DiscussionFor standard and custom objects in the application, you can override the following standardbuttons:• New• View• Edit• Delete• Clone• AcceptAdditionally, some standard objects also have special actions. For example, Leads have Convert,Change Status, Add to Campaign, and others. These actions can also be overridden.However, because Visualforce pages are only available through the Salesforce.<strong>com</strong> user interface,overriding the New button for contacts has no effect on new contacts that are created via Apexor the API.You can only override standard buttons that appear on an object's detail page or list views.Buttons that only appear on an edit page or in reports can't be overridden.As a final note, button overrides shouldn't be confused with Apex triggers, which execute intandem with the typical behavior. Button overrides replace the standard behavior entirely. Forexample, if you override the Delete button on Accounts and a user attempts to delete anaccount, it won't necessarily be deleted. Instead, the user is forwarded on to the URL of yourchoosing, which may or may not include code to delete the account. If you define an Apexdelete trigger on Accounts, however, the normal delete behavior still occurs, as long as thetrigger doesn't prevent deletion by adding an error to the record.See Also• Overriding a Standard Page on page 85• Overriding a Page for Some, but not All, Users on page 9365
Chapter 3: Customizing the User InterfaceCreating a Button with ApexProblemYou want to create a new button that executes logic written in Apex.SolutionDefine a webService method in Apex and then call it using the AJAX Toolkit in a button.For example, suppose you want to create a Mass Add Notes button on accounts:1. Define the Web service method in Apex by clicking Setup ➤ Develop ➤ ApexClasses, clicking New, and adding the following code into the body of your newclass:global class MassNoteInsert{}WebService static Integer insertNotes(String iTitle,String iBody,Id[] iParentIds) {Note[] notes = new Note[0];iBody = String.escapeSingleQuotes(iBody);for (Id iParentId : iParentIds) {notes.add(new Note(parentId = iParentId,title = iTitle, body = iBody));}insert notes; //Bulk Insertreturn notes.size();}2. Then, click Setup ➤ Customize ➤ Accounts ➤ Buttons and Links, and click Newin the Custom Buttons and Links related list.3. Name the button and assign it the following attributes:• Display Type: List Button• Behavior: Execute JavaScript• Content Source: OnClick JavaScript4. In the code for the button, enter:{!REQUIRESCRIPT("/soap/ajax/14.0/connection.js")}{!REQUIRESCRIPT("/soap/ajax/14.0/apex.js")}66var idsToInsert= {!GETRECORDIDS( $ObjectType.Account )};var noteTitle = prompt("Please enter the title of the note");
Customizing the User Interfacevar noteBody = prompt("Please enter the body of the note");if (idsToInsert.length) {// Now make a synchronous call to the Apex Web service// methodvar result = sforce.apex.execute("MassNoteInsert", // class"insertNotes",// method{iTitle : noteTitle, // method argumentsiBody: noteBody,iParentIds: idsToInsert });alert(result[0] + " notes inserted!"); //response} else if (idsToInsert.length == 0) {alert("Please select the accounts to which" +" you would like to add notes.");}5. Click Save.6. Click Setup ➤ Customize ➤ Accounts ➤ Search Layouts and add the button tothe Accounts List View layout.To test this new button, visit the Accounts tab and click Go! to view a list of accounts. Selectone or more accounts and click Mass Add Notes.Creating a Consistent Look and Feel with StaticResourcesProblemYou want all of your Visualforce pages to have a consistent look and feel that can easily beupdated.SolutionCreate a static resource from a Cascading Style Sheet and include it in your Visualforce pages.A static resource is a file or archive that you upload and then reference in a Visualforce page.To create a static resource from a stylesheet:1. Click Setup ➤ Develop ➤ Static Resources.2. Click New Static Resource.3. In the Name text box, enter myStyleSheet. This name is used to identify theresource in Visualforce markup.4. In the Description text area, enter My site-wide stylesheet.67
Chapter 3: Customizing the User Interface5. Next to the File text box, click Browse to navigate to a local copy of your stylesheet.6. Click Save.To reference the stylesheet in a page, create the following Visualforce page:My StyleThis page uses styles from my stylesheet.The stylesheet is a static resource.To change the look of your pages, all you need to do is update the static resource with yournew styles, and every page that uses that static resource displays with your new style.DiscussionStatic resources can be used for many other purposes, not just stylesheets. A static resource canbe an archive (such as .zip and .jar files), image, stylesheet, JavaScript, or any other type of fileyou want to use in your Visualforce pages.A static resource name can only contain alphanumeric characters, must begin with a letter, andmust be unique in your organization. If you reference a static resource in Visualforce markupand then change the name of the resource, the Visualforce markup is updated to reflect thatchange.A single static resource can be up to 5 MB in size, and an organization can have up to 250 MBof static resources, total.See Also• Creating Custom Help• “Managing Static Resources” in the Salesforce.<strong>com</strong> online help• Visualforce Developer's GuideFormatting a CurrencyProblemYou want to display a currency value, but the API doesn't return currencies in a formattedstate.68
Customizing the User InterfaceSolutionUse Visualforce to display currencies in a manner that is correctly formatted for your users.The following Visualforce page will show Opportunity date and amount values in the formatfor their locale.DiscussionThe Visualforce <strong>com</strong>ponent does the formatting automatically forusers in all locales.Building a Table of Data in a Visualforce PageProblemYou want to display a set of records in a table in a Visualforce page.SolutionDefine a custom controller that returns the set of records you want to display, and then usethe tag to display the results. For example, assume that you want todisplay the contacts associated with a record in a table.1. Create a controller so that it returns a list of associated contacts with an accountrecord:public class mySecondController {}public Account getAccount() {return [select id, name,(select id, firstname, lastnamefrom Contacts limit 5)from Account where id =:System.currentPageReference().getParameters().get('id')];}69
Chapter 3: Customizing the User Interface2. Iterate over the resulting contacts with the tag.This tag allowsus to define an iteration variable that we can use to access the fields on each contact:You belong to the {!account.name} account.{!contact.FirstName}{!contact.LastName}DiscussionFigure 7: The ComponentNotice that the tag supports styling attributes like cellPadding andborder. You can also style individual data elements with HTML tags. For example, thefollowing <strong>com</strong>ponent makes the last name of each contact bold:{!contact.FirstName}{!contact.LastName}70
Customizing the User InterfaceSee Also• Using Query String Parameters in a Visualforce Page on page 132• Building a Form in a Visualforce Page on page 71• Using AJAX in a Visualforce Page on page 134• Creating a Wizard with Visualforce Pages on page 72Building a Form in a Visualforce PageProblemYou want to create a Visualforce page that captures input from users.SolutionUse the tag with one or more input <strong>com</strong>ponents and a or tag to submit the form.DiscussionTo gather data for fields that are defined on a custom or standard object, use the tag. This tag renders the appropriate input widget based on the field'stype. For example, if you use an tag to display a date field, a calendarwidget displays on the form. If you use an tag to display a picklist field,a drop-down list displays instead.For example, the following page allows users to edit and save the name of an account.You belong to the {!account.name} account.Account Name:Note: Remember, for this page to display account data, the ID of a valid accountrecord must be specified as a query parameter in the URL for the page.71
Chapter 3: Customizing the User InterfaceNotice that the tag is associated with the save action of thestandard controller, which performs the same action as the Save button on the standard editpage. The tag is bound to the account name field by setting the valueattribute with an expression containing dot notation.Figure 8: The Component with a Single Input FieldThe tag can be used with either standard or custom controllers andenforces all security restrictions and other flags on the field, such as whether a value for thefield is required, or whether it must be unique from the value on all other records of that type.Its only drawback is that if it's used to display variables in a custom controller that aren't boundto an object field, the variables might not display the way you want them to.To gather data for these variables, use the , ,, , or tags instead.To learn more about these tags, browse the <strong>com</strong>ponent library by clicking ComponentReference in the Page Editor or accessing it through the Salesforce.<strong>com</strong> online help.See Also• Using Query String Parameters in a Visualforce Page on page 132• Building a Table of Data in a Visualforce Page on page 69• Using AJAX in a Visualforce Page on page 134• Creating a Wizard with Visualforce Pages on page 72Creating a Wizard with Visualforce PagesProblemYou want to create a three-step opportunity wizard that allows users to create an opportunityat the same time as a related contact, account, and contact role:• The first step captures information related to the account and contact• The second step captures information related to the opportunity• The final step shows which records will be created and allows the user to save or cancel72
Customizing the User InterfaceSolutionDefine three Visualforce pages for each of the three steps in the wizard, plus a single customcontroller that sets up navigation between each of the pages and tracks the data that the userenters.It's important to understand the best procedure for creating the Visualforce pages, since thethree pages and the custom controller reference each other. In what appears to be a Catch-22,you can't create the controller without the pages, but the pages have to exist in order for youto refer to them in the controller.Luckily, we can work our way out of this conundrum by defining a page that's <strong>com</strong>pletelyempty. To create the wizard pages and controller:1. Navigate to the URL for the first page:https://.salesforce.<strong>com</strong>/apex/opptyStep12. Click Create Page newOpptyStep1.3. Repeat the two steps above for the other pages in the wizard: opptyStep2 andopptyStep3.Note: Although you can create an empty page, the reverse is not true. Inorder for a page to refer to a controller, the controller has to exist with allof its methods and properties.Now all three of the pages exist. Even though they are empty, they need to existbefore we can create a controller that refers to them.4. Create the newOpportunityController controller by adding it as an attributeto the tag on one of your pages (for example, , and clicking Create Apexcontroller newOpportunityController. Paste in all of the following controller code:/** This class is the controller behind the New Customer Opportunity* wizard. The new wizard is <strong>com</strong>prised of three pages, each of* which utilizes the same instance of this controller.*/public class newOpportunityController {// These four class variables maintain the state of the wizard.// When users enter data into the wizard, their input is stored// in these variables.Account account;Contact contact;Opportunity opportunity;OpportunityContactRole role;// The next four methods return one of each of the four class// variables. If this is the first time the method is called,73
Chapter 3: Customizing the User Interface// it creates an empty record for the variable.public Account getAccount() {if(account == null) account = new Account();return account;}public Contact getContact() {if(contact == null) contact = new Contact();return contact;}public Opportunity getOpportunity() {if(opportunity == null) opportunity = new Opportunity();return opportunity;}public OpportunityContactRole getRole() {if(role == null) role = new OpportunityContactRole();return role;}74// The next three methods are used to control navigation through// the wizard. Each returns a reference to one of the three pages// in the wizard.public PageReference step1() {return Page.newOpptyStep1;}public PageReference step2() {return Page.newOpptyStep2;}public PageReference step3() {return Page.newOpptyStep3;}// This method performs the final save for all four objects, and// then navigates the user to the detail page for the new// opportunity.public PageReference save() {// Create the account. Before inserting, copy the contact's// phone number into the account phone number field.account.phone = contact.phone;insert account;// Create the contact. Before inserting, use the id field// that's created once the account is inserted to create// the relationship between the contact and the account.contact.accountId = account.id;insert contact;// Create the opportunity. Before inserting, create// another relationship with the account.opportunity.accountId = account.id;
Customizing the User Interfaceinsert opportunity;// Create the junction contact role between the opportunity// and the contact.role.opportunityId = opportunity.id;role.contactId = contact.id;insert role;// Finally, send the user to the detail page for// the new opportunity.// Note that using '/' in the new PageReference object keeps// the user in the current instance of salesforce, rather than// redirecting him or her elsewhere.PageReference opptyPage = new PageReference('/' +opportunity.id);opptyPage.setRedirect(true);}return opptyPage;}5. Save the controller.6. Navigate to the URL for the first page:https://.salesforce.<strong>com</strong>/apex/opptyStep1 and copy in thefollowing:75
Chapter 3: Customizing the User Interface767. Save the page.8. Navigate to the URL for the first page:https://.salesforce.<strong>com</strong>/apex/opptyStep2 and copy in thefollowing:
Customizing the User Interfacevalue="{!opportunity.closeDate}"/>9. Save the page.10. Navigate to the URL for the first page:https://.salesforce.<strong>com</strong>/apex/opptyStep3 and copy in thefollowing:77
Chapter 3: Customizing the User Interface11. Save the page.You'll now have a wizard that is <strong>com</strong>posed of the following three pages:Figure 9: Step 1 of the New Customer Opportunity Wizard78
Customizing the User InterfaceFigure 10: Step 2 of the New Customer Opportunity WizardFigure 11: Step 3 of the New Customer Opportunity WizardYou can start the wizard by navigating to the first page:https://.salesforce.<strong>com</strong>/apex/opptyStep1.79
Chapter 3: Customizing the User InterfaceDiscussionOn page 1 of the wizard, data about the associated contact and account is gathered from theuser. Notice the following about the code for the first page of the wizard:• Some tags, including , can take an optional childelement that controls the header or footer of the <strong>com</strong>ponent. The order in which the facettag appears in the body doesn't matter because it includes a nameattribute that identifies where the element should be placed. In this page of the wizard, thefacet tag defines the Next button that appears in the footer of the pageBlock area.• An tag represents a user control that executes a method in thecontroller class. In this page of the wizard, the Next button calls the step2() method inthe controller, which returns a PageReference to the next step of the wizard. Commandbuttons must appear in a form, because the form <strong>com</strong>ponent itself is responsible forrefreshing the page display based on the new pageReference.• An tag organizes a set of data for display. Similar to a table, it simplytakes a number of columns and then places all child elements in successive cells, inleft-to-right, top-to-bottom order. For example, in the Account Information area of thispage, the “Account Name” label is in the first cell, the input field for Account Name isin the second cell, the “Account Site” label is in the third cell, and the input field forAccount Site is in the fourth.• The value attribute on the first tag in the preceding code excerptassigns the user's input to the name field of the account record that's returned by thegetAccount() method in the controller.• The and tags can be bound together whenthe id attribute value on tag matches the for attribute value on. Binding these tags together improves the user experience becauseit provides special behavior in the Web page. For example, clicking on the label puts thecursor in the associated input field. Likewise, if the input is a checkbox, it toggles thecheckmark.On page 2 of the wizard, data about the opportunity is gathered from the user. Notice thefollowing about the code for the second page of the wizard:80
Customizing the User Interface• Because this page displays two buttons in the pageBlock footer, they're wrapped in an tag. This tag needs to be used because expectsonly one child <strong>com</strong>ponent.Note: You also must use an tag within an if you want to place more than one <strong>com</strong>ponent into a singlecell of the grid.• Although the code for placing the Close Date, Stage, and Role for Contact fieldson the form is the same as the other fields, the tag examines thedata type of each field to determine how to display it. For example, clicking in the CloseDate text box brings up a calendar from which users can select the date.On page 3 of the wizard, the user can choose to save the changes or cancel. Notice that thethird page of the wizard simply writes text to the page with tags.See Also• Using Query String Parameters in a Visualforce Page on page 132• Building a Table of Data in a Visualforce Page on page 69• Building a Form in a Visualforce Page on page 71• Using AJAX in a Visualforce Page on page 134Creating Custom HelpProblemYou've extended Salesforce.<strong>com</strong> and developed new functionality for your users. Now you needto tell them how to use this new functionality.SolutionYou can use the <strong>com</strong>ponent to redirect from a Visualforce page to astatic resource.This functionality allows you to add rich, custom help to your Visualforce pages.For example, to redirect a user to a PDF:1. Upload the PDF as a static resource named customhelp.2. On your Visualforce page, create the following link:
Customizing the User InterfaceSolutionYou can create a custom <strong>com</strong>ponent and use that on your Visualforce page. The followingcustom <strong>com</strong>ponent allows your users to easily increase or decrease a value on the page. First,create the <strong>com</strong>ponent, and then add it to a Visualforce page.To create a custom <strong>com</strong>ponent:1. In Salesforce.<strong>com</strong> click Setup ➤ Develop ➤ Components.2. Click New.3. In the Label text box, enter Add or Subtract Values.4. In the Name text box, enter addSubValue.5. In the Description text box, enter Increase or decrease a value.6. In the Body text box, enter the following Visualforce markup:funtion increment(valueId) {if(document.getElementById(valueId).value < {!max}){document.getElementById(valueId).value++;}else{alert("You can't increase the number above " + {!max});}}function decrement(valueId) {if(document.getElementById(valueId).value >{!min}){document.getElementById(valueId).value--;}else{alert("You can't decrease the number below " + {!min});}}83
Chapter 3: Customizing the User Interface▲▼7. Click Save.To add your new <strong>com</strong>ponent to a page:1. Click SetupDevelop ➤ Pages.2. Click New.3. In the name field, enter testAddSub.4. Optionally enter a label and description.5. In the editor, enter the following markup:6. Click Save.When you open the page in a browser, you will see something like the following:Click the up or down arrow to increase or decrease the number displayed. If you try to changeit to a value lower than 0 or greater than 15, an error message displays in a popup dialog.84
Customizing the User InterfaceDiscussionThis solution illustrates how you can mix Visualforce, HTML, and JavaScript within a custom<strong>com</strong>ponent. This <strong>com</strong>bination allows you to create very powerful custom <strong>com</strong>ponents. Toreally make this <strong>com</strong>ponent useful, you can bind the value to a field (like the number ofemployees on an account) and update that field when your user submits the form.The name of a custom <strong>com</strong>ponent can only contain alphanumeric characters, start with a letter,and must be unique from all other <strong>com</strong>ponents in your organization.The description of a custom <strong>com</strong>ponent appears in the <strong>com</strong>ponent reference with other standard<strong>com</strong>ponent descriptions. If your custom <strong>com</strong>ponent includes apex:attribute <strong>com</strong>ponents,the description will be included in the <strong>com</strong>ponent reference as well.A single <strong>com</strong>ponent can hold up to 1 MB of text, or approximately 1,000,000 characters.When working on a custom <strong>com</strong>ponent, you can click Quick Save to save your changes andcontinue editing your <strong>com</strong>ponent.The Visualforce markup must be valid before you can save your <strong>com</strong>ponent.Overriding a Standard PageProblemYou want to override what happens when a user clicks a tab in Salesforce.<strong>com</strong>, such as theAccount or Contact tab.SolutionTo override a standard object tab:1. Create a Visualforce page called accountOverride.a. Click Setup ➤ Develop ➤ Pages.b. Click New.c. In the label field, enter Override the Account Home Page.d. In the name field, enter accountOverride.e. In the description, enter This page will display for allusers.f. In the editor, enter the following markup:85
Chapter 3: Customizing the User InterfacePreviousNexta. Click Save.2. Set the page level security to allow all users to view the page.a. Click Security for the page you just created.b. Select all the profiles in the Available Profiles list and click Add to addthem to the Enabled Profiles list.c. Click Save.3. Create an override that directs users to your new page.a. Click Setup ➤ Customize ➤ Accounts ➤ Buttons and Links.b. In the Standard Buttons and Links list, click Override for the AccountsTab.c. Set the content type to Visualforce Page.d. From the Content Name drop-down list, select accountOverride.e. Click Save.DiscussionOverriding a tab overrides what a user sees when he or she clicks on the tab. Overriding astandard button overrides its functionality in all parts of the Salesforce.<strong>com</strong> user interface. Forexample, if you override a New button for contacts, it overrides the New button on the Contactstab, the New button on any Contacts related list, and the Contact option in the Create Newdrop-down list in the sidebar.You can override the home tab for all standard and custom objects.86
Customizing the User InterfaceSee Also• Overriding a Standard Button on page 64• Dynamically Updating a Page on page 88Redirecting to a Standard Object List PageProblemYou want to redirect a user to the standard account list page.SolutionFor buttons or links that navigate a user to the accounts tab, redirect them to a Visualforcepage with the following content:The user will see a page that resembles the following:DiscussionFigure 12: Overriding the Account Detail PageThe Visualforce page can also refer to other standard objects, such as contacts, by changingthe reference to the standard object. For example:See Also• Overriding a Standard Button on page 64• Overriding a Standard Page on page 85• Overriding a Page for Some, but not All, Users on page 9387
Chapter 3: Customizing the User Interface88Dynamically Updating a PageProblemYou have fields on a page in your Salesforce.<strong>com</strong> application that you only want displayedwhen the user has made a specific selection. In this example, you want to capture specificinformation about a lost opportunity. During the normal progression of a deal, there is noreason to display a field called Reason Lost. You want this field to display only when theStage moves to Closed Lost. In addition to the Reason Lost field, you would like arequired lookup field that contains <strong>com</strong>petitors names, so that the user can specify which<strong>com</strong>petitor won the deal.SolutionUsing Visualforce, you can create a page that updates just a portion of that page based on achanged value.Because you're merely extending the existing behavior of the <strong>Force</strong>.<strong>com</strong> platform, you don'tneed to create a controller (an Apex class).Some Visualforce <strong>com</strong>ponents are AJAX aware and allow you to add AJAX behaviors to apage without having to write any JavaScript. One of the most widely used AJAX behaviors isa partial page update, in which only a specific portion of a page is updated following some useraction, rather than a reload of the entire page. The simplest way to implement a partial pageupdate is to use the reRender attribute on a Visualforce <strong>com</strong>ponent.This example creates two new fields for Opportunity: Primary Competitor and ReasonLost. After you create the fields, you need to create a Visualforce page that uses these fieldswith an existing opportunity.To create the new fields:1. In Salesforce.<strong>com</strong> click Setup ➤ Customize ➤ Opportunities ➤ Fields.2. In Opportunity Custom Fields & Relationships, click New.3. Select Lookup Relationship and click Next.4. For Related To select Account and click Next.5. In the Field Label text box, enter Primary Competitor.6. In the Field Name text box, enter Primary_Competitor.7. Add a brief description in the Description text box, and what should display as helptext in the Help Text text box as a best practice.8. Click Next.9. In Enterprise, Unlimited, and Developer Editions, accept the default field-levelsecurity and click Next.
Customizing the User Interface10. Use the default values to make the field appear on all page layouts, and click Next.11. Use the default value for the related list label, and accept the defaults for all the pagelayouts where the related list appears.12. Click Save and New so you can immediately create the second field.13. Select Text Area (Long) and click Next.14. In the Field Label text box, enter Reason Lost.15. In the Field Name text box, enter Reason_Lost.16. Add a brief description in the Description text box, and what should display as helptext in the Help Text text box as a best practice.17. Click Next.18. Use the default values and click Next for field-level security, adding the reference topage layouts, and adding custom related lists.19. Click Save.To create the Visualforce page:1. In Salesforce.<strong>com</strong> click Setup ➤ Develop ➤ Pages.2. Click New.3. In the Label text box, enter Dynamic Opportunity Edit.4. In the Name text box, enter opportunityEdit.5. In the Description text box, enter Dynamically edit an opportunity.6. In the Body text box, delete the existing Visualforce markup and enter the followinginstead:89
Chapter 3: Customizing the User Interface7. Click Save.To test the Visualforce page:1. Find the ID for an opportunity record:a. Click the Opportunities tab and find an opportunity that hasn't been closed.b. Click the name of that opportunity. In the URL, the ID of the opportunityrecord follows the name of the instance of Salesforce.<strong>com</strong> your organizationuses. For example, in the following URL,https://na3.salesforce.<strong>com</strong>/006D000000C4V1N,006D000000C4V1N is the ID of an opportunity record.2. Call the page by using the following URL:https://salesforce_instance/apex/opportunityEdit?id=IDSubstitute the instance of Salesforce.<strong>com</strong> that you use, such asna3.salesforce.<strong>com</strong>, for salesforce_instance. Substitute the opportunityrecord ID you found in the previous step for ID. For example,https://na3.salesforce.<strong>com</strong>/apex/opportunityEdit?id=006D000000C4V1D.Your page should resemble the following:90
Customizing the User InterfaceDiscussionFigure 13: Edit Opportunity PageNote that the Basic Information portion of the page (the top page block) is contained in an tag:. . .. . .. . .. . .The tag encapsulates which <strong>com</strong>ponents should be processed bythe <strong>Force</strong>.<strong>com</strong> server when the AJAX partial page update request to rerender the page is made.Because these fields are in an action region, they do not get passed to the server until the user91
Chapter 3: Customizing the User Interfaceclicks Save: all the data is still in memory.This is important when you have field dependencies.For example, once the user specifies Closed Lost, the Primary Competitor field be<strong>com</strong>esrequired. If the updated field information was sent back to the server before the user couldupdate the field, you would receive an error about the required field.When a user changes the value of Stage to Closed Lost, a message displays stating “applyingvalue. . .” This message is generated by the following markup in the Visualforce page.The input field is opportunity.stageName, the event is onchange, and the status isstatus. This is bound to the tag by the ID status.In addition to controlling the message that displays, this input field also controls the renderingof the page. If the field changes, this field specifies that a <strong>com</strong>ponent named thePageBlockshould be rerendered. The entire page is contained in an tag with theID thePageBlock:Toward the bottom of the Visualforce page markup is an section. This section is only rendered when the opportunity.stageName field has beenset to Closed Lost:See Also• Using AJAX in a Visualforce Page on page 134• Overriding a Page for Some, but not All, Users on page 9392
Customizing the User InterfaceOverriding a Page for Some, but not All, UsersProblemSome of your users should use a custom Visualforce page, while others should use a standardSalesforce.<strong>com</strong> page.SolutionTo override the Account tab with a Visualforce page for most of your users, but send userswith the “System Administrator” profile to the standard Salesforce.<strong>com</strong> Account home page:1. Create a Visualforce page called conditionalAccountOverride.a. Click Setup ➤ Develop ➤ Pages.b. Click New.c. In the label field, enter Override the Account Page for MostUsers.d. In the name field, enter accountOverride.e. In the description, enter This page will display for allusers, except System Administrators, when they clickthe Account tab.f. In the editor, enter the following markup:This page replaces your Account home page forall users except Administrators.g. Click Save.2. Set the page level security to allow all users to view the page.a. Click Security for the page you just created.b. Select all the profiles that will be using this page in the Available Profileslist and click Add to add them to the Enabled Profiles list.c. Click Save.93
Chapter 3: Customizing the User Interface3. Create an override that directs users to your new page.a. Click Setup ➤ Customize ➤ Accounts ➤ Buttons and Links.b. In the Standard Buttons and Links list, click Override for the AccountsTab.c. Set the content type to Visualforce Page.d. From the Content Name drop-down list, selectconditionalAccountOverride.e. Click Save.DiscussionThis solution uses the action attribute on the apex:page <strong>com</strong>ponent to test the user'sprofile. Using the action attribute is a good way to ensure an action is taken when the pageloads.If instead of limiting the standard page to a particular group of users, you want to limit theoverride to a particular group of users, such as all “Marketing Users” and “Solution Managers,”you need to create a controller extension.To override the Account tab with a custom Visualforce page only for users with the “MarketingUser” or the “Solution Manager” profile:1. Create a Visualforce page called standardAcctPage.a. Click Setup ➤ Develop ➤ Pages.b. Click New.c. In the label field, enter Override the Account Page for MostUsers.d. In the name field, enter standardAcctPage.e. In the description, enter This page will display for allusers, except Marketing Users and Solution Managers,when they click the Account tab.f. In the editor, enter the following markup:This page overrides your current Account home page. It uses a controller extensionto test the user profile. If the user is a “Marketing User” or “Solution Manager,” theyare redirected to a different page.94
Customizing the User Interface2. Using the procedure in step 1, create a second Visualforce page calledcustomAcctPage:Override Account page for two profilesThis is the page that only the “Marketing Users” and “Solutions Managers” will see.They only get to this page through redirection.3. Grant access to both pages for all profiles.a. Click Security for the each of the pages you just created.b. Select all the profiles that will be using this page in the Available Profileslist and click Add to add them to the Enabled Profiles list.c. Click Save.4. Create a controller extension called overrideCon.a. Click Setup ➤ Develop ➤ Apex Classes.b. Click New.c. In the editor, add the following content:public class overrideCon {String recordId;public overrideCon(ApexPages.StandardControllercontroller) {recordId = controller.getId();}public PageReference redirect() {Profile p = [select name from Profile where id =:UserInfo.getProfileId()];if ('Marketing User'.equals(p.name)|| 'Solution Manager'.equals(p.name)){PageReference customPage =Page.customAccountPage;customPage.setRedirect(true);customPage.getParameters().put('id', recordId);return customPage;} else {return null; //otherwise stay on the same page}}}d. Click Save.5. Create an override that directs users to the standardAcctPage page when theyclick on the Accounts tab.95
Chapter 3: Customizing the User Interfacea. Click Setup ➤ Customize ➤ Accounts ➤ Buttons and Links.b. In the Standard Buttons and Links list, click Override for the AccountsTab.c. Set the content type to Visualforce Page.d. From the Content Name drop-down list, select standardAcctPage.e. Click Save.When a user clicks on the Account tab, if their profile is “Marketing User” or “SolutionManager” the controller extension will automatically redirect them to the customAcctPage.See Also• For more information about page level security and creating home page overrides, see theSalesforce.<strong>com</strong> online help.• For more information about creating page overrides, see Overriding a Standard Button onpage 64.• For more information about creating controller extensions, see Custom Controllers andController Extensions in the Visualforce Developer Guide.Referencing an Existing PageProblemYou want to create a Visualforce page that is used in exactly the same way in multiple places.SolutionUse the tag to duplicate the entire content of another page without makingany changes. You can use this technique to reference existing markup that will be used thesame way in several locations.For example, suppose you want to create a form that takes a user's name and displays it backto them. First, create a page called formTemplate that represents a reusable form and usesa controller called templateExample:After you receive the prompt about templateExample not existing, use the following codeto define that custom controller:public class templateExample{96
Customizing the User InterfaceString name;Boolean showGreeting = false;public PageReference save() {showGreeting = true;return null;}public void setNameField(String nameField) {name = nameField;}public String getNameField() {return name;}}public Boolean getShowGreeting() {return showGreeting;}Next, return to templateExample and add the following markup:Nothing happens if you click Save. This is the expected behavior.Next, create a page called displayName, which includes formTemplate:When you save this page, the entire formTemplate page is imported. When you enter aname and click Save, the form passes a true value to the showGreeting field, which thenrenders the and displays the user's name.97
Chapter 3: Customizing the User InterfaceDiscussionYou can create another Visualforce page that uses formTemplate to display a differentgreeting. Create a page called displayBoldName and use the following markup:.boldify { font-weight: bolder; }Although the displayed text changes, the templateExample logic remains the same.See Also• Creating a Custom Visualforce Component on page 82• Defining Skeleton Visualforce Templates on page 98Defining Skeleton Visualforce TemplatesProblemYou want to create a Visualforce page that looks the same in multiple places, but its fields andvalues change with each implementation.SolutionCreate a skeleton template that allows subsequent Visualforce pages to implement differentcontent within the same standard structure. To do so, create a template page with the tag.The following example shows how you can use , ,and to implement a skeleton template.First, create an empty page called myFormComposition that uses a controller called<strong>com</strong>positionExample:98
Customizing the User InterfaceAfter saving the page, a prompt appears that asks you to create <strong>com</strong>positionExample. Usethe following code to define that custom controller:public class <strong>com</strong>positionExample{String name;Integer age;String meal;String color;Boolean showGreeting = false;public PageReference save() {showGreeting = true;return null;}public void setNameField(String nameField) {name = nameField;}public String getNameField() {return name;}public void setAgeField(Integer ageField) {age= ageField;}public Integer getAgeField() {return age;}public void setMealField(String mealField) {meal= mealField;}public String getMealField() {return meal;}public void setColorField(String colorField) {color = colorField;}public String getColorField() {return color;}}public Boolean getShowGreeting() {return showGreeting;}99
Chapter 3: Customizing the User InterfaceNext, return to myFormComposition and create a skeleton template:That's everything, right?Notice the two fields requiring the age and meal content. The markup forthese fields is defined in whichever page calls this <strong>com</strong>position template.Next, create a page called myFullForm, which defines the tags inmyFormComposition:100DiscussionNotice the following about the markup:
Customizing the User Interface• When you save myFullForm, the previously defined tags and Savebutton appear.• Since the <strong>com</strong>position page requires age and meal fields, myFullForm defines them astext input fields. The order in which they appear on the page doesn't matter;myFormComposition specifies that the age field is always displayed before the meal field.• The name field is still imported, even without a matching field.• The color field is disregarded, even though controller code exists for the field. This isbecause the <strong>com</strong>position template does not require any field named color.• The age and meal fields don't need to be text inputs. The <strong>com</strong>ponents within an tag can be any valid Visualforce tag.To show how you can use any valid Visualforce in an tag, create a newVisualforce page called myAgelessForm and use the following markup:You look great for your age!Notice that the <strong>com</strong>position template only requires an tag to exist. In thisexample, age is defined as text.See Also• Creating a Consistent Look and Feel with Static Resources on page 67• Referencing an Existing Page on page 96101
Chapter 3: Customizing the User InterfaceCreating Tabbed AccountsProblemIn Salesforce.<strong>com</strong>, all the information for an account displays on a single page. If there's a lotof information, you might end up doing a lot of scrolling. You'd like a different way to displaythe information for accounts.SolutionUsing a Visualforce page, you can make each section for an account display in a tab, such ascontacts, opportunities, and so on.To create a tabbed view for account, first you have to create a Visualforce page. Then you haveto override the standard account view to use the page.To create the Visualforce page:1. In Salesforce.<strong>com</strong> click Setup ➤ Develop ➤ Pages.2. Click New.3. In the Label text box, enter Tabbed Account View.4. In the Name text box, enter tabbedAccount.5. In the Description text box, enter Displays account information intabs.6. In the Body text box, delete the existing Visualforce markup and enter the followinginstead:
Customizing the User Interfaceid="tabOpenAct">7. Click Save.To override the standard account view:1. Click Setup ➤ Customize ➤ Accounts ➤ Buttons and Links.2. In the Standard Buttons and Links related list, click Override next to View.3. For Content Type select Visualforce Page.4. For Content Name select tabbedAccount.5. Click Save.DiscussionTo see your changes, select the Account tab, then select an account to view. Across the top ofthe page you should see a list of tabs: Details, Contacts, Opportunities, Open Activities andNotes and Attachments.The tabbed display looks like the following:103
Chapter 3: Customizing the User InterfaceSee AlsoFigure 14: Account Detail Page Displayed as Tabbed View• Overriding a Standard Page on page 85• Overriding a Standard Button on page 64• Adding CSS to Visualforce Pages on page 104104Adding CSS to Visualforce PagesProblemYou want to set your pages apart by changing color, font, or other display options on the page.SolutionAdd CSS markup to your page, then have the appropriate <strong>com</strong>ponent refer to it.This example expands Creating Tabbed Accounts on page 102.The following Visualforce page markup is from Creating Tabbed Accounts on page 102. Itcreates tabs to display account information.
Customizing the User Interfaceid="AccountTabPanel">One thing you may notice about this page is that all of the tabs display in the same color. Whenyou select a tab, it does not change color. Adding the following CSS markup to the Visualforcepage causes the color of the active tab to change when the user selects it.To add CSS markup to the page:1. In Salesforce.<strong>com</strong> click Setup ➤ Develop ➤ Pages.2. Click Edit next to the page tabbedAccount.3. Add this code immediately following the tag. This Visualforce pagemarkup defines the colors for the active tab and inactive tabs, as CSS:.activeTab {background-color: #236FBD; color:white;background-image:none}.inactiveTab {background-color: lightgrey; color:black;background-image:none}4. Replace the existing markup with the following:This code sets values for the following:• tabClass attribute: specifies the style class used to display a tab when it is active.105
Chapter 3: Customizing the User Interface• inactiveTabClass attribute: specifies the style class used to display a tab whenit is inactive.5. Click Save.Here is the <strong>com</strong>plete updated Visualforce page markup:.activeTab {background-color: #236FBD; color:white;background-image:none}.inactiveTab { background-color: lightgrey; color:black;background-image:none}The tabbed display with colored tabs looks like the following:106
Customizing the User InterfaceFigure 15: Account Detail Page Displayed as Tabbed ViewSee Also• Creating Tabbed Accounts on page 102• Overriding a Standard Page on page 85Editing Multiple Records Using a Visualforce ListControllerProblemYou need to edit a set of records at the same time. A standard detail page, though, only allowsyou to edit one record at a time.SolutionCreate a Visualforce page using a standard list controller. The standard list controller enablesyou to create Visualforce pages that can display or act on a set of records.To create a Visualforce page using a standard list controller to edit a list of opportunities:1. In Salesforce.<strong>com</strong> click Setup ➤ Develop ➤ Pages.2. Click New.107
Chapter 3: Customizing the User Interface3. In the Label text box, enter Multiple opportunity edit.4. In the Name text box, enter multOppEdit.5. In the Description text box, enter Edit multiple opportunity recordsin a set.6. In the Body text box, delete the existing Visualforce markup and enter the followinginstead:7. Click Save.Call the page by using the following URL:https://salesforce_instance/apex/multOppEditSubstitute salesforce_instance for the instance of Salesforce.<strong>com</strong> that you use, such asna3.salesforce.<strong>com</strong>. For example,https://na3.salesforce.<strong>com</strong>/apex/multOppEdit.Your page should resemble the following:108
Customizing the User InterfaceDiscussionFigure 16: Editing Multiple Opportunities on a Single PageUsing a standard list controller is very similar to using a standard controller. First you set thestandardController attribute on the <strong>com</strong>ponent. This specifies the typeof records that you want to access. Then set the recordSetVar attribute on the same<strong>com</strong>ponent. This indicates that you're using a standard set controller.The recordSetVar attribute not only indicates that the page uses a list controller, it indicatesthe variable name of the record collection.This variable is then used to access data in the recordcollection.In this example, two fields, Stage and Close Date are displayed for edit in the table. Theyeach form a column in the table:See Also• Building a Table of Data in a Visualforce Page on page 69109
Chapter 3: Customizing the User Interface• Creating a Wizard with Visualforce Pages on page 72110Selecting Records with a Visualforce Custom ListControllerProblemYou need to edit a set of records, but you want to exclude irrelevant ones.SolutionCreate a Visualforce page using a custom list controller. The custom list controller can definewhich records to present using SOQL.DiscussionA custom list controller is similar to a standard list controller, except it implements Apex logicto define actions on a set of records.You can also create a custom list controller that uses anti- and semi-joins as part of the SOQLquery. Anti-joins exclude records that match certain criteria, while semi-joins includes records.The following custom list controller uses an anti-join to retrieve all accounts that don't haveany open opportunities. It is implemented as a controller extension:public with sharing class AccountPagination {private final Account acct;public AccountPagination(ApexPages.StandardSetController controller){this.acct = (Account)controller.getRecord();}public ApexPages.StandardSetController accountRecords{get {if(accountRecords == null) {return new ApexPages.StandardSetController(Database.getQueryLocator([SELECT name FROM Account WHERE Id NOT IN(SELECT AccountId FROM OpportunityWHERE IsClosed = false)]));}return accountRecords;}private set;}public List getAccountPagination() {
Customizing the User Interface}}return (List) accountRecords.getRecords();The page to display these records uses standard list controller actions ({!previous} and{!next}). However, the set of available records depends on the list returned from the customlist controller:{!a.name}PreviousNextSee Also• Editing Multiple Records Using a Visualforce List Controller on page 110• Overriding a Page for Some, but not All, Users on page 93• Retrieving Data Based on a Relative Date on page 31111
Chapter 4: Displaying Data and Modifying Data ActionsChapter 4Displaying Data and Modifying Data ActionsIn this chapter ...• Creating a Many-to-ManyRelationship• Storing and DisplayingConfidential Information• Averaging AggregatedData• Displaying Fields from aRelated Record on aDetail Page• Blocking Record Creationwith Cross-ObjectValidation Rules• Validating Data Based onFields in Other Records• Using Query StringParameters in aVisualforce Page• Using AJAX in aVisualforce Page• Using Properties in Apex• Mass Updating ContactsWhen an AccountChanges• Bulk Processing Recordsin a TriggerAfter using recipes in previous chapters that help you modifythe look and feel of Salesforce.<strong>com</strong> or inspect existing data,you may wish to modify how specific data is presented, orchange the behavior of data actions. Use the recipes in thischapter to explore the <strong>Force</strong>.<strong>com</strong> platform: specify howconfidential information is displayed, the default behaviorof bulk processing of records, the handling of duplicaterecords, and many other data display or data actionbehaviors.112
Displaying Data and Modifying Data Actions• Using Batch Apex toReassign Account Owners• Controlling RecursiveTriggers• Comparing QueriesAgainst Trigger.old andTrigger.new• Preventing DuplicateRecords from Saving• Creating a Child RecordWhen a Parent Record isCreated• Using Custom Settings toDisplay Data• Using System.runAs inTest Methods• Integrating Visualforceand Google Charts• Using Special Charactersin Custom Links113
Chapter 4: Displaying Data and Modifying Data ActionsCreating a Many-to-Many RelationshipProblemYou want to model a many-to-many relationship between objects in which each record of oneobject can be related to many records of the other object, and vice versa. For example, a customercase can require many bug fixes, and a bug fix can resolve multiple customer cases.Note: This recipe has been provided by salesforce.<strong>com</strong> Training & Certification andis drawn from the expert-led training courses available around the world. Salesforce.<strong>com</strong>training courses provide an opportunity to get hands-on experience with the <strong>Force</strong>.<strong>com</strong>platform and Salesforce.<strong>com</strong> applications as well as to prepare you to be<strong>com</strong>eSalesforce.<strong>com</strong> Certified. Register for a course at www.salesforce.<strong>com</strong>/training.SolutionRelate the two objects using a custom junction object, and customize the junction object relatedlists and reports. A custom junction object is an object with two master-detail relationships.Its purpose is to create an association between two other objects. For example, a many-to-manyrelationship between bugs and cases uses a custom junction object called BugCaseAssociationto associate the Bug and Case objects.Figure 17: A Many-to-Many Relationship Between Bugs and Customer CasesTo create the junction object:1141. Click Setup ➤ Create ➤ Objects.2. Click New Custom Object.
Displaying Data and Modifying Data Actions3. In the custom object wizard, consider these tips specifically for junction objects:• Name the object with a label that indicates its purpose, such asBugCaseAssociation.• For the Record Name field, use the auto-number data type.• Do not launch the custom tab wizard before clicking Save. Junction objects donot need a tab.To create the two master-detail relationships:1. Verify that the two objects you want to relate to each other already exist. For example,you may want to relate the standard case object to a custom bug object.2. On the junction object, create the first master-detail relationship field. In the customfield wizard:a. Choose Master-Detail Relationship as the field type.b. Select one of the objects to relate to your junction object. For example,select Case.The first master-detail relationship you create on your junction objectbe<strong>com</strong>es the primary relationship.This affects the following for the junctionobject records:• Look and feel: The junction object's detail and edit pages use the colorand any associated icon of the primary master object.• Record ownership: The junction object records inherit the value of theOwner field from their associated primary master record. Because objectson the detail side of a relationship do not have a visible Owner field,this is only relevant if you later delete both master-detail relationshipson your junction object.• Division: If your organization uses divisions to segment data, thejunction object records inherit their division from their associatedprimary master record. Similar to the record ownership, this is onlyrelevant if you later delete both master-detail relationships.c. Select a Sharing Setting option. For master-detail relationship fields,the Sharing Setting attribute determines the sharing access that usersmust have to a master record in order to create, edit, or delete its associateddetail records.d. For the Related List Label that will display on the page layout ofthe master object, do not accept the default. Change this to use the nameof the other master object in your many-to-many relationship. For example,change this to Bugs so users will see a Bugs related list on the case detailpage.115
Chapter 4: Displaying Data and Modifying Data Actions3. On the junction object, create the second master-detail relationship. In the customfield wizard:a. Choose Master-Detail Relationship as the field type.b. Select the other desired master object to relate to your junction object. Forexample, select Bug.The second master-detail relationship you create on your junction objectbe<strong>com</strong>es the secondary relationship. If you delete the primary master-detailrelationship or convert it to a lookup relationship, the secondary masterobject be<strong>com</strong>es primary.c. Select a Sharing Setting option. For master-detail relationship fields,the Sharing Setting attribute determines the sharing access that usersmust have to a master record in order to create, edit, or delete its associateddetail records.d. For the Related List Label that will display on the page layout ofthe master object, do not accept the default. Change this to use the nameof the other master object in your many-to-many relationship. For example,change this to Cases so users will see a Cases related list on the bug detailpage.To customize the fields that display in the junction object related list on each master objectpage layout:1. Edit the page layout of each master object that is related to the junction object. Forexample, to modify the BugCaseAssociations related list for case records, edit thepage layout for cases at Setup ➤ Customize ➤ Cases ➤ Page Layouts.2. Edit the properties of the related list you want to modify. For example, on cases theBugCaseAssociations related list was renamed to Bugs, so select the Bugs relatedlist.3. Add the fields to display in the related list. You can add fields from the junctionobject itself, but more importantly, you can add fields from the other master object.Each field is prefixed with its object name in the popup window. In the related listitself, only fields from the junction object are prefixed with the object name; fieldsfrom the other master object are not.Note: The junction object related list does not include an icon on the master record'sdetail pages because the junction object does not have a custom tab. If you make a tabfor the junction object, the icon is included.116
Displaying Data and Modifying Data ActionsDiscussionFor a many-to-many relationship in Salesforce.<strong>com</strong>, each master object record displays a relatedlist of the associated junction object records. To create a seamless user experience, you canchange the name of the junction object related list on each of the master object page layoutsto have the name of the other master object. For example, you might change theBugCaseAssociations related list to Cases on the bugs page layout and to Bugs on the casespage layout. You can further customize these related lists to display fields from the other masterobject.Review the following considerations before creating many-to-many relationships betweenobjects:• Junction object records are deleted when either associated master record is deleted. If bothassociated master records are deleted, the junction object record is deleted permanently andcannot be restored.• Sharing access to a junction object record is determined by a user's sharing access to bothassociated master records and the Sharing Setting option on the relationship field.For example, if the sharing setting on both parents is Read/Write, then the user must haveRead/Write access to both parents in order to have Read/Write access to the junction object.• In a many-to-many relationship, a user cannot delete a parent record if there are more than200 junction object records associated with it and if the junction object has a roll-up summaryfield that rolls up to the other parent. To delete this object, manually delete junction objectrecords until the count is fewer than 200.• Roll-up summary fields that summarize data from the junction object can be created onboth master objects.• Formula fields and validation rules on the junction object can reference fields on bothmaster objects.• You can define Apex triggers on both master objects and the junction object.• A junction object cannot be on the master side of another master-detail relationship.• Junction objects cannot be on the subscriber side of a Salesforce to Salesforce connection.• You cannot create a many-to-many self relationship, that is, the two master-detailrelationships on the junction object cannot have the same master object.Many-to-many relationships provide two standard report types that join the master objectsand the junction object. The report types are:• “Primary master with junction object and secondary master” in the primary master object'sreport category• “Secondary master with junction object and primary master” in the secondary master object'sreport categoryThe order of the master objects in the report type is important. The master object listed firstdetermines the scope of records that can be displayed in the report.117
Chapter 4: Displaying Data and Modifying Data ActionsYou can create custom reports based on these standard report types. In addition, you can createcustom report types to customize which related objects are joined in the report.See Also• “Considerations for Relationships” in the Salesforce.<strong>com</strong> online help• “Customizing Page Layouts” in the Salesforce.<strong>com</strong> online help• “What is a Custom Report Type?” in the Salesforce.<strong>com</strong> online helpStoring and Displaying Confidential InformationProblemYou want to store employee Social Security numbers as encrypted data as required bygovernment regulations or industry standards. Only select certain users should be able to viewthe entire social security number; all other users should only be able to view the last four digits.In addition, you want to ensure that users enter the numbers in the standard social securitynumber format, including the dashes after the third and fifth digits.SolutionOn the standard user object, create an encrypted custom field to store the user's Social Securitynumber. Set the field's Mask Type attribute to hide the first five digits of the social securitynumber, and add field-level help to inform users of the required format.Then, create a validationrule that uses the REGEX() function to verify that the value of the custom field is in the correctformat. Finally, create a new custom profile that allows a select group of users to the see theSocial Security numbers unmasked.Note: To enable encrypted fields for your organization, contact salesforce.<strong>com</strong>Customer Support.1. Define the encrypted custom field.118a. Click Setup ➤ Customize ➤ Users ➤ Fields.b. In the User Custom Fields related list, click New.c. Select Text (Encrypted), and click Next.d. In the Field Label field, enter Social Security Number.e. In the Length field, enter 11.This allows the field to accept all nine digitsof the Social Security number plus the dashes after the third and fifth digits.f. In the Description field, enter Encrypted Social SecurityNumber field.g. In the Help Text field, enter information to help your users understandwhat value to type. For example, Enter your Social Security
Displaying Data and Modifying Data Actionsnumber. Remember to include dashes after the thirdand fifth digits.h. In the Mask Type field, select Social Security Number. Thisoption hides the first five digits (it hides the first 7 characters) and displaysthe last four. Only users with profiles that have the “View Encrypted Data”permission selected are able to view all nine digits of the Social Securitynumber.i. In the Mask Character field, select the character, either an asterisk (*)or an X, to use for hidden characters.j. Click Next.k. In Enterprise, Unlimited, and Developer Editions, set the field-level securityto determine whether the field should be visible or read only for specificprofiles. These settings determine whether or not the field itself is visible,but do not affect whether or not the user sees the masked or full SocialSecurity number. You will specify the type of masking when you create thecustom profile.l. Click Next.m. Leave the Add Field and User Layout checkboxes selected.n. Click Save.2. Create the validation rule.a. Click Setup ➤ Customize ➤ Users ➤ Validation Rules.b. Click New.c. In the Rule Name field, enter Social Security Number FormatCheck.d. In the Description field, enter Validates that the SocialSecurity Number is in the correct format.e. Enter the following error condition formula:NOT(OR(LEN (Social_Security_Number__c) = 0,REGEX( Social_Security_Number__c ,"[0-9]{3}-[0-9]{2}-[0-9]{4}")))f. Click Check Syntax to make sure the syntax is correct.g. In the Error Message field, enter a message that appears if the userenters a Social Security number in an invalid format. For example, themessage might read: The Social Security number you enteredis not in the correct format. The correct format is999-99-9999.h. In the Error Location field, specify whether you want the error messageyou entered above to appear at the top of the page or next to the field. If119
Chapter 4: Displaying Data and Modifying Data Actionsyou choose Field, select the Social Security Number field in theadjacent drop-down list.i. Click Save.3. Create the custom profile.a. Click Setup ➤ Manage Users ➤ Profiles.b. Click New.c. Select an existing profile to copy.d. Name the new custom profile.e. Click Save.f. Click Edit.g. In the General User Permissions section, select the View EncryptedData checkbox. This allows users with this profile to see the <strong>com</strong>pletevalue of encrypted fields instead of the masking characters.h. Click Save.4. Assign the new custom profile to the users allowed to view the encrypted data.DiscussionGovernment regulations and industry standards require many <strong>com</strong>panies to use encryption toprotect their most sensitive employee and customer data. Encrypted custom fields can help<strong>com</strong>panies <strong>com</strong>ply with these regulations. Salesforce.<strong>com</strong> encrypts these fields with 128-bitkeys and uses the AES (Advanced Encryption Standard) algorithm which has been adoptedas an encryption standard by the U.S. government. Encrypted custom fields should only beused when regulations require encryption because they involve additional processing and havesearch-related limitations.To further protect the confidentiality of encrypted custom field values, Salesforce.<strong>com</strong> requiresyou to specify a mask type for each encrypted field you create. Character masking lets you hidethe characters in encrypted field values, allowing users to see the full value of an encryptedcustom field only if their profile has the “View Encrypted Data” permission. If your <strong>com</strong>panyuses parts of confidential data, such as the last four digits of a person's Social Security or creditcard number, to verify the identity of customers, configure your encrypted custom fields to usea mask type that reveals only the those digits, such as the Last Four Characters Clearmask type.In addition to ensuring your data's confidentiality, you also want to ensure its accuracy.Validation rules improve the quality of your data by verifying that the data a user enters in arecord meets the standards you specify before the user can save the record. A validation rulecontains a formula expression that evaluates the data in one or more fields and returns a valueof “True” or “False.” If the validation rule returns “True,” Salesforce.<strong>com</strong> lets the user save therecord; otherwise, Salesforce.<strong>com</strong> displays an error message.120
Displaying Data and Modifying Data ActionsThe validation rule in this recipe uses the REGEX() function, which <strong>com</strong>pares the custom fieldto a regular expression. A regular expression is a string used to describe a format of a stringaccording to certain syntax rules. Salesforce.<strong>com</strong> regular expression syntax is based on JavaPlatform SE 6 syntax; however, backslash characters (\) must be changed to double backslashes(\\) because backslash is an escape character in Salesforce.<strong>com</strong>.See Also• Validating Data Based on Fields in Other Records on page 129• “About Validation Rules” in the Salesforce.<strong>com</strong> online help• “Operators and Functions” in the Salesforce.<strong>com</strong> online help• “About Encrypted Custom Fields” in the Salesforce.<strong>com</strong> online helpAveraging Aggregated DataProblemYou want to calculate the average value of a numeric field on a set of detail records in amaster-detail relationship.Note: This recipe has been provided by salesforce.<strong>com</strong> Training & Certification andis drawn from the expert-led training courses available around the world. Salesforce.<strong>com</strong>training courses provide an opportunity to get hands-on experience with the <strong>Force</strong>.<strong>com</strong>platform and Salesforce.<strong>com</strong> applications as well as to prepare you to be<strong>com</strong>eSalesforce.<strong>com</strong> Certified. Register for a course at www.salesforce.<strong>com</strong>/training.SolutionCreate two roll-up summary fields: one that sums a numeric field on a detail record and anotherthat counts the number of detail records. Then use a formula field that divides the first roll-upsummary field by the second.To illustrate this example, we'll look at the Job Application and Review objects in the sampleRecruiting application.The Job Application object is the master in a master-detail relationshipwith the Review object. The Review object has a 1-5 rating system. We want to display theaverage rating on the job application.To create the first roll-up summary field:1. Click Setup ➤ Create ➤ Objects.2. Click Job Application.3. In the Custom Fields & Relationships related list, click New.4. Select the Roll-Up Summary data type, and click Next.121
Chapter 4: Displaying Data and Modifying Data Actions5. In the Field Label field, enter Total Rating. Once you move your cursor,the Field Name text box should be automatically populated with Total_Rating.6. Click Next.7. In the Summarized Object drop-down list, choose Reviews.8. Under Select Roll-Up Type, select SUM.9. In the Field to Aggregate drop-down list, select Rating.10. Leave All records should be included in the calculation selected,and click Next.11. Configure the remaining field-level security and page layout settings as desired.12. Click Save.To create the second roll-up summary field:1. Click Setup ➤ Create ➤ Objects.2. Click Job Application.3. In the Custom Fields & Relationships related list, click New.4. Select the Roll-Up Summary data type, and click Next.5. In the Field Label field, enter Number of Reviews. Once you move yourcursor, the Field Name text box should be automatically populated withNumber_of_Reviews.6. Click Next.7. In the Summarized Object drop-down list, choose Reviews.8. Under Select Roll-Up Type, select COUNT.9. Leave All records should be included in the calculation selected,and click Next.10. Configure the remaining field-level security and page layout settings as desired.11. Click Save.To create the formula field:1. Click Setup ➤ Create ➤ Objects.2. Click Job Application.3. In the Custom Fields & Relationships related list, click New.4. Select the Formula data type, and click Next.5. In the Field Label field, enter Average Rating. Once you move your cursor,the Field Name text box should be automatically populated with Average_Rating.6. Select the Number formula return type and click Next.7. Enter the following formula:IF(Number_of_Reviews__c > 0, Total_Rating__c /Number_of_Reviews__c, 0)1228. Click Next.9. Configure the remaining field-level security and page layout settings as desired.
Displaying Data and Modifying Data Actions10. Click Save.DiscussionRoll-up summary fields let you easily display values from a set of detail records. Use roll-upsummary fields to display the total number of detail records, the sum of all the values in a detailrecord field, or the highest or lowest value of a detail field.Before you begin working with roll-up summary fields, note that they are only available on themaster object in a master-detail relationship.When working with merge fields in formulas, use the IF function to ensure that the formulafield displays correctly even if they have an invalid value. (For example, an invalid value mayoccur if the formula divides by zero.) The IF function in this recipe ensures that the formuladisplays a value when there are one or more reviews, and displays a zero if there are no reviews;otherwise, the formula field might display #Error.See Also• Blocking Record Creation with Cross-Object Validation Rules on page 126• “About Roll-Up Summary Fields” in the Salesforce.<strong>com</strong> online help• “Examples of Advanced Formula Fields” in the Salesforce.<strong>com</strong> online help• “Considerations for Relationships” in the Salesforce.<strong>com</strong> online helpDisplaying Fields from a Related Record on a DetailPageProblemYou want to show field values from a related object on a detail page.SolutionUse a cross-object formula field to retrieve and display the field values from a related object.To illustrate this example, we'll look at the Review object in the sample Recruiting application.The Review object is the detail record of the Job Application object. The Job Applicationobject has lookup relationships to the Position and Candidate objects. Using cross-objectformulas, we will display the title of the related position and the name of the related candidateon each review record.1. Click Setup ➤ Create ➤ Objects.2. Click Review.123
Chapter 4: Displaying Data and Modifying Data Actions3. In the Custom Fields & Relationships related list, click New.4. Select the Formula data type, and click Next.5. In the Field Label field, enter Position. Once you move your cursor, theField Name text box should be automatically populated with Position.6. Select the Text formula return type and click Next.7. Click the Advanced Formula tab.Note: You can create cross-object formulas only on the Advanced Formulatab.8. Click the Insert Field button.9. Select Review > in the first column. The second column displays all of the Reviewobject's fields as well as its related objects, which are denoted by a greater-than (>)sign .10. Select Job Application > in the second column. The third column displays thefields of the Job Application object.11. Select Position> in the third column. The fourth column displays the fields ofthe Position object.Be sure that you select Position > (with the greater-than sign) and not Position.The one with the greater-than sign is the Position object, while the one without thegreater-than sign is the Position lookup field on the Job Application object.12. Choose Position Title in the fourth column.13. Click Insert.Your formula now looks like this:Job_Application__r.Position__r.Name14. Click Next.15. Configure the remaining field-level security and page layout settings as desired.16. Click Save.The Review object now displays the value of the Position Title field from the relatedposition record. Next, create a cross-object formula field on the Review object that displaysthe first and last names of the candidate being reviewed, and we'll use the HYPERLINK functionso that users can access the candidate's record by clicking the formula field.1241. Click Setup ➤ Create ➤ Objects.2. Click Review.3. In the Custom Fields & Relationships related list, click New.4. Select the Formula data type, and click Next.5. In the Field Label field, enter Candidate. Once you move your cursor, theField Name text box should be automatically populated with Candidate.
Displaying Data and Modifying Data Actions6. Select the Text formula return type and click Next.7. Click the Advanced Formula tab.8. From the Functions list, double-click HYPERLINK.9. Delete url from the HYPERLINK function you just inserted, but leave your cursorthere.10. Click the Insert Field button, select Review >, Job Application >, Candidate>, Record ID, and click Insert.11. Delete friendly_name from the HYPERLINK function, but leave your cursor there.12. Click the Insert Field button, select Review >, Job Application >, Candidate>, First Name, and click Insert.13. Enter a space, click the Insert Operator button, and choose Concatenate.14. Enter another space, then type a blank space enclosed in quotes:" "This appends a blank space after the first name of the candidate.15. Enter a space, click the Insert Operator button, and choose Concatenate once moreto add a second ampersand in your formula.16. Click the Insert Field button, select Review >, Job Application >, Candidate>, and Last Name, then click Insert.17. Delete [ target ] from the HYPERLINK function. This is an optional parameterthat isn't necessary for our formula field.18. Click Check Syntax to check your formula for errors.Your finished formula should look like this:HYPERLINK( Job_Application__r.Candidate__r.Id ,Job_Application__r.Candidate__r.First_Name__c & " " &Job_Application__r.Candidate__r.Last_Name__c )19. Click Next.20. Configure the remaining field-level security and page layout settings as desired.21. Click Save.DiscussionCross-object formulas are formulas that span two or more objects by referencing merge fieldsfrom related records.They are available anywhere you can use formulas except for default valuesand summary reports. Use them in calculations or simply to display fields from related objectson detail pages, list views, related lists, and reports.Each formula can reference up to five related objects, and can span to an object that is fiverelationships away. For example, consider the following formula we created in the first set ofsolution steps:Job_Application__r.Position__r.Name125
Chapter 4: Displaying Data and Modifying Data ActionsThis formula spans two relationships: first it spans to the review's related job application(Job_Application__r), then to the job application's related position (Position__r).Theformula ultimately references the position's title (Name) on the Position object. Notice thateach part of the formula is separated by a period, and that the relationship names consist ofthe related object followed by __r.In the second cross-object formula field we created, we used the Concatenate (&) operator tojoin two separate fields (First_Name__c and Last_Name__c) and inserted a space betweenthem. We also used the HYPERLINK function, which lets you to create a hyperlink to any URLor record in Salesforce.<strong>com</strong>. Note that the label of the hyperlink can differ from the URL itself,which is especially useful when working with a cross-object formula field that displays a valuethat a user will want to click. In this recipe, we used the HYPERLINK function to let usersconveniently access the candidate's record by clicking the Candidate's Name field on theReview object.See Also• Validating Data Based on Fields in Other Records on page 129• Averaging Aggregated Data on page 121• The Sample Recruiting App on page 3• “About Formulas” in the Salesforce.<strong>com</strong> online help• “Examples of Advanced Formula Fields” in the Salesforce.<strong>com</strong> online help• “Formulas: How Do I...” in the Salesforce.<strong>com</strong> online help• “Operators and Functions” in the Salesforce.<strong>com</strong> online helpBlocking Record Creation with Cross-Object ValidationRulesProblemYou want to prevent a subset of users from saving a record if certain conditions exist on arelated record.For example, the Recruiting app has the following custom objects:• Employment Website Information about the cost of posting a position on a particularemployment website, such as Monster.<strong>com</strong>, and the budget the <strong>com</strong>pany has allocated forposting on that website.• Position An open employment opportunity in the <strong>com</strong>pany.• Job Posting A custom junction object between the Employment Website and Positionobjects that represents a single posting on an employment website.126
Displaying Data and Modifying Data ActionsYou want to prevent users from creating a Job Posting record if the record will cause the<strong>com</strong>pany to go over its budget for an employment website unless the position was created bythe CEO.Note: This recipe has been provided by salesforce.<strong>com</strong> Training & Certification andis drawn from the expert-led training courses available around the world. Salesforce.<strong>com</strong>training courses provide an opportunity to get hands-on experience with the <strong>Force</strong>.<strong>com</strong>platform and Salesforce.<strong>com</strong> applications as well as to prepare you to be<strong>com</strong>eSalesforce.<strong>com</strong> Certified. Register for a course at www.salesforce.<strong>com</strong>/training.SolutionCreate a cross-object validation rule on the Job Posting object that references one roll-upsummary field and two currency fields on the Employment Website object.Create the roll-up summary field.1. Click Setup ➤ Create ➤ Objects.2. Click Employment Website.3. In the Custom Fields & Relationships related list, click New.4. Select the Roll-Up Summary data type, and click Next.5. In the Field Label field, enter Current Number of Posts. Once you moveyour cursor, the Field Name text box should be automatically populated withCurrent_Number_of_Posts.6. Click Next.7. In the Summarized Object drop-down list, choose Job Postings.8. Under Select Roll-Up Type, select COUNT.9. Leave All records should be included in the calculation selected,and click Next.10. Configure the remaining field-level security and page layout settings as desired.11. Click Save.Create the currency field that stores the price per post.1. Click Setup ➤ Create ➤ Objects.2. Click Employment Website.3. In the Custom Fields & Relationships related list, click New.4. Select the Currency data type, and click Next.5. In the Field Label field, enter Price Per Post. Once you move your cursor,the Field Name text box should be automatically populated with Price_Per_Post.6. In the Length field, enter 7.7. In the Decimal Places field, enter 2.8. Click Next.127
Chapter 4: Displaying Data and Modifying Data Actions9. Configure the remaining field-level security and page layout settings as desired.10. Click Save.Create the currency field that stores the maximum budget.1. Click Setup ➤ Create ➤ Objects.2. Click Employment Website.3. In the Custom Fields & Relationships related list, click New.4. Select the Currency data type, and click Next.5. In the Field Label field, enter Maximum Budget. Once you move your cursor,the Field Name text box is automatically populated with Maximum_Budget.6. In the Length field, enter 7.7. In the Decimal Places field, enter 2.8. Click Next.9. Configure the remaining field-level security and page layout settings as desired.10. Click Save.Create the validation rule.1. Click Setup ➤ Create ➤ Objects.2. Click Job Posting.3. In the Validation Rules related list, click New.4. In the Rule Name field, enter Max Posts.5. Enter the following error condition formula:(Position__r.CreatedBy.UserRole.Name"CEO")&&(Employment_Website__r.Current_Number_of_Posts__c*Employment_Website__r.Price_Per_Post__c)>(Employment_Website__r.Maximum_Budget__c-Employment_Website__r.Price_Per_Post__c)6. In the Error Message field, enter You have exceeded the budget forposting on this employment website.7. In the Error Location field, select Top of Page.8. Click Save.128
Displaying Data and Modifying Data ActionsDiscussionThe first part of the validation rule formula spans to the Positions object to verify that the userwho created the position is not the CEO. This gives users the flexibility of going over budgeton job postings for positions that the CEO has created.The second part of the validation rule formula spans to the Employment Website object toretrieve three values that are essential to the calculation. First, the formula references the rollup summary field to count how many Job Posting records have been saved for the associatedEmployment Website record. Then the formula references the currency field that stores theprice per post, and multiplies this value by the job record count to anticipate what the totalamount spent on this website will be if the job posting is saved. Finally, the formula referencesthe currency field that stores the maximum budget, and subtracts the price per post from thisvalue. Subtracting the price per post from the maximum budget <strong>com</strong>pensates for the fact thatSalesforce.<strong>com</strong> cannot determine if the record exceeds the budget until after the record is saved.See Also• Validating Data Based on Fields in Other Records on page 129• Averaging Aggregated Data on page 121• The Sample Recruiting App on page 3• “About Validation Rules” in the Salesforce.<strong>com</strong> online help• “About Roll-Up Summary Fields” in the Salesforce.<strong>com</strong> online help• “Examples of Advanced Formula Fields” in the Salesforce.<strong>com</strong> online help• “Considerations for Relationships” in the Salesforce.<strong>com</strong> online helpValidating Data Based on Fields in Other RecordsProblemYou want to validate a candidate's ZIP code before saving a candidate record.SolutionOn the Candidate object in the Recruiting app, create a validation rule that uses the VLOOKUP()function to verify the value of the ZIP Code field against a list of valid ZIP codes stored ona custom object.1. Create a custom object called ZIP Code with the following settings:FieldLabelValueZIP Code129
Chapter 4: Displaying Data and Modifying Data ActionsFieldPlural LabelObject NameDescriptionContext-Sensitive Help SettingRecord NameData TypeAllow ReportsAllow ActivitiesTrack Field HistoryDeployment StatusAdd Notes & Attachmentsrelated list to default pagelayoutLaunch New Custom Tab Wizardafter saving this customobjectValueZIP CodesZIP_CodeRepresents a ZIP codeOpen the standard Salesforce.<strong>com</strong> Help& Training windowZIP CodeTextNoNoNoDeployedNoYes2. Add the following custom fields to the ZIP code object:Field LabelCityLatitudeLongitudeStateState AbbreviationData TypeText (Length: 20)NumberNumberText (Length: 20)Text (Length: 2)3. Create a validation rule on the Candidate object that uses the following formula:130LEN(ZIP_Code__c) > 0 &&(Country__c = "USA" || Country__c = "US") &&VLOOKUP($ObjectType.ZIP_Code__c.Fields.City__c,
Displaying Data and Modifying Data Actions$ObjectType.ZIP_Code__c.Fields.Name,LEFT(ZIP_Code__c,5)) City__c)Set the Error Message to The ZIP Code you entered is incorrect.4. Download the <strong>com</strong>pressed file from zips.sourceforge.net. It contains the UnitedStates zip codes in Comma-Separated Values (CSV) file format. Extract its contents.5. Click Setup ➤ Data Management ➤ Data Loader ➤ Download the Data Loader.6. Follow the on-screen instructions to download and install the Data Loader.7. Use the Data Loader to load the CSV file data into Salesforce.<strong>com</strong>.a. Launch the Data Loader.b. Click Insert.c. Enter your Salesforce.<strong>com</strong> username and password, and click Login.d. After Salesforce.<strong>com</strong> verifies your login credentials, click Next.e. A popup window appears that displays the record count. Click OK.f. Select ZIP Code (ZIP_Code_c) and click Next.g. Click Create or Edit a Map.h. Map the Salesforce.<strong>com</strong> fields to the fields in the CSV file by dragging theSalesforce.<strong>com</strong> fields from the top table to the bottom table.i. Click OK.j. Click Next.k. Click Finish.l. A popup appears that asks if you want to create new records. Click Yes.DiscussionThe VLOOKUP() function returns a value by looking up a related value on a custom object. Inthis recipe, the validation rule uses the VLOOKUP() function to search the Name field on allthe ZIP code records. It searchesuntil it finds one that matches the value of the ZIP Codefield on the candidate record that the user is trying to save. After finding the matching ZIPcode record, the VLOOKUP() function checks the record's City field to see if it is not equalto the City field on the candidate record. If the search for a matching ZIP code record isunsuccessful, or if the values of the City fields on either record do not match, the validationrule prevents the candidate record from being saved, and returns the message The ZIP Codeyou entered is incorrect.See Also• “About Validation Rules” in the Salesforce.<strong>com</strong> online help• Storing and Displaying Confidential Information on page 118• “Operators and Functions” in the Salesforce.<strong>com</strong> online help131
Chapter 4: Displaying Data and Modifying Data Actions• The Sample Recruiting App on page 3• “Examples of Advanced Formula Fields” in the Salesforce.<strong>com</strong> online helpUsing Query String Parameters in a Visualforce PageProblemYou want to read and set query string parameters in a Visualforce page, either in a customcontroller or in the page itself.SolutionThe way to read and set query string parameters depends on whether you access them from acustom controller or directly from a Visualforce page.To read a query string parameter:• If you're writing a custom controller, use the ApexPages global object variable andcurrentPage() and getParameters() methods to get query string parameters. Forexample, to get the value of the name query parameter in the URL:https://na1.salesforce.<strong>com</strong>/001/e?name=value, use the following line in yourcustom controller:String value = ApexPages.currentPage().getParameters().get('name');• If you're editing a page, use the $PageContext global variable in a merge field.For example, suppose you want to add the Open Activities related list to an account detailpage, but instead of showing the account's activities, you want to show the activities of aspecified contact. To specify the contact, the following page looks for a query stringparameter for the contact's ID under the name relatedId:You belong to the {!account.name} account.You're also a nice person.For this related list to render in a saved page, valid account and contact IDs must be specifiedin the URL. For example, if 001D000000HRgU6 is the account ID and 003D000000OXDIxis the contact ID, use the URL132
Displaying Data and Modifying Data Actionshttps://na3.salesforce.<strong>com</strong>/apex/MyFirstPage?id=001D000000HRgU6&relatedId=003D000000OXDIx.To set a query string parameter:• If you're writing a custom controller, use the setParameters() method withApexPages.currentPage() to add a query parameter in a test method. For example:String key = 'name';String value = 'Caroline';ApexPages.currentPage().setParameters().put(key, value);Note: The setParameters() method is only valid inside test methods.• If you're editing a page, you can either construct a URL manually:Search GoogleOr you can use the tag as a child tag to write cleaner code:Search GoogleNote: In addition to , can be a child ofother tags such as and .See Also• Building a Table of Data in a Visualforce Page on page 69• Building a Form in a Visualforce Page on page 71• Creating a Wizard with Visualforce Pages on page 72• Using AJAX in a Visualforce Page on page 134133
Chapter 4: Displaying Data and Modifying Data ActionsUsing AJAX in a Visualforce PageProblemYou want to use AJAX in a Visualforce page so that only part of the page needs to be refreshedwhen a user clicks a button or link.SolutionUse the reRender attribute on an or tag to identify the <strong>com</strong>ponent that should be refreshed. When a user clicks the button or link,only the identified <strong>com</strong>ponent and all of its child <strong>com</strong>ponents are refreshed.For example, the following page shows a list of contacts. When a user clicks the name of acontact, only the area below the list refreshes, showing the details for the contact:134Figure 18: Developers Can Use Embedded AJAX to Refresh Part of a PageThe following markup defines the page from the previous example:
Displaying Data and Modifying Data ActionsName{!c.name}Account Name{!c.account.name}Notice the following about the markup for this page:• Setting the reRender attribute of the tag to 'detail' (the id valuefor the tag) means that only the output panel <strong>com</strong>ponent isrefreshed when a user clicks the name of a contact.• The tag sets the id query parameter for each contact name link to the IDof the associated contact record.• In the tags, an tag is used to add the header row. Facetsare special child <strong>com</strong>ponents of some tags that can control the header, footer, or otherspecial areas of the parent <strong>com</strong>ponent. Even though the columns are in an iteration<strong>com</strong>ponent (the data table), the facets only display once, in the header for each column.• In the tag, the details for the currently-selected contact aredisplayed without the detail section title or <strong>com</strong>plete set of related lists; however, we canadd individual related lists with the tag.The following markup defines the Apex controller class for the page. It includes two methods:one to return a list of the ten most recently modified contacts and one to return a single contactrecord based on the id query parameter of the page URL:public class contactController {// Return a list of the ten most recently modified contactspublic List getContacts() {return [SELECT Id, Name, Account.Name, Phone, EmailFROM ContactORDER BY LastModifiedDate DESC LIMIT 10];}// Get the 'id' query parameter from the URL of the page.// If it's not specified, return an empty contact.// Otherwise, issue a SOQL query to return the contact from the// database.135
Chapter 4: Displaying Data and Modifying Data Actionspublic Contact getContact() {Id id = System.currentPageReference().getParameters().get('id');}return id == null ? new Contact() : [SELECT Id, NameFROM ContactWHERE Id = :id];}See Also• Using Query String Parameters in a Visualforce Page on page 132• Building a Table of Data in a Visualforce Page on page 69• Building a Form in a Visualforce Page on page 71• Creating a Wizard with Visualforce Pages on page 72Using Properties in ApexProblemYou want to create a page that captures input from users, and that input spans multiple sObjects.SolutionUse a Visualforce page with a custom Apex controller, and give it properties to represent theinput fields from Accounts and Contacts.1. Create a custom controller with a simple getName method.a. Click Setup ➤ Develop ➤ Apex Classes.b. Click New.c. In the editor, add the following content:/** This class is the controller for the* NewCustomer Visual<strong>Force</strong> page.* It uses properties to hold values entered* by the user. These values* will used to construct multiple SObjects.*/public class Customer {// Add properties here136/* Required method in a Visual<strong>Force</strong> controller */public String getName() {return 'Customer';
Displaying Data and Modifying Data Actions}// Add methods here// Add queries here}d. Click Quick Save.2. Update the controller by replacing the line // Add properties here with thefollowing Apex properties:public String <strong>com</strong>panyName {get; set;}public Integer numEmployees {get; set;}public String streetAddress {get; set;}public String cityAddress {get; set;}public String stateAddress {get; set;}public String postalCodeAddress {get; set;}public String countryAddress {get; set;}public String department {get; set;}public String email {get; set;}public String phone {get; set;}public String firstName {get; set;}public String lastName {get; set;}public String title {get; set;}3. Click Quick Save.4. Update the controller by replacing the line // Add methods here with thefollowing method for saving the property values to a new pair of Account and Contactobjects:/** Takes the values entered by the user in the Visual<strong>Force</strong>* page and constructs Account and Contact sObjects.*/public void save() {Account a = new Account(Name = <strong>com</strong>panyName,NumberOfEmployees = numEmployees,ShippingStreet = streetAddress,ShippingCity = cityAddress,ShippingState = stateAddress,ShippingPostalCode = postalCodeAddress,ShippingCountry = countryAddress);insert a;Contact c = new Contact(FirstName = firstName,LastName = lastName,Account = a,Department = department,Email = email,Phone = phone,Title = title,137
Chapter 4: Displaying Data and Modifying Data ActionsMailingStreet = streetAddress,MailingCity = cityAddress,MailingState = stateAddress,MailingPostalCode = postalCodeAddress,MailingCountry = countryAddress);}insert c;5. Click Quick Save.6. Update the controller by replacing the line // Add queries here with queriesfor displaying Accounts and Contacts related lists:/* Used for the Account list at the end of theVisual<strong>Force</strong> page*/public List getAccountList() {return [select name, numberofemployees from account];}/* Used for the Contact list at the end of theVisual<strong>Force</strong> page*/public List getContactList() {return [select name, title, department, email, phonefrom contact];}7. Click Save.8. Click SetupDevelop ➤ Pages.9. Click New.10. In the name field, enter newCustomerEntry.11. Optionally enter a label and description.12. In the editor, enter the following markup:First Name:Last Name:Company Name:# Employees:Department:Email:Phone:138
Displaying Data and Modifying Data ActionsTitle:AddressStreet:City:State:Zip:Country:13. Click Quick Save.14. Update the page by replacing with thefollowing markup to displays the related lists from the queries:15. Click Save.16. Call the page by using the following URL:https://salesforce_instance/apex/newCustomerEntry.139
Chapter 4: Displaying Data and Modifying Data ActionsDiscussionYou want to ask the user to enter information about a new customer. The fields are used tocreate both a new account and a new contact associated with that account. Using a Visualforcepage lets you present whatever user interface you want, using HTML and Visualforce markup;however, each standard controller in Visualforce corresponds to a single sObject type, such asAccount or Contact. To work with more than on sObject type, you need to use a customcontroller.When using a Apex custom controller, the easiest way to do to access data on exposed by thecontroller is to use Apex properties. The syntax for Apex properties is similar to C# properties.Java-style bean properties (with getters and setters that you create for each property) also work;however, the property syntax used above is much more readable, and makes it easier todistinguish the controller's properties from its actions.Queries in a custom controller can be used to present data to the user. In this example, queriesare used to create two tables that mimic related lists.Since the form is simple HTML, you can modify it to your style either using HTML orVisualforce <strong>com</strong>ponents.Note that when you add a new customer and click Save, the account and contact informationis displayed in the related lists on the page.See Also• Creating a Child Record When a Parent Record is Created on page 159• Making Apex Work in any Organization on page 40140Mass Updating Contacts When an Account ChangesProblemYou want to update the address of all contacts associated with an account whenever the account'saddress changes.SolutionWrite a trigger in Apex that updates associated contacts when an account is updated. Forexample:trigger updateContactsOnAddressChange on Account(before update) {// The map allows us to keep track of the accounts that have
Displaying Data and Modifying Data Actions// new addressesMap acctsWithNewAddresses = new Map();// Trigger.new is a list of the Accounts that will be updated// This loop iterates over the list, and adds any that have new// addresses to the acctsWithNewAddresses map.for (Integer i = 0; i < Trigger.new.size(); i++) {if ( (Trigger.old[i].ShippingCity != Trigger.new[i].ShippingCity)|| (Trigger.old[i].ShippingCountry != Trigger.new[i].ShippingCountry)|| (Trigger.old[i].ShippingPostalCode != Trigger.new[i].ShippingPostalCode)|| (Trigger.old[i].ShippingState != Trigger.new[i].ShippingState)|| (Trigger.old[i].ShippingStreet != Trigger.new[i].ShippingStreet)) {acctsWithNewAddresses.put(Trigger.old[i].id,Trigger.new[i]);}}List updatedContacts = new List();//Here we can see two syntatic features of Apex:// 1) iterating over an embedded SOQL query// 2) binding an array directly to a SOQL query with 'in'for (Contact c : [SELECT id, accountId, MailingCity,MailingCountry, MailingPostalCode,MailingState, MailingStreetFROM contactWHERE accountIdin :acctsWithNewAddresses.keySet()]) {Account parentAccount = acctsWithNewAddresses.get(c.accountId);c.MailingCity = parentAccount.ShippingCity;c.MailingCountry = parentAccount.ShippingCountry;c.MailingPostalCode = parentAccount.ShippingPostalCode;c.MailingState = parentAccount.ShippingState;c.MailingStreet = parentAccount.ShippingStreet;}// Rather than insert the contacts individually, add the// contacts to a list and bulk insert it. This makes the// trigger run faster and allows us to avoid hitting the// governor limit on DML statementsupdatedContacts.add(c);}update updatedContacts;See Also• Creating a Child Record When a Parent Record is Created on page 159• Bulk Processing Records in a Trigger on page 142141
Chapter 4: Displaying Data and Modifying Data Actions• Preventing Duplicate Records from Saving on page 153• Controlling Recursive Triggers on page 149Bulk Processing Records in a TriggerProblemYou're new to writing triggers, and when you write one for bulk processing, it often runs intoApex governor limits.SolutionFor efficient bulk processing, it's critical that triggers execute a constant number of databasequeries, regardless of how many records are being processed. Instead of looping over individualrecords in the Trigger.old or Trigger.new lists, use maps to organize records based ontheir ID or another identifying field, and use sets to isolate distinct records.For example, consider the following lead deduplication trigger, which rejects any new or updatedlead that has a duplicate email address:• The trigger first uses a map to store the updated leads with each lead's email address as thekey.• The trigger then uses the set of keys in the map to query the database for any existing leadrecords with the same email addresses. For every matching lead, the duplicate record ismarked with an error condition.trigger leadDuplicatePreventer on Lead(before insert, before update) {Map leadMap = new Map();for (Lead lead : System.Trigger.new) {// Make sure we don't treat an email address that// isn't changing during an update as a duplicate.if ((lead.Email != null) &&(System.Trigger.isInsert ||(lead.Email !=System.Trigger.oldMap.get(lead.Id).Email))) {142}}// Make sure another new lead isn't also a duplicateif (leadMap.containsKey(lead.Email)) {lead.Email.addError('Another new lead has the '+ 'same email address.');} else {leadMap.put(lead.Email, lead);}
Displaying Data and Modifying Data Actions}// Using a single database query, find all the leads in// the database that have the same email address as any// of the leads being inserted or updated.for (Lead lead : [SELECT Email FROM LeadWHERE Email IN :leadMap.KeySet()]) {Lead newLead = leadMap.get(lead.Email);newLead.Email.addError('A lead with this email '+ 'address already exists.');}See Also• Preventing Duplicate Records from Saving on page 153 contains further discussion of theApex trigger in this recipe.• Controlling Recursive Triggers on page 149Using Batch Apex to Reassign Account OwnersProblemYou want to reassign accounts from one owner to another. However, you have 100,000 accounts,which are too many to use a standard Apex trigger or class in a single transaction.SolutionUse batch Apex to process all the records at once.To use batch Apex, you must write a class that implements the Database.Batchableinterface provided by Salesforce.<strong>com</strong>.After you write the class, you should create a Visualforce page for executing the class. Youcould also create a button that calls a Visualforce controller. It is a best practice to execute abatch job from Visualforce.Caution: You can only have five queued or active batch jobs at one time. Use extremecare if you are planning to invoke a batch job from a trigger. You must be able toguarantee that the trigger will not add more batch jobs than the five that are allowed.In particular, consider API bulk updates, import wizards, mass record changes throughthe user interface, and all cases where more than one record can be updated at a time.143
Chapter 4: Displaying Data and Modifying Data ActionsThe following is the entire code example. In the discussion, we include more explanation ofthe various pieces that must be included in the class.global class AccountOwnerReassignment implementsDatabase.Batchable, Database.Stateful{User fromUser{get; set;}User toUser{get; set;}Double failedUpdates{get; set;}global AccountOwnerReassignment(User fromUser, User toUser){this.fromUser = fromUser;this.toUser = toUser;failedUpdates = 0;}global Database.queryLocatorstart(Database.BatchableContext ctx){return Database.getQueryLocator([SELECT id, name, ownerIdFROM Account WHERE ownerId = :fromUser.id]);}global void execute(Database.BatchableContext ctx, Listscope){List accs = (List)scope;for(Integer i = 0; i < accs.size(); i++){accs[i].ownerId = toUser.id;}List dsrs = Database.update(accs, false);for(Database.SaveResult dsr : dsrs){if(!dsr.isSuccess()){failedUpdates++;}}}global void finish(Database.BatchableContext ctx){AsyncApexJob a = [SELECT id, ApexClassId,JobItemsProcessed, TotalJobItems,NumberOfErrors, CreatedBy.EmailFROM AsyncApexJobWHERE id = :ctx.getJobId()];String emailMessage = 'Your batch job '+ 'AccountOwnerReassignment '+ 'has finished. It executed '+ a.totalJobItems+ ' batches. Of which, ' + a.jobitemsprocessed+ ' processed without any exceptions thrown and '+ a.numberOfErrors +144
Displaying Data and Modifying Data Actions' batches threw unhandled exceptions.'+ ' Of the batches that executed without error, '+ failedUpdates+ ' records were not updated successfully.';}Messaging.SingleEmailMessage mail =new Messaging.SingleEmailMessage();String[] toAddresses = new String[] {a.createdBy.email};mail.setToAddresses(toAddresses);mail.setReplyTo('noreply@salesforce.<strong>com</strong>');mail.setSenderDisplayName('Batch Job Summary');mail.setSubject('Batch job <strong>com</strong>pleted');mail.setPlainTextBody(emailMessage);mail.setHtmlBody(emailMessage);Messaging.sendEmail(new Messaging.SingleEmailMessage[]{ mail });public static testmethod void testBatchAccountOwnerReassignment(){// Access the standard user profileProfile p = [SELECT Id FROM profileWHERE name='Standard User'];// Create the two users for the testUser fromUser = new User(alias = 'newUser1',email='newuser1@testorg.<strong>com</strong>',emailencodingkey='UTF-8', lastname='Testing',languagelocalekey='en_US',localesidkey='en_US', profileid = p.Id,timezonesidkey='America/Los_Angeles',username='newuser1@testorg.<strong>com</strong>');User toUser = new User(alias = 'newUser2',email='newuser2@testorg.<strong>com</strong>',emailencodingkey='UTF-8', lastname='Testing',languagelocalekey='en_US',localesidkey='en_US', profileid = p.Id,timezonesidkey='America/Los_Angeles',username='newuser2@testorg.<strong>com</strong>');insert fromUser;insert toUser;// Use the new users to create a new accountList accs = new List();for(integer i = 0; i < 200; i++){accs.add(new Account(name = 'test',ownerId = fromUser.id));}insert accs;// Actually start the testTest.startTest();Database.executeBatch(newAccountOwnerReassignment(fromUser,toUser));Test.stopTest();145
Chapter 4: Displaying Data and Modifying Data Actions}}// Verify the test workedaccs = [SELECT id, name FROM accountWHERE ownerId = :toUser.id];System.assert(accs.size() == 200);DiscussionThe Database.Batchable interface provided by Salesforce.<strong>com</strong> has three methods thatmust be implemented by your class: start, execute, and finish. This class also includesthe method testBatchAccountOwnerReassignment used for testing the class. As a bestpractice you should always test your code, so this example includes testing.The following steps through each part of the class.1. Implement the interface Database.Batchable.Each execution of a batch Apex job is considered a discrete transaction. For example,a batch Apex job that contains 1,000 records and is executed without the optionalscope parameter is considered five transactions of 200 records each. By includingDatabase.Stateful in the class declaration, you maintain state across each ofthese transactions.global class AccountOwnerReassignment implementsDatabase.Batchable,Database.Stateful{2. Declare the variables used in the rest of the class, as well as the class constructor.User fromUser{get; set;}User toUser{get; set;}Double failedUpdates{get; set;}global AccountOwnerReassignment(User fromUser,User toUser){this.fromUser = fromUser;this.toUser = toUser;failedUpdates = 0;}3. The class implementing Database.Batchable must implement the startmethod. Use the start method to collect the records or objects to be passed to theinterface method execute.This start method populates the QueryLocator objectwith all the accounts owned by the specified owner.global Database.queryLocatorstart(Database.BatchableContext ctx){146
Displaying Data and Modifying Data Actions}return Database.getQueryLocator([SELECT id,name, ownerIdFROM AccountWHERE ownerId = :fromUser.id]);4. This class must also implement the execute method. The execute method iscalled for each batch of records passed to the method. Use this method to do allrequired processing for each chunk of data. This execute method reassigns theowner.global void execute(Database.BatchableContext ctx,List scope){List accs = (List)scope;for(Integer i = 0; i < accs.size(); i++){accs[i].ownerId = toUser.id;}List dsrs =Database.update(accs, false);for(Database.SaveResult dsr : dsrs){if(!dsr.isSuccess()){failedUpdates++;}}}5. This class must also implement the finish method. The finish method is calledafter all batches are processed. This method sends confirmation emails.global void finish(Database.BatchableContextctx){AsyncApexJob a = [SELECT id, ApexClassId,JobItemsProcessed,TotalJobItems,NumberOfErrors,CreatedBy.EmailFROM AsyncApexJobWHERE id = :ctx.getJobId()];String emailMessage ='Your batch job '+ 'AccountOwnerReassignment'+ ' has finished. It executed '+ a.totalJobItems +' batches. Of which, '+ a.jobitemsprocessed+ ' processed without any exceptions'+ 'thrown and '+ a.numberOfErrors +' batches threw unhandled exceptions.'147
Chapter 4: Displaying Data and Modifying Data Actions148+ ' Of the batches that executed'+ 'without error, '+ failedUpdates+ ' records were not updated successfully.';Messaging.SingleEmailMessage mail =new Messaging.SingleEmailMessage();String[] toAddresses = new String[]{a.createdBy.email};mail.setToAddresses(toAddresses);mail.setReplyTo('noreply@salesforce.<strong>com</strong>');mail.setSenderDisplayName('Batch Job Summary');mail.setSubject('Batch job <strong>com</strong>pleted');mail.setPlainTextBody(emailMessage);mail.setHtmlBody(emailMessage);Messaging.sendEmail(newMessaging.SingleEmailMessage[] { mail });}6. Generate the setup data for testing your code. Create the two users that are necessaryfor the test, as well as the 200 accounts:public static testmethod voidtestBatchAccountOwnerReassignment(){// Access the standard user profileProfile p = [SELECT Id FROM profileWHERE name='Standard User'];// Create the two users for the testUser fromUser = new User(alias = 'newUser1',email='newuser1@testorg.<strong>com</strong>',emailencodingkey='UTF-8',lastname='Testing',languagelocalekey='en_US',localesidkey='en_US', profileid = p.Id,timezonesidkey='America/Los_Angeles',username='newuser1@testorg.<strong>com</strong>');User toUser = new User(alias = 'newUser2',email='newuser2@testorg.<strong>com</strong>',emailencodingkey='UTF-8',lastname='Testing',languagelocalekey='en_US',localesidkey='en_US', profileid = p.Id,timezonesidkey='America/Los_Angeles',username='newuser2@testorg.<strong>com</strong>');insert fromUser;insert toUser;// Use the new users to create a new accountList accs = new List();for(integer i = 0; i < 200; i++){accs.add(new Account(name = 'test',ownerId = fromUser.id));}insert accs;
Displaying Data and Modifying Data Actions7. The executeBatch method starts an asynchronous process. However, your batchjob must finish before you can test against the results. Use the Test methodsstartTest and stopTest around the executeBatch method to ensure theasynchronous process finishes before you test. When the startTest method iscalled, all asynchronous calls get accumulated by the system. When the stopTestmethod is called, all asynchronous jobs are run synchronously.Note: Asynchronous calls, such as @future or executeBatch, called ina startTest, stopTest block, do not count against your organizationlimits for the number of queued jobs.// Actually start the testTest.startTest();Database.executeBatch(newAccountOwnerReassignment(fromUser, toUser));Test.stopTest();}// Verify the test workedaccs = [SELECT id, name FROM accountWHERE ownerId = :toUser.id];System.assert(accs.size() == 200);See Also• Bulk Processing Records in a Trigger on page 142• Using Properties in Apex on page 136• “Batch Apex” in the <strong>Force</strong>.<strong>com</strong> Apex Code Developer's Guide available atwww.salesforce.<strong>com</strong>/us/developer/docs/apexcode/index_CSH.htm#apex_batch.htmControlling Recursive TriggersProblemYou want to write a trigger that creates a new record as part of its processing logic; however,that record may then cause another trigger to fire, which in turn causes another to fire, and soon. You don't know how to stop that recursion.SolutionUse a static variable in an Apex class to avoid an infinite loop. Static variables are local to thecontext of a Web request (or test method during a call to runTests()), so all triggers thatfire as a result of a user's action have access to it.149
Chapter 4: Displaying Data and Modifying Data ActionsFor example, consider the following scenario: frequently a Salesforce.<strong>com</strong> user wants to followup with a customer the day after logging a call with that customer. Because this is such a<strong>com</strong>mon use case, you want to provide your users with a helpful checkbox on a task that allowsthem to automatically create a follow-up task scheduled for the next day.You can use a before insert trigger on Task to insert the follow-up task, but this, in turn,refires the before insert trigger before the follow-up task is inserted. To exit out of thisrecursion, set a static class boolean variable during the first pass through the trigger to informthe second trigger that it should not insert another follow-up task:Note: For this Apex script to work properly, you first must define a custom checkboxfield on Task. In this example, this field is named Create_Follow_Up_Task__c.The following code defines the class with the static class variable:public class FollowUpTaskHelper {// Static variables are local to the context of a Web request// (or testMethod during a runTests call)// Therefore, this variable will be initialized as false// at the beginning of each Web request which accesses it.private static boolean alreadyCreatedTasks = false;public static boolean hasAlreadyCreatedFollowUpTasks() {return alreadyCreatedTasks;}// By setting the variable to true, it maintains this// new value throughout the duration of the request// (or testMethod)public static void setAlreadyCreatedFollowUpTasks() {alreadyCreatedTasks = true;}150}public static String getFollowUpSubject(String subject) {return 'Follow Up: ' + subject;}The following code defines the trigger:trigger AutoCreateFollowUpTasks on Task (before insert) {// Before cloning and inserting the follow-up tasks,// make sure the current trigger context isn't operating// on a set of cloned follow-up tasks.if (!FollowUpTaskHelper.hasAlreadyCreatedFollowUpTasks()) {
Displaying Data and Modifying Data ActionsList followUpTasks = new List();for (Task t : Trigger.new) {if (t.Create_Follow_Up_Task__c) {// False indicates that the ID should NOT// be preservedTask followUpTask = t.clone(false);System.assertEquals(null, followUpTask.id);followUpTask.subject =FollowUpTaskHelper.getFollowUpSubect(followUpTask.subject);if (followUpTask.ActivityDate != null) {followUpTask.ActivityDate =followUpTask.ActivityDate + 1; //The day after}followUpTasks.add(followUpTask);}}FollowUpTaskHelper.setAlreadyCreatedFollowUpTasks();insert followUpTasks;}}The following code defines the test methods:// This class includes the test methods for the// AutoCreateFollowUpTasks trigger.public class FollowUpTaskTester {private static integer NUMBER_TO_CREATE = 4;private static String UNIQUE_SUBJECT ='Testing follow-up tasks';static testMethod void testCreateFollowUpTasks() {List tasksToCreate = new List();for (Integer i = 0; i < NUMBER_TO_CREATE; i++) {Task newTask = new Task(subject = UNIQUE_SUBJECT,ActivityDate = System.today(),Create_Follow_Up_Task__c = true );System.assert(newTask.Create_Follow_Up_Task__c);tasksToCreate.add(newTask);}insert tasksToCreate;System.assertEquals(NUMBER_TO_CREATE,[select count()from Taskwhere subject = :UNIQUE_SUBJECTand ActivityDate = :System.today()]);// Make sure there are follow-up tasks createdSystem.assertEquals(NUMBER_TO_CREATE,151
Chapter 4: Displaying Data and Modifying Data Actions}[select count()from Taskwhere subject =:FollowUpTaskHelper.getFollowUpSubject(UNIQUE_SUBJECT)and ActivityDate = :System.today()+1]);static testMethod void assertNormalTasksArentFollowedUp() {List tasksToCreate = new List();for (integer i = 0; i < NUMBER_TO_CREATE; i++) {Task newTask = new Task(subject=UNIQUE_SUBJECT,ActivityDate = System.today(),Create_Follow_Up_Task__c = false);tasksToCreate.add(newTask);}insert tasksToCreate;System.assertEquals(NUMBER_TO_CREATE,[select count()from Taskwhere subject=:UNIQUE_SUBJECTand ActivityDate =:System.today()]);// There should be no follow-up tasks createdSystem.assertEquals(0,[select count()from Taskwhere subject=:FollowUpTaskHelper.getFollowUpSubject(UNIQUE_SUBJECT)}and ActivityDate =:(System.today() +1)]);}See Also• Bulk Processing Records in a Trigger on page 142• Comparing Queries Against Trigger.old and Trigger.new on page 152Comparing Queries Against Trigger.old andTrigger.newProblemYou're writing a before update or before delete trigger and need to issue a SOQLquery to get related data for records in the Trigger.new and Trigger.old lists.152
Displaying Data and Modifying Data ActionsSolutionCorrelate records and query results with the Trigger.newMap and Trigger.oldMapID-to-SObject maps.For example, the following trigger uses Trigger.oldMap to create a set of unique IDs(Trigger.oldMap.keySet()). The set is then used as part of a query to create a list of jobapplications associated with the candidates being processed by the trigger. For every jobapplication returned by the query, the related candidate is retrieved from Trigger.oldMapand prevented from being deleted.trigger candidateTrigger on Candidate__c (before delete) {for (Job_Application__c jobApp : [SELECT Candidate__cFROM Job_Application__cWHERE Candidate__cIN :Trigger.oldMap.keySet()]) {Trigger.oldMap.get(jobApp.Candidate__c).addError('Cannot delete candidate with a job application');}}DiscussionIt's a better practice to use Trigger.newMap and Trigger.oldMap because you can't assumethat directly querying the Trigger.new and Trigger.old lists will return the same numberof records in the same order. Even though these lists are sorted by ID, external operationsmight change the number of records that are returned and make parallel list processingdangerous.See Also• Bulk Processing Records in a Trigger on page 142• Controlling Recursive Triggers on page 149Preventing Duplicate Records from SavingProblemYou want to prevent users from saving duplicate records based on the value of one or morefields.153
Chapter 4: Displaying Data and Modifying Data ActionsSolutionIf you can determine whether a record is a duplicate based on the value of a single custom field,select the Unique and Required checkboxes on that field's definition:• To edit a custom field on a standard object:1. Click Setup ➤ Customize.2. Select the link for the desired object, and click Fields.3. Click Edit next to the name of the appropriate field.• To edit a custom field on a custom object:1. Click Setup ➤ Develop ➤ Objects.2. Click the name of the object on which the field appears.3. Click Edit next to the name of the field in the Custom Fields and Relationshipsrelated list.The Unique and Required checkboxes are only available on custom fields. If you want tocheck for uniqueness based on the value of a single standard field and your edition can't useApex, you can also use the following workaround:1. Create a custom field with the same type and label as the standard field. Select theUnique and Required checkboxes on the custom field's definition page.2. Replace the standard field with your new custom field on all page layouts.3. Use field-level security to make the standard field read-only for all user profiles.Thisprevents any user from mistakenly modifying the standard field through the API,unless the user has the “Modify All Data” profile permission.4. Define a workflow rule that automatically updates the value of the standard fieldwith the value of the custom field whenever the custom field changes. This ensuresthat any application functionality that relies on the value of the standard fieldcontinues to work properly. (For example, the Send An Email button on the ActivityHistory related list relies on the standard Email field for a lead or contact.)Note: Because this is a less-elegant solution than using Apex, creating a trigger onlead is the preferred solution for Unlimited Edition and Developer Edition.If you need to require uniqueness based on the value of two or more fields, or a single standardfield, write an Apex before insert and before update trigger. For example, the followingtrigger prevents leads from being saved if they have a matching Email field:• The trigger first uses a map to store the updated leads with each lead's email address as thekey.154
Displaying Data and Modifying Data Actions• The trigger then uses the set of keys in the map to query the database for any existing leadrecords with the same email addresses. For every matching lead, the duplicate record ismarked with an error condition.trigger leadDuplicatePreventer on Lead(before insert, before update) {Map leadMap = new Map();for (Lead lead : System.Trigger.new) {// Make sure we don't treat an email address that// isn't changing during an update as a duplicate.if ((lead.Email != null) &&(System.Trigger.isInsert ||(lead.Email !=System.Trigger.oldMap.get(lead.Id).Email))) {}}// Make sure another new lead isn't also a duplicateif (leadMap.containsKey(lead.Email)) {lead.Email.addError('Another new lead has the '+ 'same email address.');} else {leadMap.put(lead.Email, lead);}}// Using a single database query, find all the leads in// the database that have the same email address as any// of the leads being inserted or updated.for (Lead lead : [SELECT Email FROM LeadWHERE Email IN :leadMap.KeySet()]) {Lead newLead = leadMap.get(lead.Email);newLead.Email.addError('A lead with this email '+ 'address already exists.');}The following class can be used to test the trigger for both single- and bulk-record inserts andupdates.public class leadDupePreventerTests{static testMethod void testLeadDupPreventer() {// First make sure there are no leads already in the system// that have the email addresses used for testingSet testEmailAddress = new Set();testEmailAddress.add('test1@duptest.<strong>com</strong>');testEmailAddress.add('test2@duptest.<strong>com</strong>');testEmailAddress.add('test3@duptest.<strong>com</strong>');testEmailAddress.add('test4@duptest.<strong>com</strong>');testEmailAddress.add('test5@duptest.<strong>com</strong>');System.assert([SELECT count() FROM LeadWHERE Email IN :testEmailAddress] == 0);155
Chapter 4: Displaying Data and Modifying Data Actions156// Seed the database with some leads, and make sure they can// be bulk inserted successfully.Lead lead1 = new Lead(LastName='Test1', Company='Test1 Inc.',Email='test1@duptest.<strong>com</strong>');Lead lead2 = new Lead(LastName='Test2', Company='Test2 Inc.',Email='test4@duptest.<strong>com</strong>');Lead lead3 = new Lead(LastName='Test3', Company='Test3 Inc.',Email='test5@duptest.<strong>com</strong>');Lead[] leads = new Lead[] {lead1, lead2, lead3};insert leads;// Now make sure that some of these leads can be changed and// then bulk updated successfully. Note that lead1 is not// being changed, but is still being passed to the update// call. This should be OK.lead2.Email = 'test2@duptest.<strong>com</strong>';lead3.Email = 'test3@duptest.<strong>com</strong>';update leads;// Make sure that single row lead duplication prevention works// on insert.Lead dup1 = new Lead(LastName='Test1Dup',Company='Test1Dup Inc.',Email='test1@duptest.<strong>com</strong>');try {insert dup1;System.assert(false);} catch (DmlException e) {System.assert(e.getNumDml() == 1);System.assert(e.getDmlIndex(0) == 0);System.assert(e.getDmlFields(0).size() == 1);System.assert(e.getDmlFields(0)[0] == 'Email');System.assert(e.getDmlMessage(0).indexOf('A lead with this email address already exists.') > -1);}// Make sure that single row lead duplication prevention works// on update.dup1 = new Lead(Id = lead1.Id, LastName='Test1Dup',Company='Test1Dup Inc.',Email='test2@duptest.<strong>com</strong>');try {update dup1;System.assert(false);} catch (DmlException e) {System.assert(e.getNumDml() == 1);System.assert(e.getDmlIndex(0) == 0);System.assert(e.getDmlFields(0).size() == 1);System.assert(e.getDmlFields(0)[0] == 'Email');System.assert(e.getDmlMessage(0).indexOf('A lead with this email address already exists.') > -1);}// Make sure that bulk lead duplication prevention works on// insert. Note that the first item being inserted is fine,
Displaying Data and Modifying Data Actions// but the second and third items are duplicates. Note also// that since at least one record insert fails, the entire// transaction will be rolled back.dup1 = new Lead(LastName='Test1Dup', Company='Test1Dup Inc.',Email='test4@duptest.<strong>com</strong>');Lead dup2 = new Lead(LastName='Test2Dup',Company='Test2Dup Inc.',Email='test2@duptest.<strong>com</strong>');Lead dup3 = new Lead(LastName='Test3Dup',Company='Test3Dup Inc.',Email='test3@duptest.<strong>com</strong>');Lead[] dups = new Lead[] {dup1, dup2, dup3};try {insert dups;System.assert(false);} catch (DmlException e) {System.assert(e.getNumDml() == 2);System.assert(e.getDmlIndex(0) == 1);System.assert(e.getDmlFields(0).size() == 1);System.assert(e.getDmlFields(0)[0] == 'Email');System.assert(e.getDmlMessage(0).indexOf('A lead with this email address already exists.') > -1);System.assert(e.getDmlIndex(1) == 2);System.assert(e.getDmlFields(1).size() == 1);System.assert(e.getDmlFields(1)[0] == 'Email');System.assert(e.getDmlMessage(1).indexOf('A lead with this email address already exists.') > -1);}// Make sure that bulk lead duplication prevention works on// update. Note that the first item being updated is fine,// because the email address is new, and the second item is// also fine, but in this case it's because the email// address doesn't change. The third case is flagged as an// error because it is a duplicate of the email address of the// first lead's value in the database, even though that value// is changing in this same update call. It would be an// interesting exercise to rewrite the trigger to allow this// case. Note also that since at least one record update// fails, the entire transaction will be rolled back.dup1 = new Lead(Id=lead1.Id, Email='test4@duptest.<strong>com</strong>');dup2 = new Lead(Id=lead2.Id, Email='test2@duptest.<strong>com</strong>');dup3 = new Lead(Id=lead3.Id, Email='test1@duptest.<strong>com</strong>');dups = new Lead[] {dup1, dup2, dup3};try {update dups;System.assert(false);} catch (DmlException e) {System.debug(e.getNumDml());System.debug(e.getDmlMessage(0));System.assert(e.getNumDml() == 1);System.assert(e.getDmlIndex(0) == 2);System.assert(e.getDmlFields(0).size() == 1);System.assert(e.getDmlFields(0)[0] == 'Email');System.assert(e.getDmlMessage(0).indexOf('A lead with this email address already exists.') > -1);157
Chapter 4: Displaying Data and Modifying Data Actions}// Make sure that duplicates in the submission are caught when// inserting leads. Note that this test also catches an// attempt to insert a lead where there is an existing// duplicate.dup1 = new Lead(LastName='Test1Dup', Company='Test1Dup Inc.',Email='test4@duptest.<strong>com</strong>');dup2 = new Lead(LastName='Test2Dup', Company='Test2Dup Inc.',Email='test4@duptest.<strong>com</strong>');dup3 = new Lead(LastName='Test3Dup', Company='Test3Dup Inc.',Email='test3@duptest.<strong>com</strong>');dups = new Lead[] {dup1, dup2, dup3};try {insert dups;System.assert(false);} catch (DmlException e) {System.assert(e.getNumDml() == 2);System.assert(e.getDmlIndex(0) == 1);System.assert(e.getDmlFields(0).size() == 1);System.assert(e.getDmlFields(0)[0] == 'Email');System.assert(e.getDmlMessage(0).indexOf('Another new lead has the same email address.') > -1);System.assert(e.getDmlIndex(1) == 2);System.assert(e.getDmlFields(1).size() == 1);System.assert(e.getDmlFields(1)[0] == 'Email');System.assert(e.getDmlMessage(1).indexOf('A lead with this email address already exists.') > -1);}}}// Make sure that duplicates in the submission are caught when// updating leads. Note that this test also catches an attempt// to update a lead where there is an existing duplicate.dup1 = new Lead(Id=lead1.Id, Email='test4@duptest.<strong>com</strong>');dup2 = new Lead(Id=lead2.Id, Email='test4@duptest.<strong>com</strong>');dup3 = new Lead(Id=lead3.Id, Email='test2@duptest.<strong>com</strong>');dups = new Lead[] {dup1, dup2, dup3};try {update dups;System.assert(false);} catch (DmlException e) {System.assert(e.getNumDml() == 2);System.assert(e.getDmlIndex(0) == 1);System.assert(e.getDmlFields(0).size() == 1);System.assert(e.getDmlFields(0)[0] == 'Email');System.assert(e.getDmlMessage(0).indexOf('Another new lead has the same email address.') > -1);System.assert(e.getDmlIndex(1) == 2);System.assert(e.getDmlFields(1).size() == 1);System.assert(e.getDmlFields(1)[0] == 'Email');System.assert(e.getDmlMessage(1).indexOf('A lead with this email address already exists.') > -1);}158
Displaying Data and Modifying Data ActionsDiscussionThe first and most important lesson to learn from this recipe is that you should generally takeadvantage of point-and-click <strong>Force</strong>.<strong>com</strong> functionality if it can solve your problem, rather thanwriting code. By using the point-and-click tools that are provided, you leverage the power ofthe platform. Why reinvent the wheel if you can take advantage of a point-and-click featurethat performs the same functionality? As a result, we indicate in this recipe that you shouldfirst determine whether you can simply use the Unique and Required checkboxes on a singlecustom field definition to prevent duplicates.If you do need to check for duplicates based on the value of a single standard field, or morethan one field, Apex is the best way to ac<strong>com</strong>plish this. Because Apex runs on the <strong>Force</strong>.<strong>com</strong>servers, it's far more efficient than a deduplication algorithm that runs in a Web control.Additionally, Apex can execute every time a record is inserted or updated in the database,regardless of whether the database operation occurs as a result of a user clicking Save in theuser interface, or as a result of a bulk upsert call to the API. Web controls can only be triggeredwhen a record is saved through the user interface.The included trigger is production-ready because it meets the following criteria:• The trigger only makes a single database query, regardless of the number of leads beinginserted or updated.• The trigger catches duplicates that are in the list of leads being inserted or updated.• The trigger handles updates properly. That is, leads that are being updated with emailaddresses that haven't changed are not flagged as duplicates.• The trigger has full unit test coverage, including tests for both single- and bulk-recordinserts and updates.See AlsoControlling Recursive Triggers on page 149Creating a Child Record When a Parent Record isCreatedProblemYou want to automatically create a new child record when you create a parent record. Thechild record should be populated with default values from the position.SolutionUse an Apex trigger to automatically create the child record when a new parent record iscreated.159
Chapter 4: Displaying Data and Modifying Data ActionsFor this example, let's automatically create a new interviewer record (child) for the specifiedhiring manager whenever a new position (parent) is created.trigger AutoCreateInterviewer on Position__c (after insert) {List interviewers = new List();}//For each position processed by the trigger, add a new//interviewer record for the specified hiring manager.//Note that Trigger.New is a list of all the new positions//that are being created.for (Position__c newPosition: Trigger.New) {if (newPosition.Hiring_Manager__c != null) {interviewers.add(new Interviewer__c(Name = '1',Position__c = newPosition.Id,Employee__c = newPosition.Hiring_Manager__c,Role__c = 'Managerial'));}}insert interviewers;See Also• Bulk Processing Records in a Trigger on page 142• Controlling Recursive Triggers on page 149• Comparing Queries Against Trigger.old and Trigger.new on page 152Using Custom Settings to Display DataProblemYou have different default data in an application that you want to display to different users.For example, a system administrator should see one set of data, while a standard user shouldsee a different data set. In addition, you want to be able to quickly access specific sets of data,without worrying about governor limits.SolutionUse hierarchy custom settings to specify different default data to different users, and use listcustom settings to display different sets of data programmatically. One of the advantages ofcustom setting data is that it's loaded into cache, and so is quickly available. In addition,accessing the custom setting data sets doesn't require a SOQL or SOSL query, so you won'trun into governor limits.This example has several parts:160
Displaying Data and Modifying Data Actions• Two Visualforce pages—one for setting up the data, another for displaying it to a user.• Two Visualforce controllers—written in Apex.• Two custom setting definitions—one for the list of games, the other for the user preferences.The following are the <strong>com</strong>plete code examples. See the discussion on page 166 for detailedwalk-throughs of the code and custom settings.Visualforce PagesThe administration page:Your default platform is: {!Platform}Your custom preferred platform is: {!PlatformValue}Your default genre is: {!Genre}Your custom preferred genre is: {!GenreValue}161
Chapter 4: Displaying Data and Modifying Data ActionsThe user page:Your default platform is: {!Platform}Your default genre is: {!Genre}Visualforce ControllersAdministration page controller:public class CSAdminController {public gamepref__c myPref {get;set;}162public CSAdminController(){myPref = gamepref__c.getvalues(System.UserInfo.getUserId());if(myPref == null)myPref = new gamepref__c(setupOwnerId =System.Userinfo.getUserId());
Displaying Data and Modifying Data Actions}public static String getPlatform() {return gamepref__c.getInstance().Platform__c;}public static String getGenre(){return gamepref__c.getInstance().genre__c;}public static String getPlatformValue() {if(gamepref__c.getValues(System.Userinfo.getUserId())== null){return 'You do not have a personal gaming preference set';}}else if(gamepref__c.getValues(System.Userinfo.getUserId()).platform__c == null){return 'You did not set a personal preferred platform';}return gamepref__c.getValues(System.Userinfo.getUserId()).Platform__c;public static String getGenreValue(){if(gamepref__c.getValues(System.Userinfo.getUserId())== null){return 'You do not have a personal gaming preference set';}}else if(gamepref__c.getValues(System.Userinfo.getUserId()).genre__c == null){return 'You did not set a personal preferred genre';} return gamepref__c.getValues(System.Userinfo.getUserId()).genre__c;public PageReference save() {if(myPref.id == null){insert myPref;}elseupdate myPref;return null;}}User page controller:public class CSDemoController {public static String getGenre(){return gamepref__c.getInstance().genre__c;}163
Chapter 4: Displaying Data and Modifying Data Actions164public static String getPlatform() {return gamepref__c.getInstance().Platform__c;}public static list getGames() {return GameList__c.getall().values();}public static list getGamesByPlatform(){list AllGames = getGames();list returnlist = new list();String myPlatform = getPlatform();for(gamelist__c Game : AllGames){if(Game.platform__c.contains(myPlatform))returnlist.add(Game);System.debug(returnlist.size());}return returnlist;}public static list getGamesByGenre(){list AllGames = getGames();list returnlist = new list();String myGenre = getGenre();for(gamelist__c Game : AllGames){if(Game.genre__c.contains(myGenre))returnlist.add(Game);}return returnlist;}public static testmethod void test1(){Profile SysAdProfileId = [SELECT id FROM ProfileWHERE name = 'System Administrator'];User newUser = new User(username='thecircleoflife@test.<strong>com</strong>',lastName='myLastName', profileId=SysAdProfileId.id,email='foobar@a.<strong>com</strong>', alias='testUser',timeZoneSidKey='America/Denver',localeSidKey='en_CA', emailEncodingKey='UTF-8',languageLocaleKey='en_US');insert newUser;DemoCSPkg__gamepref__c newUserVal =new DemoCSPkg__gamepref__c();newUserVal.setupOwnerId = newUser.id;newUserVal.platform__c = '<strong>Force</strong>.<strong>com</strong> Platform';newUserVal.genre__c = 'Made up genre';insert newUserVal;DemoCSPkg__GameList__c testGame =new DemoCSPkg__GameList__c();
Displaying Data and Modifying Data ActionstestGame.name = 'Test Game';testGame.genre__c = 'Made up genre';testGame.platform__c = 'Platform A';insert testGame;DemoCSPkg__GameList__c testGame2 =new DemoCSPkg__GameList__c();testGame2.name = 'Test Game2';testGame2.genre__c = 'Only the best';testGame2.platform__c = '<strong>Force</strong>.<strong>com</strong> Platform';insert testGame2;System.runAs(newUser){list myListGenre = getGamesByGenre();list myListPlatform = getGamesByPlatform();for(gamelist__c Game : myListGenre){System.Debug(Game.name);System.Assert(Game.name.equals('Test Game'));System.Assert(Game.genre__c.equals('Made up genre'));}}}}for(gamelist__c Game : myListPlatform){System.Assert(Game.name.equals('Test Game2'));System.Assert(Game.platform__c.equals('<strong>Force</strong>.<strong>com</strong> Platform'));}Custom SettingsHierarchy custom setting:165
Chapter 4: Displaying Data and Modifying Data ActionsList custom setting:166DiscussionThe first on the administrator's Visualforce page calls various Apexmethods to return values set by the user. All four are very similar. Let's look more closely atthe first two.
Displaying Data and Modifying Data ActionsHere's the code for the first message on the page:Your default platform is: {!Platform}Here's the corresponding Apex:public static String getPlatform() {return gamepref__c.getInstance().Platform__c;}Custom settings are accessed in Apex just like a custom object.The name of the custom settingbeing called is gamepref, so in the code it's gamepref__c. The gamepref custom setting is ahierarchy custom setting, which means that the data uses a built-in hierarchical logic that letsyou personalize settings for specific profiles or users.The hierarchy logic checks the organization,profile, and user settings for the current user and returns the most specific, or “lowest,” value.In the hierarchy, settings for an organization are overridden by profile settings, which, in turn,are overridden by user settings.The getInstance method returns the lowest value for the current user for the field Platformdefined in the custom setting.The second method returns the value of the Platform field:Your custom preferred platform is: {!PlatformValue}Here's the corresponding Apex:public static String getPlatformValue() {if(gamepref__c.getValues(System.Userinfo.getUserId()) == null){return 'You do not have a personal gaming preference set';}}else if(gamepref__c.getValues(System.Userinfo.getUserId()).platform__c == null){return 'You did not set a personal preferred platform';}return gamepref__c.getValues(System.Userinfo.getUserId()).Platform__c;167
Chapter 4: Displaying Data and Modifying Data ActionsIf the user has specified a value, it is returned. If the user hasn't specified a value, a message isreturned instead.The second page block of the administrator's page allows the user to set the values for platformand game preference:The first page block in the user page that displays the values chosen on the administrator pagecontains two very similar methods that merely call the controller to retrieve values from thecustom setting.The second and third page blocks in the user page display similar data. Let's look at the firstone.Here's the corresponding Apex:public static list getGames() {return GameList__c.getall().values();}public static list getGamesByPlatform(){list AllGames = getGames();list returnlist = new list();String myPlatform = getPlatform();for(gamelist__c Game : AllGames){if(Game.platform__c.contains(myPlatform))returnlist.add(Game);System.debug(returnlist.size());}return returnlist;}168
Displaying Data and Modifying Data ActionsThe first method returns all the values for the list custom setting gameList as a list.The getAllmethod returns a map, used with the value method to transform it into a list.The second method accumulates all the defined values for the user into a list that is thenreturned to the Visualforce page.The class CSDemoController also includes the methods used for testing the class. As a bestpractice you should always test your code, so this example includes testing.1. Create the users to test the different roles and data from the hierarchy custom setting:User newUser = new User(username='thecircleoflife@test.<strong>com</strong>',lastName='myLastName', profileId=SysAdProfileId.id,email='foobar@a.<strong>com</strong>', alias='testUser',timeZoneSidKey='America/Denver',localeSidKey='en_CA', emailEncodingKey='UTF-8',languageLocaleKey='en_US');insert newUser;2. Create new data in both of the custom settings, gamePref and gameList:DemoCSPkg__gamepref__c newUserVal =new DemoCSPkg__gamepref__c();newUserVal.setupOwnerId = newUser.id;newUserVal.platform__c = '<strong>Force</strong>.<strong>com</strong> Platform';newUserVal.genre__c = 'Made up genre';insert newUserVal;DemoCSPkg__GameList__c testGame = new DemoCSPkg__GameList__c();testGame.name = 'Test Game';testGame.genre__c = 'Made up genre';testGame.platform__c = 'Platform A';insert testGame;DemoCSPkg__GameList__c testGame2 = new DemoCSPkg__GameList__c();testGame2.name = 'Test Game2';testGame2.genre__c = 'Only the best';testGame2.platform__c = '<strong>Force</strong>.<strong>com</strong> Platform';3. Run the tests as the specified user:System.runAs(newUser){list myListGenre = getGamesByGenre();list myListPlatform = getGamesByPlatform();for(gamelist__c Game : myListGenre){System.Debug(Game.name);System.Assert(Game.name.equals('Test Game'));System.Assert(Game.genre__c.equals('Made up genre'));}for(gamelist__c Game : myListPlatform){System.Assert(Game.name.equals('Test Game2'));169
Chapter 4: Displaying Data and Modifying Data ActionsSystem.Assert(Game.platform__c.equals('<strong>Force</strong>.<strong>com</strong> Platform'));See Also• Using System.runAs in Test Methods on page 170• Building a Table of Data in a Visualforce Page on page 69• “Custom Settings Overview” in the Salesforce.<strong>com</strong> online help.Using System.runAs in Test Methods170ProblemGenerally, all Apex scripts run in system mode. The permissions and record sharing of thecurrent user are not taken into account; however, you need to verify if a specific user has accessto a specific object.SolutionThe system method runAs enables you to write test methods that change user contexts toeither an existing user or a new user. All of that user's record sharing is then enforced.In the following example, a new user is created, based on the standard user profile. In addition,a second user is instantiated, based on the system administrator profile, to demonstrate bothways of generating users for tests. Two accounts are created, and then runAs verifies that thestandard user cannot view the administrator account.@isTestprivate class MyTestClass {static testMethod void test1(){// Retrieve two profiles, for the standard user and the system// administrator, then populate a map with them.Map profiles = new Map();List ps = [select id, name from Profile where name ='Standard User' or name = 'System Administrator'];for(Profile p : ps){profiles.put(p.name, p.id);}// Create the users to be used in this test.// First make a new user.
Displaying Data and Modifying Data Actions}}User standard = new User(alias = 'standt',email='standarduser@testorg.<strong>com</strong>',emailencodingkey='UTF-8',lastname='Testing', languagelocalekey='en_US',localesidkey='en_US',profileid = profiles.get('Standard User'),timezonesidkey='America/Los_Angeles',username='standarduser@testorg.<strong>com</strong>');insert standard;// Then instantiate a user from an existing profileUser admin = [SELECT Id FROM user WHERE profileid =:profiles.get('System Administrator')];// Create some test data for testing these two usersList accnts = new List();Account a1 =new Account(name='Admin Account', ownerid = admin.id);Account a2 =new Account(name='Standard Account', ownerid = standard.id);accnts.add(a1);accnts.add(a2);insert accnts;// Confirm that the standard user cannot see the admin accountsystem.runas(standard){accnts.clear();accnts = [select id, name from account where id = :a1.id];system.debug(accnts.isEmpty() + ' really'+accnts);System.assertEquals(accnts.isEmpty(), true);}// Confirm that the admin user can see the standard accountsystem.runas(admin){accnts.clear();accnts = [select id, name from account where id = :a2.id];System.assertEquals(accnts.isEmpty(), false);}DiscussionNote that this class is defined as isTest. Classes defined with the isTest annotation do notcount against your organization limit of 1 MB for all Apex scripts.You can only use runAs in a test method.171
Chapter 4: Displaying Data and Modifying Data ActionsOnly the following items use the permissions granted by the user specified with runAs:• dynamic Apex• methods using with sharing or without sharing• shared recordsThe original permissions are reset after runAs <strong>com</strong>pletes.See Also“Understanding Testing in Apex” in the <strong>Force</strong>.<strong>com</strong> Apex Code Developer's Guide available atwww.salesforce.<strong>com</strong>/us/developer/docs/apexcode/index_CSH.htm#apex_testing_intro.htmIntegrating Visualforce and Google ChartsProblemYou want to create a Visualforce page that can render data using Google Charts.SolutionUse the tag to capture information about the chart. Then, construct the URLthat passes the data to the Google Charts API through a custom controller.DiscussionGoogle Charts provides a way to dynamically render data through different visualizations.Combined with Visualforce, the Google Charts can offer more flexibility and distributionpotential than using a dashboard. Since the charts are generated through a URL, thevisualizations can be shared and embedded wherever images are permitted.There are two prerequisites before using the Google Charts API. The first is to determinehow to encode the data. The Google Charts API has three data encoding types—text, simple,and extended. For this example, we'll only use the simple encoding. The second is to decidewhat type of chart to use. For this example, a user will choose between a bar graph or a linechart.The custom controller has two important functions—init() and create()—that correspondto the requirements above:• The function init() takes a numeric value and converts it to Google Chart's simple dataencoding type. For more information, see Simple Encoding Data Format in the GoogleCharts API documentation.172
Displaying Data and Modifying Data Actions• The function create() constructs the URL that makes the request to the Google ChartsAPI.The following code represents the controller for the Visualforce page:/* This class contains the encoding algorithm for use with theGoogle chartAPI. */public class GoogleDataEncoding {// Exceptions to handle any erroneous datapublic class EncodingException extends Exception {}public class UnsupportedEncodingTypeExceptionextends Exception {}/* The encoding map which takes an integer key and returns therespective encoding value as defined by Google.This map is initialized in init() */private Map encodingMap { get; set; }/* The maximum encoding value supported for the given encodingtype. This value is set during init() */private Integer encodingMax { get; set; }/* The minimum encoding value supported for the given encodingtype. This value is set during init() */private Integer encodingMin { get; set; }/* The encoding type according to Google's API. Only SIMPLEis implemented. */public enum EncodingType { TEXT, SIMPLE, EXTENDED }/* The minimum value to use in the generation of an encodingvalue. */public Integer min { get; private set; }/* The maximum value to use in the generation of an encodingvalue. */public Integer max { get; private set; }// The encoding type according to the API defined by Googlepublic EncodingType eType { get; private set; }// Corresponds to the data set provided by the pagepublic String dataSet { get; set; }// Corresponds to the type of graph selected on the pagepublic String graph { get; set; }// The URL that renders the Google Chartpublic String chartURL { get; set; }// Indicates whether the chart should be displayedpublic Boolean displayChart { get; set; }public GoogleDataEncoding() {min = 0;173
Chapter 4: Displaying Data and Modifying Data Actions}max = 61;eType = EncodingType.SIMPLE;displayChart = false;init();public PageReference create() {String[] dataSetList = dataSet.split(',', 0);String mappedValue = 'chd=s:';chartURL = 'http://chart.apis.google.<strong>com</strong>/chart?chs=600x300'+ '&chtt=Time+vs|Distance&chxt=x,y,x,y'+ '&chxr=0,0,10,1|1,0,65,5'+ '&chxl=2:|Seconds|3:|Meters';if (graph.<strong>com</strong>pareTo('barChart') == 0){chartURL += '&cht=bvs';}else if (graph.<strong>com</strong>pareTo('lineChart') == 0){chartURL += '&cht=ls';}else{throw new EncodingException('An unsupported chart type'+ 'was selected: ' + graph + ' does not exist.');}for(String dataPoint : dataSetList){mappedValue +=getEncode(Integer.valueOf(dataPoint.trim()));}}chartURL += '&' + mappedValue;displayChart = true;return null;/* This method returns the encoding type parameter value thatmatches the specified encoding type. */public static String getEncodingDescriptor(EncodingType t) {if(t == EncodingType.TEXT) return 't';else if(t == EncodingType.SIMPLE) return 's';else if(t == EncodingType.EXTENDED) return 'e';else return '';}/* This method takes a given number within the declaredrange of the encoding class and encodes it according to theencoding type. If the value provided fall outside of thedeclared range, an EncodingException is thrown. */public String getEncode(Integer d) {if(d > max || d < min) {174
Displaying Data and Modifying Data Actions}throw new EncodingException('Value provided ' + d+ ' was outside the declared min/max range ('+ min + '/' + max + ')');}else {return encodingMap.get(d);}/* This method initializes the encoding map which is thenstored for expected repetitious use to minimize statementinvocation. */private void init() {if(eType == EncodingType.SIMPLE) {encodingMax = 61;encodingMin = 0;encodingMap = new Map();encodingMap.put(0,'A');encodingMap.put(1,'B');encodingMap.put(2,'C');encodingMap.put(3,'D');encodingMap.put(4,'E');encodingMap.put(5,'F');encodingMap.put(6,'G');encodingMap.put(7,'H');encodingMap.put(8,'I');encodingMap.put(9,'J');encodingMap.put(10,'K');encodingMap.put(11,'L');encodingMap.put(12,'M');encodingMap.put(13,'N');encodingMap.put(14,'O');encodingMap.put(15,'P');encodingMap.put(16,'Q');encodingMap.put(17,'R');encodingMap.put(18,'S');encodingMap.put(19,'T');encodingMap.put(20,'U');encodingMap.put(21,'V');encodingMap.put(22,'W');encodingMap.put(23,'X');encodingMap.put(24,'Y');encodingMap.put(25,'Z');encodingMap.put(26,'a');encodingMap.put(27,'b');encodingMap.put(28,'c');encodingMap.put(29,'d');encodingMap.put(30,'e');encodingMap.put(31,'f');encodingMap.put(32,'g');encodingMap.put(33,'h');encodingMap.put(34,'i');encodingMap.put(35,'j');encodingMap.put(36,'k');encodingMap.put(37,'l');encodingMap.put(38,'m');175
Chapter 4: Displaying Data and Modifying Data Actions}}}encodingMap.put(39,'n');encodingMap.put(40,'o');encodingMap.put(41,'p');encodingMap.put(42,'q');encodingMap.put(43,'r');encodingMap.put(44,'s');encodingMap.put(45,'t');encodingMap.put(46,'u');encodingMap.put(47,'v');encodingMap.put(48,'w');encodingMap.put(49,'x');encodingMap.put(50,'y');encodingMap.put(51,'z');encodingMap.put(52,'0');encodingMap.put(53,'1');encodingMap.put(54,'2');encodingMap.put(55,'3');encodingMap.put(56,'4');encodingMap.put(57,'5');encodingMap.put(58,'6');encodingMap.put(59,'7');encodingMap.put(60,'8');encodingMap.put(61,'9');The Visualforce page needs two input elements: one for the chart type, and one for the dataset. Below is a sample page that constructs the form to collect this information:176
Displaying Data and Modifying Data ActionsFor a sample, enter the following sequence of numbers: 1, 1, 2, 3, 5, 8, 13, 21,34, 55. Your page should render the following:See Also• Using Query String Parameters in a Visualforce Page on page 132• Using AJAX in a Visualforce Page on page 134Using Special Characters in Custom LinksProblemYou have customers who are using non-English versions of a browser, and URLs and customlinks aren't passing special characters properly. The characters either don't show up, or theentire line of code is copied.SolutionEncode the URLs with the encodeURI() JavaScript function. For example:function redirect(){parent.frames.location.replace(encodeURI("/003/e?retURL=" +"%2F{!Contact.Id}&con4_lkid={!Account.Id}&" +"con4{!Account.Name}&00N30000001KqeH=" +177
Chapter 4: Displaying Data and Modifying Data Actions"{!Account.Account_Name_Localized__c}" +"&cancelURL=%2F{!Account.Id}"))}redirect();178
Chapter 5Creating Public WebsitesIn this chapter ...• Registering a CustomDomain for Your<strong>Force</strong>.<strong>com</strong> Site• Using <strong>Force</strong>.<strong>com</strong>Site-Specific Merge Fields• Customizing the Look andFeel of Your <strong>Force</strong>.<strong>com</strong>Site• Adding a Feed to Your<strong>Force</strong>.<strong>com</strong> Site• Creating a Sitemap File• Creating a Web-to-LeadForm for Your <strong>Force</strong>.<strong>com</strong>SiteSalesforce.<strong>com</strong> organizations contain valuable informationabout partners, solutions, products, users, ideas, and otherbusiness data. Some of this information would be useful topeople outside your organization, but only users with theright access and permissions can view and use it. In the past,to make this data available to the general public, you had toset up a Web server, create custom Web pages ( JSP, PHP,or other), and perform API integration between your siteand your organization. Additionally, if you wanted to collectinformation using a Web form, you had to program yourpages to perform data validation.With <strong>Force</strong>.<strong>com</strong> sites, you no longer have to do any of thosethings. <strong>Force</strong>.<strong>com</strong> sites enables you to create public websitesand applications that are directly integrated with yourSalesforce.<strong>com</strong> organization—without requiring users to login with a username and password. You can publicly exposeany information stored in your organization through abranded URL of your choice. You can also make the site'spages match the look and feel of your <strong>com</strong>pany's brand.Because sites are hosted on <strong>Force</strong>.<strong>com</strong> servers, there are nodata integration issues. And because sites are built on nativeVisualforce pages, data validation on collected informationis performed automatically. You can also enable users toregister for or log in to an associated portal seamlessly fromyour public site.179
Chapter 5: Creating Public WebsitesRegistering a Custom Domain for Your <strong>Force</strong>.<strong>com</strong> SiteProblemYou want to use a branded top-level domain name for your public <strong>Force</strong>.<strong>com</strong> site—withoutexposing the force.<strong>com</strong> domain in the URL.SolutionWith Sites, you can register a branded domain name for your public site. When users visit yoursite, they see only the URL that you registered, and not the <strong>Force</strong>.<strong>com</strong> domain. For example,if you registered http://www.my<strong>com</strong>pany.<strong>com</strong> with a domain name registrar, all site trafficis redirected from that domain to your <strong>Force</strong>.<strong>com</strong> domain. Users see onlyhttp://www.my<strong>com</strong>pany.<strong>com</strong> in the browser's address bar.To enable Sites, contact your salesforce.<strong>com</strong> representative.Note: Custom Web addresses are not supported for sandbox or Developer Editionorganizations. SSL is supported, but if org-wide security settings are enabled, and thesite-level override is not enabled, branded domains revert toprefix.secure.force.<strong>com</strong> on customer login.To use a custom Web address for your public site:1. Register your <strong>Force</strong>.<strong>com</strong> domain.a. Click Setup ➤ Develop ➤ Sites.b. Enter a unique name for your <strong>Force</strong>.<strong>com</strong> domain. This name can containonly underscores and alphanumeric characters, and must be unique in yourorganization. It must begin with a letter, not include spaces, not end withan underscore, and not contain two consecutive underscores. Salesforce.<strong>com</strong>re<strong>com</strong>mends using your <strong>com</strong>pany's name or a variation, such asmy<strong>com</strong>pany.Caution: You cannot modify your <strong>Force</strong>.<strong>com</strong> domain name afteryou have registered it.Free Edition domain names are assigned automatically and can'tbe updated. Create a custom Web address if you want to use acustom domain name.180c. Click Check Availability to confirm that the domain name you entered isunique. If it is not unique, you are prompted to change it.d. Read and accept the Sites Terms of Use by selecting the checkbox.
Creating Public Websitese. Click Register My <strong>Force</strong>.<strong>com</strong> Domain. After you accept the Terms ofUse and register your <strong>Force</strong>.<strong>com</strong> domain, the changes related to site creationare tracked in your organization's Setup Audit Trail and the Site Historyrelated list. It may take up to 48 hours for your registration to take effect.This domain is used for all of your sites, even if you use a branded domain.2. Register your branded Web address with a domain name registrar, such asGoDaddy.<strong>com</strong>. For this example, let's say you registered www.acme.<strong>com</strong>. Onceyou register the domain, you can also register subdomain names, such assupport.acme.<strong>com</strong>, partners.acme.<strong>com</strong>, developers.acme.<strong>com</strong>.3. Create CNAME records with your registrar to point your top-level domain and yoursubdomains to your <strong>Force</strong>.<strong>com</strong> domain. In this example, create CNAME recordsto point from:• acme.<strong>com</strong> to acme.force.<strong>com</strong>• support.acme.<strong>com</strong> to acme.force.<strong>com</strong>• partners.acme.<strong>com</strong> to acme.force.<strong>com</strong>• acmeideas.<strong>com</strong> to acme.force.<strong>com</strong>Note: If you choose to create a branded top-level domain or subdomainthrough a domain name registrar, the CNAME record that you provide tothat registrar must be your <strong>Force</strong>.<strong>com</strong> domain name and not the site URL.For example, if you entered my<strong>com</strong>pany when registering your <strong>Force</strong>.<strong>com</strong>domain, the CNAME must be my<strong>com</strong>pany.force.<strong>com</strong>, not the full valueof the site URL.4. Create your site and associate your branded domain or subdomain:a. Click Setup ➤ Develop ➤ Sites.b. Click New.c. On the Site Edit page, define the site and enter your branded domain orsubdomain in the Custom Web Address field. This field determineswhich branded domain or subdomain is associated with each site.d. Click Save.DiscussionBy registering a custom Web Address through a domain name registrar and associating it withyour site, you can create a <strong>com</strong>pletely branded experience for your users. With Sites andVisualforce pages, you can customize the look and feel, the branding, and public securitysettings for each of your sites.181
Chapter 5: Creating Public WebsitesSee AlsoCustomizing the Look and Feel of Your <strong>Force</strong>.<strong>com</strong> Site on page 184Using <strong>Force</strong>.<strong>com</strong> Site-Specific Merge FieldsProblemYou want to create one Visualforce “About Us” page to be used for several public sites, so youcan't hard-code site-specific values like site URL, site email address, and site template. Youwant the “About Us” page to conditionally display links for registration and login, and connectthe “Contact Us” link to each respective site's designated email address.SolutionTake advantage of the available merge fields when creating the Visualforce pages used for yourpublic sites. By using merge fields, the same Visualforce page can be used for multiple sites.The following merge fields are available:Merge Field{!$Site.Name}{!$Site.Domain}{!$Site.CustomWebAddress}{!$Site.OriginalUrl}{!$Site.CurrentSiteUrl}{!$Site.LoginEnabled}{!$Site.RegistrationEnabled}{!$Site.IsPasswordExpired}DescriptionReturns the API name of the current site.Returns the <strong>Force</strong>.<strong>com</strong> domain name for yourorganization.Returns the value of the Custom Web Address fieldfor the current site.Returns the original URL for this page if it is a designatederror page for the site; otherwise, returns null.Returns the value of the site URL for the current request(for example, http://myco.<strong>com</strong>/ orhttps://myco.force.<strong>com</strong>/prefix/).Returns true if the current site is associated with an activelogin-enabled portal; otherwise returns false.Returns true if the current site is associated with an activeself-regitration-enabled Customer Portal; otherwisereturns false.For authenticated users, returns true if the currentlylogged-in user's password is expired. Fornon-authenticated users, returns false.182
Creating Public WebsitesMerge Field{!$Site.AdminEmailAddress}{!$Site.Prefix}{!$Site.Template}{!$Site.ErrorMessage}{!$Site.ErrorDescription}{!$Site.AnalyticsTrackingCode}DescriptionReturns the value of the Site Contact field for thecurrent site.Returns the URL path prefix of the current site. Forexample, if your site URL ismyco.force.<strong>com</strong>/partners, partners is the pathprefix. Returns null if the prefix is not defined, or if thepage was accessed using a custom Web address.Returns the template name associated with the currentsite; returns the default template if no template has beendesignated.Returns an error message for the current page if it is adesignated error page for the site and an error exists;otherwise, returns an empty string.Returns the error description for the current page if it isa designated error page for the site and an error exists;otherwise, returns an empty string.The tracking code associated with your site. This codecan be used by services like Google Analytics to track pagerequest data for your site.In the following example, the Visualforce page uses the{!$Site.Template},{!$Site.AdminEmailAddress}, {!$Site.LoginEnabled}, and{!$Site.RegistrationEnabled} merge fields (shown in bold).<strong>com</strong>pany@acme.<strong>com</strong>183
Chapter 5: Creating Public Websites Login toAcess your Account Register to get an AccountDiscussionSites takes advantage of the power and flexibility of Visualforce. With the out-of-box mergefields and additional expressions available, you can more easily create feature-rich site pagesacross multiple sites.Customizing the Look and Feel of Your <strong>Force</strong>.<strong>com</strong> SiteProblemYour <strong>Force</strong>.<strong>com</strong> site is up and running, but the pages don't have your <strong>com</strong>pany's look and feel.The public sees the standard Salesforce.<strong>com</strong> beige and blue. You want to use your <strong>com</strong>pany'slogo and stylesheet.SolutionThe default sample pages are all branded with the <strong>Force</strong>.<strong>com</strong> look and feel, but you can uploadyour own logo and stylesheet as static resources and reference them from the site template.The site template controls the layout and branding for your entire site.184
Creating Public WebsitesTo brand your site with your logo, colors, and layouts:1. First, assign the template for your site:a. Click Setup ➤ Develop ➤ Sites.b. Click Edit.c. Use the lookup field to find and select SiteTemplate for the SiteTemplate field. It may be the default value.d. Click Save.2. Next, upload your stylesheet and <strong>com</strong>pany logo as static resources:a. Click Setup ➤ Develop ➤ Static Resources.b. For each static resource:i. Click New.ii. Enter the name and description, and browse to the file to upload.In this example, the stylesheet is named SiteCSS and the logo isnamed Logo.iii. Set the Cache Control setting to Public. Static resources withprivate cache control do not show up in sites.iv. Click Save.3. Now modify the SiteHeader to display your <strong>com</strong>pany's logo (Logo) and use your<strong>com</strong>pany's stylesheet:a. Click Setup ➤ Develop ➤ Components.b. Click Edit next to the SiteHeader <strong>com</strong>ponent.c. Replace the following line:with this new line:d. Add the following line after :e. Click Save.4. Browse to your site's URL to see your <strong>com</strong>pany logo and style.185
Chapter 5: Creating Public WebsitesDiscussionEnable and customize the Visualforce site template and its <strong>com</strong>ponents to control the designof your sites. Because the site template can reference other <strong>com</strong>ponents and static resources,you can change the look and feel of your site with just a few modifications.See AlsoRegistering a Custom Domain for Your <strong>Force</strong>.<strong>com</strong> Site on page 180Adding a Feed to Your <strong>Force</strong>.<strong>com</strong> SiteProblemYour <strong>Force</strong>.<strong>com</strong> site is up and running, and you'd like to add a feed that shows your users upto the last 20 accounts added to your Salesforce.<strong>com</strong> organization.SolutionDefine a feed and add it to a Visualforce page in your site. Users can then click an icon tosubscribe to the feed.Before you start, make sure that Sites are enabled and that you have set up a site as describedin the Salesforce.<strong>com</strong> online help, including setting the public access settings and enablingfeeds for your site.To create a feed and add it to a Visualforce page in your site:1. Click Setup ➤ Develop ➤ Sites to display the list of sites created for yourorganization.2. Click the name of the site where you want to add a feed. Click the Site Labellink, not the Site URL link.3. In the Syndication Feeds detail area, click New and enter the following values:• Name: LatestAccounts• Description: Up to the last 20 accounts added to ourorganization.• Query: SELECT Name from Account• Mapping ft: "test", fa:"Mysti", et:"Account", ec:Name• Max Cache Age Seconds: 6004. Click Save, then click Back to Site Detail to return to the sites detail page.186
Creating Public Websites5. Click Preview next to LatestAccounts to test the feed to ensure it delivers theinformation you expect. The preview page displays what the feed will display tousers, and provides a link to the site where the feed will be displayed.6. After the feed is created and tested, add a link to the feed in your Visualforce pageby adding the following markup:Latest AccountsThe path assumes your page is located in the base directory of the site. You mayhave to adjust the path if it is not.7. Now users who visit the page can click the link Latest Accounts and subscribe tothe feed.DiscussionThe feed created here is very simple. You can write much more <strong>com</strong>plex SOQL queries forthe feed to tailor the information for your users. For example, the following query would reportup the last five accounts created later than yesterday:SELECT Name from Account where CreatedDate < Yesterday LIMIT 5The SOQL query defines what information is collected, but the mapping determines whatinformation is displayed in the feed itself, using elements of the ATOM protocol. For anexplanation of the elements, see “Defining Syndication Feeds” in the Salesforce.<strong>com</strong> onlinehelp.This topic also explains some of the limitations placed on SOQL for feeds queries.Theselimits are in place to ensure good performance.It's important that you set public access settings for objects properly. Because the feed issuesqueries as the site guest user, you must assign the correct public access settings to the profilefor that guest user, or queries may return either not enough information or information aboutobjects that you don't wish to share with the guest user.Similarly, you must set sharing rulesappropriately. Instructions for setting the public access settings and sharing rules are providedin the Salesforce.<strong>com</strong> online help.Feeds support the use of bind variables in both the query definition and mapping. At run time,the value of the bind variable is passed in the URL. More information about bind variables isprovided in the Salesforce.<strong>com</strong> online help.See Also• Visualforce Developer's Guide• Customizing the Look and Feel of Your <strong>Force</strong>.<strong>com</strong> Site on page 184• Registering a Custom Domain for Your <strong>Force</strong>.<strong>com</strong> Site on page 180• Using <strong>Force</strong>.<strong>com</strong> Site-Specific Merge Fields on page 182187
Chapter 5: Creating Public Websites188Creating a Sitemap FileProblemYou want to improve the volume and quality of traffic to your <strong>Force</strong>.<strong>com</strong> site.SolutionFor sites with a large number of dynamic pages that are only available through the use of formsand user entries, you can create a sitemap, which lists the pages on your site that are accessibleto Web crawlers and users. The Google, Bing, Yahoo!, and Ask search engines support thesitemaps protocol. For more information on sitemaps and the sitemap protocol, seewww.sitemaps.org.To create a sitemap, you'll create a Visualforce sitemap page with text or XML content type,and populate the URLs in XML format. Then, to submit the sitemap to Web crawlers, you'llcreate a robots.txt file, adding the path to your sitemap.First, create the sitemap:1. Click Setup ➤ Develop ➤ Pages.2. Click New.3. For the Label and Name, enter Sitemap.4. Replace the existing Visualforce markup with the following, substituting the exampleURLs with your site's URLs:http://my<strong>com</strong>pany.force.<strong>com</strong>/mypathhttp://my<strong>com</strong>pany.force.<strong>com</strong>/mypath/pagename
Creating Public Websiteshttp://my<strong>com</strong>pany.force.<strong>com</strong>/mypath/page_detail?id=701300000006CnSAAUhttp://my<strong>com</strong>pany.force.<strong>com</strong>/mypath/page_indexNote: Alternatively, you can dynamically create your sitemap page content using acontroller, and enable this page for your site.Then enable the page for your site:1. Click Setup ➤ Develop ➤ Sites and click your site name.2. In the Site Visualforce Pages list, click Edit.3. Under Available Visualforce Pages, select Sitemap and click Add.4. Click Save.Finally, create and enable the robots.txt file:1. Click Setup ➤ Develop ➤ Pages.2. Click New.3. For the Label and Name, enter robots.4. Replace the existing Visualforce markup with the following, substituting the exampleURL with your site's path and sitemap name:User-Agent: *Allow: /Sitemap: http://my<strong>com</strong>pany.force.<strong>com</strong>/mypath/Sitemap5. Click Setup ➤ Develop ➤ Sites.6. Click Edit for your site.7. In the Site Robots.txt box, enter robots.8. Click Save.Note: Alternatively, you can submit the URL as a sitemap via a Google WebmasterTools account.189
Chapter 5: Creating Public WebsitesCreating a Web-to-Lead Form for Your <strong>Force</strong>.<strong>com</strong> SiteProblemYou want to create a web-to-lead form on your <strong>Force</strong>.<strong>com</strong> site to capture prospective customers'personal information. You also want to create a custom contact page that will appear whencustomers submit their information.SolutionCreate two Visualforce pages: one to capture a prospect's information and another to displaythe confirmation. You'll also need to extend the standard controller to redirect public users toa custom contact page when they submit information.First, create a Visualforce page for the confirmation:1. Click Setup ➤ Develop ➤ Pages.2. For the Label, enter Thank You Page and for the Name, enter ThankYou.3. Replace the existing Visualforce markup with the following:Next, you'll create an create an extension for the standard controller. By default inSalesforce.<strong>com</strong>, a standard controller directs the user to the standard detail page after savingthe related record. However, standard detail pages can't be made public via sites. To directusers to a custom Visualforce page, you must create an extension for the standard controller.The controller extension creates a new lead record and redirects users to the “Thank You”page. To create the extension:1. Click Setup ➤ Develop ➤ Apex Classes.2. Click New.190
Creating Public Websites3. In the editor, add the following content:public class myWeb2LeadExtension {private final Lead weblead;public myWeb2LeadExtension(ApexPages.StandardControllerstdController) {weblead = (Lead)stdController.getRecord();}}public PageReference saveLead() {try {insert(weblead);}catch(System.DMLException e) {ApexPages.addMessages(e);return null;}PageReference p = Page.ThankYou;p.setRedirect(true);return p;}Now create a “Contact Us” Visualforce page:1. Click Setup ➤ Develop ➤ Pages.2. For the Label, enter Contact Us Page and for the Name, enter ContactUs.3. Replace the existing Visualforce markup with the following:191
Chapter 5: Creating Public WebsitesFinally, make the pages available on your site:1. Enable the new Visualforce pages:a. Click Setup ➤ Develop ➤ Sites.b. Click your site label.c. In the Site Details page under Site Visualforce Pages, click Edit.d. Select ContactUs and ThankYou and click Add.e. Click Save.2. Make sure the fields you exposed on your “Contact Us” page are visible on your site:a. In the Site Details page, click Public Access Settings.b. Under Field-Level Security, next to Lead, click View.c. Verify that the Visible setting is enabled for the Address, Company,Email, Name, and Phone fields. Click Edit to change the visibility of anysettings.3. Grant the “Create” permission to your site for the lead object:a. In the Site Details page, click Public Access Settings.b. In the Profile page, click Edit.c. Under Standard Object Permissions, select the “Create” permission forLeads.d. Click Save.4. Access your “Contact Us” page via your public site and test your new lead form.See Also• Customizing the Look and Feel of Your <strong>Force</strong>.<strong>com</strong> Site on page 184• Registering a Custom Domain for Your <strong>Force</strong>.<strong>com</strong> Site on page 180192
Chapter 6Integrating with Other ApplicationsIn this chapter ...• Retrieving Informationfrom In<strong>com</strong>ing EmailMessages• Creating Records fromInformation in In<strong>com</strong>ingThis chapter contains recipes for integration using emailmessaging, mobile applications, and delegatedauthentication. Using Apex classes, functions, and interfaces,you can:• Automate inbound and outbound message processingwith Salesforce.<strong>com</strong>Email Messages • Access and manipulate Salesforce.<strong>com</strong> data from yourmobile device using the Mobile application.• Retrieving EmailAttachments and • Create a delegated authentication application to managesingle sign-on.Associating Them withRecords• Creating Email Templatesand AutomaticallySending Emails• Email Recipes—CompleteCode Example• Updating Salesforce.<strong>com</strong>Data in the MobileApplication• Retrieving a User'sLocation from aGPS-enabled Phone• Enabling Single Sign-Onwith the <strong>Force</strong>.<strong>com</strong>Platform• Implementing SingleSign-On for Clients193
Chapter 6: Integrating with Other ApplicationsRetrieving Information from In<strong>com</strong>ing Email MessagesProblemYou want to retrieve the following information from a job applicant's in<strong>com</strong>ing email:• Email address• First and last name• Phone number and street addressSolution1. Create an Apex class (ProcessApplicant) that implements theInboundEmailHandler interface. The class defines the handleInboundEmailmethod to work with the created:• InboundEmail, which contains the in<strong>com</strong>ing email's content, and attachments• InboundEnvelope, which contains the envelope to and from addressesFor example:global class processApplicant implementsMessaging.InboundEmailHandler {global Messaging.InboundEmailResult handleInboundEmail(Messaging.InboundEmail email,Messaging.InboundEnvelope envelope) {Messaging.InboundEmailResult result =new Messaging.InboundEmailresult();return result;}}2. Parse through the in<strong>com</strong>ing email message and look for the required information.For example:// Captures the sender's email addressString emailAddress = envelope.fromAddress;// Retrieves the sender's first and last namesString fName = email.fromname.substring(0,email.fromname.indexOf(' '));String lName = email.fromname.substring(email.fromname.indexOf(' '));194// Retrieves content from the email.// Splits each line by the terminating newline character// and looks for the position of the phone number and cityString[] emailBody = email.plainTextBody.split('\n', 0);
Integrating with Other ApplicationsString phoneNumber = emailBody[0].substring(6);String city = emailBody[1].substring(5);3. Create and activate an email service to process the contents of theProcessApplicant Apex class.Salesforce.<strong>com</strong> generates an email address unique to this email service. Emails sentto this inbound email address run the ProcessApplicant class:a. Click Setup ➤ Develop ➤ Email Services.b. Click New Email Service.c. Enter jobApplication for the Email Service Name.d. Enter ProcessApplicant for the Apex Class.e. Click Save and New Email Address.f. Since the Email Address and Context User fields have been automaticallypopulated, click Save.Discussion• When creating email services, consider security and truncation settings. See “DefiningEmail Services” in the Salesforce.<strong>com</strong> online help.• Email content format varies—ensure that your code can handle different messages byparsing through the entire body of the email.• For a <strong>com</strong>plete example containing code from all the email recipes, see EmailRecipes—Complete Code Example on page 202.See Also• “Managing Apex Classes” in the Salesforce.<strong>com</strong> online help• “Using the InboundEmail Object” in the Salesforce.<strong>com</strong> online help• “Inbound Email” in the <strong>Force</strong>.<strong>com</strong> Apex Code Developer's Guide atwww.salesforce.<strong>com</strong>/us/developer/docs/apexcode/index_CSH.htm#apex_classes_email_inbound.htm• “What are Email Services?” in the Salesforce.<strong>com</strong> online help• “String Methods” in the <strong>Force</strong>.<strong>com</strong> Apex Code Developer's Guide atwww.salesforce.<strong>com</strong>/us/developer/docs/apexcode/index_CSH.htm#apex_methods_system_string.htm195
Chapter 6: Integrating with Other ApplicationsCreating Records from Information in In<strong>com</strong>ing EmailMessagesProblemYou want to create and associate the following records based on information retrieved fromthe job applicant's in<strong>com</strong>ing email message:• Candidate• Job applicationSolutionUsing Apex code, create a new candidate and job application and populate them with theinformation retrieved from the job applicant's in<strong>com</strong>ing email message. Associate the candidatewith the job application.This example assumes that the subject of the job applicant's in<strong>com</strong>ingemail exactly matches an existing job name.// Creates new candidate and job application objectsCandidate__c[] newCandidate = new Candidate__c[0];Job_Application__c[] newJobApplication = new Job_Application__C[0];// Creates a new candidate from the information// retrieved from the inbound emailtry{newCandidate.add(new Candidate__c(email__c = emailAddress,first_name__c = fName,last_name__c = lName,phone__c = phoneNumber,city__c = city));}insert newCandidate;catch (System.DmlException e){System.debug('ERROR: Not able to create candidate: ' + e);}// Looks for a job name based on the email subject// (this example assumes the email subject exactly// matches an existing job name)Position__c pos;pos = [select ID from Position__c where name =:email.subject limit 1];ID jobId = pos.ID;// Associates the candidate with the application196
Integrating with Other ApplicationsnewJobApplication.add(new Job_Application__c(Position__c = jobId,candidate__c = newCandidate[0].id));insert newJobApplication;Discussion• This example contains no error handling and assumes the email subject exactly matchesthe job name. You would need to add error handling and, for example, wildcard matching.• For a <strong>com</strong>plete example containing code from all the email recipes, see EmailRecipes—Complete Code Example on page 202.See Also• Retrieving Information from In<strong>com</strong>ing Email Messages on page 194• “Using the InboundEmail Object” in the Salesforce.<strong>com</strong> online help• “Inbound Email” in the <strong>Force</strong>.<strong>com</strong> Apex Code Developer's Guide atwww.salesforce.<strong>com</strong>/us/developer/docs/apexcode/index_CSH.htm#apex_classes_email_inbound.htmRetrieving Email Attachments and Associating Themwith RecordsProblemYou want to retrieve an attached resume from the job applicant's in<strong>com</strong>ing email and associatethe attachment with the job application.SolutionVerify that the in<strong>com</strong>ing email message has an attached file. Create an attachment from thefile and associate the attachment with the job application.This example looks for a binary file attachment (for example, a PDF) that we can associatewith a Job Application as a resume://Searches the email for binary attachments and// associates them with the job applicationif (email.binaryAttachments !=null && email.binaryAttachments.size() > 0){for (integer i = 0 ; i < email.binaryAttachments.size() ; i++){Attachment a = new Attachment(ParentId = newJobApplication[0].Id,Name = email.binaryAttachments[i].filename,197
Chapter 6: Integrating with Other ApplicationsBody = email.binaryAttachments[i].body);insert a;}}Discussion• This example searches for binary attachments only. You would also need to consider otherattachment types, such as text file attachments. You can define different actions dependingon the type of attached file.• To view in<strong>com</strong>ing email status and debug any processing errors, view the debug logs createdwhen email services Apex code executes. See “Monitoring Debug Logs” in theSalesforce.<strong>com</strong> online help.• For a <strong>com</strong>plete example containing code from all the email recipes, see EmailRecipes—Complete Code Example on page 202.Caution: Attachment validation is an essential part of processing emails. Maliciouscode can masquerade as a different file type.See Also• “InboundEmail.BinaryAttachment Object” in the <strong>Force</strong>.<strong>com</strong> Apex Code Developer's Guideatwww.salesforce.<strong>com</strong>/us/developer/docs/apexcode/Content/apex_classes_email_inbound_binary.htm• “Using the InboundEmail Object” in the Salesforce.<strong>com</strong> online help• “InboundEmail.TextAttachment Object” in the <strong>Force</strong>.<strong>com</strong> Apex Code Developer's Guide atwww.salesforce.<strong>com</strong>/us/developer/docs/apexcode/Content/apex_classes_email_inbound_text.htmCreating Email Templates and Automatically SendingEmailsProblemYou want to send an automatic email response to the job applicant's in<strong>com</strong>ing email message.Solution1. Create an appropriate email template through the email template wizard.Salesforce.<strong>com</strong> supports multiple email template types. This examples assumes youare using a Visualforce email template. To create a Visualforce email template, youmust have the “Customize Application” permission enabled.198
Integrating with Other Applications2. Send an automatic email response to the job applicant's in<strong>com</strong>ing email using theMessaging.sendEmail static method to process outbound email messages.First, create a Visualforce email template:1. Click Setup ➤ Email ➤ My Templates. If you have permission to edit publictemplates, click Setup ➤ Communication Templates ➤ Email Templates.2. Click New Template.3. Choose Visualforce and click Next.4. Choose a folder in which to store the template.5. Select the Available For Use checkbox if you would like this template offeredto users when sending an email.6. Enter an Email Template Name.7. If necessary, change the Template Unique Label.8. Select an Encoding setting to determine the character set for the template.9. Enter a Description of the template. Both template name and description are foryour internal use only.10. Enter the subject line for your template in Email Subject.11. In the Recipient Type drop-down list, select the type of recipient that will receivethe email template.12. Optionally, in the Related To Type drop-down list, select the object from whichthe template will retrieve merge field data.13. Click Save.14. Click Edit Template.15. Enter markup text for your Visualforce email template.16. Click Save to save your changes and view the details of the template, or click QuickSave to save your changes and continue editing your template. Your Visualforcemarkup must be valid before you can save your template.Note: The maximum size of a Visualforce email template cannot exceed 1MB.This sample Visualforce email template creates an interview invitation:Dear {!relatedTo.Candidate__r.First_Name__c}{!relatedTo.Candidate__r.Last_Name__c}Thank you for your interest in the position{!relatedto.Position__r.name}We would like to invite you for an interview.199
Chapter 6: Integrating with Other ApplicationsPlease respond to the attached invitation.Regards,CompanyBEGIN:VCALENDARMETHOD:REQUESTBEGIN:VTIMEZONETZID:(GMT-08.00) Pacific Time (US and Canada)BEGIN:STANDARDDTSTART:16010101T020000TZOFFSETFROM:-0700TZOFFSETTO:-0800RRULE:FREQ=YEARLY;WKST=MO;INTERVAL=1;BYMONTH=11;BYDAY=1SUEND:STANDARDBEGIN:DAYLIGHTDTSTART:16010101T020000TZOFFSETFROM:-0800TZOFFSETTO:-0700RRULE:FREQ=YEARLY;WKST=MO;INTERVAL=1;BYMONTH=3;BYDAY=2SUEND:DAYLIGHTEND:VTIMEZONEBEGIN:VEVENTDTSTAMP:20090921T202219ZDTSTART;TZID="(GMT-08.00) Pacific Time(US and Canada)":20090923T140000SUMMARY:Invitation: Interview Schedule @ Wed Sep 23 2pm - 4pmATTENDEE;ROLE=REQ-PARTICIPANT;PARTSTAT=NEEDS-ACTION;RSVP=TRUE;CN="{!recipient.name}":MAILTO:{!recipient.email}ORGANIZER;CN="John.Smith":MAILTO:recruiter@<strong>com</strong>pany.<strong>com</strong>LOCATION:HawaiiDTEND;TZID="(GMT-08.00) Pacific Time(US and Canada)":20090923T160000DESCRIPTION: You are invited to an inverview\NInterview Schedule\NWed Sep 23 2pm - 4pm(Timezone: Pacific Time) \NCalendar: John Smith\N\NOwner/Creator: recruiter@<strong>com</strong>pany.<strong>com</strong>\NYou will be meeting with these people:CEO Bill Jones,Office Manager Jane Jones\NSEQUENCE:0PRIORITY:5STATUS:CONFIRMEDEND:VEVENTEND:VCALENDAR200
Integrating with Other ApplicationsThen, send an automatic email response to the job applicant's in<strong>com</strong>ing email. This exampleuses a Visualforce email template:emailHelper.sendEmail(myContact[0].id, newCandidate[0].id);// In a separate class so that it can be used elsewhereGlobal class emailHelper {public static void sendEmail(ID recipient, ID candidate) {//New instance of a single email messageMessaging.SingleEmailMessage mail =new Messaging.SingleEmailMessage();// Who you are sending the email tomail.setTargetObjectId(recipient);// The email template ID used for the emailmail.setTemplateId('00X30000001GLJj');mail.setWhatId(candidate);mail.setBccSender(false);mail.setUseSignature(false);mail.setReplyTo('recruiting@acme.<strong>com</strong>');mail.setSenderDisplayName('HR Recruiting');mail.setSaveAsActivity(false);Messaging.sendEmail(new Messaging.SingleEmailMessage[] { mail });}}Discussion• You can use merge fields in Visualforce email templates. Merge fields are placeholders fordata that will be replaced with information from your records, user information, or <strong>com</strong>panyinformation.• To check email delivery status, see “Requesting an Email Log” in the Salesforce.<strong>com</strong> onlinehelp.• For a <strong>com</strong>plete example containing code from all the email recipes, see EmailRecipes—Complete Code Example on page 202.See Also• “Managing Email Templates” in the Salesforce.<strong>com</strong> online help• “Defining Visualforce Pages” in the Salesforce.<strong>com</strong> online help• “Creating Visualforce Email Templates” in the Salesforce.<strong>com</strong> online help• “Outbound Email” in the <strong>Force</strong>.<strong>com</strong> Apex Code Developer's Guide atwww.salesforce.<strong>com</strong>/us/developer/docs/apexcode/index_CSH.htm#apex_classes_email_outbound.htm201
Chapter 6: Integrating with Other Applications202Email Recipes—Complete Code ExampleThe following Apex code is a <strong>com</strong>plete version of the ProcessApplicant class, containingcode from these recipes:• Retrieving Information from In<strong>com</strong>ing Email Messages on page 194• Creating Records from Information in In<strong>com</strong>ing Email Messages on page 196• Retrieving Email Attachments and Associating Them with Records on page 197• Creating Email Templates and Automatically Sending Emails on page 198/*** Email services are automated processes that use Apex classes* to process the contents, headers, and attachments of inbound* emails.*/global class processApplicant implementsMessaging.InboundEmailHandler {// Creates new candidate and job application objectsContact[] myContact = new Contact[0];Candidate__c[] newCandidate = new Candidate__c[0];Job_Application__c[] newJobApplication =new Job_Application__C[0];global Messaging.InboundEmailResult handleInboundEmail(Messaging.InboundEmail email,Messaging.InboundEnvelope envelope) {Messaging.InboundEmailResult result =new Messaging.InboundEmailresult();// Captures the sender's email addressString emailAddress = envelope.fromAddress;// Retrieves the sender's first and last namesString fName = email.fromname.substring(0,email.fromname.indexOf(' '));String lName = email.fromname.substring(email.fromname.indexOf(' '));// Retrieves content from the email.// Splits each line by the terminating newline character// and looks for the position of the phone number and cityString[] emailBody = email.plainTextBody.split('\n', 0);String phoneNumber = emailBody[0].substring(6);String city = emailBody[1].substring(5);// Creates a new candidate from the information// retrieved from the inbound emailtry
Integrating with Other Applications{newCandidate.add(new Candidate__c(email__c = emailAddress,first_name__c = fName,last_name__c = lName,phone__c = phoneNumber,city__c = city));}insert newCandidate;catch (System.DmlException e){System.debug('ERROR: Not able to create candidate: ' + e);}// Looks for a job name based on the email subject// (this example assumes the email subject exactly// matches an existing job name)Position__c pos;pos = [select ID from Position__c where name =:email.subject limit 1];ID jobId = pos.ID;// Associates the candidate with the job applicationnewJobApplication.add(new Job_Application__c(Position__c = jobId,candidate__c = newCandidate[0].id));insert newJobApplication;// Searches the email for binary attachments and// associates them with the job applicationif (email.binaryAttachments != null && email.binaryAttachments.size() > 0){for (integer i = 0 ; i < email.binaryAttachments.size() ; i++){Attachment a = new Attachment(ParentId =newJobApplication[0].Id,Name = email.binaryAttachments[i].filename,Body = email.binaryAttachments[i].body);insert a;}}// Sends the email responsemyContact = createContact.newContact(fName, lName, emailAddress, phoneNumber);// Sends an email notification to the applicantemailHelper.sendEmail(myContact[0].id, newCandidate[0].id);return result;}203
Chapter 6: Integrating with Other Applications}// In a separate class so that it can be used elsewhereGlobal class emailHelper {public static void sendEmail(ID recipient, ID candidate) {//New instance of a single email messageMessaging.SingleEmailMessage mail =new Messaging.SingleEmailMessage();// Who you are sending the email tomail.setTargetObjectId(recipient);// The email template ID used for the emailmail.setTemplateId('00X30000001GLJj');mail.setWhatId(candidate);mail.setBccSender(false);mail.setUseSignature(false);mail.setReplyTo('recruiting@acme.<strong>com</strong>');mail.setSenderDisplayName('HR Recruiting');mail.setSaveAsActivity(false);Messaging.sendEmail(new Messaging.SingleEmailMessage[] { mail });}}Updating Salesforce.<strong>com</strong> Data in the MobileApplicationProblemYou want to modify related lists of Salesforce.<strong>com</strong> records in the mobile application, evenwhen the records are not available locally on the mobile phone. Optionally, you'll use a Bluetoothperipheral device to update the data in the records.SolutionFor this recipe, let's assume that your organization sells servers. Your field service representativeswant to update related list information on records from their mobile devices while at customersites. For example, if they replace a broken <strong>com</strong>ponent in a server, they want to be able to enterthe new <strong>com</strong>ponent's serial number and update the server record. The server is then associatedwith the new <strong>com</strong>ponent instead of the replaced one.204
Integrating with Other ApplicationsTo ac<strong>com</strong>plish this, we'll create three custom objects and some custom fields. We'll use anApex trigger to update the server record when the field service representatives replace a<strong>com</strong>ponent.Before starting this recipe, make sure you meet the following requirements:• Mobile Licenses: All existing Developer Edition organizations have mobile licenses. VisitDeveloper <strong>Force</strong> and click Getting Started to sign up for a new Developer Editionorganization.• Mobile Devices: Verify that your mobile device will run Salesforce Mobile. See SalesforceMobile Supported Devices in the Salesforce.<strong>com</strong> online help.If your mobile device is not supported, you can download and install the BlackBerrysimulator package so you can run the mobile application on a simulator.To use Apex to update data in Salesforce Mobile:First, create a custom object named Server that has a lookup relationship to Account. Thisobject allows your organization to keep track of the servers housed at each customer's site.1. Click Setup ➤ Create ➤ Objects ➤ New Custom Object.2. Enter the following information:• Label: Server• Plural Label: Servers3. Accept the remaining defaults and click Save.4. In the Custom Fields & Relationships related list, click New and define a field withthe following attributes:• Data Type: Lookup Relationship• Related To: Account• Field Label: Account• Field Name: Account• Field-Level Security: Visible for all profiles• Add Related List: On all page layouts5. In the Custom Fields & Relationships related list, click New and define a secondfield with the following attributes:• Data Type: Text Area• Field Label: Description• Field Name: Description• Field-Level Security: Visible for all profiles• Add Related List: On all page layouts205
Chapter 6: Integrating with Other Applications206Next, create a custom object named Component that has a lookup relationship to Server. Thisobject represents the various <strong>com</strong>ponents that can be installed inside a server.1. Click Setup ➤ Create ➤ Objects ➤ New Custom Object.2. Enter the following information:• Label: Component• Plural Label: Components3. Accept the remaining defaults and click Save.4. In the Custom Fields & Relationships related list, click New and define a field withthe following attributes:• Data Type: Master-Detail Relationship• Related To: Server• Field Label: Server• Field Name: Server• Field-Level Security: Visible for all profiles• Add Related List: On all page layouts5. In the Custom Fields & Relationships related list, click New and define a secondfield with the following attributes:• Data Type: Checkbox• Field Label: Operational• Field Name: Operational• Field-Level Security: Visible for all profiles• Add Related List: On all page layouts6. In the Custom Fields & Relationships related list, click New and define a third fieldwith the following attributes:• Data Type: Picklist• Field Label: Type• Values: Motherboard, RAM, CPU, Network Card, Power Supply• Field Name: Type• Field-Level Security: Visible for all profiles• Add Related List: On all page layouts7. By default, one of the standard fields for the Component object is ComponentName; however, the field service representatives reference the <strong>com</strong>ponents by serialnumber. We'll change the standard field name to Component Serial Number.In the Standard Fields related list, click Edit next to Component Name.8. In the Record Name field, type Component Serial Number.9. Click Save.
Integrating with Other ApplicationsNext, create a custom object named Replacement. This object allows the field servicerepresentatives to enter information about the new <strong>com</strong>ponent.1. Click Setup ➤ Create ➤ Objects ➤ New Custom Object.2. Enter the following information:• Label: Replacement• Plural Label: Replacements3. Accept the remaining defaults and click Save.4. In the Custom Fields & Relationships related list, click New and define a field withthe following attributes:• Data Type: Date• Field Label: Date• Field Name: Date• Field-Level Security: Visible for all profiles• Add Related List: On all page layouts5. In the Custom Fields & Relationships related list, click New and define a secondfield with the following attributes:• Data Type: Lookup Relationship• Related To: Component• Field Label: New Component• Field Name: New Component• Field-Level Security: Hidden from all profiles• Add Related List: Hidden from all page layouts6. In the Custom Fields & Relationships related list, click New and define a third fieldwith the following attributes:• Data Type: Lookup Relationship• Related To: Component• Field Label: Replaced Component• Field Name: Replaced Component• Field-Level Security: Hidden from all profiles• Add Related List: Hidden from all page layoutsIn the next two steps, we'll create text versions of the New Component andReplaced Component lookup fields.This is because Salesforce Mobile handleslookup fields differently than the Salesforce.<strong>com</strong> website. Users can type in lookupfields on the website, but not in the mobile application. We want the fieldrepresentatives to be able to quickly enter the serial number of the new <strong>com</strong>ponent,so we'll create text fields to replace the lookup fields.207
Chapter 6: Integrating with Other ApplicationsTo further <strong>com</strong>plicate matters, mobile configurations deliver only a subset of auser's data to the mobile application. There is a possibility that the record theuser is trying to look up is not stored locally on the mobile device. By allowinga user to enter text, the mobile application can send the information toSalesforce.<strong>com</strong> when the record is saved, and then Salesforce.<strong>com</strong> validates theuser's text entry against the <strong>com</strong>ponent records with the Apex trigger.Additionally, if we want to pair the mobile device with a Bluetooth barcodescanner so that the field representatives can simply scan the serial numbers ofthe new and replaced <strong>com</strong>ponents, it is imperative to set up the fields as textfields. For information about using a barcode reader, see the Discussion at theend of this recipe.7. In the Custom Fields & Relationships related list, click New and define a fourthfield with the following attributes:• Data Type: Text• Field Label: New Component Serial Number• Field Name: New Component Serial Number• Field-Level Security: Visible for all profiles• Add Related List: On all page layouts8. In the Custom Fields & Relationships related list, click New and define a fifth fieldwith the following attributes:• Data Type: Text• Field Label: Replaced Component Serial Number• Field Name: Replaced Component Serial Number• Field-Level Security: Visible for all profiles• Add Related List: On all page layoutsNext, create an Apex trigger on the Replacement object so that a server's <strong>com</strong>ponents areautomatically updated when a field representative creates a replacement record.1. Click Setup ➤ Create ➤ Objects ➤ Replacement.2. In the Triggers related list, click New.3. In the Body text box, enter the following Apex trigger code:trigger replacementPart on Replacement__c (before insert) {for(Replacement__c r : Trigger.new) {//first, find the old <strong>com</strong>ponent//(the one we are replacing)Component__c oldCompInfo = [select id, type__c, Server__c208from <strong>com</strong>ponent__c where Name=:r.Replaced_Component_Serial_Number__c];
Integrating with Other Applications}}//find the new <strong>com</strong>ponent by nameComponent__c newCompInfo = [select id, type__c from<strong>com</strong>ponent__c whereName=:r.New_Component_Serial_Number__c];if(oldCompInfo == null)r.Replaced_Component_Serial_Number__c.addError('The serial number you entered does not match '+'any existing <strong>com</strong>ponents.');if(newCompInfo == null)r.New_Component_Serial_Number__c.addError('The serial number you entered does not match '+'any existing <strong>com</strong>ponents.');//set the Replacement part's fieldsr.Replaced_Component__c = oldCompInfo.Id;r.New_Component__c = newCompInfo.Id;if(newCompInfo.type__c != oldCompInfo.type__c)r.New_Component__c.addError('The new <strong>com</strong>ponent type must be ' +'the same as the replaced <strong>com</strong>ponent type.');//update the old <strong>com</strong>ponent's Server__c to nullComponent__c oldComp = new Component__c(Id= oldCompInfo.Id, Server__c=null);//update the new <strong>com</strong>ponent's Server__c//to the old <strong>com</strong>ponent's Server__c<strong>com</strong>ponent__c newComp = new Component__c(Id=r.New_Component__c, Server__c=oldCompInfo.Server__c);//update both <strong>com</strong>ponentsList <strong>com</strong>ps = new List();<strong>com</strong>ps.add(oldComp);<strong>com</strong>ps.add(newComp);update(<strong>com</strong>ps);r.Date__c = System.Today();4. Click Save.Next, create a mobile configuration and mobilize the new objects.1. Click Setup ➤ Mobile Configurations ➤ New Mobile Configuration.2. In the Name field, type Field Service.3. Select the Active checkbox.4. Select the Mobilize Recent Items checkbox.5. Select your name in the Available Members list box and click Add.6. Click Save.7. In the Data Sets related list, click Edit.8. Click Add....9. Select Server and click OK.10. Click the Data Sets node in the tree, click Add.... Select Component, and clickOK.209
Chapter 6: Integrating with Other Applications11. Click the Data Sets node in the tree, and click Add.... Select Replacement, andclick OK.If this was a real mobile configuration for field representatives, you would probablyalso mobilize other objects, like Account and Case. For the recipe, we just need tomobilize the custom objects we created.12. Click Done.Finally, test the Apex trigger in the mobile application:1. On the Salesforce.<strong>com</strong> website, create a server record and three related <strong>com</strong>ponentrecords so you have some data to work with in the mobile application.• Server: IBM BladeCenter S• Component Serial Number: 100000; Type: CPU• Component Serial Number: 100001; Type: Motherboard• Component Serial Number: 100002; Type: Power Supply2. Create one more <strong>com</strong>ponent record that is not associated with any server record.Enter 100003 as the Component Serial Number, and set the Type to CPU.3. Install the mobile application on your device. For installation instructions, see“Installing the Mobile Application” in the Salesforce.<strong>com</strong> online help. If you're usinga BlackBerry simulator, the mobile application is already installed on the simulatordevice; you just need to activate your Salesforce.<strong>com</strong> Developer Edition account afterlaunching Salesforce Mobile for the first time.4. In the mobile application, select the Replacement tab.5. Open the menu and select New.6. In the Replaced Component Serial Number field, type 100000.7. In the New Component Serial Number field, type 100003.Tip: Pairing the mobile device with a Bluetooth barcode scanner allows thefield service representative to enter the serial numbers in the replacementrecord fields by scanning the barcodes.8. Open the menu and select Save.The mobile application sends the record to Salesforce.<strong>com</strong> and the new <strong>com</strong>ponentis associated with the server record.210DiscussionTo make this solution even more effective, implement the Apex trigger and give the fieldrepresentatives barcode scanners so that they can quickly scan the serial numbers when replacing<strong>com</strong>ponents. Many barcode scanners can operate wirelessly using a Bluetooth connection. Just
Integrating with Other Applicationspair the barcode scanner with a Bluetooth-enabled mobile device, and you'll be able to use thescanner for entering data in the mobile application.See Also• For information about extending your Visualforce pages to mobile users, see Retrieving aUser's Location from a GPS-enabled Phone on page 211.• For information about deploying the mobile solution to Salesforce.<strong>com</strong> users, see theSalesforce Mobile Implementation Guide in the Salesforce.<strong>com</strong> online help.Retrieving a User's Location from a GPS-enabled PhoneProblemYou want to capture the location where your mobile users enter Salesforce.<strong>com</strong> data by retrievingthe GPS coordinates from a BlackBerry smartphone or iPhone when users save a record.SolutionWrite a Visualforce page that sales representatives can use when logging sales visits. TheVisualforce page contains JavaScript that captures the device's longitude and latitude when therecord is saved. After writing the Visualforce page, we'll create a tab for the page and add thetab to the mobile application.Before starting this recipe, make sure you <strong>com</strong>plete the following prerequisites:• Mobile Licenses: All existing Developer Edition organizations have mobile licenses. VisitDeveloper <strong>Force</strong> and click Getting Started to sign up for a new Developer Editionorganization.• Mobile Devices: Verify that your BlackBerry smartphone or iPhone can use SalesforceMobile. See “Salesforce Mobile Supported Devices” in the Salesforce.<strong>com</strong> online help.• GPS Receiver: Verify that your BlackBerry smartphone has an internal GPS receiver oran external Bluetooth GPS receiver, and that the receiver is enabled. To find out if yourBlackBerry smartphone's GPS receiver is on, select Options ➤ Advanced ➤ GPS orOptions ➤ Advanced ➤ Location Based Services. If your device does not meet theserequirements, download and install the BlackBerry simulator package.GPS is unavailable in first-generation iPhones. The earliest iPhone model with GPSsupport is the iPhone 3G.First, create a custom object named Sales Visit.This object allows sales representatives to enterinformation in Salesforce.<strong>com</strong> after making a sales visit.1. Click Setup ➤ Create ➤ Objects ➤ New Custom Object.211
Chapter 6: Integrating with Other Applications2. Enter the following information:• Label: Sales Visit• Plural Label: Sales Visits• Description: Include a brief description so other developers know what thisobject does.3. Accept the remaining defaults and click Save.4. In the Custom Fields & Relationships related list, click New and define a field withthe following attributes:• Data Type: Text Area• Field Label: Description• Field Name: Description• Field-Level Security: Visible for all profiles• Add Related List: Select for all page layouts5. In the Custom Fields & Relationships related list, click New and define a secondfield with the following attributes:• Data Type: Number• Field Label: Longitude• Length: 3• Decimal Places: 10• Field Name: Longitude• Field-Level Security: Visible for all profiles• Add Related List: Select for all page layouts6. In the Custom Fields & Relationships related list, click New and define a third fieldwith the following attributes:• Data Type: Number• Field Label: Latitude• Length: 3• Decimal Places: 10• Field Name: Latitude• Field-Level Security: Visible for all profiles• Add Related List: Select for all page layoutsCreate an Apex class that mimics the Sales Visit object but changes the save behavior:1. Click Setup ➤ Develop ➤ Apex Classes, then click New.212
Integrating with Other Applications2. Enter the following code:public class visitController {public Sales_Visit__c visit {get;set;}public visitController() {visit = new Sales_Visit__c();}}public PageReference save() {insert visit;visit = new Sales_Visit__c();return null;}Normally after saving a record, the record's detail page displays, along with the tabsand sidebar. The Apex class suppresses all these screen elements—which wouldoverload the mobile device's small screen—by displaying a blank Sales Visit recordinstead.3. Click Save.Create a Visualforce page that sends the user's GPS coordinates when the sales visit record issaved.1. Click Setup ➤ Develop ➤ Pages ➤ New.2. In the Label field, enter Sales Visit Form.3. In the Name field, enter Sales_Visit_Form.4. Replace the generic markup with the following Visualforce <strong>com</strong>ponent:function updateLocation(lat,lon) {document.getElementById('{!$Component.form.block.longitude}').value=lon;document.getElementById('{!$Component.form.block.latitude}').value=lat;}function getLocation() {mobileforce.device.getLocation(updateLocation);//work around required for BBif (window.blackberry)setInterval("getLocation()", 10000);return false;}213
Chapter 6: Integrating with Other ApplicationsSales Visit Name: Sales Visit Description: Longitude: Latitude: Get location 5. Click Save.Create a tab for the Visualforce page.1. Click Setup ➤ Create ➤ Tabs ➤ New.2. Select Sales_Visit_Form from the Visualforce Page drop-down.3. In the Tab Label field, enter Sales Visit.4. Select a tab style.5. Select the Mobile Ready checkbox.6. Click Next.7. Click Next again.8. Click Save.Create a mobile configuration and mobilize the new Visualforce page.2141. Click Setup ➤ Mobile Configurations ➤ New Mobile Configuration.2. In the Name field, type Sales Representative.3. Select the Active checkbox.4. Select the Mobilize Recent Items checkbox.5. Select your name in the Available Members list box, and then click Add.6. Click Save.7. In the Data Sets related list, click Edit.8. Click Add....9. Select Account and click OK.10. Click the Data Sets node in the tree and click Add.... Select Opportunity and clickOK.11. Click the Data Sets node in the tree and click Add.... Select Lead and click OK.
Integrating with Other Applications12. Click Done.13. In the Mobile Tabs related list, click Customize Tabs.14. Select the Account, Opportunity, Lead, and Sales Visit tabs and click Add.If the Sales Visit tab isn't in the Available Tabs list, you might not have selected theMobile Ready checkbox when creating the Visualforce tab.15. Click Save.Test the Visualforce page in the mobile application.1. Install the mobile application on your device. For installation instructions, see“Installing the Mobile Application” in the Salesforce.<strong>com</strong> online help. If you're usinga BlackBerry simulator, the mobile application is already installed on the simulatordevice; just activate your Salesforce.<strong>com</strong> Developer Edition account after launchingSalesforce Mobile for the first time.If you already <strong>com</strong>pleted Updating Salesforce.<strong>com</strong> Data in the Mobile Applicationon page 204, you don't need to reinstall the application. Simply open the mobileapplication and refresh the data on your device. To synchronize the data:• On a BlackBerry smartphone, open the main menu, and select System Info.Open the menu and select Refresh All Data.• On an iPhone, tap More, then tap App Info. Tap Sync Now on the toolbar,then tap Refresh All Data.2. In the mobile application, select the Sales Visit tab.3. Open the menu, and select New.4. In the Description field, enter a description of the sales visit.5. Open the menu and select Save.The record is saved and sent to Salesforce.<strong>com</strong> along with the user's GPS location.The application permissions on the BlackBerry smartphone control whether or notthe browser is allowed to send the GPS coordinates. If the browser is not permittedto send the information, the Visualforce page doesn't display. To ensure that allmobile Salesforce.<strong>com</strong> users are able to properly view the page, the BlackBerryadministrator should globally enable the application permissions on the BlackBerryEnterprise Server. To enable the permission on your BlackBerry smartphone:a. Select Options ➤ Advanced Options ➤ Applications.b. Highlight Browser, open the main menu, and select Edit DefaultPermissions.c. Change the value of Location (GPS) to Allow.215
Chapter 6: Integrating with Other ApplicationsDiscussionThe Visualforce markup in this recipe uses <strong>com</strong>mands in a JavaScript library provided bySalesforce.<strong>com</strong> to obtain the device's GPS coordinates. The JavaScript library contains<strong>com</strong>mands that trigger actions in Salesforce Mobile, which helps provide a seamless userexperience between Visualforce Mobile pages and the native client application.In your Visualforce pages, use the following static resource to point to the JavaScript library:External websites must include the instance name in the src parameter:The actions in the JavaScript library can be used in any Visualforce page. These <strong>com</strong>mandswork on JavaScript-enabled devices that support Visualforce. Currently, these devices includeiPhones and BlackBerry smartphones. When using the JavaScript library for pages that displayon BlackBerry smartphones, Salesforce.<strong>com</strong> re<strong>com</strong>mends that version 4.6 or later of theBlackBerry operating system is installed on the device.For more information, see “Using the JavaScript Library” in the Visualforce Developer's Guide.Enabling Single Sign-On with the <strong>Force</strong>.<strong>com</strong> PlatformProblemYou want to validate usernames and passwords for Salesforce.<strong>com</strong> against your corporate userdatabase or another client application rather than having separate user passwords managed bySalesforce.<strong>com</strong>.SolutionSalesforce.<strong>com</strong> offers two ways to use single sign-on:Delegated AuthenticationUse delegated authentication if you have mobile users in your organization,or if you want to enable single-sign on for partner portals or CustomerPortals.You must request that this feature be enabled by salesforce.<strong>com</strong>. Thisrecipe explains delegated authentication in more detail.216
Integrating with Other ApplicationsFederated Authentication using SAMLFederated authentication uses SAML, an industry standard for secureintegrations. Investing in SAML with Salesforce.<strong>com</strong> can be leveragedwith other products or services. If you use SAML, you don't have to exposean internal server to the Internet: the secure integration is done using thebrowser. In addition, Salesforce.<strong>com</strong> never handles any passwords usedby your organization.For more information, see “Configuring SAML Settings for SingleSign-On” in the Salesforce.<strong>com</strong> online help.When delegated authentication is enabled, salesforce.<strong>com</strong> does not validate a user's password.Instead, salesforce.<strong>com</strong> makes a Web services call to your organization to establish authenticationcredentials for the user.When implementing delegated authentication, select one of the following security modes:Simple passwordsTokensMixedUsers directly provide passwords that the delegated authentication serverevaluates. In this mode, users can also use the Salesforce.<strong>com</strong> login pageand all of the Salesforce.<strong>com</strong> clients without modification or extrainfrastructure.Instead of passwords, security tokens are provided, and the delegatedauthentication server evaluates these.This mode hides all passwords fromSalesforce.<strong>com</strong>. Instead of a user signing onto a Salesforce.<strong>com</strong> login page,the user signs onto a private login page on your <strong>com</strong>pany's web server thatmay be behind your corporate firewall. In this mode, the user isauthenticated on that private login page. When the user has beensuccessfully authenticated, the user is redirected to the Salesforce.<strong>com</strong>login page and logged in using a single-use token. In this mode, userscan't login directly to the Salesforce.<strong>com</strong> login page (users can't generatetokens), and they can't directly login using a client or mobile app. Thisrecipe uses this mode.Your organization creates a delegated authentication server that canevaluate either tokens or passwords. This enables organizations to mobileand client apps, while still providing their users with a private login page.Note: Contact salesforce.<strong>com</strong> to enable delegated authentication for your organizationif it is not already enabled.To enable delegated authentication for your organization, build your delegated authenticationWeb service, and then configure your Salesforce.<strong>com</strong> organization to enable the Web service.First, build your delegated authentication Web service:217
Chapter 6: Integrating with Other Applications1. In Salesforce.<strong>com</strong>, click Setup ➤ Develop ➤ API ➤ Download DelegatedAuthentication WSDL to download the Web Services Description Language(WSDL) file, AuthenticationService.wsdl.The WSDL describes the delegated authentication service and can be used toautomatically generate a server-side stub to which you can add your specificimplementation. For example, in the WSDL2Java tool from Apache Axis, you canuse the --server-side switch. In the wsdl.exe tool from .NET, you can use the/server switch.A simple C# implementation of delegated authentication is shown below.The sampleuses Microsoft .NET v1.1 and works with IIS6 on a Windows 2003 server. Seewiki.apexdevnet.<strong>com</strong>/index.php/How_to_Implement_Single_Sign-On_with_<strong>Force</strong>.<strong>com</strong>for a more <strong>com</strong>plex sample that demonstrates a solution using an authenticationtoken.using System;using System.DirectoryServices;namespace samples.sforce.<strong>com</strong>{/// /// This is a very basic implemention of an/// authentication service for illustration purposes./// This sample should only be used/// with a HTTPS Delegated Gateway URL./// It simply connects to your Active Directory/// server using the credentials that are passed in./// If there is a bad username/password <strong>com</strong>bination,/// it throws an exception and returns false;/// otherwise the credentials are ok/// and it returns true./// Note that DirectoryEntry might not connect to/// Active Directory until we do something/// that actually requires it./// That's why we read a property from the/// created DirectoryEntry object./// public class SimpleAdAuth : System.Web.Services.WebService{[System.Web.Services.WebMethodAttribute()][System.Web.Services.Protocols.SoapDocumentMethodAttribute("",RequestNamespace = "urn:authentication.soap.sforce.<strong>com</strong>",ResponseElementName = "AuthenticateResult",ResponseNamespace = "urn:authentication.soap.sforce.<strong>com</strong>",Use = System.Web.Services.Description.SoapBindingUse.Literal,ParameterStyle =System.Web.Services.Protocols.SoapParameterStyle.Wrapped)][return:System.Xml.Serialization.XmlElementAttribute("Authenticated")]218
Integrating with Other Applicationspublic bool Authenticate (string username, string password, string sourceIp,[System.Xml.Serialization.XmlAnyElementAttribute()]System.Xml.XmlElement[] Any){if(username.IndexOf("@")==-1)return false;// Attempt to bind to an Active Directory entry.// This will authenticate the username and password.// TODO: you'll need to change this to match// your Active Directory nameconst string root = "LDAP://DC=sample,DC=org";try{DirectoryEntry de= new DirectoryEntry(root, username, password);// retrieve a propertystring tempName = de.Name;return true;}catch(Exception){return false;}}}}As part of the delegated authentication process, a salesforce.<strong>com</strong> server makes aSOAP 1.1 request to authenticate the user who is passing in the credentials. Anexample of this type of request is shown below.sampleuser@sample.orgmyPassword991.2.3.4Your delegated authentication service needs to accept this request, process it, andreturn a true or false response. A sample response is shown below.219
Chapter 6: Integrating with Other Applicationstrue2. Add a link to your corporate intranet or other internally-accessible site that takesthe authenticated user’s credentials and passes them using an HTTPS POST to theSalesforce.<strong>com</strong> login page. For security reasons, you should make your service availableby SSL only. This ensures that a password, if it is included, is not sent unencrypted.You must use an SSL certificate from a trusted provider, such as Verisign or Thawte.Because Salesforce.<strong>com</strong> does not use the password field other than to pass it backto you, you do not need to send a password in this field. Instead, you could passanother authentication token, such as a Kerberos Ticket, so that your actual corporatepasswords are not passed to or from Salesforce.<strong>com</strong>.You can configure the Salesforce.<strong>com</strong>-delegated authentication authority to allowonly tokens, or to accept either tokens or passwords. If the authority only acceptstokens, a Salesforce.<strong>com</strong> user cannot log in to Salesforce.<strong>com</strong> directly, because theycannot create a valid token; however, many <strong>com</strong>panies choose to allow both tokensand passwords. In this environment, a user can still log in to Salesforce.<strong>com</strong> throughthe login page.When the salesforce.<strong>com</strong> server passes these credentials back to you in theAuthenticate message, verify them, and the user will gain access to the application.Next, in Salesforce.<strong>com</strong>, specify your organization’s delegated authentication gateway URLby clicking Setup ➤ Security Controls ➤ Single Sign-On Settings ➤ Edit. Enter the URLin the Delegated Gateway URL text box. For security reasons, Salesforce.<strong>com</strong> restricts theoutbound ports you may specify to one of the following:• 80: This port only accepts HTTP connections.• 443: This port only accepts HTTPS connections.• 7000-10000 (inclusive): These ports accept HTTP or HTTPS connections.Note: For security reasons, you should make your service available by SSL only.Finally, modify your user profiles to enable the Is Single Sign-On Enabled userpermission. In Salesforce.<strong>com</strong>, click Setup ➤ Manage Users ➤ Profiles to add or edit profiles.220DiscussionThe actual implementation of delegated authentication is transparent to users, but involves anumber of steps behind the scenes. When you configure Salesforce.<strong>com</strong> for delegated
Integrating with Other Applicationsauthentication, you are allowing a delegated authority to control authentication. When a userfirst logs onto their network environment, they are initially authenticated by this authority.When the user attempts to log on to subsequent protected applications, instead of passing ausername and password to the application, the user requests a token from a token generator.(On Windows, this token request can use the NTLM protocol.) The received token is passedto the application, which verifies that the token properly identifies the user, and then allowsthe user access to the application.Salesforce.<strong>com</strong> can use this method, since the password field is simply used to exchangeinformation with the client, rather than specifying a particular data type.This flexibility meansthat Salesforce.<strong>com</strong> can accept a token, which is then used with the delegated authenticationauthority to verify the user. If the verification succeeds, the user is logged on to Salesforce.<strong>com</strong>.If the verification fails, the user receives an error.The process flow for Salesforce.<strong>com</strong> delegatedauthentication is shown in the figure below.See AlsoFigure 19: Delegated Authentication Process Flow• How to Implement Single Sign-On with the <strong>Force</strong>.<strong>com</strong> atwiki.apexdevnet.<strong>com</strong>/index.php/How_to_Implement_Single_Sign-On_with_<strong>Force</strong>.<strong>com</strong>221
Chapter 6: Integrating with Other Applications• “Configuring SAML Settings for Single Sign-On” in the Salesforce.<strong>com</strong> online help• The Single Sign-On Implementation Guide in the Salesforce.<strong>com</strong> online helpImplementing Single Sign-On for ClientsProblemYou want to use single sign-on with a desktop client, such as Outlook Edition, Lotus NotesEdition, or Office Edition, so that your users only have to log into an environmentonce—instead of having to login more than once to access different services and resources inan environment.Note: This recipe assumes that you are familiar with enabling single sign-on.SolutionThere are three main approaches for using single sign-on to authenticate <strong>Force</strong>.<strong>com</strong> clients:• Use the network password, such as an LDAP password for authentication using the clients.End users would enter their Salesforce.<strong>com</strong> usernames and LDAP password into the logindialog box, and delegated authentication would be performed.Note: <strong>Force</strong>.<strong>com</strong> never logs the LDAP password, and clears it out of memory assoon as it has passed on in the SOAP message to the single sign-on service.222• Use a client application registry setting that can designate where <strong>Force</strong>.<strong>com</strong> directs thelogin request. By making this URL an internal URL, a customer can provide a proxy forthe username and password, verify it locally, then pass a one-time use token (such as aSAML token) to <strong>Force</strong>.<strong>com</strong> for verification. This is then passed back to the customer forvalidation.• Use a customer-built proxy that requires NT Lan Manager (NTLM) authentication. OnceNTLM has passed, the proxy can send the Salesforce.<strong>com</strong> username and a one-time usetoken to <strong>Force</strong>.<strong>com</strong>, which gets passed back to the customer for validation. This approachhas the benefit of not having to configure a username and password for all clients that aredeployed. Only the registry setting needs to be changed.Note: You do not need to implement a proxy service to make client applications workif your single sign-on listener supports tokens and passwords. Users can configuretheir passwords in the client application. In this case, the network password temporarilypasses through the <strong>Force</strong>.<strong>com</strong> servers. This password is not logged anywhere, and iscleared out of memory as soon as the outbound SOAP message has been sent.
Integrating with Other ApplicationsDiscussionThe single sign-on login process for <strong>Force</strong>.<strong>com</strong> desktop clients involves the following<strong>com</strong>ponents:• SOAP message packages• Local Microsoft ® Windows registry keyHKEY_LOCAL_MACHINE\SOFTWARE\salesforce.<strong>com</strong>\OfficeToolkit\ServerUrl• Desktop client proxy (specified in the registry key)• Token generator• Single use tokens• Token authentication proxy223
Chapter 6: Integrating with Other ApplicationsFigure 20: Single Sign-On Login Process from a Client1. The desktop client sends a login request to the desktop client proxy as a SOAPmessage package.2. The desktop client proxy extracts the username and password and sends them to thetoken generator.3. The token generator validates the credentials and replies to the desktop client proxywith a single-use token.224
Integrating with Other Applications4. The desktop client proxy modifies the SOAP message package by replacing thecorporate password in the login request with the token and sends a secure login callto <strong>Force</strong>.<strong>com</strong>.5. <strong>Force</strong>.<strong>com</strong> sends a request to the authentication proxy to validate the token.6. The authentication proxy replies to <strong>Force</strong>.<strong>com</strong>.7. <strong>Force</strong>.<strong>com</strong> replies to the desktop client proxy.8. The desktop client proxy passes the response back to the desktop client, authenticatingthe user.Note: This process occurs only if the registry key has a value.When the desktop client proxy is not exposed to the public Internet, only users insidethe network or with VPN access have the ability to use authenticate to <strong>Force</strong>.<strong>com</strong>using the client applications.Sample MessagesThe following is an example of a HTML/SOAP login message. As summarized in the firststep above, login messages such as the following sample are sent to the desktop client proxyspecified in the ServerUrl registry key.Outlook/33101outlook100b.lake@salesforce.<strong>com</strong>proxy1234225
Chapter 6: Integrating with Other ApplicationsThe following is an example of a SOAP response message. As summarized in the last stepabove, responses from <strong>Force</strong>.<strong>com</strong> such as the following sample are passed by the desktop clientproxy to the desktop client.https://na1-api.salesforce.<strong>com</strong>/services/Soap/m/10.0/00D30000000Kc5Bfalsehttps://na1-api.salesforce.<strong>com</strong>/services/Soap/c/10.0/00D30000000Kc5B00D30000000Kc5B!ARkAQPsowlYLaw8G_Y1AgnUG9mZ3Z1mSiNCKislQ69ltrluugmUqstbFdLUCddq2PFTFZRxsXRXx0aBS82XJME6xMP_4Xut600530000001Yx3rAACfalse$00D30000000Kc5BERSfalseSan Francisco Coffee Supply00e30000000w2Z8AAIbjmark@salesforce.<strong>com</strong>Blake J Mark00530000001Yx3rAACen_USen_USblake@desktopclientsdemo.<strong>com</strong>America/Los_AngelesStandardTheme2226See Also• Enabling Single Sign-On with the <strong>Force</strong>.<strong>com</strong> Platform on page 216• How to Implement Single Sign-On with <strong>Force</strong>.<strong>com</strong> atwiki.apexdevnet.<strong>com</strong>/index.php/How_to_Implement_Single_Sign-On_with_<strong>Force</strong>.<strong>com</strong>• “Configuring SAML Settings for Single Sign-On” in the Salesforce.<strong>com</strong> online help• The Single Sign-On Implementation Guide in the Salesforce.<strong>com</strong> online help
Chapter 7Integrating Applications with the API and ApexIn this chapter ...• Setting Up YourSalesforce.<strong>com</strong> WebServices API Applications• Implementing thequery()/queryMore()Pattern• Batching Records for APICalls• Using a Wrapper Class forCommon API Functions• Building a Web Portalwith Salesforce.<strong>com</strong> Data• Add and Remove Tags ona Single Record• Add and Remove Tags onMultiple Records• Updating Tag DefinitionsAs you be<strong>com</strong>e more experienced developing on theplatform, you'll find that there are some types of applicationsand integrations that can't be handled by modifying a singleapp. For situations like these, you can leverage the powerful,SOAP-based API to write client applications that are createdand executed outside of Salesforce.<strong>com</strong>.In this chapter, you'll learn about choosing a developmentlanguage, selecting a WSDL document, and managing APIauthentication, sessions, and timeouts. We'll also take a lookat what it takes to build a full-fledged client application thatdemonstrates several API best practices.227
Chapter 7: Integrating Applications with the API and ApexSetting Up Your Salesforce.<strong>com</strong> Web Services APIApplicationsBefore working with the API in the recipes in this chapter, perform the following setup steps.1. Select a Development Language on page 2282. Create an Integration User on page 2283. Select a WSDL on page 2294. Generate a WSDL Document on page 2305. If You Use the Partner WSDL on page 2316. Log In to and Out of the API on page 2337. Manage Sessions on page 2368. Change the Session Timeout Value on page 237Select a Development LanguageChoose the programming language or languages in which you'll write your application.If you're interested in building a Web control or client application, write your code in anylanguage that supports Web services, including Java, Perl, Python, PHP, Ruby on Rails,C#.NET, Visual Basic.NET, and Cocoa for Mac OS X. You can find toolkits and code samplesfor several Web-services-enabled languages on the Developer <strong>Force</strong> website atwiki.developerforce.<strong>com</strong>/index.php/API.Create an Integration UserClient applications that access Salesforce.<strong>com</strong> through the API must first log in as aSalesforce.<strong>com</strong> user for authentication. Create a special user in your organization, solely forintegration purposes. That way, even if an actual user leaves your organization, you'll alwayshave a user with the correct permissions available.Assign this user a special profile with the following permissions selected:• “API Only”—Specifies that the user can only log in through the API. This prevents theuser from being used for any purpose other than integration scenarios.• “Modify All Data”—Specifies that the user can view any data stored in the database andedit any field with the editable flag. (Some fields, like CreatedDate, do not have theeditable flag set and cannot be edited by any user, regardless of the “Modify All Data”228
Integrating Applications with the API and Apexpermission.) This permission is also required for any user who wants to upsert non-uniqueexternal IDs through the API.Tip: If you don't need to worry about external IDs, use the “Modify All Records”permission for a more secure integration. This permission further restricts theintegration user's access.In addition, consider restricting the following to enable a more secure integration:• All logins use secure access (HTTPS).• The integration user's access to just those objects required for the integration.• The IP addresses that the integration user can use, perhaps to just the IP address of theserver.• The organization-wide sharing model—select the lowest level of the hierarchy for theintegration user to make changes.• All passwords are considered strong and contain at least 20 random characters.Select a WSDLA WSDL document is an XML file that describes the format of messages you send and receivefrom a Web service. It's the protocol that your development environment's SOAP client usesto <strong>com</strong>municate with external services like Salesforce.<strong>com</strong>.Salesforce.<strong>com</strong> provides two primary WSDL documents for operating on objects and fieldsin an organization, plus three additional WSDL documents for specific features of workflowrules and the API. Choose the WSDL document you should download and consume basedon the type of application you're going to develop:Enterprise WSDLThe enterprise WSDL is a strongly typed WSDL document for customerswho want to build an integration with their Salesforce.<strong>com</strong> organizationonly, or for partners who are using tools like Tibco or webMethods tobuild integrations that require strong typecasting.Strong typing means that an object in Salesforce.<strong>com</strong> has an equivalentobject in Java, .NET, or whatever environment is accessing the API. Thismodel generally makes it easier to write code because you don't need todeal with any underlying XML structures. It's also safer because data andschema dependencies are resolved at <strong>com</strong>pile time, not at runtime.The downside of the enterprise WSDL, however, is that it only workswith the schema of a single Salesforce.<strong>com</strong> organization because it's boundto all of the unique objects and fields that exist in that organization's datamodel. Consequently, if you use the enterprise WSDL, you must downloadand re-consume it whenever your organization makes a change to its229
Chapter 7: Integrating Applications with the API and Apexcustom objects or fields. Additionally, you can't use it to create solutionsthat can work for multiple organizations.Partner WSDLThe partner WSDL is a loosely typed WSDL document for customers,partners, and ISVs who want to build an integration or an AppExchangeapp that can work across multiple Salesforce.<strong>com</strong> organizations.With this WSDL document, the developer is responsible for marshalingdata in the correct object representation, which typically involves editingthe XML. However, you're also freed from being dependent on anyparticular data model or Salesforce.<strong>com</strong> organization. Consequently, ifyou use the partner WSDL, you only need to download and consume itonce, regardless of any changes to custom objects or fields.Outbound Message WSDLThe Outbound Message WSDL document is for developers who wantto send outbound messages from a workflow rule or approval process toan external service.Apex WSDLMetadata WSDLThe Apex WSDL document is for developers who want to run or <strong>com</strong>pileApex scripts in another environment.The Metadata WSDL document is for users who want to use the MetadataAPI to retrieve or deploy customization information, such as custom objectdefinitions and page layouts. See “Understanding the Metadata API” inthe <strong>Force</strong>.<strong>com</strong> Metadata API Developer's Guide.Delegated Authentication WSDLThe delegated authentication WSDL document is for users who want tocreated a delegated authentication application to support single-sign on.You can also download a client certificate for validating requests generatedby Salesforce.<strong>com</strong>.Generate a WSDL DocumentIf you want to generate a WSDL document other than an Outbound Message WSDLdocument, log in to your Salesforce.<strong>com</strong> organization and click Setup ➤ Develop ➤ API.Right-click the WSDL document you want to generate, and select Save Link As in Firefox,or Save Target As in Internet Explorer.If you want to view a WSDL document without downloading it, simply click the downloadlink for the WSDL document you want to view.230
Integrating Applications with the API and ApexTip: To keep track of the WSDL documents you download, name them with adate/time stamp.If you want to generate an Outbound Message WSDL document, click Setup ➤ Create ➤Workflow & Approvals ➤ Outbound Messagaes. Select the name of the outbound messageand then click Click for WSDL. This file is bound to the outbound message and contains theinstructions about how to reach the endpoint service and what data is sent to it.If You Use the Partner WSDLIf you want to use the partner WSDL, but you don't know how to work with the loosely typedSOAP messages, use the following information.The partner WSDL is based on a generic SObject, which represents a Salesforce.<strong>com</strong> recordsuch as a particular account or contact. Every SObject has the following properties:NameTypeIDTypestringIDDescriptionThe API name of the object on which this SObject isbased. For example, Account and Position__c.The unique ID for this SObject. For the create()call, this value is null. For all other API calls, this valuemust be specified.AnyXMLElement[](in .NET)MessageElement[](in Java)An array of fields for the SObject. Each element of thearray consists of an XML tag, where the name of thefield is the name of the element, and the value of thefield is the body of the tag. For example:valueFieldsToNullstring[]An array of one or more field names whose value youwant to explicitly set to null. This array is used onlywith the update() or upsert() calls.Note that you can only specify fields that you can updateand that are nillable. For example, specifying an IDfield or required field results in a runtime error.231
Chapter 7: Integrating Applications with the API and ApexThe partner WSDL provides methods that allow you to work with these properties so thatyou can perform the same tasks with the partner WSDL as you can with the enterprise WSDL.For example, the following Java code creates a job application record using the enterpriseWSDL:public Job_Application__c createJobApp(String candidateId,String positionId) {Job_Application__c jobApp = new Job_Application__c();jobApp.setCandidate__c(new ID(candidateId));jobApp.setPosition__c(new ID(positionId));jobApp.setStatus__c("New");SaveResult [] sr = binding.create(new SObject[] {jobApp});if(!sr[0].isSuccess())throw new SaveException(sr[0]);jobApp.setId(sr[0].getId());return jobApp;}The same createJobApp() method can also be written in Java with the partner WSDL:public SObject createJobApp(String candidateId,String positionId) {SObject jobApp = new SObject();// Submit four fields as part of the Any array on the 184// Chapter 11:Writing Web Controls and Client Applications// Job_Application__c recordMessageElement[] fields = new MessageElement[3];// Candidate idfield[0] = util.createNewXmlElement("Candidate__c", candidateId);}// Position idfield[1] = util.createNewXmlElement("Position__c", positionId);// Statusfield[2] = util.createNewXmlElement("Status__c", "New");jobApp.set_any(fields);jobApp.setType("Job_Application__c");SaveResult [] sr = binding.update(new SObject[] {jobApp});if(!sr[0].isSuccess())throw new SaveException(sr[0]);jobApp.setId(sr[0].getId());return jobApp;The following VB.NET code creates a position record using the enterprise WSDL:Dim p as New Position__cp.Id = "a00D0000005iYiq"p.Name = "Analyst"p.Status__c = "Open"binding.create(New sObject() {p})232
Integrating Applications with the API and ApexThis code can be written using the partner WSDL as follows:Dim p as New SObjectp.Type = "Position__c"p.Id = "a00D0000005iYiq"Dim doc as New XmlDocumentDim e1, e2 as XmlElemente1 = doc.CreateNewElement("Name")e2 = doc.CreateNewElement("Status")e1.InnerText = "Analyst"e2.InnerText = "Open"p.Any = new XmlElement() {e1,e2}binding.update(New sObject() {p})Note: In these examples, notice that Java and .NET use different elements to representfield name/value pairs. For example, given the following name/value pair:Chicago• Java uses a MessageElement where:- City__c is the Name- Chicago is the Value• .NET uses an XMLElement where:- City__c is the LocalName- Chicago is the InnerTextUse the partner WSDL in conjunction with the describeGlobal() anddescribeSObjects() API calls to get object metadata. For example, a particular object'stype is defined in the name field in the returned DescribeSObjectResult. Likewise, thename of an object's field is defined in the name field of the Field type in the returnedDescribeSObjectResult.Log In to and Out of the APIIf a client application originates from outside the Salesforce.<strong>com</strong> user interface, it must firstlog in to the API. The best practice is to log out of the API when the client application<strong>com</strong>pletes its work. Use the following information to understand how to log in and log outfrom a client application.Similar to the way the login page works in the Salesforce.<strong>com</strong> user interface, the login() calltakes a username and password and executes a login sequence onhttps://login.salesforce.<strong>com</strong>/. If the login is successful, the login() call returns233
Chapter 7: Integrating Applications with the API and Apexa session ID and URL.The session ID represents the user's authentication token and the URLpoints to the host that contains data for the user's organization.Note: For performance and reliability, the platform runs on multiple instances (forexample, na1.salesforce.<strong>com</strong> and na2.salesforce.<strong>com</strong>), but data for anysingle organization is always consolidated on a single instance. As long as you use theURL that is returned from the login() call, you should never need to know theactual instance that hosts an organization's data.234Figure 21: Authenticating with the login() CallOnce you've obtained a session ID and server URL, you'll generally include the session ID inevery API call, and you'll direct your client to make the API request to the host that youobtained.Tip: It's not necessary to use login() when writing an s-control that executes withinthe Salesforce.<strong>com</strong> user interface because the user accessing the s-control has alreadylogged in and acquired a session ID.To log in, acquire a Salesforce.<strong>com</strong> session ID and the appropriate host for your organizationby using the login() call.For example, the following Java code from the wrapper class described in Using a WrapperClass for Common API Functions on page 242:• Logs in to Salesforce.<strong>com</strong>• Sets the login time• Resets the URL for the SOAP binding stub to the returned server URL• Creates a new session header for the binding class variable• Updates the wrapper class' sessionID and serverURL variables/*** This method is used to log in to salesforce and set the* private class variables for the wrapper, including the* session ID.*/public void login() throws UnexpectedErrorFault, InvalidIdFault,
Integrating Applications with the API and ApexLoginFault, RemoteException,ServiceException {resetBindingStub();LoginResult loginResult = binding.login(username, password);this.nextLoginTime = System.currentTimeMillis() +(this.sessionlength * 60000);this.binding._setProperty(SoapBindingStub.ENDPOINT_ADDRESS_PROPERTY,loginResult.getServerUrl());this.sessionId = loginResult.getSessionId();this.serverUrl = loginResult.getServerUrl();}// Create a new session header object and set the// session id to that returned by the loginSessionHeader sh = new SessionHeader();sh.setSessionId(loginResult.getSessionId());this.binding.setHeader(newSforceServiceLocator().getServiceName().getNamespaceURI(),"SessionHeader", sh);This VB .NET code performs the same logic as for the VB.NET version of the wrapper class(see Using a Wrapper Class for Common API Functions on page 242):Public Sub Login()Dim lr As sforce.LoginResultMe._binding.Url = Me._hostlr = Me._binding.login(username, password)Me._nextLoginTime = Now().AddMinutes(Me.sessionlength)'Reset the SOAP endpoint to the returned server URLMe._binding.Url = lr.serverUrlMe._binding.SessionHeaderValue = New sforce.SessionHeaderMe._binding.SessionHeaderValue.sessionId = lr.sessionIdMe._sessionId = lr.sessionIdMe._serverURL = lr.serverUrlEnd SubTo log out of the session you created, issue the logout() call.Java:/*** This method is used to log out of salesforce*/public void logout() {try {binding.logout();}catch (Exception e) {System.out.println("Unexpected error:\n\n" + e.getMessage());235
Chapter 7: Integrating Applications with the API and Apex}}VB.NET:Public Sub Logout()Me._binding.logout()End SubManage SessionsAn integration may last longer than the session timeout value specified for an organization,but logging in to Salesforce.<strong>com</strong> every time you need to make an API call is inefficient. Tomanage sessions, use the information in this section.The session timeout value is the amount of time a single session ID remains valid beforeexpiring. Sessions expire automatically after a predetermined length of inactivity, which canbe configured in Salesforce.<strong>com</strong> by clicking Setup ➤ Security Controls. The default is 120minutes (two hours). If you make an API call, the inactivity timer is reset to zero.You can manage sessions by writing a method that checks to see whether your session ID isabout to expire by <strong>com</strong>paring your last login time with the current session length. When thismethod returns true, log in again.For example, the following Java code from the wrapper class discussed in Using a WrapperClass for Common API Functions implements a loginRequired() method:/*** This method returns true if a login to Salesforce is* necessary, otherwise false. It should be used to check the* session length before performing any API calls.*/private boolean loginRequired() {if (sessionId == null || sessionId.length() == 0)return true;return !isConnected();}/*** This method checks whether the session is active or not* @return boolean*/public boolean isConnected() {return System.currentTimeMillis() < nextLoginTime;}236
Integrating Applications with the API and ApexThis VB.NET function implements the same logic:Private Function loginRequired() As BooleanloginRequired = Not (isConnected())End FunctionPublic Function isConnected() As BooleanIf _sessionId "" And _sessionId Nothing ThenIf Now() > Me._nextLoginTime ThenisConnected = FalseEnd IfisConnected = TrueElseisConnected = FalseEnd IfEnd FunctionTip: Be sure that the value you use for session length is no more than the configuredsession timeout value. Because the session timeout value for an organization is notaccessible through the API, it's a good idea to build applications that assume athirty-minute session timeout so that administrators don't inadvertently break yourintegrations.This example is very simple. Another, more robust option is to catch the session expirationremove exception (Exception Code - INVALID_SESSION_ID) and only then log in again.This ensures that you only log in when absolutely necessary and that you'll get a new sessionID if your current session ever be<strong>com</strong>es invalid. This method is usually coupled withimplementing retry logic.Change the Session Timeout ValueTo change the session timeout value from the two hour default, so that your integrations canwork longer without having to get a new session ID:1. Log in to the application as an administrator.2. Click Setup ➤ Security Controls ➤ Session Settings.3. Change the Timeout value to one of the few preset values. They range from aslittle as 15 minutes to as long as 8 hours.Note:• Make sure you update any integration code so that it uses the new timeout value.Otherwise, your integrations might break.• Changing the session timeout value affects all users in an organization.237
Chapter 7: Integrating Applications with the API and ApexImplementing the query()/queryMore() PatternProblemYou need to issue queries that return more than 2,000 records, but the query() call can onlyreturn up to 2,000 at a time.SolutionUse queryMore() to retrieve any additional records in batches of up to 2,000 at a time. ThequeryMore() call takes a single queryLocator parameter that specifies the index of thelast result record that was returned.This queryLocator is created and returned by the previousquery() or queryMore() call.When the query() or queryMore() calls return a result with the isDone flag set to true,there are no more records to process.For example, the following Java code implements the query()/queryMore() pattern whenquerying leads:QueryResult queryResult = this.stub.query("Select name From lead");do {for(sObject lead : queryResult.getRecords()) {System.out.println(lead.get_any()[0].getValue());}if(queryResult.isDone())break;queryResult = this.stub.queryMore(queryResult.getQueryLocator());} while(true);This code implements query()/queryMore() in VB.NET:Dim lead As sforce.sObjectDim i As IntegerDim qr As sforce.QueryResult = binding.query("select name from lead")DoFor i = 0 To qr.records.Lengthlead = qr.records(i)Console.WriteLine(lead.Any(0).InnerText)NextIf qr.done Then Exit Doqr = binding.queryMore(qr.queryLocator)LoopThe query()/queryMore() batch size defaults to 500 records, but can be as small as 200or as large as 2000. To change the batch size, use the QueryOptions header.238
Integrating Applications with the API and ApexNote:• If you use query()/queryMore() during a long-running integration scenariowhere you need to log in again to get new session IDs, the queryLocator cursorremains valid after you log in, as long as you get the next batch of records withinfifteen minutes of idle time.• Only 10 queryLocator cursors can be active for an organization at any one time.See Also• Manage Sessions on page 236• Using a Wrapper Class for Common API Functions on page 242• Batching Records for API Calls on page 239Batching Records for API CallsProblemYou want to create, update, or delete records in Salesforce.<strong>com</strong>, but you have more than 200records you want to process, which exceeds the maximum allowed per call.SolutionWrite a method that batches the records into multiple API calls.For example, the following Java code from the wrapper class described in Using a WrapperClass for Common API Functions implements a create() method that takes an array ofSObjects and a batch size as parameters. Any method that calls create() can pass in anynumber of records and dynamically vary the batch size to improve performance:/*** This method creates an array of sObjects with a specified* batchSize.* @param records* @param batchSize* @return SaveResult[]*/public SaveResult[] create(SObject[] records, int batchSize)throws InvalidSObjectFault, UnexpectedErrorFault,InvalidIdFault, RemoteException,ServiceException {if (batchSize > 200 || batchSize < 1)throw new IllegalArgumentException("batchSize must be between 1 and 200");return batch(records, batchSize, new CreateBatcher());239
Chapter 7: Integrating Applications with the API and Apex}private SaveResult[] batch(SObject[] records, int batchSize,Batcher batchOperation)throws UnexpectedErrorFault, InvalidIdFault,LoginFault, RemoteException, ServiceException {if (records.length
Integrating Applications with the API and Apex}}return binding.update(records);This VB.NET function implements the same logic:Public Function create(ByVal records() As sObject,Optional ByVal batchSize As Integer = 200)As sforce.SaveResult()Return batch(records, batchSize, New CreateBatcher)End FunctionPrivate Function batch(ByVal records() As sObject,ByVal batchSize As Integer,ByVal oper As Batcher)As sforce.SaveResult()If (records.Length
Chapter 7: Integrating Applications with the API and ApexByVal binding As sforce.SforceService,ByVal records As sforce.sObject())As sforce.SaveResult()perform = binding.create(records)End FunctionEnd ClassPrivate Class UpdateBatcherInherits BatcherPublic Overloads Function perform(ByVal binding As sforce.SforceService,ByVal records As sforce.sObject())As sforce.SaveResult()perform = binding.update(records)End FunctionEnd ClassSee Also• Manage Sessions on page 236• Using a Wrapper Class for Common API Functions on page 242• Log In to and Out of the API on page 233Using a Wrapper Class for Common API FunctionsProblemYou find yourself writing similar sections of code wherever you need to make calls to the APIin a client application.SolutionUse an API wrapper class to abstract <strong>com</strong>mon functions whenever you write client applicationsand integrations. A wrapper class makes your integration more straightforward to develop andmaintain, keeps the logic necessary to make API calls in one place, and affords easy reuse acrossall <strong>com</strong>ponents that require API access.Wrapper classes typically include methods for the following types of actions:• Logging in• Managing sessions• Querying with the query()/queryMore() pattern• Batching records for create, update, delete, and so on242
Integrating Applications with the API and ApexFor example, the following Java code is a <strong>com</strong>plete implementation of the wrapper class usedin Building a Web Portal with Salesforce.<strong>com</strong> Data on page 255:package <strong>com</strong>.sforce.client;import java.net.MalformedURLException;import java.net.URL;import java.rmi.RemoteException;import javax.xml.rpc.ServiceException;import org.apache.axis.transport.http.HTTPConstants;import <strong>com</strong>.sforce.soap.partner.AssignmentRuleHeader;import <strong>com</strong>.sforce.soap.partner.LoginResult;import <strong>com</strong>.sforce.soap.partner.QueryOptions;import <strong>com</strong>.sforce.soap.partner.QueryResult;import <strong>com</strong>.sforce.soap.partner.SaveResult;import <strong>com</strong>.sforce.soap.partner.SessionHeader;import <strong>com</strong>.sforce.soap.partner.SforceServiceLocator;import <strong>com</strong>.sforce.soap.partner.SoapBindingStub;import <strong>com</strong>.sforce.soap.partner.fault.InvalidIdFault;import <strong>com</strong>.sforce.soap.partner.fault.InvalidSObjectFault;import <strong>com</strong>.sforce.soap.partner.fault.LoginFault;import <strong>com</strong>.sforce.soap.partner.fault.UnexpectedErrorFault;import <strong>com</strong>.sforce.soap.partner.sobject.SObject;public class Client {// Private wrapper class variablesprivate String username;private String password;private URL host;private int querySize;private int sessionlength;private String sessionId;private String serverUrl;private long nextLoginTime;private SoapBindingStub binding;private boolean useCompression;private QueryOptions queryOptions;private AssignmentRuleHeader assignmentRules;/*** This method initializes the private class variables*/public Client() throws MalformedURLException {this.querySize = 500;this.sessionlength = 29;this.useCompression = true;this.host = new URL("https://www.salesforce.<strong>com</strong>/services/Soap/u/18.0");243
Chapter 7: Integrating Applications with the API and Apex244}/*** These methods get and set the private class variables*/public String getUsername() {return this.username;}public void setUsername(String value) {this.username = value;}public String getPassword() {return this.password;}public void setPassword(String value) {this.password = value;}public URL getHost() {return this.host;}public void setHost(URL value) {this.host = value;}public void setHost(String url) throws MalformedURLException {this.host = new URL(url);}public String getServerURL() {return this.serverUrl;}public int getQuerySize() {return this.querySize;}public void setQuerySize(int value) {this.querySize = value;}public int getSessionlength() {return this.sessionlength;}public void setSessionlength(int value) {this.sessionlength = value;}public boolean getUseCompression() {return this.useCompression;}
Integrating Applications with the API and Apexpublic void setUseCompression(boolean value) {this.useCompression = value;setCompressionOnBinding();}/*** This method is used to log in to salesforce and set the* private class variables for the wrapper, including the* session ID.*/public void login() throws UnexpectedErrorFault, InvalidIdFault,LoginFault, RemoteException,ServiceException {resetBindingStub();LoginResult loginResult = binding.login(username, password);this.nextLoginTime = System.currentTimeMillis() +(this.sessionlength * 60000);this.binding._setProperty(SoapBindingStub.ENDPOINT_ADDRESS_PROPERTY,loginResult.getServerUrl());this.sessionId = loginResult.getSessionId();this.serverUrl = loginResult.getServerUrl();}// Create a new session header object and set the// session id to that returned by the loginSessionHeader sh = new SessionHeader();sh.setSessionId(loginResult.getSessionId());this.binding.setHeader(new SforceServiceLocator().getServiceName().getNamespaceURI(),"SessionHeader", sh);private void checkLogin() throws UnexpectedErrorFault,InvalidIdFault, LoginFault, RemoteException,ServiceException {if (this.loginRequired())login();}/*** This method is used to log in with an existing sessionId* @param String sid sessionId* @param String sURL serverUrl*/public void loginBySessionId(String sid, String sURL)throws ServiceException {this.nextLoginTime = System.currentTimeMillis() +(this.sessionlength * 60000);resetBindingStub();binding._setProperty(245
Chapter 7: Integrating Applications with the API and Apex}SoapBindingStub.ENDPOINT_ADDRESS_PROPERTY, sURL);this.sessionId = sid;this.serverUrl = sURL;SessionHeader sh = new SessionHeader();sh.setSessionId(sid);binding.setHeader(new SforceServiceLocator().getServiceName().getNamespaceURI(),"SessionHeader", sh);/** This method resets the binding object back to its* initial state.*/private void resetBindingStub() throws ServiceException {this.binding = (SoapBindingStub) newSforceServiceLocator().getSoap(this.host);this.binding.setTimeout(60000);setCompressionOnBinding();this.assignmentRules = null;this.queryOptions = null;}private void setCompressionOnBinding() {binding._setProperty(HTTPConstants.MC_ACCEPT_GZIP,useCompression);binding._setProperty(HTTPConstants.MC_GZIP_REQUEST,useCompression);}/*** This method checks whether the session is active or not* @return boolean*/public boolean isConnected() {return System.currentTimeMillis() < nextLoginTime;}/*** This method returns true if a login to Salesforce is* necessary, otherwise false. It should be used to check the* session length before performing any API calls.*/private boolean loginRequired() {if (sessionId == null || sessionId.length() == 0)return true;return !isConnected();}private void setBatchSizeHeader(int batchSize) {if (queryOptions == null) {this.queryOptions = new QueryOptions();binding.setHeader(new SforceServiceLocator().getServiceName().getNamespaceURI(),246
Integrating Applications with the API and Apex}"QueryOptions", queryOptions);}queryOptions.setBatchSize(batchSize);/*** This method queries the database and returns the results.* @param String strSOQLStmt* @return SObject[]*/public QueryResult executeQuery(String strSOQLStmt,Integer queryBatchSize)throws UnexpectedErrorFault, InvalidIdFault, LoginFault,RemoteException, ServiceException {}checkLogin();setBatchSizeHeader(queryBatchSize ==null ? querySize : queryBatchSize);return binding.query(strSOQLStmt);public QueryResult executeSOQL(String strSOQLStmt)throws UnexpectedErrorFault, InvalidIdFault, LoginFault,RemoteException, ServiceException {return executeQuery(strSOQLStmt, null);}public QueryResult executeQueryMore(String queryLocator)throws UnexpectedErrorFault, InvalidIdFault, LoginFault,RemoteException, ServiceException {checkLogin();return binding.queryMore(queryLocator);}/*** This method sets the assignment rule header.* @param ruleId*/public void setAssignmentRuleHeaderId(String ruleId) {setAssignmentRuleHeader(ruleId, false);}/*** This method sets the assignment rule header with a* default ruleId.* @param ruleId*/public void setAssignmentRuleHeaderToDefault(boolean runDefaultRule) {setAssignmentRuleHeader(null, runDefaultRule);}private void setAssignmentRuleHeader(String ruleId,247
Chapter 7: Integrating Applications with the API and Apex}boolean useDefault) {if (this.assignmentRules == null) {this.assignmentRules = new AssignmentRuleHeader();binding.setHeader(new SforceServiceLocator().getServiceName().getNamespaceURI(),"AssignmentRuleHeader", this.assignmentRules);}this.assignmentRules.setUseDefaultRule(useDefault);this.assignmentRules.setAssignmentRuleId(ruleId);public SoapBindingStub getBinding()throws UnexpectedErrorFault, InvalidIdFault, LoginFault,RemoteException, ServiceException {checkLogin();return this.binding;}/*** This method creates an array of sObjects with a specified* batchSize.* @param records* @param batchSize* @return SaveResult[]*/public SaveResult[] create(SObject[] records, int batchSize)throws InvalidSObjectFault, UnexpectedErrorFault,InvalidIdFault, RemoteException,ServiceException {if (batchSize > 200 || batchSize < 1)throw new IllegalArgumentException("batchSize must be between 1 and 200");return batch(records, batchSize, new CreateBatcher());}public SaveResult[] create(SObject[] records)throws InvalidSObjectFault, UnexpectedErrorFault,InvalidIdFault, RemoteException, ServiceException {}return create(records, 200);public SaveResult[] update(SObject[] records, int batchSize)throws UnexpectedErrorFault, InvalidIdFault, LoginFault,RemoteException, ServiceException {if (batchSize > 200 || batchSize < 1)throw new IllegalArgumentException("batchSize must be between 1 and 200");}return batch(records, batchSize, new UpdateBatcher());/*** This method updates an array of sObjects with a specified248
Integrating Applications with the API and Apex* batchSize.* @param records* @param batchSize* @return SaveResult[]*/public SaveResult[] update(SObject[] records)throws UnexpectedErrorFault, InvalidIdFault, LoginFault,RemoteException, ServiceException {return update(records, 200);}private SaveResult[] batch(SObject[] records, int batchSize,Batcher batchOperation)throws UnexpectedErrorFault, InvalidIdFault,LoginFault, RemoteException, ServiceException {if (records.length
Chapter 7: Integrating Applications with the API and Apex}}}private class UpdateBatcher extends Batcher {SaveResult [] perform(SObject [] records)throws UnexpectedErrorFault, InvalidIdFault, LoginFault,RemoteException, ServiceException {checkLogin();return binding.update(records);}}This code implements the VB.NET version of the wrapper class used in Building a Web Portalwith Salesforce.<strong>com</strong> Data on page 255:Imports Microsoft.VisualBasicImports SystemImports System.CollectionsImports sforcePublic Class ClientPrivate _binding As SforceServiceCompressedPrivate _username As StringPrivate _password As StringPrivate _host As StringPrivate _querySize As IntegerPrivate _sessionlength As IntegerPrivate _sessionId As StringPrivate _serverURL As StringPrivate _nextLoginTime As DateTime'Initialize private variables for the classSub New()Me._binding = New SforceServiceCompressedMe._querySize = 500Me._sessionlength = 29Me._host = "https://www.salesforce.<strong>com</strong>/services/Soap/u/10.0"End Sub'Expose variables to calling functionPublic Property username() As String'Allows calling class to get valuesGetReturn Me._usernameEnd Get'Allows calling class to set valueSet(ByVal Value As String)Me._username = ValueEnd SetEnd Property250Public Property password() As String
Integrating Applications with the API and ApexGetReturn Me._passwordEnd GetSet(ByVal Value As String)Me._password = ValueEnd SetEnd PropertyPublic Property host() As StringGetReturn Me._hostEnd GetSet(ByVal Value As String)Me._host = ValueEnd SetEnd PropertyPublic ReadOnly Property serverURL() As StringGetReturn Me._serverURLEnd GetEnd PropertyPublic Property querySize() As IntegerGetReturn Me._querySizeEnd GetSet(ByVal Value As Integer)Me._querySize = ValueEnd SetEnd PropertyPublic Property sessionlength() As IntegerGetReturn Me._sessionlengthEnd GetSet(ByVal Value As Integer)Me._sessionlength = ValueEnd SetEnd Property'In case of proxy server...Public Property proxy() As System.Net.WebProxyGetReturn Me._binding.ProxyEnd GetSet(ByVal Value As System.Net.WebProxy)Me._binding.Proxy = ValueEnd SetEnd Property' Compress SOAP messagesPublic Property useCompression() As BooleanGetReturn Me._binding.AcceptCompressedResponse()End Get251
Chapter 7: Integrating Applications with the API and ApexSet(ByVal Value As Boolean)Me._binding.AcceptCompressedResponse = ValueMe._binding.SendCompressedRequest = ValueEnd SetEnd PropertyPublic Sub Login()Dim lr As sforce.LoginResultMe._binding.Url = Me._hostlr = Me._binding.login(username, password)Me._nextLoginTime = Now().AddMinutes(Me.sessionlength)'Reset the SOAP endpoint to the returned server URLMe._binding.Url = lr.serverUrlMe._binding.SessionHeaderValue = New sforce.SessionHeaderMe._binding.SessionHeaderValue.sessionId = lr.sessionIdMe._sessionId = lr.sessionIdMe._serverURL = lr.serverUrlEnd SubPublic Sub loginBySessionId(ByVal sid As String,ByVal sURL As String)Me._nextLoginTime = Now().AddMinutes(Me.sessionlength)Me._binding.Url = sURLMe._binding.SessionHeaderValue = New sforce.SessionHeaderMe._binding.SessionHeaderValue.sessionId = sidMe._sessionId = sidMe._serverURL = sURLEnd SubPublic Function isConnected() As BooleanIf _sessionId "" And _sessionId Nothing ThenIf Now() > Me._nextLoginTime ThenisConnected = FalseEnd IfisConnected = TrueElseisConnected = FalseEnd IfEnd FunctionPrivate Function loginRequired() As BooleanloginRequired = Not (isConnected())End Function252Public Function executeQuery(ByVal strSOQLStmt As String,Optional ByVal queryBatchSize As Integer = -1)As sforce.QueryResultIf queryBatchSize = -1 ThenqueryBatchSize = _querySizeEnd If
Integrating Applications with the API and ApexIf (Me.loginRequired()) ThenLogin()End If_binding.QueryOptionsValue = New sforce.QueryOptions_binding.QueryOptionsValue.batchSizeSpecified = True_binding.QueryOptionsValue.batchSize = queryBatchSizeexecuteQuery = _binding.query(strSOQLStmt)End FunctionPublic Function executeQueryMore(ByVal queryLocator As String)As sforce.QueryResultIf loginRequired() Then Login()Return _binding.queryMore(queryLocator)End FunctionPublic Sub setAssignmentRuleHeaderId(ByVal ruleId As String)_binding.AssignmentRuleHeaderValue =New AssignmentRuleHeader_binding.AssignmentRuleHeaderValue.assignmentRuleId = ruleIdEnd SubPublic Sub setAssignmentRuleHeaderToDefault(ByVal runDefaultRule As Boolean)End Sub_binding.AssignmentRuleHeaderValue = New AssignmentRuleHeader_binding.AssignmentRuleHeaderValue.useDefaultRule =runDefaultRulePublic ReadOnly Property Binding() As sforce.SforceServiceGetReturn _bindingEnd GetEnd PropertyPublic Function create(ByVal records() As sObject,Optional ByVal batchSize As Integer = 200)As sforce.SaveResult()Return batch(records, batchSize, New CreateBatcher)End FunctionPublic Function update(ByVal records() As sObject,Optional ByVal batchSize As Integer = 200)As sforce.SaveResult()Return batch(records, batchSize, New UpdateBatcher)End Function253
Chapter 7: Integrating Applications with the API and Apex254Private Function batch(ByVal records() As sObject,ByVal batchSize As Integer,ByVal oper As Batcher)As sforce.SaveResult()If (records.Length
Integrating Applications with the API and Apexperform = binding.update(records)End FunctionEnd ClassEnd ClassSee Also• Building a Web Portal with Salesforce.<strong>com</strong> Data on page 255• Log In to and Out of the API on page 233• Manage Sessions on page 236• Implementing the query()/queryMore() Pattern on page 238• Batching Records for API Calls on page 239Building a Web Portal with Salesforce.<strong>com</strong> DataProblemYou want to build a Web portal for the Recruiting app that allows visitors to apply online foropen positions. The portal needs to include the following Web pages:• A list view of all currently open positions, with data from the position records that arestored in Salesforce.<strong>com</strong>• Detail views of all currently open positions, also with data from the position records thatare stored in Salesforce.<strong>com</strong>• An online application form that allows a visitor to apply for an open position. When theuser clicks Submit, the data is sent back to Salesforce.<strong>com</strong> as a new job application andcandidate record.Most importantly, your Web portal visitors shouldn't have to log in to view the open positionsin your organization.Note: This Web portal is part of the Application Laboratory class offered bysalesforce.<strong>com</strong> Training & Certification. For more information, seewww.salesforce.<strong>com</strong>/training.255
Chapter 7: Integrating Applications with the API and ApexFigure 22: The Web Portal's Job Listings PageFigure 23: The Web Portal's Position Detail Page256
Integrating Applications with the API and ApexSolutionFigure 24: The Web Portal's Application PageWrite a client application that runs on an external server and uses the API to accessSalesforce.<strong>com</strong> data.Note: Because there's a lot of code involved with this solution, this recipe discusseshow such a client can be designed, and some of the features that can be implemented.To download the <strong>com</strong>plete Java, C#.NET, or VB.NET code that implements thisclient application, visit developer.force.<strong>com</strong>/books/cookbook.The following diagram shows the key <strong>com</strong>ponents of such an application. While there can besome overlap, each <strong>com</strong>ponent represents a different aspect of the MVC(Model-View-Controller) design paradigm:257
Chapter 7: Integrating Applications with the API and ApexFigure 25: Typical Client Application ArchitectureModelViewControllerThe API wrapper class and the WSDL-<strong>com</strong>piled proxy classes providenon-application-specific access to the data in Salesforce.<strong>com</strong>. For thewrapper class used to implement the Web portal application, see Using aWrapper Class for Common API Functions on page 242.The JSP or ASPX pages contain the user interface of the application,including how the data is displayed for and captured from the user.The delegator, utility, and business logic classes define theapplication-specific logic, including the logic that controls how captureddata is returned to Salesforce.<strong>com</strong> as new or updated records.258
Integrating Applications with the API and ApexOf particular note is the delegator class that the Web portal application uses to provide <strong>com</strong>mon,reusable code for creating and updating the key objects related to the application, such as JobApplication and Candidate. Unlike the API wrapper class, which can be reused by manydifferent client applications, the delegator is application-specific, providing an additional layerof abstraction between the API and the logic required to display the application's pages.For example, the following Java-based delegator method provides the logic for creating a jobapplication record. Based on the partner WSDL, it prepares a single record and passes it tothe wrapper class for creation via the API:public SObject createJobApp(String candidateId,String positionId) {SObject application = new SObject();try {MessageElement[] fields = new MessageElement[3];MessageElement field;//Candidate idfield = util.createNewXmlElement("Candidate__c",candidateId);fields[0] = field;//Positionidfield = util.createNewXmlElement("Position__c",positionId);fields[1] = field;//Statusfield = util.createNewXmlElement("Status__c","New");fields[2] = field;application.set_any(fields);application.setType("Job_Application__c");application = createOneRecord(application);} catch (Exception e) {System.out.println(e.getMessage());}}return application;This same logic can be implemented in VB.NET as follows:Public Function createJobApp(ByVal candidateId As String,ByVal positionId As String) As sforce.sObjectDim application As New sforce.sObjectDim fields(2) As System.Xml.XmlElementDim field As System.Xml.XmlElement259
Chapter 7: Integrating Applications with the API and Apex' Candidate idfield = util.createNewXmlElement("Candidate__c",candidateId)fields(0) = field' Position idfield = util.createNewXmlElement("Position__c",positionId)fields(1) = field' Statusfield = util.createNewXmlElement("Status__c","New")fields(2) = fieldapplication.Any = fieldsapplication.type = "Job_Application__c"application = createOneRecord(application)Return applicationEnd Function260DiscussionThe code that implements this Web portal client application also uses a configuration file andSOAP message <strong>com</strong>pression, two best practices for client application development:• Using a configuration file to control dynamic aspects of a client application is highlyre<strong>com</strong>mended because it reduces code maintenance time. It can include properties such asthe API URL, username, password, and any SOQL or SOSL queries that drive businesslogic. For example, by storing the URL of the targeted Salesforce.<strong>com</strong> host in a configurationfile, changing an integration target from sandbox to production only requires a simpleconfiguration file edit.The Java-based solution uses a configuration file named config.properties, while theVB.NET and C#.NET solutions use configuration files named web.config.• SOAP messages generated by both an API client and the API service can be<strong>com</strong>e verylarge, especially when they include large clobs of data, such as the resume attachment inthe Web portal client application. To avoid lengthy transmission times across the Internet,you can configure your SOAP binding to use GZIP <strong>com</strong>pression to reduce the size ofSOAP messages by up to 90%. When the API server receives a <strong>com</strong>pressed message, itde<strong>com</strong>presses the message, processes it, and then re<strong>com</strong>presses the response before returningit.The Java-based solution uses the following classes to <strong>com</strong>press and de<strong>com</strong>press SOAPmessages:- GZipWebRequest.java
Integrating Applications with the API and Apex- GZipWebResponse.java- GZIP2WayRequestStream.java- GZIP2WayRequestWrapper.java- GZIP2WayResponseStream.java- GZIP2WayResponseWrapper.javaThe VB.NET and C#.NET solutions use these classes:- GZipWebRequest.vb/GZipWebRequest.cs- GZipWebResponse.vb/GZipWebResponse.cs- SforceServiceCompressed.vb/SforceServiceCompressed.csFor information about SOAP <strong>com</strong>pression in Java, seehttp://wiki.developerforce.<strong>com</strong>/index.php/Compression_with_Axis_1.3.For information about SOAP <strong>com</strong>pression in VB.NET and C#.NET, seehttp://wiki.developerforce.<strong>com</strong>/index.php/SOAP_Compression.See Also• Log In to and Out of the API on page 233• Manage Sessions on page 236• Implementing the query()/queryMore() Pattern on page 238• Batching Records for API Calls on page 239Add and Remove Tags on a Single RecordProblemYou want to remove a public tag that is no longer applicable and add a new public tag for anexisting record.SolutionTo add or remove a tag on a single record, you should first query the record to determine whichtags are already present, before continuing with the create() and delete() operations.1. To see the tags on a single contact, for example a contact named John Smith, executethe following in the AJAX Toolkit or your own client application:var johnSmithTags = sforce.connection.query("SELECT Name, Id, ItemId " +"FROM ContactTag " +"WHERE Item.LastName = \'Smith\' " +"AND Item.FirstName = \'John\'");261
Chapter 7: Integrating Applications with the API and ApexjohnSmithTags contains the following tag names:• Northwest• StaffJohn Smith has been promoted from Staff to Senior Staff, a tag that does not yetexist.2. To create the new Senior Staff tag, execute the following in the AJAX Toolkit oryour own client application:var SeniorStaffTag = new sforce.SObject('ContactTag');SeniorStaffTag.ItemId = johnSmithResults.records[0].Id;SeniorStaffTag.Name = "Senior Staff";SeniorStaffTag.Type = "Public";sforce.connection.create([SeniorStaffTag]);3. Run the query in the first step again. johnSmithTags contains the following tagnames:• Northwest• Senior Staff• Staff4. The Staff position is eliminated. To remove the Staff tag, delete its ID:var staffID = sforce.connection.query("SELECT Id FROM ContactTag " +"WHERE Name = 'Staff' AND ItemId = '" +"johnSmithTags.records[0].ItemId + "'");sforce.connection.deleteIds([staffID.records.Id]);5. Run the query in the first step again. johnSmithTags contains the following tagnames:• Northwest• Senior Staff262DiscussionQuery to ensure that records have been tagged appropriately.The API enforces the same limits as the Salesforce.<strong>com</strong> user interface on the number of tagsthat you can create.Across all users, an organization is limited to:• 1,000 unique public tags• 50,000 instances of public tags applied to records
Integrating Applications with the API and Apex• 5,000,000 instances of personal and public tags applied to recordsSee Also• Viewing Tags on page 37• Viewing Records with Tags on page 38• “Tagging Limits” in the Salesforce.<strong>com</strong> Online Help• “TagDefinition” in the <strong>Force</strong>.<strong>com</strong> Web Services API Developer's Guide atwww.salesforce.<strong>com</strong>/us/developer/docs/api/Content/sforce_api_objects_tagdefinition.htm• “create()” in the <strong>Force</strong>.<strong>com</strong> Web Services API Developer's Guide atwww.salesforce.<strong>com</strong>/us/developer/docs/api/index_CSH.htm#sforce_api_calls_create.htm• “delete()” in the <strong>Force</strong>.<strong>com</strong> Web Services API Developer's Guide atwww.salesforce.<strong>com</strong>/us/developer/docs/api/index_CSH.htm#sforce_api_calls_delete.htm• The AJAX Toolkit Developer's Guide atwww.salesforce.<strong>com</strong>/us/developer/docs/ajax/index.htmAdd and Remove Tags on Multiple RecordsProblemYou want to remove public tags that are no longer applicable to multiple records of the sameobject type and replace them with a different tag.SolutionTo work with multiple records, loop through all records with a particular tag, collect theirItemIds, and edit them on an individual basis.Suppose that all Northwest and Southwest tags need to be consolidated to a single West Coasttag. To remove the tags and replace them:1. Store the accounts that contain the tags you want to delete. You can execute thefollowing in the AJAX Toolkit or your own client application:var westCoastAccounts = sforce.connection.query("SELECT ItemId, Id " +"FROM AccountTag WHERE " +"Name = 'Northwest' OR Name = 'Southwest'");2. Create the new West Coast tag. Add the ItemIds by looping through the records:var WestCoastTagArray = new Array();for (var i = 0; i < westCoastAccounts.size; i++){WestCoastTagArray[i] = new sforce.SObject('AccountTag');263
Chapter 7: Integrating Applications with the API and ApexWestCoastTagArray[i].Name = "West Coast";WestCoastTagArray[i].Type = "Public";WestCoastTagArray[i].ItemId =westCoastAccounts.records[i].ItemId;}sforce.connection.create(WestCoastTagArray);3. Delete all instances of the Northwest and Southwest tags:var IdsToDelete = new Array();for (var k = 0; k < westCoastAccounts.size; k++){IdsToDelete[k] = westCoastAccounts.records[k].Id;}sforce.connection.deleteIds(IdsToDelete);DiscussionMake as few calls to Salesforce.<strong>com</strong> as possible for the best performance. It is efficient to createa single array, populate it with a for loop, and call a single operation, such as create() ordelete(), on that array.The API enforces the same limits as the Salesforce.<strong>com</strong> user interface on the number of tagsthat you can create.Across all users, an organization is limited to:• 1,000 unique public tags• 50,000 instances of public tags applied to records• 5,000,000 instances of personal and public tags applied to recordsSee Also• Viewing Tags on page 37• Viewing Records with Tags on page 38• “TagDefinition” in the <strong>Force</strong>.<strong>com</strong> Web Services API Developer's Guide atwww.salesforce.<strong>com</strong>/us/developer/docs/api/index_CSH.htm#sforce_api_objects_tagdefinition.htm• “create()” in the <strong>Force</strong>.<strong>com</strong> Web Services API Developer's Guide atwww.salesforce.<strong>com</strong>/us/developer/docs/api/index_CSH.htm#sforce_api_calls_create.htm• “delete()” in the <strong>Force</strong>.<strong>com</strong> Web Services API Developer's Guide atwww.salesforce.<strong>com</strong>/us/developer/docs/api/index_CSH.htm#sforce_api_calls_delete.htm264
Integrating Applications with the API and ApexUpdating Tag DefinitionsProblemYou want to correct some public tags that have misspellings in them and remove some thatare no longer useful in your application.SolutionRun a query to determine the ID of the incorrect tag, then rename it. For example, supposeyou see that a user has created a tag called WC. You want to retrieve the ID of this tag to seewhich records it is applied to. You can execute the following in the AJAX Toolkit or your ownclient application:To udpate the tag definition:1. Query for all the tags with the name WC.var IDToUpdate = sforce.connection.query("SELECT Id FROMTagDefinition " +"WHERE Name = 'WC'");2. The name WC should be West Coast. Since this change affects multiple recordtypes, create a new TagDefinition record with the correct value.var updateTD = new sforce.SObject('TagDefinition');updateTD.Id = IDToUpdate.records.Id;IDToUpdate.records.Name = "West Coast";3. updateTD is used to replace the previous TagDefinition record. The final stepis to call update() using the corrected record.sforce.connection.update([updateTD]);Since we essentially overwrote the ID, every record previously tagged with WC willnow be tagged as West Coast.DiscussionOperating on TagDefinition records does not take into consideration the types of any childtags. Ensure that the action you want to perform is appropriate for all types of tags. For instance,an AccountTag named WC and an ContactTag named WC will both be changed to WestCoast. For information on changing tags on multiple records, see Add and Remove Tags onMultiple Records on page 263.265
Chapter 7: Integrating Applications with the API and ApexSee Also• Viewing Tags on page 37• Viewing Records with Tags on page 38• “TagDefinition” in the <strong>Force</strong>.<strong>com</strong> Web Services API Developer's Guide atwww.salesforce.<strong>com</strong>/us/developer/docs/api/Content/sforce_api_objects_tagdefinition.htm• “update()” in the <strong>Force</strong>.<strong>com</strong> Web Services API Developer's Guide atwww.salesforce.<strong>com</strong>/us/developer/docs/api/index_CSH.htm#sforce_api_calls_update.htm266
<strong>Force</strong>.<strong>com</strong> Platform GlossaryA | B | C | D | E | F | G | H | I | J | K | L | M | N | O | P | Q | R | S | T | U| V | W | X | Y | ZThis glossary defines terms that appear throughout the <strong>Force</strong>.<strong>com</strong> platform documentationsuite.AActivity (Calendar Events/Tasks)Planned task or event, optionally related to another type of record suchas an account, contact, lead, opportunity, or case.Activity HistoryThe Activity History related list of a record displays all <strong>com</strong>pleted tasks,logged phone calls, expired events, outbound email, mass email, emailadded from Microsoft Outlook ® , and merged documents for the recordand its associated records.Administrator (System Administrator)One or more individuals in your organization who can configure andcustomize the application. Users assigned to the System Administratorprofile have administrator privileges.Advanced FunctionA formula function designed for use in custom buttons, links, ands-controls. For example, the INCLUDE advanced function returns thecontent from an s-control snippet.AJAX ToolkitA JavaScript wrapper around the API that allows you to execute any APIcall and access any object you have permission to view from withinJavaScript code. For more information, see the AJAX Toolkit Developer'sGuide.Analytic SnapshotAn analytic snapshot enables users to run a tabular or summary report andsave the report results to fields on a custom object. With analytic snapshots,users with the appropriate permissions can map fields from a source reportto the fields on a target object, and schedule when to run the report toload the custom object's fields with the report's data.267
Chapter 9: <strong>Force</strong>.<strong>com</strong> Platform GlossaryAnalytic Snapshot Running UserThe user whose security settings determine the source report's level ofaccess to data. This bypasses all security settings, giving all users who canview the results of the source report in the target object access to data theymight not be able to see otherwise.Analytic Snapshot Source ReportThe custom report scheduled to run and load data as records into a customobject.Analytic Snapshot Target ObjectThe custom object that receives the results of the source report as records.Anonymous Block, ApexAn Apex script that does not get stored in Salesforce.<strong>com</strong>, but that canbe <strong>com</strong>piled and executed through the use of theExecuteAnonymousResult() API call, or the equivalent in the AJAXToolkit.Anti-JoinAn anti-join is a subquery on another object in a NOT IN clause in aSOQL query. You can use anti-joins to create advanced queries, such asgetting all accounts that do not have any open opportunities. See alsoSemi-Join.Apex<strong>Force</strong>.<strong>com</strong> Apex code is a strongly-typed, object-oriented programminglanguage that allows developers to execute flow and transaction controlstatements on the <strong>Force</strong>.<strong>com</strong> platform server in conjunction with calls tothe <strong>Force</strong>.<strong>com</strong> API. Using syntax that looks like Java and acts like databasestored procedures, Apex code enables developers to add business logic tomost system events, including button clicks, related record updates, andVisualforce pages. Apex scripts can be initiated by Web service requestsand from triggers on objects.Apex ControllerSee Controller, Visualforce.Apex-Managed SharingEnables developers to programmatically manipulate sharing to supporttheir application’s behavior. Apex-managed sharing is only available forcustom objects.Apex PageSee Visualforce Page.API VersionSee Version.268
<strong>Force</strong>.<strong>com</strong> Platform GlossaryAppShort for “application.” A collection of <strong>com</strong>ponents such as tabs, reports,dashboards, and Visualforce pages that address a specific business need.Salesforce.<strong>com</strong> provides standard apps such as Sales and Call Center. Youcan customize the standard apps to match the way you work. In addition,you can package an app and upload it to AppExchange along with related<strong>com</strong>ponents such as custom fields, custom tabs, and custom objects.Then,you can make the app available to other Salesforce.<strong>com</strong> users fromAppExchange.App MenuSee <strong>Force</strong>.<strong>com</strong> App Menu.AppExchangeAppExchange is a sharing interface from salesforce.<strong>com</strong> that allows youto browse and share apps and services for the <strong>Force</strong>.<strong>com</strong> platform.AppExchange UpgradesUpgrading an app is the process of installing a newer version.Application Lifecycle Management (ALM)The process of managing an application's lifecycle, from planning, todevelopment, to integration and support. Application lifecycle managementis often depicted as a circle, because the cycle repeats itself as theapplication evolves.Application Programming Interface (API)The interface that a <strong>com</strong>puter system, library, or application provides inorder to allow other <strong>com</strong>puter programs to request services from it andexchange data between them.Approval ActionSee Workflow and Approval Actions.Approval ProcessAn automated process your organization can use to approve records inSalesforce.<strong>com</strong>. An approval process specifies the steps necessary for arecord to be approved and who must approve it at each step. A step canapply to all records included in the process, or just records that have certainattributes. An approval process also specifies the actions to take when arecord is approved, rejected, recalled, or first submitted for approval.Asynchronous CallsA call that does not return results immediately because the operation maytake a long time. Calls in the Metadata API and Bulk API areasynchronous.269
Chapter 9: <strong>Force</strong>.<strong>com</strong> Platform GlossaryAuto NumberA custom field type that automatically adds a unique sequential numberto each record. These fields are read only.BCBatch ApexThe ability to perform long, <strong>com</strong>plex operations on many records at ascheduled time using Apex.Batch, Bulk APIA batch is a CSV or XML representation of a set of records in the BulkAPI. You process a set of records by creating a job that contains one ormore batches. Each batch is processed independently by the server, notnecessarily in the order it is received. See Job, Bulk API.Beta, Managed PackageIn the context of managed packages, a beta managed package is an earlyversion of a managed package distributed to a sampling of your intendedaudience to test it.Boolean OperatorsYou can use Boolean operators in report filters to specify the logicalrelationship between two values. For example, the AND operator betweentwo values yields search results that include both values. Likewise, the ORoperator between two values yields search results that include either value.Bulk APIThe REST-based Bulk API is optimized for processing large sets of data.It allows you to insert, update, upsert, or delete a large number of recordsasynchronously by submitting a number of batches which are processedin the background by Salesforce.<strong>com</strong>.Cascading Style Sheet (CSS)Files that contain all of the information relevant to color, font, borders,and images that are displayed in a user interface.Child RelationshipA relationship that has been defined on an sObject that references anothersObject as the “one” side of a one-to-many relationship. For example,contacts, opportunities, and tasks have child relationships with accounts.See also sObject.Class, ApexA template or blueprint from which Apex objects are created. Classesconsist of other classes, user-defined methods, variables, exception types,270
<strong>Force</strong>.<strong>com</strong> Platform Glossaryand static initialization code. In most cases, Apex classes are modeled ontheir counterparts in Java.Client AppAn app that runs outside the Salesforce.<strong>com</strong> user interface and uses onlythe <strong>Force</strong>.<strong>com</strong> API or Bulk API. It typically runs on a desktop or mobiledevice. These apps treat the platform as a data source, using thedevelopment model of whatever tool and platform for which they aredesigned. See also Composite App and Native App.CloneClone is the name of a button or link that allows you to create a new itemby copying the information from an existing item, for example, a contactor opportunity.Cloud ComputingA virtual development and deployment environment that eliminates theneed for <strong>com</strong>puting hardware and software infrastructure and <strong>com</strong>ponents.Developers and users connect to this environment through a Web browser.Code CoverageA way to identify which lines of code are exercised by a set of unit tests,and which are not. This helps you identify sections of code that are<strong>com</strong>pletely untested and therefore at greatest risk of containing a bug orintroducing a regression in the future.Collapsible SectionSections on detail pages that users can hide or show.Combination ChartA <strong>com</strong>bination chart plots multiple sets of data on a single chart. Eachset of data is based on a different field, so values are easy to <strong>com</strong>pare. Youcan also <strong>com</strong>bine certain chart types to present data in different ways ona single chart.Component, MetadataA <strong>com</strong>ponent is an instance of a metadata type in the Metadata API. Forexample, CustomObject is a metadata type for custom objects, and theMyCustomObject__c <strong>com</strong>ponent is an instance of a custom object. A<strong>com</strong>ponent is described in an XML file and it can be deployed or retrievedusing the Metadata API, or tools built on top of it, such as the <strong>Force</strong>.<strong>com</strong>IDE or the <strong>Force</strong>.<strong>com</strong> Migration Tool.Component, VisualforceSomething that can be added to a Visualforce page with a set of tags, forexample, . Visualforce includes a number of standard<strong>com</strong>ponents, or you can create your own custom <strong>com</strong>ponents.271
Chapter 9: <strong>Force</strong>.<strong>com</strong> Platform GlossaryComponent Reference, VisualforceA description of the standard and custom Visualforce <strong>com</strong>ponents thatare available in your organization. You can access the <strong>com</strong>ponent libraryfrom the development footer of any Visualforce page or the VisualforceDeveloper's Guide.Composite AppAn app that <strong>com</strong>bines native platform functionality with one or moreexternal Web services, such as Yahoo! Maps. Composite apps allow formore flexibility and integration with other services, but may requirerunning and managing external code. See also Client App and NativeApp.Connect for Lotus Notes<strong>Force</strong>.<strong>com</strong> Connect for Lotus Notes is an add-in for IBM ® Lotus Notes ®that adds new <strong>com</strong>mands to the Lotus Notes user interface that let youinteract with Salesforce.<strong>com</strong>.Connect for OfficeProduct that allows you to integrate Salesforce.<strong>com</strong> with Microsoft ® Wordand Excel.Connect for Outlook<strong>Force</strong>.<strong>com</strong> Connect for Microsoft Outlook is an add-in for MicrosoftOutlook that allows you to interact with Salesforce.<strong>com</strong> conveniently fromOutlook. Connect for Outlook adds buttons and options to your Outlookuser interface.Connect OfflineProduct that allows salespeople to use Salesforce.<strong>com</strong> to update their dataremotely, anywhere, anytime—totally unplugged.ConsoleA page that <strong>com</strong>bines related records into one screen with different framesso that users can view and edit information all in one place.Console LayoutObjects chosen by an administrator to display in the list view frame of theconsole. For example, if an administrator adds cases to a console layout,then users whose profiles are assigned to that console layout can see listviews of cases in the console's list view frame.Controller, VisualforceAn Apex class that provides a Visualforce page with the data and businesslogic it needs to run. Visualforce pages can use the standard controllersthat <strong>com</strong>e by default with every standard or custom object, or they canuse custom controllers.272
<strong>Force</strong>.<strong>com</strong> Platform GlossaryController ExtensionA controller extension is an Apex class that extends the functionality of astandard or custom controller.Controlling FieldAny standard or custom picklist or checkbox field whose values controlthe available values in one or more corresponding dependent fields.CookieClient-specific data used by some Web applications to store user andsession-specific information. Salesforce.<strong>com</strong> issues a session “cookie” onlyto record encrypted authentication information for the duration of a specificsession.CSV (Comma Separated Values)A file format that enables the sharing and transportation of structureddata. The import wizards, Data Loader and the Bulk API support CSV.Each line in a CSV file represents a record. A <strong>com</strong>ma separates each fieldvalue in the record.Custom AppSee App.Custom ControllerA custom controller is an Apex class that implements all of the logic fora page without leveraging a standard controller. Use custom controllerswhen you want your Visualforce page to run entirely in system mode,which does not enforce the profile-based permissions and field-levelsecurity of the current user.Custom FieldA field that can be added in addition to the standard fields to customizeSalesforce.<strong>com</strong> for your organization’s needs.Custom HelpCustom text administrators create to provide users with on-screeninformation specific to a standard field, custom field, or custom object.Custom LinksCustom URLs defined by administrators to integrate your Salesforce.<strong>com</strong>data with external websites and back-office systems. Formerly known asWeb links.Custom ObjectCustom records that allow you to store information unique to yourorganization.Custom Report TypeA selection in the Report Wizard that allows you to define the reportcriteria from which users can run and create custom reports. For example,273
Chapter 9: <strong>Force</strong>.<strong>com</strong> Platform Glossaryyou may want users to run and customize reports based on accounts withor without opportunities. With custom report types, you can enable usersto create reports from predefined standard and custom objects, objectrelationships, and standard and custom fields that you specify..Custom SettingsCustom settings are similar to custom objects and enable applicationdevelopers to create custom sets of data, as well as create and associatecustom data for an organization, profile, or specific user. All customsettings data is exposed in the application cache, which enables efficientaccess without the cost of repeated queries to the database. This data canthen be used by formula fields, validation rules, Apex, and the <strong>Force</strong>.<strong>com</strong>Web Services API.See also Hierarchy Custom Settings and List Custom Settings.Custom S-ControlCustom Web content for use in custom links. Custom s-controls cancontain any type of content that you can display in a browser, for examplea Java applet, an Active-X control, an Excel file, or a custom HTML Webform.Custom ViewA display feature that lets you see a specific set of records for a particularobject.DDashboardA visual representation of your custom report data. You can create severaldashboard <strong>com</strong>ponents within a dashboard to give you a real-time snapshotof corporate metrics and key performance indicators.DatabaseAn organized collection of information. The underlying architecture ofthe <strong>Force</strong>.<strong>com</strong> platform includes a database where your data is stored.Database TableA list of information, presented with rows and columns, about the person,thing, or concept you want to track. See also Object.Data LoaderA <strong>Force</strong>.<strong>com</strong> platform tool used to import and export data from yourSalesforce.<strong>com</strong> organization.Data Manipulation Language (DML)An Apex method or operation that inserts, updates, or deletes recordsfrom the <strong>Force</strong>.<strong>com</strong> platform database.274
<strong>Force</strong>.<strong>com</strong> Platform GlossaryData StateThe structure of data in an object at a particular point in time.Date LiteralA keyword in a SOQL or SOSL query that represents a relative range oftime such as last month or next year.Decimal PlacesParameter for number, currency, and percent custom fields that indicatesthe total number of digits you can enter to the right of a decimal point,for example, 4.98 for an entry of 2. Note that the system rounds thedecimal numbers you enter, if necessary. For example, if you enter 4.986in a field with Decimal Places of 2, the number rounds to 4.99.Delegated AdministrationA security model in which a group of non-administrator users performadministrative tasks.Delegated AuthenticationA security process where an external authority is used to authenticate<strong>Force</strong>.<strong>com</strong> platform users.DependencyA relationship where one object's existence depends on that of another.There are a number of different kinds of dependencies including mandatoryfields, dependent objects (parent-child), file inclusion (referenced images,for example), and ordering dependencies (when one object must bedeployed before another object).Dependent FieldAny custom picklist or multi-select picklist field that displays availablevalues based on the value selected in its corresponding controlling field.DeployTo move functionality from an inactive state to active. For example, whendeveloping new features in the Salesforce.<strong>com</strong> user interface, you mustselect the “Deployed” option to make the functionality visible to otherusers.The process by which an application or other functionality is moved fromdevelopment to production.To move metadata <strong>com</strong>ponents from a local file system to a Salesforce.<strong>com</strong>organization.For installed apps, deployment makes any custom objects in the appavailable to users in your organization. Before a custom object is deployed,it is only available to administrators and any users with the “CustomizeApplication” permission.275
Chapter 9: <strong>Force</strong>.<strong>com</strong> Platform GlossaryDetailA page that displays information about a single object record. The detailpage of a record allows you to view the information, whereas the edit pageallows you to modify it.A term used in reports to distinguish between summary information andinclusion of all column data for all information in a report. You can togglethe Show Details/Hide Details button to view and hide report detailinformation.Developer EditionA free, fully-functional Salesforce.<strong>com</strong> organization designed for developersto extend, integrate, and develop with the <strong>Force</strong>.<strong>com</strong> platform. DeveloperEdition accounts are available on developer.force.<strong>com</strong>.Developer <strong>Force</strong>The Developer <strong>Force</strong> website at developer.force.<strong>com</strong> provides a full rangeof resources for platform developers, including sample code, toolkits, anonline developer <strong>com</strong>munity, and the ability to obtain limited <strong>Force</strong>.<strong>com</strong>platform environments.Development as a Service (DaaS)An application development model where all development is on the Web.This means that source code, <strong>com</strong>pilation, and development environmentsare not on local machines, but are Web-based services.Development EnvironmentA Salesforce.<strong>com</strong> organization where you can make configuration changesthat will not affect users on the production organization. There are twokinds of development environments, sandboxes and Developer Editionorganizations.Document LibraryA place to store documents without attaching them to accounts, contacts,opportunities, or other records.EEmail AlertEmail alerts are workflow and approval actions that are generated usingan email template by a workflow rule or approval process and sent todesignated recipients, either Salesforce.<strong>com</strong> users or others.Email TemplateA form email that <strong>com</strong>municates a standard message, such as a wel<strong>com</strong>eletter to new employees or an acknowledgement that a customer servicerequest has been received. Email templates can be personalized with mergefields, and can be written in text, HTML, or custom format.276
<strong>Force</strong>.<strong>com</strong> Platform GlossaryEnterprise ApplicationAn application that is designed to support functionality for an organizationas a whole, rather than solving a specific problem.Enterprise EditionA Salesforce.<strong>com</strong> edition designed for larger, more <strong>com</strong>plex businesses.Enterprise WSDLA strongly-typed WSDL for customers who want to build an integrationwith their Salesforce.<strong>com</strong> organization only, or for partners who are usingtools like Tibco or webMethods to build integrations that require strongtypecasting. The downside of the Enterprise WSDL is that it only workswith the schema of a single Salesforce.<strong>com</strong> organization because it is boundto all of the unique objects and fields that exist in that organization's datamodel.Entity Relationship Diagram (ERD)A data modeling tool that helps you organize your data into entities (orobjects, as they are called in the <strong>Force</strong>.<strong>com</strong> platform) and define therelationships between them. ERD diagrams for key Salesforce.<strong>com</strong> objectsare published in the <strong>Force</strong>.<strong>com</strong> Web Services API Developer's Guide.Enumeration FieldAn enumeration is the WSDL equivalent of a picklist field. The validvalues of the field are restricted to a strict set of possible values, all havingthe same data type.EventAn event is an activity that has a scheduled time. For example, a meeting,or a scheduled phone call.FFacetA child of another Visualforce <strong>com</strong>ponent that allows you to override anarea of the rendered parent with the contents of the facet.FieldA part of an object that holds a specific piece of information, such as atext or currency value.Field-Level SecuritySettings that determine whether fields are hidden, visible, read only, oreditable for users based on their profiles. Available in Enterprise,Unlimited, and Developer Editions only.Field DependencyA filter that allows you to change the contents of a picklist based on thevalue of another field.277
Chapter 9: <strong>Force</strong>.<strong>com</strong> Platform GlossaryField UpdateField updates are workflow and approval actions that specify the field youwant updated and the new value for it. Depending on the type of field,you can choose to apply a specific value, make the value blank, or calculatea value based on a formula you create.Filter Condition/CriteriaCondition on particular fields that qualifies items to be included in a listview or report, such as “State equals California.”Flex Toolkit for <strong>Force</strong>.<strong>com</strong>An Adobe ® Flex library that allows you to access Salesforce.<strong>com</strong> datafrom within a Flex 2 application.FolderA central place to store documents, email templates, and reports. Foldersare available for all organizations. Report and document folders are notavailable in Personal Edition.<strong>Force</strong>.<strong>com</strong>The salesforce.<strong>com</strong> platform for building applications in the cloud.<strong>Force</strong>.<strong>com</strong> <strong>com</strong>bines a powerful user interface, operating system, anddatabase to allow you to customize and deploy applications in the cloudfor your entire enterprise.<strong>Force</strong>.<strong>com</strong> App MenuA menu that enables users to switch between customizable applications(or “apps”) with a single click. The <strong>Force</strong>.<strong>com</strong> app menu displays at thetop of every page in the user interface.<strong>Force</strong>.<strong>com</strong> BuilderThe App Setup area of the Salesforce.<strong>com</strong> setup menu.<strong>Force</strong>.<strong>com</strong> IDEAn Eclipse plug-in that allows developers to manage, author, debug anddeploy <strong>Force</strong>.<strong>com</strong> applications in the Eclipse development environment.<strong>Force</strong>.<strong>com</strong> Migration ToolA toolkit that allows you to write an Apache Ant build script for migrating<strong>Force</strong>.<strong>com</strong> <strong>com</strong>ponents between a local file system and a Salesforce.<strong>com</strong>organization.<strong>Force</strong>.<strong>com</strong> Web Services APIA Web services-based application programming interface that providesaccess to your Salesforce.<strong>com</strong> organization's information.Foreign keyA field whose value is the same as the primary key of another table. Youcan think of a foreign key as a copy of a primary key from another table.278
<strong>Force</strong>.<strong>com</strong> Platform GlossaryA relationship is made between two tables by matching the values of theforeign key in one table with the values of the primary key in another.Formula FieldA type of custom field. Formula fields automatically calculate their valuesbased on the values of merge fields, expressions, or other values.FunctionBuilt-in formulas that you can customize with input parameters. Forexample, the DATE function creates a date field type from a given year,month, and day.GGet RequestA get request is made when a user initially requests a Visualforce page,either by entering a URL or clicking a link or button.Getter MethodsMethods that enable developers to display database and other <strong>com</strong>putedvalues in page markup.Methods that return values. See also Setter Methods.Global VariableA special merge field that you can use to reference data in yourorganization.A method access modifier for any method that needs to be referencedoutside of the application, either in the <strong>Force</strong>.<strong>com</strong> Web Services API orby other Apex scripts.Governor limitsApex execution limits that prevent developers who write inefficient codefrom monopolizing the resources of other Salesforce.<strong>com</strong> users.Gregorian YearA calendar based on a twelve month structure used throughout much ofthe world.GroupA groups is a set of users. Groups can contain individual users, othergroups, or the users in a role. Groups can be used to help define sharingaccess to data or to specify which data to synchronize when using Connectfor Outlook or Connect for Lotus Notes.Users can define their own personal groups. Administrators can createpublic groups for use by everyone in the organization.Group EditionA product designed for small businesses and workgroups with a limitednumber of users.279
Chapter 9: <strong>Force</strong>.<strong>com</strong> Platform GlossaryHIHierarchy Custom SettingsA type of custom setting that uses a built-in hierarchical logic that letsyou “personalize” settings for specific profiles or users.The hierarchy logicchecks the organization, profile, and user settings for the current user andreturns the most specific, or “lowest,” value. In the hierarchy, settings foran organization are overridden by profile settings, which, in turn, areoverridden by user settings.Home OrganizationThe organization used for retrieving <strong>com</strong>ponents to a local file system. Ifusing the <strong>Force</strong>.<strong>com</strong> IDE, the home organization is the organization usedto create a project. If using the <strong>Force</strong>.<strong>com</strong> Migration Tool, the homeorganization is the server you specify in build.properties when youretrieve <strong>com</strong>ponents.Home TabStarting page from which users can choose sidebar shortcuts and options,view current tasks and activities, or select another tab.Hover DetailHover details display an interactive overlay containing detailed informationabout a record when users hover the mouse over a link to that record inthe Recent Items list on the sidebar or in a lookup field on a record detailpage. Users can quickly view information about a record before clickingView for the record's detail page or Edit for the edit page. The fieldsdisplayed in the hover details are determined by the record's mini pagelayout. The fields that display in document hover details are notcustomizable.HTML S-ControlAn s-control that contains the actual HTML that should be rendered ona page. When saved this way, the HTML is ultimately hosted on aplatform server, but is executed in an end-user's browser.HTTP DebuggerAn application that can be used to identify and inspect SOAP requeststhat are sent from the AJAX Toolkit.They behave as proxy servers runningon your local machine and allow you to inspect and author individualrequests.IDSee Salesforce.<strong>com</strong> Record ID.280
<strong>Force</strong>.<strong>com</strong> Platform GlossaryIdeaExchangeA forum where salesforce.<strong>com</strong> customers can suggest new productconcepts, promote favorite enhancements, interact with product managersand other customers, and preview what salesforce.<strong>com</strong> is planning todeliver in future releases. Visit IdeaExchange at ideas.salesforce.<strong>com</strong>.Integrated Development Environment (IDE)A software application that provides <strong>com</strong>prehensive facilities for softwaredevelopers including a source code editor, testing and debugging tools,and integration with source code control systems.Immediate ActionA workflow action that executes instantly when the conditions of aworkflow rule are met.Import WizardA tool for importing data into your Salesforce.<strong>com</strong> organization, accessiblefrom Setup.Inline S-ControlAn s-control that displays within a record detail page or dashboard, ratherthan on its own page.InstanceThe cluster of software and hardware represented as a single logical serverthat hosts an organization's data and runs their applications. The<strong>Force</strong>.<strong>com</strong> platform runs on multiple instances, but data for any singleorganization is always consolidated on a single instance.Integration TestingAn intermediate phase of software testing in which individual projects are<strong>com</strong>bined and tested as a group. Integration testing follows unit testingand precedes system testing.Integration UserA Salesforce.<strong>com</strong> user defined solely for client apps or integrations. Alsoreferred to as the logged-in user in a <strong>Force</strong>.<strong>com</strong> Web Services API context.ISO CodeThe International Organization for Standardization country code, whichrepresents each country by two letters.JJob, Bulk APIA job in the Bulk API specifies which object is being processed (forexample, Account, Opportunity) and what type of action is being used(insert, upsert, update, or delete). You process a set of records by creatinga job that contains one or more batches. See Batch, Bulk API.281
Chapter 9: <strong>Force</strong>.<strong>com</strong> Platform GlossaryKJunction ObjectA custom object with two master-detail relationships. Using a customjunction object, you can model a “many-to-many” relationship betweentwo objects. For example, you may have a custom object called “Bug” thatrelates to the standard case object such that a bug could be related tomultiple cases and a case could also be related to multiple bugs.No glossary items for this entry.282LLayoutSee Page Layout.LengthParameter for custom text fields that specifies the maximum number ofcharacters (up to 255) that a user can enter in the field.Parameter for number, currency, and percent fields that specifies thenumber of digits you can enter to the left of the decimal point, for example,123.98 for an entry of 3.LetterheadDetermines the basic attributes of an HTML email template. Users cancreate a letterhead that includes attributes like background color, logo,font size, and font color.License Management Application (LMA)A free AppExchange app that allows you to track sales leads and accountsfor every user who downloads a managed package of yours fromAppExchange.License Management Organization (LMO)The Salesforce.<strong>com</strong> organization that you use to track all theSalesforce.<strong>com</strong> users who install your package. A license managementorganization must have the License Management Application (LMA)installed. It automatically receives notification every time your package isinstalled or uninstalled so that you can easily notify users of upgrades. Youcan specify any Enterprise, Unlimited, or Developer Edition organizationas your license management organization. For more information, go tohttp://www.salesforce.<strong>com</strong>/docs/en/lma/index.htm.List Custom SettingsA type of custom setting that provides a reusable set of static data thatcan be accessed across your organization. If you use a particular set of datafrequently within your application, putting that data in a list custom settingstreamlines access to it. Data in list settings does not vary with profile or
<strong>Force</strong>.<strong>com</strong> Platform Glossaryuser, but is available organization-wide. Examples of list data includetwo-letter state abbreviations, international dialing prefixes, and catalognumbers for products. Because the data is cached, access is low-cost andefficient: you don't have to use SOQL queries that count against yourgovernor limits.List ViewA list display of items (for example, accounts or contacts) based on specificcriteria. Salesforce.<strong>com</strong> provides some predefined views.In the console, the list view is the top frame that displays a list view ofrecords based on specific criteria. The list views you can select to displayin the console are the same list views defined on the tabs of other objects.You cannot create a list view within the console.Local NameThe value stored for the field in the user’s or account’s language.The localname for a field is associated with the standard name for that field.Local ProjectA .zip file containing a project manifest (package.xml file) and oneor more metadata <strong>com</strong>ponents.LocaleThe country or geographic region in which the user is located.The settingaffects the format of date and number fields, for example, dates in theEnglish (United States) locale display as 06/30/2000 and as 30/06/2000in the English (United Kingdom) locale.In Professional, Enterprise, Unlimited, and Developer Editionorganizations, a user’s individual Locale setting overrides theorganization’s Default Locale setting. In Personal and Group Editions,the organization-level locale field is called Locale, not DefaultLocale.Long Text AreaData type of custom field that allows entry of up to 32,000 characters onseparate lines.Lookup DialogPopup dialog available for some fields that allows you to search for a newitem, such as a contact, account, or user.Lookup FieldA type of field that contains a linkable value to another record. You candisplay lookup fields on page layouts where the object has a lookup ormaster-detail relationship with another object. For example, cases have alookup relationship with assets that allows users to select an asset using alookup dialog from the case edit page and click the name of the asset fromthe case detail page.283
Chapter 9: <strong>Force</strong>.<strong>com</strong> Platform GlossaryLookup RelationshipA relationship between two records so you can associate records with eachother. For example, cases have a lookup relationship with assets that letsyou associate a particular asset with a case. On one side of the relationship,a lookup field allows users to click a lookup icon and select another recordfrom a popup window. On the associated record, you can then display arelated list to show all of the records that have been linked to it. A lookuprelationship has no effect on record deletion or security, and the lookupfield is not required in the page layout.284MManaged PackageA collection of application <strong>com</strong>ponents that are posted as a unit onAppExchange, and are associated with a namespace and possibly a LicenseManagement Organization. A package must be managed for it to supportupgrades. An organization can create a single managed package that canbe downloaded and installed by many different organizations. They differfrom unmanaged packages in that some <strong>com</strong>ponents are locked, allowingthe managed package to be upgraded later. Unmanaged packages do notinclude locked <strong>com</strong>ponents and cannot be upgraded. In addition, managedpackages obfuscate certain <strong>com</strong>ponents (like Apex) on subscribingorganizations, so as to protect the intellectual property of the developer.Managed Package ExtensionAny package, <strong>com</strong>ponent, or set of <strong>com</strong>ponents that adds to thefunctionality of a managed package. An extension requires that the basemanaged package be installed in the organization.Manifest FileThe project manifest file (package.xml) lists the XML <strong>com</strong>ponents toretrieve or deploy when working with the Metadata API, or clients builton top of the Metadata API, such as the <strong>Force</strong>.<strong>com</strong> IDE or the <strong>Force</strong>.<strong>com</strong>Migration Tool.Manual SharingRecord-level access rules that allow record owners to give read and editpermissions to other users who might not have access to the record anyother way.Many-to-Many RelationshipA relationship where each side of the relationship can have many childrenon the other side. Many-to-many relationships are implemented throughthe use of junction objects.Master-Detail RelationshipA relationship between two different types of records that associates therecords with each other. For example, accounts have a master-detail
<strong>Force</strong>.<strong>com</strong> Platform Glossaryrelationship with opportunities. This type of relationship affects recorddeletion, security, and makes the lookup relationship field required on thepage layout.Master PicklistA <strong>com</strong>plete list of picklist values available for a record type or businessprocess.Matrix ReportMatrix reports are similar to summary reports, but allow you to group andsummarize data by both rows and columns.They can be used as the sourcereport for dashboard <strong>com</strong>ponents. Use this type for <strong>com</strong>paring relatedtotals, especially if you have large amounts of data to summarize and youneed to <strong>com</strong>pare values in several different fields, or you want to look atdata by date and by product, person, or geography.Merge FieldA field you can place in an email template, mail merge template, customlink, or formula to incorporate values from a record. For example, Dear{!Contact.FirstName}, uses a contact merge field to obtain the valueof a contact record's First Name field to address an email recipient byhis or her first name.MetadataInformation about the structure, appearance, and functionality of anorganization and any of its parts. <strong>Force</strong>.<strong>com</strong> uses XML to describemetadata.Metadata ComponentAn instance of a metadata type. For example, the Account standard objectis a metadata <strong>com</strong>ponent, which is an instance of the CustomObject type.Metadata-Driven DevelopmentAn app development model that allows apps to be defined as declarative“blueprints,” with no code required. Apps built on the platform—theirdata models, objects, forms, workflows, and more—are defined bymetadata.Metadata TypeA type of object in a Salesforce.<strong>com</strong> organization, for exampleCustomObject or CustomTab.Metadata WSDLA WSDL for users who want to use the <strong>Force</strong>.<strong>com</strong> Metadata API calls.MigrationThe process of moving metadata from one organization to another, usuallybetween two development environments. See also Deploy.285
Chapter 9: <strong>Force</strong>.<strong>com</strong> Platform GlossaryMini Page LayoutA subset of the items in a record's existing page layout that administratorschoose to display in the console's Mini View and in Hover Details. Minipage layouts inherit record type and profile associations, related lists, fields,and field access settings from the page layout.Mini ViewThe console's right frame which displays the records associated with therecord displayed in the detail view. The fields displayed in the mini vieware defined in the mini page layouts by an administrator. The mini viewdoes not display if the record in the detail view does not have any recordsassociated with it.MultitenancyAn application model where all users and apps share a single, <strong>com</strong>moninfrastructure and code base.MVC (Model-View-Controller)A design paradigm that deconstructs applications into <strong>com</strong>ponents thatrepresent data (the model), ways of displaying that data in a user interface(the view), and ways of manipulating that data with business logic (thecontroller).NNamespaceIn a packaging context, a one- to 15-character alphanumeric identifierthat distinguishes your package and its contents from packages of otherdevelopers onAppExchange, similar to a domain name. Salesforce.<strong>com</strong>automatically prepends your namespace prefix, followed by two underscores(“__”), to all unique <strong>com</strong>ponent names in your Salesforce.<strong>com</strong> organization.Namespace PrefixIn a packaging context, a namespace prefix is a one to 15-characteralphanumeric identifier that distinguishes your package and its contentsfrom packages of other developers on AppExchange. Namespace prefixesare case-insensitive. For example, ABC and abc are not recognized asunique. Your namespace prefix must be globally unique across allSalesforce.<strong>com</strong> organizations. It keeps your managed package under yourcontrol exclusively.Native AppAn app that is built exclusively with setup (metadata) configuration on<strong>Force</strong>.<strong>com</strong>. Native apps do not require any external services orinfrastructure.NotesMiscellaneous information pertaining to a specific record.286
<strong>Force</strong>.<strong>com</strong> Platform GlossaryOObjectAn object allows you to store information in your Salesforce.<strong>com</strong>organization.The object is the overall definition of the type of informationyou are storing. For example, the case object allow you to store informationregarding customer inquiries. For each object, your organization will havemultiple records that store the information about specific instances of thattype of data. For example, you might have a case record to store theinformation about Joe Smith's training inquiry and another case recordto store the information about Mary Johnson's configuration issue.Object-Level HelpCustom help text that you can provide for any custom object. It displayson custom object record home (overview), detail, and edit pages, as wellas list views and related lists.Object-Level SecuritySettings that allow an administrator to hide whole tabs and objects froma user so that he or she does not know that type of data exists. On theplatform you set object-level access rules with object permissions on userprofiles.onClick JavaScriptJavaScript code that executes when a button or link is clicked.One-to-Many RelationshipA relationship in which a single object is related to many other objects.For example, an account may have one or more related contacts.OrganizationA deployment of Salesforce.<strong>com</strong> with a defined set of licensed users. Anorganization is the virtual space provided to an individual customer ofsalesforce.<strong>com</strong>. Your organization includes all of your data and applications,and is separate from all other organizations.Organization-Wide DefaultsSettings that allow you to specify the baseline level of data access that auser has in your organization. For example, you can make it so that anyuser can see any record of a particular object that is enabled in their userprofile, but that they need extra permissions to edit one.Outbound CallAny call that originates from a user to a number outside of a call centerin Salesforce CRM Call Center.Outbound MessageWorkflow, approval, or milestone actions that send the information youspecify to an endpoint you designate, such as an external service. Anoutbound message sends the data in the specified fields in the form of a287
Chapter 9: <strong>Force</strong>.<strong>com</strong> Platform GlossarySOAP message to the endpoint. Outbound messaging is configured inthe Salesforce.<strong>com</strong> setup menu. Then you must configure the externalendpoint. You can create a listener for the messages using the <strong>Force</strong>.<strong>com</strong>Web Services API.OverlayAn overlay displays additional information when you hover your mouseover certain user interface elements. Depending on the overlay, it willclose when you move your mouse away, click outside of the overlay, orclick a close button.OwnerIndividual user to which a record (for example, a contact or case) isassigned.PPaaSSee Platform as a Service.PackageA group of <strong>Force</strong>.<strong>com</strong> <strong>com</strong>ponents and applications that are made availableto other organizations through the AppExchange. You use packages tobundle an app along with any related <strong>com</strong>ponents so that you can uploadthem to AppExchange together.Package DependencyCreated when one <strong>com</strong>ponent references another <strong>com</strong>ponent, permission,or preference, which must exist for the <strong>com</strong>ponent to be valid. Componentscan include, but are not limited to:• Standard or custom fields• Standard or custom objects• Visualforce pages• Apex scriptsPermissions and preferences can include but are not limited to:• Divisions• Multicurrency• Record typesPackage InstallationIncorporates the contents of a package into your Salesforce.<strong>com</strong>organization. A package on AppExchange can include an app, a<strong>com</strong>ponent, or a <strong>com</strong>bination of the two. After you install a package, youmay need to deploy <strong>com</strong>ponents in the package to make it generallyavailable to the users in your organization.288
<strong>Force</strong>.<strong>com</strong> Platform GlossaryPackage PublicationPublishing your package makes it publicly available on AppExchange.Apps can be found under specific categories and by doing a search forkeywords.Page LayoutThe organization of fields, custom links, and related lists on a record detailor edit page. Use page layouts primarily for organizing pages for yourusers. In Enterprise, Unlimited, and Developer Editions, use field-levelsecurity to restrict users’ access to specific fields.Parameterized TypingParameterized typing allows interfaces to be implemented with genericdata type parameters that are replaced with actual data types uponconstruction.Parent AccountOrganization or <strong>com</strong>pany that an account is affiliated with or owned by.By specifying a parent for an account, you can get a global view of allparent/subsidiary relationships using the View Hierarchy link.Partial PageAn AJAX behavior where only a specific portion of a page is updatedfollowing some user action, rather than a reload of the entire page.Partner WSDLA loosely-typed WSDL for customers, partners, and ISVs who want tobuild an integration or an AppExchange app that can work across multipleSalesforce.<strong>com</strong> organizations. With this WSDL, the developer isresponsible for marshaling data in the correct object representation, whichtypically involves editing the XML. However, the developer is also freedfrom being dependent on any particular data model or Salesforce.<strong>com</strong>organization. Contrast this with the Enterprise WSDL, which is stronglytyped.Personal EditionProduct designed for individual sales representatives and single users.Personal InformationUser information including personal contact information, quotas, personalgroup information, and default sales team.PicklistSelection list of options available for specific fields in a Salesforce.<strong>com</strong>object, for example, the Industry field for accounts. Users can choosea single value from a list of options rather than make an entry directly inthe field. See also Master Picklist.289
Chapter 9: <strong>Force</strong>.<strong>com</strong> Platform Glossary290Picklist (Multi-Select)Selection list of options available for specific fields in a Salesforce.<strong>com</strong>object. Multi-select picklists allow users to choose one or more values.Users can choose a value by double clicking on it, or choose additionalvalues from a scrolling list by holding down the Control key while clickinga value and using the arrow icon to move them to the selected box.Picklist ValuesSelections displayed in drop-down lists for particular fields. Some values<strong>com</strong>e predefined, and other values can be changed or defined by anadministrator.Platform as a Service (PaaS)An environment where developers use programming tools offered by aservice provider to create applications and deploy them in a cloud. Theapplication is hosted as a service and provided to customers via the Internet.The PaaS vendor provides an API for creating and extending specializedapplications. The PaaS vendor also takes responsibility for the dailymaintenance, operation, and support of the deployed application and eachcustomer's data.The service alleviates the need for programmers to install,configure, and maintain the applications on their own hardware, software,and related IT resources. Services can be delivered using the PaaSenvironment to any market segment.Platform EditionA Salesforce.<strong>com</strong> edition based on either Enterprise Edition or UnlimitedEdition that does not include any of the standard Salesforce.<strong>com</strong> CRMapps, such as Sales or Service & Support.Postback RequestA postback request is made when user interaction requires a Visualforcepage update, such as when a user clicks on a Save button and triggers asave action.Primary KeyA relational database concept. Each table in a relational database has afield in which the data value uniquely identifies the record. This field iscalled the primary key. The relationship is made between two tables bymatching the values of the foreign key in one table with the values of theprimary key in another.Printable ViewAn option that displays a page in a print-ready format.Private SharingPrivate sharing is the process of sharing an uploaded package by using theURL you receive from Salesforce.<strong>com</strong>. This URL is not listed in theAppExchange. Using the unlisted URL allows you to share a packagewithout going through the listing process or making it public.
<strong>Force</strong>.<strong>com</strong> Platform GlossaryProcess VisualizerA tool that displays a graphical version of an approval process. Theview-only diagram is presented as a flowchart. The diagram and aninformational sidebar panel can help you visualize and understand thedefined steps, rule criteria, and actions that <strong>com</strong>prise your approval process.Production OrganizationA Salesforce.<strong>com</strong> organization that has live users accessing data.Professional EditionA Salesforce.<strong>com</strong> edition designed for businesses who need full-featuredCRM functionality.ProfileDefines a user’s permission to perform different functions withinSalesforce.<strong>com</strong>. For example, the Solution Manager profile gives a useraccess to create, edit, and delete solutions.ProjectSee Local Project.Project ManifestA control file (package.xml) that determines which <strong>com</strong>ponents areretrieved or deployed. See also Local Project.PrototypeThe classes, methods and variables that are available to other Apex scripts.ProviderThe provider of an AppExchange listing is the Salesforce.<strong>com</strong> user ororganization that published the listing.Public CalendarA calendar in which a group of people can track events of interest to allof them (such as marketing events, product releases, or training classes)or schedule a <strong>com</strong>mon activity (such as a team vacation calendar). Forexample, your marketing team can set up an events calendar to showup<strong>com</strong>ing marketing events to the entire sales and marketing organization.QQueueA holding area for items before they are processed. Salesforce.<strong>com</strong> usesqueues in a number of different features and technologies.Query LocatorA parameter returned from the query() or queryMore() API call thatspecifies the index of the last result record that was returned.291
Chapter 9: <strong>Force</strong>.<strong>com</strong> Platform GlossaryQuery String ParameterA name-value pair that's included in a URL, typically after a '?' character.For example:http://na1.salesforce.<strong>com</strong>/001/e?name=valueRRead OnlyOne of the standard profiles to which a user can be assigned. Read Onlyusers can view and report on information based on their role in theorganization. (That is, if the Read Only user is the CEO, they can viewall data in the system. If the Read Only user has the role of Western Rep,they can view all data for their role and any role below them in thehierarchy.)Recent ItemsList of links in the sidebar for most recently accessed records. Note thatnot all types of records are listed in the recent items.RecordA single instance of a Salesforce.<strong>com</strong> object. For example, “John Jones”might be the name of a contact record.Record IDSee Salesforce.<strong>com</strong> Record ID.Record-Level SecurityA method of controlling data in which you can allow a particular user toview and edit an object, but then restrict the records that the user is allowedto see.Record NameA standard field on all Salesforce.<strong>com</strong> objects. Whenever a record nameis displayed in a <strong>Force</strong>.<strong>com</strong> application, the value is represented as a linkto a detail view of the record. A record name can be either free-form textor an autonumber field. Record Name does not have to be a unique value.Record TypeA field available for certain records that can include some or all of thestandard and custom picklist values for that record. Record types are specialfields that you can associate with profiles to make only the included picklistvalues available to users with that profile.Recycle BinA page that lets you view and restore deleted information. Access theRecycle Bin by using the link in the sidebar.292
<strong>Force</strong>.<strong>com</strong> Platform GlossaryRegression TestingTesting that uncovers why functionality that was previously working stopsworking as intended. A stable set of data must be used for regressiontesting. For this reason, it is a good idea to use a configuration-onlysandbox that pulls its data from an immutable source. See also SandboxOrganization.Related ListA section of a record or other detail page that lists items related to thatrecord. For example, the Stage History related list of an opportunity orthe Open Activities related list of a case.Related List Hover LinksA type of link that allows you to quickly view information on a detail pageabout related lists, by hovering your mouse over the link. Youradministrator must enable the display of hover links. The displayed textcontains the corresponding related list and its number of records. You canalso click this type of link to jump to the content of the related list withouthaving to scroll down the page.Related ObjectObjects chosen by an administrator to display in the console's mini viewwhen records of a particular type are shown in the console's detail view.For example, when a case is in the detail view, an administrator can chooseto display an associated account, contact, or asset in the mini view.RelationshipA connection between two objects, used to create related lists in pagelayouts and detail levels in reports. Matching values in a specified field inboth objects are used to link related data; for example, if one object storesdata about <strong>com</strong>panies and another object stores data about people, arelationship allows you to find out which people work at the <strong>com</strong>pany.Relationship QueryIn a SOQL context, a query that traverses the relationships between objectsto identify and return results. Parent-to-child and child-to-parent syntaxdiffers in SOQL queries.Release ManagementSee Application Lifecycle Management (ALM).Release TrainA scheduling technique for delivering application upgrades on a regularcycle.Remote Access ApplicationA remote access application is an application external to Salesforce.<strong>com</strong>that uses the OAuth protocol to verify both the Salesforce.<strong>com</strong> user andthe external application.293
Chapter 9: <strong>Force</strong>.<strong>com</strong> Platform GlossaryReportInformation you can display or print that provides a summary of your data.See Tabular Report, Summary Report, and Matrix Report.Report TypesSpecifies the objects and fields that can be used as the basis of a report.In addition to pre-defined standard report types, you can create customreport types for more advanced reporting requirements.Role HierarchyA record-level security setting that defines different levels of users suchthat users at higher levels can view and edit information owned by orshared with users beneath them in the role hierarchy, regardless of theorganization-wide sharing model settings.Roll-Up Summary FieldA field type that automatically provides aggregate values from child recordsin a master-detail relationship.Running UserThe user whose security settings determine what data is displayed in adashboard. Because only one running user is specified per dashboard,everyone who can access the dashboard sees the same data, regardless oftheir personal security settings.SSaaSSee Software as a Service (SaaS).S-ControlCustom Web content for use in custom links. Custom s-controls cancontain any type of content that you can display in a browser, for examplea Java applet, an Active-X control, an Excel file, or a custom HTML Webform.Important: S-controls have been superseded by Visualforcepages. After March 2010 organizations that have never createds-controls, as well as new organizations, won't be allowed tocreate them. Existing s-controls will remain unaffected, and canstill be edited.Salesforce.<strong>com</strong> API VersionSee Version.Salesforce CRM Call CenterA Salesforce.<strong>com</strong> feature that seamlessly integrates Salesforce.<strong>com</strong> withthird-party <strong>com</strong>puter-telephony integration (CTI) systems.294
<strong>Force</strong>.<strong>com</strong> Platform GlossarySalesforce CRM ContentAn on-demand, content-management system that allows you to organize,share, search, and manage content within your organization and acrosskey areas of the Salesforce.<strong>com</strong> application. Content can include all filetypes, from traditional business documents such as Microsoft PowerPointpresentations to audio files, video files, and Web pages.Salesforce CRM and Google AdWordsSalesforce CRM and Google AdWords is a <strong>Force</strong>.<strong>com</strong> AppExchange appthat connects Google AdWords with Salesforce.<strong>com</strong>, allowing you totrack the effectiveness of your online advertising investments.Salesforce CRM for OutlookSalesforce CRM for Outlook is a Microsoft ® Outlook ® integrationapplication that lets you log emails in Salesforce.<strong>com</strong> and sync calendarevents and contacts between Outlook and Salesforce.<strong>com</strong>. It consists ofa system tray program and an Outlook add-in. User settings are stored inOutlook configurations, which administrators manage in Salesforce.<strong>com</strong>.Note: Salesforce CRM for Outlook is available through a pilotprogram. For information on enabling Salesforce CRM forOutlook for your organization, contact salesforce.<strong>com</strong>.Salesforce MobileSalesforce Mobile is a Salesforce.<strong>com</strong> feature that enables users to accesstheir Salesforce.<strong>com</strong> data from mobile devices running the mobile clientapplication.The Salesforce Mobile client application exchanges data withSalesforce.<strong>com</strong> over wireless carrier networks, and stores a local copy ofthe user’s data in its own database on the mobile device. Users can editlocal copies of their Salesforce.<strong>com</strong> records when a wireless connection isunavailable, and transmit those changes when a wireless connectionbe<strong>com</strong>es available..Salesforce.<strong>com</strong> Record IDA unique 15- or 18-character alphanumeric string that identifies a singlerecord in Salesforce.<strong>com</strong>.Salesforce.<strong>com</strong> SOA (Service-Oriented Architecture)A powerful capability of <strong>Force</strong>.<strong>com</strong> that allows you to make calls to externalWeb services from within Apex.Sandbox OrganizationA nearly identical copy of a Salesforce.<strong>com</strong> production organization. Youcan create multiple sandboxes in separate environments for a variety ofpurposes, such as testing and training, without <strong>com</strong>promising the dataand applications in your production environment.295
Chapter 9: <strong>Force</strong>.<strong>com</strong> Platform Glossary296Save AsOption on any standard, public, or custom report to save the parametersof the report without altering the original report. It creates a new customreport with your saved changes.Save & NewAlternative “save” on most pages with which you can save your currentchanges and create a new entry.SearchFeature that lets you search for information that matches specifiedkeywords. You can enter a search from the Search section of the sidebarcolumn, or perform an Advanced Search by clicking Advanced Search inthe sidebar.Search LayoutThe organization of fields included in search results, in lookup dialogs,and in the key lists on tab home pages.Search PhraseSearch phrases are queries that users enter when searching onwww.google.<strong>com</strong>.ServiceA service is an offering of professional assistance. Services related toSalesforce.<strong>com</strong> and the <strong>Force</strong>.<strong>com</strong> platform, such as enhanced customersupport, or assistance with configuration can be listed on platform. canbe listed on AppExchange.Semi-JoinA semi-join is a subquery on another object in an IN clause in a SOQLquery. You can use semi-joins to create advanced queries, such as gettingall contacts for accounts that have an opportunity with a particular recordtype. See also Anti-Join.Session IDAn authentication token that is returned when a user successfully logs into Salesforce.<strong>com</strong>. The Session ID prevents a user from having to log inagain every time he or she wants to perform another action inSalesforce.<strong>com</strong>. Different from a record ID or Salesforce.<strong>com</strong> ID, whichare terms for the unique ID of a Salesforce.<strong>com</strong> record.Session TimeoutThe period of time after login before a user is automatically logged out.Sessions expire automatically after a predetermined length of inactivity,which can be configured in Salesforce.<strong>com</strong> by clicking Setup ➤ SecurityControls. The default is 120 minutes (two hours). The inactivity timeris reset to zero if a user takes an action in the Web interface or makes anAPI call.
<strong>Force</strong>.<strong>com</strong> Platform GlossarySetter MethodsMethods that assign values. See also Getter Methods.SetupAn administration area where you can customize and define <strong>Force</strong>.<strong>com</strong>applications. Access Setup through the Setup link at the top ofSalesforce.<strong>com</strong> pages.SharingAllowing other users to view or edit information you own. There aredifferent ways to share data:• Sharing Model—defines the default organization-wide access levelsthat users have to each other’s information and whether to use thehierarchies when determining access to data.• Role Hierarchy—defines different levels of users such that users athigher levels can view and edit information owned by or shared withusers beneath them in the role hierarchy, regardless of theorganization-wide sharing model settings.• Sharing Rules—allow an administrator to specify that all informationcreated by users within a given group or role is automatically sharedto the members of another group or role.• Manual Sharing—allows individual users to share a specific accountor opportunity with other users or groups.• Apex-Managed Sharing—enables developers to programmaticallymanipulate sharing to support their application’s behavior. SeeApex-Managed Sharing.Sharing ModelBehavior defined by your administrator that determines default access byusers to different types of records.Sharing RuleType of default sharing created by administrators. Allows users in aspecified group or role to have access to all information created by userswithin a given group or role.Show/Hide DetailsOption available for reports that lets you show/hide the details of individualcolumn values in report results.SidebarColumn appearing on the left side of each page that provides links tosearch, recent items, and other resources.297
Chapter 9: <strong>Force</strong>.<strong>com</strong> Platform GlossarySites<strong>Force</strong>.<strong>com</strong> sites enables you to create public websites and applications thatare directly integrated with your Salesforce.<strong>com</strong> organization—withoutrequiring users to log in with a username and password.Skeleton TemplateA type of Visualforce template that uses the tag.Skeleton templates define a standard structure that requires implementationfrom subsequent pages.SnippetA type of s-control that is designed to be included in other s-controls.Similar to a helper method that is used by other methods in a piece ofcode, a snippet allows you to maintain a single copy of HTML orJavaScript that you can reuse in multiple s-controls.SOAP (Simple Object Access Protocol)A protocol that defines a uniform way of passing XML-encoded data.sObjectAny object that can be stored in the <strong>Force</strong>.<strong>com</strong> platform.Software as a Service (SaaS)A delivery model where a software application is hosted as a service andprovided to customers via the Internet. The SaaS vendor takesresponsibility for the daily maintenance, operation, and support of theapplication and each customer's data. The service alleviates the need forcustomers to install, configure, and maintain applications with their ownhardware, software, and related IT resources. Services can be deliveredusing the SaaS model to any market segment.SOQL (Salesforce.<strong>com</strong> Object Query Language)A query language that allows you to construct simple but powerful querystrings and to specify the criteria that should be used to select data fromthe <strong>Force</strong>.<strong>com</strong> database.SOSL (Salesforce.<strong>com</strong> Object Search Language)A query language that allows you to perform text-based searches usingthe <strong>Force</strong>.<strong>com</strong> API.Source ReportA custom report scheduled to run and load data as records into a targetobject for an analytic snapshot.Standard ObjectA built-in object included with the <strong>Force</strong>.<strong>com</strong> platform. You can alsobuild custom objects to store information that is unique to your app.298
<strong>Force</strong>.<strong>com</strong> Platform GlossarySubscriberThe subscriber of a package is a Salesforce.<strong>com</strong> user with an installedpackage in their Salesforce.<strong>com</strong> organization.Summary FieldStandard and custom summary fields defined for a report. Standardsummary fields are report columns with one of the following summariesapplied: sum, average, largest value, smallest value. Custom summary fieldsare user-defined custom summary formulas. In addition to showingsummarized information, summary fields can be used to define charts andanalytic snapshots.Summary ReportSummary reports are similar to tabular reports, but also allow users togroup rows of data, view subtotals, and create charts. They can be used asthe source report for dashboard <strong>com</strong>ponents. Use this type for a report toshow subtotals based on the value of a particular field or when you wantto create a hierarchical list, such as all opportunities for your team,subtotaled by Stage and Owner.Syndication FeedsGive users the ability to subscribe to changes within <strong>Force</strong>.<strong>com</strong> sites andreceive updates in external news readers.System AdministratorSee Administrator (System Administrator).System LogA separate window console that can be used for debugging code snippets.Enter the code you want to test at the bottom of the window and clickExecute. The body of the System Log displays system resourceinformation, such as how long a line took to execute or how many databasecalls were made. If the code did not run to <strong>com</strong>pletion, the console alsodisplays debugging information.System TestingThe phase of testing that detects problems caused by multiple integrationsor within the system as a whole. System testing should require noknowledge of the inner design of the code or logic.TTabA tab is an interface <strong>com</strong>ponent that allows you to navigate around anapp. A tab serves as the starting point for viewing, editing, and enteringinformation for a particular object. When you click a tab at the top of thepage, the corresponding tab home page for that object appears. A tab canbe associated with an object, a Web page, or a Visualforce page.299
Chapter 9: <strong>Force</strong>.<strong>com</strong> Platform GlossaryTabular ReportTabular reports are the simplest and fastest way to look at data. Similarto a spreadsheet, they consist simply of an ordered set of fields in columns,with each matching record listed in a row. Tabular reports are best forcreating lists of records or a list with a single grand total. They can't beused to create groups of data or charts, and can't be used in dashboardsunless rows are limited. Examples include contact mailing lists and activityreports.TagIn Salesforce.<strong>com</strong>, a word or short phrases that users can associate withmost records to describe and organize their data in a personalized way.Administrators can enable tags for accounts, activities, assets, campaigns,cases, contacts, contracts, dashboards, documents, events, leads, notes,opportunities, reports, solutions, tasks, and any custom objects (exceptrelationship group members) Tags can also be accessed through the<strong>Force</strong>.<strong>com</strong> Web Services API.In Salesforce CRM Content, a descriptive label that helps classify andorganize content across workspaces. Users can view a list of all files orWeb links that belong to a particular tag or filter search results based ona tag or tags.TaskAssigns a task to a user you specify. You can specify the Subject,Status, Priority, and Due Date of the task. Tasks are workflow andapproval actions that are triggered by workflow rules or approval processes.For Calender-related tasks, see Activity (Calendar Events/Tasks).Task Bar LinksLinks on tabbed pages that provide quick access to the most <strong>com</strong>monoperations available for a particular page, for example, creating a newaccount.Test Case CoverageTest cases are the expected real-world scenarios in which your code willbe used.Test cases are not actual unit tests, but are documents that specifywhat your unit tests should do. High test case coverage means that mostor all of the real-world scenarios you have identified are implemented asunit tests. See also Code Coverage and Unit Test.Test DriveA test drive is a fully functional Salesforce.<strong>com</strong> organization that containsan app and any sample records added by the publisher for a particularpackage. It allows users on AppExchange to experience an app as aread-only user using a familiar Salesforce.<strong>com</strong> interface.300
<strong>Force</strong>.<strong>com</strong> Platform GlossaryTest MethodAn Apex class method that verifies whether a particular piece of code isworking properly. Test methods take no arguments, <strong>com</strong>mit no data tothe database, and can be executed by the runTests() system methodeither through the <strong>com</strong>mand line or in an Apex IDE, such as the<strong>Force</strong>.<strong>com</strong> IDE.Test OrganizationA Salesforce.<strong>com</strong> organization used strictly for testing. See also SandboxOrganization.TextData type of a custom field that allows entry of any <strong>com</strong>bination of letters,numbers, or symbols, up to a maximum length of 255 characters.Text AreaA custom field data type that allows entry of up to 255 characters onseparate lines.Text Area (Long)See Long Text Area.Time-Dependent Workflow ActionA workflow action that executes when the conditions of a workflow ruleand an associated time trigger are met.TimeoutSee Session Timeout.Time TriggerAn event that starts according to a specified time threshold, such as sevendays before an opportunity close date. For example, you might define atime-based workflow action that sends email to the account manager whena scheduled milestone will occur in seven days.Translation WorkbenchAdministration setup area where your users can translate custom fieldnames, picklist values, record types, and page layout sections. Thetranslation workbench also determines which users translate differentlanguages.TriggerA piece of Apex that executes before or after records of a particular typeare inserted, updated, or deleted from the database. Every trigger runswith a set of context variables that provide access to the records that causedthe trigger to fire, and all triggers run in bulk mode—that is, they processseveral records at once, rather than just one record at a time.301
Chapter 9: <strong>Force</strong>.<strong>com</strong> Platform GlossaryTrigger Context VariableDefault variables that provide access to information about the trigger andthe records that caused it to fire.UUnit TestA unit is the smallest testable part of an application, usually a method. Aunit test operates on that piece of code to make sure it works correctly.See also Test Method.Unlimited EditionUnlimited Edition is salesforce.<strong>com</strong>'s flagship solution for maximizingCRM success and extending that success across the entire enterprisethrough the <strong>Force</strong>.<strong>com</strong> platform.Unmanaged PackageA package that cannot be upgraded or controlled by its developer.UpgradingUpgrading a package is the process of installing a newer version.Salesforce.<strong>com</strong> supports upgrades for managed packages that are not beta.UploadingUploading a package in Salesforce.<strong>com</strong> provides an installation URL soother users can install it. Uploading also makes your packaged availableto be published on AppExchange.URL (Uniform Resource Locator)The global address of a website, document, or other resource on theInternet. For example, http://www.salesforce.<strong>com</strong>.URL S-ControlAn s-control that contains an external URL that hosts the HTML thatshould be rendered on a page. When saved this way, the HTML is hostedand run by an external website. URL s-controls are also called Webcontrols.User Acceptance Testing (UAT)A process used to confirm that the functionality meets the plannedrequirements. UAT is one of the final stages before deployment toproduction.User InterfaceThe layouts that specify how a data model should be displayed.302
<strong>Force</strong>.<strong>com</strong> Platform GlossaryVWValidation RuleA rule that prevents a record from being saved if it does not meet thestandards that are specified.VersionA number value that indicates the release of an item. Items that can havea version include API objects, fields and calls; Apex classes and triggers;and Visualforce pages and <strong>com</strong>ponents.ViewThe user interface in the Model-View-Controller model, defined byVisualforce.View StateWhere the information necessary to maintain the state of the databasebetween requests is saved.VisualforceA simple, tag-based markup language that allows developers to easilydefine custom pages and <strong>com</strong>ponents for apps built on the platform. Eachtag corresponds to a coarse or fine-grained <strong>com</strong>ponent, such as a sectionof a page, a related list, or a field.The <strong>com</strong>ponents can either be controlledby the same logic that is used in standard Salesforce.<strong>com</strong> pages, ordevelopers can associate their own logic with a controller written in Apex.Visualforce ControllerSee Controller, Visualforce.Visualforce LifecycleThe stages of execution of a Visualforce page, including how the page iscreated and destroyed during the course of a user session.Visualforce PageA web page created using Visualforce.Typically, Visualforce pages presentinformation relevant to your organization, but they can also modify orcapture data. They can be rendered in several ways, such as a PDFdocument or an email attachment, and can be associated with a CSS style.Web Direct LeadsWeb direct leads is a specific lead source indicating that the lead wasgenerated when a user, who has bookmarked your website or directly typedthe URL of your website into a browser, filled out the Web-to-Lead formcontaining the Salesforce.<strong>com</strong> tracking code.Web ControlSee URL S-Control.303
Chapter 9: <strong>Force</strong>.<strong>com</strong> Platform Glossary304Web LinksSee Custom Links.Web ServiceA mechanism by which two applications can easily exchange data overthe Internet, even if they run on different platforms, are written in differentlanguages, or are geographically remote from each other.WebService MethodAn Apex class method or variable that can be used by external systems,such as an s-control or mash-up with a third-party application. Webservice methods must be defined in a global class.Web TabA custom tab that allows your users to use external websites from withinthe application.WizardA user interface that leads a user through a <strong>com</strong>plex task in multiple steps.Workflow and Approval ActionsWorkflow and approval actions consist of email alerts, tasks, field updates,and outbound messages that can be triggered by a workflow rule orapproval process.Workflow ActionAn email alert, field update, outbound message, or task that fires whenthe conditions of a workflow rule are met.Workflow Email AlertA workflow action that sends an email when a workflow rule is triggered.Unlike workflow tasks, which can only be assigned to application users,workflow alerts can be sent to any user or contact, as long as they have avalid email address.Workflow Field UpdateA workflow action that changes the value of a particular field on a recordwhen a workflow rule is triggered.Workflow Outbound MessageA workflow action that sends data to an external Web service, such asanother cloud <strong>com</strong>puting application. Outbound messages are usedprimarily with <strong>com</strong>posite apps.Workflow QueueA list of workflow actions that are scheduled to fire based on workflowrules that have one or more time-dependent workflow actions.Workflow RuleA workflow rule sets workflow actions into motion when its designatedconditions are met. You can configure workflow actions to execute
<strong>Force</strong>.<strong>com</strong> Platform Glossaryimmediately when a record meets the conditions in your workflow rule,or set time triggers that execute the workflow actions on a specific day.Workflow TaskA workflow action that assigns a task to an application user when aworkflow rule is triggered.Wrapper ClassA class that abstracts <strong>com</strong>mon functions such as logging in, managingsessions, and querying and batching records. A wrapper class makes anintegration more straightforward to develop and maintain, keeps programlogic in one place, and affords easy reuse across <strong>com</strong>ponents. Examplesof wrapper classes in Salesforce.<strong>com</strong> include theAJAX Toolkit, which isa JavaScript wrapper around the Salesforce.<strong>com</strong> Web Services API,wrapper classes such as CCritical Section in the CTI Adapter forSalesforce CRM Call Center, or wrapper classes created as part of a clientintegration application that accesses Salesforce.<strong>com</strong> using the <strong>Force</strong>.<strong>com</strong>Web Services API.WSDL (Web Services Description Language) FileAn XML file that describes the format of messages you send and receivefrom a Web service. Your development environment's SOAP client usesthe Salesforce.<strong>com</strong> Enterprise WSDL or Partner WSDL to <strong>com</strong>municatewith Salesforce.<strong>com</strong> using the Salesforce.<strong>com</strong> Web Services API.XXML (Extensible Markup Language)A markup language that enables the sharing and transportation ofstructured data. All <strong>Force</strong>.<strong>com</strong> <strong>com</strong>ponents that are retrieved or deployedthrough the Metadata API are represented by XML definitions.YNo glossary items for this entry.ZZip FileA data <strong>com</strong>pression and archive format.A collection of files retrieved or deployed by the Metadata API. See alsoLocal Project.305
IndexIndexAAbout this book 1Accounts, mass updating accounts 143Accounts, mass updating contacts 140actionSupport tag 96Adobe Flex 228AJAX 228in Visualforce pages 134updating a page 88AJAX Toolkit 13, 18AJAX Tools 6Alerts, workflow 10Anonymous execution, Apex 12anti-join 39in Visualforce 110Any array, partner WSDL 231Apex 54about 12creating a button 66custom settings 160documentation 5dynamic 40integrating applications 227mobile application, trigger for 204preventing duplicate records 153properties 136triggers 142, 149, 152, 153, 159WSDL 229APIbatching records 239client applications 255documentation 5integrating applications 227introduction 13login() call 233metadata introduction 14queries and searches 16query() 238queryMore() 238session ID 233setting the session timeout value 237setting up 228wrapper classes 242, 258API Only permission 228306Approval processes 10, 54else option 50parallel approvers 50Approvals processmanaging 44Architecture, client application 257Asynchronous outbound messages 56tracking 59Attributes, SObject 18, 24Authenticating calls to the API 233Averages, roll-up summary fields 121BBatch Apex 143Batching records for API calls 239Bulk API 14documentation 6Bulk processing, trigger 142, 153Buttonscreating with Apex 66overriding with Visualforce 64CC#.NET 228using the partner WSDL 231Certificates, client 230Child recordscreation from parent 159mass updating 140Classes, Apex 12Client applications 255configuration files 260SOAP message <strong>com</strong>pression 260Client certificates 230Client classes, API 242, 258<strong>com</strong>mandAction tag, Visualforce 71<strong>com</strong>mandButton tag, Visualforce 80<strong>com</strong>mandLink tag, Visualforce 110, 134<strong>com</strong>position tag 98Compression, SOAP message 260Concatenate 123Configuration files 260
IndexConsole 11Contactsfinding records 29mass updating 140Controllers, Visualforcecreating dependent controllers and pages 73query string parameters 132COUNT() 33Cross-object formulas 123CSS 104Currency field format 68Custom buttonscreating with Apex 66Custom <strong>com</strong>ponent 82Custom fieldsabout 9encrypted fields 118history tracking 10Custom help 81Custom junction objects 114Custom links, passing UTF-8 characters into 177Custom list controller 110Custom objectsabout 9creating 118Custom relationships 9Custom report types 11Custom settings 160Custom views 11DDashboards 11Data actions 112Data display 112Data modelcreating ERD diagrams 24examining with enterprise WSDL and AJAXToolkit 18examining with SoqlXplorer 24dataList tag, Visualforce 110dataTable tag, Visualforce 69Date literals, relative 31Default field values 10define tag 98Delegated authentication 193, 216describeGlobal() 18Development languages, supported 228Divisions, SOSL filtering based on 32Duplicate records, preventing 153Dynamic Apex 40Dynamic Approval Routing application 54Dynamic approvals 54Dynamic page updates 88EEmailalerts, workflow 10attachments 197creating 193creating records 196example code 202inbound 194, 196, 197messaging 10outbound 198receiving 193retrieving information 194sending 193services, activating 194templates 198encodeURI() JavaScript function 177Encrypted fields 118Enterprise WSDL 229ERD diagrams, creating 24Errata, book 7External IDs and upserting 228Ffacet tag, Visualforce 80, 134Feedback, sending book 7Feeds 186Fieldscustom 9default values 10formula 10, 121history tracking 10roll-up summary 121FieldsToNull array, artner WSDL 231Filtering using Divisions in SOSL 32Finding records 29<strong>Force</strong>.<strong>com</strong> IDE 6, 14<strong>Force</strong>.<strong>com</strong> Migration Tool 6, 14<strong>Force</strong>.<strong>com</strong> Platformdocumentation 4point-and-click setup tools 9understanding 7, 9<strong>Force</strong>.<strong>com</strong> sitesSee Also Sites 184307
Index308form tag, Visualforce 71, 80, 172Formatting currencies 68Forms, building in Visualforce pages 71Formula fields 10Formulas, cross-object 123Frontdoor URLs 18FunctionsHYPERLINK 123REGEX() 118VLOOKUP() 129GGlobal objects variable 132HHelp with this book 1Help, field-level 118Hierarchy, role 10HTML in Visualforce 70HYPERLINK 123IID prefixes, record 18ID, session 233IDE 14image tag, Visualforce 172include tag 96Input <strong>com</strong>ponents, Visualforce 71, 172inputCheckbox tag, Visualforce 71inputField tag, Visualforce 71, 80inputHidden tag, Visualforce 71inputSecret tag, Visualforce 71inputText tag, Visualforce 71inputTextarea tag, Visualforce 71, 172insert tag 98Instance, Salesforce.<strong>com</strong> 234Integrating with Salesforce Mobile 193Integration users 228Iteration <strong>com</strong>ponents, Visualforce 69JJava 228batching records 239query/queryMore pattern implementation 238using the partner WSDL 231Java (continued)wrapper class implementation 243JavaScript encodeURI() 177LLanguages, supported development 228Layouts, page 11Leads, finding records 29LIMIT keyword, SOQL 33Literals, relative date 31Locking records 126login() call, API 233MMac OS X, SoqlXplorer 24Manual sharing rules 10Many-to-many relationships 114Mass updating records 140, 143Matrix-based approvals 54MessageElement, partner WSDL 231Messages, asynchronous outbound 56tracking 59Messaging 193Metadata APIabout 14documentation 5Metadata WSDL 229Migration Tool 14Mobile 13Apex trigger 204Visualforce Mobile page, creating 211Modify All Data permission 228MVC design paradigm 257OObjectsabout 9attributes 18, 24frontdoor URLs 18ID prefixes 18Operators, concatenate 123Organization-wide defaults 10Outbound messages, asynchronous 56tracking 59Outer joins in SOQL 39outputLabel tag, Visualforce 80outputLink tag, Visualforce 132
IndexoutputPanel tag, Visualforce 80PPage layouts 11pageReference class, Visualforce 80Pages, overriding with Visualforce 85panelGrid tag, Visualforce 80panelGroup tag, Visualforce 80param tag, Visualforce 132Partner WSDL 229, 231Password Never Expires permission 228Perl 228Permissionsabout 10API Only 228Modify All Data 228Password Never Expires 228Person accounts, finding records 29PHP 228batching records 239Point-and-click setup tools 9Prefixes, record ID 18Previewing query results 33Processes, approval 10Profiles, user 10Python 228QQueries, previewing results 33Query string parameters, Visualforce 132query() 26query/queryMore pattern 238RRecordsbulk processing in a trigger 142ID prefixes 18locking 126preventing duplicates with Apex 153Recruiting app, sample 3Recursive triggers, controlling 149Redirects, overriding with Visualforce 87REGEX() function 118Related records, fields 123relatedList tag, Visualforce 132, 134Relationshipsabout 9Relationships (continued)many-to-many 114traversing in SOQL 27viewing SObject 18, 24Relative date literals 31Reports 11reRender attribute, Visualforce 134Role hierarchy 10Roll-up summary fields 121in cross-object formulas 126Ruby on Rails 228Rulessharing 10validation 10workflow 10runAs method 170SSalesforce Mobile 13Salesforce.<strong>com</strong> instance 234SAML 216search() 26Security settings 10selectOption tag, Visualforce 172selectRadio tag, Visualforce 172semi-join 39Session ID, API 233Sessionsmanaging 236setting the timeout value 237Sharing rules 10Single sign-on 193, 216clients 222Sitemaps, creating for sites 188Sitesabout 13branding 184CNAME 180<strong>com</strong>ponents 184custom domain 180feeds 186merge fields 182site template 184sitemaps 188static resources 184Visualforce 182Web-to-Lead form 190SOAP clients 229SOAP message <strong>com</strong>pression 260309
IndexSObjectsattributes 18, 24frontdoor URLs 18ID prefixes 18SOQLanti-join 110COUNT() 33LIMIT 33outer joins 39previewing results 33relative date literals 31semi-join 110sorting results 34SOSL, <strong>com</strong>pared to 26traversing relationships 27SoqlXplorerMac OS X 6using 24Sorting query results 34SOSLfiltering based on division 32relative date literals 31SOQL, <strong>com</strong>pared to 26sorting results 34WHERE clause 32WITH clause 32Standard list controller 107Static resources 67Styles in Visualforce 70System global object, Visualforce 132TTabbed accounts 102Tabs 11Tagsadding 261, 263removing 261, 263updating 265viewing 37viewing records 38Tasks, workflow 10Testing Apex 170Timeout values, session 237Tools, integrated 6Trigger.new 152Trigger.old 152Triggers 159about 12bulk processing 142, 153310Triggers (continued)<strong>com</strong>paring Trigger.old and Trigger.new 152preventing duplicate records 153recursive 149UUpsert with external IDs 228URL query string parameters, Visualforce 132URLs, frontdoor 18Usersabout profiles 10integration 228Using this book 1UTF-8 characters, passing into custom links 177VValidation rules 10, 118, 126VLOOKUP() 129VB.NET 228using the partner WSDL 231wrapper class implementation 250Verifying data 129Views, custom 11Visualforce 81about 12adding feeds 186AJAX 134Apex properties 136apex:outputLink tag 132apex:param tag 132<strong>com</strong>mandAction tag 71<strong>com</strong>mandButton tag 80<strong>com</strong>mandLink tag 110, 134conditional overrides 93controller extension 93, 110creating dependent controllers and pages 73creating forms 71, 80CSS 104custom <strong>com</strong>ponent 82custom list controller 110dataList tag 110dataTable tag 69documentation 5dynamically updating 88editing multiple records 107email template 198excluding records 110facet tag 80, 134
IndexVisualforce (continued)form tag 71, 80, 172formatting currencies 68formatting dates 68Google Charts, integrating with 172HTML tags 70image tag 172include templates 96including records 110inputCheckbox tag 71inputField tag 71, 80inputHidden tag 71inputSecret tag 71inputText tag 71inputTextarea tag 71, 172iteration <strong>com</strong>ponents 69mobile page, creating 211multiple sObjects on a page 136navigation 72outputLabel tag 80outputPanel tag 80overriding buttons 64overriding pages 85pageReference class 80panelGrid tag 80panelGroup tag 80queries 136query string parameters 132redirecting pages 87relatedList tag 132, 134reRender attribute 134selectOption tag 172selectRadio tag 172skeleton templates 98standard list controller 107static resources 67styles 70System global object 132tabs 102wizards 72VLOOKUP() function 129WWeb controlsSOAP message <strong>com</strong>pression 260Web services<strong>com</strong>paring Salesforce.<strong>com</strong> WSDLs 229generating client certificates 230generating Salesforce.<strong>com</strong> WSDLs 230sending asynchronous outbound messages 56SOAP message <strong>com</strong>pression 260tracking asynchronous outbound messages 59Web-to-Lead form, creating for sites 190WHERE clause, SOSL/SOQL 32WITH clause, SOSL 32Wizards, creating with Visualforce pages 72Workflowasynchronous outbound messages 56, 59email alerts 45, 47, 48, 60field updates 49formulas 47, 49managing 44rules 10, 45, 47, 48, 49, 60time triggers 45, 60Wrapper classes, API 242, 257, 258WSDLs<strong>com</strong>paring 229generating 230using the partner WSDL 231XXMLElement, partner WSDL 231ZZIP codes 129311