Inline 2550 w Reinfusion - Atrium Medical Corporation
Inline 2550 w Reinfusion - Atrium Medical Corporation
Inline 2550 w Reinfusion - Atrium Medical Corporation

You also want an ePaper? Increase the reach of your titles
YUMPU automatically turns print PDFs into web optimized ePapers that Google loves.
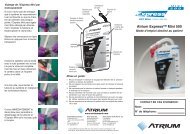
<strong>Inline</strong> ATS Bag <strong>2550</strong>PositivePressureReleaseValveSuctionPortManual HighNegativity VentWaterSealChamberEasy-to-GripHandleIn-lineConnector100%LATEX-FREEStep 2: To Connect In-Line ATS Bag To Chest DrainTo begin, move the open patient tube clamp next tothe in-line connector for convenient system set upand easy visual check. Close the patient tube slideclamp firmly and separate by depressing connectorlock.DrySuctionControlRegulatorCollectionChamberSuctionMonitorBellowsAir LeakMonitorMove clamp next to connector.Close prior to connector separation.Depress connectorlock and pull tubeup to separate.PatientPressureFloat BallSwing OutFloor StandPatientConnector■ In-Line ATS Bag (<strong>2550</strong>)PatientTubeClamp<strong>Atrium</strong>’s <strong>2550</strong> in-line ATS bag is a compact postoperative ATScollection device for use with <strong>Atrium</strong> chest drains equipped within-line patient tube connectors. <strong>Atrium</strong>’s locking “auto-connect”in-line tubing connectors provide rapid conversion from collectionmode to reinfusion mode in seconds.Once separated, remove cap from female ATS bag connector andinsert male patient tube connector. Remove second ATS bag cap andinsert male ATS bagconnector into female chest drain connector. <strong>Inline</strong>ATS bag is now connected to chest drain and patient.Attach ATS bagto chest drainAttachpatienttube toATS bagStep 1: Placement Onto Chest Drain Or Bed Rail<strong>Atrium</strong>’s advanced hanger design provides quick and easy positioningdirectly onto the front face of the chest drain or adjacentbed rail as shown. For added security during patient transit, thehanger can be placed over the chest drain handle. Firmly closeboth ATS bag clamps prior to connector cap removal.Move patient tube clampnext to in-line connectorPosition ATS baghanger on frontface or over handleCloseclampsprior tocapremovalStep 3: Open Clamps To Begin Blood CollectionOpen both in-line ATS bag clamps prior to opening patient tubeclamp to bring ATS bag pressure to proper vacuum level. Open thepatient tube clamp after both ATS bag clamps have been opened.All clamps must remain fully open at all times when ATS bag isconnected to patient. Patient tube and ATS bag should be free ofdependent loops to ensure maximum drainage efficiency. Do notleave patient tube slide clamp closed after in-line ATS bagattachment to patient.© <strong>Atrium</strong> <strong>Medical</strong> <strong>Corporation</strong> 2012. All Rights Reserved Printed in U.S.A.
Reading And Recording Blood VolumeThe in-line ATS bag deflects slightly under vacuum and is thereforecalibrated on one side under vacuum pressure. The opposite side iscalibrated for non-vacuum conditions. All fluid level calibrations arein 25ml increments, up to a maximum collection volume of 600ml.All ml increments are approximate.Step 4: To Disconnect In-Line ATS Bag From Chest DrainTo remove in-line ATS bag from the chest drain, securely closepatient tube clamp and both ATS bag clamps. Dis con nect “chestdrain” side first, then disconnect the “patient side” connector. Immediatelyplace the male patient tube con nector into the female chestdrain connector, and open patient tube clamp. Reconnect ATS bagconnectors to each other. ATS bag is now ready to be handled forreinfusion use.Caution: Open patient tube slide clamp immediately followingrecon nec tion to chest drain or new in-line ATS bag. Do not keeppatient tube clamp closed during chest drain age or patient transit.Reconnect ATS bagconnectors toeach otherOpen patienttube clampafterreconnectionto chest drainKeepATS bagclampsclosed■ ATS Bag <strong>Reinfusion</strong> Set Up AndPrimingA microemboli blood filter and I.V. blood set are required for unwashedblood reinfusion. Caution: A new microemboli blood filter must beused for each new ATS bag. Priming of the blood filter and I.V. set isaccomplished by the following steps:1. Prime I.V. blood administration set and microemboli blood filter withsterile saline.2. After chest drain disconnection, invert in-line ATS bag with spike portpointing upward and remove tethered cap using sterile technique.Insert saline filter spike into ATS bag spike port using a firm twistingmotion. Return ATS bag to upright position and place on standardheight I.V. pole.3. Open filtered air vent located on top of ATS bag first, then open theI.V. clamp to complete priming. All remaining air within the I.V. circuitmust be evacuated prior to patient connection. Close I.V. clamp whenfully primed. I.V. is now ready for patient connection. Caution: Failureto purge all air from the entire I.V. circuit prior to patient connectioncan result in air emboli.■ ATS Bag <strong>Reinfusion</strong>Follow all hospital protocols for administering autologous whole bloodreinfusion for both gravity drip or pressure infuser application:1. Attach distal end of fully primed I.V. set to patient and open I.V. lineclamp to begin patient infusion.2. For non-pressure infusion, open filtered air vent for maximum flowrate.3. For pressure infuser application, filtered air vent must remain closed.Maximum in-line bag infuser pressure is 150mmHg. Caution: Donot reinfuse entire blood contents completely through blood filterand I.V. set, as air emboli can result.Caution: Anticoagulant therapy and dosage recommen dations arethe discretion of a physician and should be monitored carefully duringand after patient reinfusion.Have a question or need help in a hurry?Call <strong>Atrium</strong> toll free at 1-800-528-7486.Visit us on the web at:www.atriummed.com