

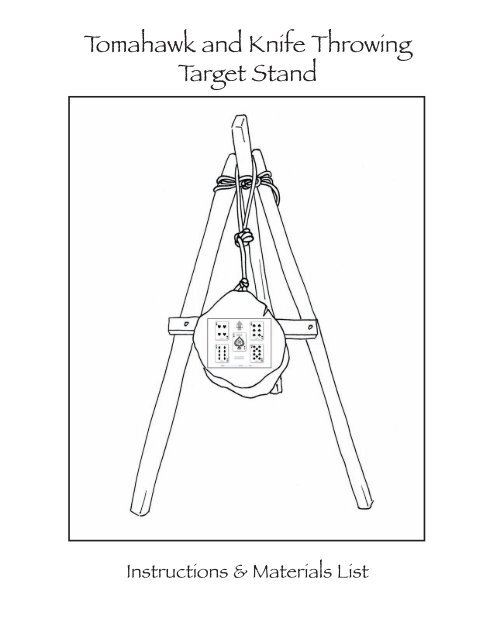
Tomahawk and Knife Throwing Target Stand
Tomahawk and Knife Throwing Target Stand
Tomahawk and Knife Throwing Target Stand

Create successful ePaper yourself
Turn your PDF publications into a flip-book with our unique Google optimized e-Paper software.
<strong>Tomahawk</strong> <strong>and</strong> <strong>Knife</strong> <strong>Throwing</strong><br />
<strong>Target</strong> St<strong>and</strong><br />
Instructions & Materials List
5 feet of 3/8”<br />
Manila Rope<br />
3” Wood Screws<br />
Materials <strong>and</strong> Parts<br />
6 feet of 3/8” Manila Rope<br />
Pine Round<br />
16-18” Dia.<br />
5-7” Thick<br />
6.5’x3”x4” Treated<br />
L<strong>and</strong>scape Poles<br />
28” Pine 2x4
Step 1.<br />
Drill a 5/8” hole 5” from the top of two l<strong>and</strong>scape<br />
poles. Drill a 5/8” hole 9” from the top of the third<br />
l<strong>and</strong>scape pole.<br />
(Figure 1).<br />
Step 2.<br />
Lay the three poles on their side with the two with<br />
the hole 5” from the top on the outside of the third<br />
pole <strong>and</strong> run the rope through the holes. Tie the<br />
rope loosly with a sqaure knot. Leaving more of<br />
the rope on one side.<br />
(Figure 2).<br />
Step 3.<br />
Then st<strong>and</strong> the three poles upright <strong>and</strong> bring the<br />
outside poles forward <strong>and</strong> spread them apart.<br />
The center pole is pushed toward the back so that<br />
the top of it rests against the square knot. (see<br />
step #4)<br />
(Figure 3).<br />
1.<br />
2.<br />
3.
Step 4.<br />
The center pole should be resting on the square<br />
knot. The st<strong>and</strong> will be a little wobbly, <strong>and</strong> that is<br />
alright at this stage.<br />
(Figure 4)<br />
Step 5.<br />
After the poles are spread apart, bring the long<br />
end of the rope around the back of the tripod <strong>and</strong><br />
tie tightly in the front with a second square knot.<br />
(Figure 5 <strong>and</strong> 6)<br />
4.<br />
5.<br />
6.
Step 6.<br />
7. 4.<br />
Predrill the 2x4 cross piece 2” from each end. Then<br />
screw onto front legs using 3” wood screws. Put the crosspiece<br />
crosspiece approximately 30” from the bottom of<br />
the legs.<br />
(Figure 7)<br />
Step 7.<br />
Screw the eyebolt into the top of the target round.<br />
Attach one end of the 3/8” rope to the eyebolt using<br />
two half hitches. Then tie a taughtline hitch on the<br />
opposite end of the rope.<br />
(Figure 8)<br />
Step 8.<br />
Loop the end of the rope around the center pole.<br />
Loosen or tighten the tautline hitch until the target<br />
round is against the cross piece. The round should<br />
sit low enough on the cross piece so that the face is<br />
close to perpendicular to the ground. Attach target<br />
<strong>and</strong> start to throw!<br />
(Figure 9)<br />
8.<br />
9.