Installation Instructions - Kohler New Zealand
Installation Instructions - Kohler New Zealand
Installation Instructions - Kohler New Zealand

You also want an ePaper? Increase the reach of your titles
YUMPU automatically turns print PDFs into web optimized ePapers that Google loves.
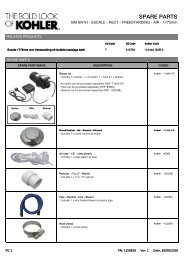
<strong>Kohler</strong> DTV Digital Interface<strong>Installation</strong> GuideK-683A, K-685A, K-684A, K686AMODEL NUMBERSImportant! Please quote the above model number(s) when ordering sparesIMPORTANTInstaller: This manual is the property of thecustomer and must be retained with the productfor maintenance and operational purposes.1 1065922-A2-B
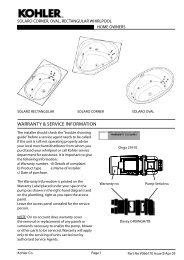
11. Remove the cap from the interface cable and connect the interface to theinterface cable.12. Carefully feed the connection through the hole in the wall sleeve and into thewall cavity.13. Make sure that the gasket is in place on the interface.14. Slide the body of the interface into the sleeve.15. Firmly press on the interface until it snaps into place.16. Install the control knob.Complete the <strong>Installation</strong>Power SupplyScrewsPower SupplyOptional ExternalInterface CableGrommetsInternal InterfaceCableDoorTabClipRetainingScrew1. Release the retaining screw.2. Press the clips to release and open the door on the valve.3. Connect the interface cables to the valve.4. Connect the power supply to the valve.5. Make sure that all the moulded grommets are in place before closing thedoor.6. Close the door and press on the tabs until the clips snap into place.7. Secure the retaining screw.8. Connect the power supply to the 3 amp switched fused spur box.Check the <strong>Installation</strong>1. Turn on the water supply to the valve.2. Check all connections for leaks and make any adjustments necessary.3. Turn on the main power supply. You should hear the valve power up and thepower icon on the user interface will be lit with a green pulsing light.4. If not already complete, set up the interface. Refer to ’COMMISSIONING’.9 1065922-A2-B
5. At the main menu of the interface select SHOWER>Options> All On.This will select all the connected components and purge air from the system.6. Check all connections for leaks and make any adjustments necessary.7. Make sure that the water flow is sufficient for your showering needs.operationRefer to the user guide supplied with the DTV Digital Interface on how to operatethe unit.commissioningRefer to the user guide supplied with the DTV Digital Interface on how to set up theinterface.fault diagnosisRead the section “Important Safety Information” first.The DTV Thermostatic Mixing Valve is one part of an entire plumbing system. Thefitting of a pump places additional requirements on the plumbing system. Somesystems may require plumbing modifications to allow them to cope with higher flowrates.Providing the DTV Digital Interface has been correctly installed and is operatedin accordance with the instructions contained in this guide, difficulties should notarise. If any maintenance is required then it must be carried out by a competenttradesperson. Before replacing any parts make sure that the underlying cause ofthe malfunction has been resolved.Warning! There are no user serviceable components beneath the cover of theappliance. Only a competent tradesperson should remove the cover.Note! This is not an extensive list of faults, if you find a fault that is not listed in thetroubleshooting table, please contact us for assistance.Most faults can be rectified by checking the following:1. Make sure the water supply has not been interrupted. Check that the mainstopcock and shower isolating valves are fully open.1065922-A2-B10
Troubleshooting TableSymptoms Probable Cause Recommended Action1 Control panel is not lit. ABCPower supply is not pluggedinto the oulet.Power supply connection tothe valve may be loose ordisconnected.Interface cable connectionsmay be loose or disconnected.ABC2 The interface powerindicator pulses but doesnot turn on.3 The interface functionsnormally but no water flowsfrom the components.4 Only cold water from theoutlets.DEFABABCDECircuit breaker has beentripped.The valve memory mayrequire resetting.If none of the above actionscorrect the symptom, the valveor interface requires servicing.Interface cable connectionsmay be loose or disconnected.If none of the above actionscorrect the symptom, theinterface or valve requiresservicing.Inlet / outlet fittings may beblocked.Hot and cold water suppliesare not turned on.The valve memory may requireresetting.System error.If none of the above actionscorrect the symptom, the valverequires servicing.Hot water supply is either notturned on or not connected tothe valve inlet.Hot water inlet is blocked.If none of the above actionscorrect the symptom, the valverequires servicing.5 Fluctuating or reduced flow A Inlet / outlet fittings may berate. Valve is functioning blocked.properly.ABCDEFABABCDEABCPlug the power supply into theoutlet.Check power supplyconnections to the valve andreconnect if needed.Check all interface cableconnections, connect ifneeded.Reset the circuit breaker.Disconnect and reconnect thepower supply from the valve.Contact your authorised<strong>Kohler</strong> service representative.Check all interface cableconnections, connect if needed.Contact your authorised <strong>Kohler</strong>service representative.Check the inlets and outlets fordebris. Clean the inlet screens.Refer to the “Clean the InletScreens” section.Turn on the water supply to thevalve.Disconnect and reconnect thepower supply from the valve.Check the user interface for anerror code. Refer to the UserInterface Guide.Contact your authorised <strong>Kohler</strong>service representative.Check if the hot water supplyis turned on and connected tothe valve inlet.Check if the hot water inletscreen for blockage. Clean orreplace the inlet screen.Contact your authorised <strong>Kohler</strong>service representative.A Check the inlets and outlets forblockage or debris. Clean theinlet Screens. Refer to “Cleanthe Inlet Screens” section.11 1065922-A2-B
Troubleshooting Table (continued)Symptoms Probable Cause Recommended ActionB Water outlet pressure is low. B6 Blend temperature drift ortemperature cycling.7 Maximum blendtemperature too hot or toocold.CFluctuating flow.D If none of the above actionscorrect the symptom, the valverequires servicing.A Fluctuating water temperature.BHot water supply temperaturefluctuation.If none of the above actionscorrect the symptom, the valverequires servicing.Incorrect maximumtemperature setting.If none of the above actionscorrect the symptom, the valverequires servicing.8 Continuous flow. A System will not switch off.9 Water leaking from thevalve.CAUTION: Risk ofpersonal injury orproduct damage.Turn off the main powerand water supply.10 Massaged mode shutsdown but water continuesto run from showerhead(s).11 Hot water only, the valveshuts down.CABA Connections not secure.B Seals are worn or damaged.C Internal leak.A Unequal flow rates betweenvalve outlets.A Hot and cold lines arereversed.CDABCABAABCCheck that the flow rate is ator above the minimum raterequired. Refer to the“Specifications” section.Verify that the dynamic inletpressures are withinspecifications. Refer to the“Specifications” section.Contact your authorised<strong>Kohler</strong> service representative.Check the inlet temperaturedifferentials and verify they aresufficient. Refer to“Specifications”.Check and make adjustmentsas needed.Contact your authorised <strong>Kohler</strong>service representative.Refer to the “User InterfaceHomeowners Guide”.Contact your authorised <strong>Kohler</strong>service representative.Turn off the water and powersupply and contact yourauthorised <strong>Kohler</strong> servicerepresentative.Check all connections. Makeadjustments as needed.Order a seal service pack andreplace all seals.Unit requires overhaul. contactyour authorised <strong>Kohler</strong> servicerepresentative.A Revise installation to have anequal bodyspray to valve outletratio for all bodyspraysinstalled. Use bodysprays withthe same flow rate.A Reverse the hot and cold lines.1065922-A2-B12
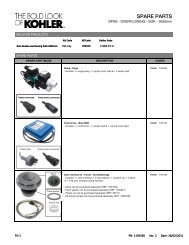
spare parts1042634Wall Sleeve1053394Tab1007936Screw1054397** (Horizontal)1054399** (Vertical)Control Panel1042627Gasket1042629**Ring10452518-Pin Cable Assembly69944Suction Cup10452524-Pin Cable Assembly**Finish/colour code must be specified when ordering.13 1065922-A2-B
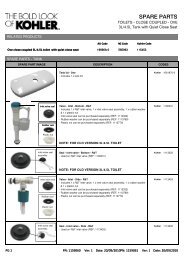
dimensions1/2" (1.3 cm) Min ClampArm Clearance3-5/8" (9.2 cm)Cutout4-1/2" (11.4 cm)Clamp Arm3-5/8" (9.2 cm) -4-5/8" (11.7 cm)Wall CavityDepth7-11/16"(19.5 cm)1/4" (6 mm) MinInterface LipClearance3-11/16" (9.4 cm)Cutout Detail8-1/2"(21.6 cm)7-5/8"(19.4 cm)8-Pin Interface Cable30' (9.14 m)4-Pin Auxiliary Interface Cable3/16" (5 mm) Min -2" (5.1 cm) Max Depth30' (9.14 m)1065922-A2-B14
notes15 1065922-A2-B
Customer Care<strong>Kohler</strong> Co. warrants its tapware manufactured after January 1, 2006, to be leak and drip free during normalresidential use for as long as the original consumer purchaser owns his/her home. *If the tapware shouldleak or drip during normal use, <strong>Kohler</strong> will, free of charge, mail to the purchaser the cartridge necessaryto put the tapware in good working condition.<strong>Kohler</strong> also warrants all other aspects of the tapware, to be free of defects in material and workmanshipduring normal residential use for as long as the original consumer purchaser owns his/her own home. If adefect is found in normal residential use, <strong>Kohler</strong> Co. will, at its election, repair, provide a replacement partor product, or make appropriate adjustment. Damage to a product caused by accident, misuse, or abuseis not covered by this warranty. Proof of purchase (original sales receipt) must be provided to <strong>Kohler</strong> withall warranty claims. <strong>Kohler</strong> Co. is not responsible for labour charges, installation, or other consequentialcosts. In no event shall the liability of <strong>Kohler</strong> exceed the purchase price of the tapware.If the tapware is used commercially, <strong>Kohler</strong> warrants the tapware to be free from defects in material andworkmanship for one (1) year from the date the product is installed, with all other terms of this warrantyapplying except duration.If you believe that you have a warranty claim, contact <strong>Kohler</strong> Co., either through your plumbing suppliesretailer, or by writing.Australian residents please contact: <strong>Kohler</strong> Co., Attn.: Customer Service Department,PO Box 257, Regents Park, NSW 2143.<strong>New</strong> <strong>Zealand</strong> residents please contact <strong>Kohler</strong> Co., Attn.: Customer Service Department,133 Diana Drive, Glenfield, Auckland.Care and cleaningLike anything of lasting quality, <strong>Kohler</strong> tapware and fittings require a certain amount of periodic care topreserve their lustrous finish. Clean your new <strong>Kohler</strong> tapware and fittings with a mild soap, rinse thoroughlywith warm water and dry with a clean, soft cloth. The ideal cleaning technique is to always blot dry anywater from metal surfaces.Allowing water to evaporate on metal will form water deposits. It is important to use a dabbing action todry metal, not an abrasive or rubbing action.Never use cleaners containing abrasive cleansers, ammonia, bleach, acids, or chemicals that can damagethe finish. By taking the time to dry your tapware often, soap and water deposits can be prevented.Failure to comply with these cleaning instructions may void <strong>Kohler</strong>’s warranty obligations.Please be sure to provide all pertinent information regarding your claim, including a complete descriptionof the problem, the product, model number, colour, the date the product was purchased and from whomthe product was purchased. Also include your original invoice. For other information, or to obtain thename and address of the service and repair facility nearest you, call 1300 362 284 from within Australiaor (09) 980 6800 from within <strong>New</strong> <strong>Zealand</strong>.The foregoing warranties are in lieu of all other warranties, express or implied, including but not limitedto the implied warranties of merchantability and fitness for a particular purpose.Seller disclaims any liability for special, incidental or consequential damages.This warranty is to the original consumer purchaser only, and excludes product damage due to installationerror, product abuse, or product misuse, whether performed by a contractor, service company, or theconsumer. This is our exclusive written warranty.1065922-A2-B 16© <strong>Kohler</strong> Mira Limited, December 2007