Dolder® System female parts (for bar attachment ... - Cendres Métaux
Dolder® System female parts (for bar attachment ... - Cendres Métaux
Dolder® System female parts (for bar attachment ... - Cendres Métaux

Create successful ePaper yourself
Turn your PDF publications into a flip-book with our unique Google optimized e-Paper software.
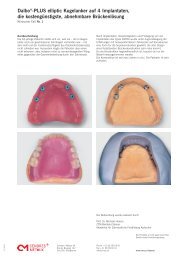
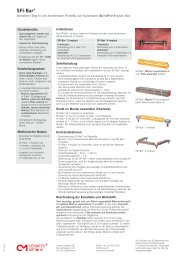
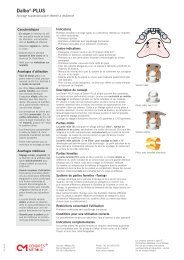
Dolder ® <strong>System</strong> <strong>female</strong> <strong>parts</strong>(<strong>for</strong> <strong>bar</strong> <strong>attachment</strong> and resilient <strong>bar</strong>)4 / 606.2012Female <strong>parts</strong> 1, 2, 3 and 4Activation / Deactivation <strong>bar</strong> sleeveThe posterior lamella, which is subjected to greater loading, isactivated (Fig. 9). The anterior lamella acts as a guide surface.The relevant activator from the Activation Set (Order No. 070 198)is used to push the sleeve carefully inwards <strong>for</strong> activation. Thedeactivator (Order No. 070 200 micro sleeve, 070 201 macrosleeve) is pushed into the sleeve to deactivate an excessively tight<strong>bar</strong> sleeve until the required friction is attained (Fig. 10).5. Female part T (with replacebal friction inters G) (Fig. 5)Six yellow (light friction) and six red (normal friction) friction insertsare supplied with the <strong>bar</strong> <strong>female</strong> part. The length of the <strong>bar</strong> <strong>female</strong>part can be shortened every 3.5 mm using the separating groove.The groove is also used as a guide <strong>for</strong> the cut-off wheel whenseparating (Fig. 11). Remove any flash (Fig. 12) with a rubberpolisher after separating. After fitting the friction inserts, place the<strong>female</strong> part on the <strong>bar</strong> and block out the space between the <strong>bar</strong>and the gingiva as well as the root and implant caps (Fig. 13) andthen resinbond or polymerise into place.Fitting the plastic insertPlace the friction insert G on the insert positioner (Order No.0700 0034) (Fig. 14). Apply a little pressure by pressing on the<strong>female</strong> part to find the correct position of the friction insert(Fig. 15). As soon as the insert engages in the groove (clearlyaudible), push the friction insert in to its final position (Fig. 16).The insert makes an audible click when it engages. Severalinserts, even inserts with different degrees of friction, can be useddepending on the amount of retention <strong>for</strong>ce required (Fig. 17).Only a few inserts, the ones with minimum friction, should beused <strong>for</strong> 2 – 4 weeks so that the patient can quickly become accustomedto handling the new restoration.Note:– Do not use the friction inserts used <strong>for</strong> laboring the denture <strong>for</strong>the patient.– Newly fitted friction inserts:– The inserts may become displaced laterally after fitting. After aday in situ they adjust to their correct position and can no longerbecome displaced.– The correct retention <strong>for</strong>ce is attained after about two weeks.The retention <strong>for</strong>ce is slightly higher initially.– Do not re-use friction inserts once they have been used.Removing the plastic insertPress the two ends of the lamella together with tweezers (OrderNo. 070 347). This disengages the insert from the retention andallows it to be easily removed.Fig. 6Fig. 7Fig. 8Fig. 9Fig. 10